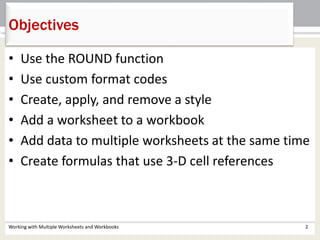
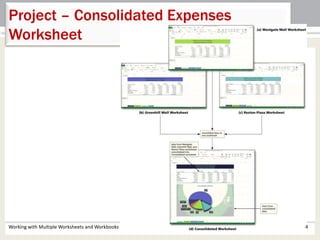
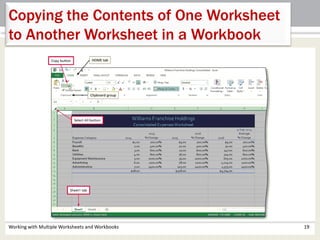
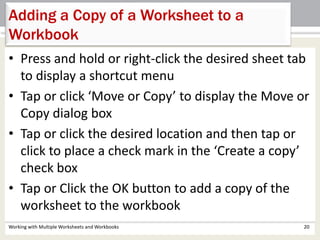
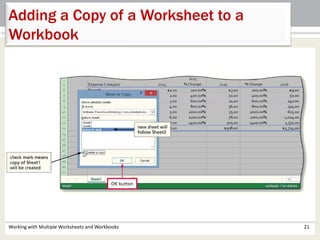
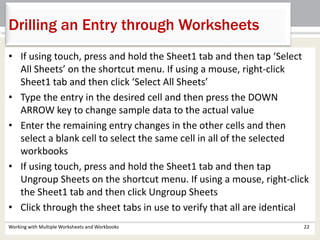
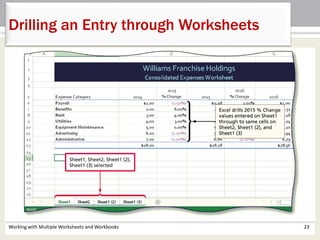
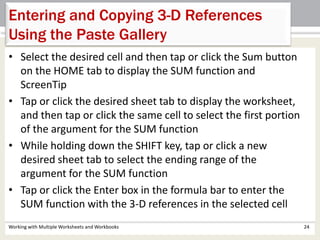
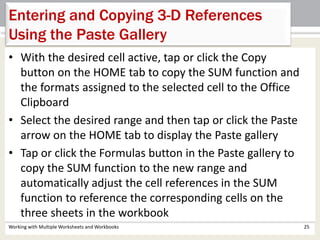
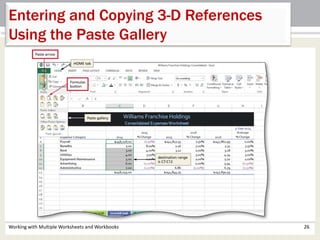
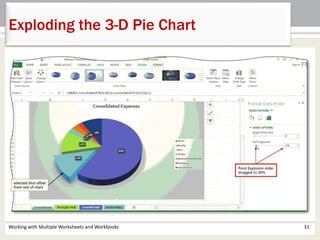
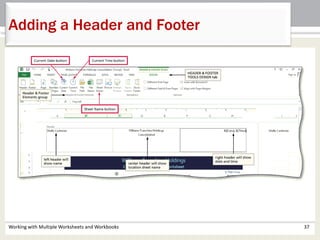
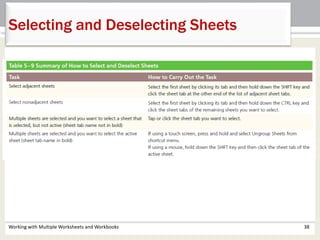
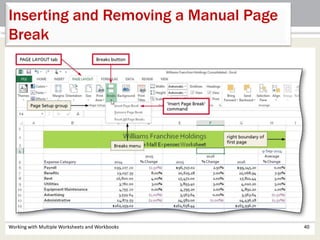
Chapter 5
Working with Multiple
Worksheets and
Workbooks
Microsoft
Excel 2013
• Use the ROUND function
• Use custom format codes
• Create, apply, and remove a style
• Add a worksheet to a workbook
• Add data to multiple worksheets at the same time
• Create formulas that use 3-D cell references
Objectives
Working with Multiple Worksheets and Workbooks 2
• Add a rotated pie chart with an exploded wedge
• Add a header or footer and change margins
• Insert and remove a page break
• Consolidate data by linking workbooks
Working with Multiple Worksheets and Workbooks 3
Objectives
Working with Multiple Worksheets and Workbooks
Project – Consolidated Expenses
Worksheet
4
• Create and format the consolidated worksheet
• Create and apply a custom format code
• Create and apply a style
• Add and populate worksheets
• Add a 3-D pie chart
• Adjust page layout
• Link workbooks
Working with Multiple Worksheets and Workbooks 5
Roadmap
Working with Multiple Worksheets and Workbooks 6
Entering Sample Data in the Consolidated
Worksheet Using the Fill Handle
• Enter a value in a the desired cell
• Select the desired range, including the desired
cell
• If you use a touch screen, press and hold the
selected cells to display the mini toolbar, tap
AutoFill, and then drag the AutoFill icon to the
desired location
• If you use a mouse, drag the AutoFill handle on
the lower right of the cell to the desired
location
Working with Multiple Worksheets and Workbooks 7
Entering Sample Data in the Consolidated
Worksheet Using the Fill Handle
Working with Multiple Worksheets and Workbooks 8
Entering Formulas Using the ROUND Function
and Determining Totals in the Consolidated
Worksheet
• Select the desired cell. Type the =round formula and then
tap or click the Enter box in the formula bar to display the
formula and the resulting value in the select cell
• If you use a touch screen, press and hold the selected cell
to display the mini toolbar, tap AutoFill, and then drag the
AutoFill icon to the desired location
• If you use a mouse, drag the fill handle on the lower right
of the cell to the desired location
• Tap or click the Sum button on the HOME tab, select the
desired cell range, and then press the ENTER key to add a
SUM function to the selected cell
Working with Multiple Worksheets and Workbooks 9
Entering Formulas Using the ROUND Function
and Determining Totals in the Consolidated
Worksheet
Working with Multiple Worksheets and Workbooks 10
Formatting Codes
Working with Multiple Worksheets and Workbooks 11
Creating and Assigning a Custom Format
Code and a Comma Style Format
• Select the range of cells and press and hold or right-click any of
the selected ranges to display a shortcut menu, and then tap or
click Format Cells to display the Format Cells dialog box
• If necessary, tap or click the Number tab to display the Number
tab and then click tap or Custom in the Category list to begin
creating a custom format code
• Delete the word General in the Type box, and then enter the
desired format code
• Tap or click the OK button to display the numbers in the
selected ranges
• Tap or click the Comma Style button on the HOME tab to display
the numbers in the selected ranges using the Comma style
format
Working with Multiple Worksheets and Workbooks 12
Creating and Assigning a Custom Format
Code and a Comma Style Format
Working with Multiple Worksheets and Workbooks 13
Cell Styles
Working with Multiple Worksheets and Workbooks 14
Creating a New Style
• Tap or click the Cell Styles button on the HOME tab to display
the Cell Styles gallery
• Tap or click ‘New Cell Style’ in the Cell Styles gallery to display
the Style dialog box
• Type the desired name for the new style
• Tap or click the Format button to display the Format Cells
dialog box and select desired formats
• Tap or click the OK button to close the Format Cells dialog box
• Tap or click the OK button to add the new style to the list of
styles available with the current workbook in the Cell Styles
gallery
Working with Multiple Worksheets and Workbooks 15
Creating a New Style
Working with Multiple Worksheets and Workbooks 16
Applying a New Style
• Select the desired cell(s) and then tap or click the Cell
Styles button on the HOME tab to display the Cell
Styles gallery
• Tap or click
the name of
the new
style to
assign the
style to the
selected
cell(s)
Working with Multiple Worksheets and Workbooks 17
Adding a Worksheet to a Workbook
• Tap or click the
New sheet
button at the
bottom of the
window to add
a new
worksheet to a
workbook
Working with Multiple Worksheets and Workbooks 18
Copying the Contents of One Worksheet
to Another Worksheet in a Workbook
• Tap or click the sheet tab for the sheet containing
the data to copy
• Tap or click the Select All button to select the
entire worksheet and then tap or click the Copy
button on the HOME tab to copy the contents of
the worksheet
• Tap or click the Paste button on the HOME tab to
copy the data on the Office Clipboard to the
selected sheet
Working with Multiple Worksheets and Workbooks 19
Copying the Contents of One Worksheet
to Another Worksheet in a Workbook
Working with Multiple Worksheets and Workbooks 20
Adding a Copy of a Worksheet to a
Workbook
• Press and hold or right-click the desired sheet tab
to display a shortcut menu
• Tap or click ‘Move or Copy’ to display the Move or
Copy dialog box
• Tap or click the desired location and then tap or
click to place a check mark in the ‘Create a copy’
check box
• Tap or Click the OK button to add a copy of the
worksheet to the workbook
Working with Multiple Worksheets and Workbooks 21
Adding a Copy of a Worksheet to a
Workbook
Working with Multiple Worksheets and Workbooks 22
Drilling an Entry through Worksheets
• If using touch, press and hold the Sheet1 tab and then tap ‘Select
All Sheets’ on the shortcut menu. If using a mouse, right-click
Sheet1 tab and then click ‘Select All Sheets’
• Type the entry in the desired cell and then press the DOWN
ARROW key to change sample data to the actual value
• Enter the remaining entry changes in the other cells and then
select a blank cell to select the same cell in all of the selected
workbooks
• If using touch, press and hold the Sheet1 tab and then tap
Ungroup Sheets on the shortcut menu. If using a mouse, right-click
the Sheet1 tab and then click Ungroup Sheets
• Click through the sheet tabs in use to verify that all are identical
Working with Multiple Worksheets and Workbooks 23
Drilling an Entry through Worksheets
• Select the desired cell and then tap or click the Sum button
on the HOME tab to display the SUM function and
ScreenTip
• Tap or click the desired sheet tab to display the worksheet,
and then tap or click the same cell to select the first portion
of the argument for the SUM function
• While holding down the SHIFT key, tap or click a new
desired sheet tab to select the ending range of the
argument for the SUM function
• Tap or click the Enter box in the formula bar to enter the
SUM function with the 3-D references in the selected cell
Working with Multiple Worksheets and Workbooks 24
Entering and Copying 3-D References
Using the Paste Gallery
• With the desired cell active, tap or click the Copy
button on the HOME tab to copy the SUM function and
the formats assigned to the selected cell to the Office
Clipboard
• Select the desired range and then tap or click the Paste
arrow on the HOME tab to display the Paste gallery
• Tap or click the Formulas button in the Paste gallery to
copy the SUM function to the new range and
automatically adjust the cell references in the SUM
function to reference the corresponding cells on the
three sheets in the workbook
Working with Multiple Worksheets and Workbooks 25
Entering and Copying 3-D References
Using the Paste Gallery
Working with Multiple Worksheets and Workbooks 26
Entering and Copying 3-D References
Using the Paste Gallery
Working with Multiple Worksheets and Workbooks 27
Moving a Chart
• If you are using a touch screen, point to the chart
and then drag the chart until the upper-left
corner of the chart is located in the upper-left
corner of the desired cell
• If you are using a mouse, point to the chart. The
pointer will change to a four-headed arrow. Use
the mouse to drag the chart until the upper-left
corner of the chart is located in the upper-left
corner of the desired cell
Working with Multiple Worksheets and Workbooks 28
Moving a Chart
Working with Multiple Worksheets and Workbooks 29
Resizing a Chart
• Drag the resizing handle in the lower-right corner of
the chart until the chart is the desired size
• If necessary, tap or click the Zoom Out button on the
task bar until
you can see
the whole
chart
• Tap or click a pie slice twice (do not double-tap or
double-click) to select only one slice of the 3-D Pie
chart
• Press and hold or right-click the desired slice to
display a shortcut menu and the mini toolbar
• Tap or click ‘Format Data Point’ on the shortcut menu
to open the Format Data Point task pane
• Drag the Point Explosion slider to the desired size to
set how far the slice in the 3-D pie chart should be
offset from the rest of the chart
Working with Multiple Worksheets and Workbooks 30
Exploding the 3-D Pie Chart
Working with Multiple Worksheets and Workbooks 31
Exploding the 3-D Pie Chart
Working with Multiple Worksheets and Workbooks 32
Rotating the 3-D Pie Chart
• Press and hold or right-click the chart to display a
shortcut menu
• Tap or click ‘3-D Rotation’ on the shortcut menu
to open the Format Chart Area task pane
• Tap or click the X Rotation up arrow (Format Chart
Area dialog box) to the desired X rotation to
rotate the chart
Working with Multiple Worksheets and Workbooks 33
Rotating the 3-D Pie Chart
Working with Multiple Worksheets and Workbooks 34
Changing the Margins and Centering the
Printout Horizontally
• Press and hold or right-click desired sheet tab and tap or click
‘Select All Sheets’ on the shortcut menu
• Display the PAGE LAYOUT tab and tap or click the Page Setup
Dialog Box Launcher to display the Page Setup dialog box
• When Excel displays the Page Setup dialog box, if necessary,
tap or click the Page tab to select desired orientation and
scaling
• Make the Margins tab the active tab to set the top, bottom,
left, and right margins as desired
• Tap or click the Horizontally check box in the ‘Center on page’
area to center the worksheet on the printed page horizontally
Working with Multiple Worksheets and Workbooks 35
Changing the Margins and Centering the
Printout Horizontally
Working with Multiple Worksheets and Workbooks 36
Adding a Header and Footer
• Tap or click the Page Layout button on the status
bar to display the worksheet in Page Layout view
• Display the Header area. Tap or click a header box
to select it as the area for a header, and then type
the desired name
• Enter desired data into the other header areas
• Repeat the above steps for the footer areas
Working with Multiple Worksheets and Workbooks 37
Adding a Header and Footer
Working with Multiple Worksheets and Workbooks 38
Selecting and Deselecting Sheets
Inserting and Removing a Manual Page
Break
Working with Multiple Worksheets and Workbooks 39
• Tap or click the Breaks button on the PAGE
LAYOUT tab to display the Breaks menu
• Tap or click ‘Insert Page Break’ on the Breaks
Menu to insert a page break
• Tap or click ‘Remove Page Break’ on the Breaks
Menu to remove the page breaks
Working with Multiple Worksheets and Workbooks 40
Inserting and Removing a Manual Page
Break
Hiding Page Breaks
Working with Multiple Worksheets and Workbooks 41
• Tap or click Options in Backstage view to display
the Excel Options dialog box
• Tap or click the Advanced tab in the left pane to
display advanced Excel options in the right pane
• Scroll the right pane until the Display options for
the worksheet area appears
• Tap or click the ‘Show page breaks’ check box to
clear the check box
Working with Multiple Worksheets and Workbooks 42
Hiding Page Breaks
Searching for and Opening Workbooks
Working with Multiple Worksheets and Workbooks 43
• Tap or click ‘Open Other Workbooks’ in the
Backstage view to display the Open gallery
• Tap or click Computer, SkyDrive, or other location
in the left pane and then navigate to the location
of the drive to be searched
• Type the Search text in the Search box
• While holding down the CTRL key, tap or click
each of the location workbook names one at a
time to select the workbooks to open
Searching for and Opening Workbooks
Working with Multiple Worksheets and Workbooks 44
• Tap or click the Open button to open the selected workbooks
• Tap or click the Switch Windows button on the VIEW tab to
display the names of the workbooks with a check mark to the
left of the active workbook
• Tap or click the Arrange All button on the VIEW tab to display
the Arrange Windows dialog box
• Tap or click Vertical in the Arrange Windows dialog box to
arrange the windows vertically, and then, if necessary, tap or
click the ‘Windows of active workbook’ check box to clear it
• Tap or click the OK button to display the opened workbooks
arranged vertically
Working with Multiple Worksheets and Workbooks 45
Searching for and Opening Workbooks
Consolidating Data by Linking
Workbooks
Working with Multiple Worksheets and Workbooks 46
• Select the desired worksheet and begin a formula
in the desired cell
• Tap or click the Switch Windows button on the
VIEW tab to display the Switch Windows menu
• Select the next desired worksheet and select the
desired cell for to use in the formula from the first
worksheet
• Continue selecting cells to reference from other
workbooks by using the Switch Windows button
until the formula is complete
Working with Multiple Worksheets and Workbooks 47
Consolidating Data by Linking
Workbooks
Chapter Summary
Working with Multiple Worksheets and Workbooks 48
• Use the ROUND function
• Use custom format codes
• Create, apply, and remove a style
• Add a worksheet to a workbook
• Add data to multiple worksheets at the same time
• Create formulas that use 3-D cell references
Chapter Summary
Working with Multiple Worksheets and Workbooks 49
• Add a rotated pie chart with an exploded wedge
• Add a header or footer and change margins
• Insert and remove a page break
• Consolidate data by linking workbooks
Chapter 5
Complete
Microsoft
Excel 2013

Excel ch05

  • 1.
    Chapter 5 Working withMultiple Worksheets and Workbooks Microsoft Excel 2013
  • 2.
    • Use theROUND function • Use custom format codes • Create, apply, and remove a style • Add a worksheet to a workbook • Add data to multiple worksheets at the same time • Create formulas that use 3-D cell references Objectives Working with Multiple Worksheets and Workbooks 2
  • 3.
    • Add arotated pie chart with an exploded wedge • Add a header or footer and change margins • Insert and remove a page break • Consolidate data by linking workbooks Working with Multiple Worksheets and Workbooks 3 Objectives
  • 4.
    Working with MultipleWorksheets and Workbooks Project – Consolidated Expenses Worksheet 4
  • 5.
    • Create andformat the consolidated worksheet • Create and apply a custom format code • Create and apply a style • Add and populate worksheets • Add a 3-D pie chart • Adjust page layout • Link workbooks Working with Multiple Worksheets and Workbooks 5 Roadmap
  • 6.
    Working with MultipleWorksheets and Workbooks 6 Entering Sample Data in the Consolidated Worksheet Using the Fill Handle • Enter a value in a the desired cell • Select the desired range, including the desired cell • If you use a touch screen, press and hold the selected cells to display the mini toolbar, tap AutoFill, and then drag the AutoFill icon to the desired location • If you use a mouse, drag the AutoFill handle on the lower right of the cell to the desired location
  • 7.
    Working with MultipleWorksheets and Workbooks 7 Entering Sample Data in the Consolidated Worksheet Using the Fill Handle
  • 8.
    Working with MultipleWorksheets and Workbooks 8 Entering Formulas Using the ROUND Function and Determining Totals in the Consolidated Worksheet • Select the desired cell. Type the =round formula and then tap or click the Enter box in the formula bar to display the formula and the resulting value in the select cell • If you use a touch screen, press and hold the selected cell to display the mini toolbar, tap AutoFill, and then drag the AutoFill icon to the desired location • If you use a mouse, drag the fill handle on the lower right of the cell to the desired location • Tap or click the Sum button on the HOME tab, select the desired cell range, and then press the ENTER key to add a SUM function to the selected cell
  • 9.
    Working with MultipleWorksheets and Workbooks 9 Entering Formulas Using the ROUND Function and Determining Totals in the Consolidated Worksheet
  • 10.
    Working with MultipleWorksheets and Workbooks 10 Formatting Codes
  • 11.
    Working with MultipleWorksheets and Workbooks 11 Creating and Assigning a Custom Format Code and a Comma Style Format • Select the range of cells and press and hold or right-click any of the selected ranges to display a shortcut menu, and then tap or click Format Cells to display the Format Cells dialog box • If necessary, tap or click the Number tab to display the Number tab and then click tap or Custom in the Category list to begin creating a custom format code • Delete the word General in the Type box, and then enter the desired format code • Tap or click the OK button to display the numbers in the selected ranges • Tap or click the Comma Style button on the HOME tab to display the numbers in the selected ranges using the Comma style format
  • 12.
    Working with MultipleWorksheets and Workbooks 12 Creating and Assigning a Custom Format Code and a Comma Style Format
  • 13.
    Working with MultipleWorksheets and Workbooks 13 Cell Styles
  • 14.
    Working with MultipleWorksheets and Workbooks 14 Creating a New Style • Tap or click the Cell Styles button on the HOME tab to display the Cell Styles gallery • Tap or click ‘New Cell Style’ in the Cell Styles gallery to display the Style dialog box • Type the desired name for the new style • Tap or click the Format button to display the Format Cells dialog box and select desired formats • Tap or click the OK button to close the Format Cells dialog box • Tap or click the OK button to add the new style to the list of styles available with the current workbook in the Cell Styles gallery
  • 15.
    Working with MultipleWorksheets and Workbooks 15 Creating a New Style
  • 16.
    Working with MultipleWorksheets and Workbooks 16 Applying a New Style • Select the desired cell(s) and then tap or click the Cell Styles button on the HOME tab to display the Cell Styles gallery • Tap or click the name of the new style to assign the style to the selected cell(s)
  • 17.
    Working with MultipleWorksheets and Workbooks 17 Adding a Worksheet to a Workbook • Tap or click the New sheet button at the bottom of the window to add a new worksheet to a workbook
  • 18.
    Working with MultipleWorksheets and Workbooks 18 Copying the Contents of One Worksheet to Another Worksheet in a Workbook • Tap or click the sheet tab for the sheet containing the data to copy • Tap or click the Select All button to select the entire worksheet and then tap or click the Copy button on the HOME tab to copy the contents of the worksheet • Tap or click the Paste button on the HOME tab to copy the data on the Office Clipboard to the selected sheet
  • 19.
    Working with MultipleWorksheets and Workbooks 19 Copying the Contents of One Worksheet to Another Worksheet in a Workbook
  • 20.
    Working with MultipleWorksheets and Workbooks 20 Adding a Copy of a Worksheet to a Workbook • Press and hold or right-click the desired sheet tab to display a shortcut menu • Tap or click ‘Move or Copy’ to display the Move or Copy dialog box • Tap or click the desired location and then tap or click to place a check mark in the ‘Create a copy’ check box • Tap or Click the OK button to add a copy of the worksheet to the workbook
  • 21.
    Working with MultipleWorksheets and Workbooks 21 Adding a Copy of a Worksheet to a Workbook
  • 22.
    Working with MultipleWorksheets and Workbooks 22 Drilling an Entry through Worksheets • If using touch, press and hold the Sheet1 tab and then tap ‘Select All Sheets’ on the shortcut menu. If using a mouse, right-click Sheet1 tab and then click ‘Select All Sheets’ • Type the entry in the desired cell and then press the DOWN ARROW key to change sample data to the actual value • Enter the remaining entry changes in the other cells and then select a blank cell to select the same cell in all of the selected workbooks • If using touch, press and hold the Sheet1 tab and then tap Ungroup Sheets on the shortcut menu. If using a mouse, right-click the Sheet1 tab and then click Ungroup Sheets • Click through the sheet tabs in use to verify that all are identical
  • 23.
    Working with MultipleWorksheets and Workbooks 23 Drilling an Entry through Worksheets
  • 24.
    • Select thedesired cell and then tap or click the Sum button on the HOME tab to display the SUM function and ScreenTip • Tap or click the desired sheet tab to display the worksheet, and then tap or click the same cell to select the first portion of the argument for the SUM function • While holding down the SHIFT key, tap or click a new desired sheet tab to select the ending range of the argument for the SUM function • Tap or click the Enter box in the formula bar to enter the SUM function with the 3-D references in the selected cell Working with Multiple Worksheets and Workbooks 24 Entering and Copying 3-D References Using the Paste Gallery
  • 25.
    • With thedesired cell active, tap or click the Copy button on the HOME tab to copy the SUM function and the formats assigned to the selected cell to the Office Clipboard • Select the desired range and then tap or click the Paste arrow on the HOME tab to display the Paste gallery • Tap or click the Formulas button in the Paste gallery to copy the SUM function to the new range and automatically adjust the cell references in the SUM function to reference the corresponding cells on the three sheets in the workbook Working with Multiple Worksheets and Workbooks 25 Entering and Copying 3-D References Using the Paste Gallery
  • 26.
    Working with MultipleWorksheets and Workbooks 26 Entering and Copying 3-D References Using the Paste Gallery
  • 27.
    Working with MultipleWorksheets and Workbooks 27 Moving a Chart • If you are using a touch screen, point to the chart and then drag the chart until the upper-left corner of the chart is located in the upper-left corner of the desired cell • If you are using a mouse, point to the chart. The pointer will change to a four-headed arrow. Use the mouse to drag the chart until the upper-left corner of the chart is located in the upper-left corner of the desired cell
  • 28.
    Working with MultipleWorksheets and Workbooks 28 Moving a Chart
  • 29.
    Working with MultipleWorksheets and Workbooks 29 Resizing a Chart • Drag the resizing handle in the lower-right corner of the chart until the chart is the desired size • If necessary, tap or click the Zoom Out button on the task bar until you can see the whole chart
  • 30.
    • Tap orclick a pie slice twice (do not double-tap or double-click) to select only one slice of the 3-D Pie chart • Press and hold or right-click the desired slice to display a shortcut menu and the mini toolbar • Tap or click ‘Format Data Point’ on the shortcut menu to open the Format Data Point task pane • Drag the Point Explosion slider to the desired size to set how far the slice in the 3-D pie chart should be offset from the rest of the chart Working with Multiple Worksheets and Workbooks 30 Exploding the 3-D Pie Chart
  • 31.
    Working with MultipleWorksheets and Workbooks 31 Exploding the 3-D Pie Chart
  • 32.
    Working with MultipleWorksheets and Workbooks 32 Rotating the 3-D Pie Chart • Press and hold or right-click the chart to display a shortcut menu • Tap or click ‘3-D Rotation’ on the shortcut menu to open the Format Chart Area task pane • Tap or click the X Rotation up arrow (Format Chart Area dialog box) to the desired X rotation to rotate the chart
  • 33.
    Working with MultipleWorksheets and Workbooks 33 Rotating the 3-D Pie Chart
  • 34.
    Working with MultipleWorksheets and Workbooks 34 Changing the Margins and Centering the Printout Horizontally • Press and hold or right-click desired sheet tab and tap or click ‘Select All Sheets’ on the shortcut menu • Display the PAGE LAYOUT tab and tap or click the Page Setup Dialog Box Launcher to display the Page Setup dialog box • When Excel displays the Page Setup dialog box, if necessary, tap or click the Page tab to select desired orientation and scaling • Make the Margins tab the active tab to set the top, bottom, left, and right margins as desired • Tap or click the Horizontally check box in the ‘Center on page’ area to center the worksheet on the printed page horizontally
  • 35.
    Working with MultipleWorksheets and Workbooks 35 Changing the Margins and Centering the Printout Horizontally
  • 36.
    Working with MultipleWorksheets and Workbooks 36 Adding a Header and Footer • Tap or click the Page Layout button on the status bar to display the worksheet in Page Layout view • Display the Header area. Tap or click a header box to select it as the area for a header, and then type the desired name • Enter desired data into the other header areas • Repeat the above steps for the footer areas
  • 37.
    Working with MultipleWorksheets and Workbooks 37 Adding a Header and Footer
  • 38.
    Working with MultipleWorksheets and Workbooks 38 Selecting and Deselecting Sheets
  • 39.
    Inserting and Removinga Manual Page Break Working with Multiple Worksheets and Workbooks 39 • Tap or click the Breaks button on the PAGE LAYOUT tab to display the Breaks menu • Tap or click ‘Insert Page Break’ on the Breaks Menu to insert a page break • Tap or click ‘Remove Page Break’ on the Breaks Menu to remove the page breaks
  • 40.
    Working with MultipleWorksheets and Workbooks 40 Inserting and Removing a Manual Page Break
  • 41.
    Hiding Page Breaks Workingwith Multiple Worksheets and Workbooks 41 • Tap or click Options in Backstage view to display the Excel Options dialog box • Tap or click the Advanced tab in the left pane to display advanced Excel options in the right pane • Scroll the right pane until the Display options for the worksheet area appears • Tap or click the ‘Show page breaks’ check box to clear the check box
  • 42.
    Working with MultipleWorksheets and Workbooks 42 Hiding Page Breaks
  • 43.
    Searching for andOpening Workbooks Working with Multiple Worksheets and Workbooks 43 • Tap or click ‘Open Other Workbooks’ in the Backstage view to display the Open gallery • Tap or click Computer, SkyDrive, or other location in the left pane and then navigate to the location of the drive to be searched • Type the Search text in the Search box • While holding down the CTRL key, tap or click each of the location workbook names one at a time to select the workbooks to open
  • 44.
    Searching for andOpening Workbooks Working with Multiple Worksheets and Workbooks 44 • Tap or click the Open button to open the selected workbooks • Tap or click the Switch Windows button on the VIEW tab to display the names of the workbooks with a check mark to the left of the active workbook • Tap or click the Arrange All button on the VIEW tab to display the Arrange Windows dialog box • Tap or click Vertical in the Arrange Windows dialog box to arrange the windows vertically, and then, if necessary, tap or click the ‘Windows of active workbook’ check box to clear it • Tap or click the OK button to display the opened workbooks arranged vertically
  • 45.
    Working with MultipleWorksheets and Workbooks 45 Searching for and Opening Workbooks
  • 46.
    Consolidating Data byLinking Workbooks Working with Multiple Worksheets and Workbooks 46 • Select the desired worksheet and begin a formula in the desired cell • Tap or click the Switch Windows button on the VIEW tab to display the Switch Windows menu • Select the next desired worksheet and select the desired cell for to use in the formula from the first worksheet • Continue selecting cells to reference from other workbooks by using the Switch Windows button until the formula is complete
  • 47.
    Working with MultipleWorksheets and Workbooks 47 Consolidating Data by Linking Workbooks
  • 48.
    Chapter Summary Working withMultiple Worksheets and Workbooks 48 • Use the ROUND function • Use custom format codes • Create, apply, and remove a style • Add a worksheet to a workbook • Add data to multiple worksheets at the same time • Create formulas that use 3-D cell references
  • 49.
    Chapter Summary Working withMultiple Worksheets and Workbooks 49 • Add a rotated pie chart with an exploded wedge • Add a header or footer and change margins • Insert and remove a page break • Consolidate data by linking workbooks
  • 50.