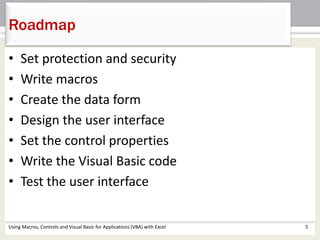
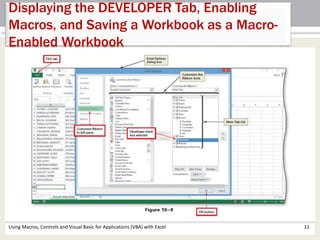
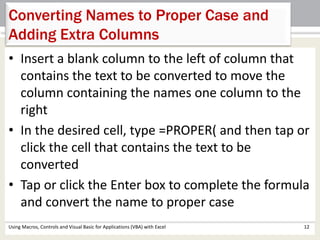
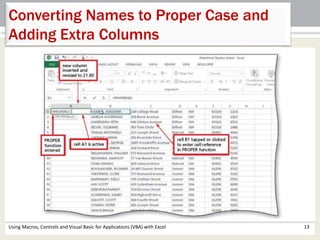
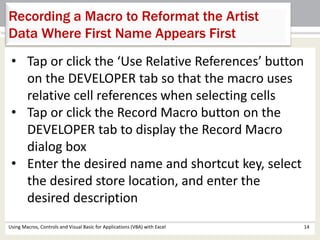
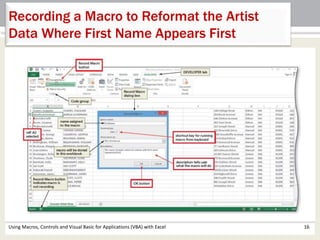
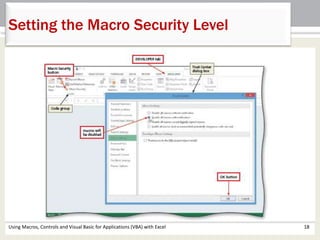
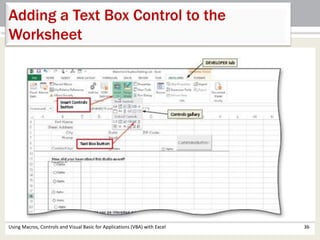
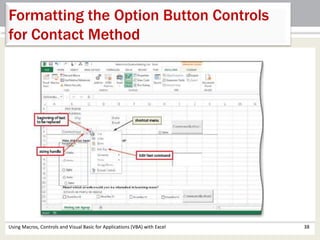
Microsoft 
Excel 2013 
Chapter 10 
Using Macros, Controls 
and Visual Basic for 
Applications (VBA) with 
Excel
Objectives 
• Use passwords to assign protected and 
unprotected status to a worksheet 
• Use the macro recorder to create a macro 
• Execute a macro and view and print code for a 
macro 
• Customize the Quick Access Toolbar by adding a 
button 
• Use a Data Form to add data to a Worksheet 
Using Macros, Controls and Visual Basic for Applications (VBA) with Excel 2
Objectives 
• Understand Visual Basic for Applications (VBA) 
code and explain event-driven programs 
• Add controls such as command buttons, option 
buttons, and check boxes to a worksheet 
• Assign properties to controls 
• Review a digital signature on a workbook 
Using Macros, Controls and Visual Basic for Applications (VBA) with Excel 3
Project – Waterfront Studios 
Using Macros, Controls and Visual Basic for Applications (VBA) with Excel 4
Roadmap 
• Set protection and security 
• Write macros 
• Create the data form 
• Design the user interface 
• Set the control properties 
• Write the Visual Basic code 
• Test the user interface 
Using Macros, Controls and Visual Basic for Applications (VBA) with Excel 5
Unprotecting a Password-Protected 
Worksheet 
• If necessary, tap or click the desired sheet tab 
to make it the active sheet 
• Tap or click REVIEW on the ribbon to display 
the REVIEW tab 
• Tap or click the Unprotect Sheet button on the 
REVIEW tab to display the Unprotect Sheet 
dialog box 
• Type the Password in the Password text box 
• Tap or click the OK button to unprotect the 
worksheet 
Using Macros, Controls and Visual Basic for Applications (VBA) with Excel 6
Unprotecting a Password-Protected 
Worksheet 
Using Macros, Controls and Visual Basic for Applications (VBA) with Excel 7
Displaying the DEVELOPER Tab, Enabling 
Macros, and Saving a Workbook as a Macro- 
Enabled Workbook 
• Tap or click the FILE tab to display the 
Backstage view 
• Tap or click Options in the left pane to display 
the Excel Options dialog box 
• Tap or click the Customize Ribbon to display the 
Customize Ribbon tools 
• Tap or click the Developer check box in the 
Main Tabs list to select the DEVELOPER tab for 
display on the ribbon 
Using Macros, Controls and Visual Basic for Applications (VBA) with Excel 8
Displaying the DEVELOPER Tab, Enabling 
Macros, and Saving a Workbook as a Macro- 
Enabled Workbook 
• Tap or click the OK button to display the 
DEVELOPER tab on the ribbon 
• Tap or click the Macro Security button on the 
DEVELOPER tab to display the Trust Center 
dialog box 
• Tap or click ‘Enable all macros’ to select the 
option button 
• Tap or click the OK button to close the dialog 
box and enable macros 
Using Macros, Controls and Visual Basic for Applications (VBA) with Excel 9
Displaying the DEVELOPER Tab, Enabling 
Macros, and Saving a Workbook as a Macro- 
Enabled Workbook 
• Tap or click the FILE to display the Backstage 
view 
• Tap or click the Save As tab to display the Save 
As gallery and then navigate to the location on 
which you want to save the workbook to 
display the Save As dialog box 
• Tap or click the ‘Save as type’ arrow and then 
tab or click to select the file format 
• Tap or click the Save button 
Using Macros, Controls and Visual Basic for Applications (VBA) with Excel 10
Displaying the DEVELOPER Tab, Enabling 
Macros, and Saving a Workbook as a Macro- 
Enabled Workbook 
Using Macros, Controls and Visual Basic for Applications (VBA) with Excel 11
Converting Names to Proper Case and 
Adding Extra Columns 
• Insert a blank column to the left of column that 
contains the text to be converted to move the 
column containing the names one column to the 
right 
• In the desired cell, type =PROPER( and then tap or 
click the cell that contains the text to be 
converted 
• Tap or click the Enter box to complete the formula 
and convert the name to proper case 
Using Macros, Controls and Visual Basic for Applications (VBA) with Excel 12
Converting Names to Proper Case and 
Adding Extra Columns 
Using Macros, Controls and Visual Basic for Applications (VBA) with Excel 13
Recording a Macro to Reformat the Artist 
Data Where First Name Appears First 
• Tap or click the ‘Use Relative References’ button 
on the DEVELOPER tab so that the macro uses 
relative cell references when selecting cells 
• Tap or click the Record Macro button on the 
DEVELOPER tab to display the Record Macro 
dialog box 
• Enter the desired name and shortcut key, select 
the desired store location, and enter the 
desired description 
Using Macros, Controls and Visual Basic for Applications (VBA) with Excel 14
Recording a Macro to Reformat the Artist 
Data Where First Name Appears First 
• Tap or click the OK button to begin recording 
the macro and change the Record Macro 
button to the Stop Recording button 
• Perform the desired actions to add to the 
macro 
• Tap or click the Stop Recording button on the 
DEVELOPER tab to stop recording the 
worksheet activities 
Using Macros, Controls and Visual Basic for Applications (VBA) with Excel 15
Recording a Macro to Reformat the Artist 
Data Where First Name Appears First 
Using Macros, Controls and Visual Basic for Applications (VBA) with Excel 16
Setting the Macro Security Level 
• Tap or click the Macro Security button on the 
DEVELOPER tab to display the Trust Center dialog 
box 
• If necessary, tap or click the ‘Disable all macros 
with notification’ option button 
• Tap or click the OK button to close the dialog box 
Using Macros, Controls and Visual Basic for Applications (VBA) with Excel 17
Setting the Macro Security Level 
Using Macros, Controls and Visual Basic for Applications (VBA) with Excel 18
Opening a Workbook with Macros and 
Executing a Macro 
• Open the desired workbook containing a macro 
• Tap or click the Enable Content button in the 
SECURITY WARNING bar to open the workbook 
with macros enabled 
• Tap or click REVIEW on the ribbon 
• Tap or click the desired macro’s shortcut key to 
run the macro 
Using Macros, Controls and Visual Basic for Applications (VBA) with Excel 19
Opening a Workbook with Macros and 
Executing a Macro 
Using Macros, Controls and Visual Basic for Applications (VBA) with Excel 20
Viewing and Printing a Macro’s VBA 
Code 
• Tap or click the View Macros button on the DEVELOPER 
tab to display the Macro dialog box 
• When the Macro dialog box is displayed, tap or click 
the desired macro in the Macro name list 
• Tap or click the Edit button in the Macro dialog box to 
display the Visual Basic Editor 
• Tap or click Print on the File menu to display the Print 
– VBAProject dialog box 
• Tap or click the OK button (Print - VBAProject dialog 
box) to print the macro code 
Using Macros, Controls and Visual Basic for Applications (VBA) with Excel 21
Viewing and Printing a Macro’s VBA 
Code 
Using Macros, Controls and Visual Basic for Applications (VBA) with Excel 22
Adding a Button to the Quick Access Toolbar, 
Assigning the Button a Macro, and Using the 
Button 
• Press and hold or right-click anywhere on the Quick Access 
Toolbar to display the shortcut menu 
• Tap or click ‘Customize Quick Access Toolbar’ on the shortcut 
menu to display the Customize the Quick Access Toolbar 
options in the Excel Options dialog box 
• Tap or click the ‘Choose commands from’ arrow in the right 
pane to display a list of commands to add to the Quick Access 
Toolbar 
• Tap or click Macros in the Choose commands from list to 
display a list of macros 
• Tap or click the desired Macro in the Macros list to select it 
• Tap or click the Add button in the Excel Options dialog box to 
add the macro to the Customize Quick Access Toolbar list 
Using Macros, Controls and Visual Basic for Applications (VBA) with Excel 23
Adding a Button to the Quick Access Toolbar, 
Assigning the Button a Macro, and Using the 
Button 
• Tap or click the Modify button to display the Modify Button 
dialog box 
• Type the desired Macro in the Display name text Box 
• Tap or click the OK button in the Modify Button dialog box to 
modify the display name of the button 
• Tap or click the OK button in the Excel Options dialog box to 
close the dialog box 
• Point to the desired Macro button on the Quick Access 
Toolbar to display the ScreenTip for the button 
• Select the desired cell and then tap or click the desired 
Macro button on the Quick Access Toolbar to run the macro 
Using Macros, Controls and Visual Basic for Applications (VBA) with Excel 24
Adding a Button to the Quick Access Toolbar, 
Assigning the Button a Macro, and Using the 
Button 
Using Macros, Controls and Visual Basic for Applications (VBA) with Excel 25
Using a Data Form to Enter Additional 
Records 
• Press and hold or right-click anywhere on the Quick Access 
Toolbar to display the shortcut menu 
• Tap or click ‘Customize Quick Access Toolbar’ on the shortcut 
menu to display the Quick Access Toolbar options in the Excel 
Options dialog box 
• Tap or click the ‘Choose commands from’ arrow to display a list 
of commands to add to the Quick Access Toolbar 
• Tap or click ‘Commands Not in the Ribbon’ in the Choose 
commands from list to display a list of commands that currently 
do not appear on the ribbon 
• Scroll down to Form in the list, tap or click Form to select it, and 
then tap or click the Add button in the Excel Options dialog box 
to add the Form command to the Customize Quick Access 
Toolbar list 
Using Macros, Controls and Visual Basic for Applications (VBA) with Excel 26
Using a Data Form to Enter Additional 
Records 
• Tap or click the OK button in the Excel Options dialog box to 
close the dialog box 
• With the desired cell selected, tap or click the Form button 
on the Quick Access Toolbar to open the desired data form 
• Tap or click the New button in the form to create a new 
record 
• Enter the information for the first record into the form 
• Tap or click the New button in the selected data form to 
add the information you just entered 
• Save and close the workbook 
Using Macros, Controls and Visual Basic for Applications (VBA) with Excel 27
Using a Data Form to Enter Additional 
Records 
Using Macros, Controls and Visual Basic for Applications (VBA) with Excel 28
Adding Form Controls to a Worksheet 
• Tap or click the Insert Controls button on the 
DEVELOPER tab to display the Controls gallery 
• Tap or click the Option Button button in the Form 
Controls area in the Controls gallery 
• Drag the mouse pointer to the desired location 
• Tap or click the Insert Controls button on the 
DEVELOPER tab to display the Controls gallery 
• Tap or click the desired control in the Form Controls 
area in the Controls gallery 
• Using your finger or the mouse, drag the mouse 
pointer to the desired location 
Using Macros, Controls and Visual Basic for Applications (VBA) with Excel 29
Adding Form Controls to a Worksheet 
Using Macros, Controls and Visual Basic for Applications (VBA) with Excel 30
Grouping Option Buttons in a User 
Interface 
• Tap or click the Insert Controls button on the 
DEVELOPER tab to display the Controls gallery 
• Tap or click the Group Box button in the Form 
Controls area in the Controls gallery 
• Using your finger, stylus, or the mouse, drag the 
pointer so the Group Box control is in the desired 
location 
Using Macros, Controls and Visual Basic for Applications (VBA) with Excel 31
Grouping Option Buttons in a User 
Interface 
Using Macros, Controls and Visual Basic for Applications (VBA) with Excel 32
Adding a Command Button Control to 
the Worksheet 
• Tap or click the Insert Controls button on the DEVELOPER 
tab to display the Controls gallery 
• Tap or click the Command Button button in the ActiveX 
Controls area of the Controls gallery to switch to Design 
mode 
• Using your finger, a stylus, or a mouse, drag a box to 
place the control on the worksheet 
Using Macros, Controls and Visual Basic for Applications (VBA) with Excel 33
Adding a Command Button Control to 
the Worksheet 
Using Macros, Controls and Visual Basic for Applications (VBA) with Excel 34
Adding a Text Box Control to the 
Worksheet 
• Tap or click the Insert Controls button on the DEVELOPER 
tab to display the Controls gallery 
• Tap or click the Text Box button in the ActiveX Controls 
area of the Controls gallery to switch to Design mode 
• Using your finger, a stylus, or a mouse, drag the text box 
to place the control on the worksheet 
Using Macros, Controls and Visual Basic for Applications (VBA) with Excel 35
Adding a Text Box Control to the 
Worksheet 
Using Macros, Controls and Visual Basic for Applications (VBA) with Excel 36
Formatting the Option Button Controls 
for Contact Method 
• Press and hold or right-click the first option button 
control in the Contact by area to display the shortcut 
menu 
• Tap or click Edit Text on the shortcut menu so you can 
edit the control text 
• Delete the text in the control and type the replacement 
text 
• Select the control(s) to resize 
• Tap or click the Align Controls button on the DRAWING 
TOOLS FORMAT tab to display the alignment options 
• Tap or click the desired alignment option 
Using Macros, Controls and Visual Basic for Applications (VBA) with Excel 37
Formatting the Option Button Controls 
for Contact Method 
Using Macros, Controls and Visual Basic for Applications (VBA) with Excel 38
Formatting the Command Button and 
Text Box Controls 
• Select each of the command button controls and the text box 
control 
• Tap or click the Control Properties button on the DEVELOPER 
tab to open the Properties window 
• Select the desired properties and make the desired changes 
• Close the Properties window 
• Select the command buttons and the text box and use the 
Align button on the DRAWING TOOLS FORMAT tab set the 
desired alignment 
• With the three controls still selected, use the arrow keys to 
move the controls as a group to the final location 
Using Macros, Controls and Visual Basic for Applications (VBA) with Excel 39
Formatting the Command Button and 
Text Box Controls 
Using Macros, Controls and Visual Basic for Applications (VBA) with Excel 40
Recording User Input for Contact Method 
to Another Location on the Worksheet 
• Press and hold or right-click the control to link to display 
the shortcut menu 
• Tap or click Format Control to display the Format Control 
dialog box 
• If necessary, tap or click the Control tab to display the 
Control sheet 
• Enter the desired cell in the Cell link box to enter the 
identity of the control in that cell 
• Tap or click the OK button to close the dialog box 
• Enter the formula (i.e. =INDEX(contact,$I$41) to return 
text rather than numbers 
Using Macros, Controls and Visual Basic for Applications (VBA) with Excel 41
Entering the Command Button 
Procedures Using the Visual Basic Editor 
• With the command button selected and Excel in 
Design mode, tap or click the View Code button 
on the DEVELOPER tab to display the Microsoft 
Visual Basic Editor 
• Tap or click the Object box arrow at the top of the 
window and then tap or click the name of the 
command button 
• Enter the desired VBA code 
Using Macros, Controls and Visual Basic for Applications (VBA) with Excel 42
Entering the Command Button 
Procedures Using the Visual Basic Editor 
Using Macros, Controls and Visual Basic for Applications (VBA) with Excel 43
Removing the Outline from the Group 
Control 
• If necessary, switch to the Visual Basic Editor 
• Press CTRL+G to open the Immediate window 
• Type activesheet.groupboxes.visible = false and 
then press the ENTER key to remove the box 
from around the group control 
Using Macros, Controls and Visual Basic for Applications (VBA) with Excel 44
Removing the Outline from the Group 
Control 
Using Macros, Controls and Visual Basic for Applications (VBA) with Excel 45
Preparing and Protecting the Worksheet 
and Saving the Workbook 
• Tap or click FILE on the ribbon to open the Backstage view 
• Tap or click Options to display the Excel Options dialog box 
• Tap or click Advanced in the left pane to display the 
advanced options 
• Tap or click the ‘Show page breaks’ and ‘Show a zero in cells 
that have zero value’ check boxes to deselect them 
• Tap or click the OK button to close the dialog box 
• Tap or click the Gridlines, Formula Bar, and Headings check 
boxes on the VIEW tab to deselect them 
• Tap or click the Minimize the Ribbon button on the title bar 
to minimize the Ribbon 
Using Macros, Controls and Visual Basic for Applications (VBA) with Excel 46
Preparing and Protecting the Worksheet 
and Saving the Workbook 
Using Macros, Controls and Visual Basic for Applications (VBA) with Excel 47
Chapter Summary 
• Use passwords to assign protected and 
unprotected status to a worksheet 
• Use the macro recorder to create a macro 
• Execute a macro and view and print code for a 
macro 
• Customize the Quick Access Toolbar by adding a 
button 
• Use a Data Form to add data to a Worksheet 
Using Macros, Controls and Visual Basic for Applications (VBA) with Excel 48
Chapter Summary 
• Understand Visual Basic for Applications (VBA) 
code and explain event-driven programs 
• Add controls such as command buttons, option 
buttons, and check boxes to a worksheet 
• Assign properties to controls 
• Review a digital signature on a workbook 
Using Macros, Controls and Visual Basic for Applications (VBA) with Excel 49
Microsoft 
Excel 2013 
Chapter 10 
Complete

Excel ch10

  • 1.
    Microsoft Excel 2013 Chapter 10 Using Macros, Controls and Visual Basic for Applications (VBA) with Excel
  • 2.
    Objectives • Usepasswords to assign protected and unprotected status to a worksheet • Use the macro recorder to create a macro • Execute a macro and view and print code for a macro • Customize the Quick Access Toolbar by adding a button • Use a Data Form to add data to a Worksheet Using Macros, Controls and Visual Basic for Applications (VBA) with Excel 2
  • 3.
    Objectives • UnderstandVisual Basic for Applications (VBA) code and explain event-driven programs • Add controls such as command buttons, option buttons, and check boxes to a worksheet • Assign properties to controls • Review a digital signature on a workbook Using Macros, Controls and Visual Basic for Applications (VBA) with Excel 3
  • 4.
    Project – WaterfrontStudios Using Macros, Controls and Visual Basic for Applications (VBA) with Excel 4
  • 5.
    Roadmap • Setprotection and security • Write macros • Create the data form • Design the user interface • Set the control properties • Write the Visual Basic code • Test the user interface Using Macros, Controls and Visual Basic for Applications (VBA) with Excel 5
  • 6.
    Unprotecting a Password-Protected Worksheet • If necessary, tap or click the desired sheet tab to make it the active sheet • Tap or click REVIEW on the ribbon to display the REVIEW tab • Tap or click the Unprotect Sheet button on the REVIEW tab to display the Unprotect Sheet dialog box • Type the Password in the Password text box • Tap or click the OK button to unprotect the worksheet Using Macros, Controls and Visual Basic for Applications (VBA) with Excel 6
  • 7.
    Unprotecting a Password-Protected Worksheet Using Macros, Controls and Visual Basic for Applications (VBA) with Excel 7
  • 8.
    Displaying the DEVELOPERTab, Enabling Macros, and Saving a Workbook as a Macro- Enabled Workbook • Tap or click the FILE tab to display the Backstage view • Tap or click Options in the left pane to display the Excel Options dialog box • Tap or click the Customize Ribbon to display the Customize Ribbon tools • Tap or click the Developer check box in the Main Tabs list to select the DEVELOPER tab for display on the ribbon Using Macros, Controls and Visual Basic for Applications (VBA) with Excel 8
  • 9.
    Displaying the DEVELOPERTab, Enabling Macros, and Saving a Workbook as a Macro- Enabled Workbook • Tap or click the OK button to display the DEVELOPER tab on the ribbon • Tap or click the Macro Security button on the DEVELOPER tab to display the Trust Center dialog box • Tap or click ‘Enable all macros’ to select the option button • Tap or click the OK button to close the dialog box and enable macros Using Macros, Controls and Visual Basic for Applications (VBA) with Excel 9
  • 10.
    Displaying the DEVELOPERTab, Enabling Macros, and Saving a Workbook as a Macro- Enabled Workbook • Tap or click the FILE to display the Backstage view • Tap or click the Save As tab to display the Save As gallery and then navigate to the location on which you want to save the workbook to display the Save As dialog box • Tap or click the ‘Save as type’ arrow and then tab or click to select the file format • Tap or click the Save button Using Macros, Controls and Visual Basic for Applications (VBA) with Excel 10
  • 11.
    Displaying the DEVELOPERTab, Enabling Macros, and Saving a Workbook as a Macro- Enabled Workbook Using Macros, Controls and Visual Basic for Applications (VBA) with Excel 11
  • 12.
    Converting Names toProper Case and Adding Extra Columns • Insert a blank column to the left of column that contains the text to be converted to move the column containing the names one column to the right • In the desired cell, type =PROPER( and then tap or click the cell that contains the text to be converted • Tap or click the Enter box to complete the formula and convert the name to proper case Using Macros, Controls and Visual Basic for Applications (VBA) with Excel 12
  • 13.
    Converting Names toProper Case and Adding Extra Columns Using Macros, Controls and Visual Basic for Applications (VBA) with Excel 13
  • 14.
    Recording a Macroto Reformat the Artist Data Where First Name Appears First • Tap or click the ‘Use Relative References’ button on the DEVELOPER tab so that the macro uses relative cell references when selecting cells • Tap or click the Record Macro button on the DEVELOPER tab to display the Record Macro dialog box • Enter the desired name and shortcut key, select the desired store location, and enter the desired description Using Macros, Controls and Visual Basic for Applications (VBA) with Excel 14
  • 15.
    Recording a Macroto Reformat the Artist Data Where First Name Appears First • Tap or click the OK button to begin recording the macro and change the Record Macro button to the Stop Recording button • Perform the desired actions to add to the macro • Tap or click the Stop Recording button on the DEVELOPER tab to stop recording the worksheet activities Using Macros, Controls and Visual Basic for Applications (VBA) with Excel 15
  • 16.
    Recording a Macroto Reformat the Artist Data Where First Name Appears First Using Macros, Controls and Visual Basic for Applications (VBA) with Excel 16
  • 17.
    Setting the MacroSecurity Level • Tap or click the Macro Security button on the DEVELOPER tab to display the Trust Center dialog box • If necessary, tap or click the ‘Disable all macros with notification’ option button • Tap or click the OK button to close the dialog box Using Macros, Controls and Visual Basic for Applications (VBA) with Excel 17
  • 18.
    Setting the MacroSecurity Level Using Macros, Controls and Visual Basic for Applications (VBA) with Excel 18
  • 19.
    Opening a Workbookwith Macros and Executing a Macro • Open the desired workbook containing a macro • Tap or click the Enable Content button in the SECURITY WARNING bar to open the workbook with macros enabled • Tap or click REVIEW on the ribbon • Tap or click the desired macro’s shortcut key to run the macro Using Macros, Controls and Visual Basic for Applications (VBA) with Excel 19
  • 20.
    Opening a Workbookwith Macros and Executing a Macro Using Macros, Controls and Visual Basic for Applications (VBA) with Excel 20
  • 21.
    Viewing and Printinga Macro’s VBA Code • Tap or click the View Macros button on the DEVELOPER tab to display the Macro dialog box • When the Macro dialog box is displayed, tap or click the desired macro in the Macro name list • Tap or click the Edit button in the Macro dialog box to display the Visual Basic Editor • Tap or click Print on the File menu to display the Print – VBAProject dialog box • Tap or click the OK button (Print - VBAProject dialog box) to print the macro code Using Macros, Controls and Visual Basic for Applications (VBA) with Excel 21
  • 22.
    Viewing and Printinga Macro’s VBA Code Using Macros, Controls and Visual Basic for Applications (VBA) with Excel 22
  • 23.
    Adding a Buttonto the Quick Access Toolbar, Assigning the Button a Macro, and Using the Button • Press and hold or right-click anywhere on the Quick Access Toolbar to display the shortcut menu • Tap or click ‘Customize Quick Access Toolbar’ on the shortcut menu to display the Customize the Quick Access Toolbar options in the Excel Options dialog box • Tap or click the ‘Choose commands from’ arrow in the right pane to display a list of commands to add to the Quick Access Toolbar • Tap or click Macros in the Choose commands from list to display a list of macros • Tap or click the desired Macro in the Macros list to select it • Tap or click the Add button in the Excel Options dialog box to add the macro to the Customize Quick Access Toolbar list Using Macros, Controls and Visual Basic for Applications (VBA) with Excel 23
  • 24.
    Adding a Buttonto the Quick Access Toolbar, Assigning the Button a Macro, and Using the Button • Tap or click the Modify button to display the Modify Button dialog box • Type the desired Macro in the Display name text Box • Tap or click the OK button in the Modify Button dialog box to modify the display name of the button • Tap or click the OK button in the Excel Options dialog box to close the dialog box • Point to the desired Macro button on the Quick Access Toolbar to display the ScreenTip for the button • Select the desired cell and then tap or click the desired Macro button on the Quick Access Toolbar to run the macro Using Macros, Controls and Visual Basic for Applications (VBA) with Excel 24
  • 25.
    Adding a Buttonto the Quick Access Toolbar, Assigning the Button a Macro, and Using the Button Using Macros, Controls and Visual Basic for Applications (VBA) with Excel 25
  • 26.
    Using a DataForm to Enter Additional Records • Press and hold or right-click anywhere on the Quick Access Toolbar to display the shortcut menu • Tap or click ‘Customize Quick Access Toolbar’ on the shortcut menu to display the Quick Access Toolbar options in the Excel Options dialog box • Tap or click the ‘Choose commands from’ arrow to display a list of commands to add to the Quick Access Toolbar • Tap or click ‘Commands Not in the Ribbon’ in the Choose commands from list to display a list of commands that currently do not appear on the ribbon • Scroll down to Form in the list, tap or click Form to select it, and then tap or click the Add button in the Excel Options dialog box to add the Form command to the Customize Quick Access Toolbar list Using Macros, Controls and Visual Basic for Applications (VBA) with Excel 26
  • 27.
    Using a DataForm to Enter Additional Records • Tap or click the OK button in the Excel Options dialog box to close the dialog box • With the desired cell selected, tap or click the Form button on the Quick Access Toolbar to open the desired data form • Tap or click the New button in the form to create a new record • Enter the information for the first record into the form • Tap or click the New button in the selected data form to add the information you just entered • Save and close the workbook Using Macros, Controls and Visual Basic for Applications (VBA) with Excel 27
  • 28.
    Using a DataForm to Enter Additional Records Using Macros, Controls and Visual Basic for Applications (VBA) with Excel 28
  • 29.
    Adding Form Controlsto a Worksheet • Tap or click the Insert Controls button on the DEVELOPER tab to display the Controls gallery • Tap or click the Option Button button in the Form Controls area in the Controls gallery • Drag the mouse pointer to the desired location • Tap or click the Insert Controls button on the DEVELOPER tab to display the Controls gallery • Tap or click the desired control in the Form Controls area in the Controls gallery • Using your finger or the mouse, drag the mouse pointer to the desired location Using Macros, Controls and Visual Basic for Applications (VBA) with Excel 29
  • 30.
    Adding Form Controlsto a Worksheet Using Macros, Controls and Visual Basic for Applications (VBA) with Excel 30
  • 31.
    Grouping Option Buttonsin a User Interface • Tap or click the Insert Controls button on the DEVELOPER tab to display the Controls gallery • Tap or click the Group Box button in the Form Controls area in the Controls gallery • Using your finger, stylus, or the mouse, drag the pointer so the Group Box control is in the desired location Using Macros, Controls and Visual Basic for Applications (VBA) with Excel 31
  • 32.
    Grouping Option Buttonsin a User Interface Using Macros, Controls and Visual Basic for Applications (VBA) with Excel 32
  • 33.
    Adding a CommandButton Control to the Worksheet • Tap or click the Insert Controls button on the DEVELOPER tab to display the Controls gallery • Tap or click the Command Button button in the ActiveX Controls area of the Controls gallery to switch to Design mode • Using your finger, a stylus, or a mouse, drag a box to place the control on the worksheet Using Macros, Controls and Visual Basic for Applications (VBA) with Excel 33
  • 34.
    Adding a CommandButton Control to the Worksheet Using Macros, Controls and Visual Basic for Applications (VBA) with Excel 34
  • 35.
    Adding a TextBox Control to the Worksheet • Tap or click the Insert Controls button on the DEVELOPER tab to display the Controls gallery • Tap or click the Text Box button in the ActiveX Controls area of the Controls gallery to switch to Design mode • Using your finger, a stylus, or a mouse, drag the text box to place the control on the worksheet Using Macros, Controls and Visual Basic for Applications (VBA) with Excel 35
  • 36.
    Adding a TextBox Control to the Worksheet Using Macros, Controls and Visual Basic for Applications (VBA) with Excel 36
  • 37.
    Formatting the OptionButton Controls for Contact Method • Press and hold or right-click the first option button control in the Contact by area to display the shortcut menu • Tap or click Edit Text on the shortcut menu so you can edit the control text • Delete the text in the control and type the replacement text • Select the control(s) to resize • Tap or click the Align Controls button on the DRAWING TOOLS FORMAT tab to display the alignment options • Tap or click the desired alignment option Using Macros, Controls and Visual Basic for Applications (VBA) with Excel 37
  • 38.
    Formatting the OptionButton Controls for Contact Method Using Macros, Controls and Visual Basic for Applications (VBA) with Excel 38
  • 39.
    Formatting the CommandButton and Text Box Controls • Select each of the command button controls and the text box control • Tap or click the Control Properties button on the DEVELOPER tab to open the Properties window • Select the desired properties and make the desired changes • Close the Properties window • Select the command buttons and the text box and use the Align button on the DRAWING TOOLS FORMAT tab set the desired alignment • With the three controls still selected, use the arrow keys to move the controls as a group to the final location Using Macros, Controls and Visual Basic for Applications (VBA) with Excel 39
  • 40.
    Formatting the CommandButton and Text Box Controls Using Macros, Controls and Visual Basic for Applications (VBA) with Excel 40
  • 41.
    Recording User Inputfor Contact Method to Another Location on the Worksheet • Press and hold or right-click the control to link to display the shortcut menu • Tap or click Format Control to display the Format Control dialog box • If necessary, tap or click the Control tab to display the Control sheet • Enter the desired cell in the Cell link box to enter the identity of the control in that cell • Tap or click the OK button to close the dialog box • Enter the formula (i.e. =INDEX(contact,$I$41) to return text rather than numbers Using Macros, Controls and Visual Basic for Applications (VBA) with Excel 41
  • 42.
    Entering the CommandButton Procedures Using the Visual Basic Editor • With the command button selected and Excel in Design mode, tap or click the View Code button on the DEVELOPER tab to display the Microsoft Visual Basic Editor • Tap or click the Object box arrow at the top of the window and then tap or click the name of the command button • Enter the desired VBA code Using Macros, Controls and Visual Basic for Applications (VBA) with Excel 42
  • 43.
    Entering the CommandButton Procedures Using the Visual Basic Editor Using Macros, Controls and Visual Basic for Applications (VBA) with Excel 43
  • 44.
    Removing the Outlinefrom the Group Control • If necessary, switch to the Visual Basic Editor • Press CTRL+G to open the Immediate window • Type activesheet.groupboxes.visible = false and then press the ENTER key to remove the box from around the group control Using Macros, Controls and Visual Basic for Applications (VBA) with Excel 44
  • 45.
    Removing the Outlinefrom the Group Control Using Macros, Controls and Visual Basic for Applications (VBA) with Excel 45
  • 46.
    Preparing and Protectingthe Worksheet and Saving the Workbook • Tap or click FILE on the ribbon to open the Backstage view • Tap or click Options to display the Excel Options dialog box • Tap or click Advanced in the left pane to display the advanced options • Tap or click the ‘Show page breaks’ and ‘Show a zero in cells that have zero value’ check boxes to deselect them • Tap or click the OK button to close the dialog box • Tap or click the Gridlines, Formula Bar, and Headings check boxes on the VIEW tab to deselect them • Tap or click the Minimize the Ribbon button on the title bar to minimize the Ribbon Using Macros, Controls and Visual Basic for Applications (VBA) with Excel 46
  • 47.
    Preparing and Protectingthe Worksheet and Saving the Workbook Using Macros, Controls and Visual Basic for Applications (VBA) with Excel 47
  • 48.
    Chapter Summary •Use passwords to assign protected and unprotected status to a worksheet • Use the macro recorder to create a macro • Execute a macro and view and print code for a macro • Customize the Quick Access Toolbar by adding a button • Use a Data Form to add data to a Worksheet Using Macros, Controls and Visual Basic for Applications (VBA) with Excel 48
  • 49.
    Chapter Summary •Understand Visual Basic for Applications (VBA) code and explain event-driven programs • Add controls such as command buttons, option buttons, and check boxes to a worksheet • Assign properties to controls • Review a digital signature on a workbook Using Macros, Controls and Visual Basic for Applications (VBA) with Excel 49
  • 50.
    Microsoft Excel 2013 Chapter 10 Complete