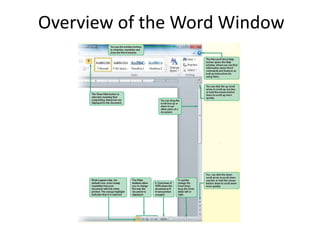
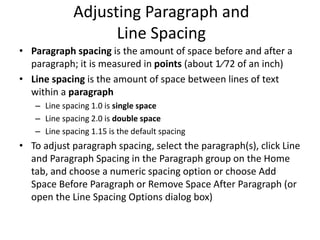
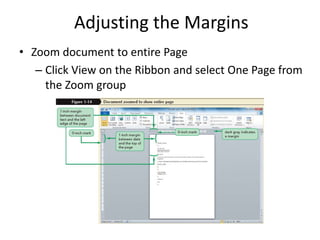
Microsoft Word 2010
Overview
• This three-day instructor-led training provides
students with an overview of the features and
functions of Microsoft Word 2010
Audience Profile
• This training is intended for novice
information workers who want to learn
beginning level Word 2010 skills.
Contents
• Explore Word 2010
• Edit and Proofread Text
• Change the Look of Text
• Organize Information in Columns and Tables
• Add Simple Graphics Elements
• Preview, Print and Distribute Documents
Module 1: Explore Word 2010
• This module explains how to work with
documents, including how to create, save,
open and close them.
Starting Word
• To start Word:
– Click the Start button on the taskbar
– Click All Programs
– Click Microsoft Office
– Click Microsoft Word 2010
• Nonprinting characters are symbols that appear on
the screen but are not visible on the printed page
• Click the Show/Hide ¶ button in the Paragraph group
on the Home tab, to displaying nonprinting characters
Starting Word
• Setting up the Word Window
– Click the Maximize button in the upper-right
corner if Word does not fill the entire screen
– Click the View tab on the Ribbon
– In the Show group, click the Ruler check box if
necessary to turn on the Ruler
– In the Zoom group, click the Page Width button
– Click the Print Layout button in the Status bar to
select it if necessary
Overview of the Word Window
Creating a Block Style
Business Letter
Entering Text
• Inserting a date with AutoComplete
– Word’s AutoComplete feature automatically inserts
dates and other regularly used items for you
Entering Text
• Entering the inside address
– Type the addressee’s name, street address, and
city, state, and Zip code, pressing Enter after each.
– Do not be concerned about line spacing, it will be
corrected later.
Entering Text
• Enter the salutation and the body text
– Address the letter and press Enter
– Begin typing the letter, pressing Enter at the end of
paragraphs
Saving and Opening the Document
• Click the Save button at the Quick Access Toolbar
• Choose a location and type in a filename for your
document
• Click the Save button
• At the Quick Access Toolbar, click the Open
document button
• Choose the file you want to open at the Open
Dialog box
• Click the Open button
Module 2: Edit and Proofread Text
• This module explains how to make a
document say exactly what you want it to say
and how to check it for spelling and
grammatical errors.
Using the Undo and Redo Commands
• To undo (or reverse) the last thing you did in a
document, you can click the Undo button on the
Quick Access Toolbar
• To restore your original change, the Redo button
reverses the action of the Undo button (or redoes the
undo)
Correcting Errors as You Type
• If you notice a typing error as soon as you make it,
you can press the Backspace key
• AutoCorrect automatically corrects common typing
errors, such as typing “adn” for “and”
• Spelling checker continually checks your document
against Word’s built-in dictionary
• Spelling checker does not catch contextual spelling
errors
• Grammar checker marks grammatical errors with a
green wavy line
Correcting Errors as You Type
Proofreading a Finished Document
• After a document is typed, it needs to be proofread
from start to finish
• Correct all spelling and grammar errors
• Remove all incorrect error indicators (such as those
on people’s names) by right-clicking on the word or
words in question and choosing Ignore Once or
Ignore All
Module 3: Change the Look of Text
• This module explains how to apply Quick
Styles to text and paragraphs, work with
document themes, manually change the look
of characters and paragraphs, and create and
modify lists
Changing the Font and Font Size
• Select the text you want to format
• Select the options you want in the Font group on the
Home tab
Applying Text Effects, Font Colors, and
Font Styles
• Text effects are special visual enhancements
(outlines, shading, shadows, reflections)
• To apply text effects:
– Select the text to change
– Click the Text Effects button in Font group and then select
the desired effects
– Click the Font Color button in the Font group and select a
color from the palette
– Click one of the style buttons (Bold, Italic, Underline) in the
Font group to apply a style
• The Format Painter allows you to copy all the font
settings from one word to others
Applying Text Effects, Font Colors, and
Font Styles
Aligning Text
• By default, the words in a document are left aligned
(even on the left) and ragged (uneven) on the right
• With right alignment, words are even on the right
and ragged on the left
• With center alignment, words are ragged on both
sides and lines are centered on the page
• With justified alignment, the text is even at both
margins and spaced out within the line
Aligning Text
• Alignment
buttons are found
in the Paragraph
group of the
Home tab
Adjusting Paragraph and
Line Spacing
• Paragraph spacing is the amount of space before and after a
paragraph; it is measured in points (about 1⁄72 of an inch)
• Line spacing is the amount of space between lines of text
within a paragraph
– Line spacing 1.0 is single space
– Line spacing 2.0 is double space
– Line spacing 1.15 is the default spacing
• To adjust paragraph spacing, select the paragraph(s), click Line
and Paragraph Spacing in the Paragraph group on the Home
tab, and choose a numeric spacing option or choose Add
Space Before Paragraph or Remove Space After Paragraph (or
open the Line Spacing Options dialog box)
Adjusting Paragraph and
Line Spacing
• The quickest method to adjust paragraph and line
spacing is to click the Line spacing button in the
Paragraph group on the Home tab
Adjusting the Margins
• Zoom document to entire Page
– Click View on the Ribbon and select One Page from
the Zoom group
Adjusting the Margins
• Click Page Layout on the Ribbon
• Click Margins in the Page Setup group
• Select the desired predefined margin options from
the Margin menu or click Custom Margins
Adjusting the Margins
• Use the Page Setup dialog box to customize the
margins
Creating and Modifying Lists
• There are two kinds of lists that you can do in Word:
numbered and bulleted lists.
• To create numbered lists:
– Click the Numbering button drop down box
– Choose the Numbering style
– Type in your list
• To create bulleted lists:
– Click the Bullets button drop down box
– Choose the Bullet style
– Type in your list
• Note: To end the list, press Enter twice
Module 4: Organize Information in
Columns and Tables
• This module explains how to divide
documents into columns; use tab stops; and
create, convert, and format tables
Presenting information in Columns
• Highlight the text
you want to be
presented in
columns
• Click the Page
Layout menu, and
click the Columns
button. Choose the
number of
columns you want
to use for your text
Creating Tabbed Lists
• On a new line, press Tab.
• Type the item for the first column.
• Press Tab.
• Type the item for the second column.
• Press Enter to end that line and start a new line.
• Repeat Steps above for each item in the list.
• Summon the ruler, if necessary.
• Select all lines of text that you want to organize into a two-column tabbed
list.
• Choose a left tab stop from the Tab gizmo on the ruler.
• Click the mouse on the ruler at the number 1, the 1-inch position.
• Click the mouse to set a second tab stop at the 3-inch mark.
• Adjust the tab stops, if necessary.
Creating tables
• At the Insert
Tab, Click the
Tables button
• Choose the
number of
columns and
rows you want
for your table
Formatting Tables
• Click on any created table you want to format
• There will be new tabs on the screen: Design and Layout
• The Design tab allows you to choose designs for your table
• The Layout tab allows you to insert, delete, split, merge,
adjust and determine alignments for your table
Module 5: Add Simple Graphic
Elements
• This module explains how to illustrate a
document with pictures, how to dress up the
page background, how to work with ready-
made building blocks, and how to enhance
text with WordArt.
Adding a Paragraph Border
and Shading
• A paragraph border is an outline around one or more
paragraphs
• Shading is background color applied to one or more
paragraphs
• The Border and Shading buttons are found in the
Paragraph group of the Home tab
Adding a Paragraph Border
and Shading
Inserting, Deleting, and
Resizing a Photo
• Use the Picture button in the Illustrations group on
the Insert tab to insert a photo
• To work with a photo click on it to select it
• When a photo is selected, the Picture Tools Format
tab appears on the Ribbon with options for editing
the photo in various ways (including resizing, framing,
and shaping)
• To delete a photo, select it and then press the Delete
key
Inserting, Deleting, and
Resizing a Photo
Page Backgrounds
• Page backgrounds can be done by clicking on
the Page Layout tab and clicking on Page Color
• Color backgrounds can be used by choosing a
color from the palette
Fill Effects
• Gradient background can be used by
clicking on the Fill Effects menu from
the Page Color dropdown and
choosing a gradient and colors from
the Gradient tab.
• Texture backgrounds can be used by
choosing the Texture tab and
choosing a texture to be used as
background
• Patterns can also be used as
background by clicking the Patterns
tab and choosing a pattern and color
combination
• A picture can also be used as
background by clicking the Picture
tab and browsing for the picture you
want to use as background
Module 6: Preview, Print, and
Distribute Documents
• This module explains how to preview a
document and control its layout, how to print
a document, and how to ensure that a
document contains no inappropriate
information before marking it as final
Adjusting the Margins
• Zoom document to entire Page
– Click View on the Ribbon and select One Page from
the Zoom group
Adjusting the Margins
• Click Page Layout on the Ribbon
• Click Margins in the Page Setup group
• Select the desired predefined margin options from
the Margin menu or click Custom Margins
Adjusting the Margins
• Use the Page Setup dialog box to customize the
margins
Previewing and Printing a Document
• To avoid wasting paper and time, you should preview
your document on the Print tab in Backstage view
• Click the File tab to open Backstage, and then click
the Print tab in the navigation bar
• Review the document
• If the document is correct and the printer is on and
has paper, click the Print button
Previewing and Printing a Document

Microsoft word 2010

  • 1.
  • 2.
    Overview • This three-dayinstructor-led training provides students with an overview of the features and functions of Microsoft Word 2010
  • 3.
    Audience Profile • Thistraining is intended for novice information workers who want to learn beginning level Word 2010 skills.
  • 4.
    Contents • Explore Word2010 • Edit and Proofread Text • Change the Look of Text • Organize Information in Columns and Tables • Add Simple Graphics Elements • Preview, Print and Distribute Documents
  • 5.
    Module 1: ExploreWord 2010 • This module explains how to work with documents, including how to create, save, open and close them.
  • 6.
    Starting Word • Tostart Word: – Click the Start button on the taskbar – Click All Programs – Click Microsoft Office – Click Microsoft Word 2010 • Nonprinting characters are symbols that appear on the screen but are not visible on the printed page • Click the Show/Hide ¶ button in the Paragraph group on the Home tab, to displaying nonprinting characters
  • 7.
    Starting Word • Settingup the Word Window – Click the Maximize button in the upper-right corner if Word does not fill the entire screen – Click the View tab on the Ribbon – In the Show group, click the Ruler check box if necessary to turn on the Ruler – In the Zoom group, click the Page Width button – Click the Print Layout button in the Status bar to select it if necessary
  • 8.
    Overview of theWord Window
  • 9.
    Overview of theWord Window
  • 10.
    Creating a BlockStyle Business Letter
  • 11.
    Entering Text • Insertinga date with AutoComplete – Word’s AutoComplete feature automatically inserts dates and other regularly used items for you
  • 12.
    Entering Text • Enteringthe inside address – Type the addressee’s name, street address, and city, state, and Zip code, pressing Enter after each. – Do not be concerned about line spacing, it will be corrected later.
  • 13.
    Entering Text • Enterthe salutation and the body text – Address the letter and press Enter – Begin typing the letter, pressing Enter at the end of paragraphs
  • 14.
    Saving and Openingthe Document • Click the Save button at the Quick Access Toolbar • Choose a location and type in a filename for your document • Click the Save button • At the Quick Access Toolbar, click the Open document button • Choose the file you want to open at the Open Dialog box • Click the Open button
  • 15.
    Module 2: Editand Proofread Text • This module explains how to make a document say exactly what you want it to say and how to check it for spelling and grammatical errors.
  • 16.
    Using the Undoand Redo Commands • To undo (or reverse) the last thing you did in a document, you can click the Undo button on the Quick Access Toolbar • To restore your original change, the Redo button reverses the action of the Undo button (or redoes the undo)
  • 17.
    Correcting Errors asYou Type • If you notice a typing error as soon as you make it, you can press the Backspace key • AutoCorrect automatically corrects common typing errors, such as typing “adn” for “and” • Spelling checker continually checks your document against Word’s built-in dictionary • Spelling checker does not catch contextual spelling errors • Grammar checker marks grammatical errors with a green wavy line
  • 18.
  • 19.
  • 20.
    Proofreading a FinishedDocument • After a document is typed, it needs to be proofread from start to finish • Correct all spelling and grammar errors • Remove all incorrect error indicators (such as those on people’s names) by right-clicking on the word or words in question and choosing Ignore Once or Ignore All
  • 21.
    Module 3: Changethe Look of Text • This module explains how to apply Quick Styles to text and paragraphs, work with document themes, manually change the look of characters and paragraphs, and create and modify lists
  • 22.
    Changing the Fontand Font Size • Select the text you want to format • Select the options you want in the Font group on the Home tab
  • 23.
    Applying Text Effects,Font Colors, and Font Styles • Text effects are special visual enhancements (outlines, shading, shadows, reflections) • To apply text effects: – Select the text to change – Click the Text Effects button in Font group and then select the desired effects – Click the Font Color button in the Font group and select a color from the palette – Click one of the style buttons (Bold, Italic, Underline) in the Font group to apply a style • The Format Painter allows you to copy all the font settings from one word to others
  • 24.
    Applying Text Effects,Font Colors, and Font Styles
  • 25.
    Aligning Text • Bydefault, the words in a document are left aligned (even on the left) and ragged (uneven) on the right • With right alignment, words are even on the right and ragged on the left • With center alignment, words are ragged on both sides and lines are centered on the page • With justified alignment, the text is even at both margins and spaced out within the line
  • 26.
    Aligning Text • Alignment buttonsare found in the Paragraph group of the Home tab
  • 27.
    Adjusting Paragraph and LineSpacing • Paragraph spacing is the amount of space before and after a paragraph; it is measured in points (about 1⁄72 of an inch) • Line spacing is the amount of space between lines of text within a paragraph – Line spacing 1.0 is single space – Line spacing 2.0 is double space – Line spacing 1.15 is the default spacing • To adjust paragraph spacing, select the paragraph(s), click Line and Paragraph Spacing in the Paragraph group on the Home tab, and choose a numeric spacing option or choose Add Space Before Paragraph or Remove Space After Paragraph (or open the Line Spacing Options dialog box)
  • 28.
    Adjusting Paragraph and LineSpacing • The quickest method to adjust paragraph and line spacing is to click the Line spacing button in the Paragraph group on the Home tab
  • 29.
    Adjusting the Margins •Zoom document to entire Page – Click View on the Ribbon and select One Page from the Zoom group
  • 30.
    Adjusting the Margins •Click Page Layout on the Ribbon • Click Margins in the Page Setup group • Select the desired predefined margin options from the Margin menu or click Custom Margins
  • 31.
    Adjusting the Margins •Use the Page Setup dialog box to customize the margins
  • 32.
    Creating and ModifyingLists • There are two kinds of lists that you can do in Word: numbered and bulleted lists. • To create numbered lists: – Click the Numbering button drop down box – Choose the Numbering style – Type in your list • To create bulleted lists: – Click the Bullets button drop down box – Choose the Bullet style – Type in your list • Note: To end the list, press Enter twice
  • 33.
    Module 4: OrganizeInformation in Columns and Tables • This module explains how to divide documents into columns; use tab stops; and create, convert, and format tables
  • 34.
    Presenting information inColumns • Highlight the text you want to be presented in columns • Click the Page Layout menu, and click the Columns button. Choose the number of columns you want to use for your text
  • 35.
    Creating Tabbed Lists •On a new line, press Tab. • Type the item for the first column. • Press Tab. • Type the item for the second column. • Press Enter to end that line and start a new line. • Repeat Steps above for each item in the list. • Summon the ruler, if necessary. • Select all lines of text that you want to organize into a two-column tabbed list. • Choose a left tab stop from the Tab gizmo on the ruler. • Click the mouse on the ruler at the number 1, the 1-inch position. • Click the mouse to set a second tab stop at the 3-inch mark. • Adjust the tab stops, if necessary.
  • 36.
    Creating tables • Atthe Insert Tab, Click the Tables button • Choose the number of columns and rows you want for your table
  • 37.
    Formatting Tables • Clickon any created table you want to format • There will be new tabs on the screen: Design and Layout • The Design tab allows you to choose designs for your table • The Layout tab allows you to insert, delete, split, merge, adjust and determine alignments for your table
  • 38.
    Module 5: AddSimple Graphic Elements • This module explains how to illustrate a document with pictures, how to dress up the page background, how to work with ready- made building blocks, and how to enhance text with WordArt.
  • 39.
    Adding a ParagraphBorder and Shading • A paragraph border is an outline around one or more paragraphs • Shading is background color applied to one or more paragraphs • The Border and Shading buttons are found in the Paragraph group of the Home tab
  • 40.
    Adding a ParagraphBorder and Shading
  • 41.
    Inserting, Deleting, and Resizinga Photo • Use the Picture button in the Illustrations group on the Insert tab to insert a photo • To work with a photo click on it to select it • When a photo is selected, the Picture Tools Format tab appears on the Ribbon with options for editing the photo in various ways (including resizing, framing, and shaping) • To delete a photo, select it and then press the Delete key
  • 42.
  • 43.
    Page Backgrounds • Pagebackgrounds can be done by clicking on the Page Layout tab and clicking on Page Color • Color backgrounds can be used by choosing a color from the palette
  • 44.
    Fill Effects • Gradientbackground can be used by clicking on the Fill Effects menu from the Page Color dropdown and choosing a gradient and colors from the Gradient tab. • Texture backgrounds can be used by choosing the Texture tab and choosing a texture to be used as background • Patterns can also be used as background by clicking the Patterns tab and choosing a pattern and color combination • A picture can also be used as background by clicking the Picture tab and browsing for the picture you want to use as background
  • 45.
    Module 6: Preview,Print, and Distribute Documents • This module explains how to preview a document and control its layout, how to print a document, and how to ensure that a document contains no inappropriate information before marking it as final
  • 46.
    Adjusting the Margins •Zoom document to entire Page – Click View on the Ribbon and select One Page from the Zoom group
  • 47.
    Adjusting the Margins •Click Page Layout on the Ribbon • Click Margins in the Page Setup group • Select the desired predefined margin options from the Margin menu or click Custom Margins
  • 48.
    Adjusting the Margins •Use the Page Setup dialog box to customize the margins
  • 49.
    Previewing and Printinga Document • To avoid wasting paper and time, you should preview your document on the Print tab in Backstage view • Click the File tab to open Backstage, and then click the Print tab in the navigation bar • Review the document • If the document is correct and the printer is on and has paper, click the Print button
  • 50.