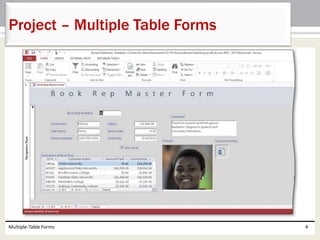
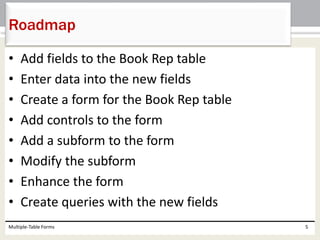
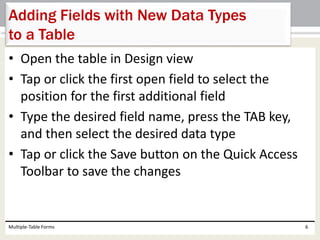
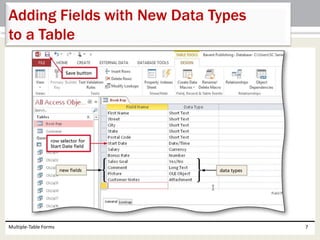
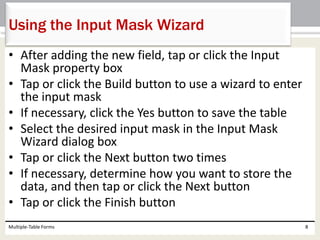
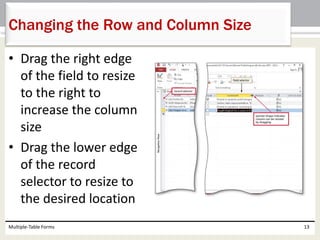
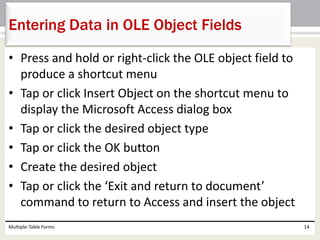
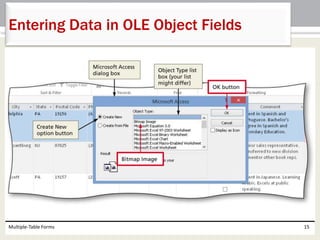
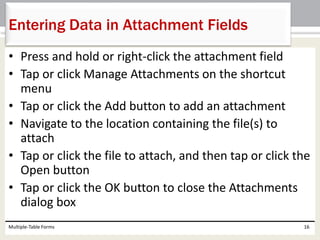
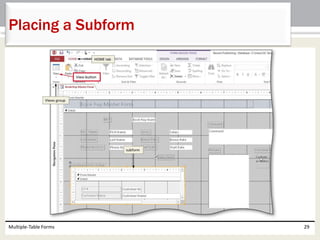
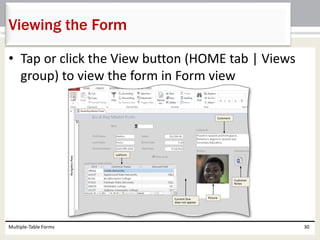
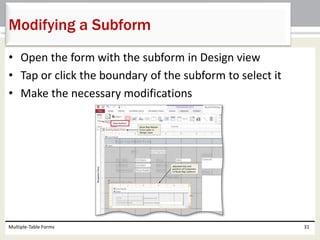
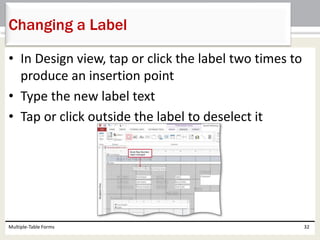
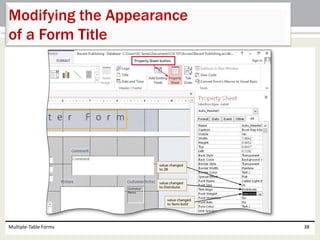
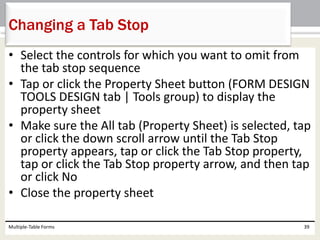
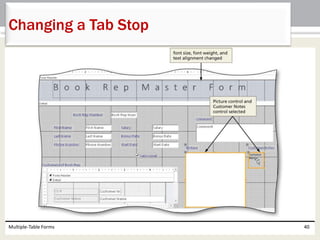
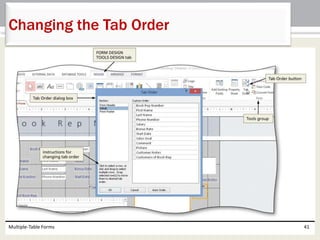
Chapter 5
Multiple-Table Forms
Microsoft
Access 2013
• Add Yes/No, Long Text, OLE Object, and
Attachment fields
• Use the Input Mask Wizard
• Update fields and enter data
• Change row and column size
• Create a form with a subform in Design view
• Modify a subform and form design
Multiple-Table Forms 2
Objectives
• Enhance the form title
• Change tab stops and tab order
• Use the form to view data and attachments
• View object dependencies
• Use Date/Time, Long Text, and Yes/No fields in a
query
• Create a form with a datasheet
Multiple-Table Forms 3
Objectives
Multiple-Table Forms 4
Project – Multiple Table Forms
• Add fields to the Book Rep table
• Enter data into the new fields
• Create a form for the Book Rep table
• Add controls to the form
• Add a subform to the form
• Modify the subform
• Enhance the form
• Create queries with the new fields
Multiple-Table Forms 5
Roadmap
• Open the table in Design view
• Tap or click the first open field to select the
position for the first additional field
• Type the desired field name, press the TAB key,
and then select the desired data type
• Tap or click the Save button on the Quick Access
Toolbar to save the changes
Multiple-Table Forms 6
Adding Fields with New Data Types
to a Table
Multiple-Table Forms 7
Adding Fields with New Data Types
to a Table
• After adding the new field, tap or click the Input
Mask property box
• Tap or click the Build button to use a wizard to enter
the input mask
• If necessary, click the Yes button to save the table
• Select the desired input mask in the Input Mask
Wizard dialog box
• Tap or click the Next button two times
• If necessary, determine how you want to store the
data, and then tap or click the Next button
• Tap or click the Finish button
Multiple-Table Forms 8
Using the Input Mask Wizard
Multiple-Table Forms 9
Using the Input Mask Wizard
• Tap or click the beginning of the field in Datasheet
view
• Type the field value
Multiple-Table Forms 10
Entering Data Using an Input Mask
• Tap or click the check box in the Yes/No field to
place a check mark in the box
Multiple-Table Forms 11
Entering Data in Yes/No Fields
• Tap or click the desired field and then type the
entry
Multiple-Table Forms 12
Entering Data in Long Text Fields
• Drag the right edge
of the field to resize
to the right to
increase the column
size
• Drag the lower edge
of the record
selector to resize to
the desired location
Multiple-Table Forms 13
Changing the Row and Column Size
• Press and hold or right-click the OLE object field to
produce a shortcut menu
• Tap or click Insert Object on the shortcut menu to
display the Microsoft Access dialog box
• Tap or click the desired object type
• Tap or click the OK button
• Create the desired object
• Tap or click the ‘Exit and return to document’
command to return to Access and insert the object
Multiple-Table Forms 14
Entering Data in OLE Object Fields
Multiple-Table Forms 15
Entering Data in OLE Object Fields
• Press and hold or right-click the attachment field
• Tap or click Manage Attachments on the shortcut
menu
• Tap or click the Add button to add an attachment
• Navigate to the location containing the file(s) to
attach
• Tap or click the file to attach, and then tap or click the
Open button
• Tap or click the OK button to close the Attachments
dialog box
Multiple-Table Forms 16
Entering Data in Attachment Fields
Multiple-Table Forms 17
Entering Data in Attachment Fields
• Tap or click CREATE on the ribbon to display the
CREATE tab
• Tap or click the Form Design button to create a
new form in Design View
• If a field list does not appear, tap or click the ‘Add
Existing Fields’ button (FORM DESIGN TOOLS
DESIGN tab | Tools group) to display a field list
Multiple-Table Forms 18
Creating a Form in Design View
Multiple-Table Forms 19
Creating a Form in Design View
• Drag the field in the field list to the desired
location on the form
Multiple-Table Forms 20
Adding a Control for a Field
to the Form
• Tap or click the first control to align
• Hold the SHIFT key down and tap or click the
remaining controls to align
• Tap or click the Align button (FORM DESIGN
TOOLS ARRANGE tab | Sizing & Ordering group) to
display the Align menu
• Tap or click the desired alignment option
Multiple-Table Forms 21
Aligning Controls
Multiple-Table Forms 22
Aligning Controls
• Select the controls on which to modify the vertical
spacing
• Tap or click the Size/Space button (FORM DESIGN
TOOLS ARRANGE tab | Sizing & Ordering group) to
display the Size/Space menu
• Tap or click the desired spacing option to specify
the spacing
Multiple-Table Forms 23
Adjusting Vertical Spacing
Multiple-Table Forms 24
Adjusting Vertical Spacing
• Press and hold or right-click the form to produce a
shortcut menu
• Point to the ‘Fill/Back Color’ arrow on the shortcut menu
to display a color palette
• Tap or click the desired color
Multiple-Table Forms 25
Using a Shortcut Menu to Change
the Fill/Back Color
• Tap or click the Title button (FORM DESIGN TOOLS
DESIGN tab | Header/Footer group) to add a title
to the form
Multiple-Table Forms 26
Adding a Title
• Tap or click the More button (FORM DESIGN TOOLS
DESIGN tab | Controls group) to display a gallery of
available tools
• Be sure the ‘Use Control Wizards’ button is selected,
tap or click the Subform/ Subreport tool on the FORM
DESIGN TOOLS DESIGN tab, and move the pointer to
and tap or click the position where you want to
position the subform
• Ensure the ‘Use existing Tables and Queries’ option
button is selected
• Tap or click the Next button
Multiple-Table Forms 27
Placing a Subform
• Tap or click the Tables/Queries arrow, and then tap or
click the table that contains the fields for the subform
• Add the desired fields to the subform
• Tap or click the Next button to move to the next
SubForm Wizard dialog box
• Be sure the ‘Choose from a list’ option button is
selected
• Tap or click the Next button
• Type the desired name of the subform
• Tap or click the Finish button to place the subform
Multiple-Table Forms 28
Placing a Subform
Multiple-Table Forms 29
Placing a Subform
• Tap or click the View button (HOME tab | Views
group) to view the form in Form view
Multiple-Table Forms 30
Viewing the Form
• Open the form with the subform in Design view
• Tap or click the boundary of the subform to select it
• Make the necessary modifications
Multiple-Table Forms 31
Modifying a Subform
• In Design view, tap or click the label two times to
produce an insertion point
• Type the new label text
• Tap or click outside the label to deselect it
Multiple-Table Forms 32
Changing a Label
• Tap or click the label(s) to change
• Tap or click the Font Color arrow (FORM DESIGN TOOLS
FORMAT tab | Font group) to display a color palette
• Tap or click the desired color to change the font color for
the label(s)
• Tap or click the Property Sheet button (FORM DESIGN
TOOLS DESIGN tab | Tools group) to produce the property
sheet for the selected labels. If your property sheet still
appears on the left side of the screen, drag it back to the
right. Make sure the All tab is selected
• Tap or click the Border Style property box to display the
Border Style property arrow, and then tap or click the arrow
to display a menu of border styles
Multiple-Table Forms 33
Changing Label Effects and Colors
• Tap or click the desired border style
• Tap or click the Border Width property box to display
the Border Width property arrow, and then tap or
click the arrow to display a menu of border widths
• Tap or click the desired border width
• Tap or click the Special Effect property box to display
the Special Effect property arrow, and then tap or
click the arrow to display a menu of special effects
• Tap or click the desired special effect
Multiple-Table Forms 34
Changing Label Effects and Colors
Multiple-Table Forms 35
Changing Label Effects and Colors
• Display the form in Design view
• Resize the Form Header section by dragging down the
lower boundary of the section to the desired location
• Tap or click the control containing the form title to
select the control
• Drag the lower-right sizing handle to resize the
control to the desired size
• Tap or click the Property Sheet button (FORM DESIGN
TOOLS DESIGN tab | Tools group) to display the
control’s property sheet
Multiple-Table Forms 36
Modifying the Appearance
of a Form Title
• Tap or click the Font Size property box, tap or click
the Font Size property arrow, and then tap or click
the desired font size
• In a similar fashion, change the Text Align
property and the Font Weight property
• Close the property sheet by tapping or clicking the
Property Sheet button (FORM DESIGN TOOLS
DESIGN tab | Tools group)
Multiple-Table Forms 37
Modifying the Appearance
of a Form Title
Multiple-Table Forms 38
Modifying the Appearance
of a Form Title
• Select the controls for which you want to omit from
the tab stop sequence
• Tap or click the Property Sheet button (FORM DESIGN
TOOLS DESIGN tab | Tools group) to display the
property sheet
• Make sure the All tab (Property Sheet) is selected, tap
or click the down scroll arrow until the Tab Stop
property appears, tap or click the Tab Stop property,
tap or click the Tab Stop property arrow, and then tap
or click No
• Close the property sheet
Multiple-Table Forms 39
Changing a Tab Stop
Multiple-Table Forms 40
Changing a Tab Stop
Multiple-Table Forms 41
Changing the Tab Order
• Open the Navigation Pane and tap or click the desired
table
• Tap or click the Object Dependencies button
(DATABASE TOOLS tab | Relationships group) to
display the Object Dependencies pane
• If necessary, tap or click the ‘Objects that depend on
me’ option button to select it
• Close the Object Dependencies pane by tapping or
clicking the Object Dependencies button (DATABASE
TOOLS tab | Relationships group) a second time
Multiple-Table Forms 42
Viewing Object Dependencies
Multiple-Table Forms 43
Viewing Object Dependencies
Multiple-Table Forms 44
Using the Date/Time, Long Text,
and Yes/No Fields in a Query
• Add Yes/No, Long Text, OLE Object, and
Attachment fields
• Use the Input Mask Wizard
• Update fields and enter data
• Change row and column size
• Create a form with a subform in Design view
• Modify a subform and form design
Multiple-Table Forms 45
Chapter Summary
• Enhance the form title
• Change tab stops and tab order
• Use the form to view data and attachments
• View object dependencies
• Use Date/Time, Long Text, and Yes/No fields in a
query
• Create a form with a datasheet
Multiple-Table Forms 46
Chapter Summary
Chapter 5 Complete
Microsoft
Access 2013

Access2013 ch05

  • 1.
  • 2.
    • Add Yes/No,Long Text, OLE Object, and Attachment fields • Use the Input Mask Wizard • Update fields and enter data • Change row and column size • Create a form with a subform in Design view • Modify a subform and form design Multiple-Table Forms 2 Objectives
  • 3.
    • Enhance theform title • Change tab stops and tab order • Use the form to view data and attachments • View object dependencies • Use Date/Time, Long Text, and Yes/No fields in a query • Create a form with a datasheet Multiple-Table Forms 3 Objectives
  • 4.
    Multiple-Table Forms 4 Project– Multiple Table Forms
  • 5.
    • Add fieldsto the Book Rep table • Enter data into the new fields • Create a form for the Book Rep table • Add controls to the form • Add a subform to the form • Modify the subform • Enhance the form • Create queries with the new fields Multiple-Table Forms 5 Roadmap
  • 6.
    • Open thetable in Design view • Tap or click the first open field to select the position for the first additional field • Type the desired field name, press the TAB key, and then select the desired data type • Tap or click the Save button on the Quick Access Toolbar to save the changes Multiple-Table Forms 6 Adding Fields with New Data Types to a Table
  • 7.
    Multiple-Table Forms 7 AddingFields with New Data Types to a Table
  • 8.
    • After addingthe new field, tap or click the Input Mask property box • Tap or click the Build button to use a wizard to enter the input mask • If necessary, click the Yes button to save the table • Select the desired input mask in the Input Mask Wizard dialog box • Tap or click the Next button two times • If necessary, determine how you want to store the data, and then tap or click the Next button • Tap or click the Finish button Multiple-Table Forms 8 Using the Input Mask Wizard
  • 9.
    Multiple-Table Forms 9 Usingthe Input Mask Wizard
  • 10.
    • Tap orclick the beginning of the field in Datasheet view • Type the field value Multiple-Table Forms 10 Entering Data Using an Input Mask
  • 11.
    • Tap orclick the check box in the Yes/No field to place a check mark in the box Multiple-Table Forms 11 Entering Data in Yes/No Fields
  • 12.
    • Tap orclick the desired field and then type the entry Multiple-Table Forms 12 Entering Data in Long Text Fields
  • 13.
    • Drag theright edge of the field to resize to the right to increase the column size • Drag the lower edge of the record selector to resize to the desired location Multiple-Table Forms 13 Changing the Row and Column Size
  • 14.
    • Press andhold or right-click the OLE object field to produce a shortcut menu • Tap or click Insert Object on the shortcut menu to display the Microsoft Access dialog box • Tap or click the desired object type • Tap or click the OK button • Create the desired object • Tap or click the ‘Exit and return to document’ command to return to Access and insert the object Multiple-Table Forms 14 Entering Data in OLE Object Fields
  • 15.
    Multiple-Table Forms 15 EnteringData in OLE Object Fields
  • 16.
    • Press andhold or right-click the attachment field • Tap or click Manage Attachments on the shortcut menu • Tap or click the Add button to add an attachment • Navigate to the location containing the file(s) to attach • Tap or click the file to attach, and then tap or click the Open button • Tap or click the OK button to close the Attachments dialog box Multiple-Table Forms 16 Entering Data in Attachment Fields
  • 17.
    Multiple-Table Forms 17 EnteringData in Attachment Fields
  • 18.
    • Tap orclick CREATE on the ribbon to display the CREATE tab • Tap or click the Form Design button to create a new form in Design View • If a field list does not appear, tap or click the ‘Add Existing Fields’ button (FORM DESIGN TOOLS DESIGN tab | Tools group) to display a field list Multiple-Table Forms 18 Creating a Form in Design View
  • 19.
    Multiple-Table Forms 19 Creatinga Form in Design View
  • 20.
    • Drag thefield in the field list to the desired location on the form Multiple-Table Forms 20 Adding a Control for a Field to the Form
  • 21.
    • Tap orclick the first control to align • Hold the SHIFT key down and tap or click the remaining controls to align • Tap or click the Align button (FORM DESIGN TOOLS ARRANGE tab | Sizing & Ordering group) to display the Align menu • Tap or click the desired alignment option Multiple-Table Forms 21 Aligning Controls
  • 22.
  • 23.
    • Select thecontrols on which to modify the vertical spacing • Tap or click the Size/Space button (FORM DESIGN TOOLS ARRANGE tab | Sizing & Ordering group) to display the Size/Space menu • Tap or click the desired spacing option to specify the spacing Multiple-Table Forms 23 Adjusting Vertical Spacing
  • 24.
  • 25.
    • Press andhold or right-click the form to produce a shortcut menu • Point to the ‘Fill/Back Color’ arrow on the shortcut menu to display a color palette • Tap or click the desired color Multiple-Table Forms 25 Using a Shortcut Menu to Change the Fill/Back Color
  • 26.
    • Tap orclick the Title button (FORM DESIGN TOOLS DESIGN tab | Header/Footer group) to add a title to the form Multiple-Table Forms 26 Adding a Title
  • 27.
    • Tap orclick the More button (FORM DESIGN TOOLS DESIGN tab | Controls group) to display a gallery of available tools • Be sure the ‘Use Control Wizards’ button is selected, tap or click the Subform/ Subreport tool on the FORM DESIGN TOOLS DESIGN tab, and move the pointer to and tap or click the position where you want to position the subform • Ensure the ‘Use existing Tables and Queries’ option button is selected • Tap or click the Next button Multiple-Table Forms 27 Placing a Subform
  • 28.
    • Tap orclick the Tables/Queries arrow, and then tap or click the table that contains the fields for the subform • Add the desired fields to the subform • Tap or click the Next button to move to the next SubForm Wizard dialog box • Be sure the ‘Choose from a list’ option button is selected • Tap or click the Next button • Type the desired name of the subform • Tap or click the Finish button to place the subform Multiple-Table Forms 28 Placing a Subform
  • 29.
  • 30.
    • Tap orclick the View button (HOME tab | Views group) to view the form in Form view Multiple-Table Forms 30 Viewing the Form
  • 31.
    • Open theform with the subform in Design view • Tap or click the boundary of the subform to select it • Make the necessary modifications Multiple-Table Forms 31 Modifying a Subform
  • 32.
    • In Designview, tap or click the label two times to produce an insertion point • Type the new label text • Tap or click outside the label to deselect it Multiple-Table Forms 32 Changing a Label
  • 33.
    • Tap orclick the label(s) to change • Tap or click the Font Color arrow (FORM DESIGN TOOLS FORMAT tab | Font group) to display a color palette • Tap or click the desired color to change the font color for the label(s) • Tap or click the Property Sheet button (FORM DESIGN TOOLS DESIGN tab | Tools group) to produce the property sheet for the selected labels. If your property sheet still appears on the left side of the screen, drag it back to the right. Make sure the All tab is selected • Tap or click the Border Style property box to display the Border Style property arrow, and then tap or click the arrow to display a menu of border styles Multiple-Table Forms 33 Changing Label Effects and Colors
  • 34.
    • Tap orclick the desired border style • Tap or click the Border Width property box to display the Border Width property arrow, and then tap or click the arrow to display a menu of border widths • Tap or click the desired border width • Tap or click the Special Effect property box to display the Special Effect property arrow, and then tap or click the arrow to display a menu of special effects • Tap or click the desired special effect Multiple-Table Forms 34 Changing Label Effects and Colors
  • 35.
    Multiple-Table Forms 35 ChangingLabel Effects and Colors
  • 36.
    • Display theform in Design view • Resize the Form Header section by dragging down the lower boundary of the section to the desired location • Tap or click the control containing the form title to select the control • Drag the lower-right sizing handle to resize the control to the desired size • Tap or click the Property Sheet button (FORM DESIGN TOOLS DESIGN tab | Tools group) to display the control’s property sheet Multiple-Table Forms 36 Modifying the Appearance of a Form Title
  • 37.
    • Tap orclick the Font Size property box, tap or click the Font Size property arrow, and then tap or click the desired font size • In a similar fashion, change the Text Align property and the Font Weight property • Close the property sheet by tapping or clicking the Property Sheet button (FORM DESIGN TOOLS DESIGN tab | Tools group) Multiple-Table Forms 37 Modifying the Appearance of a Form Title
  • 38.
    Multiple-Table Forms 38 Modifyingthe Appearance of a Form Title
  • 39.
    • Select thecontrols for which you want to omit from the tab stop sequence • Tap or click the Property Sheet button (FORM DESIGN TOOLS DESIGN tab | Tools group) to display the property sheet • Make sure the All tab (Property Sheet) is selected, tap or click the down scroll arrow until the Tab Stop property appears, tap or click the Tab Stop property, tap or click the Tab Stop property arrow, and then tap or click No • Close the property sheet Multiple-Table Forms 39 Changing a Tab Stop
  • 40.
  • 41.
  • 42.
    • Open theNavigation Pane and tap or click the desired table • Tap or click the Object Dependencies button (DATABASE TOOLS tab | Relationships group) to display the Object Dependencies pane • If necessary, tap or click the ‘Objects that depend on me’ option button to select it • Close the Object Dependencies pane by tapping or clicking the Object Dependencies button (DATABASE TOOLS tab | Relationships group) a second time Multiple-Table Forms 42 Viewing Object Dependencies
  • 43.
  • 44.
    Multiple-Table Forms 44 Usingthe Date/Time, Long Text, and Yes/No Fields in a Query
  • 45.
    • Add Yes/No,Long Text, OLE Object, and Attachment fields • Use the Input Mask Wizard • Update fields and enter data • Change row and column size • Create a form with a subform in Design view • Modify a subform and form design Multiple-Table Forms 45 Chapter Summary
  • 46.
    • Enhance theform title • Change tab stops and tab order • Use the form to view data and attachments • View object dependencies • Use Date/Time, Long Text, and Yes/No fields in a query • Create a form with a datasheet Multiple-Table Forms 46 Chapter Summary
  • 47.