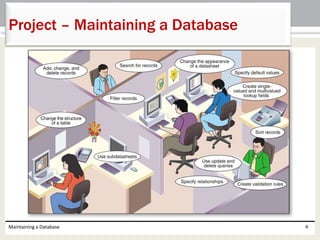
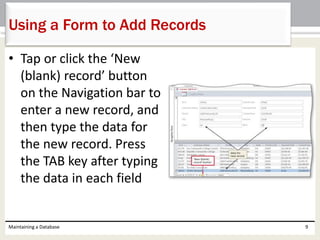
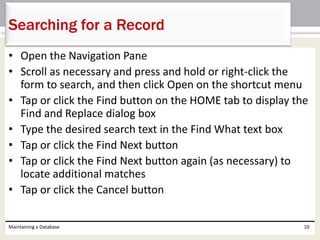
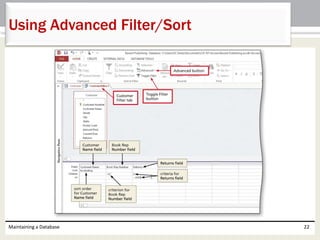
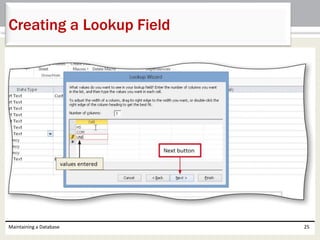
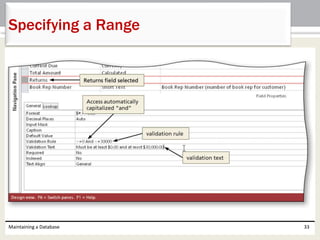
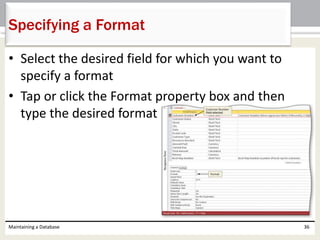
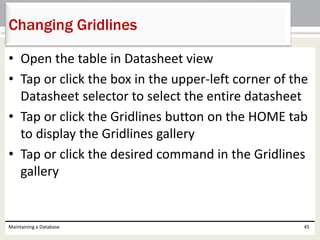
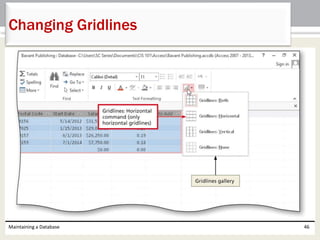
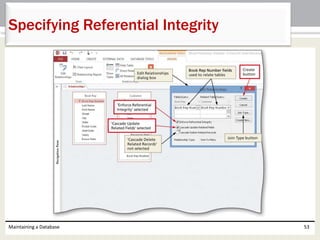
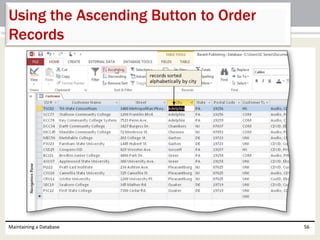
SlideShare a Scribd company logo
1 of 59
Chapter 3
Maintaining a Database
Microsoft
Access 2013
• Add, change, and delete records
• Search for records
• Filter records
• Update a table design
• Use action queries to update records
• Use delete queries to delete records
• Specify validation rules, default values, and
formats
Maintaining a Database 2
Objectives
• Create and use single-valued lookup fields
• Create and use multivalued lookup fields
• Add new fields to an existing report
• Format a datasheet
• Specify referential integrity
• Use a subdatasheet
• Sort records
Maintaining a Database 3
Objectives
Maintaining a Database 4
Project – Maintaining a Database
• Update records using a form
• Filter records using various filtering options
• Change the structure of a table
• Make mass changes to a table
• Create validation rules
• Change the appearance of a datasheet
• Specify referential integrity
• Order records in a datasheet
Maintaining a Database 5
Roadmap
• Open the Navigation Pane
• Select the table in the Navigation Pane you wish
to split
• Tap or click CREATE on the ribbon to display the
CREATE tab
• Tap or click the More Forms button to display the
More Forms menu
• Tap or click Split Form to create a split form
• Close the Navigation Pane
Maintaining a Database 6
Creating a Split Form
• Tap or click the Form View button on the Access
status bar to display the form in Form view
• Tap or click the Save button on the Quick Access
Toolbar to display the Save As dialog box
• Type the desired form name
• Tap or click the OK button
Maintaining a Database 7
Creating a Split Form
Maintaining a Database 8
Creating a Split Form
• Tap or click the ‘New
(blank) record’ button
on the Navigation bar to
enter a new record, and
then type the data for
the new record. Press
the TAB key after typing
the data in each field
Maintaining a Database 9
Using a Form to Add Records
• Open the Navigation Pane
• Scroll as necessary and press and hold or right-click the
form to search, and then click Open on the shortcut menu
• Tap or click the Find button on the HOME tab to display the
Find and Replace dialog box
• Type the desired search text in the Find What text box
• Tap or click the Find Next button
• Tap or click the Find Next button again (as necessary) to
locate additional matches
• Tap or click the Cancel button
Maintaining a Database 10
Searching for a Record
Maintaining a Database 11
Searching for a Record
• Tap or click the field you wish to update
• Type the updated text
• Press the TAB key to complete the change and
move to the next field
Maintaining a Database 12
Updating the Contents of a Record
• With the form displayed, tap or click the record
selector in the datasheet next to the field you
wish to delete
• Press the DELETE key to delete the record
• Tap or click the Yes button to complete the
deletion
Maintaining a Database 13
Deleting a Record
Maintaining a Database 14
Deleting a Record
• Open the table containing the field you wish to
filter
• Tap or click the a value in the field you wish to
filter
• Tap or click the Selection button on the HOME tab
to display the Selection menu
• Tap or click the desired selection option to select
only the matching records
Maintaining a Database 15
Using Filter By Selection
Maintaining a Database 16
Using Filter By Selection
• Tap or click the Toggle Filter button on the HOME
tab to toggle the filter
Maintaining a Database 17
Toggling a Filter
• Tap or click the arrow next to the field name
(column heading) to filter
• Tap or click the desired filter
Maintaining a Database 18
Using a Common Filter
• Tap or click the Advanced button on the HOME tab to
display the Advanced menu
• Tap or click ‘Clear All Filters’ on the Advanced menu
to clear any existing filters
• Tap or click the Advanced button to display the
Advanced menu
• Tap or click ‘Filter By Form' on the Advanced menu
• Type the criteria in the blank row for the fields to
filter
• Click the Toggle Filter button to apply the filter
Maintaining a Database 19
Using Filter By Form
Maintaining a Database 20
Using Filter By Form
• Clear the existing filters
• Tap or click the Advanced button to display the Advanced
menu
• Tap or click ‘Advanced Filter/Sort’ on the Advanced menu
• If necessary, expand the size of the field list so all the fields
appear
• Include the desired fields in the advanced filter/sort, and
type the appropriate criteria in the Criteria or ‘or’ row
• Tap or click the Toggle Filter button on the HOME tab to
toggle the filter so that only records that satisfy the criteria
will appear
Maintaining a Database 21
Using Advanced Filter/Sort
Maintaining a Database 22
Using Advanced Filter/Sort
• Open the desired table in Design view
• Tap or click the row selector below where you
wish to insert the new field, and press the INSERT
key to insert a blank row above the selected field
• Type the desired field name in the Field Name
column
Maintaining a Database 23
Adding a New Field
• Tap or click the Data Type column for the field you wish to
set as a lookup field, and then tap or click the Data Type
arrow to display the menu of available data types
• Tap or click the Lookup Wizard, and then click the ‘I will
type in the values that I want’ option button
• Tap or click the Next button
• Type the list of values (one item per row)
• Tap or click the Next button
• Enter the label for the lookup field, and click the ‘Allow
Multiple Values’ check box if necessary
• Tap or click the Finish button
Maintaining a Database 24
Creating a Lookup Field
Maintaining a Database 25
Creating a Lookup Field
• Insert a new field, and type the desired field name
in the Field Name column
• Tap or click the Data Type box, and then tap or
click Calculated to select the Calculated data type
and display the Expression Builder dialog box
• Create the desired expression, and then tap or
click the OK button
Maintaining a Database 26
Adding a Calculated Field
Maintaining a Database 27
Adding a Calculated Field
• Create a new query for the desired table
• Tap or click the Update Query button on the
QUERY TOOLS DESIGN tab
• Double-tap or double-click the field to update,
and then type the value to update the field to in
the Update To row
• Tap or click the Run button to run the query and
update the records
• Tap or click the Yes button to make the changes
Maintaining a Database 28
Using an Update Query
Maintaining a Database 29
Using an Update Query
• Create a new query for the desired table
• In Design view, indicate the fields and criteria that will
specify the records to delete
• Tap or click the Delete button on the QUERY TOOLS
DESIGN tab to make the query a delete query
• Run the query by tapping or clicking the Run button
• When Access indicates the number of records to be
deleted, tap or click the Yes button
Maintaining a Database 30
Using a Delete Query
• In Design View, tap or click the Required property
box in the Field Properties pane next to the
desired field to make required
• Tap or click the down arrow that appears, and
then tap or click Yes
Maintaining a Database 31
Specifying a Required Field
• In Design View, tap or click the desired field for
which you want to specify a range, and then click
the Validation Rule property box
• Type the desired range
• Type the desired validation text in the Validation
Text property box
Maintaining a Database 32
Specifying a Range
Maintaining a Database 33
Specifying a Range
• With the field selected in Design View, tap or click
the Default Value property box and then type the
desired default value
Maintaining a Database 34
Specifying the Default Value
• With the desired field selected in Design view, tap or click
the Validation Rule property and type the desired legal
values, each preceded by an equal sign
• Type the desired validation text
Maintaining a Database 35
Specifying a Collection of Legal Values
• Select the desired field for which you want to
specify a format
• Tap or click the Format property box and then
type the desired format
Maintaining a Database 36
Specifying a Format
• Open the desired field in Datasheet view
• Tap or click the value for the field you wish to update
• Type the new field contents
• Tap or click the Save button on the Quick Access Toolbar
Maintaining a Database 37
Changing the Contents of a Field
• Open the table containing the lookup field in Datasheet
view
• Tap or click the arrow next to the lookup field to display a
list of choices
• Select the desired choice
Maintaining a Database 38
Using a Lookup Field
• Tap or click the arrow next to a multivalued
lookup field value to display a list of available
options
• Tap or click the desired options
• Tap or click the OK button
Maintaining a Database 39
Using a Multivalued Lookup Field
• Open the report you want to modify in Layout View
• Resize columns as necessary by pointing to the right-
hand border of the column heading so that the
mouse pointer becomes a two-headed arrow , and
then drag the pointer to resize the field
• To add fields to the report, tap or click the ‘Add
Existing Fields’ button on the REPORT LAYOUT TOOLS
DESIGN tab to display a field list
• Point to the field you want to add, press and hold the
left mouse button, and then drag the mouse pointer
until the line to the left of the mouse pointer is at the
location where you want to add the field
Maintaining a Database 40
Updating a Report to Reflect the
Changes in the Table
• Repeat the previous steps as necessary to add
additional fields
• To change the orientation of the report to
Landscape, click the Landscape button on the
REPORT LAYOUT TOOLS PAGE SETUP tab
• Tap or click the Save button on the Quick Access
Toolbar to save your changes
Maintaining a Database 41
Updating a Report to Reflect the
Changes in the Table
Maintaining a Database 42
Updating a Report to Reflect the
Changes in the Table
• Open the desired table in Datasheet view
• Tap or click the Totals button on the HOME tab to
include the Total row in the datasheet
• Tap or click the Total row in the desired column
• Tap or click the arrow to display a menu of
available calculations
• Click the Desired calculation
Maintaining a Database 43
Including Totals in a Datasheet
Maintaining a Database 44
Including Totals in a Datasheet
• Open the table in Datasheet view
• Tap or click the box in the upper-left corner of the
Datasheet selector to select the entire datasheet
• Tap or click the Gridlines button on the HOME tab
to display the Gridlines gallery
• Tap or click the desired command in the Gridlines
gallery
Maintaining a Database 45
Changing Gridlines
Maintaining a Database 46
Changing Gridlines
• With the datasheet selected, tap or click the
Alternate Row Color button arrow on the HOME tab
to display the color palette
• Tap or click the desired color
• Tap or click the Font Color button arrow, and then tap
or click the desired font color
• Tap or click the Font arrow, and then scroll and tap
click the desired font
• Tap or click the Font Size arrow, and tap or click the
desired font size
Maintaining a Database 47
Changing the Colors and Font
in a Datasheet
Maintaining a Database 48
Changing the Colors and Font
in a Datasheet
• Create a query for the desired table
• Include fields you want in the query, including a
multivalued field
Maintaining a Database 49
Querying a Multivalued Field Showing
Multiple Values on a Single Row
• Create a query in Design view containing a
multivalued field containing multiple values
• Tap or lick the multivalued field name in the
design grid, position the insertion point at the
end, and then type .value to use the Value
property
• View the results
Maintaining a Database 50
Querying a Multivalued Field Showing
Multiple Values on Multiple Rows
Maintaining a Database 51
Querying a Multivalued Field Showing
Multiple Values on Multiple Rows
• Tap or click DATABASE TOOLS on the ribbon to display the
DATABASE TOOLS tab
• Tap or click the Relationships button to open the
Relationships window and display the Show Table dialog
box
• Add the tables with associated primary and foreign keys
• Drag the primary key from the first table to the foreign key
in the second table to display the Edit Relationships dialog
box to create a relationship
• Tap or click the ‘Enforce Referential Integrity’ check box
• Tap or click the ‘Cascade Update Related Fields’ check box
• Tap or click the Create button to complete the creation of
the relationship
Maintaining a Database 52
Specifying Referential Integrity
Maintaining a Database 53
Specifying Referential Integrity
• Open the table related another table in Datasheet
view
• Tap or click the plus sign in front of the row for a
record to display the subdatasheet
Maintaining a Database 54
Using a Subdatasheet
• Open the desired table in Datasheet view
• Tap or click in the first record on the field to sort
• Tap or click the Ascending button on the HOME
tab to sort the records in ascending order
Maintaining a Database 55
Using the Ascending Button
to Order Records
Maintaining a Database 56
Using the Ascending Button to Order
Records
• Add, change, and delete records
• Search for records
• Filter records
• Update a table design
• Use action queries to update records
• Use delete queries to delete records
• Specify validation rules, default values, and
formats
Maintaining a Database 57
Chapter Summary
• Create and use single-valued lookup fields
• Create and use multivalued lookup fields
• Add new fields to an existing report
• Format a datasheet
• Specify referential integrity
• Use a subdatasheet
• Sort records
Maintaining a Database 58
Chapter Summary
Chapter 3 Complete
Microsoft
Access 2013

More Related Content

What's hot

What's hot (20)

Excel ch06
Excel ch06Excel ch06
Excel ch06
 
Excel ch08
Excel ch08Excel ch08
Excel ch08
 
Excel Chapter 03
Excel Chapter 03Excel Chapter 03
Excel Chapter 03
 
Excel ch04
Excel ch04Excel ch04
Excel ch04
 
Excel ch07
Excel ch07Excel ch07
Excel ch07
 
Creating a table in ms access
Creating a table in ms accessCreating a table in ms access
Creating a table in ms access
 
Excel ch09
Excel ch09Excel ch09
Excel ch09
 
Excel ch05
Excel ch05Excel ch05
Excel ch05
 
Access Chapter 02
Access Chapter 02Access Chapter 02
Access Chapter 02
 
Access Chapter 01
Access Chapter 01Access Chapter 01
Access Chapter 01
 
Excel Chapter 03
Excel Chapter 03Excel Chapter 03
Excel Chapter 03
 
Microsoft access exercises
Microsoft access exercisesMicrosoft access exercises
Microsoft access exercises
 
New Perspectives: Access.02
New Perspectives: Access.02New Perspectives: Access.02
New Perspectives: Access.02
 
Excel chapter 01
Excel chapter 01Excel chapter 01
Excel chapter 01
 
Excel chapter 01
Excel chapter 01Excel chapter 01
Excel chapter 01
 
New Perspectives: Access.09
New Perspectives: Access.09New Perspectives: Access.09
New Perspectives: Access.09
 
Access advanced tutorial
Access advanced tutorialAccess advanced tutorial
Access advanced tutorial
 
New Perspectives: Access.04
New Perspectives: Access.04New Perspectives: Access.04
New Perspectives: Access.04
 
Access4
Access4Access4
Access4
 
Office 2013 reference card
Office 2013 reference cardOffice 2013 reference card
Office 2013 reference card
 

Viewers also liked

Viewers also liked (14)

Access Chapter 01
Access Chapter 01Access Chapter 01
Access Chapter 01
 
PowerPoint Chapter 03
PowerPoint Chapter 03PowerPoint Chapter 03
PowerPoint Chapter 03
 
Excel SUMIFS Function
Excel SUMIFS FunctionExcel SUMIFS Function
Excel SUMIFS Function
 
PowerPoint Chapter 2
PowerPoint Chapter 2PowerPoint Chapter 2
PowerPoint Chapter 2
 
D1 Halldór Pálsson
D1 Halldór PálssonD1 Halldór Pálsson
D1 Halldór Pálsson
 
Excel Chapter 01
Excel Chapter 01Excel Chapter 01
Excel Chapter 01
 
Excel 2013 guide book
Excel 2013 guide bookExcel 2013 guide book
Excel 2013 guide book
 
How to Create A Microsoft Access 2007 Database
How to Create A Microsoft Access 2007 DatabaseHow to Create A Microsoft Access 2007 Database
How to Create A Microsoft Access 2007 Database
 
MS Excel 2013
MS Excel 2013MS Excel 2013
MS Excel 2013
 
9780840024220 ppt ch02
9780840024220 ppt ch029780840024220 ppt ch02
9780840024220 ppt ch02
 
9780840024220 ppt ch12
9780840024220 ppt ch129780840024220 ppt ch12
9780840024220 ppt ch12
 
9780840024220 ppt ch10
9780840024220 ppt ch109780840024220 ppt ch10
9780840024220 ppt ch10
 
Chapter 10
Chapter 10Chapter 10
Chapter 10
 
Chapter 13
Chapter 13Chapter 13
Chapter 13
 

Similar to Access2013 ch03

Similar to Access2013 ch03 (20)

Excel chapter 05
Excel chapter 05Excel chapter 05
Excel chapter 05
 
Access.01.ppt
Access.01.pptAccess.01.ppt
Access.01.ppt
 
Chapter 7 -DescriptiveStatistics and Pivot Table
Chapter 7 -DescriptiveStatistics and Pivot TableChapter 7 -DescriptiveStatistics and Pivot Table
Chapter 7 -DescriptiveStatistics and Pivot Table
 
Excel chapter 03
Excel chapter 03Excel chapter 03
Excel chapter 03
 
Word ch10
Word ch10Word ch10
Word ch10
 
Excel chapter 02
Excel chapter 02Excel chapter 02
Excel chapter 02
 
Excel Chapter 02
Excel Chapter 02Excel Chapter 02
Excel Chapter 02
 
Access slide show
Access slide showAccess slide show
Access slide show
 
MS ACCESS PPT.pptx
MS ACCESS PPT.pptxMS ACCESS PPT.pptx
MS ACCESS PPT.pptx
 
Word ch06
Word ch06Word ch06
Word ch06
 
Ppt2013 ch10
Ppt2013 ch10Ppt2013 ch10
Ppt2013 ch10
 
Ppt2013 ch10
Ppt2013 ch10Ppt2013 ch10
Ppt2013 ch10
 
Gl2010 m5 wd3-presentation
Gl2010 m5 wd3-presentationGl2010 m5 wd3-presentation
Gl2010 m5 wd3-presentation
 
Word ch11
Word ch11Word ch11
Word ch11
 
Word Chapter 04
Word Chapter 04Word Chapter 04
Word Chapter 04
 
05 access howtolookupselect
05 access howtolookupselect05 access howtolookupselect
05 access howtolookupselect
 
Word ch05
Word ch05Word ch05
Word ch05
 
Access Introduction
Access IntroductionAccess Introduction
Access Introduction
 
Libre Office Writer Lesson 4: Working with tables and templates
Libre Office Writer Lesson 4: Working with tables and templatesLibre Office Writer Lesson 4: Working with tables and templates
Libre Office Writer Lesson 4: Working with tables and templates
 
Excel Chapter 01
Excel Chapter 01Excel Chapter 01
Excel Chapter 01
 

More from xtin101

PowerPoint Chapter 01
PowerPoint Chapter 01PowerPoint Chapter 01
PowerPoint Chapter 01xtin101
 
Word Chapter 03
Word Chapter 03Word Chapter 03
Word Chapter 03xtin101
 
Word Chapter 02
Word Chapter 02Word Chapter 02
Word Chapter 02xtin101
 
Word Chapter 01
Word Chapter 01Word Chapter 01
Word Chapter 01xtin101
 
Chapter 10 Communications and Networks
Chapter 10 Communications and NetworksChapter 10 Communications and Networks
Chapter 10 Communications and Networksxtin101
 
Chapter 8 Digital Storage
Chapter 8 Digital StorageChapter 8 Digital Storage
Chapter 8 Digital Storagextin101
 
Chapter 09 Operating Systems
Chapter 09 Operating SystemsChapter 09 Operating Systems
Chapter 09 Operating Systemsxtin101
 
Chapter 05 Digital Safety and Security
Chapter 05 Digital Safety and SecurityChapter 05 Digital Safety and Security
Chapter 05 Digital Safety and Securityxtin101
 
Chapter 06 Inside Computers and Mobile Devices
Chapter 06 Inside Computers and Mobile DevicesChapter 06 Inside Computers and Mobile Devices
Chapter 06 Inside Computers and Mobile Devicesxtin101
 
Chapter 3 Computers and Mobile Devices
Chapter 3 Computers and Mobile DevicesChapter 3 Computers and Mobile Devices
Chapter 3 Computers and Mobile Devicesxtin101
 
Chapter 4 Programs and Apps
Chapter 4 Programs and AppsChapter 4 Programs and Apps
Chapter 4 Programs and Appsxtin101
 
Chapter 02 The Internet
Chapter 02 The InternetChapter 02 The Internet
Chapter 02 The Internetxtin101
 
Chapter 01 Digital Literacy
Chapter 01 Digital LiteracyChapter 01 Digital Literacy
Chapter 01 Digital Literacyxtin101
 
Ch12 records management
Ch12 records managementCh12 records management
Ch12 records managementxtin101
 
Ch10 records management
Ch10 records managementCh10 records management
Ch10 records managementxtin101
 
Ch11 records management
Ch11 records managementCh11 records management
Ch11 records managementxtin101
 
Ch09 records management
Ch09 records managementCh09 records management
Ch09 records managementxtin101
 
Ch07 records management
Ch07 records managementCh07 records management
Ch07 records managementxtin101
 
Ch08 records management
Ch08 records managementCh08 records management
Ch08 records managementxtin101
 
Ch06 records management
Ch06 records managementCh06 records management
Ch06 records managementxtin101
 

More from xtin101 (20)

PowerPoint Chapter 01
PowerPoint Chapter 01PowerPoint Chapter 01
PowerPoint Chapter 01
 
Word Chapter 03
Word Chapter 03Word Chapter 03
Word Chapter 03
 
Word Chapter 02
Word Chapter 02Word Chapter 02
Word Chapter 02
 
Word Chapter 01
Word Chapter 01Word Chapter 01
Word Chapter 01
 
Chapter 10 Communications and Networks
Chapter 10 Communications and NetworksChapter 10 Communications and Networks
Chapter 10 Communications and Networks
 
Chapter 8 Digital Storage
Chapter 8 Digital StorageChapter 8 Digital Storage
Chapter 8 Digital Storage
 
Chapter 09 Operating Systems
Chapter 09 Operating SystemsChapter 09 Operating Systems
Chapter 09 Operating Systems
 
Chapter 05 Digital Safety and Security
Chapter 05 Digital Safety and SecurityChapter 05 Digital Safety and Security
Chapter 05 Digital Safety and Security
 
Chapter 06 Inside Computers and Mobile Devices
Chapter 06 Inside Computers and Mobile DevicesChapter 06 Inside Computers and Mobile Devices
Chapter 06 Inside Computers and Mobile Devices
 
Chapter 3 Computers and Mobile Devices
Chapter 3 Computers and Mobile DevicesChapter 3 Computers and Mobile Devices
Chapter 3 Computers and Mobile Devices
 
Chapter 4 Programs and Apps
Chapter 4 Programs and AppsChapter 4 Programs and Apps
Chapter 4 Programs and Apps
 
Chapter 02 The Internet
Chapter 02 The InternetChapter 02 The Internet
Chapter 02 The Internet
 
Chapter 01 Digital Literacy
Chapter 01 Digital LiteracyChapter 01 Digital Literacy
Chapter 01 Digital Literacy
 
Ch12 records management
Ch12 records managementCh12 records management
Ch12 records management
 
Ch10 records management
Ch10 records managementCh10 records management
Ch10 records management
 
Ch11 records management
Ch11 records managementCh11 records management
Ch11 records management
 
Ch09 records management
Ch09 records managementCh09 records management
Ch09 records management
 
Ch07 records management
Ch07 records managementCh07 records management
Ch07 records management
 
Ch08 records management
Ch08 records managementCh08 records management
Ch08 records management
 
Ch06 records management
Ch06 records managementCh06 records management
Ch06 records management
 

Access2013 ch03

  • 1. Chapter 3 Maintaining a Database Microsoft Access 2013
  • 2. • Add, change, and delete records • Search for records • Filter records • Update a table design • Use action queries to update records • Use delete queries to delete records • Specify validation rules, default values, and formats Maintaining a Database 2 Objectives
  • 3. • Create and use single-valued lookup fields • Create and use multivalued lookup fields • Add new fields to an existing report • Format a datasheet • Specify referential integrity • Use a subdatasheet • Sort records Maintaining a Database 3 Objectives
  • 4. Maintaining a Database 4 Project – Maintaining a Database
  • 5. • Update records using a form • Filter records using various filtering options • Change the structure of a table • Make mass changes to a table • Create validation rules • Change the appearance of a datasheet • Specify referential integrity • Order records in a datasheet Maintaining a Database 5 Roadmap
  • 6. • Open the Navigation Pane • Select the table in the Navigation Pane you wish to split • Tap or click CREATE on the ribbon to display the CREATE tab • Tap or click the More Forms button to display the More Forms menu • Tap or click Split Form to create a split form • Close the Navigation Pane Maintaining a Database 6 Creating a Split Form
  • 7. • Tap or click the Form View button on the Access status bar to display the form in Form view • Tap or click the Save button on the Quick Access Toolbar to display the Save As dialog box • Type the desired form name • Tap or click the OK button Maintaining a Database 7 Creating a Split Form
  • 8. Maintaining a Database 8 Creating a Split Form
  • 9. • Tap or click the ‘New (blank) record’ button on the Navigation bar to enter a new record, and then type the data for the new record. Press the TAB key after typing the data in each field Maintaining a Database 9 Using a Form to Add Records
  • 10. • Open the Navigation Pane • Scroll as necessary and press and hold or right-click the form to search, and then click Open on the shortcut menu • Tap or click the Find button on the HOME tab to display the Find and Replace dialog box • Type the desired search text in the Find What text box • Tap or click the Find Next button • Tap or click the Find Next button again (as necessary) to locate additional matches • Tap or click the Cancel button Maintaining a Database 10 Searching for a Record
  • 11. Maintaining a Database 11 Searching for a Record
  • 12. • Tap or click the field you wish to update • Type the updated text • Press the TAB key to complete the change and move to the next field Maintaining a Database 12 Updating the Contents of a Record
  • 13. • With the form displayed, tap or click the record selector in the datasheet next to the field you wish to delete • Press the DELETE key to delete the record • Tap or click the Yes button to complete the deletion Maintaining a Database 13 Deleting a Record
  • 14. Maintaining a Database 14 Deleting a Record
  • 15. • Open the table containing the field you wish to filter • Tap or click the a value in the field you wish to filter • Tap or click the Selection button on the HOME tab to display the Selection menu • Tap or click the desired selection option to select only the matching records Maintaining a Database 15 Using Filter By Selection
  • 16. Maintaining a Database 16 Using Filter By Selection
  • 17. • Tap or click the Toggle Filter button on the HOME tab to toggle the filter Maintaining a Database 17 Toggling a Filter
  • 18. • Tap or click the arrow next to the field name (column heading) to filter • Tap or click the desired filter Maintaining a Database 18 Using a Common Filter
  • 19. • Tap or click the Advanced button on the HOME tab to display the Advanced menu • Tap or click ‘Clear All Filters’ on the Advanced menu to clear any existing filters • Tap or click the Advanced button to display the Advanced menu • Tap or click ‘Filter By Form' on the Advanced menu • Type the criteria in the blank row for the fields to filter • Click the Toggle Filter button to apply the filter Maintaining a Database 19 Using Filter By Form
  • 20. Maintaining a Database 20 Using Filter By Form
  • 21. • Clear the existing filters • Tap or click the Advanced button to display the Advanced menu • Tap or click ‘Advanced Filter/Sort’ on the Advanced menu • If necessary, expand the size of the field list so all the fields appear • Include the desired fields in the advanced filter/sort, and type the appropriate criteria in the Criteria or ‘or’ row • Tap or click the Toggle Filter button on the HOME tab to toggle the filter so that only records that satisfy the criteria will appear Maintaining a Database 21 Using Advanced Filter/Sort
  • 22. Maintaining a Database 22 Using Advanced Filter/Sort
  • 23. • Open the desired table in Design view • Tap or click the row selector below where you wish to insert the new field, and press the INSERT key to insert a blank row above the selected field • Type the desired field name in the Field Name column Maintaining a Database 23 Adding a New Field
  • 24. • Tap or click the Data Type column for the field you wish to set as a lookup field, and then tap or click the Data Type arrow to display the menu of available data types • Tap or click the Lookup Wizard, and then click the ‘I will type in the values that I want’ option button • Tap or click the Next button • Type the list of values (one item per row) • Tap or click the Next button • Enter the label for the lookup field, and click the ‘Allow Multiple Values’ check box if necessary • Tap or click the Finish button Maintaining a Database 24 Creating a Lookup Field
  • 25. Maintaining a Database 25 Creating a Lookup Field
  • 26. • Insert a new field, and type the desired field name in the Field Name column • Tap or click the Data Type box, and then tap or click Calculated to select the Calculated data type and display the Expression Builder dialog box • Create the desired expression, and then tap or click the OK button Maintaining a Database 26 Adding a Calculated Field
  • 27. Maintaining a Database 27 Adding a Calculated Field
  • 28. • Create a new query for the desired table • Tap or click the Update Query button on the QUERY TOOLS DESIGN tab • Double-tap or double-click the field to update, and then type the value to update the field to in the Update To row • Tap or click the Run button to run the query and update the records • Tap or click the Yes button to make the changes Maintaining a Database 28 Using an Update Query
  • 29. Maintaining a Database 29 Using an Update Query
  • 30. • Create a new query for the desired table • In Design view, indicate the fields and criteria that will specify the records to delete • Tap or click the Delete button on the QUERY TOOLS DESIGN tab to make the query a delete query • Run the query by tapping or clicking the Run button • When Access indicates the number of records to be deleted, tap or click the Yes button Maintaining a Database 30 Using a Delete Query
  • 31. • In Design View, tap or click the Required property box in the Field Properties pane next to the desired field to make required • Tap or click the down arrow that appears, and then tap or click Yes Maintaining a Database 31 Specifying a Required Field
  • 32. • In Design View, tap or click the desired field for which you want to specify a range, and then click the Validation Rule property box • Type the desired range • Type the desired validation text in the Validation Text property box Maintaining a Database 32 Specifying a Range
  • 33. Maintaining a Database 33 Specifying a Range
  • 34. • With the field selected in Design View, tap or click the Default Value property box and then type the desired default value Maintaining a Database 34 Specifying the Default Value
  • 35. • With the desired field selected in Design view, tap or click the Validation Rule property and type the desired legal values, each preceded by an equal sign • Type the desired validation text Maintaining a Database 35 Specifying a Collection of Legal Values
  • 36. • Select the desired field for which you want to specify a format • Tap or click the Format property box and then type the desired format Maintaining a Database 36 Specifying a Format
  • 37. • Open the desired field in Datasheet view • Tap or click the value for the field you wish to update • Type the new field contents • Tap or click the Save button on the Quick Access Toolbar Maintaining a Database 37 Changing the Contents of a Field
  • 38. • Open the table containing the lookup field in Datasheet view • Tap or click the arrow next to the lookup field to display a list of choices • Select the desired choice Maintaining a Database 38 Using a Lookup Field
  • 39. • Tap or click the arrow next to a multivalued lookup field value to display a list of available options • Tap or click the desired options • Tap or click the OK button Maintaining a Database 39 Using a Multivalued Lookup Field
  • 40. • Open the report you want to modify in Layout View • Resize columns as necessary by pointing to the right- hand border of the column heading so that the mouse pointer becomes a two-headed arrow , and then drag the pointer to resize the field • To add fields to the report, tap or click the ‘Add Existing Fields’ button on the REPORT LAYOUT TOOLS DESIGN tab to display a field list • Point to the field you want to add, press and hold the left mouse button, and then drag the mouse pointer until the line to the left of the mouse pointer is at the location where you want to add the field Maintaining a Database 40 Updating a Report to Reflect the Changes in the Table
  • 41. • Repeat the previous steps as necessary to add additional fields • To change the orientation of the report to Landscape, click the Landscape button on the REPORT LAYOUT TOOLS PAGE SETUP tab • Tap or click the Save button on the Quick Access Toolbar to save your changes Maintaining a Database 41 Updating a Report to Reflect the Changes in the Table
  • 42. Maintaining a Database 42 Updating a Report to Reflect the Changes in the Table
  • 43. • Open the desired table in Datasheet view • Tap or click the Totals button on the HOME tab to include the Total row in the datasheet • Tap or click the Total row in the desired column • Tap or click the arrow to display a menu of available calculations • Click the Desired calculation Maintaining a Database 43 Including Totals in a Datasheet
  • 44. Maintaining a Database 44 Including Totals in a Datasheet
  • 45. • Open the table in Datasheet view • Tap or click the box in the upper-left corner of the Datasheet selector to select the entire datasheet • Tap or click the Gridlines button on the HOME tab to display the Gridlines gallery • Tap or click the desired command in the Gridlines gallery Maintaining a Database 45 Changing Gridlines
  • 46. Maintaining a Database 46 Changing Gridlines
  • 47. • With the datasheet selected, tap or click the Alternate Row Color button arrow on the HOME tab to display the color palette • Tap or click the desired color • Tap or click the Font Color button arrow, and then tap or click the desired font color • Tap or click the Font arrow, and then scroll and tap click the desired font • Tap or click the Font Size arrow, and tap or click the desired font size Maintaining a Database 47 Changing the Colors and Font in a Datasheet
  • 48. Maintaining a Database 48 Changing the Colors and Font in a Datasheet
  • 49. • Create a query for the desired table • Include fields you want in the query, including a multivalued field Maintaining a Database 49 Querying a Multivalued Field Showing Multiple Values on a Single Row
  • 50. • Create a query in Design view containing a multivalued field containing multiple values • Tap or lick the multivalued field name in the design grid, position the insertion point at the end, and then type .value to use the Value property • View the results Maintaining a Database 50 Querying a Multivalued Field Showing Multiple Values on Multiple Rows
  • 51. Maintaining a Database 51 Querying a Multivalued Field Showing Multiple Values on Multiple Rows
  • 52. • Tap or click DATABASE TOOLS on the ribbon to display the DATABASE TOOLS tab • Tap or click the Relationships button to open the Relationships window and display the Show Table dialog box • Add the tables with associated primary and foreign keys • Drag the primary key from the first table to the foreign key in the second table to display the Edit Relationships dialog box to create a relationship • Tap or click the ‘Enforce Referential Integrity’ check box • Tap or click the ‘Cascade Update Related Fields’ check box • Tap or click the Create button to complete the creation of the relationship Maintaining a Database 52 Specifying Referential Integrity
  • 53. Maintaining a Database 53 Specifying Referential Integrity
  • 54. • Open the table related another table in Datasheet view • Tap or click the plus sign in front of the row for a record to display the subdatasheet Maintaining a Database 54 Using a Subdatasheet
  • 55. • Open the desired table in Datasheet view • Tap or click in the first record on the field to sort • Tap or click the Ascending button on the HOME tab to sort the records in ascending order Maintaining a Database 55 Using the Ascending Button to Order Records
  • 56. Maintaining a Database 56 Using the Ascending Button to Order Records
  • 57. • Add, change, and delete records • Search for records • Filter records • Update a table design • Use action queries to update records • Use delete queries to delete records • Specify validation rules, default values, and formats Maintaining a Database 57 Chapter Summary
  • 58. • Create and use single-valued lookup fields • Create and use multivalued lookup fields • Add new fields to an existing report • Format a datasheet • Specify referential integrity • Use a subdatasheet • Sort records Maintaining a Database 58 Chapter Summary