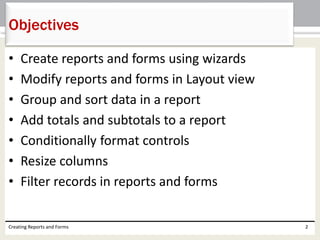
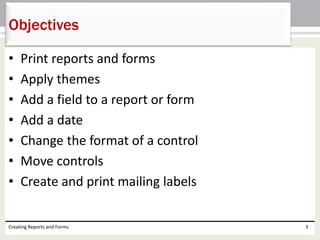
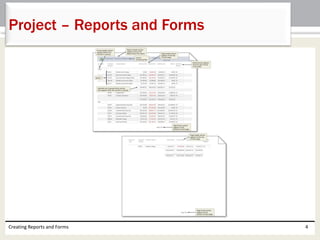
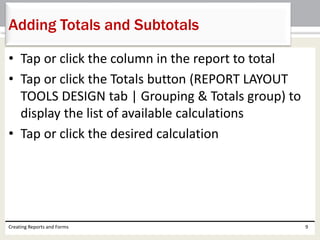
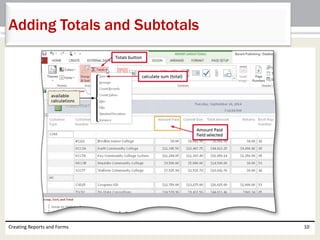
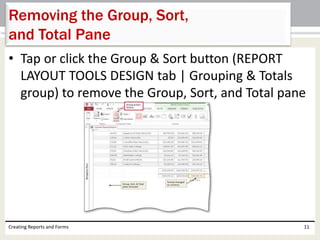
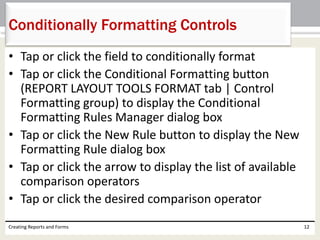
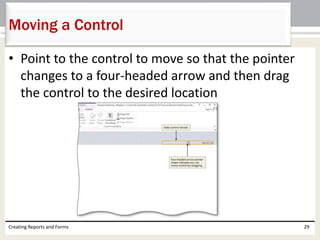
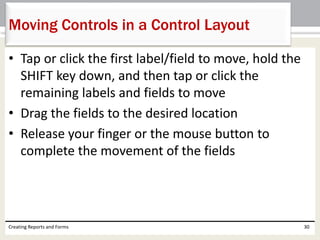
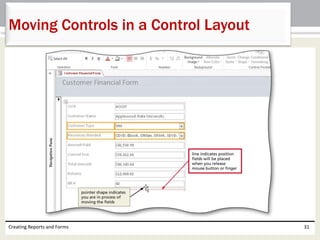
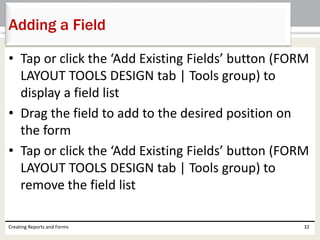
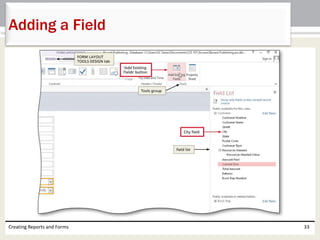
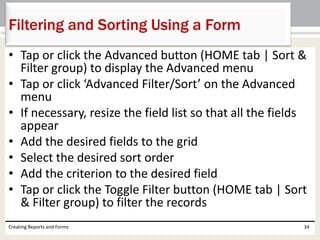
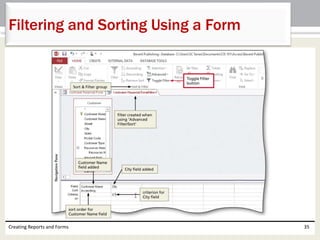
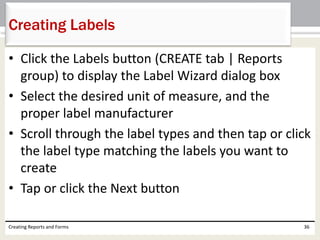
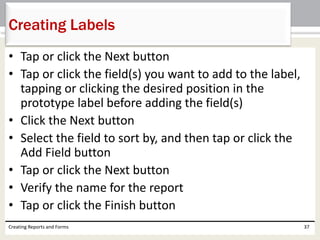
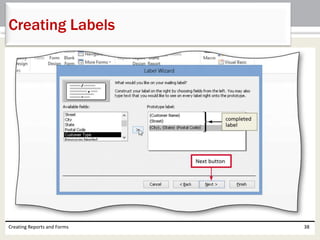
Chapter 4
Creating Reports
and Forms
Microsoft
Access 2013
• Create reports and forms using wizards
• Modify reports and forms in Layout view
• Group and sort data in a report
• Add totals and subtotals to a report
• Conditionally format controls
• Resize columns
• Filter records in reports and forms
Creating Reports and Forms 2
Objectives
• Print reports and forms
• Apply themes
• Add a field to a report or form
• Add a date
• Change the format of a control
• Move controls
• Create and print mailing labels
Creating Reports and Forms 3
Objectives
Creating Reports and Forms 4
Project – Reports and Forms
Creating Reports and Forms 5
Project – Reports and Forms
• Group, sort, and total in a report.
• Conditionally format controls in a report.
• Filter report records.
• Create a multiple-table report.
• Create a form using the form wizard.
• Modify controls in a control layout on a form.
• Filter form records.
• Create mailing labels.
Creating Reports and Forms 6
Roadmap
• Open the report to group and sort
• Press and hold or right-click the Group & Sort button
(REPORT LAYOUT TOOLS DESIGN tab | Grouping &
Totals group) to display the Group, Sort, and Total
pane
• Tap or click the ‘Add a group’ button to add a group
• Tap or click to select the field for grouping and group
the records on the selected field
• Tap or click the ‘Add a sort’ button to add a sort
• Tap or click the field on which the records in each
group will be sorted
Creating Reports and Forms 7
Grouping and Sorting in a Report
Creating Reports and Forms 8
Grouping and Sorting in a Report
• Tap or click the column in the report to total
• Tap or click the Totals button (REPORT LAYOUT
TOOLS DESIGN tab | Grouping & Totals group) to
display the list of available calculations
• Tap or click the desired calculation
Creating Reports and Forms 9
Adding Totals and Subtotals
Creating Reports and Forms 10
Adding Totals and Subtotals
• Tap or click the Group & Sort button (REPORT
LAYOUT TOOLS DESIGN tab | Grouping & Totals
group) to remove the Group, Sort, and Total pane
Creating Reports and Forms 11
Removing the Group, Sort,
and Total Pane
• Tap or click the field to conditionally format
• Tap or click the Conditional Formatting button
(REPORT LAYOUT TOOLS FORMAT tab | Control
Formatting group) to display the Conditional
Formatting Rules Manager dialog box
• Tap or click the New Rule button to display the New
Formatting Rule dialog box
• Tap or click the arrow to display the list of available
comparison operators
• Tap or click the desired comparison operator
Creating Reports and Forms 12
Conditionally Formatting Controls
• Tap or click the box for the comparison value, and
then type the desired comparison value
• Tap or click the Font Color arrow to display a color
palette
• Tap or click the desired color to select the color
• Tap or click the OK button to enter the rule
• Tap or click the OK button to complete the entry
of the conditional formatting rules and apply the
rule
Creating Reports and Forms 13
Conditionally Formatting Controls
Creating Reports and Forms 14
Conditionally Formatting Controls
• Press and hold or
right-click the
field on which to
filter
• Tap or click the
desired filtering
option
Creating Reports and Forms 15
Filtering Records in a Report
• Press and hold or
right-click the
filtered field
• Tap or click the
Clear filter
command on the
shortcut menu to
clear the filter and
redisplay all records
Creating Reports and Forms 16
Clearing a Report Filter
• Tap or click the table in the Navigation Pane to select
it
• Tap or click the Report Wizard button (CREATE tab |
Reports group) to start the Report Wizard
• Select the desired fields and tap or click the Add Field
button to add the field(s) to the report
• Tap or click the Tables/Queries arrow, and then tap or
click the desired table to add to the report
• Select the desired fields and tap or click the Add Field
button to add the field(s) to the report
• Tap or click the Next button three times
Creating Reports and Forms 17
Creating a Report
that Involves Multiple Tables
• Tap or click the arrow in the text box labeled 1 and
then tap or click the field on which to sort the report
• Tap or click the Summary Options button to display
the Summary Options dialog box
• Tap or click the check boxes to calculate the desired
calculations
• Tap or click the OK button
• Tap or click the Next button, and then select the
desired layout and orientation
Creating Reports and Forms 18
Creating a Report
that Involves Multiple Tables
• Tap or click the Next button to move to the next
Report Wizard screen, and then type the desired
report title
• Tap or click the Finish button to produce the
report
• Tap or click the magnifying glass mouse pointer
somewhere within the report to view more of the
report
Creating Reports and Forms 19
Creating a Report
that Involves Multiple Tables
Creating Reports and Forms 20
Creating a Report
that Involves Multiple Tables
• Tap or click the Hide Details button (REPORT
LAYOUT TOOLS DESIGN tab | Grouping & Totals
group) to hide the details in the report
Creating Reports and Forms 21
Creating a Summary Report
• Open the Navigation Pane and select the table on
which to create the form
• Tap or click the Form Wizard button (CREATE tab |
Forms group) to start the Form Wizard
• Add the desired fields to the form
• Tap or click the Next button
• Select the desired layout, tap or click the Next button,
and then type the desired form title
• Tap or click the Finish button to complete and display
the form
Creating Reports and Forms 22
Using the Form Wizard to Create a Form
Creating Reports and Forms 23
Using the Form Wizard to Create a Form
• Tap or click the first control on the form, and then
select the remaining controls while holding down
the SHIFT key
• Tap or click the Stacked button (FORM LAYOUT
TOOLS ARRANGE tab | Table group) to place the
controls in a stacked layout
Creating Reports and Forms 24
Placing Controls in a Control Layout
Creating Reports and Forms 25
Placing Controls in a Control Layout
• Tap or click the ‘Date and Time’ button (FORM
LAYOUT TOOLS DESIGN tab | Header/Footer
group) to display the Date and Time dialog box
• Tap or click the option button for the desired date
format
• If desired, tap or click the option button for the
time format you want to include. If you do not
want to display the time, tap or click the Include
Time check box to remove the check mark
• Tap or click the OK button
Creating Reports and Forms 26
Enhancing a Form by Adding a Date
Creating Reports and Forms 27
Enhancing a Form by Adding a Date
• Tap or click the control of which you want to change the
format
• Click the desired formatting option(s) on the FORM
LAYOUT TOOLS FORMAT tab
Creating Reports and Forms 28
Changing the Format of a Control
• Point to the control to move so that the pointer
changes to a four-headed arrow and then drag
the control to the desired location
Creating Reports and Forms 29
Moving a Control
• Tap or click the first label/field to move, hold the
SHIFT key down, and then tap or click the
remaining labels and fields to move
• Drag the fields to the desired location
• Release your finger or the mouse button to
complete the movement of the fields
Creating Reports and Forms 30
Moving Controls in a Control Layout
Creating Reports and Forms 31
Moving Controls in a Control Layout
• Tap or click the ‘Add Existing Fields’ button (FORM
LAYOUT TOOLS DESIGN tab | Tools group) to
display a field list
• Drag the field to add to the desired position on
the form
• Tap or click the ‘Add Existing Fields’ button (FORM
LAYOUT TOOLS DESIGN tab | Tools group) to
remove the field list
Creating Reports and Forms 32
Adding a Field
Creating Reports and Forms 33
Adding a Field
• Tap or click the Advanced button (HOME tab | Sort &
Filter group) to display the Advanced menu
• Tap or click ‘Advanced Filter/Sort’ on the Advanced
menu
• If necessary, resize the field list so that all the fields
appear
• Add the desired fields to the grid
• Select the desired sort order
• Add the criterion to the desired field
• Tap or click the Toggle Filter button (HOME tab | Sort
& Filter group) to filter the records
Creating Reports and Forms 34
Filtering and Sorting Using a Form
Creating Reports and Forms 35
Filtering and Sorting Using a Form
• Click the Labels button (CREATE tab | Reports
group) to display the Label Wizard dialog box
• Select the desired unit of measure, and the
proper label manufacturer
• Scroll through the label types and then tap or click
the label type matching the labels you want to
create
• Tap or click the Next button
Creating Reports and Forms 36
Creating Labels
• Tap or click the Next button
• Tap or click the field(s) you want to add to the label,
tapping or clicking the desired position in the
prototype label before adding the field(s)
• Click the Next button
• Select the field to sort by, and then tap or click the
Add Field button
• Tap or click the Next button
• Verify the name for the report
• Tap or click the Finish button
Creating Reports and Forms 37
Creating Labels
Creating Reports and Forms 38
Creating Labels
• Create reports and forms using wizards
• Modify reports and forms in Layout view
• Group and sort data in a report
• Add totals and subtotals to a report
• Conditionally format controls
• Resize columns
• Filter records in reports and forms
Creating Reports and Forms 39
Chapter Summary
• Print reports and forms
• Apply themes
• Add a field to a report or form
• Add a date
• Change the format of a control
• Move controls
• Create and print mailing labels
Creating Reports and Forms 40
Chapter Summary
Chapter 4 Complete
Microsoft
Access 2013

Access2013 ch04

  • 1.
    Chapter 4 Creating Reports andForms Microsoft Access 2013
  • 2.
    • Create reportsand forms using wizards • Modify reports and forms in Layout view • Group and sort data in a report • Add totals and subtotals to a report • Conditionally format controls • Resize columns • Filter records in reports and forms Creating Reports and Forms 2 Objectives
  • 3.
    • Print reportsand forms • Apply themes • Add a field to a report or form • Add a date • Change the format of a control • Move controls • Create and print mailing labels Creating Reports and Forms 3 Objectives
  • 4.
    Creating Reports andForms 4 Project – Reports and Forms
  • 5.
    Creating Reports andForms 5 Project – Reports and Forms
  • 6.
    • Group, sort,and total in a report. • Conditionally format controls in a report. • Filter report records. • Create a multiple-table report. • Create a form using the form wizard. • Modify controls in a control layout on a form. • Filter form records. • Create mailing labels. Creating Reports and Forms 6 Roadmap
  • 7.
    • Open thereport to group and sort • Press and hold or right-click the Group & Sort button (REPORT LAYOUT TOOLS DESIGN tab | Grouping & Totals group) to display the Group, Sort, and Total pane • Tap or click the ‘Add a group’ button to add a group • Tap or click to select the field for grouping and group the records on the selected field • Tap or click the ‘Add a sort’ button to add a sort • Tap or click the field on which the records in each group will be sorted Creating Reports and Forms 7 Grouping and Sorting in a Report
  • 8.
    Creating Reports andForms 8 Grouping and Sorting in a Report
  • 9.
    • Tap orclick the column in the report to total • Tap or click the Totals button (REPORT LAYOUT TOOLS DESIGN tab | Grouping & Totals group) to display the list of available calculations • Tap or click the desired calculation Creating Reports and Forms 9 Adding Totals and Subtotals
  • 10.
    Creating Reports andForms 10 Adding Totals and Subtotals
  • 11.
    • Tap orclick the Group & Sort button (REPORT LAYOUT TOOLS DESIGN tab | Grouping & Totals group) to remove the Group, Sort, and Total pane Creating Reports and Forms 11 Removing the Group, Sort, and Total Pane
  • 12.
    • Tap orclick the field to conditionally format • Tap or click the Conditional Formatting button (REPORT LAYOUT TOOLS FORMAT tab | Control Formatting group) to display the Conditional Formatting Rules Manager dialog box • Tap or click the New Rule button to display the New Formatting Rule dialog box • Tap or click the arrow to display the list of available comparison operators • Tap or click the desired comparison operator Creating Reports and Forms 12 Conditionally Formatting Controls
  • 13.
    • Tap orclick the box for the comparison value, and then type the desired comparison value • Tap or click the Font Color arrow to display a color palette • Tap or click the desired color to select the color • Tap or click the OK button to enter the rule • Tap or click the OK button to complete the entry of the conditional formatting rules and apply the rule Creating Reports and Forms 13 Conditionally Formatting Controls
  • 14.
    Creating Reports andForms 14 Conditionally Formatting Controls
  • 15.
    • Press andhold or right-click the field on which to filter • Tap or click the desired filtering option Creating Reports and Forms 15 Filtering Records in a Report
  • 16.
    • Press andhold or right-click the filtered field • Tap or click the Clear filter command on the shortcut menu to clear the filter and redisplay all records Creating Reports and Forms 16 Clearing a Report Filter
  • 17.
    • Tap orclick the table in the Navigation Pane to select it • Tap or click the Report Wizard button (CREATE tab | Reports group) to start the Report Wizard • Select the desired fields and tap or click the Add Field button to add the field(s) to the report • Tap or click the Tables/Queries arrow, and then tap or click the desired table to add to the report • Select the desired fields and tap or click the Add Field button to add the field(s) to the report • Tap or click the Next button three times Creating Reports and Forms 17 Creating a Report that Involves Multiple Tables
  • 18.
    • Tap orclick the arrow in the text box labeled 1 and then tap or click the field on which to sort the report • Tap or click the Summary Options button to display the Summary Options dialog box • Tap or click the check boxes to calculate the desired calculations • Tap or click the OK button • Tap or click the Next button, and then select the desired layout and orientation Creating Reports and Forms 18 Creating a Report that Involves Multiple Tables
  • 19.
    • Tap orclick the Next button to move to the next Report Wizard screen, and then type the desired report title • Tap or click the Finish button to produce the report • Tap or click the magnifying glass mouse pointer somewhere within the report to view more of the report Creating Reports and Forms 19 Creating a Report that Involves Multiple Tables
  • 20.
    Creating Reports andForms 20 Creating a Report that Involves Multiple Tables
  • 21.
    • Tap orclick the Hide Details button (REPORT LAYOUT TOOLS DESIGN tab | Grouping & Totals group) to hide the details in the report Creating Reports and Forms 21 Creating a Summary Report
  • 22.
    • Open theNavigation Pane and select the table on which to create the form • Tap or click the Form Wizard button (CREATE tab | Forms group) to start the Form Wizard • Add the desired fields to the form • Tap or click the Next button • Select the desired layout, tap or click the Next button, and then type the desired form title • Tap or click the Finish button to complete and display the form Creating Reports and Forms 22 Using the Form Wizard to Create a Form
  • 23.
    Creating Reports andForms 23 Using the Form Wizard to Create a Form
  • 24.
    • Tap orclick the first control on the form, and then select the remaining controls while holding down the SHIFT key • Tap or click the Stacked button (FORM LAYOUT TOOLS ARRANGE tab | Table group) to place the controls in a stacked layout Creating Reports and Forms 24 Placing Controls in a Control Layout
  • 25.
    Creating Reports andForms 25 Placing Controls in a Control Layout
  • 26.
    • Tap orclick the ‘Date and Time’ button (FORM LAYOUT TOOLS DESIGN tab | Header/Footer group) to display the Date and Time dialog box • Tap or click the option button for the desired date format • If desired, tap or click the option button for the time format you want to include. If you do not want to display the time, tap or click the Include Time check box to remove the check mark • Tap or click the OK button Creating Reports and Forms 26 Enhancing a Form by Adding a Date
  • 27.
    Creating Reports andForms 27 Enhancing a Form by Adding a Date
  • 28.
    • Tap orclick the control of which you want to change the format • Click the desired formatting option(s) on the FORM LAYOUT TOOLS FORMAT tab Creating Reports and Forms 28 Changing the Format of a Control
  • 29.
    • Point tothe control to move so that the pointer changes to a four-headed arrow and then drag the control to the desired location Creating Reports and Forms 29 Moving a Control
  • 30.
    • Tap orclick the first label/field to move, hold the SHIFT key down, and then tap or click the remaining labels and fields to move • Drag the fields to the desired location • Release your finger or the mouse button to complete the movement of the fields Creating Reports and Forms 30 Moving Controls in a Control Layout
  • 31.
    Creating Reports andForms 31 Moving Controls in a Control Layout
  • 32.
    • Tap orclick the ‘Add Existing Fields’ button (FORM LAYOUT TOOLS DESIGN tab | Tools group) to display a field list • Drag the field to add to the desired position on the form • Tap or click the ‘Add Existing Fields’ button (FORM LAYOUT TOOLS DESIGN tab | Tools group) to remove the field list Creating Reports and Forms 32 Adding a Field
  • 33.
    Creating Reports andForms 33 Adding a Field
  • 34.
    • Tap orclick the Advanced button (HOME tab | Sort & Filter group) to display the Advanced menu • Tap or click ‘Advanced Filter/Sort’ on the Advanced menu • If necessary, resize the field list so that all the fields appear • Add the desired fields to the grid • Select the desired sort order • Add the criterion to the desired field • Tap or click the Toggle Filter button (HOME tab | Sort & Filter group) to filter the records Creating Reports and Forms 34 Filtering and Sorting Using a Form
  • 35.
    Creating Reports andForms 35 Filtering and Sorting Using a Form
  • 36.
    • Click theLabels button (CREATE tab | Reports group) to display the Label Wizard dialog box • Select the desired unit of measure, and the proper label manufacturer • Scroll through the label types and then tap or click the label type matching the labels you want to create • Tap or click the Next button Creating Reports and Forms 36 Creating Labels
  • 37.
    • Tap orclick the Next button • Tap or click the field(s) you want to add to the label, tapping or clicking the desired position in the prototype label before adding the field(s) • Click the Next button • Select the field to sort by, and then tap or click the Add Field button • Tap or click the Next button • Verify the name for the report • Tap or click the Finish button Creating Reports and Forms 37 Creating Labels
  • 38.
    Creating Reports andForms 38 Creating Labels
  • 39.
    • Create reportsand forms using wizards • Modify reports and forms in Layout view • Group and sort data in a report • Add totals and subtotals to a report • Conditionally format controls • Resize columns • Filter records in reports and forms Creating Reports and Forms 39 Chapter Summary
  • 40.
    • Print reportsand forms • Apply themes • Add a field to a report or form • Add a date • Change the format of a control • Move controls • Create and print mailing labels Creating Reports and Forms 40 Chapter Summary
  • 41.