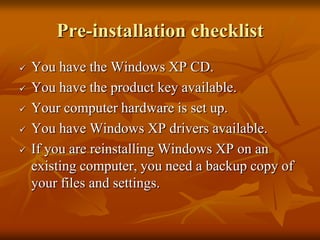
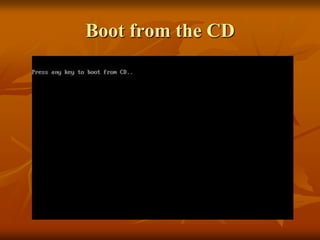
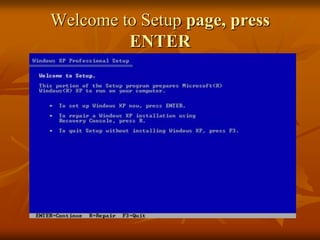
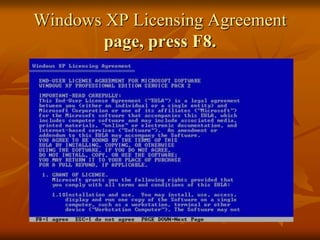
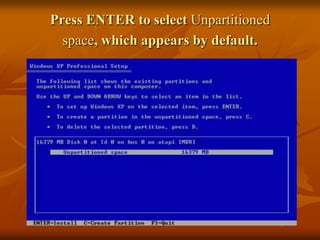
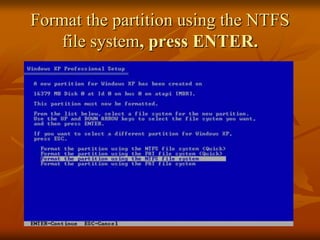
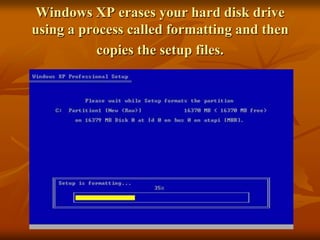
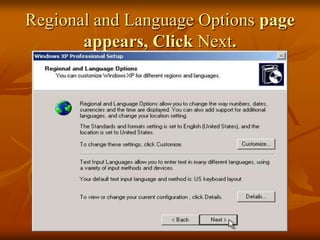
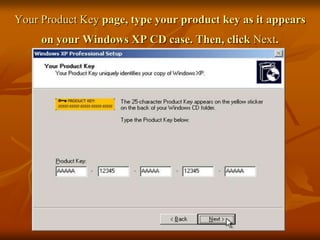
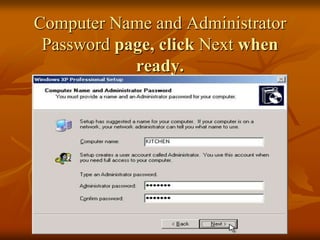
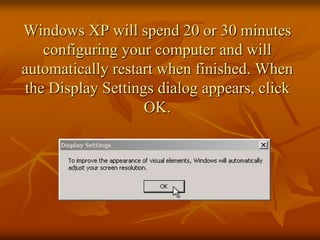
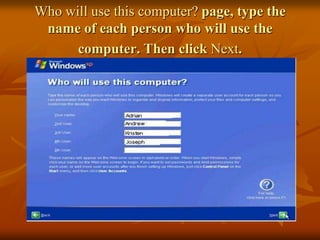
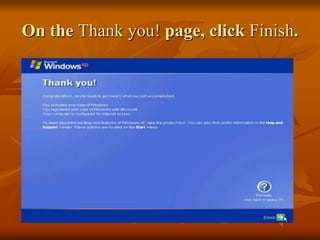
Windows XP Install

   Computer Maintenance
You may need to install Windows XP
                    if:
   You replaced your hard disk drive with a new hard
    disk drive that does not have Windows XP installed.
   You are reinstalling Windows XP on a computer
    because you want to clean off your hard drive and
    remove any unwanted programs, such as spyware.
   You purchased a computer without an operating
    system.
   You are going to upgrade a computer which had an
    older operating system. (Windows 98, ME, or 2000)
Pre-installation checklist
   You have the Windows XP CD.
   You have the product key available.
   Your computer hardware is set up.
   You have Windows XP drivers available.
   If you are reinstalling Windows XP on an
    existing computer, you need a backup copy of
    your files and settings.
Installation process
Part 1: Begin the
  installation
Boot from the CD
Welcome to Setup page, press
         ENTER
Windows XP Licensing Agreement
        page, press F8.
Press ENTER to select Unpartitioned
  space, which appears by default.
Format the partition using the NTFS
    file system, press ENTER.
Windows XP erases your hard disk drive
using a process called formatting and then
           copies the setup files.
Part 2: Continue the installation
Regional and Language Options page
       appears, Click Next.
Personalize Your Software page, type your name and
     your organization name. Then click Next.
Your Product Key page, type your product key as it appears
     on your Windows XP CD case. Then, click Next.
Computer Name and Administrator
 Password page, click Next when
            ready.
Date and Time Settings page, set your computer’s
clock. Then, click the Time Zone down arrow, and
        select your time zone. Click Next.
On the Networking Settings
     page, click Next.
Workgroup or Computer Domain
      page, click Next.
Part 3: Complete the installation
Windows XP will spend 20 or 30 minutes
   configuring your computer and will
automatically restart when finished. When
the Display Settings dialog appears, click
                   OK.
When the Monitor Settings dialog box
        appears, click OK.
On the Welcome to Microsoft
 Windows page, click Next.
Help protect your PC page, click Help protect
my PC by turning on Automatic Updates now.
              Then, click Next.
Will this computer connect to the Internet directly, or
through a network? page. If you’re not sure, accept
       the default selection, and click Next.
How will this computer connect to the
    Internet? page, click Next.
Who will use this computer? page, type the
 name of each person who will use the
      computer. Then click Next.
On the Thank you! page, click Finish.
Congratulations! Windows XP
     setup is complete.

Windows xp install

  • 1.
    Windows XP Install Computer Maintenance
  • 2.
    You may needto install Windows XP if:  You replaced your hard disk drive with a new hard disk drive that does not have Windows XP installed.  You are reinstalling Windows XP on a computer because you want to clean off your hard drive and remove any unwanted programs, such as spyware.  You purchased a computer without an operating system.  You are going to upgrade a computer which had an older operating system. (Windows 98, ME, or 2000)
  • 3.
    Pre-installation checklist  You have the Windows XP CD.  You have the product key available.  Your computer hardware is set up.  You have Windows XP drivers available.  If you are reinstalling Windows XP on an existing computer, you need a backup copy of your files and settings.
  • 4.
  • 5.
    Part 1: Beginthe installation
  • 6.
  • 7.
    Welcome to Setuppage, press ENTER
  • 8.
    Windows XP LicensingAgreement page, press F8.
  • 9.
    Press ENTER toselect Unpartitioned space, which appears by default.
  • 10.
    Format the partitionusing the NTFS file system, press ENTER.
  • 11.
    Windows XP erasesyour hard disk drive using a process called formatting and then copies the setup files.
  • 12.
    Part 2: Continuethe installation
  • 13.
    Regional and LanguageOptions page appears, Click Next.
  • 14.
    Personalize Your Softwarepage, type your name and your organization name. Then click Next.
  • 15.
    Your Product Keypage, type your product key as it appears on your Windows XP CD case. Then, click Next.
  • 16.
    Computer Name andAdministrator Password page, click Next when ready.
  • 17.
    Date and TimeSettings page, set your computer’s clock. Then, click the Time Zone down arrow, and select your time zone. Click Next.
  • 18.
    On the NetworkingSettings page, click Next.
  • 19.
    Workgroup or ComputerDomain page, click Next.
  • 20.
    Part 3: Completethe installation
  • 21.
    Windows XP willspend 20 or 30 minutes configuring your computer and will automatically restart when finished. When the Display Settings dialog appears, click OK.
  • 22.
    When the MonitorSettings dialog box appears, click OK.
  • 23.
    On the Welcometo Microsoft Windows page, click Next.
  • 24.
    Help protect yourPC page, click Help protect my PC by turning on Automatic Updates now. Then, click Next.
  • 25.
    Will this computerconnect to the Internet directly, or through a network? page. If you’re not sure, accept the default selection, and click Next.
  • 26.
    How will thiscomputer connect to the Internet? page, click Next.
  • 27.
    Who will usethis computer? page, type the name of each person who will use the computer. Then click Next.
  • 28.
    On the Thankyou! page, click Finish.
  • 29.
    Congratulations! Windows XP setup is complete.