The document provides instructions on using various shape, path, and drawing tools in Adobe Illustrator. It explains how to draw and manipulate shapes, paths, lines, and gradients. Techniques covered include constraining proportions while resizing, rotating shapes, drawing lines and closing paths with the Pencil tool, using the Pen tool to draw straight and curved lines, adding and removing anchor points, applying brush strokes and patterns, using compound paths, and filling objects with colors, gradients, and patterns.
The A to Z of Adobe Illustrator – design & illustrationFanus van Straten
The Adobe Illustrator toolbar is jam-packed with useful tools you may have used a million times or that may be entirely unfamiliar to you. Add to that the numerous panels and effects, and this program can create most any type of artwork. This A–Z list breaks down every tool in the Illustrator toolbar, with a link to a quick tip.
Introduction to
Adobe Photoshop
By BijuComax
bijucomax@gmail.com
www.bijucomax.blogspot.com
Copyright@bijucomax 2010
Do you remember those days ..................?
....of childhood when we played with Drawing
Do you remember those days ..................?
....of childhood when we played with Colour
ADOBE CREATIVE SUITE 4
ADOBE CREATIVE SUITE 4 WEB PREMIUM
DREAMWEAVER CS4
FLASH CS4 PROFESSIONAL
PHOTOSHOP CS4 EXTENDED
ILLUSTRATOR CS4
FIREWORKS CS4
ACROBAT 9 PRO
What is Adobe Photoshop ?
Adobe Photoshop is an high end image Editing software
for Multimedia Professionals like Photographers,
Web Designers, Graphic Designers, Animatores ,
Graphic Producers and Artists World Wild.
The Role of Photoshop in Multimedia Industry
Photographers use for Photoshop
Photo Retouch
Photo Re-Copy
Colorizing Black And White Photographs
Digital Album Designing
Web Designers Use For Photoshop
Web-Templates
Web Buttons
Image Editing
Graphic Designers Use For Photoshop
Graphic Designing
Digital Painting
Logo Designing
Image Editing
Animation Industry Use For Photoshop
Matte Painting
Character Designing
Digital Painting
Texturing,UV Editing
Face Mapping
Concept Art
Special Makeup With Photoshop
Computer Graphics
There are Two Type Of Computer Graphics
Vector Graphics and Raster Graphics
Vector Graphics and Raster Graphics Difference
Fun With Photoshop
Cool Photoshop
Vector Graphics and Raster Graphics Difference
Image Editor
Digital Album Designer
Web Designer
Graphic Designer
Texturing Artist
Matte Painter
Digital illustrator
Digital Painter
What Talent or Skills Do I Need ?
Drawing
Anatomy
Imagination
Creativity
Patience
Practice
Thank You
BijuComax
bijucomax@gmail.com
www.bijucomax.blogspot.com
Copyright@bijucomax 2010
Adobe Illustrator CS5 Part 1 : Introduction to Illustratorcsula its training
Adobe Illustrator CS5 is used to create graphics and type in vector format. Vector graphics are made up of points, lines, and curves that are defined by mathematical equations. Vector graphics are resolution independent, which means that they can be resized to any size without losing quality. This handout provides an overview of the Illustrator CS5 user interface and vector graphics, and covers how to create different shapes using the Pen tool.
If you would like to see more videos on Adobe Illustrator, please visit http://www.youtube.com/mycsula for more online training.
There you can find FREE tutorials on Illustrator, Photoshop, Microsoft Office, HTML5, and many more!
North Raleigh Ministries is participating in #GivingTuesday this year, and we are working hard to get the word out. We are expecting great things for 12/2/2014!
Voting is underway for th eTriangleTreeChallenge and North Raleigh Ministries needs your vote. Please text tree26 to 33733 or go to triangletreechallenge.com and enter#26.
DEVELOPMENT OF PARAFFIN BASED FUEL FOR HYBRID ROCKET MOTORJHUMKI NANDY
This project main finding was the high regression rate of paraffin with adding stearic acid, LDPE, EVA, carbon black, araldite and hardener. Regression rate was for three samples between 5-6mm/sec
toolbars and axis , how to import file from autocad to sketchup , basic tools of sketchup , how to extrude walls , how to make a window (quick way ) , how to see dimensions, commands - position camera, walk and look around. All this can be learned in this presentation. A guide for beginners.
Unit 8 - Information and Communication Technology (Paper I).pdfThiyagu K
This slides describes the basic concepts of ICT, basics of Email, Emerging Technology and Digital Initiatives in Education. This presentations aligns with the UGC Paper I syllabus.
Honest Reviews of Tim Han LMA Course Program.pptxtimhan337
Personal development courses are widely available today, with each one promising life-changing outcomes. Tim Han’s Life Mastery Achievers (LMA) Course has drawn a lot of interest. In addition to offering my frank assessment of Success Insider’s LMA Course, this piece examines the course’s effects via a variety of Tim Han LMA course reviews and Success Insider comments.
Model Attribute Check Company Auto PropertyCeline George
In Odoo, the multi-company feature allows you to manage multiple companies within a single Odoo database instance. Each company can have its own configurations while still sharing common resources such as products, customers, and suppliers.
Embracing GenAI - A Strategic ImperativePeter Windle
Artificial Intelligence (AI) technologies such as Generative AI, Image Generators and Large Language Models have had a dramatic impact on teaching, learning and assessment over the past 18 months. The most immediate threat AI posed was to Academic Integrity with Higher Education Institutes (HEIs) focusing their efforts on combating the use of GenAI in assessment. Guidelines were developed for staff and students, policies put in place too. Innovative educators have forged paths in the use of Generative AI for teaching, learning and assessments leading to pockets of transformation springing up across HEIs, often with little or no top-down guidance, support or direction.
This Gasta posits a strategic approach to integrating AI into HEIs to prepare staff, students and the curriculum for an evolving world and workplace. We will highlight the advantages of working with these technologies beyond the realm of teaching, learning and assessment by considering prompt engineering skills, industry impact, curriculum changes, and the need for staff upskilling. In contrast, not engaging strategically with Generative AI poses risks, including falling behind peers, missed opportunities and failing to ensure our graduates remain employable. The rapid evolution of AI technologies necessitates a proactive and strategic approach if we are to remain relevant.
The Roman Empire A Historical Colossus.pdfkaushalkr1407
The Roman Empire, a vast and enduring power, stands as one of history's most remarkable civilizations, leaving an indelible imprint on the world. It emerged from the Roman Republic, transitioning into an imperial powerhouse under the leadership of Augustus Caesar in 27 BCE. This transformation marked the beginning of an era defined by unprecedented territorial expansion, architectural marvels, and profound cultural influence.
The empire's roots lie in the city of Rome, founded, according to legend, by Romulus in 753 BCE. Over centuries, Rome evolved from a small settlement to a formidable republic, characterized by a complex political system with elected officials and checks on power. However, internal strife, class conflicts, and military ambitions paved the way for the end of the Republic. Julius Caesar’s dictatorship and subsequent assassination in 44 BCE created a power vacuum, leading to a civil war. Octavian, later Augustus, emerged victorious, heralding the Roman Empire’s birth.
Under Augustus, the empire experienced the Pax Romana, a 200-year period of relative peace and stability. Augustus reformed the military, established efficient administrative systems, and initiated grand construction projects. The empire's borders expanded, encompassing territories from Britain to Egypt and from Spain to the Euphrates. Roman legions, renowned for their discipline and engineering prowess, secured and maintained these vast territories, building roads, fortifications, and cities that facilitated control and integration.
The Roman Empire’s society was hierarchical, with a rigid class system. At the top were the patricians, wealthy elites who held significant political power. Below them were the plebeians, free citizens with limited political influence, and the vast numbers of slaves who formed the backbone of the economy. The family unit was central, governed by the paterfamilias, the male head who held absolute authority.
Culturally, the Romans were eclectic, absorbing and adapting elements from the civilizations they encountered, particularly the Greeks. Roman art, literature, and philosophy reflected this synthesis, creating a rich cultural tapestry. Latin, the Roman language, became the lingua franca of the Western world, influencing numerous modern languages.
Roman architecture and engineering achievements were monumental. They perfected the arch, vault, and dome, constructing enduring structures like the Colosseum, Pantheon, and aqueducts. These engineering marvels not only showcased Roman ingenuity but also served practical purposes, from public entertainment to water supply.
Instructions for Submissions thorugh G- Classroom.pptxJheel Barad
This presentation provides a briefing on how to upload submissions and documents in Google Classroom. It was prepared as part of an orientation for new Sainik School in-service teacher trainees. As a training officer, my goal is to ensure that you are comfortable and proficient with this essential tool for managing assignments and fostering student engagement.
Instructions for Submissions thorugh G- Classroom.pptx
Adobe illustrator 2
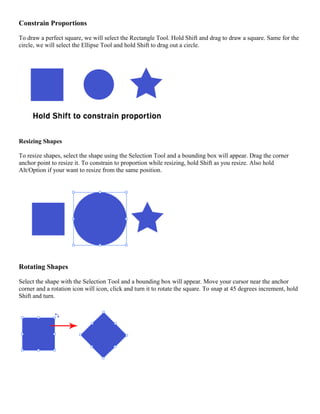
1. Constrain Proportions
To draw a perfect square, we will select the Rectangle Tool. Hold Shift and drag to draw a square. Same for the circle, we will select the Ellipse Tool and hold Shift to drag out a circle.
Resizing Shapes
To resize shapes, select the shape using the Selection Tool and a bounding box will appear. Drag the corner anchor point to resize it. To constrain to proportion while resizing, hold Shift as you resize. Also hold Alt/Option if your want to resize from the same position.
Rotating Shapes
Select the shape with the Selection Tool and a bounding box will appear. Move your cursor near the anchor corner and a rotation icon will icon, click and turn it to rotate the square. To snap at 45 degrees increment, hold Shift and turn.
2. More Options for Shape Tools
Select the Star Tool. Click once on the artboard and an option will pop up. Enter the same values below and click Ok. It will draw a star burst shape. This method can be used to bring out more options for shape tools.
Drawing a Line
Select the pencil tool and click and drag to draw a free hand line drawing.
Closing Paths with Pencil Tool
To close a path, hold Alt/Option as your Pencil Tool reaches the start point. A circle icon will appear next to the Pencil Tool to indicate path closure.
3. Smoothing Jaggy Lines
Normally when you draw with the Pencil Tool, the path looks jaggy. To smoothen the parts that are jaggy, simply hold Alt/Option to turn the Pencil Tool to Smooth Tool. Then draw over the the area of the lines which you would like to smoothen.
Reshaping Path
To reshape a path, make sure your path is selected and use the Pencil Tool to redraw the parts you would like to reshape. Note that the start and end path must be close to the original path to make it work.
4. Pencil Tool Preferences
You can turn on the Pencil Tool Preferences by double clicking on the Pencil Tool. You can change the fidelity and smoothness to find a combination that works for you.
Fidelity: Determines how close the path is drawn to your mouse movement. Set it at a higher fidelity if your not good at drawing with your mouse.
Smoothness: The higher you set for smoothness, the less anchor point it produces. Thus, producing a smoother line.
Drawing Straight Lines
Select the Pen Tool and click once to add the first anchor point. Move your mouse to the next position and click again to create the second point. The two anchor points will be connected together. Continue doing this to create a W shape as shown.To draw a new line, click the Selection Tool(The Black Arrow Icon) and click back the Pen Tool again.
Closing a Path
To close a path, click back the starting point to close the shape.
5. Drawing a Curved Line
Click and drag to put out the handles to create a smooth anchor point.
Changing Path Directions
Click and drag to create a smooth anchor point. Without releasing your mouse, hold Alt/Option and drag the handle up to change the path direction.
6. Drawing a Circular Path
Click and drag to create a smooth anchor point. Continue adding points and click back the starting point to close the path.
Adding Anchor Points
With the Pen Tool selected, go near the path where you want to add a new anchor point. A plus sign will appear next to the pen, click on the path to create a new anchor point.
7. Removing Anchor Points
To remove point, move your Pen Tool close to an anchor. A minus sign will appear next to the pen. Click on the anchor point to delete it.
Converting Anchor Points
To convert a smooth anchor point to a sharp anchor point, move your Pen Tool near the anchor and hold Alt/Option and your Pen Tool will change to an arrow shape. Click on the smooth anchor to convert it to an anchor point. Click and drag on the anchor point again to change it back to a smooth anchor point.
Moving Anchor Points
Select the Direct Selection Tool and click and on anchor you want to move. Click and drag to change positions.
8. Changing Anchor Directions
With the Pen Tool, you can quickly change the anchor directions. Hold Ctrl/Command to quickly change the Pen Tool to Direction Selection Tool. Select the anchor point you want to edit. The anchor handle will appear. Now release Ctrl/Command and hold Alt/Option to change it to Convert Anchor Tool. Click and drag the handles to change the direction.
9. Drawing an Old Key
After learning the concepts of how the Pen Tool works, we will apply what you have learnt to create this ancient old key shape. For the right angles, hold Shift before adding anchor point to constrain it to 90-degree.
10. Final Illustration
This is the final illustration.
Tips for Using Pen Tool
Use as little anchor points your need to create your shape
Add anchor points where there is a change in direction of the line/curve
Use shortcuts like Alt/Option or Ctrl/Command to quickly swap to other tools to edit your path
Hold shift to lock your path while adding new anchor point for 45-degree increments.
More Training for Pen Tool
I have included more exercises for tracing using Pen Tool. Save it to your desktop and place it in illustrator by going to File>Place. Select the image and make sure Template is ticked. The image will now be faded and placed as a template. Now you can start practicing and don’t give up.
11. Applying Brush Stroke
Select the Brush Tool and draw your object. Then go to your Brushes Palette and select the crayon brush to apply the effect.
Calligraphy Brush Stroke
To apply a calligraphy brush stroke, draw your path and select the calligraphy brush. Increase the Stroke to make it thicker.
12. Calligraphy Brush Options
To make changes to your calligraphy brush, you can double click the Calligraphy Brush to pop up the calligraphic brush options. Drag the brush to change the angle in the thumbnail. Change the Diameter makes it thicker.
13. Create a Border Pattern
Draw a rectangle and pick the border pattern. This will create a frame for it.
Creating a New Pattern Brush
To crate a new brush. Draw a Star and drag it to the Brushes Palette. A New Brush selection appears. Choose New Pattern Brush for it.
14. Applying Pattern Brush
Draw a circle and apply our new brush stroke.
Next draw a line path and apply the brush stroke. Double click the star brush from your brushes and set Scale and Spacing to 20% to get the effect below.
15. What is Compound Path?
Compound path is made out of at least two objects. You can add, subtract and intersect shapes to form a compound path.
Compound Path Cheat Sheet
I have compiled a cheat sheet to show how it looks like using different functions of compound path. You can see the final effect after we applied the compound path to three colored circles.
Creating an Ancient Key Using Compound Path
In this tutorial, I will show you how to create an ancient key using compound paths rather than using Pen Tool in our previous tutorial.
16. Turning on the Grids
Go to View>Show Grid to turn on the grids, then go and turn on Snap to Grid. With the grid and snapping turned on, you can easily snap objects to the grid.
First draw a Circle using your Shape Tools, hold Alt/Option as you click and drag a new copy beside it.
17. Duplicate a new circle and place it on top.
Next, select the Rectangle Tool and continue building up your key shape.
18.
19. Swap the Fill and Stroke for the object, this will show you all the objects we have.
Using the Selection Tool, select the whole shape and go to Window>Pathfinder to bring up the Pathfinder. Select Add to shape to combine the objects.
20. You can still make changes to the compound path at this stage. Try moving the top circle below to see how it works. To do this, double click with the Selection Tool to go into isolation mode to move the individual shapes.
Next we will swap it back to black fill again, draw a circle in the middle which we will punch a new hole there. Select both shapes and select Subtract from shape area.
22. Filling Color Using Swatches
To fill an object, open up your Swatches Palette. Select your object and pick any color from the swatches.
Filling Color Using Color Picker
Another way to fill color is by double clicking on the Fill in your Tool Palette. A Color Picker window will appear and you can pick your color.
23. Changing Fill and Stroke Using Control Palette
You can also easily change fill, stroke color and stroke width by accessing your Control Palette at the top of your artboard.
Stroke Caps
The Stroke Caps determine the start and end points of a stroke. This applies to open paths only. You can choose between a Butt, Round, or Projecting cap.
Miter Limit
The stroke’s Miter Limit specifies the appearance for the joins in a shape. Notice how the joins look after we applied different miter settings to the stars.
24. Applying Gradient to Objects
To apply gradient to your object, go to the Tool Palette and set it to Gradient Fill.
Open up your Gradient and Color Palette. By default it is a Grayscale gradient. Click Options icon at the corner and change it to RGB mode.
After we switched to RGB there will be slider and a color chart to pick the color. Choose a dark blue for it.
25. Do the same for the start point, change it to RGB and choose a light blue.
To add a new gradient stop to the gradient, click right below the gradient ramp to create a new stop. Change it to white color. To remove it, you can drag the stop out of the Palette.
26. To change the direction of the gradient, select the Gradient Tool from the Tool Palette. Click and drag in the direction you want the gradient to follow.
Radial Gradient
To set it to radial gradient, Choose Radial instead of Linear.
27. Pattern Fill
To create seamless pattern fill, we can choose the pattern fill from the Swatches.
Conclusion
Using radial and linear gradient, we can achieve alot of realism to our artwork. Radial patterns can add depth and volume to circle, and linear pattern can used to create volume for cylinders. Here is an example of gradients used to create a jingle bell.
28. As you start working on complicated illustrations, layers will start to build up. And you will have to group and arrange them so that you can move and edit the layers easily. I will show you an example of an illustration I did so that you can see how I name and group my layers.
Layers Palette
You can access your Layers Palette from Window>Layers. As you can see below, I have grouped my objects into 6 different layers. You can see the stacking order with the background at the bottom and towel at the top for my illustration. Below is a list of layer settings and their uses.
Visibility Icon: Click to hide/unhide layer
Lock Icon: Click the lock to lock the layer
Layer Name: Double click to rename it
Target Indicator: Click to select layer
Delete Layer: Click to delete layer
New Layer: Add new layer on top
New Sublayer: Add new sublayer under Layer 1
29. Arranging Objects
To bring a layer on top, select the layer and drag it to the top. Now the flower is at the top layer and covers the whole picture.
30. Grouping Objects
By grouping objects, you can move them together rather than spend time selecting all the objects individually. Here is an example of a flower made up of 6 layers. By selecting my object and grouping them by pressing Ctrl/Command+G, I am able to group them together and move. To edit the grouped object, double click to go into isolation mode to edit the objects. If you want to ungroup them, press Ctrl+Shift+G/Command+Shift+G.
Next, I duplicate a few more of my grouped flower and group them again to form my flower layer.
31. Appearance Palette
The Appearance Palette shows what effect is applied to a layer. You can Add New Fill or Add New Stroke to the whole layer or individual objects. Go Windows>Appearance to open up your Appearance Palette. Let’s see how it looks when we apply a new fill. Click the option icon and choose Add New Fill.
After we set the Fill with pink color, it turns the whole layer to pink.
32. Adding Transparency
You can add transparency in Illustrator by lowering the opacity of objects so that underlying artwork becomes visible. Go Window>Transparency to open up your Transparency Window. Stack a few objects and set it to a lower opacity of 50% for the underlying color to show through.
Blending Modes for Objects
If you are familiar with Photoshop, you may have heard of Blending Modes. Blending modes let you vary the ways that the colors of objects blend with the colors of underlying objects. Here I have an example of 3 popular blending modes to show you the effect. I shall not go through how each blending mode in detail as it is quite technical for beginners. If your are interested, you can read Adobe livedocs here.
33. Button Reflection Using Screen
Screen blending mode is one of my favourite as it allows me create reflection effortlessly. I will be showing you a popular technique on creating a button reflection using Screen. First draw a circle and apply a gradient of light to dark orange to it.
Draw another circle on top and apply a gradient from black to white.
Finally, select the black to white circle and change the blending mode to Screen. And you’re done!
34. Applying Graphic Styles
Illustrator has some built in graphic styles which you are quickly apply to your objects. It is like a saved set of attributes. Once you have created an object style, you can apply it across different objects.
To see the attributes of an graphic styles, go Window>Appearance. Here we can see that there are 3 fills with effects(fx icon) applied. We will learn more about using effects in the later lessons.