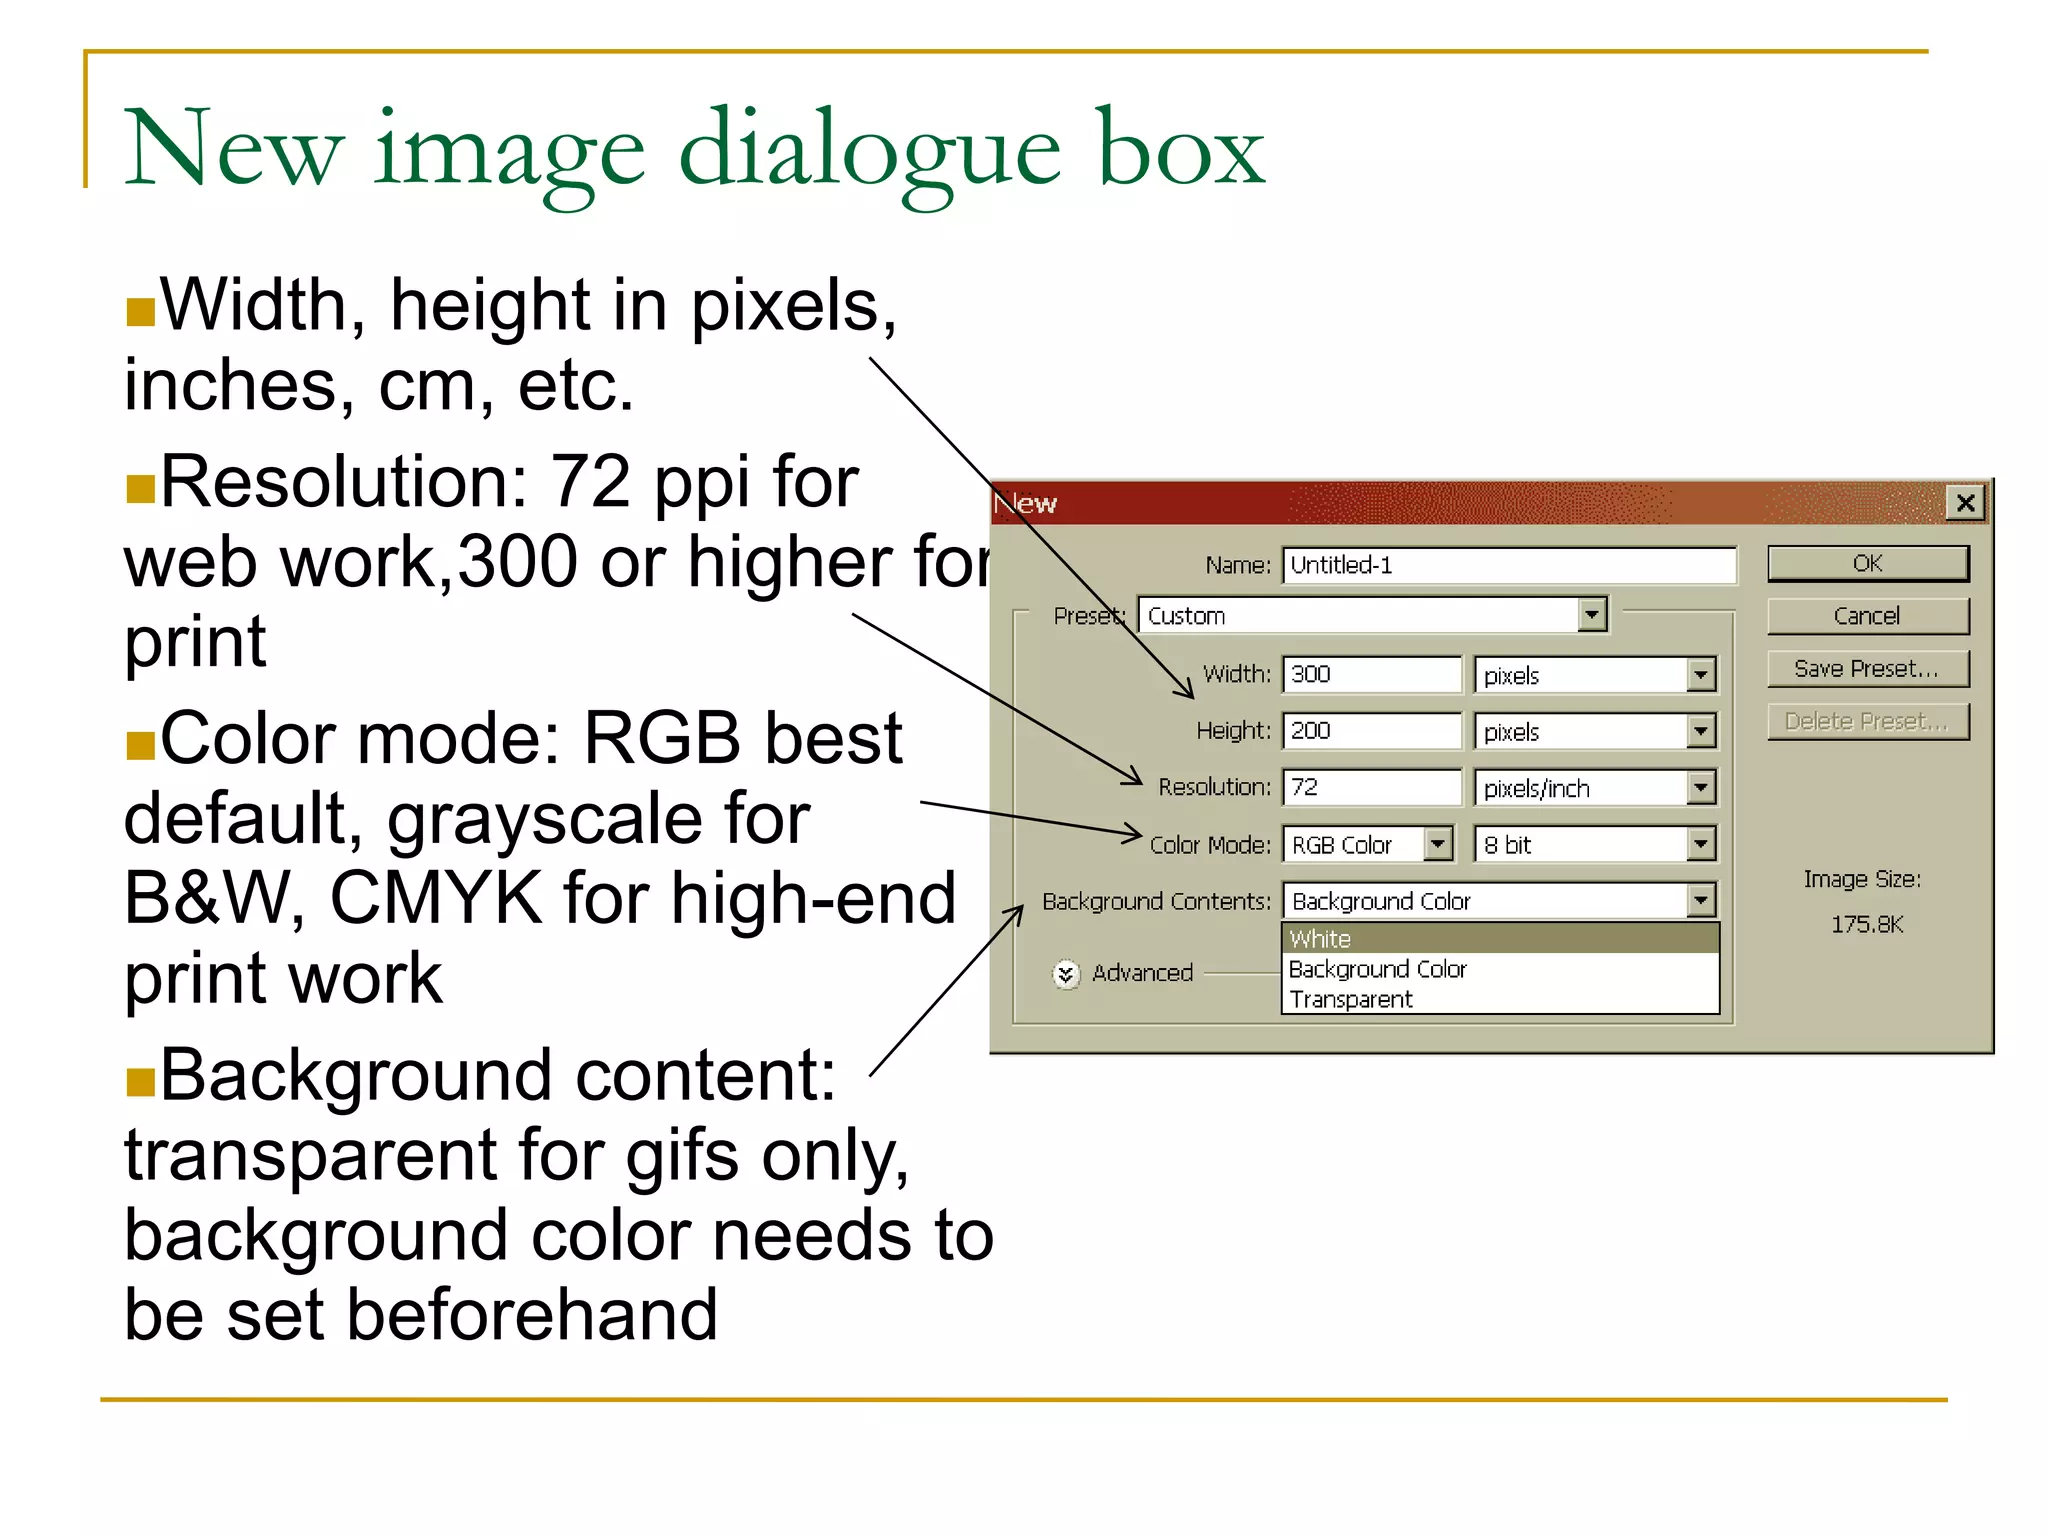
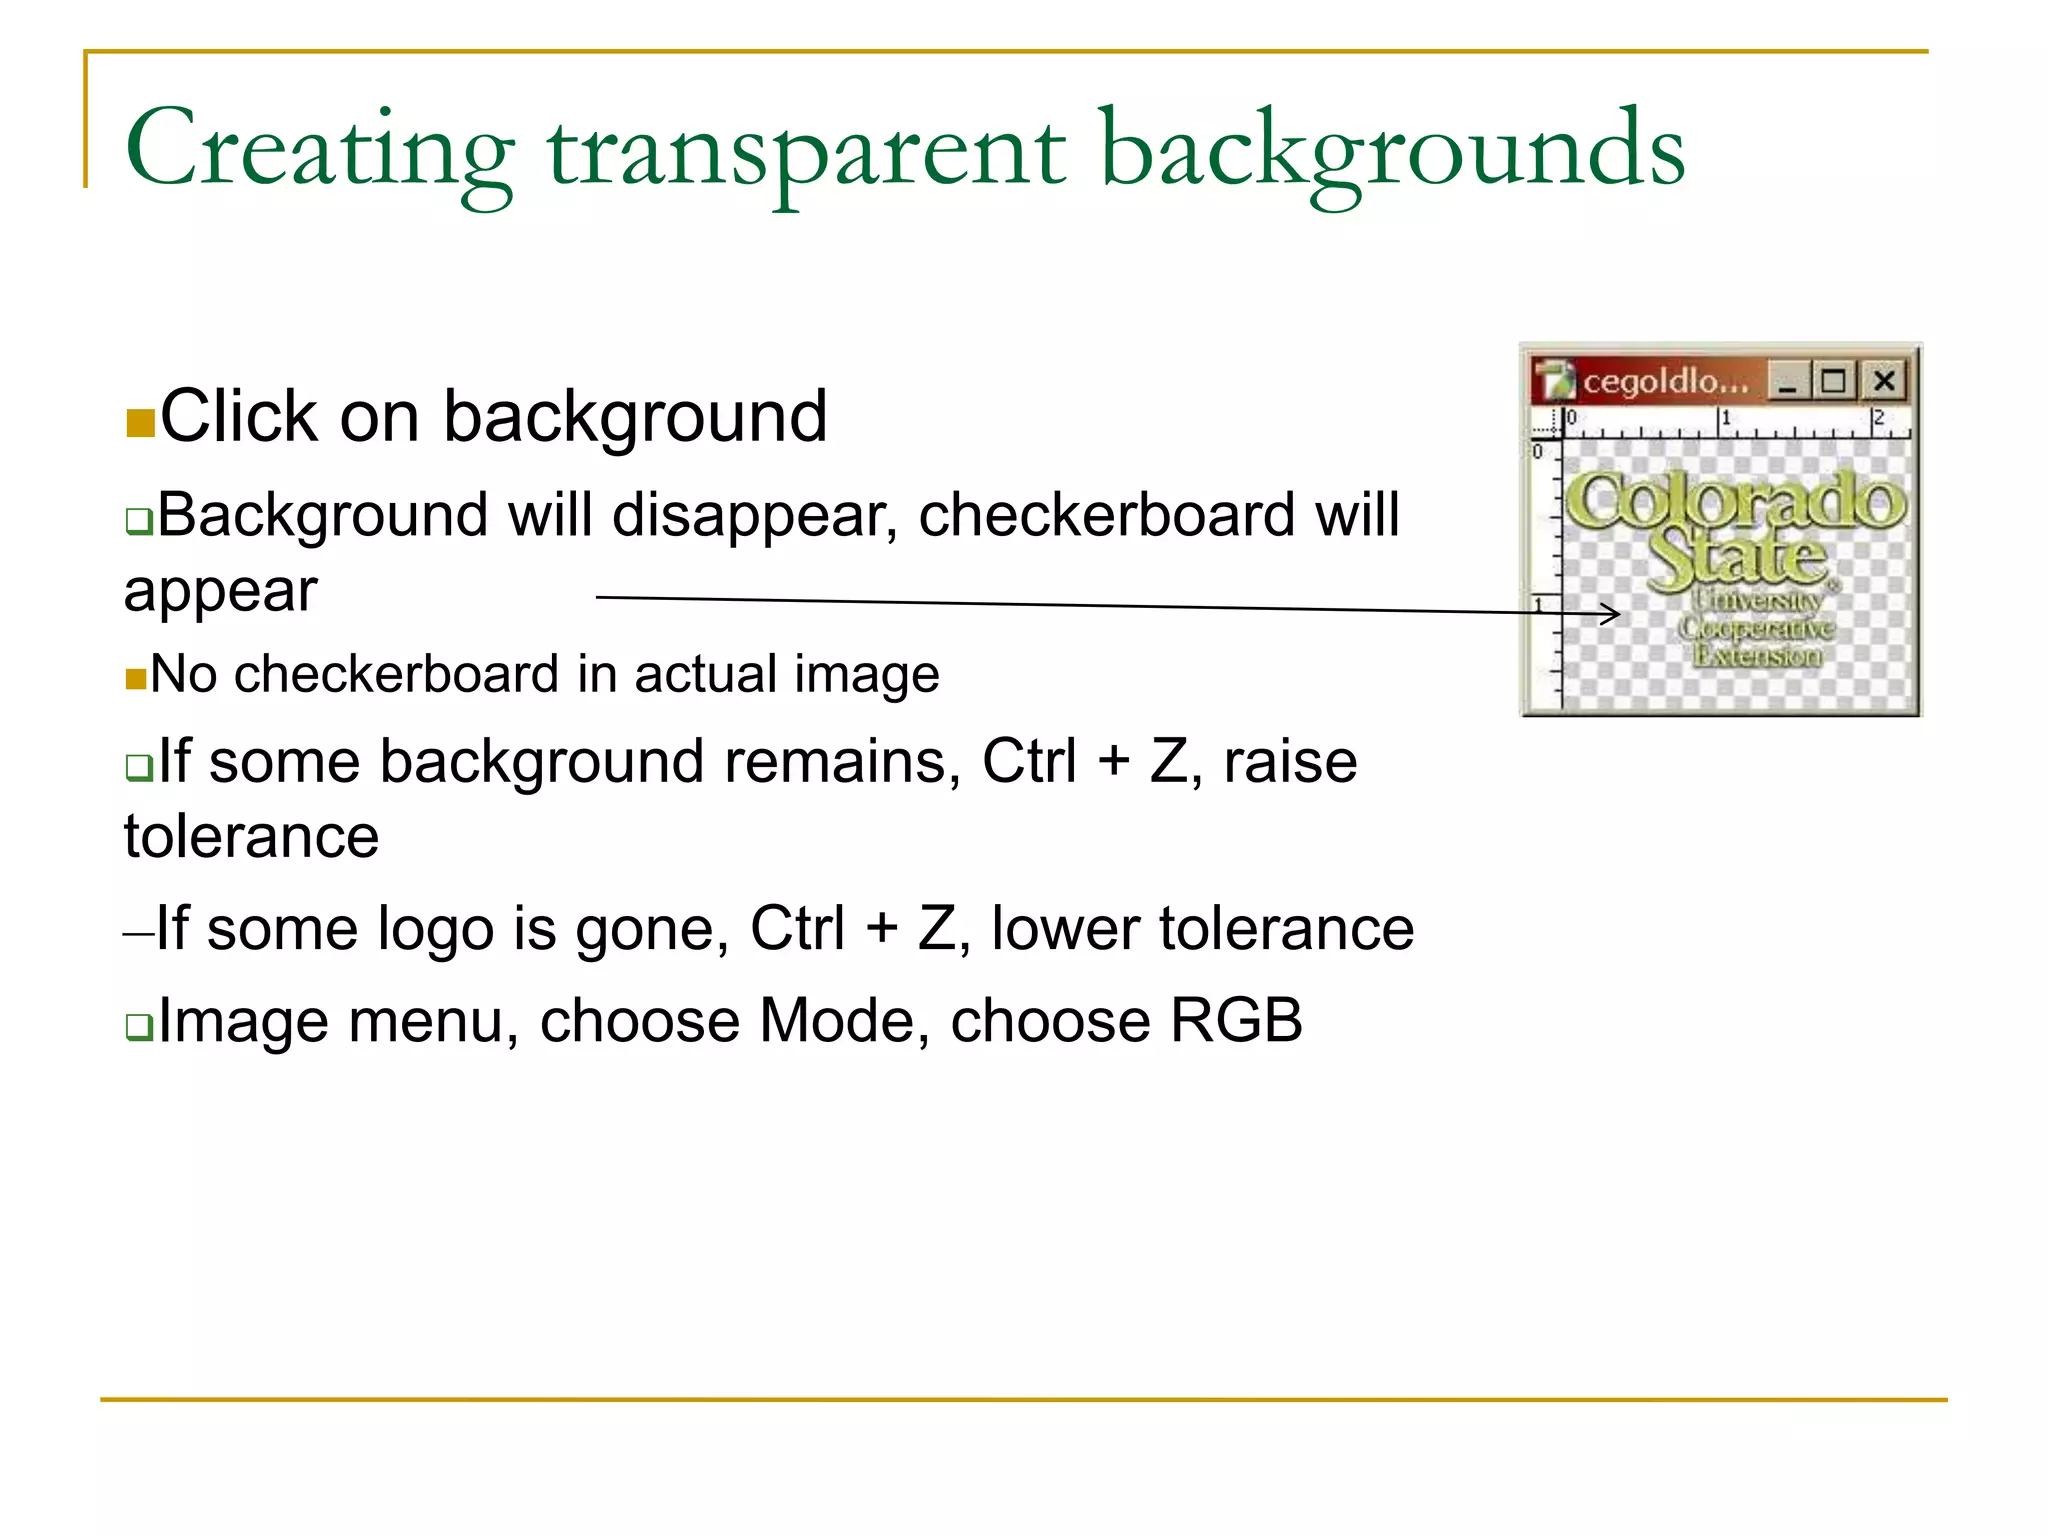
Contents
Basic concepts…
What is Photoshop?, other options, types of image files, The Photoshop
workspace (toolbox, options bar, palettes)
Basic photo manipulation …
Opening, cropping, resizing, saving as .jpeg
Creating new images…
New image dialogue box, pencil and paintbrush tools, paintbucket and
gradient tools, saving as .gifs, dither
Transparency…
Creating transparent backgrounds, saving transparent images, transparency
dither
Layers…
Layer basics, moving layers, naming layers, copying layers, compositing
images, transforming layers, layer via copy/cut, adding text
What is Photoshop?
Image editing program
Pixel = “Picture element” - smallest unit of an image
Size of pixel depends on resolution
Typical web image: 72 dpi
Typical print image: 300 dpi or higher
End result can be saved in variety of ways: .bmp, .jpeg,
.gif, .tif
Types of image files
.gif
Often good for B & W
Supports transparency
.jpeg
Slightly longer to download (decompression time)
Lossy
Doesn’t support transparency
.png
Good for web, best of both worlds (lossless, supports complex
photographs)
Not supported by older browsers
Color modes
Image, Modes
RGB is almost always best bet
Default choice
CMYK for high end professional printers
Grayscale for B&W
Index greatly reduces file size
IMPORTANT: If Photoshop is not allowing you to use a tool,
change mode from index to RGB
8-bit is usually adequate
16-bit only for very high resolution pictures
Very large file size
6
The Photoshop workspace
image
Options palette
toolbox
History palette
Layers palette
The toolbox
Commonly used tools arranged as icons
Triangle in lower right means multiple
tools are nested there
Left-click the icon and hold down the
button to see all tools nested there
Paintbucket icon Expanded: Gradient and paintbucket tools
The options palette
Just below the Menu choices
Changes depending on which tool you’ve
chosen from the toolbox
Allows greater control of that tool by changing
settings
Options palette for paintbucket tool
Basic photo manipulation
Opening, cropping, resizing, saving as
.jpeg
The File browser
Thumbnails
Folder browser
Metadata
Rotate Flag DeleteSearch
Cropping an image
Bring up image
File, Open (if you know the name of file)
Window, File Browser (to see thumbnails
of all images in a folder)
Choose cropping tool
Left-click and drag to define crop
area
Uncropped area will be shaded
Use sizing boxes to fine-tune crop area
Cropping an image
When done with crop, double-click inside it
Cursor will change to solid black triangle
The cropped image will be displayed
Rename the image and save it
Resizing an image
Images will not necessarily be
shown actual size in Photoshop
Look at title bar to see percentage
Ctrl and + to zoom in
Ctrl and – to zoom out
Resizing an image
Image menu, Image Size
Make sure “Constrain
proportions” is checked to avoid
stretching
Link icon appears
Change width (in pixels),
height will automatically change
Use document size box for
print (set in inches, not pixels)
Save as new file name, so as
not to overwrite original image
Creating new images
New image dialogue box, pencil and
paintbrush tools, paintbucket and
gradient tools, saving as .gifs, dither
New image dialogue box
Width, height in pixels,
inches, cm, etc.
Resolution: 72 ppi for
web work,300 or higher for
print
Color mode: RGB best
default, grayscale for
B&W, CMYK for high-end
print work
Background content:
transparent for gifs only,
background color needs to
be set beforehand
The pencil and paintbrush tools
Left-click and hold down icon to choose
Pencil has hard edges
Brush has feathered edges
Brush pulldown in options bar controls
diameter, hardness
Brush palette
has presets for
stars, leaves, grass,
etc.
The color picker 1
On toolbox
Flips background and foreground
Foreground color picker
Background color picker
Default (in this case B&W)
Click background or foreground to bring up
color picker
The color picker 2
Color slider
Color field
Field/slider combo
gives you access to all
colors
Numeric color values
Web safe colors option
(important!)
You can sample
colors with the CP
eyedropper
The paintbucket tool
Left-click and hold down to choose between
paintbucket and gradient
Paintbucket is for solid fill backgrounds and patterns
 Solid fill – choose color from options bar
 Patterns – lots to chose from: cloth and paper textures, nature
images (rocks, flowers), abstract patterns
Select proper layer, choose paintbucket, click on area
to fill
Can’t paint a background – change to layer first
The gradient tool
Gradient = gradual transition between two or more
colors
Choose gradient tool, choose preset from options bar
“Draw” gradient with a left click and drag
Starting and stopping points and direction of dragged line will
define gradient
Use History panel to back up, try again
Click on Gradient box in toolbar to create own
gradient
Custom gradients
Preset gradients are here
Click on these boxes to
change opacity (for a fade
to transparency)
Click on these to change
color of gradient
Slide them to change
when gradient ends
This changes midpoint of
transition
Saving .gifs
File, Save for web, 4-Up tab
(just like .jpegs)
Can have between 2 and
256 colors
More colors = larger file size
Control # of colors with this
pulldown
Adjusting and retouching
photos
Rotation, adjustments, the clone tool,
the filters menu
Transparency
Creating transparent backgrounds,
saving transparent images,
transparency dither
Creating transparent backgrounds
Bring up image
Need a flat color background
Left-click and hold down eraser tool to
get all options
Choose Magic Eraser tool
Set tolerance to 5 in options bar (a
starting point)
Anti-alias should be checked (gets rid
of “jaggies” on edges)
Uncheck contiguous to make insides of letters
transparent
Creating transparent backgrounds
Click on background
Background will disappear, checkerboard will
appear
No checkerboard in actual image
If some background remains, Ctrl + Z, raise
tolerance
–If some logo is gone, Ctrl + Z, lower tolerance
Image menu, choose Mode, choose RGB
Layers
Layer basics, moving layers, naming
layers, copying layers, compositing
images, transforming layers, layer via
copy/cut, adding text
Layer basics
Layers are like sheets of glass
stacked on top of each other
From top to bottom:
Text layer
Text effect/Drop shadow
Photo at left
Gray background
L-click and drag layers to move
them up or down
Presentation on Adobe Photoshop

Presentation on Adobe Photoshop

  • 1.
    Contents Basic concepts… What isPhotoshop?, other options, types of image files, The Photoshop workspace (toolbox, options bar, palettes) Basic photo manipulation … Opening, cropping, resizing, saving as .jpeg Creating new images… New image dialogue box, pencil and paintbrush tools, paintbucket and gradient tools, saving as .gifs, dither Transparency… Creating transparent backgrounds, saving transparent images, transparency dither Layers… Layer basics, moving layers, naming layers, copying layers, compositing images, transforming layers, layer via copy/cut, adding text
  • 2.
    What is Photoshop? Imageediting program Pixel = “Picture element” - smallest unit of an image Size of pixel depends on resolution Typical web image: 72 dpi Typical print image: 300 dpi or higher End result can be saved in variety of ways: .bmp, .jpeg, .gif, .tif
  • 3.
    Types of imagefiles .gif Often good for B & W Supports transparency .jpeg Slightly longer to download (decompression time) Lossy Doesn’t support transparency .png Good for web, best of both worlds (lossless, supports complex photographs) Not supported by older browsers
  • 4.
    Color modes Image, Modes RGBis almost always best bet Default choice CMYK for high end professional printers Grayscale for B&W Index greatly reduces file size IMPORTANT: If Photoshop is not allowing you to use a tool, change mode from index to RGB 8-bit is usually adequate 16-bit only for very high resolution pictures Very large file size
  • 5.
    6 The Photoshop workspace image Optionspalette toolbox History palette Layers palette
  • 6.
    The toolbox Commonly usedtools arranged as icons Triangle in lower right means multiple tools are nested there Left-click the icon and hold down the button to see all tools nested there Paintbucket icon Expanded: Gradient and paintbucket tools
  • 7.
    The options palette Justbelow the Menu choices Changes depending on which tool you’ve chosen from the toolbox Allows greater control of that tool by changing settings Options palette for paintbucket tool
  • 8.
    Basic photo manipulation Opening,cropping, resizing, saving as .jpeg
  • 9.
    The File browser Thumbnails Folderbrowser Metadata Rotate Flag DeleteSearch
  • 10.
    Cropping an image Bringup image File, Open (if you know the name of file) Window, File Browser (to see thumbnails of all images in a folder) Choose cropping tool Left-click and drag to define crop area Uncropped area will be shaded Use sizing boxes to fine-tune crop area
  • 11.
    Cropping an image Whendone with crop, double-click inside it Cursor will change to solid black triangle The cropped image will be displayed Rename the image and save it
  • 12.
    Resizing an image Imageswill not necessarily be shown actual size in Photoshop Look at title bar to see percentage Ctrl and + to zoom in Ctrl and – to zoom out
  • 13.
    Resizing an image Imagemenu, Image Size Make sure “Constrain proportions” is checked to avoid stretching Link icon appears Change width (in pixels), height will automatically change Use document size box for print (set in inches, not pixels) Save as new file name, so as not to overwrite original image
  • 14.
    Creating new images Newimage dialogue box, pencil and paintbrush tools, paintbucket and gradient tools, saving as .gifs, dither
  • 15.
    New image dialoguebox Width, height in pixels, inches, cm, etc. Resolution: 72 ppi for web work,300 or higher for print Color mode: RGB best default, grayscale for B&W, CMYK for high-end print work Background content: transparent for gifs only, background color needs to be set beforehand
  • 16.
    The pencil andpaintbrush tools Left-click and hold down icon to choose Pencil has hard edges Brush has feathered edges Brush pulldown in options bar controls diameter, hardness Brush palette has presets for stars, leaves, grass, etc.
  • 17.
    The color picker1 On toolbox Flips background and foreground Foreground color picker Background color picker Default (in this case B&W) Click background or foreground to bring up color picker
  • 18.
    The color picker2 Color slider Color field Field/slider combo gives you access to all colors Numeric color values Web safe colors option (important!) You can sample colors with the CP eyedropper
  • 19.
    The paintbucket tool Left-clickand hold down to choose between paintbucket and gradient Paintbucket is for solid fill backgrounds and patterns  Solid fill – choose color from options bar  Patterns – lots to chose from: cloth and paper textures, nature images (rocks, flowers), abstract patterns Select proper layer, choose paintbucket, click on area to fill Can’t paint a background – change to layer first
  • 20.
    The gradient tool Gradient= gradual transition between two or more colors Choose gradient tool, choose preset from options bar “Draw” gradient with a left click and drag Starting and stopping points and direction of dragged line will define gradient Use History panel to back up, try again Click on Gradient box in toolbar to create own gradient
  • 21.
    Custom gradients Preset gradientsare here Click on these boxes to change opacity (for a fade to transparency) Click on these to change color of gradient Slide them to change when gradient ends This changes midpoint of transition
  • 22.
    Saving .gifs File, Savefor web, 4-Up tab (just like .jpegs) Can have between 2 and 256 colors More colors = larger file size Control # of colors with this pulldown
  • 23.
    Adjusting and retouching photos Rotation,adjustments, the clone tool, the filters menu
  • 24.
    Transparency Creating transparent backgrounds, savingtransparent images, transparency dither
  • 25.
    Creating transparent backgrounds Bringup image Need a flat color background Left-click and hold down eraser tool to get all options Choose Magic Eraser tool Set tolerance to 5 in options bar (a starting point) Anti-alias should be checked (gets rid of “jaggies” on edges) Uncheck contiguous to make insides of letters transparent
  • 26.
    Creating transparent backgrounds Clickon background Background will disappear, checkerboard will appear No checkerboard in actual image If some background remains, Ctrl + Z, raise tolerance –If some logo is gone, Ctrl + Z, lower tolerance Image menu, choose Mode, choose RGB
  • 27.
    Layers Layer basics, movinglayers, naming layers, copying layers, compositing images, transforming layers, layer via copy/cut, adding text
  • 28.
    Layer basics Layers arelike sheets of glass stacked on top of each other From top to bottom: Text layer Text effect/Drop shadow Photo at left Gray background L-click and drag layers to move them up or down