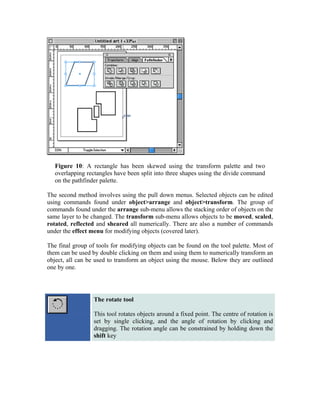
SlideShare a Scribd company logo
Illustrator: Toolbox
                                  TOPICS COVERED

Colour & Transform, Editing & Transforming Objects, Drawing Modes, Gradients,
Layers, drawing Path.


                                     OBJECTIVES

Upon completion of this Lesson, you should be able to:
Understanding Color Palette,
Usage of Drawing Tools.
Editing The Objects.
Know about layers.


Colour & Transform

Colour is applied to selected objects by setting the fill and stroke properties towards the
bottom of the main tool palette (figure 07). The three buttons underneath the fill and
stroke colours set both the fill and stroke to a solid colour, gradient or no colour.


   Figure 07: The colour tools at the bottom of the main tool palette

When an object is selected its fill and stroke colours are modified using the colour
palette (window menu). For example, to change the stroke colour, click on the stroke
colour icon on the main tool palette and then use the colour sliders on the colour palette.
Stroke width is set using the stroke palette. Note that the Appearance palette (figure
08) displays the current properties of a selected object.
Figure 08: The appearance palette

To use a Pantone shade to colour an object the shade must first be added to the swatches
palette (Window>show swatches). Select Window>swatch libraries>pantone coated
and single click on a colour to add it to the swatches palette. To apply the colour to an
object, select the object, select fill or stroke colour in the tool palette and then click on the
appropriate colour in the swatches palette.


   Figure 09: The swatches palette


Editing/transforming objects

Objects can be transformed in a number of ways. The first is by using the transform and
pathfinder palettes (window > show transform or show pathfinder). When an object is
selected the transform palette can be used to rotate, skew and scale it numerically. The
pathfinder palette is used to perform 2D Boolean operations on objects.
Figure 10: A rectangle has been skewed using the transform palette and two
   overlapping rectangles have been split into three shapes using the divide command
   on the pathfinder palette.

The second method involves using the pull down menus. Selected objects can be edited
using commands found under object>arrange and object>transform. The group of
commands found under the arrange sub-menu allows the stacking order of objects on the
same layer to be changed. The transform sub-menu allows objects to be moved, scaled,
rotated, reflected and sheared all numerically. There are also a number of commands
under the effect menu for modifying objects (covered later).

The final group of tools for modifying objects can be found on the tool palette. Most of
them can be used by double clicking on them and using them to numerically transform an
object, all can be used to transform an object using the mouse. Below they are outlined
one by one.


                  The rotate tool

                  This tool rotates objects around a fixed point. The centre of rotation is
                  set by single clicking, and the angle of rotation by clicking and
                  dragging. The rotation angle can be constrained by holding down the
                  shift key
The scale tool

Scales objects about a fixed point. Click to select the origin for the
scaling and click and drag to scale. Holding the shift key while scaling
constrains the object to its original proportions.

The reflect tool

Click once to define a point on the line of reflection then click and
drag to define a further (final) point.

The shear tool

Click to select a reference point for the shear then click and drag to
shear. Use the shift key to constrain the transformation.

The free transform tool

This tool can be used to transform an object in a number of ways.
When the tool is picked the selected object(s) is surrounded by a
bounding box. Clicking and dragging any of the bounding box handles
scales the object(s) leaving the opposite handle position fixed. Holding
down the alt key while clicking and dragging scales about the centre
point of the object(s), Holding down the shift key constrains the
scaling. Clicking and dragging just outside any of the bounding boxes
handles allows the object(s) to be rotated.
Drawing modes

PageMaker allows the display of images to be customised so the screen redraw times are
quicker. Images can be set to display as grey boxes, low resolution previews or high
resolution previews. Illustrator allows objects to be created and modified in outline or
preview modes (View>preview or View>outline). Toggle between the two modes to see
how this changes the screen display of objects. Most work can be produced in preview
mode with very little speed reduction.

Gradients

To fill a shape with a blend of two colours first select the gradient fill option on the main
tool palette and then use the gradient tool. To use the tool first select the shape to be filled
with the pointer tool, next select the gradient tool and drag across the shape to specify the
direction and 'smoothness' of the gradient. Drag a long line for a smooth gradient or a
short line for an abrupt gradient. To change the colours of a gradient use the gradient and
colour palettes. NB: Gradients can be made up from more than one colour, click on the
gradient representation in the gradient palette to add more (figure 12).


   Figure 12: The gradient palette showing a three colour gradient. Click on the
   colour markers underneath the gradient to change the colours.

Illustrator also has a gradient mesh tool for creating complex gradients. Select a shape,
select the gradient mesh tool and click once (or more) in the shape to create a mesh. To
colour the nodes of the mesh select them with the direct selection pointer (top right of
the tool palette) and use the colour palette.
Figure 13: A shape filled with a gradient mesh

NB: To select a node in a gradient mesh with the direct selection pointer, first deselect
the object and reselect it with the direct selection pointer and click on the node.

Using layers

Objects in Illustrator documents can be split across a number of layers. Layers are
controlled using the layers palette which is very similar to the layers palette in
PhotoShop. Layers can be created, deleted, copied, hidden and locked. Layers can be
assigned a colour which does not colour the objects within the layer but colours their
outline when selected.

Objects contained within a layer are also shown in the layers palette. To move an object
from one layer to another simply drag its icon in the layers palette.


   Figure 14: The layers palette showing two layers and the objects on each of the
   layers. Layer 2 is the active layer. The 'eye' icons on the left show that all the layers
   and objects are visible. To add a new layer click on the 'stationary' icon (next to the
   trash icon), to delete a layer (or object) drag it onto the trash icon at the bottom
   right of the palette.

Custom styles

Illustrator's style palette is useful for applying the same attributes to a number of different
objects. To add a custom style draw an object and set its properties (fill, stroke, effect,
etc) as required. Select the object and select 'new style' from the style palette's pop-out
menu to save the object's properties as a new style. To apply the style to other objects
select the object with the pointer tool and click on the style in the palette.

Masking
Illustrator can use one shape to mask another object. Draw a shape or path (covered later)
over an existing object, select both the shape and original object and select
Object>Clipping masks>make. To reposition the shape behind the mask use the direct
selection pointer (white arrow, top right on the main tool palette).


   Figure 15: A rectangle and circle before and after masking.

Transparency

Objects can be made transparent using the transparency palette. Select and object and
drag the transparency/opacity slider.

The effects menu

The Illustrator effects pull down menu is similar to the filter menu in PhotoShop. The
best way to discover what it does is to experiment with it. For example, draw a shape and
select blur. Try the effects under effect>distort.

Drawing Paths

An Illustrator path is equivalent to an AutoCAD polyline. Paths can be drawn with a
number of different tools and there are a number of ways of editing them. Paths can be
single lines, polygons or irregular shapes. Shapes drawn with Illustrator's simple shape
tools (i.e rectangles and ellipses) are paths. Paths can be made up from straight and
curved sections.

The easiest way to draw an irregular path in Illustrator is to use the pencil or paintbrush
tools. Simply select one of the tools and draw freehand. Illustrator converts the freehand
line to a path. The smoothness of the path can be specified by double clicking on either of
the tools before using them. Open paths can be added to using the pencil tool (see later)


   Figure 16: Path drawing tools; the pencil tool, paintbrush tool and pen tool.

The most accurate way to create a path is using the pen tool. Select the pen tool, single
click in the work area to start a path and click again to create a second point etc. To end
and close a shape click on the start point, to leave a shape open click on the pen tool to
end it. Using the pen tool in this way creates irregular polygon shapes.


   Figure 17: An irregular path created using the pencil tool

To create paths with curved sections (or completely curved shapes) click and drag with
the pen tool as follows. Click to start the shape but hold down the mouse and drag to set a
curve then release the mouse. Click to set the second point and drag to set the curve, etc.
Compound paths can be created by drawing a path inside an existing path and selecting
Objects>compound paths>make. For example, a polo-mint shaped path can be created
by drawing two concentric circles and selecting Objects>compound paths>make.

More Related Content

What's hot

Illustrator assignment 1
Illustrator assignment 1Illustrator assignment 1
Illustrator assignment 1
rgosselin
 
Adobe illustrator cs6
Adobe illustrator cs6Adobe illustrator cs6
Adobe illustrator cs6
Ila Azmil
 
Adobe illustrator 1
Adobe illustrator 1Adobe illustrator 1
Adobe illustrator 1
ilaazmil2
 
Illustrator's basic shapes part 2 & combining shapes
Illustrator's basic shapes part 2 & combining shapesIllustrator's basic shapes part 2 & combining shapes
Illustrator's basic shapes part 2 & combining shapes
Jerry Arnold
 
Lighting with Photoshop
Lighting with PhotoshopLighting with Photoshop
Lighting with Photoshop
NYCCTfab
 
Photoshop dimensional looking sphere
Photoshop dimensional looking spherePhotoshop dimensional looking sphere
Photoshop dimensional looking sphere
Jerry Arnold
 
Adobe Photoshop Tools
Adobe Photoshop ToolsAdobe Photoshop Tools
Adobe Photoshop Tools
Bapu Graphics India
 
Adobe Photoshop Toolbar Introduction
Adobe Photoshop Toolbar IntroductionAdobe Photoshop Toolbar Introduction
Adobe Photoshop Toolbar Introduction
Sidrah Noor
 
Adobe illustrator 2
Adobe illustrator 2Adobe illustrator 2
Adobe illustrator 2
ilaazmil2
 
Drawing and selecting
Drawing and selectingDrawing and selecting
Drawing and selecting
SanthiNivas
 
Adobe After Effects
Adobe After EffectsAdobe After Effects
Adobe After Effects
Kat350
 
Presentation on Photoshop Tools By Batra Computer Centre
Presentation on Photoshop Tools By Batra Computer CentrePresentation on Photoshop Tools By Batra Computer Centre
Presentation on Photoshop Tools By Batra Computer Centre
Batra Computer Centre
 
Adobe illustrator cs4 tutorial
Adobe illustrator cs4 tutorial Adobe illustrator cs4 tutorial
Adobe illustrator cs4 tutorial
Agung Yuwono
 
DID Unit 5 - Illustrator Basics
DID Unit 5 - Illustrator BasicsDID Unit 5 - Illustrator Basics
DID Unit 5 - Illustrator Basics
MrLawler
 
Adobe Photoshop Toolbox definition term
Adobe Photoshop Toolbox definition termAdobe Photoshop Toolbox definition term
Adobe Photoshop Toolbox definition term
Allan Roloma
 
IndesignFlyer
IndesignFlyerIndesignFlyer
IndesignFlyer
Andy Tucker
 
Chapter 10
Chapter 10Chapter 10
Chapter 10
Tracie King
 
Adobe Illustrator: 6 Essential Tips and Tools
Adobe Illustrator: 6 Essential Tips and ToolsAdobe Illustrator: 6 Essential Tips and Tools
Adobe Illustrator: 6 Essential Tips and Tools
Nguyet Minh
 
How to use photoshop
How to use photoshopHow to use photoshop
How to use photoshop
entwistlesophie8064
 
Image manipulation - Photoshop
Image manipulation - PhotoshopImage manipulation - Photoshop
Image manipulation - Photoshop
Cardinal Newman Catholic School
 

What's hot (20)

Illustrator assignment 1
Illustrator assignment 1Illustrator assignment 1
Illustrator assignment 1
 
Adobe illustrator cs6
Adobe illustrator cs6Adobe illustrator cs6
Adobe illustrator cs6
 
Adobe illustrator 1
Adobe illustrator 1Adobe illustrator 1
Adobe illustrator 1
 
Illustrator's basic shapes part 2 & combining shapes
Illustrator's basic shapes part 2 & combining shapesIllustrator's basic shapes part 2 & combining shapes
Illustrator's basic shapes part 2 & combining shapes
 
Lighting with Photoshop
Lighting with PhotoshopLighting with Photoshop
Lighting with Photoshop
 
Photoshop dimensional looking sphere
Photoshop dimensional looking spherePhotoshop dimensional looking sphere
Photoshop dimensional looking sphere
 
Adobe Photoshop Tools
Adobe Photoshop ToolsAdobe Photoshop Tools
Adobe Photoshop Tools
 
Adobe Photoshop Toolbar Introduction
Adobe Photoshop Toolbar IntroductionAdobe Photoshop Toolbar Introduction
Adobe Photoshop Toolbar Introduction
 
Adobe illustrator 2
Adobe illustrator 2Adobe illustrator 2
Adobe illustrator 2
 
Drawing and selecting
Drawing and selectingDrawing and selecting
Drawing and selecting
 
Adobe After Effects
Adobe After EffectsAdobe After Effects
Adobe After Effects
 
Presentation on Photoshop Tools By Batra Computer Centre
Presentation on Photoshop Tools By Batra Computer CentrePresentation on Photoshop Tools By Batra Computer Centre
Presentation on Photoshop Tools By Batra Computer Centre
 
Adobe illustrator cs4 tutorial
Adobe illustrator cs4 tutorial Adobe illustrator cs4 tutorial
Adobe illustrator cs4 tutorial
 
DID Unit 5 - Illustrator Basics
DID Unit 5 - Illustrator BasicsDID Unit 5 - Illustrator Basics
DID Unit 5 - Illustrator Basics
 
Adobe Photoshop Toolbox definition term
Adobe Photoshop Toolbox definition termAdobe Photoshop Toolbox definition term
Adobe Photoshop Toolbox definition term
 
IndesignFlyer
IndesignFlyerIndesignFlyer
IndesignFlyer
 
Chapter 10
Chapter 10Chapter 10
Chapter 10
 
Adobe Illustrator: 6 Essential Tips and Tools
Adobe Illustrator: 6 Essential Tips and ToolsAdobe Illustrator: 6 Essential Tips and Tools
Adobe Illustrator: 6 Essential Tips and Tools
 
How to use photoshop
How to use photoshopHow to use photoshop
How to use photoshop
 
Image manipulation - Photoshop
Image manipulation - PhotoshopImage manipulation - Photoshop
Image manipulation - Photoshop
 

Viewers also liked

Concepts of Graphics- Color
Concepts of Graphics- ColorConcepts of Graphics- Color
Concepts of Graphics- Color
Ashish Srivastava
 
Computer Graphics Brief Tutorial
Computer Graphics Brief TutorialComputer Graphics Brief Tutorial
Computer Graphics Brief Tutorial
Ashish Srivastava
 
Learn Illustrator
Learn IllustratorLearn Illustrator
Learn Illustrator
Ashish Srivastava
 
Photoshop Tools
Photoshop ToolsPhotoshop Tools
Photoshop Tools
Ashish Srivastava
 
Using Adobe Photoshop cs
Using Adobe Photoshop csUsing Adobe Photoshop cs
Using Adobe Photoshop cs
Ashish Srivastava
 
Effective presentation skills
Effective presentation skillsEffective presentation skills
Effective presentation skills
Subagini Manivannan
 
Effective presentation skills
Effective presentation skillsEffective presentation skills
Effective presentation skills
Ashish Srivastava
 

Viewers also liked (7)

Concepts of Graphics- Color
Concepts of Graphics- ColorConcepts of Graphics- Color
Concepts of Graphics- Color
 
Computer Graphics Brief Tutorial
Computer Graphics Brief TutorialComputer Graphics Brief Tutorial
Computer Graphics Brief Tutorial
 
Learn Illustrator
Learn IllustratorLearn Illustrator
Learn Illustrator
 
Photoshop Tools
Photoshop ToolsPhotoshop Tools
Photoshop Tools
 
Using Adobe Photoshop cs
Using Adobe Photoshop csUsing Adobe Photoshop cs
Using Adobe Photoshop cs
 
Effective presentation skills
Effective presentation skillsEffective presentation skills
Effective presentation skills
 
Effective presentation skills
Effective presentation skillsEffective presentation skills
Effective presentation skills
 

Similar to Ai tool box 1

Graphics
GraphicsGraphics
Ip lesson3 notes -master
Ip lesson3 notes -masterIp lesson3 notes -master
Ip lesson3 notes -master
Littlestown High School
 
Introduction- The Basics of Photoshop CS6
Introduction- The Basics of Photoshop CS6Introduction- The Basics of Photoshop CS6
Introduction- The Basics of Photoshop CS6
Crest TechnoSoft
 
Edit images using selection in Adobe Photoshop.pptx
Edit images using selection in Adobe Photoshop.pptxEdit images using selection in Adobe Photoshop.pptx
Edit images using selection in Adobe Photoshop.pptx
Marvin Santiago
 
Corel draw
Corel drawCorel draw
Corel draw
argusacademy
 
Drawing and Selecting Through Line
Drawing and Selecting Through LineDrawing and Selecting Through Line
Drawing and Selecting Through Line
SanthiNivas
 
Lesson 9 (Tools Palette 1)
Lesson 9 (Tools Palette 1)Lesson 9 (Tools Palette 1)
Lesson 9 (Tools Palette 1)
Denden Amarante
 
Chap39
Chap39Chap39
Chap39
dkd_woohoo
 
Pepsi vector tutorial
Pepsi vector tutorialPepsi vector tutorial
Pepsi vector tutorial
balermm
 
Colour Magic Graphics
Colour Magic GraphicsColour Magic Graphics
Colour Magic Graphics
Malcolm Wilson
 
Photoshop Tutorial Booklet
Photoshop Tutorial BookletPhotoshop Tutorial Booklet
Photoshop Tutorial Booklet
Graveney School
 
c05_rac_2023.pdf
c05_rac_2023.pdfc05_rac_2023.pdf
c05_rac_2023.pdf
Manash Chatterjee
 
learn sketchup (for the beginners)
learn sketchup (for the beginners)learn sketchup (for the beginners)
learn sketchup (for the beginners)
Moksha Bhatia
 
Illustrator 9
Illustrator 9Illustrator 9
Illustrator 9
Daniel Downs
 
Adobe illustrator cs6
Adobe illustrator cs6Adobe illustrator cs6
Adobe illustrator cs6
ilaazmil2
 
Adobe illustrator cs6
Adobe illustrator cs6Adobe illustrator cs6
Adobe illustrator cs6
Ila Azmil
 
Tutorial
TutorialTutorial
Tutorial
hwells2101
 
Adobe Illustrator CS6 Primer
Adobe Illustrator CS6 PrimerAdobe Illustrator CS6 Primer
Adobe Illustrator CS6 Primer
NYCCTfab
 
Assignment 26
Assignment 26Assignment 26
Assignment 26
Group1A2media
 
Google sketchup8
Google sketchup8Google sketchup8
Google sketchup8
Trianz King
 

Similar to Ai tool box 1 (20)

Graphics
GraphicsGraphics
Graphics
 
Ip lesson3 notes -master
Ip lesson3 notes -masterIp lesson3 notes -master
Ip lesson3 notes -master
 
Introduction- The Basics of Photoshop CS6
Introduction- The Basics of Photoshop CS6Introduction- The Basics of Photoshop CS6
Introduction- The Basics of Photoshop CS6
 
Edit images using selection in Adobe Photoshop.pptx
Edit images using selection in Adobe Photoshop.pptxEdit images using selection in Adobe Photoshop.pptx
Edit images using selection in Adobe Photoshop.pptx
 
Corel draw
Corel drawCorel draw
Corel draw
 
Drawing and Selecting Through Line
Drawing and Selecting Through LineDrawing and Selecting Through Line
Drawing and Selecting Through Line
 
Lesson 9 (Tools Palette 1)
Lesson 9 (Tools Palette 1)Lesson 9 (Tools Palette 1)
Lesson 9 (Tools Palette 1)
 
Chap39
Chap39Chap39
Chap39
 
Pepsi vector tutorial
Pepsi vector tutorialPepsi vector tutorial
Pepsi vector tutorial
 
Colour Magic Graphics
Colour Magic GraphicsColour Magic Graphics
Colour Magic Graphics
 
Photoshop Tutorial Booklet
Photoshop Tutorial BookletPhotoshop Tutorial Booklet
Photoshop Tutorial Booklet
 
c05_rac_2023.pdf
c05_rac_2023.pdfc05_rac_2023.pdf
c05_rac_2023.pdf
 
learn sketchup (for the beginners)
learn sketchup (for the beginners)learn sketchup (for the beginners)
learn sketchup (for the beginners)
 
Illustrator 9
Illustrator 9Illustrator 9
Illustrator 9
 
Adobe illustrator cs6
Adobe illustrator cs6Adobe illustrator cs6
Adobe illustrator cs6
 
Adobe illustrator cs6
Adobe illustrator cs6Adobe illustrator cs6
Adobe illustrator cs6
 
Tutorial
TutorialTutorial
Tutorial
 
Adobe Illustrator CS6 Primer
Adobe Illustrator CS6 PrimerAdobe Illustrator CS6 Primer
Adobe Illustrator CS6 Primer
 
Assignment 26
Assignment 26Assignment 26
Assignment 26
 
Google sketchup8
Google sketchup8Google sketchup8
Google sketchup8
 

Recently uploaded

Ch-4 Forest Society and colonialism 2.pdf
Ch-4 Forest Society and colonialism 2.pdfCh-4 Forest Society and colonialism 2.pdf
Ch-4 Forest Society and colonialism 2.pdf
lakshayrojroj
 
Information and Communication Technology in Education
Information and Communication Technology in EducationInformation and Communication Technology in Education
Information and Communication Technology in Education
MJDuyan
 
KHUSWANT SINGH.pptx ALL YOU NEED TO KNOW ABOUT KHUSHWANT SINGH
KHUSWANT SINGH.pptx ALL YOU NEED TO KNOW ABOUT KHUSHWANT SINGHKHUSWANT SINGH.pptx ALL YOU NEED TO KNOW ABOUT KHUSHWANT SINGH
KHUSWANT SINGH.pptx ALL YOU NEED TO KNOW ABOUT KHUSHWANT SINGH
shreyassri1208
 
欧洲杯下注-欧洲杯下注押注官网-欧洲杯下注押注网站|【​网址​🎉ac44.net🎉​】
欧洲杯下注-欧洲杯下注押注官网-欧洲杯下注押注网站|【​网址​🎉ac44.net🎉​】欧洲杯下注-欧洲杯下注押注官网-欧洲杯下注押注网站|【​网址​🎉ac44.net🎉​】
欧洲杯下注-欧洲杯下注押注官网-欧洲杯下注押注网站|【​网址​🎉ac44.net🎉​】
andagarcia212
 
Data Structure using C by Dr. K Adisesha .ppsx
Data Structure using C by Dr. K Adisesha .ppsxData Structure using C by Dr. K Adisesha .ppsx
Data Structure using C by Dr. K Adisesha .ppsx
Prof. Dr. K. Adisesha
 
skeleton System.pdf (skeleton system wow)
skeleton System.pdf (skeleton system wow)skeleton System.pdf (skeleton system wow)
skeleton System.pdf (skeleton system wow)
Mohammad Al-Dhahabi
 
How to Manage Reception Report in Odoo 17
How to Manage Reception Report in Odoo 17How to Manage Reception Report in Odoo 17
How to Manage Reception Report in Odoo 17
Celine George
 
Pharmaceutics Pharmaceuticals best of brub
Pharmaceutics Pharmaceuticals best of brubPharmaceutics Pharmaceuticals best of brub
Pharmaceutics Pharmaceuticals best of brub
danielkiash986
 
A Free 200-Page eBook ~ Brain and Mind Exercise.pptx
A Free 200-Page eBook ~ Brain and Mind Exercise.pptxA Free 200-Page eBook ~ Brain and Mind Exercise.pptx
A Free 200-Page eBook ~ Brain and Mind Exercise.pptx
OH TEIK BIN
 
78 Microsoft-Publisher - Sirin Sultana Bora.pptx
78 Microsoft-Publisher - Sirin Sultana Bora.pptx78 Microsoft-Publisher - Sirin Sultana Bora.pptx
78 Microsoft-Publisher - Sirin Sultana Bora.pptx
Kalna College
 
THE SACRIFICE HOW PRO-PALESTINE PROTESTS STUDENTS ARE SACRIFICING TO CHANGE T...
THE SACRIFICE HOW PRO-PALESTINE PROTESTS STUDENTS ARE SACRIFICING TO CHANGE T...THE SACRIFICE HOW PRO-PALESTINE PROTESTS STUDENTS ARE SACRIFICING TO CHANGE T...
THE SACRIFICE HOW PRO-PALESTINE PROTESTS STUDENTS ARE SACRIFICING TO CHANGE T...
indexPub
 
Andreas Schleicher presents PISA 2022 Volume III - Creative Thinking - 18 Jun...
Andreas Schleicher presents PISA 2022 Volume III - Creative Thinking - 18 Jun...Andreas Schleicher presents PISA 2022 Volume III - Creative Thinking - 18 Jun...
Andreas Schleicher presents PISA 2022 Volume III - Creative Thinking - 18 Jun...
EduSkills OECD
 
Gender and Mental Health - Counselling and Family Therapy Applications and In...
Gender and Mental Health - Counselling and Family Therapy Applications and In...Gender and Mental Health - Counselling and Family Therapy Applications and In...
Gender and Mental Health - Counselling and Family Therapy Applications and In...
PsychoTech Services
 
Bonku-Babus-Friend by Sathyajith Ray (9)
Bonku-Babus-Friend by Sathyajith Ray  (9)Bonku-Babus-Friend by Sathyajith Ray  (9)
Bonku-Babus-Friend by Sathyajith Ray (9)
nitinpv4ai
 
How to Download & Install Module From the Odoo App Store in Odoo 17
How to Download & Install Module From the Odoo App Store in Odoo 17How to Download & Install Module From the Odoo App Store in Odoo 17
How to Download & Install Module From the Odoo App Store in Odoo 17
Celine George
 
A Visual Guide to 1 Samuel | A Tale of Two Hearts
A Visual Guide to 1 Samuel | A Tale of Two HeartsA Visual Guide to 1 Samuel | A Tale of Two Hearts
A Visual Guide to 1 Samuel | A Tale of Two Hearts
Steve Thomason
 
Temple of Asclepius in Thrace. Excavation results
Temple of Asclepius in Thrace. Excavation resultsTemple of Asclepius in Thrace. Excavation results
Temple of Asclepius in Thrace. Excavation results
Krassimira Luka
 
Contiguity Of Various Message Forms - Rupam Chandra.pptx
Contiguity Of Various Message Forms - Rupam Chandra.pptxContiguity Of Various Message Forms - Rupam Chandra.pptx
Contiguity Of Various Message Forms - Rupam Chandra.pptx
Kalna College
 
BÀI TẬP BỔ TRỢ TIẾNG ANH LỚP 8 - CẢ NĂM - FRIENDS PLUS - NĂM HỌC 2023-2024 (B...
BÀI TẬP BỔ TRỢ TIẾNG ANH LỚP 8 - CẢ NĂM - FRIENDS PLUS - NĂM HỌC 2023-2024 (B...BÀI TẬP BỔ TRỢ TIẾNG ANH LỚP 8 - CẢ NĂM - FRIENDS PLUS - NĂM HỌC 2023-2024 (B...
BÀI TẬP BỔ TRỢ TIẾNG ANH LỚP 8 - CẢ NĂM - FRIENDS PLUS - NĂM HỌC 2023-2024 (B...
Nguyen Thanh Tu Collection
 
HYPERTENSION - SLIDE SHARE PRESENTATION.
HYPERTENSION - SLIDE SHARE PRESENTATION.HYPERTENSION - SLIDE SHARE PRESENTATION.
HYPERTENSION - SLIDE SHARE PRESENTATION.
deepaannamalai16
 

Recently uploaded (20)

Ch-4 Forest Society and colonialism 2.pdf
Ch-4 Forest Society and colonialism 2.pdfCh-4 Forest Society and colonialism 2.pdf
Ch-4 Forest Society and colonialism 2.pdf
 
Information and Communication Technology in Education
Information and Communication Technology in EducationInformation and Communication Technology in Education
Information and Communication Technology in Education
 
KHUSWANT SINGH.pptx ALL YOU NEED TO KNOW ABOUT KHUSHWANT SINGH
KHUSWANT SINGH.pptx ALL YOU NEED TO KNOW ABOUT KHUSHWANT SINGHKHUSWANT SINGH.pptx ALL YOU NEED TO KNOW ABOUT KHUSHWANT SINGH
KHUSWANT SINGH.pptx ALL YOU NEED TO KNOW ABOUT KHUSHWANT SINGH
 
欧洲杯下注-欧洲杯下注押注官网-欧洲杯下注押注网站|【​网址​🎉ac44.net🎉​】
欧洲杯下注-欧洲杯下注押注官网-欧洲杯下注押注网站|【​网址​🎉ac44.net🎉​】欧洲杯下注-欧洲杯下注押注官网-欧洲杯下注押注网站|【​网址​🎉ac44.net🎉​】
欧洲杯下注-欧洲杯下注押注官网-欧洲杯下注押注网站|【​网址​🎉ac44.net🎉​】
 
Data Structure using C by Dr. K Adisesha .ppsx
Data Structure using C by Dr. K Adisesha .ppsxData Structure using C by Dr. K Adisesha .ppsx
Data Structure using C by Dr. K Adisesha .ppsx
 
skeleton System.pdf (skeleton system wow)
skeleton System.pdf (skeleton system wow)skeleton System.pdf (skeleton system wow)
skeleton System.pdf (skeleton system wow)
 
How to Manage Reception Report in Odoo 17
How to Manage Reception Report in Odoo 17How to Manage Reception Report in Odoo 17
How to Manage Reception Report in Odoo 17
 
Pharmaceutics Pharmaceuticals best of brub
Pharmaceutics Pharmaceuticals best of brubPharmaceutics Pharmaceuticals best of brub
Pharmaceutics Pharmaceuticals best of brub
 
A Free 200-Page eBook ~ Brain and Mind Exercise.pptx
A Free 200-Page eBook ~ Brain and Mind Exercise.pptxA Free 200-Page eBook ~ Brain and Mind Exercise.pptx
A Free 200-Page eBook ~ Brain and Mind Exercise.pptx
 
78 Microsoft-Publisher - Sirin Sultana Bora.pptx
78 Microsoft-Publisher - Sirin Sultana Bora.pptx78 Microsoft-Publisher - Sirin Sultana Bora.pptx
78 Microsoft-Publisher - Sirin Sultana Bora.pptx
 
THE SACRIFICE HOW PRO-PALESTINE PROTESTS STUDENTS ARE SACRIFICING TO CHANGE T...
THE SACRIFICE HOW PRO-PALESTINE PROTESTS STUDENTS ARE SACRIFICING TO CHANGE T...THE SACRIFICE HOW PRO-PALESTINE PROTESTS STUDENTS ARE SACRIFICING TO CHANGE T...
THE SACRIFICE HOW PRO-PALESTINE PROTESTS STUDENTS ARE SACRIFICING TO CHANGE T...
 
Andreas Schleicher presents PISA 2022 Volume III - Creative Thinking - 18 Jun...
Andreas Schleicher presents PISA 2022 Volume III - Creative Thinking - 18 Jun...Andreas Schleicher presents PISA 2022 Volume III - Creative Thinking - 18 Jun...
Andreas Schleicher presents PISA 2022 Volume III - Creative Thinking - 18 Jun...
 
Gender and Mental Health - Counselling and Family Therapy Applications and In...
Gender and Mental Health - Counselling and Family Therapy Applications and In...Gender and Mental Health - Counselling and Family Therapy Applications and In...
Gender and Mental Health - Counselling and Family Therapy Applications and In...
 
Bonku-Babus-Friend by Sathyajith Ray (9)
Bonku-Babus-Friend by Sathyajith Ray  (9)Bonku-Babus-Friend by Sathyajith Ray  (9)
Bonku-Babus-Friend by Sathyajith Ray (9)
 
How to Download & Install Module From the Odoo App Store in Odoo 17
How to Download & Install Module From the Odoo App Store in Odoo 17How to Download & Install Module From the Odoo App Store in Odoo 17
How to Download & Install Module From the Odoo App Store in Odoo 17
 
A Visual Guide to 1 Samuel | A Tale of Two Hearts
A Visual Guide to 1 Samuel | A Tale of Two HeartsA Visual Guide to 1 Samuel | A Tale of Two Hearts
A Visual Guide to 1 Samuel | A Tale of Two Hearts
 
Temple of Asclepius in Thrace. Excavation results
Temple of Asclepius in Thrace. Excavation resultsTemple of Asclepius in Thrace. Excavation results
Temple of Asclepius in Thrace. Excavation results
 
Contiguity Of Various Message Forms - Rupam Chandra.pptx
Contiguity Of Various Message Forms - Rupam Chandra.pptxContiguity Of Various Message Forms - Rupam Chandra.pptx
Contiguity Of Various Message Forms - Rupam Chandra.pptx
 
BÀI TẬP BỔ TRỢ TIẾNG ANH LỚP 8 - CẢ NĂM - FRIENDS PLUS - NĂM HỌC 2023-2024 (B...
BÀI TẬP BỔ TRỢ TIẾNG ANH LỚP 8 - CẢ NĂM - FRIENDS PLUS - NĂM HỌC 2023-2024 (B...BÀI TẬP BỔ TRỢ TIẾNG ANH LỚP 8 - CẢ NĂM - FRIENDS PLUS - NĂM HỌC 2023-2024 (B...
BÀI TẬP BỔ TRỢ TIẾNG ANH LỚP 8 - CẢ NĂM - FRIENDS PLUS - NĂM HỌC 2023-2024 (B...
 
HYPERTENSION - SLIDE SHARE PRESENTATION.
HYPERTENSION - SLIDE SHARE PRESENTATION.HYPERTENSION - SLIDE SHARE PRESENTATION.
HYPERTENSION - SLIDE SHARE PRESENTATION.
 

Ai tool box 1

  • 1. Illustrator: Toolbox TOPICS COVERED Colour & Transform, Editing & Transforming Objects, Drawing Modes, Gradients, Layers, drawing Path. OBJECTIVES Upon completion of this Lesson, you should be able to: Understanding Color Palette, Usage of Drawing Tools. Editing The Objects. Know about layers. Colour & Transform Colour is applied to selected objects by setting the fill and stroke properties towards the bottom of the main tool palette (figure 07). The three buttons underneath the fill and stroke colours set both the fill and stroke to a solid colour, gradient or no colour. Figure 07: The colour tools at the bottom of the main tool palette When an object is selected its fill and stroke colours are modified using the colour palette (window menu). For example, to change the stroke colour, click on the stroke colour icon on the main tool palette and then use the colour sliders on the colour palette. Stroke width is set using the stroke palette. Note that the Appearance palette (figure 08) displays the current properties of a selected object.
  • 2. Figure 08: The appearance palette To use a Pantone shade to colour an object the shade must first be added to the swatches palette (Window>show swatches). Select Window>swatch libraries>pantone coated and single click on a colour to add it to the swatches palette. To apply the colour to an object, select the object, select fill or stroke colour in the tool palette and then click on the appropriate colour in the swatches palette. Figure 09: The swatches palette Editing/transforming objects Objects can be transformed in a number of ways. The first is by using the transform and pathfinder palettes (window > show transform or show pathfinder). When an object is selected the transform palette can be used to rotate, skew and scale it numerically. The pathfinder palette is used to perform 2D Boolean operations on objects.
  • 3. Figure 10: A rectangle has been skewed using the transform palette and two overlapping rectangles have been split into three shapes using the divide command on the pathfinder palette. The second method involves using the pull down menus. Selected objects can be edited using commands found under object>arrange and object>transform. The group of commands found under the arrange sub-menu allows the stacking order of objects on the same layer to be changed. The transform sub-menu allows objects to be moved, scaled, rotated, reflected and sheared all numerically. There are also a number of commands under the effect menu for modifying objects (covered later). The final group of tools for modifying objects can be found on the tool palette. Most of them can be used by double clicking on them and using them to numerically transform an object, all can be used to transform an object using the mouse. Below they are outlined one by one. The rotate tool This tool rotates objects around a fixed point. The centre of rotation is set by single clicking, and the angle of rotation by clicking and dragging. The rotation angle can be constrained by holding down the shift key
  • 4. The scale tool Scales objects about a fixed point. Click to select the origin for the scaling and click and drag to scale. Holding the shift key while scaling constrains the object to its original proportions. The reflect tool Click once to define a point on the line of reflection then click and drag to define a further (final) point. The shear tool Click to select a reference point for the shear then click and drag to shear. Use the shift key to constrain the transformation. The free transform tool This tool can be used to transform an object in a number of ways. When the tool is picked the selected object(s) is surrounded by a bounding box. Clicking and dragging any of the bounding box handles scales the object(s) leaving the opposite handle position fixed. Holding down the alt key while clicking and dragging scales about the centre point of the object(s), Holding down the shift key constrains the scaling. Clicking and dragging just outside any of the bounding boxes handles allows the object(s) to be rotated.
  • 5. Drawing modes PageMaker allows the display of images to be customised so the screen redraw times are quicker. Images can be set to display as grey boxes, low resolution previews or high resolution previews. Illustrator allows objects to be created and modified in outline or preview modes (View>preview or View>outline). Toggle between the two modes to see how this changes the screen display of objects. Most work can be produced in preview mode with very little speed reduction. Gradients To fill a shape with a blend of two colours first select the gradient fill option on the main tool palette and then use the gradient tool. To use the tool first select the shape to be filled with the pointer tool, next select the gradient tool and drag across the shape to specify the direction and 'smoothness' of the gradient. Drag a long line for a smooth gradient or a short line for an abrupt gradient. To change the colours of a gradient use the gradient and colour palettes. NB: Gradients can be made up from more than one colour, click on the gradient representation in the gradient palette to add more (figure 12). Figure 12: The gradient palette showing a three colour gradient. Click on the colour markers underneath the gradient to change the colours. Illustrator also has a gradient mesh tool for creating complex gradients. Select a shape, select the gradient mesh tool and click once (or more) in the shape to create a mesh. To colour the nodes of the mesh select them with the direct selection pointer (top right of the tool palette) and use the colour palette.
  • 6. Figure 13: A shape filled with a gradient mesh NB: To select a node in a gradient mesh with the direct selection pointer, first deselect the object and reselect it with the direct selection pointer and click on the node. Using layers Objects in Illustrator documents can be split across a number of layers. Layers are controlled using the layers palette which is very similar to the layers palette in PhotoShop. Layers can be created, deleted, copied, hidden and locked. Layers can be assigned a colour which does not colour the objects within the layer but colours their outline when selected. Objects contained within a layer are also shown in the layers palette. To move an object from one layer to another simply drag its icon in the layers palette. Figure 14: The layers palette showing two layers and the objects on each of the layers. Layer 2 is the active layer. The 'eye' icons on the left show that all the layers and objects are visible. To add a new layer click on the 'stationary' icon (next to the trash icon), to delete a layer (or object) drag it onto the trash icon at the bottom right of the palette. Custom styles Illustrator's style palette is useful for applying the same attributes to a number of different objects. To add a custom style draw an object and set its properties (fill, stroke, effect, etc) as required. Select the object and select 'new style' from the style palette's pop-out menu to save the object's properties as a new style. To apply the style to other objects select the object with the pointer tool and click on the style in the palette. Masking
  • 7. Illustrator can use one shape to mask another object. Draw a shape or path (covered later) over an existing object, select both the shape and original object and select Object>Clipping masks>make. To reposition the shape behind the mask use the direct selection pointer (white arrow, top right on the main tool palette). Figure 15: A rectangle and circle before and after masking. Transparency Objects can be made transparent using the transparency palette. Select and object and drag the transparency/opacity slider. The effects menu The Illustrator effects pull down menu is similar to the filter menu in PhotoShop. The best way to discover what it does is to experiment with it. For example, draw a shape and select blur. Try the effects under effect>distort. Drawing Paths An Illustrator path is equivalent to an AutoCAD polyline. Paths can be drawn with a number of different tools and there are a number of ways of editing them. Paths can be single lines, polygons or irregular shapes. Shapes drawn with Illustrator's simple shape tools (i.e rectangles and ellipses) are paths. Paths can be made up from straight and curved sections. The easiest way to draw an irregular path in Illustrator is to use the pencil or paintbrush tools. Simply select one of the tools and draw freehand. Illustrator converts the freehand line to a path. The smoothness of the path can be specified by double clicking on either of the tools before using them. Open paths can be added to using the pencil tool (see later) Figure 16: Path drawing tools; the pencil tool, paintbrush tool and pen tool. The most accurate way to create a path is using the pen tool. Select the pen tool, single click in the work area to start a path and click again to create a second point etc. To end
  • 8. and close a shape click on the start point, to leave a shape open click on the pen tool to end it. Using the pen tool in this way creates irregular polygon shapes. Figure 17: An irregular path created using the pencil tool To create paths with curved sections (or completely curved shapes) click and drag with the pen tool as follows. Click to start the shape but hold down the mouse and drag to set a curve then release the mouse. Click to set the second point and drag to set the curve, etc. Compound paths can be created by drawing a path inside an existing path and selecting Objects>compound paths>make. For example, a polo-mint shaped path can be created by drawing two concentric circles and selecting Objects>compound paths>make.