The Pen tool and Subselect tool in Flash are used to create and manipulate paths and shapes. The Pen tool is used to place anchor points that form straight or curved lines when connected. These points can be corner points or curve points with tangent handles. The Subselect tool selects points and allows them to be moved, converted between point types, or deleted. It can also modify curve handles. Both tools can be used to edit shapes drawn with other tools by manipulating their anchor points.
This tutorial will guide you through the steps to design a fidget spinner in Solidworks. We'll start by modeling a basic spinner, then we'll design our own counterweights to be machined. We'll make a dimensioned print for the counterweight, too! We'll end by creating an assembly for the spinner and I'll give you some next steps to take your design further.
8 killer adobe photoshop tips for designersRemon Mia
Believe it or not, if you’re using Photoshop to design website, you’re on the right path to become a successful web designer. This is simply because Photoshop is one of the most advanced tool in the design industry that can make your creative imagination comes true with its plethora of professional tools which boost your productivity at the same time.
https://goo.gl/pwqYM7
IEEE CCNC 2011: Kalman Graffi - LifeSocial.KOM: A Secure and P2P-based Soluti...Kalman Graffi
The phenomenon of online social networks reaches millions of users in the Internet nowadays. In these, users present themselves, their interests and their social links which they use to interact with other users. We present in this paper LifeSocial.KOM, a p2p-based platform for secure online social networks which provides the functionality of common online social networks in a totally distributed and secure manner. It is plugin-based, thus extendible in its functionality, providing secure communication and access-controlled storage as well as monitored quality of service, addressing the needs of both, users and system providers. The platform operates solely on the resources of the users, eliminating the concentration of crucial operational costs for one provider. In a testbed evaluation, we show the feasibility of the approach and point out the potential of the p2p paradigm in the field of online social networks.
How to use the photoshop pen tool to edit e commerce imagesClipping Path Arts
In the epoch of eCommerce image & computing software, the advancement is humungous, and by the looks of it, there is no stopping of the same. One of the advanced computing software in use for the past many years has been Adobe’s Photoshop.
CorelDRAW is a vector graphics editor developed and marketed by Corel Corporation. It is also the name of the Corel graphics suite, which includes the bitmap-image editor Corel Photo-Paint as well as other graphics-related programs
CorelDRAW is Used to create Professional Art Work, This PPT gives the Introduction to CorelDRAW and its Components. Discussion about the Title Bar, Menu Bar, Standard Toolbar, Page Counter Bar,Dockers Window, Toolbox
toolbars and axis , how to import file from autocad to sketchup , basic tools of sketchup , how to extrude walls , how to make a window (quick way ) , how to see dimensions, commands - position camera, walk and look around. All this can be learned in this presentation. A guide for beginners.
Daniel Downs: Student Experiences In A Project Based Learning Technology Curr...Daniel Downs
The purpose of this qualitative study was to understand the group dynamic in PBL task delegation and technology skill fluency through the language of its participants. The researcher collected themes, experiences, and decisions depicted in the language of high school students as they negotiated a final project using computer technology tools to create mobile applications for their high school community.
Often in groups, teachers are not always part of the exchange of learning and necessary communication between students to complete tasks and negotiate ideas. This research assists teachers in developing strategies to better organize and guide groups in a PBL curriculum with technology so students can more effectively address the needs of projects independently.
In this research, the PBL curriculum promoted conversation and communication for delegated tasks amongst students and developing a sense of familiarity and cohesiveness in student centered groups. Scenarios which required the management of group members to complete the tasks required in the project were also prevalent. Group members shared critical vocabulary related to technology and the process of the project. Additional benefits included group approaches with the consideration of continually improving the project and also an increased awareness and appreciation for the technology used in the project.
The final mobile applications of the groups represent the combination of group process, technology, and addressing the authentic question in the PBL curriculum. Students were able to develop authentic projects which were the results of a variety of technology based skills, project management and conceptualization.
UiPath Test Automation using UiPath Test Suite series, part 4DianaGray10
Welcome to UiPath Test Automation using UiPath Test Suite series part 4. In this session, we will cover Test Manager overview along with SAP heatmap.
The UiPath Test Manager overview with SAP heatmap webinar offers a concise yet comprehensive exploration of the role of a Test Manager within SAP environments, coupled with the utilization of heatmaps for effective testing strategies.
Participants will gain insights into the responsibilities, challenges, and best practices associated with test management in SAP projects. Additionally, the webinar delves into the significance of heatmaps as a visual aid for identifying testing priorities, areas of risk, and resource allocation within SAP landscapes. Through this session, attendees can expect to enhance their understanding of test management principles while learning practical approaches to optimize testing processes in SAP environments using heatmap visualization techniques
What will you get from this session?
1. Insights into SAP testing best practices
2. Heatmap utilization for testing
3. Optimization of testing processes
4. Demo
Topics covered:
Execution from the test manager
Orchestrator execution result
Defect reporting
SAP heatmap example with demo
Speaker:
Deepak Rai, Automation Practice Lead, Boundaryless Group and UiPath MVP
Elevating Tactical DDD Patterns Through Object CalisthenicsDorra BARTAGUIZ
After immersing yourself in the blue book and its red counterpart, attending DDD-focused conferences, and applying tactical patterns, you're left with a crucial question: How do I ensure my design is effective? Tactical patterns within Domain-Driven Design (DDD) serve as guiding principles for creating clear and manageable domain models. However, achieving success with these patterns requires additional guidance. Interestingly, we've observed that a set of constraints initially designed for training purposes remarkably aligns with effective pattern implementation, offering a more ‘mechanical’ approach. Let's explore together how Object Calisthenics can elevate the design of your tactical DDD patterns, offering concrete help for those venturing into DDD for the first time!
State of ICS and IoT Cyber Threat Landscape Report 2024 previewPrayukth K V
The IoT and OT threat landscape report has been prepared by the Threat Research Team at Sectrio using data from Sectrio, cyber threat intelligence farming facilities spread across over 85 cities around the world. In addition, Sectrio also runs AI-based advanced threat and payload engagement facilities that serve as sinks to attract and engage sophisticated threat actors, and newer malware including new variants and latent threats that are at an earlier stage of development.
The latest edition of the OT/ICS and IoT security Threat Landscape Report 2024 also covers:
State of global ICS asset and network exposure
Sectoral targets and attacks as well as the cost of ransom
Global APT activity, AI usage, actor and tactic profiles, and implications
Rise in volumes of AI-powered cyberattacks
Major cyber events in 2024
Malware and malicious payload trends
Cyberattack types and targets
Vulnerability exploit attempts on CVEs
Attacks on counties – USA
Expansion of bot farms – how, where, and why
In-depth analysis of the cyber threat landscape across North America, South America, Europe, APAC, and the Middle East
Why are attacks on smart factories rising?
Cyber risk predictions
Axis of attacks – Europe
Systemic attacks in the Middle East
Download the full report from here:
https://sectrio.com/resources/ot-threat-landscape-reports/sectrio-releases-ot-ics-and-iot-security-threat-landscape-report-2024/
Epistemic Interaction - tuning interfaces to provide information for AI supportAlan Dix
Paper presented at SYNERGY workshop at AVI 2024, Genoa, Italy. 3rd June 2024
https://alandix.com/academic/papers/synergy2024-epistemic/
As machine learning integrates deeper into human-computer interactions, the concept of epistemic interaction emerges, aiming to refine these interactions to enhance system adaptability. This approach encourages minor, intentional adjustments in user behaviour to enrich the data available for system learning. This paper introduces epistemic interaction within the context of human-system communication, illustrating how deliberate interaction design can improve system understanding and adaptation. Through concrete examples, we demonstrate the potential of epistemic interaction to significantly advance human-computer interaction by leveraging intuitive human communication strategies to inform system design and functionality, offering a novel pathway for enriching user-system engagements.
Welocme to ViralQR, your best QR code generator.ViralQR
Welcome to ViralQR, your best QR code generator available on the market!
At ViralQR, we design static and dynamic QR codes. Our mission is to make business operations easier and customer engagement more powerful through the use of QR technology. Be it a small-scale business or a huge enterprise, our easy-to-use platform provides multiple choices that can be tailored according to your company's branding and marketing strategies.
Our Vision
We are here to make the process of creating QR codes easy and smooth, thus enhancing customer interaction and making business more fluid. We very strongly believe in the ability of QR codes to change the world for businesses in their interaction with customers and are set on making that technology accessible and usable far and wide.
Our Achievements
Ever since its inception, we have successfully served many clients by offering QR codes in their marketing, service delivery, and collection of feedback across various industries. Our platform has been recognized for its ease of use and amazing features, which helped a business to make QR codes.
Our Services
At ViralQR, here is a comprehensive suite of services that caters to your very needs:
Static QR Codes: Create free static QR codes. These QR codes are able to store significant information such as URLs, vCards, plain text, emails and SMS, Wi-Fi credentials, and Bitcoin addresses.
Dynamic QR codes: These also have all the advanced features but are subscription-based. They can directly link to PDF files, images, micro-landing pages, social accounts, review forms, business pages, and applications. In addition, they can be branded with CTAs, frames, patterns, colors, and logos to enhance your branding.
Pricing and Packages
Additionally, there is a 14-day free offer to ViralQR, which is an exceptional opportunity for new users to take a feel of this platform. One can easily subscribe from there and experience the full dynamic of using QR codes. The subscription plans are not only meant for business; they are priced very flexibly so that literally every business could afford to benefit from our service.
Why choose us?
ViralQR will provide services for marketing, advertising, catering, retail, and the like. The QR codes can be posted on fliers, packaging, merchandise, and banners, as well as to substitute for cash and cards in a restaurant or coffee shop. With QR codes integrated into your business, improve customer engagement and streamline operations.
Comprehensive Analytics
Subscribers of ViralQR receive detailed analytics and tracking tools in light of having a view of the core values of QR code performance. Our analytics dashboard shows aggregate views and unique views, as well as detailed information about each impression, including time, device, browser, and estimated location by city and country.
So, thank you for choosing ViralQR; we have an offer of nothing but the best in terms of QR code services to meet business diversity!
Encryption in Microsoft 365 - ExpertsLive Netherlands 2024Albert Hoitingh
In this session I delve into the encryption technology used in Microsoft 365 and Microsoft Purview. Including the concepts of Customer Key and Double Key Encryption.
Transcript: Selling digital books in 2024: Insights from industry leaders - T...BookNet Canada
The publishing industry has been selling digital audiobooks and ebooks for over a decade and has found its groove. What’s changed? What has stayed the same? Where do we go from here? Join a group of leading sales peers from across the industry for a conversation about the lessons learned since the popularization of digital books, best practices, digital book supply chain management, and more.
Link to video recording: https://bnctechforum.ca/sessions/selling-digital-books-in-2024-insights-from-industry-leaders/
Presented by BookNet Canada on May 28, 2024, with support from the Department of Canadian Heritage.
Dev Dives: Train smarter, not harder – active learning and UiPath LLMs for do...UiPathCommunity
💥 Speed, accuracy, and scaling – discover the superpowers of GenAI in action with UiPath Document Understanding and Communications Mining™:
See how to accelerate model training and optimize model performance with active learning
Learn about the latest enhancements to out-of-the-box document processing – with little to no training required
Get an exclusive demo of the new family of UiPath LLMs – GenAI models specialized for processing different types of documents and messages
This is a hands-on session specifically designed for automation developers and AI enthusiasts seeking to enhance their knowledge in leveraging the latest intelligent document processing capabilities offered by UiPath.
Speakers:
👨🏫 Andras Palfi, Senior Product Manager, UiPath
👩🏫 Lenka Dulovicova, Product Program Manager, UiPath
Dev Dives: Train smarter, not harder – active learning and UiPath LLMs for do...
Flash 5 toolbar
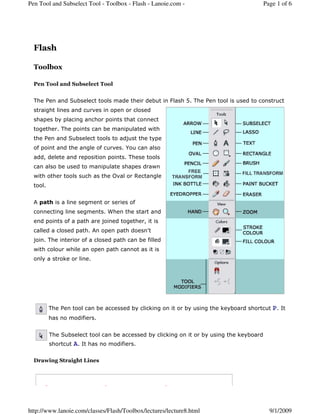
1. Flash
Toolbox
Pen Tool and Subselect Tool
The Pen and Subselect tools made their debut in Flash 5. The Pen tool is used to construct
straight lines and curves in open or closed
shapes by placing anchor points that connect
together. The points can be manipulated with
the Pen and Subselect tools to adjust the type
of point and the angle of curves. You can also
add, delete and reposition points. These tools
can also be used to manipulate shapes drawn
with other tools such as the Oval or Rectangle
tool.
A path is a line segment or series of
connecting line segments. When the start and
end points of a path are joined together, it is
called a closed path. An open path doesn't
join. The interior of a closed path can be filled
with colour while an open path cannot as it is
only a stroke or line.
The Pen tool can be accessed by clicking on it or by using the keyboard shortcut P. It
has no modifiers.
The Subselect tool can be accessed by clicking on it or by using the keyboard
shortcut A. It has no modifiers.
Drawing Straight Lines
Page 1 of 6Pen Tool and Subselect Tool - Toolbox - Flash - Lanoie.com -
9/1/2009http://www.lanoie.com/classes/Flash/Toolbox/lectures/lecture8.html
2. To draw shapes composed of straight lines with the Pen tool:
1. Select the Pen tool and click on Stage where the first line is to begin.
2. Click in another spot where you want the first line segment to end. A line will be
shown connecting the two points in the same colour as the layer outline colour.
3. Continue clicking to add additional points/line segments. (above, left)
4. To constrain line segments to multiples of 45-degree angles, hold the Shift key
while placing the end point of a line segment.
5. To complete the path as an open path, double-click the end point with the Pen tool,
Ctrl-click (Cmd-click) elsewhere on Stage, or click the Pen tool in the
Toolbox.
6. To complete the path as a closed path (above, middle), position the Pen tool over
the path's starting point. An open circle will display beside the cursor to indicate that
you're within range to close the path. Click to close it. (above, right)
7. To deselect the path so that it displays in its actual colour(s), click another tool in
the Toolbox.
Drawing Curves
Curved lines are created using a process called Bezier curves, named after its inventor,
mathematician Pierre Bezier. Instead of constructing a curve using multiple points, a
Bezier curve can consist of as few as two points - one point on each end of the curve
segment. One or both points can have tangent handles that are used to modify the
shape of the curve.
Points that create curved lines are different from those that
create straight lines in two ways. Curve points, when selected,
display as hollow circles while corner points that create
straight-line segments display as hollow squares. Each curve
point has tangent handles that dictate the depth and angle of
the curve. The length and position of the tangent handles can
be manipulated using the Subselect tool.
To draw a curved path, select the Pen tool and position the pointer on the Stage
where you want the path to begin. When you hold down the mouse button, the
first point appears and the cursor turns into a white arrowhead, which is actually
the Subselect tool. Click and drag in the direction you want the curve to slope. To
constrain tangent handles to multiples of 45 degrees, hold down the Shift key while
dragging. Release the mouse button.
Page 2 of 6Pen Tool and Subselect Tool - Toolbox - Flash - Lanoie.com -
9/1/2009http://www.lanoie.com/classes/Flash/Toolbox/lectures/lecture8.html
3. To complete the first curve segment, click on the Stage to
place an anchor point and drag away from the curved line to
create tangent handles.
Keep adding curve points as desired. You can alternate between
adding curve and corner points when drawing a path. To finish or
close a path with curve points, follow the same procedure given for
straight line paths.
Points
As mentioned above, you can add both corner and curve points
along the same path. Points that are part of a straight-line segment
are always corner points, even if they also connect to a curved
segment. This is illustrated by the outer corner points in the
diagram at the right. Sometimes corner points will "sprout" one
tangent handle on the curve side. This can happen after the shape
has been edited with the Pen tool. Another known issue is that editing may add
unexpected points to the path.
Moving Points
To move an anchor point, drag it with the Subselect tool. Only one
point at a time can be moved this way. Alternately, you can select a
point with the Subselect tool, release the mouse button, and use the
arrows on the keyboard to move the point. This is helpful when you
want to move the point very short distances. Using this method, you
can also use Shift with the Subselect tool to select multiple points and then move them
all at once with the arrow keys. To move in larger distance increments, use the Shift
key along with the arrow keys.
Adding Points
To add a point along a path, hold the pointer over a line
segment. A plus symbol will appear beside the pen icon.
Click on the line to add a point.
Page 3 of 6Pen Tool and Subselect Tool - Toolbox - Flash - Lanoie.com -
9/1/2009http://www.lanoie.com/classes/Flash/Toolbox/lectures/lecture8.html
4. Converting Points
To convert a corner point to a curve point, first select the point with the
Subselect tool then hold down the Alt (Option) key, click on the
point and drag out the tangent handles.
To convert a curve point to a corner point, hold the Pen
tool over the point and note that a corner icon is
displayed beside the pointer. Click on the point to convert
it to a corner.
Deleting Points
Points can be deleted by using the Pen tool or, more
directly, by using the Subselect tool. To delete a curve
point using the Pen tool, you must first convert it to a
corner point. Click once to convert it and then click again
to delete it. You'll notice that before the second click, a
minus sign appears by the pointer. If the point is already a corner point, one click with the
Pen tool will delete it. You can use the Subselect tool to select any type of point and then
press the Delete key to delete it.
Modifying Shapes Made With Drawing Tools
Objects drawn with the other drawing tools can be modified using the Pen and Subselect
tools. The example above shows how to transform a rotated square made with the
Rectangle tool into a triangle. Only the Subselect tool is required. This is particularly useful
for making buttons.
1. This is the image we started with.
2. Click on the path of the object with the Subselect tool. The filled black box displayed
Page 4 of 6Pen Tool and Subselect Tool - Toolbox - Flash - Lanoie.com -
9/1/2009http://www.lanoie.com/classes/Flash/Toolbox/lectures/lecture8.html
5. by the pointer means the pointer is over a line segment.
3. The square has been selected and its points are displayed.
4. Click on one of the points to select it and then press the Delete key.
5. The point disappears, leaving a triangle.
6. Click on the Stage with the Subselect tool to deselect the path.
Pen Tool States
The Pen Tool pointer can take on seven different appearances, depending on the context
in which it is being used.
Hovering over the Stage away from objects
Over an end point of a path
Over a path segment
Over a corner point
Over a curve point
Over a path when used with the Ctrl (Cmd) key (allows a quick toggle to the
Subselect tool)
Over a point when used with the Ctrl (Cmd) key (allows a quick toggle to the
Subselect tool)
Pen Tool and Subselect Tool Summary
The Pen tool is used to create paths by placing anchor points that are connected by
straight or curved lines. The two types of points that can be placed are corner points and
curve points. Curve points have tangent handles that can be used to manipulate the angle
and depth of a curve. Corner points can either have no tangent handles or, if the point lies
between a curve and a straight line, it can have a handle on the curve side. Points can be
added or deleted and their point types can be changed.
The Subselect tool is used to select paths and points, move points, and adjust tangent
handles to modify curve segments. Objects drawn with other drawing tools can be
selected with the Subselect tool to display its points and then manipulated with the Pen
and Subselect tools.
Page 5 of 6Pen Tool and Subselect Tool - Toolbox - Flash - Lanoie.com -
9/1/2009http://www.lanoie.com/classes/Flash/Toolbox/lectures/lecture8.html
6. Pen Tool and Subselect Tool Keyboard Shortcuts:
Pen tool: P
Subselect tool: A
Free seminars, open to the public:
Things to Know Before Starting your Website w/ Brent Scott 2009 Sep 14, 3:00
PM - 5:00 PM
MS Word - Tips for Small Business 2009 Oct 26, 12:00 PM - 2:00 PM
MS Excel - Tips for Small Business 2009 Oct 26, 2:30 PM - 4:30 PM
Microsoft PowerPoint w/ Ricki Miles 2009 Oct 27, 10:00 AM - 12:00 PM
Things to Know Before Starting your Website w/ Coree Francisco 2009 Nov 25,
2:00 PM - 4:00 PM
Search Engine Optimization (SEO): On-Page Tactics 2009 Dec 18, 10:00 AM -
12:00 PM
Search Engine Marketing (SEM): Off-Page Tactics 2009 Dec 18, 12:30 PM - 2:30
PM
Things to Know Before Starting your Website w/ Coree Francisco 2010 Jan 06,
10:00 AM - 12:00 PM
Writing for the Web w/ Brenda Boughton 2010 Feb 11, 1:00 PM - 3:00 PM
Flash - TOC - Introduction - Books -
Toolbox - Links - Questions - Quiz -
1 - 2 - 3 - 4 - 5 - 6 - 7 - [ 8 ] - 9 - A - B - C - D - E -
Flash - TOC - Introduction - Books -
Toolbox - Links - Questions - Quiz -
1 - 2 - 3 - 4 - 5 - 6 - 7 - [ 8 ] - 9 - A - B - C - D - E -
Page 6 of 6Pen Tool and Subselect Tool - Toolbox - Flash - Lanoie.com -
9/1/2009http://www.lanoie.com/classes/Flash/Toolbox/lectures/lecture8.html