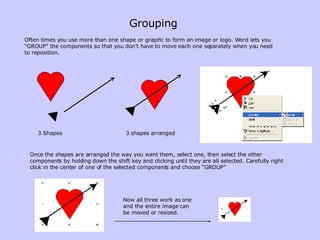
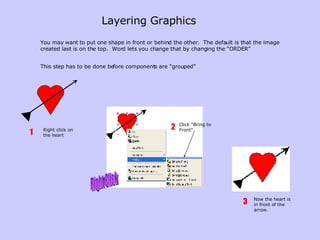
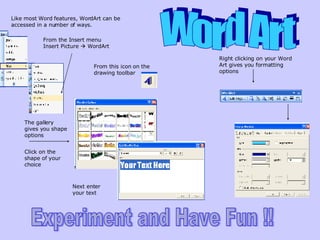
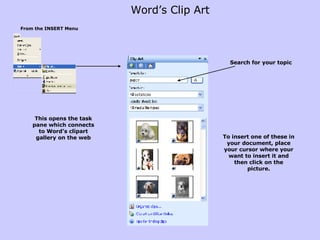
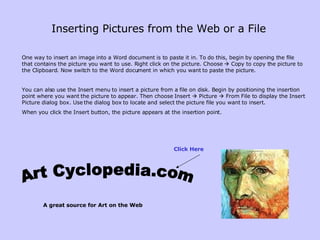
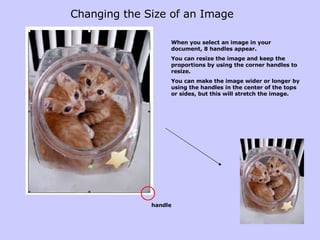
Graphics
Word includes its own drawing program. While this program is not as powerful as most graphics programs on the market, it will enable you to create simple graphics without leaving your Word document.  To open the Drawing toolbar, click on the  Drawing  button on the Standard toolbar.  Item 1 : The   Draw drop-down menu lets you group objects, change the way that objects overlap, add a grid, align objects, and more.  Item 2 : Select Objects: releases your cursor and changes to the arrow that you need to use to select and work with the next object. Item 3 : The  AutoShape  feature allows you to draw a shape with a couple of clicks. Click on the  AutoShape  button to select from an extensive list of pre-defined shapes. Select the shape you desire, then click and drag in your document where you want to put the shape.  The following is a quick reference for the Drawing toolbar buttons.  I will go into details on specific items later in the lesson. 1  2  3  4  5  6  7  8  9  10  11  12  13  14  15  16  17  18 19  20 Drawing tools
Item 4 : Use the  Line  button to quickly draw a straight line. Click the  Line  button, then click and drag to draw a line.  Item 5 : The  Arrow  button works just like the  Line  button, but puts an arrow at the end of the line where you finished drawing.  Item 6:  The  Rectangle  button lets you draw rectangular or square shapes quickly. Click the  Rectangle  button, then click and drag to draw a rectangle.  Item 7 : The  Oval  button works just like the  Rectangle  button. Hold down the Shift key while drawing to get a perfect circle.  Item 8 : This button inserts a text box.  Item 9 : Click this button to insert a WordArt object. WordArt is a lot of fun and can be very useful to create logos and titles.  Item 10 : Click this button to insert one of several available diagrams (Venn, pyramid, etc) Item 11 : Click the  Insert Clip Art  button to incorporate clip art into your drawing.  Item 12 : Opens your “pictures” folder to allow you to insert a photo. Item 13 : The  Fill Color  button lets you fill an object with a selected color. Click the down arrow to change the fill color. To fill an object, select it, and then click the  Fill Color  button.  Item 14 : The  Line Color  button works like the  Fill Color  button, but changes the color of the lines in an object.  Item 15 : The  Font Color  button changes the color of text incorporated into your drawing. It works like the  Line  and  Fill Color  buttons.  1  2  3  4  5  6  7  8  9  10  11  12  13  14  15  16  17  18 19  20
Item 16 : The  Line Style  button lets you change the width of the lines in your drawing, or even draw in multiple lines. You can select a line style before drawing an object, or you can select an object and the click the button to change the line style for that object.  Item 17 : The  Dash Style  button works just like the  Line Style  button, but lets you draw objects using dashed or dotted lines.  Item 18 : The  Arrow Style  button works with the  Line  and  Arrow  buttons to add or change the direction or style of arrows on lines. Click the button and then draw the line, or select the line and then click the button to change the arrow style.  Item 19 : The  Shadow  button adds a shadow to the selected object. Select an object, then click the  Shadow  button to select from several shadow styles. Click  Shadow Settings  to change the color of the shadow or nudge it in relation to the object.  Item 20 : The 3-D feature changes your shapes into three-dimensional objects. Draw your shape, select it, and then click on the  3-D  button to select the desired 3-D effect. Click  3-D Settings  to change the color scheme in your 3-D object as well as the direction, rotation, lighting, perspective, depth, etc., of the object. Figure 2-3 shows the 3-D button and some of the 3-D effects you can choose from.  1  2  3  4  5  6  7  8  9  10  11  12  13  14  15  16  17  18 19  20
The Drawing Canvas When you create a drawing, a drawing canvas is placed around it. The drawing canvas is an area on which you can draw multiple shapes. Because the shapes are contained within the drawing canvas, they can be moved or resized as a single unit. The drawing canvas is new to Office 2003. If you prefer to create drawings without the canvas using the “grouping: method, you can temporarily remove the canvas by clicking “escape” when it appears. If you want to change the default so that it does not appear each time, you can disable it in the options dialog box.
Word provides many ready-made shapes, called AutoShapes, that you can add to your document. On the drawing toolbar, choose AutoShapes.  Choose the type of shape you want to add, and click on it.  The drawing canvas will appear. Do not worry if it upsets the text around it. Your cursor will turn into a crosshair symbol. Inside the canvas space, click and drag the shape to the size you want, and release the mouse.  AutoShapes
You can change the size by dragging one of the handles at the edges of your shape.   To move the shape, place your cursor over it. When the cursor changes to a crosshair symbol, click and drag. Manipulate your drawing Rotate When you move your mouse over the handle, it looks like this – now drag the drawing around
Format your AutoShape Right Click On the Colors and Lines section of this dialog box, you can experiment with fill and line colors and styles. Change the color of the shape Change the color of the outline Change the thickness of the outline Change the line style of the outline
You can add text to your AutoShape Right Click
Make Your Auto Shape 3D Make your shapes more interesting by giving them a shadow or a 3-D format.  The best way to learn the graphic variations available in Word is to have lots of fun with the Drawing toolbar. Experiment! You will find many uses for it as you create new documents in Word. Shadow 3 - D Basic shape
Grouping Often times you use more than one shape or graphic to form an image or logo. Word lets you “GROUP” the components so that you don’t have to move each one separately when you need to reposition. 3 Shapes 3 shapes arranged Once the shapes are arranged the way you want them, select one, then select the other components by holding down the shift key and clicking until they are all selected. Carefully right click in the center of one of the selected components and choose “GROUP” Now all three work as one and the entire image can be moved or resized.
Layering Graphics   You may want to put one shape in front or behind the other.  The default is that the image created last is on the top.  Word lets you change that by changing the “ORDER” This step has to be done before components are “grouped” Right click on the heart 1 Now the heart is in front of the arrow. 3 Right Click Click “Bring to Front” 2
Word Art Like most Word features, WordArt can be accessed in a number of ways. From the Insert menu Insert Picture    WordArt From this icon on the drawing toolbar The gallery gives you shape options Right clicking on your Word Art gives you formatting options Click on the shape of your choice Next enter your text Experiment and Have Fun !!
Word’s Clip Art  From the INSERT Menu Search for your topic To insert one of these in your document, place your cursor where your want to insert it and then click on the picture. This opens the task pane which connects to Word’s clipart gallery on the web
Inserting Pictures from the Web or a File   One way to insert an image into a Word document is to paste it in. To do this, begin by opening the file that contains the picture you want to use. Right click on the picture. Choose    Copy to copy the picture to the Clipboard.   Now switch to the Word document in which you want to paste the picture.  You can also use the Insert menu to insert a picture from a file on disk. Begin by positioning the insertion point where you want the picture to appear. Then choose Insert    Picture    From File to display the Insert Picture dialog box. Use the dialog box to locate and select the picture file you want to insert. When you click the Insert button, the picture appears at the insertion point.  http://www.artcyclopedia.com/ Art Cyclopedia.com A great source for Art on the Web Click Here
Changing the Size of an Image When you select an image in your document, 8 handles appear. You can resize the image and keep the proportions by using the corner handles to resize. You can make the image wider or longer by using the handles in the center of the tops or sides, but this will stretch the image. handle
Cropping Images Right click on the image and choose to show the picture toolbar When you choose the cropping tool, your cursor becomes the tool. Place it over one of the “handles” and drag in to remove unwanted edges of the image. Cropping removes the outside edges of an image to eliminate excessive or irrelevant background content of a photo.
Image Brightness and Contrast Less brightness More brightness Less contrast More contrast Brightness Contrast
Grayscale and Watermark automatic Grayscale Black & White Washout
When you insert a graphic, Word puts it at the position of the cursor, sitting on the base of the current line. Sometimes, you want more control over the position of a graphic in your document. You may want text to run to the edges of the graphic, flow around the graphic, or even run on top of the graphic.  Select the image that best represents the way you want the graphic formatted in relation to your text. Try different effects to see how you like them. You can change your selection by clicking in the alternative boxes.  Wrap Text Around a Graphic
Add a Text Box Working With Text Boxes Certain kinds of information are best displayed using text boxes. If you create newsletters, flyers, reports, announcements, school projects, or other types of publications, you may want to use Word's text box feature.  Text boxes can be freely moved around your document without moving other elements. They are great for extra important information. To Create a Text Box:  Choose  Insert   Text Box .  The drawing canvas will open (you can tap escape to close it if you want to) Place your insertion point where you want your text box.  Left click and the mouse pointer becomes a  crosshair  .  Drag the text box until it is the appropriate size. Release the left mouse button when ready.  To Insert Text into the Text Box: Click once inside the text box.  The box is  selected  and a blinking insertion point appears inside the box.  Begin typing.  Format text (change font, font size, style, etc) in the usual manner.  (Select text first, make changes later.)  You can move and resize a text box the same way as any other graphic.

Graphics

  • 1.
  • 2.
    Word includes itsown drawing program. While this program is not as powerful as most graphics programs on the market, it will enable you to create simple graphics without leaving your Word document. To open the Drawing toolbar, click on the Drawing button on the Standard toolbar. Item 1 : The Draw drop-down menu lets you group objects, change the way that objects overlap, add a grid, align objects, and more. Item 2 : Select Objects: releases your cursor and changes to the arrow that you need to use to select and work with the next object. Item 3 : The AutoShape feature allows you to draw a shape with a couple of clicks. Click on the AutoShape button to select from an extensive list of pre-defined shapes. Select the shape you desire, then click and drag in your document where you want to put the shape. The following is a quick reference for the Drawing toolbar buttons. I will go into details on specific items later in the lesson. 1 2 3 4 5 6 7 8 9 10 11 12 13 14 15 16 17 18 19 20 Drawing tools
  • 3.
    Item 4 :Use the Line button to quickly draw a straight line. Click the Line button, then click and drag to draw a line. Item 5 : The Arrow button works just like the Line button, but puts an arrow at the end of the line where you finished drawing. Item 6: The Rectangle button lets you draw rectangular or square shapes quickly. Click the Rectangle button, then click and drag to draw a rectangle. Item 7 : The Oval button works just like the Rectangle button. Hold down the Shift key while drawing to get a perfect circle. Item 8 : This button inserts a text box. Item 9 : Click this button to insert a WordArt object. WordArt is a lot of fun and can be very useful to create logos and titles. Item 10 : Click this button to insert one of several available diagrams (Venn, pyramid, etc) Item 11 : Click the Insert Clip Art button to incorporate clip art into your drawing. Item 12 : Opens your “pictures” folder to allow you to insert a photo. Item 13 : The Fill Color button lets you fill an object with a selected color. Click the down arrow to change the fill color. To fill an object, select it, and then click the Fill Color button. Item 14 : The Line Color button works like the Fill Color button, but changes the color of the lines in an object. Item 15 : The Font Color button changes the color of text incorporated into your drawing. It works like the Line and Fill Color buttons. 1 2 3 4 5 6 7 8 9 10 11 12 13 14 15 16 17 18 19 20
  • 4.
    Item 16 :The Line Style button lets you change the width of the lines in your drawing, or even draw in multiple lines. You can select a line style before drawing an object, or you can select an object and the click the button to change the line style for that object. Item 17 : The Dash Style button works just like the Line Style button, but lets you draw objects using dashed or dotted lines. Item 18 : The Arrow Style button works with the Line and Arrow buttons to add or change the direction or style of arrows on lines. Click the button and then draw the line, or select the line and then click the button to change the arrow style. Item 19 : The Shadow button adds a shadow to the selected object. Select an object, then click the Shadow button to select from several shadow styles. Click Shadow Settings to change the color of the shadow or nudge it in relation to the object. Item 20 : The 3-D feature changes your shapes into three-dimensional objects. Draw your shape, select it, and then click on the 3-D button to select the desired 3-D effect. Click 3-D Settings to change the color scheme in your 3-D object as well as the direction, rotation, lighting, perspective, depth, etc., of the object. Figure 2-3 shows the 3-D button and some of the 3-D effects you can choose from. 1 2 3 4 5 6 7 8 9 10 11 12 13 14 15 16 17 18 19 20
  • 5.
    The Drawing CanvasWhen you create a drawing, a drawing canvas is placed around it. The drawing canvas is an area on which you can draw multiple shapes. Because the shapes are contained within the drawing canvas, they can be moved or resized as a single unit. The drawing canvas is new to Office 2003. If you prefer to create drawings without the canvas using the “grouping: method, you can temporarily remove the canvas by clicking “escape” when it appears. If you want to change the default so that it does not appear each time, you can disable it in the options dialog box.
  • 6.
    Word provides manyready-made shapes, called AutoShapes, that you can add to your document. On the drawing toolbar, choose AutoShapes. Choose the type of shape you want to add, and click on it. The drawing canvas will appear. Do not worry if it upsets the text around it. Your cursor will turn into a crosshair symbol. Inside the canvas space, click and drag the shape to the size you want, and release the mouse. AutoShapes
  • 7.
    You can changethe size by dragging one of the handles at the edges of your shape. To move the shape, place your cursor over it. When the cursor changes to a crosshair symbol, click and drag. Manipulate your drawing Rotate When you move your mouse over the handle, it looks like this – now drag the drawing around
  • 8.
    Format your AutoShapeRight Click On the Colors and Lines section of this dialog box, you can experiment with fill and line colors and styles. Change the color of the shape Change the color of the outline Change the thickness of the outline Change the line style of the outline
  • 9.
    You can addtext to your AutoShape Right Click
  • 10.
    Make Your AutoShape 3D Make your shapes more interesting by giving them a shadow or a 3-D format. The best way to learn the graphic variations available in Word is to have lots of fun with the Drawing toolbar. Experiment! You will find many uses for it as you create new documents in Word. Shadow 3 - D Basic shape
  • 11.
    Grouping Often timesyou use more than one shape or graphic to form an image or logo. Word lets you “GROUP” the components so that you don’t have to move each one separately when you need to reposition. 3 Shapes 3 shapes arranged Once the shapes are arranged the way you want them, select one, then select the other components by holding down the shift key and clicking until they are all selected. Carefully right click in the center of one of the selected components and choose “GROUP” Now all three work as one and the entire image can be moved or resized.
  • 12.
    Layering Graphics You may want to put one shape in front or behind the other. The default is that the image created last is on the top. Word lets you change that by changing the “ORDER” This step has to be done before components are “grouped” Right click on the heart 1 Now the heart is in front of the arrow. 3 Right Click Click “Bring to Front” 2
  • 13.
    Word Art Likemost Word features, WordArt can be accessed in a number of ways. From the Insert menu Insert Picture  WordArt From this icon on the drawing toolbar The gallery gives you shape options Right clicking on your Word Art gives you formatting options Click on the shape of your choice Next enter your text Experiment and Have Fun !!
  • 14.
    Word’s Clip Art From the INSERT Menu Search for your topic To insert one of these in your document, place your cursor where your want to insert it and then click on the picture. This opens the task pane which connects to Word’s clipart gallery on the web
  • 15.
    Inserting Pictures fromthe Web or a File   One way to insert an image into a Word document is to paste it in. To do this, begin by opening the file that contains the picture you want to use. Right click on the picture. Choose  Copy to copy the picture to the Clipboard. Now switch to the Word document in which you want to paste the picture. You can also use the Insert menu to insert a picture from a file on disk. Begin by positioning the insertion point where you want the picture to appear. Then choose Insert  Picture  From File to display the Insert Picture dialog box. Use the dialog box to locate and select the picture file you want to insert. When you click the Insert button, the picture appears at the insertion point. http://www.artcyclopedia.com/ Art Cyclopedia.com A great source for Art on the Web Click Here
  • 16.
    Changing the Sizeof an Image When you select an image in your document, 8 handles appear. You can resize the image and keep the proportions by using the corner handles to resize. You can make the image wider or longer by using the handles in the center of the tops or sides, but this will stretch the image. handle
  • 17.
    Cropping Images Rightclick on the image and choose to show the picture toolbar When you choose the cropping tool, your cursor becomes the tool. Place it over one of the “handles” and drag in to remove unwanted edges of the image. Cropping removes the outside edges of an image to eliminate excessive or irrelevant background content of a photo.
  • 18.
    Image Brightness andContrast Less brightness More brightness Less contrast More contrast Brightness Contrast
  • 19.
    Grayscale and Watermarkautomatic Grayscale Black & White Washout
  • 20.
    When you inserta graphic, Word puts it at the position of the cursor, sitting on the base of the current line. Sometimes, you want more control over the position of a graphic in your document. You may want text to run to the edges of the graphic, flow around the graphic, or even run on top of the graphic. Select the image that best represents the way you want the graphic formatted in relation to your text. Try different effects to see how you like them. You can change your selection by clicking in the alternative boxes. Wrap Text Around a Graphic
  • 21.
    Add a TextBox Working With Text Boxes Certain kinds of information are best displayed using text boxes. If you create newsletters, flyers, reports, announcements, school projects, or other types of publications, you may want to use Word's text box feature. Text boxes can be freely moved around your document without moving other elements. They are great for extra important information. To Create a Text Box: Choose Insert Text Box . The drawing canvas will open (you can tap escape to close it if you want to) Place your insertion point where you want your text box. Left click and the mouse pointer becomes a crosshair . Drag the text box until it is the appropriate size. Release the left mouse button when ready. To Insert Text into the Text Box: Click once inside the text box. The box is selected and a blinking insertion point appears inside the box. Begin typing. Format text (change font, font size, style, etc) in the usual manner. (Select text first, make changes later.) You can move and resize a text box the same way as any other graphic.