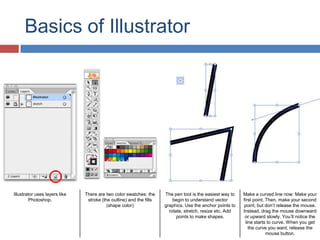
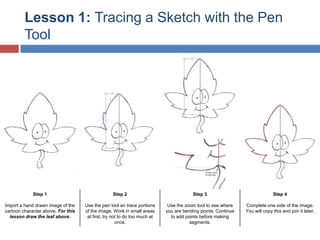
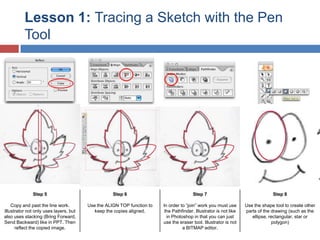
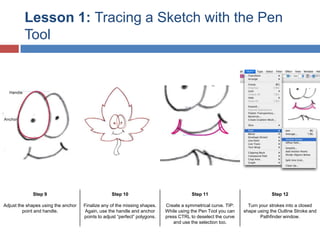
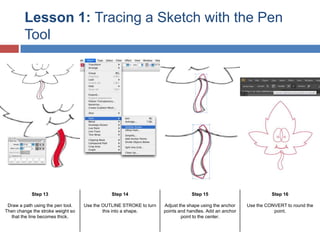
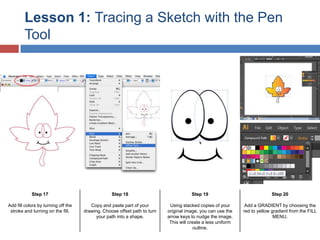
2. Basics of Illustrator
Illustrator uses layers like
Photoshop.
There are two color swatches: the
stroke (the outline) and the fills
(shape color)
The pen tool is the easiest way to
begin to understand vector
graphics. Use the anchor points to
rotate, stretch, resize etc. Add
points to make shapes.
Make a curved line now: Make your
first point. Then, make your second
point, but don’t release the mouse.
Instead, drag the mouse downward
or upward slowly. You’ll notice the
line starts to curve. When you get
the curve you want, release the
mouse button.
3. Lesson 1: Tracing a Sketch with the Pen
Tool
Step 1
Step 2
Step 3
Step 4
Import a hand drawn image of the
cartoon character above. For this
lesson draw the leaf above.
Use the pen tool an trace portions
of the image. Work in small areas
at first, try not to do too much at
once.
Use the zoom tool to see where
you are bending points. Continue
to add points before making
segments.
Complete one side of the image.
You will copy this and join it later.
4. Lesson 1: Tracing a Sketch with the Pen
Tool
Step 5
Step 6
Step 7
Step 8
Copy and past the line work.
Illustrator not only uses layers, but
also uses stacking (Bring Forward,
Send Backward) like in PPT. Then
reflect the copied image.
Use the ALIGN TOP function to
keep the copies aligned.
In order to “join” work you must use
the Pathfinder. Illustrator is not like
in Photoshop in that you can just
use the eraser tool. Illustrator is not
a BITMAP editor.
Use the shape tool to create other
parts of the drawing (such as the
ellipse, rectangular, star or
polygon)
5. Lesson 1: Tracing a Sketch with the Pen
Tool
Step 9
Step 10
Step 11
Step 12
Adjust the shapes using the anchor
point and handle.
Finalize any of the missing shapes.
Again, use the handle and anchor
points to adjust “perfect” polygons.
Create a symmetrical curve. TIP:
While using the Pen Tool you can
press CTRL to deselect the curve
and use the selection too.
Turn your strokes into a closed
shape using the Outline Stroke and
Pathfinder window.
6. Lesson 1: Tracing a Sketch with the Pen
Tool
Step 13
Step 14
Step 15
Step 16
Draw a path using the pen tool.
Then change the stroke weight so
that the line becomes thick.
Use the OUTLINE STROKE to turn
this into a shape.
Adjust the shape using the anchor
points and handles. Add an anchor
point to the center.
Use the CONVERT to round the
point.
7. Lesson 1: Tracing a Sketch with the Pen
Tool
Step 17
Step 18
Step 19
Step 20
Add fill colors by turning off the
stroke and turning on the fill.
Copy and paste part of your
drawing. Choose offset path to turn
your path into a shape.
Using stacked copies of your
original image, you can use the
arrow keys to nudge the image.
This will create a less uniform
outline.
Add a GRADIENT by choosing the
red to yellow gradient from the FILL
MENU.
8. Lesson 1: Tracing a Sketch with the Pen
Tool
Step 21
Step 22
Step 23
Step 24
Choose GRADIENT from the
WINDOW menu. Click on a color
swatch in the gradient menu to
adjust the colors.
Change the gradient color for the
shapes.
Use the gradient tool from the tool
bar. You can adjust the direction
gradients go using this tool.
Make any final adjustments and
complete your vector cartoon
drawing. When you are done, you
should have something like the
image above.