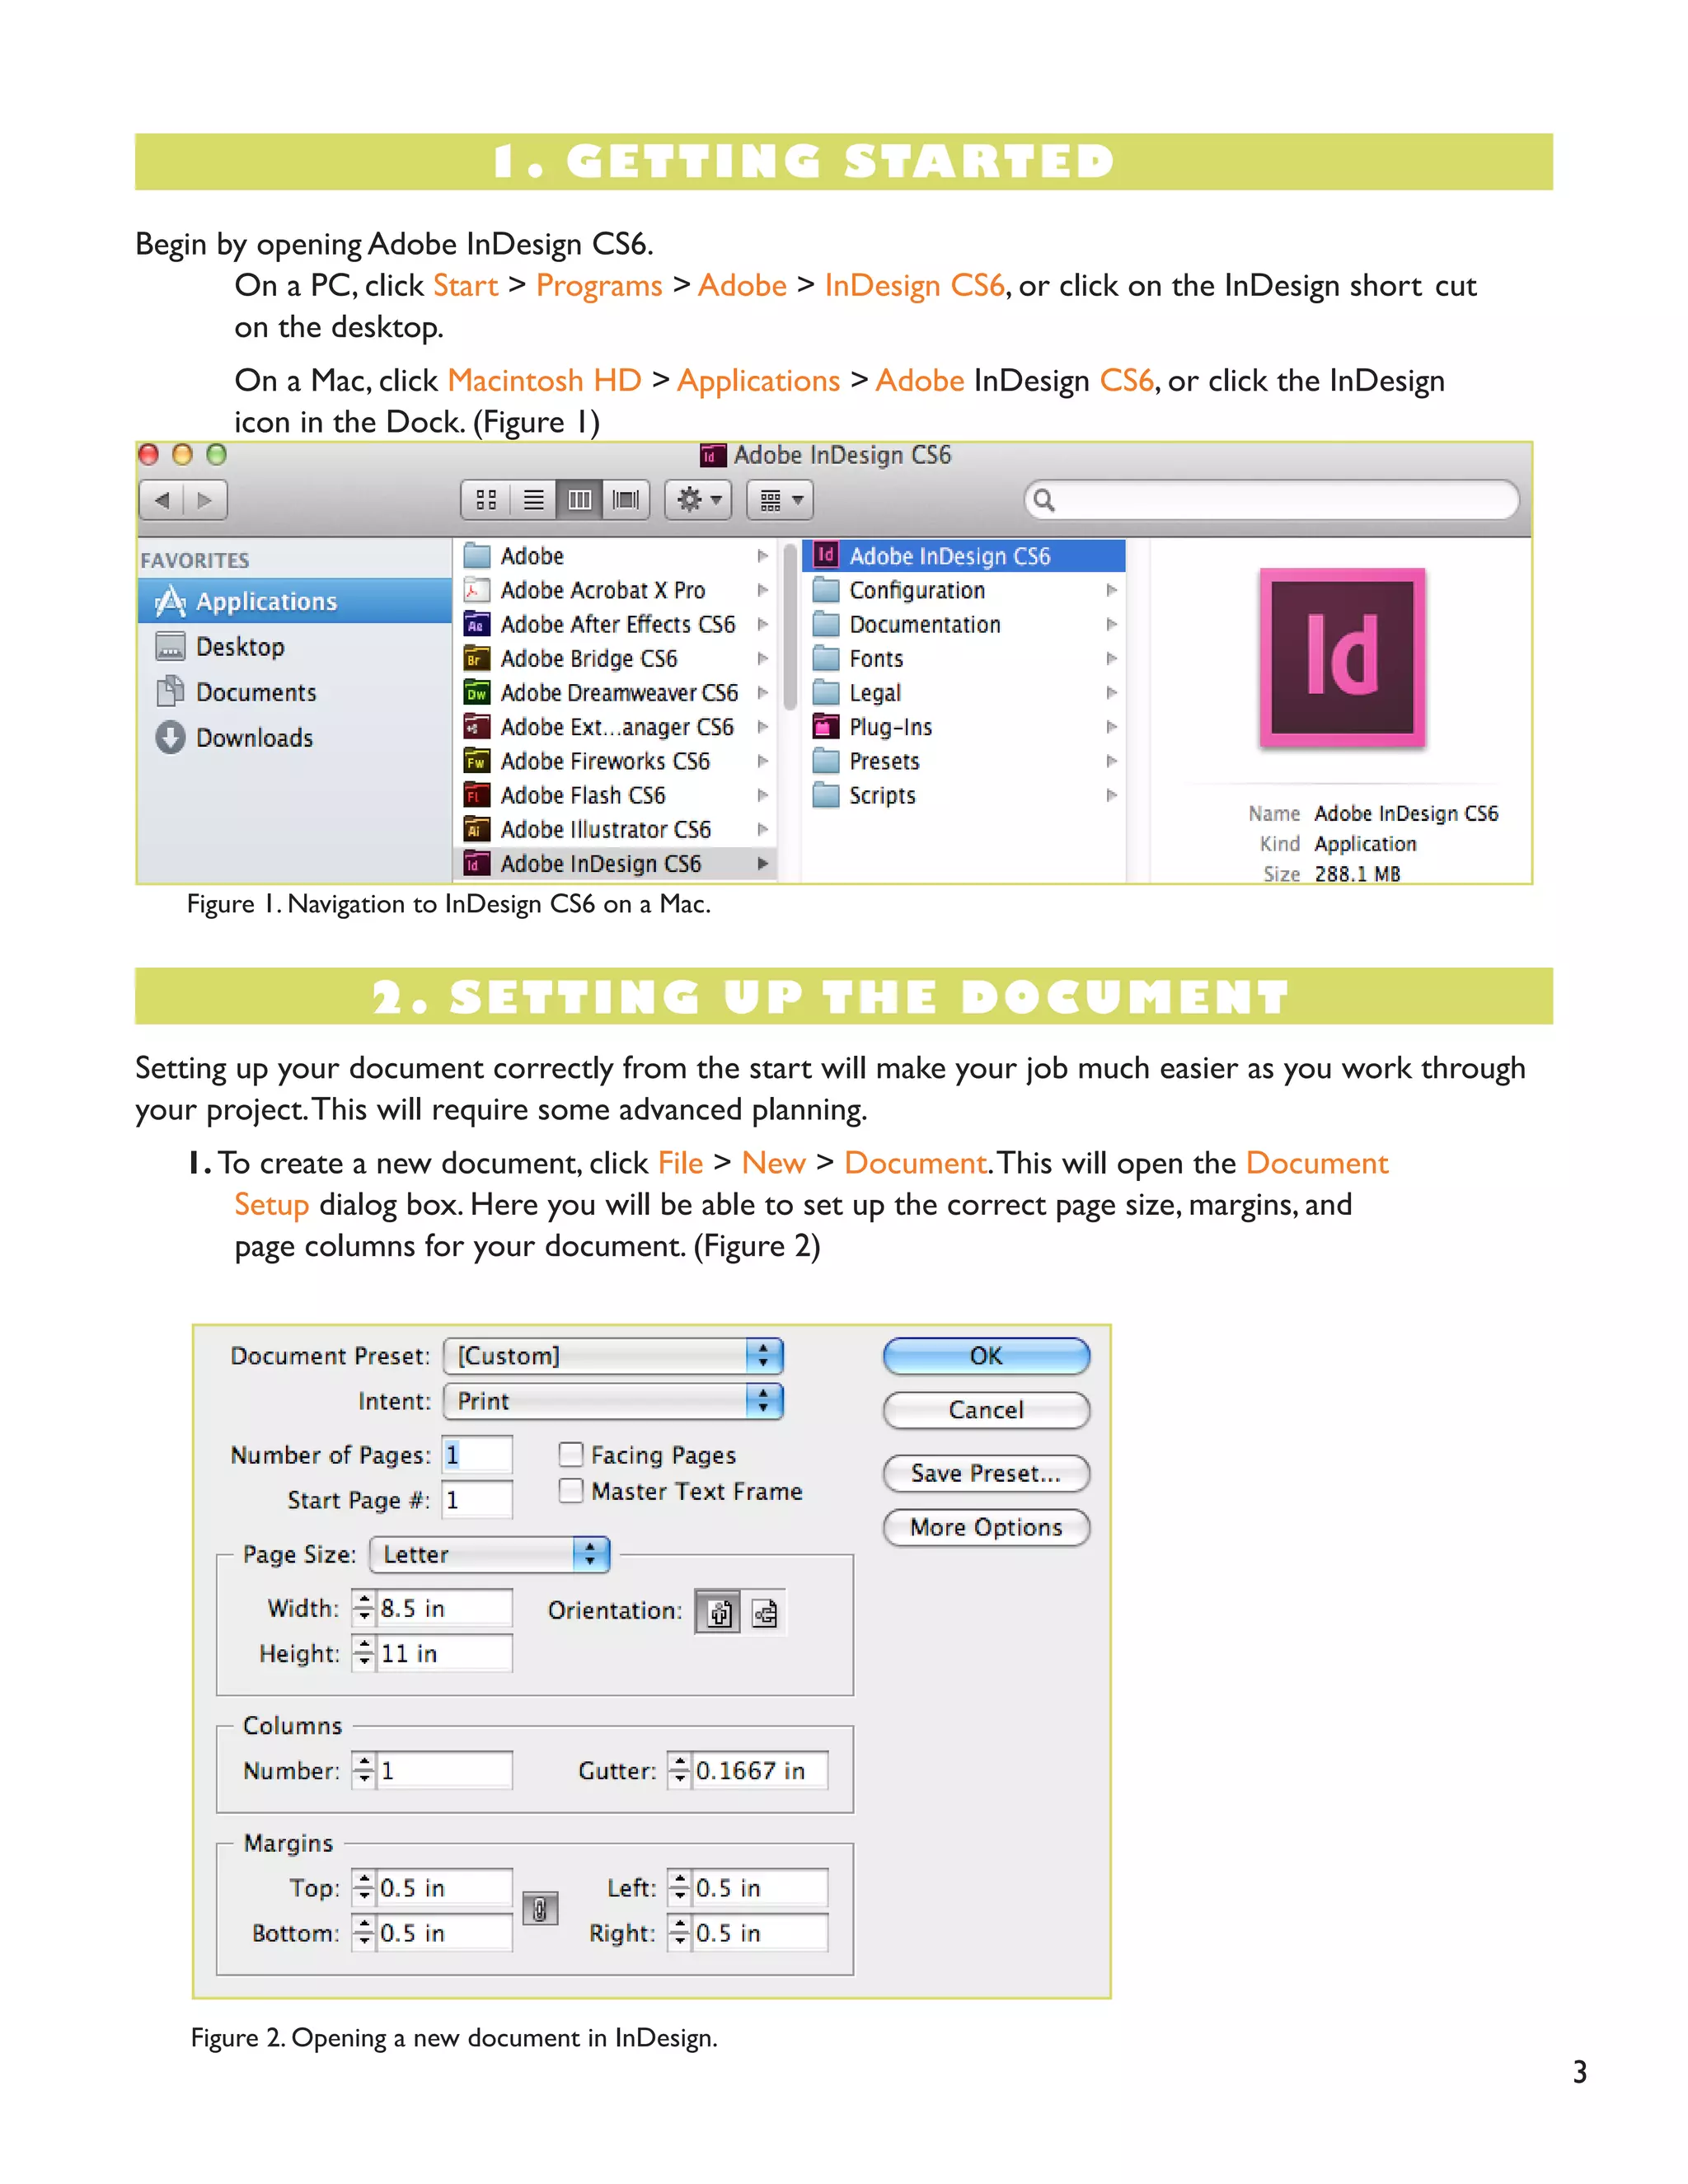
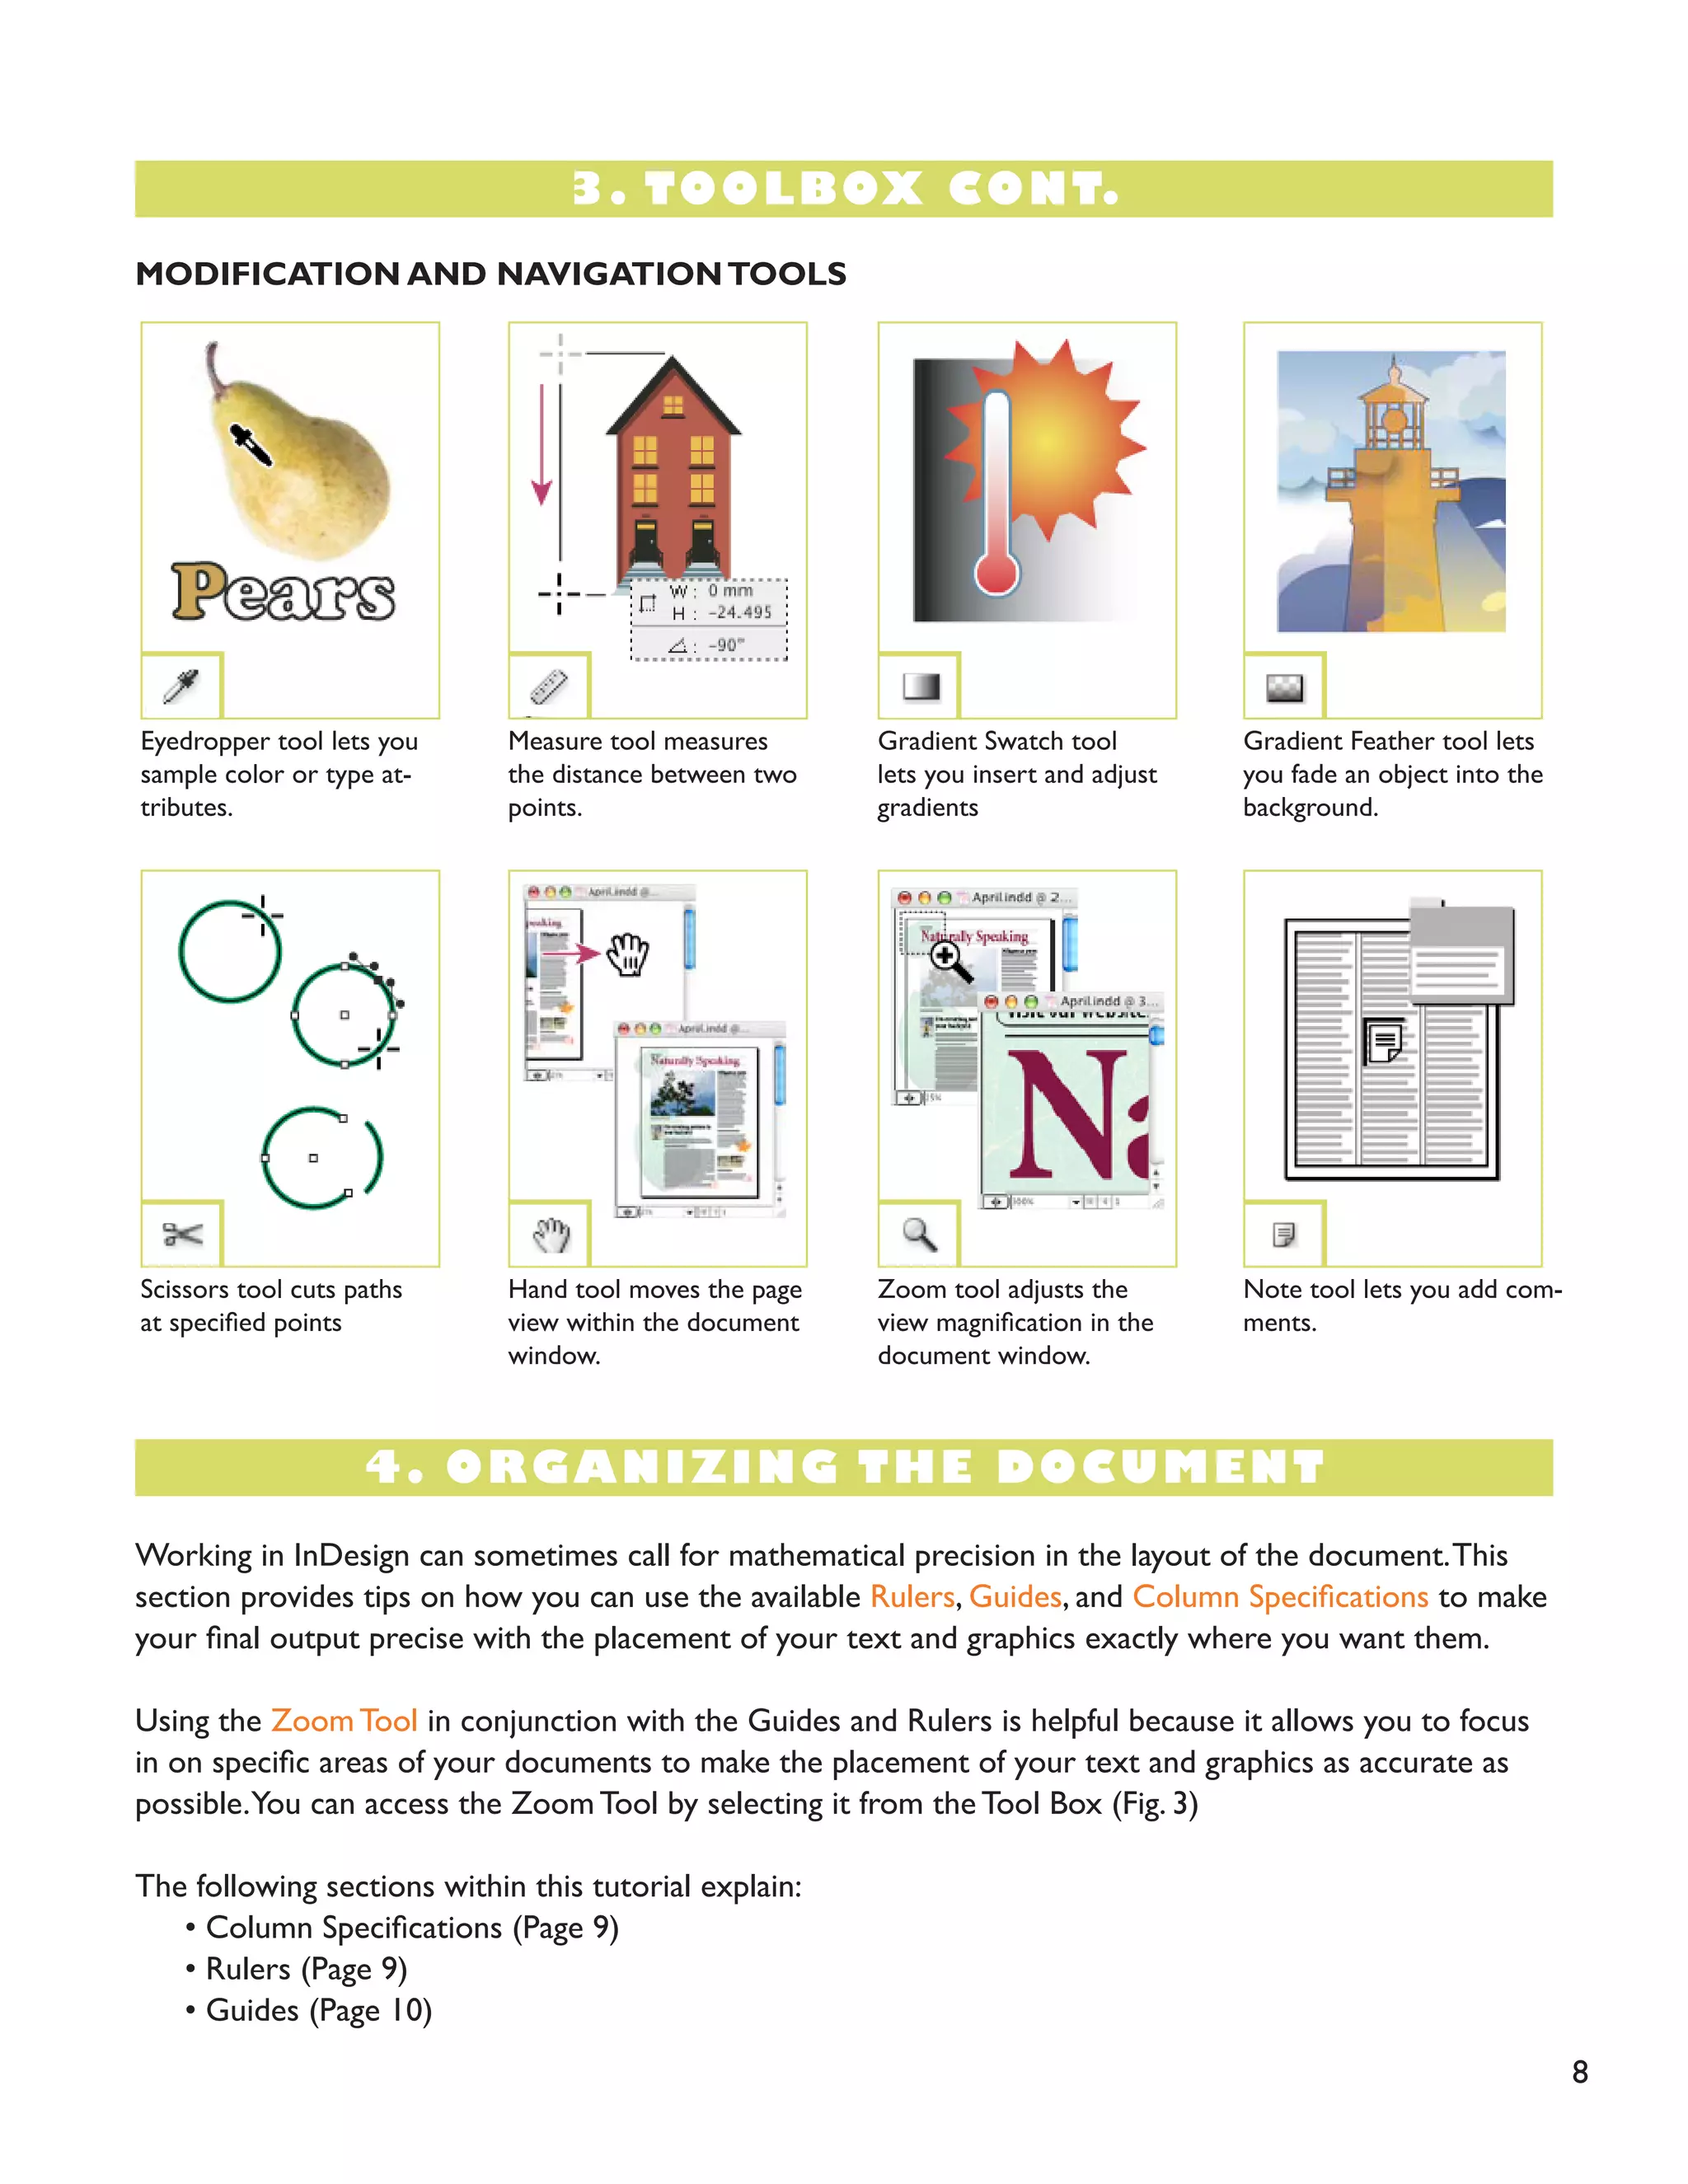
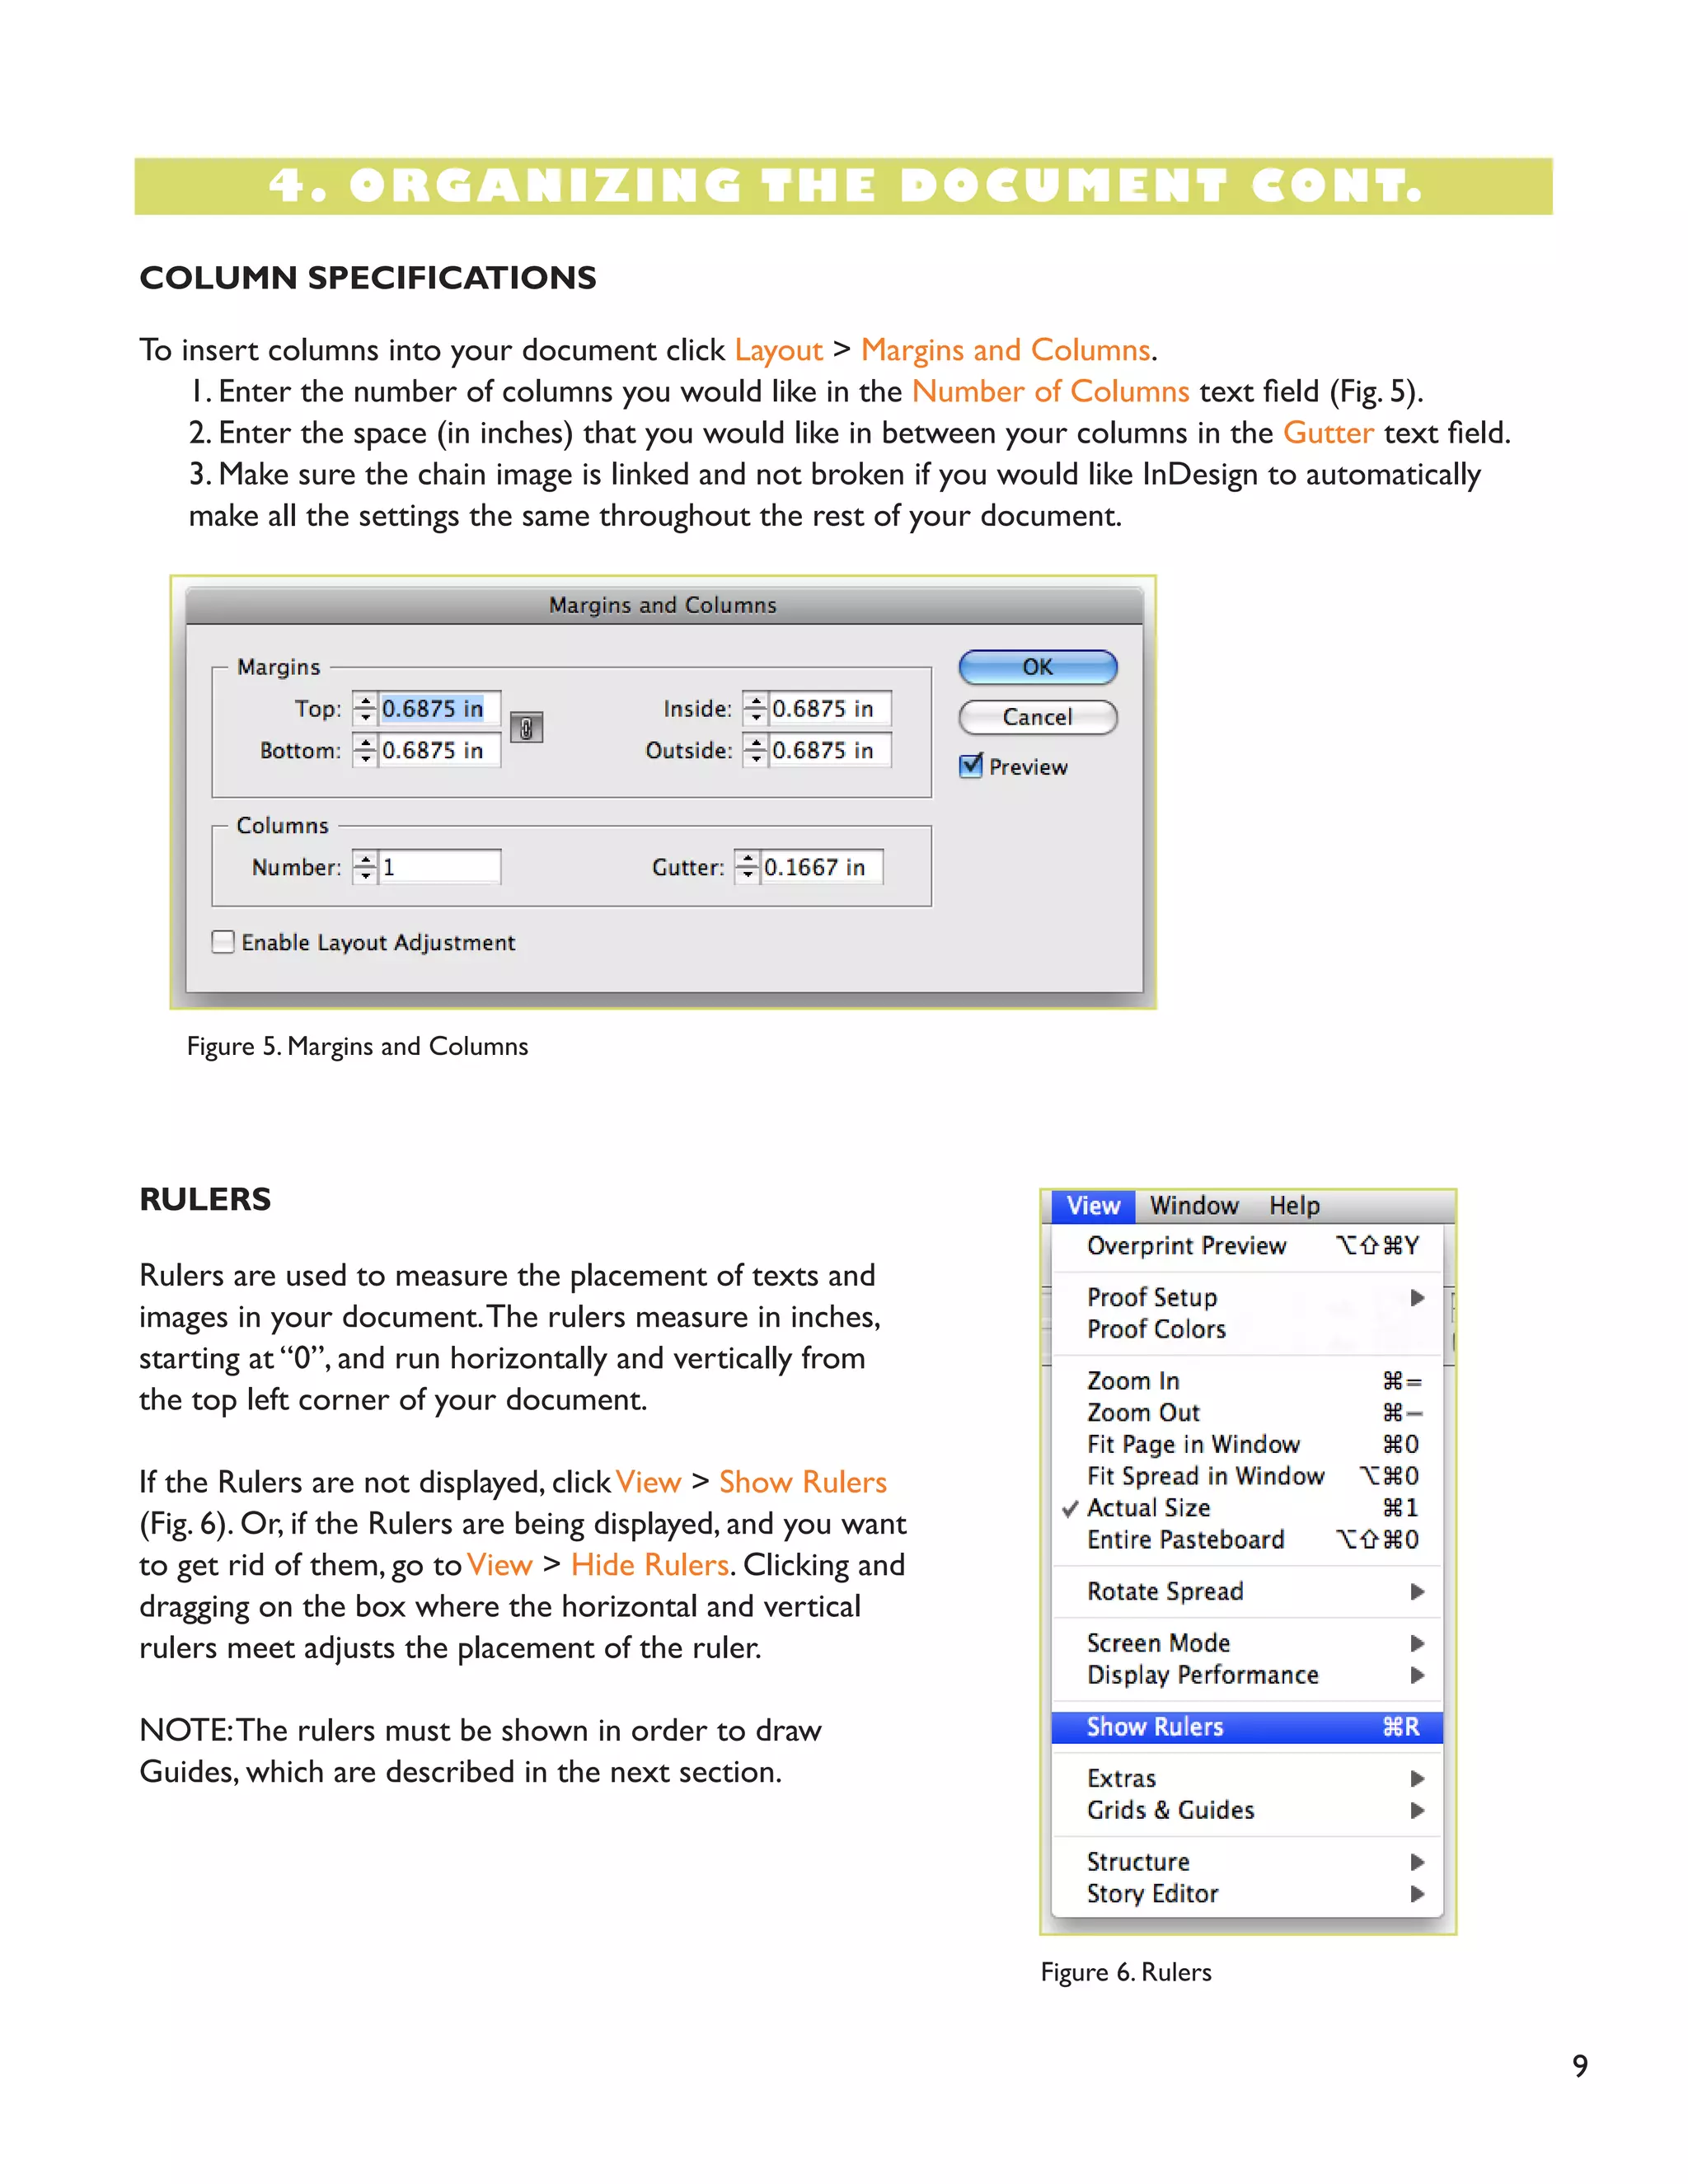
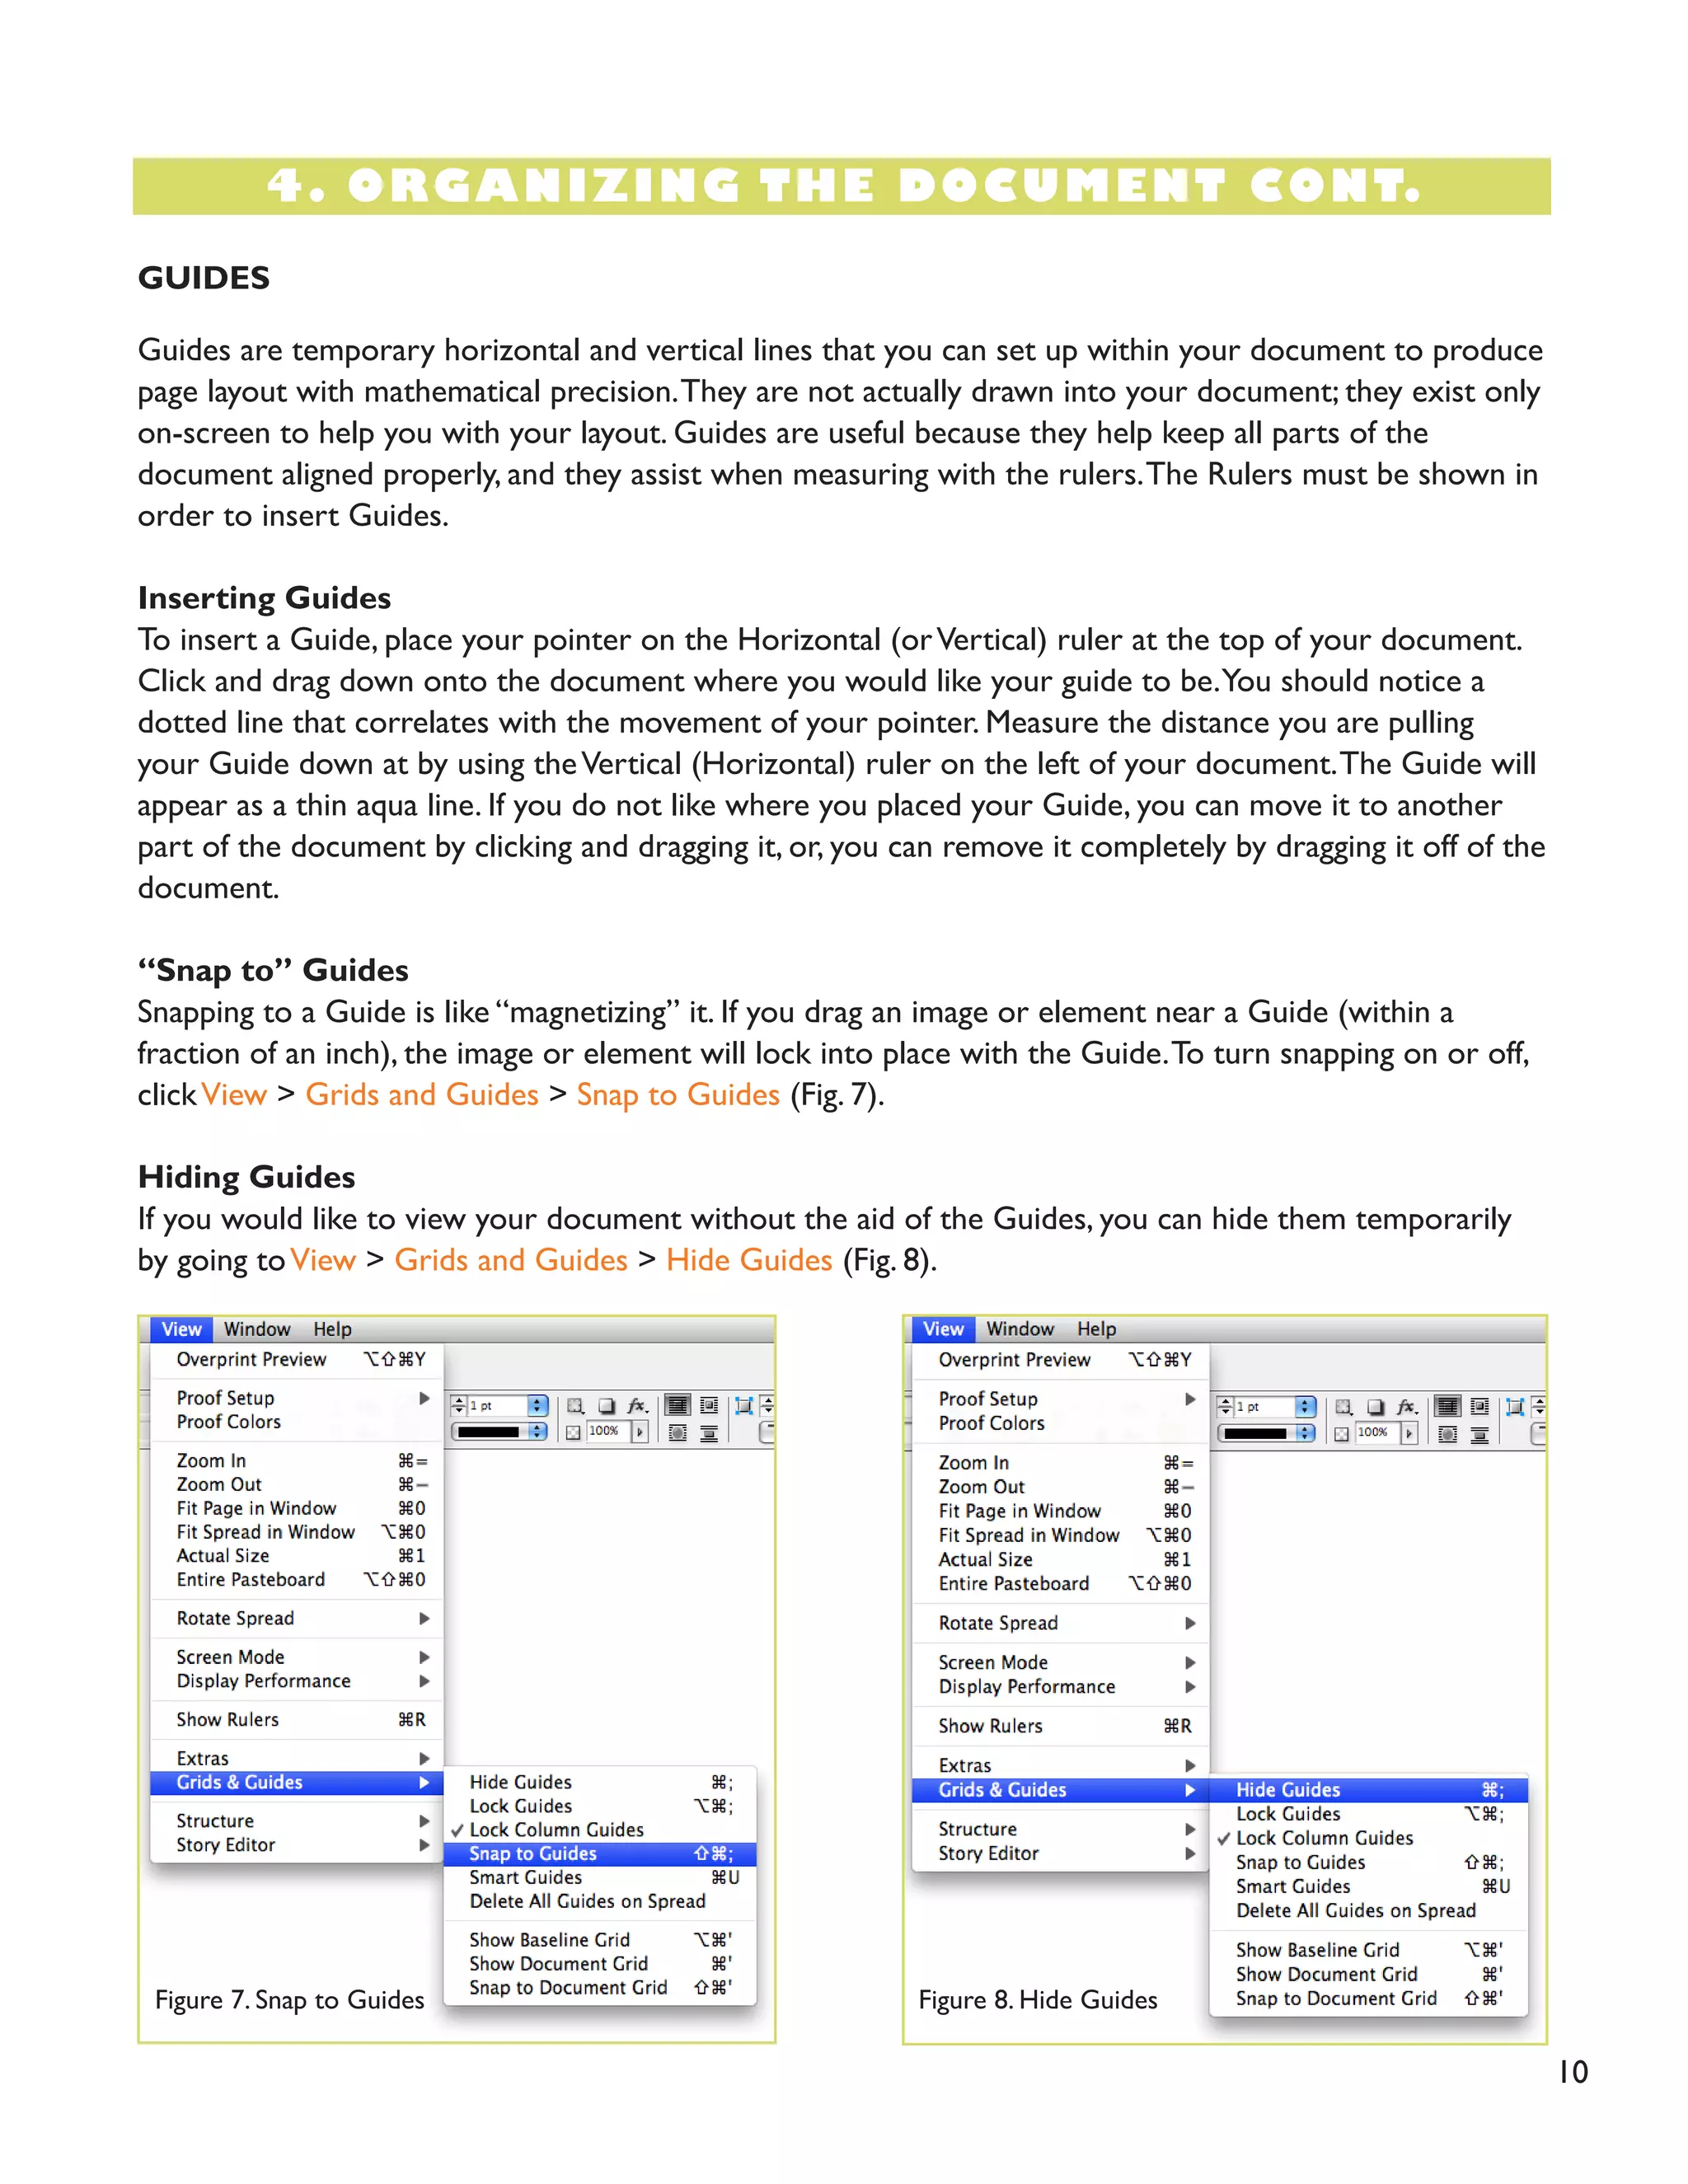
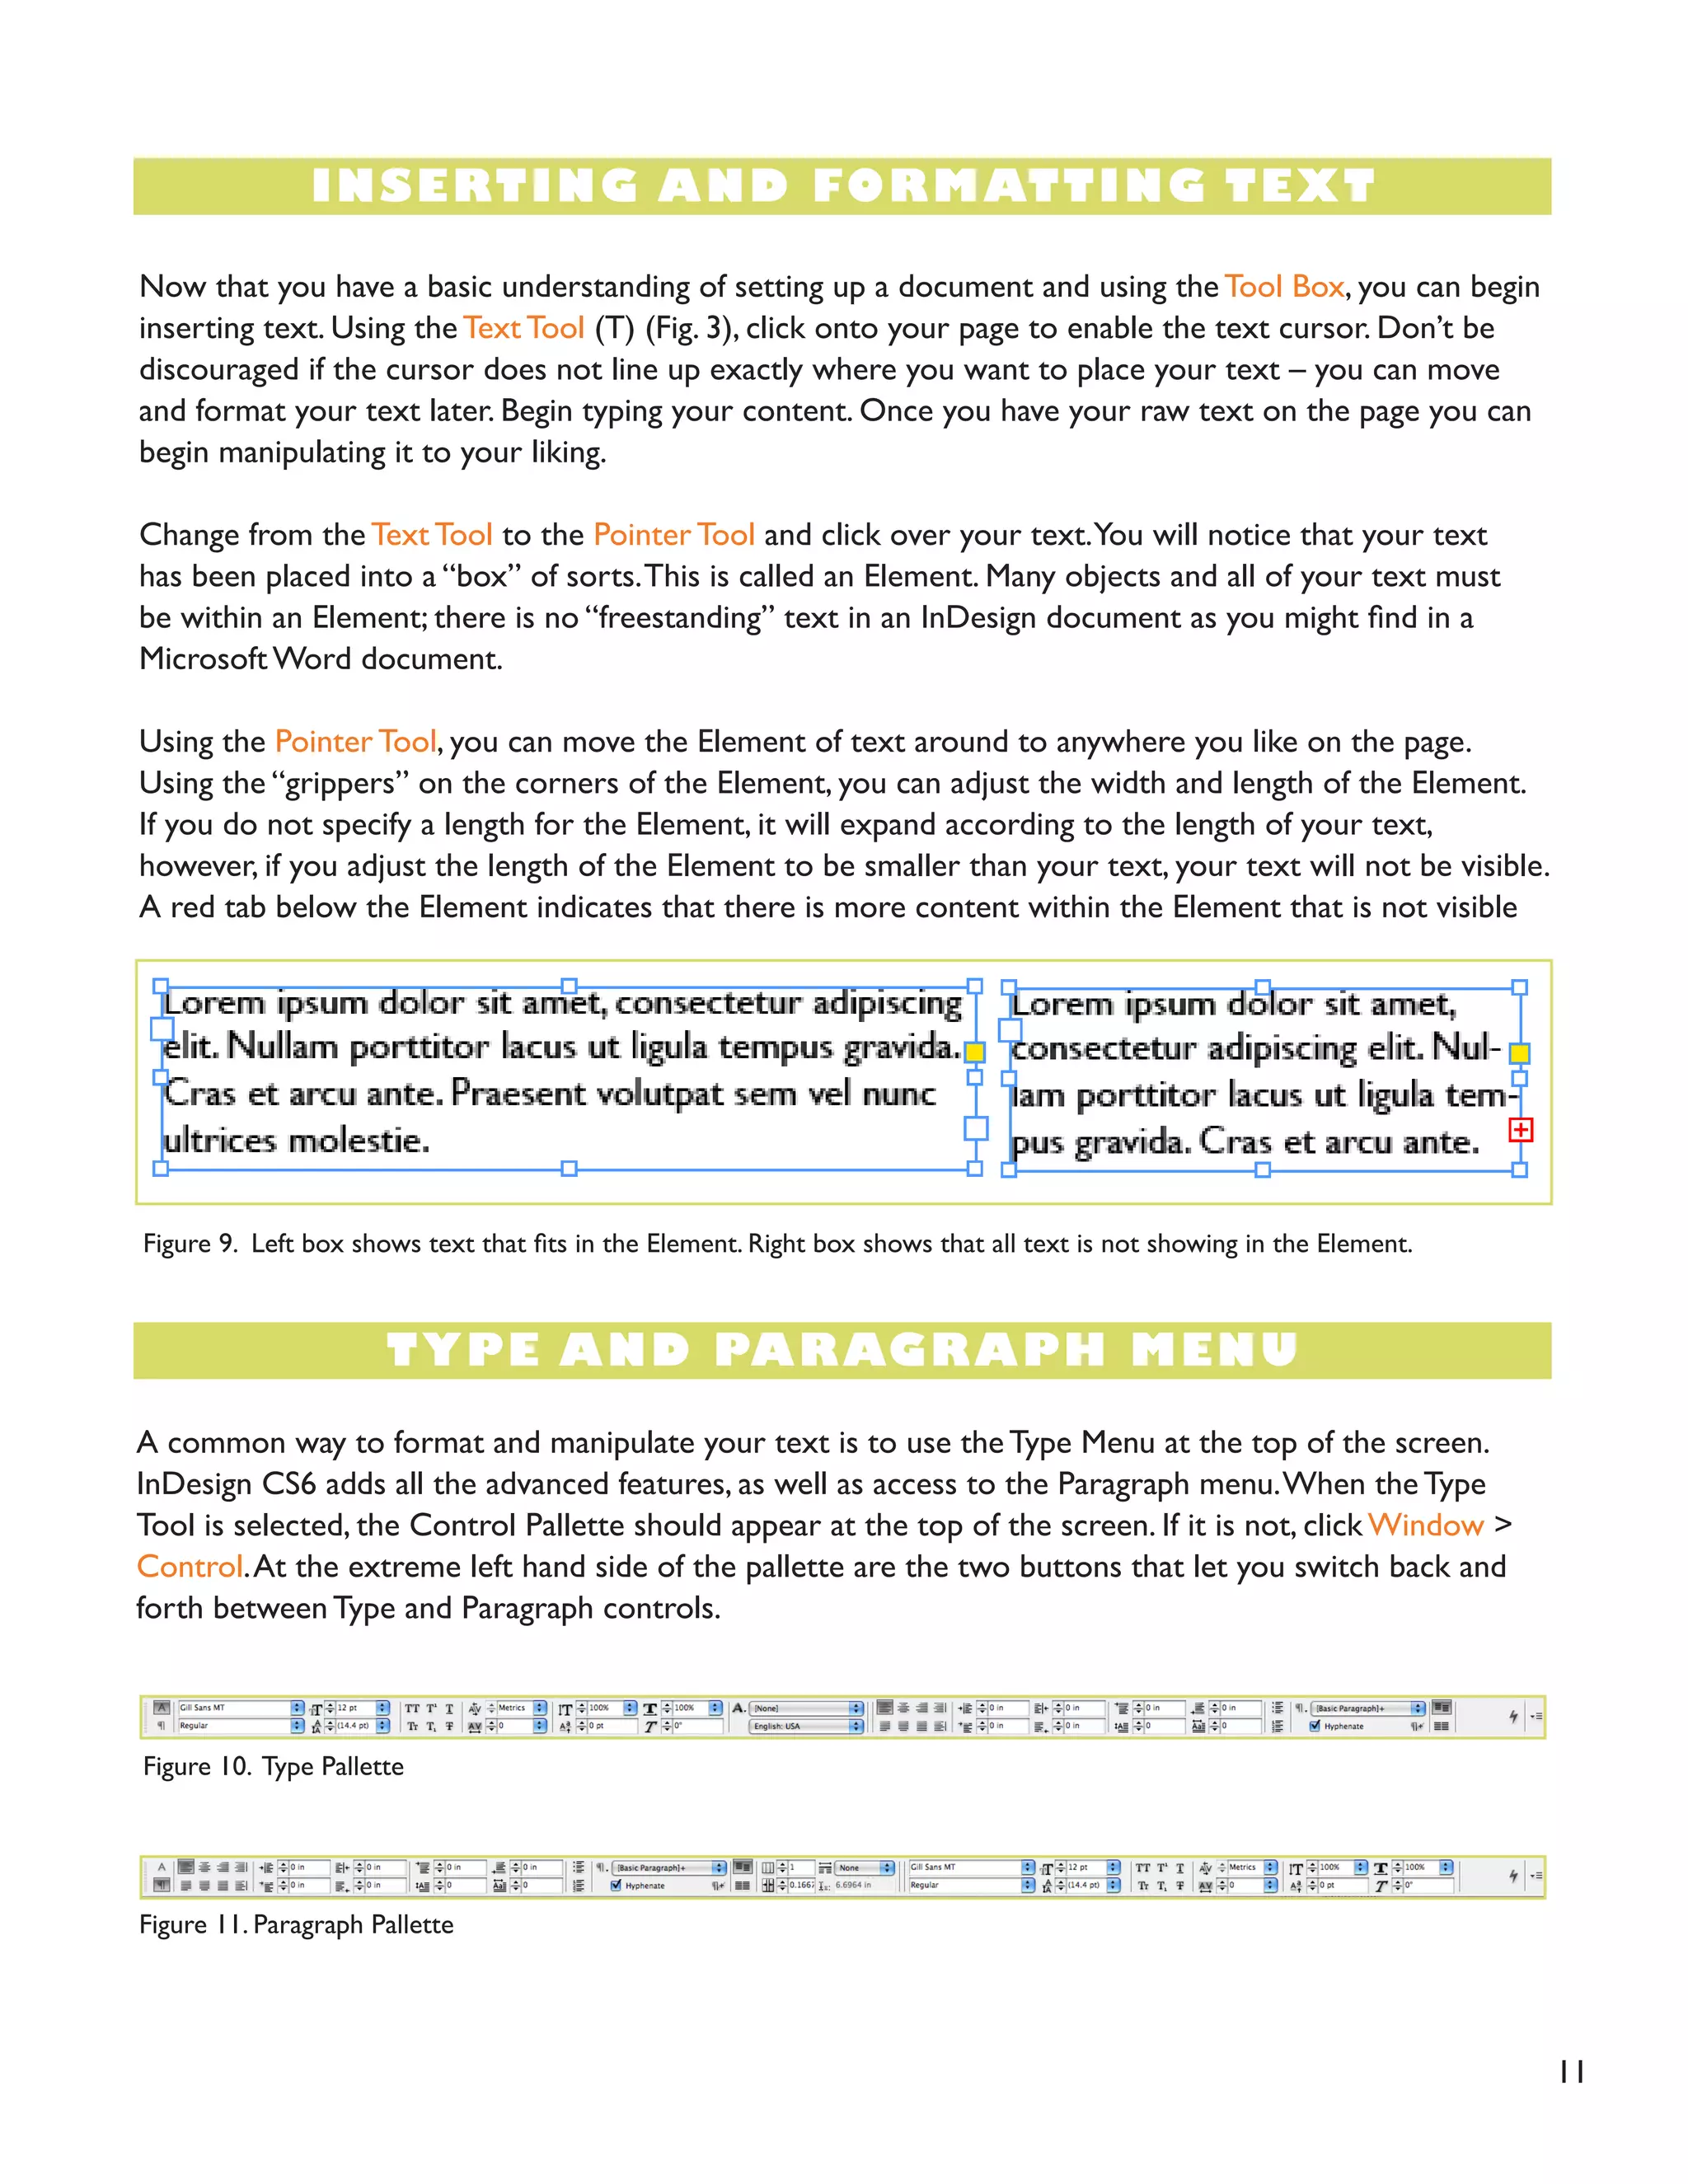
SlideShare a Scribd company logo
1 of 18
Adobe InDesign CS6 Tutorial
Adobe InDesign CS6 is a page-layout software that takes print publishing and page design beyond current boundaries. InDesign is a desktop publishing program that incorporates illustration capabilities into its interface. It also allows for cross platform interaction with Illustrator, Photoshop, and Acrobat. 
NOTE: This tutorial is fairly comprehensive in that it discusses the most common aspects of InDesign and has been developed to take beginners through the software from start to finish. 
TABLE OF CONTENTS 
1. Getting Started Page 3 
2. Setting up the Document Page 3 
3. Toolbox Page 4 
4. Organizing the Document Page 8 
• Column Specifications Page 9 
• Rulers Page 9 
• Guides Page 10 
7. Inserting/Formatting Text Page 11 
8. Type Menu Page 11 
9. Using Colors Page 12 
10. Working With Objects (Images, Graphics, and Elements) Page 13 
• Links Page 13 
• Placing Images Page 14 
• Enabling Text Wraps Page 15 
• Grouping Page 15 
• Locking Page 16 
16. Saving Page 16 
17. Exporting To PDF Page 17 
18. New Features in CS6 Page 18 
2
1. GETTING STARTED 
Begin by opening Adobe InDesign CS6. 
On a PC, click Start > Programs > Adobe > InDesign CS6, or click on the InDesign short cut on the desktop. 
On a Mac, click Macintosh HD > Applications > Adobe InDesign CS6, or click the InDesign icon in the Dock. (Figure 1) 
Figure 1. Navigation to InDesign CS6 on a Mac. 
2. SETTING UP THE DOCUMENT 
Setting up your document correctly from the start will make your job much easier as you work through your project. This will require some advanced planning. 
1. To create a new document, click File > New > Document. This will open the Document 
Setup dialog box. Here you will be able to set up the correct page size, margins, and 
page columns for your document. (Figure 2) 
Figure 2. Opening a new document in InDesign. 
3
Options include, but are not limited to: 
Number of Pages 
Type a value for the total number of pages for this document. 
Facing Pages 
Select this option to make left and right pages face each other in a double-page spread. 
Deselect this option to let each page stand alone, such as when you plan to print on both sides of a sheet of paper or want objects to bleed in the binding. 
Master Text Frame 
Select this option to create a text frame the size of the area within the margin guides, 
matching the column settings you specified. The master text frame is added to the master. 
Page Size 
Choose a page size from the menu, or type values for Width and Height. Page size 
represents the final size you want after bleeds or trimming other marks outside the page. 
There are presets for common sizes such as letter, legal, and tabloid. 
Orientation 
Click the Portrait (tall) or Landscape (wide) icons. These icons interact dynamically with 
the dimensions you enter in Page Size. When Height is the larger value, the portrait icon 
is selected. When Width is the larger value, the landscape icon is selected. Clicking the 
deselected icon switches the Height and Width values. 
NOTE: The default unit of measurement in InDesign is pica (p0). If you type a value into 
the Width or Height text fields and use the abbreviation for inches (in), InDesign will 
automatically convert it. 
Bleed 
After clicking More Options, the bleed area is used to align objects that you want to 
extend all the way to the trim line of your printed document. 
Slug 
After clicking More Options, the slug area is used for instructions to the printer, sign-off 
forms, or other information related to your document. The slug area is discarded when 
the document is trimmed to its final page size. 
2. When you have entered all of your document settings, click OK. 
NOTE: If you incorrectly enter information in the Document Setup dialog box, or if you need to adjust any of this information while you are working, you can make changes at any time by clicking File > Document Setup. 
2. SETTING UP THE DOCUMENT CONT. 
3. TOOLBOX 
If you used Adobe Photoshop or Adobe InDesign before you should be familiar with the 
toolbox in InDesign CS6 as it shares some of the tools from these applications. If you are a novice user of Adobe products you should keep in mind that you might not need to use all the tools. In this tutorial, only the basic tools will be discussed in depth. 
4
3. TOOLBOX CONT. 
5 
Figure 4. Extra Tools in InDesign. 
Some tools in the toolbox have additional tools linked to them. These tools have small black triangles in the right-hand corner. To view the additional tools click and hold down on any tool that has a black triangle in the corner. (Figure 4) 
Figure 3. Tools in InDesign.
3. TOOLBOX CONT. 
6 
Selection Tools 
DRAWING AND TYPE TOOLS 
Pen tool lets you draw straight and curved paths. 
Type tool lets you create text frames and select text. 
Gap tool lets you adjust the space between objects. 
Convert Direction Point tool lets you convert corner points and smooth points. 
Smooth tool lets you remove excess angles from a path. 
Direct Selection tool lets you select points on a path or contents within a frame. 
Add Anchor Point tool lets you add anchor points to a path. 
Type on a Path tool lets you create and edit type on paths. 
Page tool lets you create multiple page sizes within a document. 
Delete Anchor Point tool lets you remove anchor points from a path. 
Pencil tool lets you draw a freeform path. 
Selection tool lets you select entire objects.
7 
DRAWING AND TYPE TOOLS CONT. 
TRANSFORMATION TOOLS 
Erase tool lets you delete points on a path. 
Polygon Frame tool lets you create a multi-sided shape placeholder. 
Free Transform tool lets you rotate, scale, or shear an object. 
Ellipse Frame tool lets you create a circle or oval placeholder. 
Polygon tool lets you create multi-sided shape. 
Shear tool lets you skew objects around a fixed point. 
Line tool lets you draw a line segment. 
Rectangle tool lets you create a square or rectangle. 
Rotate tool lets you rotate objects around a fixed point. 
Rectangle Frame tool lets you create a square or rectangle placeholder. 
Ellipse tool lets you create a circle or oval. 
Scale tool lets you resize objects around a fixed point. 
3. TOOLBOX CONT.
4. ORGANIZING THE DOCUMENT 
8 
MODIFICATION AND NAVIGATION TOOLS 
Eyedropper tool lets you sample color or type attributes. 
Scissors tool cuts paths at specified points 
Gradient Feather tool lets you fade an object into the background. 
Note tool lets you add comments. 
Measure tool measures the distance between two points. 
Hand tool moves the page view within the document window. 
Gradient Swatch tool lets you insert and adjust gradients 
Zoom tool adjusts the view magnification in the document window. 
Working in InDesign can sometimes call for mathematical precision in the layout of the document. This section provides tips on how you can use the available Rulers, Guides, and Column Specifications to make your final output precise with the placement of your text and graphics exactly where you want them. 
Using the Zoom Tool in conjunction with the Guides and Rulers is helpful because it allows you to focus in on specific areas of your documents to make the placement of your text and graphics as accurate as possible. You can access the Zoom Tool by selecting it from the Tool Box (Fig. 3) 
The following sections within this tutorial explain: 
• Column Specifications (Page 9) 
• Rulers (Page 9) 
• Guides (Page 10) 
3. TOOLBOX CONT.
4. ORGANIZING THE DOCUMENT CONT. 
9 
COLUMN SPECIFICATIONS 
RULERS 
To insert columns into your document click Layout > Margins and Columns. 
1. Enter the number of columns you would like in the Number of Columns text field (Fig. 5). 
2. Enter the space (in inches) that you would like in between your columns in the Gutter text field. 
3. Make sure the chain image is linked and not broken if you would like InDesign to automatically make all the settings the same throughout the rest of your document. 
Rulers are used to measure the placement of texts and images in your document. The rulers measure in inches, starting at “0”, and run horizontally and vertically from the top left corner of your document. 
If the Rulers are not displayed, click View > Show Rulers (Fig. 6). Or, if the Rulers are being displayed, and you want to get rid of them, go to View > Hide Rulers. Clicking and dragging on the box where the horizontal and vertical rulers meet adjusts the placement of the ruler. 
NOTE: The rulers must be shown in order to draw Guides, which are described in the next section. 
Figure 5. Margins and Columns 
Figure 6. Rulers
10 
4. ORGANIZING THE DOCUMENT CONT. 
GUIDES 
Guides are temporary horizontal and vertical lines that you can set up within your document to produce page layout with mathematical precision. They are not actually drawn into your document; they exist only on-screen to help you with your layout. Guides are useful because they help keep all parts of the 
document aligned properly, and they assist when measuring with the rulers. The Rulers must be shown in order to insert Guides. 
Inserting Guides 
To insert a Guide, place your pointer on the Horizontal (or Vertical) ruler at the top of your document. Click and drag down onto the document where you would like your guide to be. You should notice a dotted line that correlates with the movement of your pointer. Measure the distance you are pulling your Guide down at by using the Vertical (Horizontal) ruler on the left of your document. The Guide will appear as a thin aqua line. If you do not like where you placed your Guide, you can move it to another part of the document by clicking and dragging it, or, you can remove it completely by dragging it off of the document. 
“Snap to” Guides 
Snapping to a Guide is like “magnetizing” it. If you drag an image or element near a Guide (within a 
fraction of an inch), the image or element will lock into place with the Guide. To turn snapping on or off, click View > Grids and Guides > Snap to Guides (Fig. 7). 
Hiding Guides 
If you would like to view your document without the aid of the Guides, you can hide them temporarily by going to View > Grids and Guides > Hide Guides (Fig. 8). 
Figure 7. Snap to Guides 
Figure 8. Hide Guides
11 
INSERTING AND FORMATTING TEXT 
TYPE AND PARAGRAPH MENU 
Now that you have a basic understanding of setting up a document and using the Tool Box, you can begin inserting text. Using the Text Tool (T) (Fig. 3), click onto your page to enable the text cursor. Don’t be discouraged if the cursor does not line up exactly where you want to place your text – you can move and format your text later. Begin typing your content. Once you have your raw text on the page you can begin manipulating it to your liking. 
Change from the Text Tool to the Pointer Tool and click over your text. You will notice that your text has been placed into a “box” of sorts. This is called an Element. Many objects and all of your text must be within an Element; there is no “freestanding” text in an InDesign document as you might find in a Microsoft Word document. 
Using the Pointer Tool, you can move the Element of text around to anywhere you like on the page. Using the “grippers” on the corners of the Element, you can adjust the width and length of the Element. 
If you do not specify a length for the Element, it will expand according to the length of your text, however, if you adjust the length of the Element to be smaller than your text, your text will not be visible. A red tab below the Element indicates that there is more content within the Element that is not visible (Fig. 9). 
A common way to format and manipulate your text is to use the Type Menu at the top of the screen. InDesign CS6 adds all the advanced features, as well as access to the Paragraph menu. When the Type Tool is selected, the Control Pallette should appear at the top of the screen. If it is not, click Window > Control. At the extreme left hand side of the pallette are the two buttons that let you switch back and forth between Type and Paragraph controls. 
Figure 9. Left box shows text that fits in the Element. Right box shows that all text is not showing in the Element. 
Figure 10. Type Pallette 
Figure 11. Paragraph Pallette
12 
USING COLORS 
InDesign includes thousands of color options as well as the ability to mix and create your own colors. After opening a new document, the Colors Palette window should appear on the right-hand side of the screen. If it is not there, click Window > Color. 
InDesign includes 10 default color options within the Swatches Palette (Fig.12). These colors are selected from the two common color models: RGB and CMYK. (Use RGB colors if your output will be on a computer or TV screen. Use CMYK colors for print documents.) 
To mix custom colors, open the Color Pallette. Depending on the color mode, you’re using, it will open in RGB (Fig.13) or CMYK (Fig.14). Mix hues using the slider bars. To add your custom color to the Swatches Palette, click Add to Swatches. You can also remove colors from the Swatches Palette by clicking and dragging. 
The new swatch will appear in the Swatches Pallette with the default name set to reflect the color mixture. For example, in Figure 12, pure Cyan in CMYK mode is listed as C=100 M=0 Y=0 K=0. One can easily change this to something more descriptive by double-clicking the swatch and simply renaming it. 
Figure 12. Default Swatches Pallette 
Figure 13. RGB color pallette set to black 
Figure 14. CMYK color pallette set to black
WORKING WITH OBJECTS 
Now that you have learned how to insert and edit text Elements, you need to understand how to work with other kinds of objects within your document. Nearly every InDesign document will contain text, and/or graphics. Using the three together takes thorough knowledge of InDesign’s capabilities. 
For the purposes of this tutorial, it is important to understand the kind of “objects” to which this tutorial refers: 
• Text (Element) - A block of text within a defined “text box” (discussed in a previous section). 
• Image - A picture file with one of the following extensions: .jpg, .gif, .tif, .pct, .bmp, .ai, .pdf, or .png, created in another program such as MS Excel or Photoshop. 
• Graphic - Vector illustration created directly in InDesign using the provided pen or other path tools. 
The following sections offer an in depth explanation of how to insert and adjust Images, Graphics, and Elements within your document. 
• Grouping (Page 15) 
• Links (Page 15) 
• Placing Images (Page 15) 
• Enabling Text Wraps (Page 16) 
• Layers and Arranging (Page 17) 
LINKS 
InDesign is primarily a linking device; it can create simple graphics, but it’s strength lies in the way it assembles disparate elements into a cohesive document. As a general rule, when inserting images into your document, you should never use the “copy & paste” technique. Instead, save your image files in the same folder as your InDesign document, and “link” them into the document (discussed in the next section). You can view the source location of the images that are linked into your document, as well as other important data such as colorspace and filetype, by going to the Links Palette (Fig. 15). To view the pallette, go to Window > Links (Fig.16). 
Figure 15. Links pallette 
Figure 16. To view Links pallette 
13
14 
PLACING IMAGES 
Place is the function used to insert an image into your document. It is comparable to Microsoft Word’s “Insert Picture from File” function. When you Place something into your document, it is “linked” to the document from its current location (as previously mentioned). Therefore, it is recommended that you store all of your content for your document in the same location. 
To Place an image into your document do the following: 
1. Make sure the Pointer Tool is selected. (If the Text Tool is selected when placing an image, the image will insert within a blank Element - not as an independent unit. Images within Elements are difficult to format and reposition.) 
2. Go to File > Place. 
3. Navigate through the pull down menus to find the file that you want to insert. Select the file and hit OK (Fig. 17). 
4. Your cursor will change into a small grey picture box that represents your “unplaced” image. Find the approximate location where you want to drop the image and click the mouse once. 
Once you have Placed the object, switch to the Pointer Tool to move the object to the precise location where you want it. If you want to resize your image, single-click on your image, click the Free Transform Tool (E) and you can resize it using the “grippers” – little black squares - that surround the image. Click and drag a gripper inward or outward to expand or shrink you image as desired. If you would like to maintain the original proportions of the image when you resize it, hold down the Shift key as you perform the resizing action. 
WORKING WITH OBJECTS CONT. 
Figure 17. “Place” dialogue box
ENABLING TEXT WRAP 
If you have a large block of text and would like to insert an image in close proximity without the text or image overlapping, you can use a function called Text Wrap (which is used frequently in Microsoft Word.) Using the Pointer Tool, click on the image and go to Window > Text Wrap. There are several visual options that display the different kinds of Text Wraps (Fig. 18). The numerical settings at the bottom of the window denote how much “buffer space” should be maintained between the image and the text. 
GROUPING 
Frequently, you will have many Images, Graphics, and Elements on the screen at once. It can be very beneficial to connect several of these together once they are positioned correctly so that you can move all of them at once and maintain the relational distance between each of them. This function is called Grouping. 
To Group two or more objects, do the following: 
1. Select all of the objects that you want to Group together. This can be done in two ways (both using the Pointer Tool): 
• Hold down the Shift key and click on each object individually, or, 
• Starting in an empty space on the page, click and hold the mouse and drag it outward creating a “ghost box” around all of the objects you want to select. When you release the mouse all of the items within the box should be selected. (Fig. 19) 
2. Click Object > Group (Fig. 20). 
3. If you click over the newly grouped objects with the pointer tool you will notice that they are bound together as one large object. The tip-off is that the bounding box connecting them, which was once solid, has now become dashed, and the individual object outlines have disappeared. (Fig. 21). 
4. To ungroup these objects, click on the grouped objects and hit Object > Ungroup. 
15 
WORKING WITH OBJECTS CONT. 
Figure 18.Text Wrap pallette 
Figure 19. All selected, not grouped 
Figure 20. Object > Group 
Figure 21. Grouped
16 
LOCKING 
Sometimes, you may have an object placed exactly where you want it and you will want to avoid moving it by accident. (For example, if you have a large image or graphic as a background for the page, you may select it and move it accidentally if you are not careful.) Therefore, InDesign has a function called Locking to help you avoid such accidents. When an object is Locked, it cannot be moved, adjusted, or altered in any way. 
To Lock objects, select them using the Pointer Tool and click Object > Lock Position (Fig. 22). Notice now that InDesign restricts the object from being altered in any way. To unlock the object(s), click Object > Unlock All on Spread (Fig. 23). 
NOTE: As with Grouping, you can hold down the Shift key to select multiple objects. 
Saving your document should be a habit when working in InDesign. Saving frequently lessens the risk of losing the work you have been doing. 
1. To save your InDesign document go to File > 
Save As. 
2. The Save As dialogue box will appear (Fig. 24). 
3. Navigate to the place you would like your 
document to be saved by using the 
drop-down menu and navigation window. 
4. Enter the name of your document in the Save As 
text field. 
5. Click the Save button in the lower right corner 
of the dialogue box. 
6. Check to make sure that your document is 
saved in the place you intended. 
WORKING WITH OBJECTS CONT. 
SAVING 
Figure 22. Object > Lock 
Figure 23. Object > Unlock All on Spread 
Figure 24. File > Save As 
Figure 24. File > Save As
17 
WHAT IS A PDF? 
Portable Document Format (PDF) files are an excellent way to share page files with others without the common hassles of matching applications, fonts, large file sizes, and cross platform compatibility (Mac to PC). A PDF file contains all of the elements required to view and print a document that matches the original design in all respects (type style and size, images, color, layout, etc.) 
PDFs can be viewed and printed without access to the original application that created it. Viewing and printing is done from Adobe Acrobat Reader, software that can be copied and freely distributed. 
Another feature of PDF files is their compact nature. These files are compressed in multiple ways to render a document that is just a fraction of the size of the original document. This makes them very handy for transportation and storage. This feature enables PDF files to be efficiently attached to e-mail messages. Unlike their originating documents, PDF files are not fully editable, without specialized software. This can be an 
advantage when sharing files that you don’t want changed in any way. 
NOTE: InDesign differs from most programs in the way it creates PDFs. 
CREATING A PDF 
When you are ready to create the PDF file take the following actions: 
1. Save your document. 
2. Go to File > Export > Adobe PDF. 
3. A dialogue box will appear asking you to save (Fig. 27); this time, you will be saving the PDF file, 
not the original document. Name the new file (without deleting the .pdf file extension.) and hit 
Save. A dialogue box will appear in which you can adjust settings from jpg quality to the particular 
pages you want to include in the PDF (defaults to all). Make changes accordingly and hit OK. 
EXPORTING TO PDF 
Figure 25. File > Export > Adobe PDF 
Figure 26. PDF dialogue box.
Turning on the New Features 
Make sure to select the New in CS6 (Fig. 26) tab located in a dropdown box at the top right of the application screen. When looking in the tabs located in the toolbar, the new changes will be highlighted in blue or purple (Fig. 27). 
Liquid Layout Feature 
This feature can be used to keep contents on one page the same in a different page when using an alternate layout. For example, if one page is in a different layout or size, to keep it flowing smoothly without having to rescale each page, click on the Layout tab and turn on the Liquid Layout feature. Once this option has been selected, you are then presented with other options of how you want a certain page or the entire document to be presented. 
New Features of InDesign CS6 
18 
Figure 26. Essentials tab > New in CS6 
Figure 27. Window >Drop-down menu highlight new features. 
Figure 28. Layout > Liquid Layout 
Figure 29. Choose from the drop-down menu to turn on Liquid Layout and 
options.

More Related Content

What's hot

InDesign Tutorial: Text
InDesign Tutorial: TextInDesign Tutorial: Text
InDesign Tutorial: TextSam Georgi
 
Photoshop layers
Photoshop layersPhotoshop layers
Photoshop layersMarche Ygar
 
How to Use Canva - Liezel Kabigting - Simpliezel.m4v
How to Use Canva - Liezel Kabigting - Simpliezel.m4vHow to Use Canva - Liezel Kabigting - Simpliezel.m4v
How to Use Canva - Liezel Kabigting - Simpliezel.m4vLiezel Kabigting
 
Guía práctica de Word
Guía práctica de WordGuía práctica de Word
Guía práctica de Wordirvingvc
 
InDesign Intro
InDesign IntroInDesign Intro
InDesign IntroSam Georgi
 
insertar tablas en word
insertar tablas en word insertar tablas en word
insertar tablas en word Ivan Zuñiga
 
Microsoft Paint
Microsoft PaintMicrosoft Paint
Microsoft PaintS C
 
Presentation on adobe photoshop® tools
Presentation on adobe photoshop® toolsPresentation on adobe photoshop® tools
Presentation on adobe photoshop® toolsHarshit Dave
 
Introduction to Corel Draw
Introduction to Corel DrawIntroduction to Corel Draw
Introduction to Corel DrawANUSUYA T K
 
Layer mask
Layer maskLayer mask
Layer maskalvarez
 
Adobe photoshop cc - session1
Adobe photoshop cc - session1Adobe photoshop cc - session1
Adobe photoshop cc - session1Ahmed Mousa
 
Ejercicios variados de word
Ejercicios variados de wordEjercicios variados de word
Ejercicios variados de wordRaúl Cortizo
 
InDesign Part 3
InDesign Part 3InDesign Part 3
InDesign Part 3Sam Georgi
 
Adobe Illustrator: 6 Essential Tips and Tools
Adobe Illustrator: 6 Essential Tips and ToolsAdobe Illustrator: 6 Essential Tips and Tools
Adobe Illustrator: 6 Essential Tips and ToolsNguyet Minh
 
An introduction to MS Publisher
An introduction to MS PublisherAn introduction to MS Publisher
An introduction to MS Publishersimonwhiffin
 

What's hot (20)

Insert a picture in Word
Insert a picture in WordInsert a picture in Word
Insert a picture in Word
 
MASCARAS EN PHOTOSHOP
MASCARAS EN PHOTOSHOPMASCARAS EN PHOTOSHOP
MASCARAS EN PHOTOSHOP
 
InDesign Tutorial: Text
InDesign Tutorial: TextInDesign Tutorial: Text
InDesign Tutorial: Text
 
ms paint Presentation.pdf
ms paint Presentation.pdfms paint Presentation.pdf
ms paint Presentation.pdf
 
Photoshop layers
Photoshop layersPhotoshop layers
Photoshop layers
 
How to Use Canva - Liezel Kabigting - Simpliezel.m4v
How to Use Canva - Liezel Kabigting - Simpliezel.m4vHow to Use Canva - Liezel Kabigting - Simpliezel.m4v
How to Use Canva - Liezel Kabigting - Simpliezel.m4v
 
Guía práctica de Word
Guía práctica de WordGuía práctica de Word
Guía práctica de Word
 
InDesign Intro
InDesign IntroInDesign Intro
InDesign Intro
 
insertar tablas en word
insertar tablas en word insertar tablas en word
insertar tablas en word
 
Designing Magazines: Part 2
Designing Magazines: Part 2Designing Magazines: Part 2
Designing Magazines: Part 2
 
Microsoft Paint
Microsoft PaintMicrosoft Paint
Microsoft Paint
 
Presentation on adobe photoshop® tools
Presentation on adobe photoshop® toolsPresentation on adobe photoshop® tools
Presentation on adobe photoshop® tools
 
Introduction to Corel Draw
Introduction to Corel DrawIntroduction to Corel Draw
Introduction to Corel Draw
 
Layer mask
Layer maskLayer mask
Layer mask
 
Adobe photoshop cc - session1
Adobe photoshop cc - session1Adobe photoshop cc - session1
Adobe photoshop cc - session1
 
Ejercicios variados de word
Ejercicios variados de wordEjercicios variados de word
Ejercicios variados de word
 
Adobe Photoshop
Adobe PhotoshopAdobe Photoshop
Adobe Photoshop
 
InDesign Part 3
InDesign Part 3InDesign Part 3
InDesign Part 3
 
Adobe Illustrator: 6 Essential Tips and Tools
Adobe Illustrator: 6 Essential Tips and ToolsAdobe Illustrator: 6 Essential Tips and Tools
Adobe Illustrator: 6 Essential Tips and Tools
 
An introduction to MS Publisher
An introduction to MS PublisherAn introduction to MS Publisher
An introduction to MS Publisher
 

Viewers also liked

Creating an Magazine ad with Adobe InDesign
Creating an Magazine ad with Adobe InDesignCreating an Magazine ad with Adobe InDesign
Creating an Magazine ad with Adobe InDesignAlease Michelle Jones
 
Mangalam Tours (P) Ltd.
Mangalam Tours (P) Ltd.Mangalam Tours (P) Ltd.
Mangalam Tours (P) Ltd.Mangalam Tours
 
1. основи орг.між.розрахунків
1. основи орг.між.розрахунків1. основи орг.між.розрахунків
1. основи орг.між.розрахунківBilovus
 
264 juknis penilaian prestasi kerja pns [compatibility mode] 2
264 juknis penilaian prestasi kerja pns [compatibility mode] 2264 juknis penilaian prestasi kerja pns [compatibility mode] 2
264 juknis penilaian prestasi kerja pns [compatibility mode] 2Nawirah Zubair Nawirah
 
тема 4
тема 4тема 4
тема 4Bilovus
 
4.4 Final PPP Slide Show
 4.4 Final PPP Slide Show  4.4 Final PPP Slide Show
4.4 Final PPP Slide Show CRUSHIMAGING
 
Social selling for B2B Salespeople: Why, What & Personal Branding
Social selling for B2B Salespeople: Why, What & Personal BrandingSocial selling for B2B Salespeople: Why, What & Personal Branding
Social selling for B2B Salespeople: Why, What & Personal BrandingAlice Myerhoff
 
201.11 deviance
201.11 deviance201.11 deviance
201.11 deviancecjsmann
 
екологічний податок 3333
екологічний податок 3333екологічний податок 3333
екологічний податок 3333Bilovus
 
тема 2
тема 2тема 2
тема 2Bilovus
 
екологічний податок 3333
екологічний податок 3333екологічний податок 3333
екологічний податок 3333Bilovus
 
Ejercicios de interbloqueos
Ejercicios de interbloqueosEjercicios de interbloqueos
Ejercicios de interbloqueosAngel Nava
 

Viewers also liked (15)

InDesign Crash Course
InDesign Crash CourseInDesign Crash Course
InDesign Crash Course
 
Creating an Magazine ad with Adobe InDesign
Creating an Magazine ad with Adobe InDesignCreating an Magazine ad with Adobe InDesign
Creating an Magazine ad with Adobe InDesign
 
Mangalam Tours (P) Ltd.
Mangalam Tours (P) Ltd.Mangalam Tours (P) Ltd.
Mangalam Tours (P) Ltd.
 
1. основи орг.між.розрахунків
1. основи орг.між.розрахунків1. основи орг.між.розрахунків
1. основи орг.між.розрахунків
 
25 word pitch
25 word pitch25 word pitch
25 word pitch
 
Ockels Innovation Space
Ockels Innovation SpaceOckels Innovation Space
Ockels Innovation Space
 
264 juknis penilaian prestasi kerja pns [compatibility mode] 2
264 juknis penilaian prestasi kerja pns [compatibility mode] 2264 juknis penilaian prestasi kerja pns [compatibility mode] 2
264 juknis penilaian prestasi kerja pns [compatibility mode] 2
 
тема 4
тема 4тема 4
тема 4
 
4.4 Final PPP Slide Show
 4.4 Final PPP Slide Show  4.4 Final PPP Slide Show
4.4 Final PPP Slide Show
 
Social selling for B2B Salespeople: Why, What & Personal Branding
Social selling for B2B Salespeople: Why, What & Personal BrandingSocial selling for B2B Salespeople: Why, What & Personal Branding
Social selling for B2B Salespeople: Why, What & Personal Branding
 
201.11 deviance
201.11 deviance201.11 deviance
201.11 deviance
 
екологічний податок 3333
екологічний податок 3333екологічний податок 3333
екологічний податок 3333
 
тема 2
тема 2тема 2
тема 2
 
екологічний податок 3333
екологічний податок 3333екологічний податок 3333
екологічний податок 3333
 
Ejercicios de interbloqueos
Ejercicios de interbloqueosEjercicios de interbloqueos
Ejercicios de interbloqueos
 

Similar to Adobe indesign cs6

InDesign CS5 Tutorial
InDesign CS5 TutorialInDesign CS5 Tutorial
InDesign CS5 TutorialZaxapias
 
Adobe illustrator cs6
Adobe illustrator cs6Adobe illustrator cs6
Adobe illustrator cs6ilaazmil2
 
Adobe illustrator cs6
Adobe illustrator cs6Adobe illustrator cs6
Adobe illustrator cs6Ila Azmil
 
Adobe illustrator cs6
Adobe illustrator cs6Adobe illustrator cs6
Adobe illustrator cs6Ila Azmil
 
Adobe illustrator cs4 tutorial
Adobe illustrator cs4 tutorial Adobe illustrator cs4 tutorial
Adobe illustrator cs4 tutorial Agung Yuwono
 
Introduction_to_Desktop_Publishing.pdf
Introduction_to_Desktop_Publishing.pdfIntroduction_to_Desktop_Publishing.pdf
Introduction_to_Desktop_Publishing.pdfFunkYou2
 
Adobe InDesign Primer
Adobe InDesign PrimerAdobe InDesign Primer
Adobe InDesign PrimerNYCCTfab
 
Sketchup-Handbook.pdf
Sketchup-Handbook.pdfSketchup-Handbook.pdf
Sketchup-Handbook.pdfAhmad Maher
 
Affinity+designer+start+guide
Affinity+designer+start+guideAffinity+designer+start+guide
Affinity+designer+start+guidemoodleyveez
 
Industrial Design Process Book Basics
Industrial Design Process Book BasicsIndustrial Design Process Book Basics
Industrial Design Process Book BasicsCarly Hagins
 
179 designing a_magazine_spread
179 designing a_magazine_spread179 designing a_magazine_spread
179 designing a_magazine_spreadmrhoward12
 
TUTorial By chad neuman in InDesign,Tutorial AT Vishal Dawdy .docx
TUTorial By chad neuman in InDesign,Tutorial AT Vishal Dawdy .docxTUTorial By chad neuman in InDesign,Tutorial AT Vishal Dawdy .docx
TUTorial By chad neuman in InDesign,Tutorial AT Vishal Dawdy .docxwillcoxjanay
 
Libre Office Impress Lesson 2: Creating a Slide Show
Libre Office Impress Lesson 2: Creating a Slide ShowLibre Office Impress Lesson 2: Creating a Slide Show
Libre Office Impress Lesson 2: Creating a Slide ShowSmart Chicago Collaborative
 

Similar to Adobe indesign cs6 (20)

InDesign CS5 Tutorial
InDesign CS5 TutorialInDesign CS5 Tutorial
InDesign CS5 Tutorial
 
In designtutorial
In designtutorialIn designtutorial
In designtutorial
 
Adobe illustrator cs6
Adobe illustrator cs6Adobe illustrator cs6
Adobe illustrator cs6
 
Adobe illustrator cs6
Adobe illustrator cs6Adobe illustrator cs6
Adobe illustrator cs6
 
Adobe illustrator cs6
Adobe illustrator cs6Adobe illustrator cs6
Adobe illustrator cs6
 
Adobe illustrator cs4 tutorial
Adobe illustrator cs4 tutorial Adobe illustrator cs4 tutorial
Adobe illustrator cs4 tutorial
 
Introduction_to_Desktop_Publishing.pdf
Introduction_to_Desktop_Publishing.pdfIntroduction_to_Desktop_Publishing.pdf
Introduction_to_Desktop_Publishing.pdf
 
Adobe InDesign Primer
Adobe InDesign PrimerAdobe InDesign Primer
Adobe InDesign Primer
 
Sketchup-Handbook.pdf
Sketchup-Handbook.pdfSketchup-Handbook.pdf
Sketchup-Handbook.pdf
 
Affinity+designer+start+guide
Affinity+designer+start+guideAffinity+designer+start+guide
Affinity+designer+start+guide
 
Tutorial Coreldraw_2
Tutorial Coreldraw_2Tutorial Coreldraw_2
Tutorial Coreldraw_2
 
Adobe pagemaker
Adobe pagemakerAdobe pagemaker
Adobe pagemaker
 
2010 11 Graphics
2010 11 Graphics2010 11 Graphics
2010 11 Graphics
 
Industrial Design Process Book Basics
Industrial Design Process Book BasicsIndustrial Design Process Book Basics
Industrial Design Process Book Basics
 
179 designing a_magazine_spread
179 designing a_magazine_spread179 designing a_magazine_spread
179 designing a_magazine_spread
 
TUTorial By chad neuman in InDesign,Tutorial AT Vishal Dawdy .docx
TUTorial By chad neuman in InDesign,Tutorial AT Vishal Dawdy .docxTUTorial By chad neuman in InDesign,Tutorial AT Vishal Dawdy .docx
TUTorial By chad neuman in InDesign,Tutorial AT Vishal Dawdy .docx
 
Get the Sheet out of here! Plan production for jobs due yesterday
Get the Sheet out of here! Plan production for jobs due yesterdayGet the Sheet out of here! Plan production for jobs due yesterday
Get the Sheet out of here! Plan production for jobs due yesterday
 
dr_3
dr_3dr_3
dr_3
 
dr_3
dr_3dr_3
dr_3
 
Libre Office Impress Lesson 2: Creating a Slide Show
Libre Office Impress Lesson 2: Creating a Slide ShowLibre Office Impress Lesson 2: Creating a Slide Show
Libre Office Impress Lesson 2: Creating a Slide Show
 

More from ilaazmil2

Illustrasi editorial
Illustrasi editorialIllustrasi editorial
Illustrasi editorialilaazmil2
 
Illustrasi pengiklanan
Illustrasi pengiklananIllustrasi pengiklanan
Illustrasi pengiklananilaazmil2
 
Pembungkusan
PembungkusanPembungkusan
Pembungkusanilaazmil2
 
Adobe photoshop 1
Adobe photoshop 1Adobe photoshop 1
Adobe photoshop 1ilaazmil2
 
Elemen rekabentuk
Elemen rekabentukElemen rekabentuk
Elemen rekabentukilaazmil2
 
Jalinan (texture)
Jalinan (texture)Jalinan (texture)
Jalinan (texture)ilaazmil2
 
Elemen rekabentuk
Elemen rekabentukElemen rekabentuk
Elemen rekabentukilaazmil2
 
Prinsip rekabentuk
Prinsip rekabentukPrinsip rekabentuk
Prinsip rekabentukilaazmil2
 
Proses penghasilan rekabentuk
Proses penghasilan rekabentukProses penghasilan rekabentuk
Proses penghasilan rekabentukilaazmil2
 
Pembungkusan
PembungkusanPembungkusan
Pembungkusanilaazmil2
 
Grafik persekitaran
Grafik persekitaranGrafik persekitaran
Grafik persekitaranilaazmil2
 
Adobe photoshop 1
Adobe photoshop 1Adobe photoshop 1
Adobe photoshop 1ilaazmil2
 
Teknik asas melukis
Teknik asas melukisTeknik asas melukis
Teknik asas melukisilaazmil2
 
Pengenalan asas lukisan
Pengenalan asas lukisanPengenalan asas lukisan
Pengenalan asas lukisanilaazmil2
 
Media dan teknik
Media dan teknikMedia dan teknik
Media dan teknikilaazmil2
 
Warna dalam lukisan persembahan
Warna dalam lukisan persembahanWarna dalam lukisan persembahan
Warna dalam lukisan persembahanilaazmil2
 
Adobe illustrator 2
Adobe illustrator 2Adobe illustrator 2
Adobe illustrator 2ilaazmil2
 
Adobe illustrator 1
Adobe illustrator 1Adobe illustrator 1
Adobe illustrator 1ilaazmil2
 
Adobe photoshop cs6
Adobe photoshop cs6Adobe photoshop cs6
Adobe photoshop cs6ilaazmil2
 

More from ilaazmil2 (20)

Illustrasi editorial
Illustrasi editorialIllustrasi editorial
Illustrasi editorial
 
Illustrasi pengiklanan
Illustrasi pengiklananIllustrasi pengiklanan
Illustrasi pengiklanan
 
Pembungkusan
PembungkusanPembungkusan
Pembungkusan
 
Adobe photoshop 1
Adobe photoshop 1Adobe photoshop 1
Adobe photoshop 1
 
Elemen rekabentuk
Elemen rekabentukElemen rekabentuk
Elemen rekabentuk
 
Jalinan (texture)
Jalinan (texture)Jalinan (texture)
Jalinan (texture)
 
Rca warna
Rca   warnaRca   warna
Rca warna
 
Elemen rekabentuk
Elemen rekabentukElemen rekabentuk
Elemen rekabentuk
 
Prinsip rekabentuk
Prinsip rekabentukPrinsip rekabentuk
Prinsip rekabentuk
 
Proses penghasilan rekabentuk
Proses penghasilan rekabentukProses penghasilan rekabentuk
Proses penghasilan rekabentuk
 
Pembungkusan
PembungkusanPembungkusan
Pembungkusan
 
Grafik persekitaran
Grafik persekitaranGrafik persekitaran
Grafik persekitaran
 
Adobe photoshop 1
Adobe photoshop 1Adobe photoshop 1
Adobe photoshop 1
 
Teknik asas melukis
Teknik asas melukisTeknik asas melukis
Teknik asas melukis
 
Pengenalan asas lukisan
Pengenalan asas lukisanPengenalan asas lukisan
Pengenalan asas lukisan
 
Media dan teknik
Media dan teknikMedia dan teknik
Media dan teknik
 
Warna dalam lukisan persembahan
Warna dalam lukisan persembahanWarna dalam lukisan persembahan
Warna dalam lukisan persembahan
 
Adobe illustrator 2
Adobe illustrator 2Adobe illustrator 2
Adobe illustrator 2
 
Adobe illustrator 1
Adobe illustrator 1Adobe illustrator 1
Adobe illustrator 1
 
Adobe photoshop cs6
Adobe photoshop cs6Adobe photoshop cs6
Adobe photoshop cs6
 

Recently uploaded

Concept of Vouching. B.Com(Hons) /B.Compdf
Concept of Vouching. B.Com(Hons) /B.CompdfConcept of Vouching. B.Com(Hons) /B.Compdf
Concept of Vouching. B.Com(Hons) /B.CompdfUmakantAnnand
 
How to Configure Email Server in Odoo 17
How to Configure Email Server in Odoo 17How to Configure Email Server in Odoo 17
How to Configure Email Server in Odoo 17Celine George
 
Solving Puzzles Benefits Everyone (English).pptx
Solving Puzzles Benefits Everyone (English).pptxSolving Puzzles Benefits Everyone (English).pptx
Solving Puzzles Benefits Everyone (English).pptxOH TEIK BIN
 
Software Engineering Methodologies (overview)
Software Engineering Methodologies (overview)Software Engineering Methodologies (overview)
Software Engineering Methodologies (overview)eniolaolutunde
 
Organic Name Reactions for the students and aspirants of Chemistry12th.pptx
Organic Name Reactions  for the students and aspirants of Chemistry12th.pptxOrganic Name Reactions  for the students and aspirants of Chemistry12th.pptx
Organic Name Reactions for the students and aspirants of Chemistry12th.pptxVS Mahajan Coaching Centre
 
18-04-UA_REPORT_MEDIALITERAСY_INDEX-DM_23-1-final-eng.pdf
18-04-UA_REPORT_MEDIALITERAСY_INDEX-DM_23-1-final-eng.pdf18-04-UA_REPORT_MEDIALITERAСY_INDEX-DM_23-1-final-eng.pdf
18-04-UA_REPORT_MEDIALITERAСY_INDEX-DM_23-1-final-eng.pdfssuser54595a
 
CARE OF CHILD IN INCUBATOR..........pptx
CARE OF CHILD IN INCUBATOR..........pptxCARE OF CHILD IN INCUBATOR..........pptx
CARE OF CHILD IN INCUBATOR..........pptxGaneshChakor2
 
MENTAL STATUS EXAMINATION format.docx
MENTAL     STATUS EXAMINATION format.docxMENTAL     STATUS EXAMINATION format.docx
MENTAL STATUS EXAMINATION format.docxPoojaSen20
 
Accessible design: Minimum effort, maximum impact
Accessible design: Minimum effort, maximum impactAccessible design: Minimum effort, maximum impact
Accessible design: Minimum effort, maximum impactdawncurless
 
Presiding Officer Training module 2024 lok sabha elections
Presiding Officer Training module 2024 lok sabha electionsPresiding Officer Training module 2024 lok sabha elections
Presiding Officer Training module 2024 lok sabha electionsanshu789521
 
Hybridoma Technology ( Production , Purification , and Application )
Hybridoma Technology  ( Production , Purification , and Application  ) Hybridoma Technology  ( Production , Purification , and Application  )
Hybridoma Technology ( Production , Purification , and Application ) Sakshi Ghasle
 
ECONOMIC CONTEXT - LONG FORM TV DRAMA - PPT
ECONOMIC CONTEXT - LONG FORM TV DRAMA - PPTECONOMIC CONTEXT - LONG FORM TV DRAMA - PPT
ECONOMIC CONTEXT - LONG FORM TV DRAMA - PPTiammrhaywood
 
Class 11 Legal Studies Ch-1 Concept of State .pdf
Class 11 Legal Studies Ch-1 Concept of State .pdfClass 11 Legal Studies Ch-1 Concept of State .pdf
Class 11 Legal Studies Ch-1 Concept of State .pdfakmcokerachita
 
Paris 2024 Olympic Geographies - an activity
Paris 2024 Olympic Geographies - an activityParis 2024 Olympic Geographies - an activity
Paris 2024 Olympic Geographies - an activityGeoBlogs
 
Contemporary philippine arts from the regions_PPT_Module_12 [Autosaved] (1).pptx
Contemporary philippine arts from the regions_PPT_Module_12 [Autosaved] (1).pptxContemporary philippine arts from the regions_PPT_Module_12 [Autosaved] (1).pptx
Contemporary philippine arts from the regions_PPT_Module_12 [Autosaved] (1).pptxRoyAbrique
 
Interactive Powerpoint_How to Master effective communication
Interactive Powerpoint_How to Master effective communicationInteractive Powerpoint_How to Master effective communication
Interactive Powerpoint_How to Master effective communicationnomboosow
 
Call Girls in Dwarka Mor Delhi Contact Us 9654467111
Call Girls in Dwarka Mor Delhi Contact Us 9654467111Call Girls in Dwarka Mor Delhi Contact Us 9654467111
Call Girls in Dwarka Mor Delhi Contact Us 9654467111Sapana Sha
 
microwave assisted reaction. General introduction
microwave assisted reaction. General introductionmicrowave assisted reaction. General introduction
microwave assisted reaction. General introductionMaksud Ahmed
 

Recently uploaded (20)

Concept of Vouching. B.Com(Hons) /B.Compdf
Concept of Vouching. B.Com(Hons) /B.CompdfConcept of Vouching. B.Com(Hons) /B.Compdf
Concept of Vouching. B.Com(Hons) /B.Compdf
 
How to Configure Email Server in Odoo 17
How to Configure Email Server in Odoo 17How to Configure Email Server in Odoo 17
How to Configure Email Server in Odoo 17
 
Staff of Color (SOC) Retention Efforts DDSD
Staff of Color (SOC) Retention Efforts DDSDStaff of Color (SOC) Retention Efforts DDSD
Staff of Color (SOC) Retention Efforts DDSD
 
Solving Puzzles Benefits Everyone (English).pptx
Solving Puzzles Benefits Everyone (English).pptxSolving Puzzles Benefits Everyone (English).pptx
Solving Puzzles Benefits Everyone (English).pptx
 
Software Engineering Methodologies (overview)
Software Engineering Methodologies (overview)Software Engineering Methodologies (overview)
Software Engineering Methodologies (overview)
 
Organic Name Reactions for the students and aspirants of Chemistry12th.pptx
Organic Name Reactions  for the students and aspirants of Chemistry12th.pptxOrganic Name Reactions  for the students and aspirants of Chemistry12th.pptx
Organic Name Reactions for the students and aspirants of Chemistry12th.pptx
 
18-04-UA_REPORT_MEDIALITERAСY_INDEX-DM_23-1-final-eng.pdf
18-04-UA_REPORT_MEDIALITERAСY_INDEX-DM_23-1-final-eng.pdf18-04-UA_REPORT_MEDIALITERAСY_INDEX-DM_23-1-final-eng.pdf
18-04-UA_REPORT_MEDIALITERAСY_INDEX-DM_23-1-final-eng.pdf
 
CARE OF CHILD IN INCUBATOR..........pptx
CARE OF CHILD IN INCUBATOR..........pptxCARE OF CHILD IN INCUBATOR..........pptx
CARE OF CHILD IN INCUBATOR..........pptx
 
MENTAL STATUS EXAMINATION format.docx
MENTAL     STATUS EXAMINATION format.docxMENTAL     STATUS EXAMINATION format.docx
MENTAL STATUS EXAMINATION format.docx
 
Accessible design: Minimum effort, maximum impact
Accessible design: Minimum effort, maximum impactAccessible design: Minimum effort, maximum impact
Accessible design: Minimum effort, maximum impact
 
Presiding Officer Training module 2024 lok sabha elections
Presiding Officer Training module 2024 lok sabha electionsPresiding Officer Training module 2024 lok sabha elections
Presiding Officer Training module 2024 lok sabha elections
 
Hybridoma Technology ( Production , Purification , and Application )
Hybridoma Technology  ( Production , Purification , and Application  ) Hybridoma Technology  ( Production , Purification , and Application  )
Hybridoma Technology ( Production , Purification , and Application )
 
ECONOMIC CONTEXT - LONG FORM TV DRAMA - PPT
ECONOMIC CONTEXT - LONG FORM TV DRAMA - PPTECONOMIC CONTEXT - LONG FORM TV DRAMA - PPT
ECONOMIC CONTEXT - LONG FORM TV DRAMA - PPT
 
Class 11 Legal Studies Ch-1 Concept of State .pdf
Class 11 Legal Studies Ch-1 Concept of State .pdfClass 11 Legal Studies Ch-1 Concept of State .pdf
Class 11 Legal Studies Ch-1 Concept of State .pdf
 
Paris 2024 Olympic Geographies - an activity
Paris 2024 Olympic Geographies - an activityParis 2024 Olympic Geographies - an activity
Paris 2024 Olympic Geographies - an activity
 
Contemporary philippine arts from the regions_PPT_Module_12 [Autosaved] (1).pptx
Contemporary philippine arts from the regions_PPT_Module_12 [Autosaved] (1).pptxContemporary philippine arts from the regions_PPT_Module_12 [Autosaved] (1).pptx
Contemporary philippine arts from the regions_PPT_Module_12 [Autosaved] (1).pptx
 
Interactive Powerpoint_How to Master effective communication
Interactive Powerpoint_How to Master effective communicationInteractive Powerpoint_How to Master effective communication
Interactive Powerpoint_How to Master effective communication
 
Call Girls in Dwarka Mor Delhi Contact Us 9654467111
Call Girls in Dwarka Mor Delhi Contact Us 9654467111Call Girls in Dwarka Mor Delhi Contact Us 9654467111
Call Girls in Dwarka Mor Delhi Contact Us 9654467111
 
Model Call Girl in Bikash Puri Delhi reach out to us at 🔝9953056974🔝
Model Call Girl in Bikash Puri  Delhi reach out to us at 🔝9953056974🔝Model Call Girl in Bikash Puri  Delhi reach out to us at 🔝9953056974🔝
Model Call Girl in Bikash Puri Delhi reach out to us at 🔝9953056974🔝
 
microwave assisted reaction. General introduction
microwave assisted reaction. General introductionmicrowave assisted reaction. General introduction
microwave assisted reaction. General introduction
 

Adobe indesign cs6

  • 2. Adobe InDesign CS6 is a page-layout software that takes print publishing and page design beyond current boundaries. InDesign is a desktop publishing program that incorporates illustration capabilities into its interface. It also allows for cross platform interaction with Illustrator, Photoshop, and Acrobat. NOTE: This tutorial is fairly comprehensive in that it discusses the most common aspects of InDesign and has been developed to take beginners through the software from start to finish. TABLE OF CONTENTS 1. Getting Started Page 3 2. Setting up the Document Page 3 3. Toolbox Page 4 4. Organizing the Document Page 8 • Column Specifications Page 9 • Rulers Page 9 • Guides Page 10 7. Inserting/Formatting Text Page 11 8. Type Menu Page 11 9. Using Colors Page 12 10. Working With Objects (Images, Graphics, and Elements) Page 13 • Links Page 13 • Placing Images Page 14 • Enabling Text Wraps Page 15 • Grouping Page 15 • Locking Page 16 16. Saving Page 16 17. Exporting To PDF Page 17 18. New Features in CS6 Page 18 2
  • 3. 1. GETTING STARTED Begin by opening Adobe InDesign CS6. On a PC, click Start > Programs > Adobe > InDesign CS6, or click on the InDesign short cut on the desktop. On a Mac, click Macintosh HD > Applications > Adobe InDesign CS6, or click the InDesign icon in the Dock. (Figure 1) Figure 1. Navigation to InDesign CS6 on a Mac. 2. SETTING UP THE DOCUMENT Setting up your document correctly from the start will make your job much easier as you work through your project. This will require some advanced planning. 1. To create a new document, click File > New > Document. This will open the Document Setup dialog box. Here you will be able to set up the correct page size, margins, and page columns for your document. (Figure 2) Figure 2. Opening a new document in InDesign. 3
  • 4. Options include, but are not limited to: Number of Pages Type a value for the total number of pages for this document. Facing Pages Select this option to make left and right pages face each other in a double-page spread. Deselect this option to let each page stand alone, such as when you plan to print on both sides of a sheet of paper or want objects to bleed in the binding. Master Text Frame Select this option to create a text frame the size of the area within the margin guides, matching the column settings you specified. The master text frame is added to the master. Page Size Choose a page size from the menu, or type values for Width and Height. Page size represents the final size you want after bleeds or trimming other marks outside the page. There are presets for common sizes such as letter, legal, and tabloid. Orientation Click the Portrait (tall) or Landscape (wide) icons. These icons interact dynamically with the dimensions you enter in Page Size. When Height is the larger value, the portrait icon is selected. When Width is the larger value, the landscape icon is selected. Clicking the deselected icon switches the Height and Width values. NOTE: The default unit of measurement in InDesign is pica (p0). If you type a value into the Width or Height text fields and use the abbreviation for inches (in), InDesign will automatically convert it. Bleed After clicking More Options, the bleed area is used to align objects that you want to extend all the way to the trim line of your printed document. Slug After clicking More Options, the slug area is used for instructions to the printer, sign-off forms, or other information related to your document. The slug area is discarded when the document is trimmed to its final page size. 2. When you have entered all of your document settings, click OK. NOTE: If you incorrectly enter information in the Document Setup dialog box, or if you need to adjust any of this information while you are working, you can make changes at any time by clicking File > Document Setup. 2. SETTING UP THE DOCUMENT CONT. 3. TOOLBOX If you used Adobe Photoshop or Adobe InDesign before you should be familiar with the toolbox in InDesign CS6 as it shares some of the tools from these applications. If you are a novice user of Adobe products you should keep in mind that you might not need to use all the tools. In this tutorial, only the basic tools will be discussed in depth. 4
  • 5. 3. TOOLBOX CONT. 5 Figure 4. Extra Tools in InDesign. Some tools in the toolbox have additional tools linked to them. These tools have small black triangles in the right-hand corner. To view the additional tools click and hold down on any tool that has a black triangle in the corner. (Figure 4) Figure 3. Tools in InDesign.
  • 6. 3. TOOLBOX CONT. 6 Selection Tools DRAWING AND TYPE TOOLS Pen tool lets you draw straight and curved paths. Type tool lets you create text frames and select text. Gap tool lets you adjust the space between objects. Convert Direction Point tool lets you convert corner points and smooth points. Smooth tool lets you remove excess angles from a path. Direct Selection tool lets you select points on a path or contents within a frame. Add Anchor Point tool lets you add anchor points to a path. Type on a Path tool lets you create and edit type on paths. Page tool lets you create multiple page sizes within a document. Delete Anchor Point tool lets you remove anchor points from a path. Pencil tool lets you draw a freeform path. Selection tool lets you select entire objects.
  • 7. 7 DRAWING AND TYPE TOOLS CONT. TRANSFORMATION TOOLS Erase tool lets you delete points on a path. Polygon Frame tool lets you create a multi-sided shape placeholder. Free Transform tool lets you rotate, scale, or shear an object. Ellipse Frame tool lets you create a circle or oval placeholder. Polygon tool lets you create multi-sided shape. Shear tool lets you skew objects around a fixed point. Line tool lets you draw a line segment. Rectangle tool lets you create a square or rectangle. Rotate tool lets you rotate objects around a fixed point. Rectangle Frame tool lets you create a square or rectangle placeholder. Ellipse tool lets you create a circle or oval. Scale tool lets you resize objects around a fixed point. 3. TOOLBOX CONT.
  • 8. 4. ORGANIZING THE DOCUMENT 8 MODIFICATION AND NAVIGATION TOOLS Eyedropper tool lets you sample color or type attributes. Scissors tool cuts paths at specified points Gradient Feather tool lets you fade an object into the background. Note tool lets you add comments. Measure tool measures the distance between two points. Hand tool moves the page view within the document window. Gradient Swatch tool lets you insert and adjust gradients Zoom tool adjusts the view magnification in the document window. Working in InDesign can sometimes call for mathematical precision in the layout of the document. This section provides tips on how you can use the available Rulers, Guides, and Column Specifications to make your final output precise with the placement of your text and graphics exactly where you want them. Using the Zoom Tool in conjunction with the Guides and Rulers is helpful because it allows you to focus in on specific areas of your documents to make the placement of your text and graphics as accurate as possible. You can access the Zoom Tool by selecting it from the Tool Box (Fig. 3) The following sections within this tutorial explain: • Column Specifications (Page 9) • Rulers (Page 9) • Guides (Page 10) 3. TOOLBOX CONT.
  • 9. 4. ORGANIZING THE DOCUMENT CONT. 9 COLUMN SPECIFICATIONS RULERS To insert columns into your document click Layout > Margins and Columns. 1. Enter the number of columns you would like in the Number of Columns text field (Fig. 5). 2. Enter the space (in inches) that you would like in between your columns in the Gutter text field. 3. Make sure the chain image is linked and not broken if you would like InDesign to automatically make all the settings the same throughout the rest of your document. Rulers are used to measure the placement of texts and images in your document. The rulers measure in inches, starting at “0”, and run horizontally and vertically from the top left corner of your document. If the Rulers are not displayed, click View > Show Rulers (Fig. 6). Or, if the Rulers are being displayed, and you want to get rid of them, go to View > Hide Rulers. Clicking and dragging on the box where the horizontal and vertical rulers meet adjusts the placement of the ruler. NOTE: The rulers must be shown in order to draw Guides, which are described in the next section. Figure 5. Margins and Columns Figure 6. Rulers
  • 10. 10 4. ORGANIZING THE DOCUMENT CONT. GUIDES Guides are temporary horizontal and vertical lines that you can set up within your document to produce page layout with mathematical precision. They are not actually drawn into your document; they exist only on-screen to help you with your layout. Guides are useful because they help keep all parts of the document aligned properly, and they assist when measuring with the rulers. The Rulers must be shown in order to insert Guides. Inserting Guides To insert a Guide, place your pointer on the Horizontal (or Vertical) ruler at the top of your document. Click and drag down onto the document where you would like your guide to be. You should notice a dotted line that correlates with the movement of your pointer. Measure the distance you are pulling your Guide down at by using the Vertical (Horizontal) ruler on the left of your document. The Guide will appear as a thin aqua line. If you do not like where you placed your Guide, you can move it to another part of the document by clicking and dragging it, or, you can remove it completely by dragging it off of the document. “Snap to” Guides Snapping to a Guide is like “magnetizing” it. If you drag an image or element near a Guide (within a fraction of an inch), the image or element will lock into place with the Guide. To turn snapping on or off, click View > Grids and Guides > Snap to Guides (Fig. 7). Hiding Guides If you would like to view your document without the aid of the Guides, you can hide them temporarily by going to View > Grids and Guides > Hide Guides (Fig. 8). Figure 7. Snap to Guides Figure 8. Hide Guides
  • 11. 11 INSERTING AND FORMATTING TEXT TYPE AND PARAGRAPH MENU Now that you have a basic understanding of setting up a document and using the Tool Box, you can begin inserting text. Using the Text Tool (T) (Fig. 3), click onto your page to enable the text cursor. Don’t be discouraged if the cursor does not line up exactly where you want to place your text – you can move and format your text later. Begin typing your content. Once you have your raw text on the page you can begin manipulating it to your liking. Change from the Text Tool to the Pointer Tool and click over your text. You will notice that your text has been placed into a “box” of sorts. This is called an Element. Many objects and all of your text must be within an Element; there is no “freestanding” text in an InDesign document as you might find in a Microsoft Word document. Using the Pointer Tool, you can move the Element of text around to anywhere you like on the page. Using the “grippers” on the corners of the Element, you can adjust the width and length of the Element. If you do not specify a length for the Element, it will expand according to the length of your text, however, if you adjust the length of the Element to be smaller than your text, your text will not be visible. A red tab below the Element indicates that there is more content within the Element that is not visible (Fig. 9). A common way to format and manipulate your text is to use the Type Menu at the top of the screen. InDesign CS6 adds all the advanced features, as well as access to the Paragraph menu. When the Type Tool is selected, the Control Pallette should appear at the top of the screen. If it is not, click Window > Control. At the extreme left hand side of the pallette are the two buttons that let you switch back and forth between Type and Paragraph controls. Figure 9. Left box shows text that fits in the Element. Right box shows that all text is not showing in the Element. Figure 10. Type Pallette Figure 11. Paragraph Pallette
  • 12. 12 USING COLORS InDesign includes thousands of color options as well as the ability to mix and create your own colors. After opening a new document, the Colors Palette window should appear on the right-hand side of the screen. If it is not there, click Window > Color. InDesign includes 10 default color options within the Swatches Palette (Fig.12). These colors are selected from the two common color models: RGB and CMYK. (Use RGB colors if your output will be on a computer or TV screen. Use CMYK colors for print documents.) To mix custom colors, open the Color Pallette. Depending on the color mode, you’re using, it will open in RGB (Fig.13) or CMYK (Fig.14). Mix hues using the slider bars. To add your custom color to the Swatches Palette, click Add to Swatches. You can also remove colors from the Swatches Palette by clicking and dragging. The new swatch will appear in the Swatches Pallette with the default name set to reflect the color mixture. For example, in Figure 12, pure Cyan in CMYK mode is listed as C=100 M=0 Y=0 K=0. One can easily change this to something more descriptive by double-clicking the swatch and simply renaming it. Figure 12. Default Swatches Pallette Figure 13. RGB color pallette set to black Figure 14. CMYK color pallette set to black
  • 13. WORKING WITH OBJECTS Now that you have learned how to insert and edit text Elements, you need to understand how to work with other kinds of objects within your document. Nearly every InDesign document will contain text, and/or graphics. Using the three together takes thorough knowledge of InDesign’s capabilities. For the purposes of this tutorial, it is important to understand the kind of “objects” to which this tutorial refers: • Text (Element) - A block of text within a defined “text box” (discussed in a previous section). • Image - A picture file with one of the following extensions: .jpg, .gif, .tif, .pct, .bmp, .ai, .pdf, or .png, created in another program such as MS Excel or Photoshop. • Graphic - Vector illustration created directly in InDesign using the provided pen or other path tools. The following sections offer an in depth explanation of how to insert and adjust Images, Graphics, and Elements within your document. • Grouping (Page 15) • Links (Page 15) • Placing Images (Page 15) • Enabling Text Wraps (Page 16) • Layers and Arranging (Page 17) LINKS InDesign is primarily a linking device; it can create simple graphics, but it’s strength lies in the way it assembles disparate elements into a cohesive document. As a general rule, when inserting images into your document, you should never use the “copy & paste” technique. Instead, save your image files in the same folder as your InDesign document, and “link” them into the document (discussed in the next section). You can view the source location of the images that are linked into your document, as well as other important data such as colorspace and filetype, by going to the Links Palette (Fig. 15). To view the pallette, go to Window > Links (Fig.16). Figure 15. Links pallette Figure 16. To view Links pallette 13
  • 14. 14 PLACING IMAGES Place is the function used to insert an image into your document. It is comparable to Microsoft Word’s “Insert Picture from File” function. When you Place something into your document, it is “linked” to the document from its current location (as previously mentioned). Therefore, it is recommended that you store all of your content for your document in the same location. To Place an image into your document do the following: 1. Make sure the Pointer Tool is selected. (If the Text Tool is selected when placing an image, the image will insert within a blank Element - not as an independent unit. Images within Elements are difficult to format and reposition.) 2. Go to File > Place. 3. Navigate through the pull down menus to find the file that you want to insert. Select the file and hit OK (Fig. 17). 4. Your cursor will change into a small grey picture box that represents your “unplaced” image. Find the approximate location where you want to drop the image and click the mouse once. Once you have Placed the object, switch to the Pointer Tool to move the object to the precise location where you want it. If you want to resize your image, single-click on your image, click the Free Transform Tool (E) and you can resize it using the “grippers” – little black squares - that surround the image. Click and drag a gripper inward or outward to expand or shrink you image as desired. If you would like to maintain the original proportions of the image when you resize it, hold down the Shift key as you perform the resizing action. WORKING WITH OBJECTS CONT. Figure 17. “Place” dialogue box
  • 15. ENABLING TEXT WRAP If you have a large block of text and would like to insert an image in close proximity without the text or image overlapping, you can use a function called Text Wrap (which is used frequently in Microsoft Word.) Using the Pointer Tool, click on the image and go to Window > Text Wrap. There are several visual options that display the different kinds of Text Wraps (Fig. 18). The numerical settings at the bottom of the window denote how much “buffer space” should be maintained between the image and the text. GROUPING Frequently, you will have many Images, Graphics, and Elements on the screen at once. It can be very beneficial to connect several of these together once they are positioned correctly so that you can move all of them at once and maintain the relational distance between each of them. This function is called Grouping. To Group two or more objects, do the following: 1. Select all of the objects that you want to Group together. This can be done in two ways (both using the Pointer Tool): • Hold down the Shift key and click on each object individually, or, • Starting in an empty space on the page, click and hold the mouse and drag it outward creating a “ghost box” around all of the objects you want to select. When you release the mouse all of the items within the box should be selected. (Fig. 19) 2. Click Object > Group (Fig. 20). 3. If you click over the newly grouped objects with the pointer tool you will notice that they are bound together as one large object. The tip-off is that the bounding box connecting them, which was once solid, has now become dashed, and the individual object outlines have disappeared. (Fig. 21). 4. To ungroup these objects, click on the grouped objects and hit Object > Ungroup. 15 WORKING WITH OBJECTS CONT. Figure 18.Text Wrap pallette Figure 19. All selected, not grouped Figure 20. Object > Group Figure 21. Grouped
  • 16. 16 LOCKING Sometimes, you may have an object placed exactly where you want it and you will want to avoid moving it by accident. (For example, if you have a large image or graphic as a background for the page, you may select it and move it accidentally if you are not careful.) Therefore, InDesign has a function called Locking to help you avoid such accidents. When an object is Locked, it cannot be moved, adjusted, or altered in any way. To Lock objects, select them using the Pointer Tool and click Object > Lock Position (Fig. 22). Notice now that InDesign restricts the object from being altered in any way. To unlock the object(s), click Object > Unlock All on Spread (Fig. 23). NOTE: As with Grouping, you can hold down the Shift key to select multiple objects. Saving your document should be a habit when working in InDesign. Saving frequently lessens the risk of losing the work you have been doing. 1. To save your InDesign document go to File > Save As. 2. The Save As dialogue box will appear (Fig. 24). 3. Navigate to the place you would like your document to be saved by using the drop-down menu and navigation window. 4. Enter the name of your document in the Save As text field. 5. Click the Save button in the lower right corner of the dialogue box. 6. Check to make sure that your document is saved in the place you intended. WORKING WITH OBJECTS CONT. SAVING Figure 22. Object > Lock Figure 23. Object > Unlock All on Spread Figure 24. File > Save As Figure 24. File > Save As
  • 17. 17 WHAT IS A PDF? Portable Document Format (PDF) files are an excellent way to share page files with others without the common hassles of matching applications, fonts, large file sizes, and cross platform compatibility (Mac to PC). A PDF file contains all of the elements required to view and print a document that matches the original design in all respects (type style and size, images, color, layout, etc.) PDFs can be viewed and printed without access to the original application that created it. Viewing and printing is done from Adobe Acrobat Reader, software that can be copied and freely distributed. Another feature of PDF files is their compact nature. These files are compressed in multiple ways to render a document that is just a fraction of the size of the original document. This makes them very handy for transportation and storage. This feature enables PDF files to be efficiently attached to e-mail messages. Unlike their originating documents, PDF files are not fully editable, without specialized software. This can be an advantage when sharing files that you don’t want changed in any way. NOTE: InDesign differs from most programs in the way it creates PDFs. CREATING A PDF When you are ready to create the PDF file take the following actions: 1. Save your document. 2. Go to File > Export > Adobe PDF. 3. A dialogue box will appear asking you to save (Fig. 27); this time, you will be saving the PDF file, not the original document. Name the new file (without deleting the .pdf file extension.) and hit Save. A dialogue box will appear in which you can adjust settings from jpg quality to the particular pages you want to include in the PDF (defaults to all). Make changes accordingly and hit OK. EXPORTING TO PDF Figure 25. File > Export > Adobe PDF Figure 26. PDF dialogue box.
  • 18. Turning on the New Features Make sure to select the New in CS6 (Fig. 26) tab located in a dropdown box at the top right of the application screen. When looking in the tabs located in the toolbar, the new changes will be highlighted in blue or purple (Fig. 27). Liquid Layout Feature This feature can be used to keep contents on one page the same in a different page when using an alternate layout. For example, if one page is in a different layout or size, to keep it flowing smoothly without having to rescale each page, click on the Layout tab and turn on the Liquid Layout feature. Once this option has been selected, you are then presented with other options of how you want a certain page or the entire document to be presented. New Features of InDesign CS6 18 Figure 26. Essentials tab > New in CS6 Figure 27. Window >Drop-down menu highlight new features. Figure 28. Layout > Liquid Layout Figure 29. Choose from the drop-down menu to turn on Liquid Layout and options.