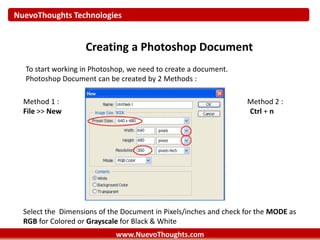
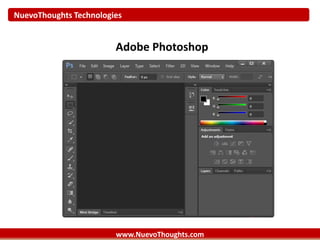
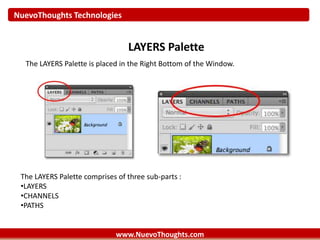
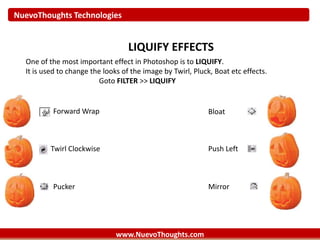
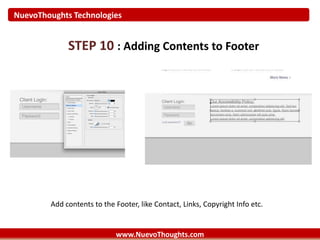
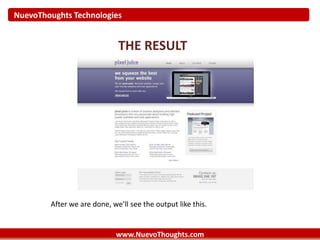
NuevoThoughts Technologies
Graphic Design and Photoshop
Made By: Jiteen
Date: Shubhendu’s DAY V1
www.NuevoThoughts.com
NuevoThoughts Technologies
www.NuevoThoughts.com
GETTING STARTED WITH PHOTOSHOP
Agenda of the Presentation :
•What is Photoshop : An Introduction
•Opening, Closing & Saving PSD
•Tools Palette
•Layers & Layer Palette
•Common Effects
•Creating a Website using Photoshop
NuevoThoughts Technologies
www.NuevoThoughts.com
WHAT IS PHOTOSHOP ?
Photoshop is basically a PHOTO EDITING SOFTWARE introduced by a US Based
company ADOBE in 1989.
The latest version of Adobe Photoshop is CS 6.
It is available in over 20 Languages (but not in HINDI... DISCRIMINATION)
FILE FORMAT
Photoshop files have default file extension as .PSD, which stands for "Photoshop
Document." A PSD file stores an image with support for most imaging options
available in Photoshop.
NuevoThoughts Technologies
www.NuevoThoughts.com
Creating a Photoshop Document
To start working in Photoshop, we need to create a document.
Photoshop Document can be created by 2 Methods :
Method 1 : Method 2 :
File >> New Ctrl + n
Select the Dimensions of the Document in Pixels/inches and check for the MODE as
RGB for Colored or Grayscale for Black & White
NuevoThoughts Technologies
www.NuevoThoughts.com
Closing a PSD Document
To CLOSE the PSD document, just Click the CLOSE button at the extreme TOP-RIGHT
of the window. And it will ask you to save changes (if not saved)
Saving a PSD Document
There are 3 methods to SAVE the PSD.
METHOD 1 METHOD 2 METHOD 3
Close the document & Go to FILE >> Save As Ctrl + S
It will ask you to save data
NuevoThoughts Technologies
www.NuevoThoughts.com
Adobe Photoshop
NuevoThoughts Technologies
www.NuevoThoughts.com
TOOLS PALETTE
The TOOLS PALLETE is the set of tools
available in Photoshop.
It is placed in the Extreme Left, if not
then you can get it by:
Window >> Workspace >> Reset palette
1.
2.
3.
4.
5.
The Palette can be broadly divided into :
1. Selection Tools
2. Coloring Tools
3. Drawing Tools
4. Transformation Tools
5. Background Color Tools
NuevoThoughts Technologies
www.NuevoThoughts.com
MOVE Tool & MARQUEE Tool
The MOVE tool is used to Move an object/shape or a part of object from one place
to other either within a document or to the other document.
The MARQUEE tool is used to SELECT the particular area of the document in a
rectangular/elliptical/row/column shape only. This changes the area of your image
that is affected by other tools or actions to be within the defined shape.
NuevoThoughts Technologies
www.NuevoThoughts.com
LASSO Tool & QUICK SELECTION Tool
The Lasso tool is used to select the area of the document in FREESTYLE (Lasso Tool),
STRAIGHTENED (Polygonal Lasso Tool), GUESSED (Magnetic Lasso Tool).
The Quick Selection Tool is used to select the area that is similar to the current
position of the clicked area. It is also Known as MAGIC WAND TOOL.
NuevoThoughts Technologies
www.NuevoThoughts.com
EYE DROPPER Tool & CROP Tool
The EYE DROPPER tool is used to select the specific color sample of the image.
Color Sampler can select up to 4 colors.
The CROP tool is used to Crop the area required. It selects in rectangular shape.
NuevoThoughts Technologies
www.NuevoThoughts.com
BRUSH Tool & SPOT HEALING Tool
The BRUSH tool is used to make a paint brush effect and is used to make free hand
drawing. Also, there are numerous brush patterns available in beautiful patterns.
The SOT HEALING BRUSH tool is used to eradicate any imperfection from the image
by replacing it by the perfect background.
NuevoThoughts Technologies
www.NuevoThoughts.com
CLONE Tool & HISTORY Tool
The CLONE STAMP tool is used to create a Xerox of the selected area (alt+click) to
the desired area (where the mouse is clicked upon).
The HISTORY Brush tool paints the copy of the selected state into the current image
window.
NuevoThoughts Technologies
www.NuevoThoughts.com
ERASER Tool & GRADIENT Tool
The ERASER tool is used to Erase the unwanted part of the image.
Background ERASER tool is used to erase the Background Layer of the Document.
The GRADIENT tool is used to make a Gradient (combination) of the colors for
effective banners etc. The BUCKET TOOL is used to add a single equally distributed
color.
NuevoThoughts Technologies
www.NuevoThoughts.com
BLUR, SHARPEN & SMUDGE Tool
The BLUR tool blurs the image , SHARPEN tool sharpens the soft image while the
Smudge tool smudges the area under the Brush.
NuevoThoughts Technologies
www.NuevoThoughts.com
DODGE & BURN Tools
The DODGE tool makes the image more lighter, it makes the shade lighter.
The BURN tool makes the image more Darker, it makes the shade darker.
NuevoThoughts Technologies
www.NuevoThoughts.com
PEN & TYPE Tools
The PEN tool is used to draw very smooth edges and at different angles which are
very difficult in Free hand drawing.
The TYPE tool is the tool used to Type TEXT. The text could be of varied sizes, and
style. There are various FONTS available to be downloaded on internet.
NuevoThoughts Technologies
www.NuevoThoughts.com
PATH SELECTION & SHAPE Tools
The PATH SELECTION tool is used to draw shapes like PEN tool, but it also shows
anchor points, direction lines and points.
The SHAPE tool is used to make predefined shapes. CUSTOM SHAPE is the option
which allows you to choose many other shapes other than geometrical as well.
NuevoThoughts Technologies
www.NuevoThoughts.com
ROTATE & ZOOM Tool
The ROTATE tool is used to Rotate the image in X-Y coordinates.
The ZOOM tool is used to Get a Zoomed/enlarged view of the image to get the basic
details of the image.
NuevoThoughts Technologies
www.NuevoThoughts.com
ORBIT & HAND Tool
The ORBIT tool is a 3D rotate tool that rotates the image along its Coordinates.
The Hand tool is used to move the image within the window.
NuevoThoughts Technologies
www.NuevoThoughts.com
FORE/BACK GROUND Tool
The TOOLS PALLETE is the set of various tools available in Photoshop.
It is placed in the Extreme Left.
This is placed at the bottom of the palette. From here the color can be chose.
NuevoThoughts Technologies
www.NuevoThoughts.com
LAYERS PALETTE
NuevoThoughts Technologies
www.NuevoThoughts.com
LAYERS Palette
The LAYERS Palette is placed in the Right Bottom of the Window.
The LAYERS Palette comprises of three sub-parts :
•LAYERS
•CHANNELS
•PATHS
NuevoThoughts Technologies
www.NuevoThoughts.com
ADDING, DELETING & HIDING a Layer
The TOOLS PALLETE is the set of various tools available in Photoshop.
It is placed in the Extreme Left.
Click on the second from Click on the First from Click on the icon at the
Right option to Right option to left of the layer to
ADD a new layer. DELETE the layer HIDE/Un-HIDE the layer.
NuevoThoughts Technologies
www.NuevoThoughts.com
LIQUIFY EFFECTS
One of the most important effect in Photoshop is to LIQUIFY.
It is used to change the looks of the image by Twirl, Pluck, Boat etc effects.
Goto FILTER >> LIQUIFY
Forward Wrap
Twirl Clockwise
Pucker Mirror
Push Left
Bloat
NuevoThoughts Technologies
www.NuevoThoughts.com
A few EFFECTS in Photoshop
NORMAL Glass in Frosted Mode
ZIG ZAG WAVE SPHERE
NuevoThoughts Technologies
www.NuevoThoughts.com
Let’s take a
NuevoThoughts Technologies
www.NuevoThoughts.com
Web Page Layout
using PSD
NuevoThoughts Technologies
www.NuevoThoughts.com
STEP 1 : Designing the Structure
Create a raw structure of the webpage to be created, using pen
and paper.
NuevoThoughts Technologies
www.NuevoThoughts.com
STEP 2 : Defining the Structure
Prepare the well-defined structure of the layout. This will be the
exact structure to be followed throughout.
NuevoThoughts Technologies
www.NuevoThoughts.com
STEP 3: Getting Started on PS
Create a new Page with suitable Dimensions and colour and
RGB mode.
NuevoThoughts Technologies
www.NuevoThoughts.com
STEP 4 : Prepare the MENU
The MENU is created as a wide bar with Grey-White GRADIENT.
NuevoThoughts Technologies
www.NuevoThoughts.com
STEP 5 : Making the HEADER
A light coloured Violet-White Gradient is made to place for the
slider and other header contents.
NuevoThoughts Technologies
www.NuevoThoughts.com
STEP 6 : Adding Menu ITEMS & LOGO
Using the TEXT tool, Add the ITEMS to the Menu and add the
LOGO (image or Decorated Text).
NuevoThoughts Technologies
www.NuevoThoughts.com
STEP 7 : Decorating the Header
Add images and text to Decorate the Header. Using Effects,
make the Header more attractive.
NuevoThoughts Technologies
www.NuevoThoughts.com
STEP 8 : Working with BODY
Add Text and Blocks in the body, choose appropriate colours to
match the Website.
NuevoThoughts Technologies
www.NuevoThoughts.com
STEP 9 : Starting the Footer
The footer is made using a light Gradient pattern.
NuevoThoughts Technologies
www.NuevoThoughts.com
STEP 10 : Adding Contents to Footer
Add contents to the Footer, like Contact, Links, Copyright Info etc.
NuevoThoughts Technologies
www.NuevoThoughts.com
THE RESULT
After we are done, we’ll see the output like this.
NuevoThoughts Technologies
www.NuevoThoughts.com
Bibliography
http://simplephotoshop.com/photoshop_tools/
http://www.1stoptutorials.com/Photoshop_Tools_Tu
torials.html
http://www.hscripts.com/tutorials/photoshop/
http://www.photoshoplab.com/photoshop-tool-
basics.html
NuevoThoughts Technologies
Thanks
www.NuevoThoughts.com
Enough of Spoon-feeding, just go and explore more….
Yourself !!

Photoshop