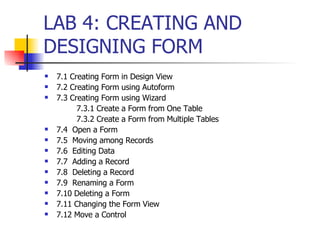
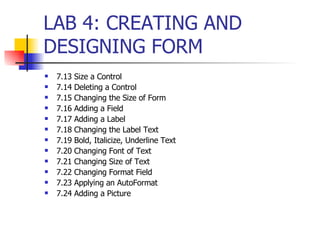
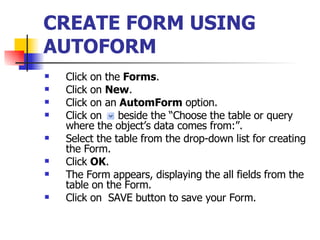
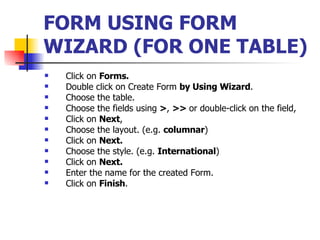
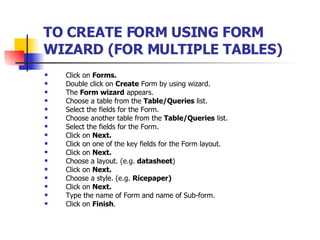
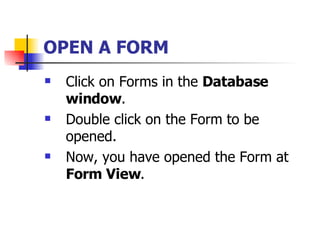
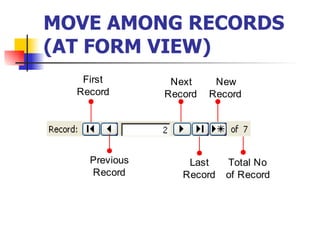
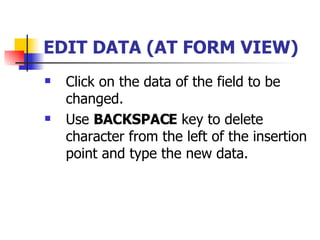
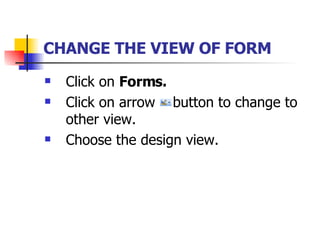
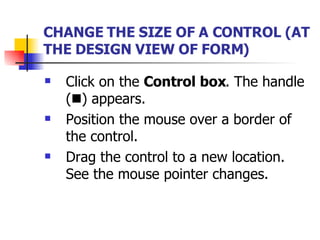
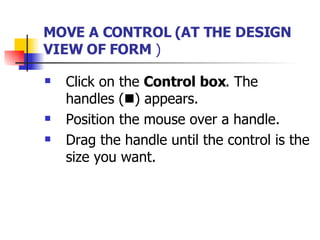
CHAPTER 7 CREATING AND DESIGNING FORM
LAB 4: CREATING AND DESIGNING FORM 7.1 Creating Form in Design View 7.2 Creating Form using Autoform 7.3 Creating Form using Wizard 7.3.1 Create a Form from One Table 7.3.2 Create a Form from Multiple Tables 7.4  Open a Form 7.5  Moving among Records 7.6  Editing Data 7.7  Adding a Record 7.8  Deleting a Record 7.9  Renaming a Form 7.10 Deleting a Form 7.11 Changing the Form View 7.12 Move a Control
7.13 Size a Control 7.14 Deleting a Control 7.15 Changing the Size of Form 7.16 Adding a Field 7.17 Adding a Label 7.18 Changing the Label Text 7.19 Bold, Italicize, Underline Text 7.20 Changing Font of Text 7.21 Changing Size of Text 7.22 Changing Format Field 7.23 Applying an AutoFormat 7.24 Adding a Picture LAB 4: CREATING AND DESIGNING FORM
CREATE FORM USING AUTOFORM   Click on the  Forms . Click on  New . Click on an  AutomForm  option. Click on  beside the “Choose the table or query where the object’s data comes from:”. Select the table from the drop-down list for creating the Form. Click  OK . The Form appears, displaying the all fields from the table on the Form. Click on  SAVE button to save your Form.
FORM USING FORM WIZARD (FOR ONE TABLE)   Click on  Forms. Double click on Create Form  by Using Wizard . Choose the table. Choose the fields using  > ,  >>  or double-click on the field, Click on  Next , Choose the layout. (e.g.  columnar ) Click on  Next. Choose the style. (e.g.  International ) Click on  Next. Enter the name for the created Form. Click on  Finish .
TO CREATE FORM USING FORM WIZARD (FOR MULTIPLE TABLES)   Click on  Forms. Double click on  Create  Form by using wizard. The  Form wizard  appears. Choose a table from the  Table/Queries  list. Select the fields for the Form. Choose another table from the  Table/Queries  list. Select the fields for the Form. Click on  Next. Click on one of the key fields for the Form layout. Click on  Next. Choose a layout. (e.g.  datasheet ) Click on  Next. Choose a style. (e.g.  Ricepaper) Click on  Next. Type the name of Form and name of Sub-form. Click on  Finish .
OPEN A FORM   Click on Forms in the  Database window . Double click on the Form to be opened. Now, you have opened the Form at  Form View .
MOVE AMONG RECORDS (AT FORM VIEW)
EDIT DATA (AT FORM VIEW) Click on the data of the field to be changed. Use  BACKSPACE  key to delete character from the left of the insertion point and type the new data.
ADD A RECORD (AT FORM VIEW)   Click on the  Add  button. Type data onto the fields.
DELETE A RECORD (AT FORM VIEW)   Click on a field of the record to be deleted. Click on  button to delete a record. Click  Yes  when the confirming box appears.
RENAME A FORM   Click on  Forms . Right click on the name of the Form to be renamed. Click on  Rename  option. A border appears around the name of the Form. Type the new Form name and press  ENTER .
DELETE A FORM   Click on  Forms  in the database window. Click on the name of the Form to be deleted. Click on  button to delete the Form.
CHANGE THE VIEW OF FORM   Click on  Forms. Click on arrow  button to change to other view. Choose the design view.
CHANGE THE SIZE OF A CONTROL   (AT THE DESIGN VIEW OF FORM) Click on the  Control box . The handle (  ) appears. Position the mouse over a border of the control. Drag the control to a new location. See the mouse pointer changes.
MOVE A CONTROL (AT THE DESIGN VIEW OF FORM  ) Click on the  Control box . The handles (  ) appears. Position the mouse over a handle. Drag the handle until the control is the size you want.
DELETE A CONTROL (AT THE DESIGN VIEW OF FORM  ) Click on the  Control box . The handles (  ) appears. Press the  DELETE  key.
CHANGE THE SIZE OF FORM   Position the mouse over the right or bottom edge of the Form. When the mouse pointer changed, drag the edge of the Form until the Form displays the size you want. The Form changes to the new size. Click on  button to save your changes
ADD A FIELD (AT THE DESIGN VIEW OF FORM)   Click on  button to display a list of fields of the table you used to create your Form. Position the mouse, click on the field to be added to your Form. Drag the field to where you want the field to appear on your Form. Click on  button to save your changes.
ADD A LABEL (AT THE DESIGN VIEW OF FORM)   Click on  button to display the Toolbox toolbar Click on  from the toolbox to add a label to your Form.  Click and drag to resize the label box. Type the text for the label and then press the  ENTER  key. Click on  to save your changes.
CHANGE A LABEL TEXT   Double click on the label to be changed. A flashing insertion point appears in the cell. Press the  BACKSPACE  key or  DELETE  key to delete the text. Enter the new text for the label.  Click on  button to save your changes.
BOLD, ITALICIZE OR UNDERLINE A TEXT   Click on the control that displays the text to have a new style. Click on one of these buttons:  for bold,  for Italic and  for underscore. The text changes to the new style. Click on  button to save your changes.
CHANGE THE FONT OF TEXT   Click on the control that displays the text for a new font. Click on  for the font size box, a list of the available fonts. Click on the new font. The text changes to the new font. Click on  button to save your changes.
CHANGE THE SIZE OF TEXT   Click on the control that displays the text to be changed to new size. Click on  to display a list of the available sizes. The text changes to a new size. Click on  button to save your change.
CHANGE FORMAT OF FIELD   Click on the field that contains the data to be displayed in a new format. Click on  button to display the properties for the field. The text box dialog box appears. Click on the  Format  area. Type > symbol to change the data entered into this field transformed into upper case character.
CHANGE TEXT OF FIELD TO UPPER CASE   Click on the field that contains the data to be displayed in a new format. Click on  button to display the properties for the field. The text box dialog box appears. Click on the Format area. Type > symbol to change the data entered into this field transformed into upper case character.
CHANGE NUMBER INTO CURRENCY FORMAT   Click on the Price field’s control and click on the  button. The price textbox properties appear. Beside the  Format  area, click on the arrow  to display a list of formats. Choose the Currency format from the list. Click on  button to close the dialog box. Click on  button to save your change. Click on  button to preview the changes that you have made.
CHANGE FORM BACKGROUND COLOR   Click on anywhere in the Form. The instructions to change Form background are same with change label fill color.  Click on arrow in the  Fill/Back Color  button to display a list of background colors. Click on the background color to be used.
CHANGE THE TEXT COLOR   Click on the control that displays the text to be changed to a different color. Click on  of the  Font/Fore Color  to display a list of text colors. Click on the text color to be used. The text in the control displays the color you selected. Click on  button to save your changes.
APPLY AUTOFORMAT TO A FORM   Click on the area at the left corner of the Form to select the Form. Click on to select an  AutoFormat . The  AutoFormat  dialog box appears. Click on the AutoFormat to be used. Click on  OK  to confirm your change. The Form displays the new format. Click on  button to save your changes
ADD A PICTURE TO A FORM   Click on  button to add a picture to your Form. Click on where the bottom right corner of the picture to appear on your Form. The Insert Picture dialog box appears. Click on  of the  Look in:  dialog box. Click on the name of the picture to be added to your Form. Click on  OK  to add the picture to your Form. The picture appears on your Form. Click on  button to view the Form in Form view. Click on  button to save your changes.

Dit211 Chapter 7 (Lab 4)

  • 1.
    CHAPTER 7 CREATINGAND DESIGNING FORM
  • 2.
    LAB 4: CREATINGAND DESIGNING FORM 7.1 Creating Form in Design View 7.2 Creating Form using Autoform 7.3 Creating Form using Wizard 7.3.1 Create a Form from One Table 7.3.2 Create a Form from Multiple Tables 7.4 Open a Form 7.5 Moving among Records 7.6 Editing Data 7.7 Adding a Record 7.8 Deleting a Record 7.9 Renaming a Form 7.10 Deleting a Form 7.11 Changing the Form View 7.12 Move a Control
  • 3.
    7.13 Size aControl 7.14 Deleting a Control 7.15 Changing the Size of Form 7.16 Adding a Field 7.17 Adding a Label 7.18 Changing the Label Text 7.19 Bold, Italicize, Underline Text 7.20 Changing Font of Text 7.21 Changing Size of Text 7.22 Changing Format Field 7.23 Applying an AutoFormat 7.24 Adding a Picture LAB 4: CREATING AND DESIGNING FORM
  • 4.
    CREATE FORM USINGAUTOFORM Click on the Forms . Click on New . Click on an AutomForm option. Click on beside the “Choose the table or query where the object’s data comes from:”. Select the table from the drop-down list for creating the Form. Click OK . The Form appears, displaying the all fields from the table on the Form. Click on SAVE button to save your Form.
  • 5.
    FORM USING FORMWIZARD (FOR ONE TABLE) Click on Forms. Double click on Create Form by Using Wizard . Choose the table. Choose the fields using > , >> or double-click on the field, Click on Next , Choose the layout. (e.g. columnar ) Click on Next. Choose the style. (e.g. International ) Click on Next. Enter the name for the created Form. Click on Finish .
  • 6.
    TO CREATE FORMUSING FORM WIZARD (FOR MULTIPLE TABLES) Click on Forms. Double click on Create Form by using wizard. The Form wizard appears. Choose a table from the Table/Queries list. Select the fields for the Form. Choose another table from the Table/Queries list. Select the fields for the Form. Click on Next. Click on one of the key fields for the Form layout. Click on Next. Choose a layout. (e.g. datasheet ) Click on Next. Choose a style. (e.g. Ricepaper) Click on Next. Type the name of Form and name of Sub-form. Click on Finish .
  • 7.
    OPEN A FORM Click on Forms in the Database window . Double click on the Form to be opened. Now, you have opened the Form at Form View .
  • 8.
    MOVE AMONG RECORDS(AT FORM VIEW)
  • 9.
    EDIT DATA (ATFORM VIEW) Click on the data of the field to be changed. Use BACKSPACE key to delete character from the left of the insertion point and type the new data.
  • 10.
    ADD A RECORD(AT FORM VIEW) Click on the Add button. Type data onto the fields.
  • 11.
    DELETE A RECORD(AT FORM VIEW) Click on a field of the record to be deleted. Click on button to delete a record. Click Yes when the confirming box appears.
  • 12.
    RENAME A FORM Click on Forms . Right click on the name of the Form to be renamed. Click on Rename option. A border appears around the name of the Form. Type the new Form name and press ENTER .
  • 13.
    DELETE A FORM Click on Forms in the database window. Click on the name of the Form to be deleted. Click on button to delete the Form.
  • 14.
    CHANGE THE VIEWOF FORM Click on Forms. Click on arrow button to change to other view. Choose the design view.
  • 15.
    CHANGE THE SIZEOF A CONTROL (AT THE DESIGN VIEW OF FORM) Click on the Control box . The handle (  ) appears. Position the mouse over a border of the control. Drag the control to a new location. See the mouse pointer changes.
  • 16.
    MOVE A CONTROL(AT THE DESIGN VIEW OF FORM ) Click on the Control box . The handles (  ) appears. Position the mouse over a handle. Drag the handle until the control is the size you want.
  • 17.
    DELETE A CONTROL(AT THE DESIGN VIEW OF FORM ) Click on the Control box . The handles (  ) appears. Press the DELETE key.
  • 18.
    CHANGE THE SIZEOF FORM Position the mouse over the right or bottom edge of the Form. When the mouse pointer changed, drag the edge of the Form until the Form displays the size you want. The Form changes to the new size. Click on button to save your changes
  • 19.
    ADD A FIELD(AT THE DESIGN VIEW OF FORM) Click on button to display a list of fields of the table you used to create your Form. Position the mouse, click on the field to be added to your Form. Drag the field to where you want the field to appear on your Form. Click on button to save your changes.
  • 20.
    ADD A LABEL(AT THE DESIGN VIEW OF FORM) Click on button to display the Toolbox toolbar Click on from the toolbox to add a label to your Form. Click and drag to resize the label box. Type the text for the label and then press the ENTER key. Click on to save your changes.
  • 21.
    CHANGE A LABELTEXT Double click on the label to be changed. A flashing insertion point appears in the cell. Press the BACKSPACE key or DELETE key to delete the text. Enter the new text for the label. Click on button to save your changes.
  • 22.
    BOLD, ITALICIZE ORUNDERLINE A TEXT Click on the control that displays the text to have a new style. Click on one of these buttons: for bold, for Italic and for underscore. The text changes to the new style. Click on button to save your changes.
  • 23.
    CHANGE THE FONTOF TEXT Click on the control that displays the text for a new font. Click on for the font size box, a list of the available fonts. Click on the new font. The text changes to the new font. Click on button to save your changes.
  • 24.
    CHANGE THE SIZEOF TEXT Click on the control that displays the text to be changed to new size. Click on to display a list of the available sizes. The text changes to a new size. Click on button to save your change.
  • 25.
    CHANGE FORMAT OFFIELD Click on the field that contains the data to be displayed in a new format. Click on button to display the properties for the field. The text box dialog box appears. Click on the Format area. Type > symbol to change the data entered into this field transformed into upper case character.
  • 26.
    CHANGE TEXT OFFIELD TO UPPER CASE Click on the field that contains the data to be displayed in a new format. Click on button to display the properties for the field. The text box dialog box appears. Click on the Format area. Type > symbol to change the data entered into this field transformed into upper case character.
  • 27.
    CHANGE NUMBER INTOCURRENCY FORMAT Click on the Price field’s control and click on the button. The price textbox properties appear. Beside the Format area, click on the arrow to display a list of formats. Choose the Currency format from the list. Click on button to close the dialog box. Click on button to save your change. Click on button to preview the changes that you have made.
  • 28.
    CHANGE FORM BACKGROUNDCOLOR Click on anywhere in the Form. The instructions to change Form background are same with change label fill color. Click on arrow in the Fill/Back Color button to display a list of background colors. Click on the background color to be used.
  • 29.
    CHANGE THE TEXTCOLOR Click on the control that displays the text to be changed to a different color. Click on of the Font/Fore Color to display a list of text colors. Click on the text color to be used. The text in the control displays the color you selected. Click on button to save your changes.
  • 30.
    APPLY AUTOFORMAT TOA FORM Click on the area at the left corner of the Form to select the Form. Click on to select an AutoFormat . The AutoFormat dialog box appears. Click on the AutoFormat to be used. Click on OK to confirm your change. The Form displays the new format. Click on button to save your changes
  • 31.
    ADD A PICTURETO A FORM Click on button to add a picture to your Form. Click on where the bottom right corner of the picture to appear on your Form. The Insert Picture dialog box appears. Click on of the Look in: dialog box. Click on the name of the picture to be added to your Form. Click on OK to add the picture to your Form. The picture appears on your Form. Click on button to view the Form in Form view. Click on button to save your changes.