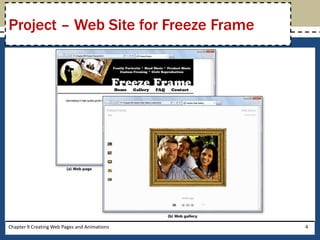
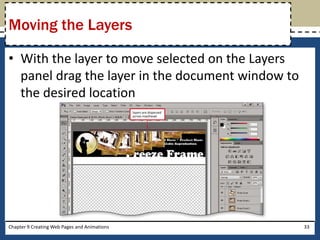
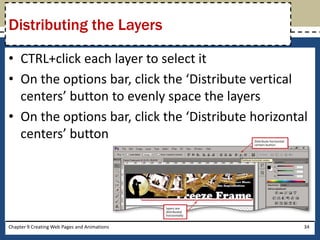
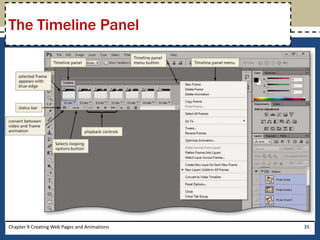
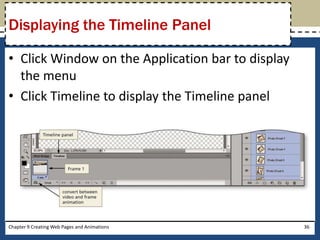
Adobe®
Photoshop® CS6
Chapter 9
Creating Web Pages
and Animations
• Explain why planning is the most important step
in Web design
• Organize photos for inclusion in a Web gallery
• Generate a Web gallery
• Differentiate between a Web page and a Web site
• Slice an image
• Apply slice settings
Chapter 9 Creating Web Pages and Animations 2
Objectives
• Create animation frames
• Describe the process of creating an animation and
optimization
• Tween an animation
• Loop an animation
• Optimize an animation
• Preview an animation
Objectives
Chapter 9 Creating Web Pages and Animations 3
Chapter 9 Creating Web Pages and Animations 4
Project – Web Site for Freeze Frame
• Organize photos for a Web site and gallery pages
• Use standard Web design and planning principles
• Employ animation carefully
Chapter 9 Creating Web Pages and Animations 5
General Project Guidelines
• Open Adobe Bridge
• Right-click a blank area of the Content panel to
display its context menu
• Click New Folder to create a new folder on your
storage device
• When the new folder is displayed, type the
desired folder name, and then press the ENTER
key
Chapter 9 Creating Web Pages and Animations 6
Creating a Folder in Bridge
Chapter 9 Creating Web Pages and Animations 7
Creating a Folder in Bridge
• Select the image(s) to copy
• Press CTRL+C to copy the files to the system
Clipboard
• Navigate to the folder where you wish to paste
the files
• Press CTRL+V to paste the files into the folder
Chapter 9 Creating Web Pages and Animations 8
Copying and Pasting Files in Bridge
Chapter 9 Creating Web Pages and Animations 9
Copying and Pasting Files in Bridge
• On the Bridge Application bar, click Output to
display the Output workspace
Chapter 9 Creating Web Pages and Animations 10
Displaying the Bridge Output Panel
• On the Output panel, click the Web Gallery
button, if necessary
• Click the Template button to display the list of
templates
• Click the desired template
• Click the Style button to display the list of styles
• Click the desired style
Chapter 9 Creating Web Pages and Animations 11
Choosing a Template and Style
Chapter 9 Creating Web Pages and Animations 12
Choosing a Template and Style
• In the Site Info area, select the desired text and
replace with the desired information about the
site
Chapter 9 Creating Web Pages and Animations 13
Editing Site Information
• On the Output panel, click the Preview in Browser
button to open a browser window
• When the browser window opens, double-click
the title bar to maximize the window, if necessary
• When you are finished, click the Close button in
the browser window title bar to return to Bridge
Chapter 9 Creating Web Pages and Animations 14
Previewing the Web Gallery
Chapter 9 Creating Web Pages and Animations 15
Previewing the Web Gallery
• On the Output panel, scroll down to display the
Create Gallery area
• Click the Browse button to display the Choose a
Folder dialog box
• Navigate to the desired save location
• Click the OK button to accept the location
• In the Output panel, click the Save button to start the
Save process
• Click the OK button in the Create Gallery dialog box
to create the gallery
Chapter 9 Creating Web Pages and Animations 16
Saving the Web Gallery
Chapter 9 Creating Web Pages and Animations 17
Saving the Web Gallery
• Press the T key. If the Horizontal Type Tool is not
active, right-click the current type tool button, and
then click Horizontal Type Tool in the list
• Select the desired font, font size, alignment, and text
color
• Drag to create a text box at the desired location
• Type the desired text in the text box
• Use the numeric keypad to enter the special
character code
– For example, ALT+0223
Chapter 9 Creating Web Pages and Animations 18
Inserting Text with Special Characters
Chapter 9 Creating Web Pages and Animations 19
Inserting Text with Special Characters
• Create a text box and type the text you wish to
include in the navigation bar
• On the options bar, click the ‘Commit any current
edits’ button to complete the creation of the
navigation bar
• Click the Move Tool on the Tools panel
• Drag the navigation bar to the desired location
Chapter 9 Creating Web Pages and Animations 20
Creating the Navigation Bar
Chapter 9 Creating Web Pages and Animations 21
Creating the Navigation Bar
• On the Tools panel, right-click the Crop Tool
button to display the context menu
• Click Slice Tool to select it
• In the document window, drag a rectangle around
each desired slice
Chapter 9 Creating Web Pages and Animations 22
Creating Slices
Chapter 9 Creating Web Pages and Animations 23
Creating Slices
Chapter 9 Creating Web Pages and Animations 24
The Slice Select Tool
• Right-click the Slice Tool button to display the context
menu
• Click Slice Select Tool to choose the tool
• Double-click the desired slice to display the Slice
Options dialog box
• Drag to select any existing text in the Name box, then
type the desired name
• Type the desired Web address in the URL box
• Set the desired target, message text, and Alt tag
• Click the OK button to apply the settings and close
the dialog box
Chapter 9 Creating Web Pages and Animations 25
Entering Slice Settings
Chapter 9 Creating Web Pages and Animations 26
Entering Slice Settings
• Click File on the Application bar, and then click Save
for Web to display the Save for Web dialog box
• Click the Preview button
• When the browser window opens, if a yellow security
bar appears across the top of the window, click it, and
then click Allow blocked button
• If Windows displays a security warning dialog box,
click the Yes button
• If necessary, maximize the browser window
• Move the mouse pointer over the link to display the
hand icon and tool tip
Chapter 9 Creating Web Pages and Animations 27
Previewing a Hyperlink
Chapter 9 Creating Web Pages and Animations 28
Previewing a Hyperlink
• Display the Layers panel
• Hide the desired layers
• Press CTRL+H to hide extras (such as guides, grids,
bounding boxes, and selections) and hide the
slices
Chapter 9 Creating Web Pages and Animations 29
Hiding Layers and Slices
Chapter 9 Creating Web Pages and Animations 30
Hiding Layers and Slices
• With the layer to rotate selected on the Layers
panel, press the V key to activate the Move Tool
• Press CTRL+T to activate the transform controls
and display the bounding box
• Position the mouse pointer just outside the
upper-right corner of the bounding box to display
the rotation handle
• Drag the layer clockwise or counter-clockwise to
rotate the layer, and then press the ENTER key to
confirm the transformation
Chapter 9 Creating Web Pages and Animations 31
Rotating the Layers
Chapter 9 Creating Web Pages and Animations 32
Rotating the Layers
• With the layer to move selected on the Layers
panel drag the layer in the document window to
the desired location
Chapter 9 Creating Web Pages and Animations 33
Moving the Layers
• CTRL+click each layer to select it
• On the options bar, click the ‘Distribute vertical
centers’ button to evenly space the layers
• On the options bar, click the ‘Distribute horizontal
centers’ button
Chapter 9 Creating Web Pages and Animations 34
Distributing the Layers
Chapter 9 Creating Web Pages and Animations 35
The Timeline Panel
• Click Window on the Application bar to display
the menu
• Click Timeline to display the Timeline panel
Chapter 9 Creating Web Pages and Animations 36
Displaying the Timeline Panel
• Click the ‘Selects frame delay time’ button to
display the list of timings
• Click the desired value in the list to delay the next
frame by that value
Chapter 9 Creating Web Pages and Animations 37
Setting the Timing
• On the Timeline panel status bar, click the
‘Duplicates selected frames’ button
Chapter 9 Creating Web Pages and Animations 38
Creating New Frames
• On the Timeline panel, click Frame 1 to select it
• On the Timeline panel status bar, click the Plays
animation button to preview the animation. The
Plays animation button becomes a Stop button
after you click it and then becomes the Plays
animation button at the last frame
Chapter 9 Creating Web Pages and Animations 39
Previewing the Animation
Chapter 9 Creating Web Pages and Animations 40
Previewing the Animation
• In the Timeline panel, click the desired frame
• On the Animation status bar, click the ‘Tweens animation
frames’ button to display the Tween dialog box
• Click the Tween With box arrow to display the list
• Click Previous Frame to create tween immediately before
the selected frames
• Type the desired number of frames to add in the Frames to
Add box
• If necessary, click the All Layers option button to select it.
Click to display a check mark in each of the check boxes in
the Parameters area
• Click the OK button to create the tween frames
Chapter 9 Creating Web Pages and Animations 41
Tweening
Chapter 9 Creating Web Pages and Animations 42
Tweening
• Click the desired frame to view how Photoshop
tweens
Chapter 9 Creating Web Pages and Animations 43
Viewing Tween Frames
• Click the Timeline panel menu button to display the
menu
• Click Select All Frames to include all of the frames in
the animation
• Click the Timeline panel menu button, and then click
Optimize Animation to display the Optimize
Animation dialog box
• If necessary, click both the Bounding Box and
Redundant Pixel Removal check boxes to select them
• Click the OK button to close the dialog box
Chapter 9 Creating Web Pages and Animations 44
Optimizing the Animation
Chapter 9 Creating Web Pages and Animations 45
Optimizing the Animation
• On the File menu, click Save for Web to display the
Save for Web dialog box
• Click the preview with the smallest file size, and then
click the Save button to display the Save Optimized As
dialog box
• If necessary, click the Save in box arrow and navigate
to the desired save location
• Click the Format box arrow to display the format
options
• Click HTML and Images in the list
Chapter 9 Creating Web Pages and Animations 46
Saving the File as a Web Page
• Click the Slices box arrow to display the options
• Click All Slices in the list
• Click the Save button to save the file and a folder
of images on the storage device
Chapter 9 Creating Web Pages and Animations 47
Saving the File as a Web Page
Chapter 9 Creating Web Pages and Animations 48
Saving the File as a Web Page
• Double-click the file to preview to launch your
default Web browser, load the page, and view the
animation
• If a bar is displayed warning about running scripts,
click the ‘Allow blocked content’ button
Chapter 9 Creating Web Pages and Animations 49
Viewing the Web Page Interactively
Chapter 9 Creating Web Pages and Animations 50
Viewing the Web Page Interactively
• Explain why planning is the most important step
in Web design
• Organize photos for inclusion in a Web gallery
• Generate a Web gallery
• Differentiate between a Web page and a Web site
• Slice an image
• Apply slice settings
Chapter 9 Creating Web Pages and Animations 51
Chapter Summary
• Create animation frames
• Describe the process of creating an animation and
optimization
• Tween an animation
• Loop an animation
• Optimize an animation
• Preview an animation
Chapter Summary
Chapter 9 Creating Web Pages and Animations 52
Chapter 9 Complete
Adobe®
Photoshop® CS6

Pscs6 ch09 ppt

  • 1.
  • 2.
    • Explain whyplanning is the most important step in Web design • Organize photos for inclusion in a Web gallery • Generate a Web gallery • Differentiate between a Web page and a Web site • Slice an image • Apply slice settings Chapter 9 Creating Web Pages and Animations 2 Objectives
  • 3.
    • Create animationframes • Describe the process of creating an animation and optimization • Tween an animation • Loop an animation • Optimize an animation • Preview an animation Objectives Chapter 9 Creating Web Pages and Animations 3
  • 4.
    Chapter 9 CreatingWeb Pages and Animations 4 Project – Web Site for Freeze Frame
  • 5.
    • Organize photosfor a Web site and gallery pages • Use standard Web design and planning principles • Employ animation carefully Chapter 9 Creating Web Pages and Animations 5 General Project Guidelines
  • 6.
    • Open AdobeBridge • Right-click a blank area of the Content panel to display its context menu • Click New Folder to create a new folder on your storage device • When the new folder is displayed, type the desired folder name, and then press the ENTER key Chapter 9 Creating Web Pages and Animations 6 Creating a Folder in Bridge
  • 7.
    Chapter 9 CreatingWeb Pages and Animations 7 Creating a Folder in Bridge
  • 8.
    • Select theimage(s) to copy • Press CTRL+C to copy the files to the system Clipboard • Navigate to the folder where you wish to paste the files • Press CTRL+V to paste the files into the folder Chapter 9 Creating Web Pages and Animations 8 Copying and Pasting Files in Bridge
  • 9.
    Chapter 9 CreatingWeb Pages and Animations 9 Copying and Pasting Files in Bridge
  • 10.
    • On theBridge Application bar, click Output to display the Output workspace Chapter 9 Creating Web Pages and Animations 10 Displaying the Bridge Output Panel
  • 11.
    • On theOutput panel, click the Web Gallery button, if necessary • Click the Template button to display the list of templates • Click the desired template • Click the Style button to display the list of styles • Click the desired style Chapter 9 Creating Web Pages and Animations 11 Choosing a Template and Style
  • 12.
    Chapter 9 CreatingWeb Pages and Animations 12 Choosing a Template and Style
  • 13.
    • In theSite Info area, select the desired text and replace with the desired information about the site Chapter 9 Creating Web Pages and Animations 13 Editing Site Information
  • 14.
    • On theOutput panel, click the Preview in Browser button to open a browser window • When the browser window opens, double-click the title bar to maximize the window, if necessary • When you are finished, click the Close button in the browser window title bar to return to Bridge Chapter 9 Creating Web Pages and Animations 14 Previewing the Web Gallery
  • 15.
    Chapter 9 CreatingWeb Pages and Animations 15 Previewing the Web Gallery
  • 16.
    • On theOutput panel, scroll down to display the Create Gallery area • Click the Browse button to display the Choose a Folder dialog box • Navigate to the desired save location • Click the OK button to accept the location • In the Output panel, click the Save button to start the Save process • Click the OK button in the Create Gallery dialog box to create the gallery Chapter 9 Creating Web Pages and Animations 16 Saving the Web Gallery
  • 17.
    Chapter 9 CreatingWeb Pages and Animations 17 Saving the Web Gallery
  • 18.
    • Press theT key. If the Horizontal Type Tool is not active, right-click the current type tool button, and then click Horizontal Type Tool in the list • Select the desired font, font size, alignment, and text color • Drag to create a text box at the desired location • Type the desired text in the text box • Use the numeric keypad to enter the special character code – For example, ALT+0223 Chapter 9 Creating Web Pages and Animations 18 Inserting Text with Special Characters
  • 19.
    Chapter 9 CreatingWeb Pages and Animations 19 Inserting Text with Special Characters
  • 20.
    • Create atext box and type the text you wish to include in the navigation bar • On the options bar, click the ‘Commit any current edits’ button to complete the creation of the navigation bar • Click the Move Tool on the Tools panel • Drag the navigation bar to the desired location Chapter 9 Creating Web Pages and Animations 20 Creating the Navigation Bar
  • 21.
    Chapter 9 CreatingWeb Pages and Animations 21 Creating the Navigation Bar
  • 22.
    • On theTools panel, right-click the Crop Tool button to display the context menu • Click Slice Tool to select it • In the document window, drag a rectangle around each desired slice Chapter 9 Creating Web Pages and Animations 22 Creating Slices
  • 23.
    Chapter 9 CreatingWeb Pages and Animations 23 Creating Slices
  • 24.
    Chapter 9 CreatingWeb Pages and Animations 24 The Slice Select Tool
  • 25.
    • Right-click theSlice Tool button to display the context menu • Click Slice Select Tool to choose the tool • Double-click the desired slice to display the Slice Options dialog box • Drag to select any existing text in the Name box, then type the desired name • Type the desired Web address in the URL box • Set the desired target, message text, and Alt tag • Click the OK button to apply the settings and close the dialog box Chapter 9 Creating Web Pages and Animations 25 Entering Slice Settings
  • 26.
    Chapter 9 CreatingWeb Pages and Animations 26 Entering Slice Settings
  • 27.
    • Click Fileon the Application bar, and then click Save for Web to display the Save for Web dialog box • Click the Preview button • When the browser window opens, if a yellow security bar appears across the top of the window, click it, and then click Allow blocked button • If Windows displays a security warning dialog box, click the Yes button • If necessary, maximize the browser window • Move the mouse pointer over the link to display the hand icon and tool tip Chapter 9 Creating Web Pages and Animations 27 Previewing a Hyperlink
  • 28.
    Chapter 9 CreatingWeb Pages and Animations 28 Previewing a Hyperlink
  • 29.
    • Display theLayers panel • Hide the desired layers • Press CTRL+H to hide extras (such as guides, grids, bounding boxes, and selections) and hide the slices Chapter 9 Creating Web Pages and Animations 29 Hiding Layers and Slices
  • 30.
    Chapter 9 CreatingWeb Pages and Animations 30 Hiding Layers and Slices
  • 31.
    • With thelayer to rotate selected on the Layers panel, press the V key to activate the Move Tool • Press CTRL+T to activate the transform controls and display the bounding box • Position the mouse pointer just outside the upper-right corner of the bounding box to display the rotation handle • Drag the layer clockwise or counter-clockwise to rotate the layer, and then press the ENTER key to confirm the transformation Chapter 9 Creating Web Pages and Animations 31 Rotating the Layers
  • 32.
    Chapter 9 CreatingWeb Pages and Animations 32 Rotating the Layers
  • 33.
    • With thelayer to move selected on the Layers panel drag the layer in the document window to the desired location Chapter 9 Creating Web Pages and Animations 33 Moving the Layers
  • 34.
    • CTRL+click eachlayer to select it • On the options bar, click the ‘Distribute vertical centers’ button to evenly space the layers • On the options bar, click the ‘Distribute horizontal centers’ button Chapter 9 Creating Web Pages and Animations 34 Distributing the Layers
  • 35.
    Chapter 9 CreatingWeb Pages and Animations 35 The Timeline Panel
  • 36.
    • Click Windowon the Application bar to display the menu • Click Timeline to display the Timeline panel Chapter 9 Creating Web Pages and Animations 36 Displaying the Timeline Panel
  • 37.
    • Click the‘Selects frame delay time’ button to display the list of timings • Click the desired value in the list to delay the next frame by that value Chapter 9 Creating Web Pages and Animations 37 Setting the Timing
  • 38.
    • On theTimeline panel status bar, click the ‘Duplicates selected frames’ button Chapter 9 Creating Web Pages and Animations 38 Creating New Frames
  • 39.
    • On theTimeline panel, click Frame 1 to select it • On the Timeline panel status bar, click the Plays animation button to preview the animation. The Plays animation button becomes a Stop button after you click it and then becomes the Plays animation button at the last frame Chapter 9 Creating Web Pages and Animations 39 Previewing the Animation
  • 40.
    Chapter 9 CreatingWeb Pages and Animations 40 Previewing the Animation
  • 41.
    • In theTimeline panel, click the desired frame • On the Animation status bar, click the ‘Tweens animation frames’ button to display the Tween dialog box • Click the Tween With box arrow to display the list • Click Previous Frame to create tween immediately before the selected frames • Type the desired number of frames to add in the Frames to Add box • If necessary, click the All Layers option button to select it. Click to display a check mark in each of the check boxes in the Parameters area • Click the OK button to create the tween frames Chapter 9 Creating Web Pages and Animations 41 Tweening
  • 42.
    Chapter 9 CreatingWeb Pages and Animations 42 Tweening
  • 43.
    • Click thedesired frame to view how Photoshop tweens Chapter 9 Creating Web Pages and Animations 43 Viewing Tween Frames
  • 44.
    • Click theTimeline panel menu button to display the menu • Click Select All Frames to include all of the frames in the animation • Click the Timeline panel menu button, and then click Optimize Animation to display the Optimize Animation dialog box • If necessary, click both the Bounding Box and Redundant Pixel Removal check boxes to select them • Click the OK button to close the dialog box Chapter 9 Creating Web Pages and Animations 44 Optimizing the Animation
  • 45.
    Chapter 9 CreatingWeb Pages and Animations 45 Optimizing the Animation
  • 46.
    • On theFile menu, click Save for Web to display the Save for Web dialog box • Click the preview with the smallest file size, and then click the Save button to display the Save Optimized As dialog box • If necessary, click the Save in box arrow and navigate to the desired save location • Click the Format box arrow to display the format options • Click HTML and Images in the list Chapter 9 Creating Web Pages and Animations 46 Saving the File as a Web Page
  • 47.
    • Click theSlices box arrow to display the options • Click All Slices in the list • Click the Save button to save the file and a folder of images on the storage device Chapter 9 Creating Web Pages and Animations 47 Saving the File as a Web Page
  • 48.
    Chapter 9 CreatingWeb Pages and Animations 48 Saving the File as a Web Page
  • 49.
    • Double-click thefile to preview to launch your default Web browser, load the page, and view the animation • If a bar is displayed warning about running scripts, click the ‘Allow blocked content’ button Chapter 9 Creating Web Pages and Animations 49 Viewing the Web Page Interactively
  • 50.
    Chapter 9 CreatingWeb Pages and Animations 50 Viewing the Web Page Interactively
  • 51.
    • Explain whyplanning is the most important step in Web design • Organize photos for inclusion in a Web gallery • Generate a Web gallery • Differentiate between a Web page and a Web site • Slice an image • Apply slice settings Chapter 9 Creating Web Pages and Animations 51 Chapter Summary
  • 52.
    • Create animationframes • Describe the process of creating an animation and optimization • Tween an animation • Loop an animation • Optimize an animation • Preview an animation Chapter Summary Chapter 9 Creating Web Pages and Animations 52
  • 53.