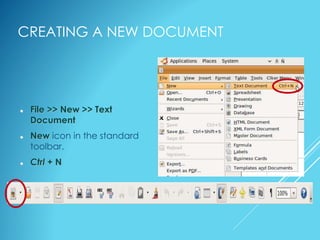
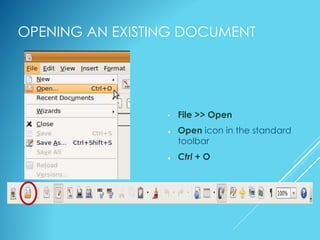
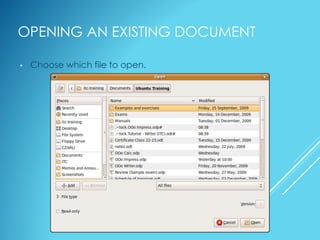
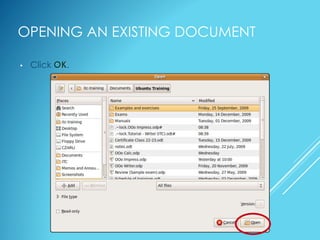
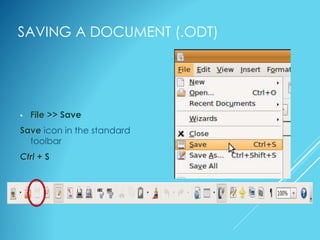
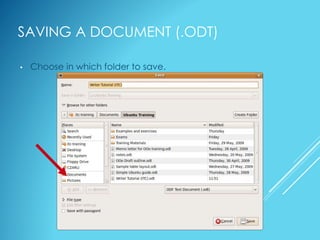
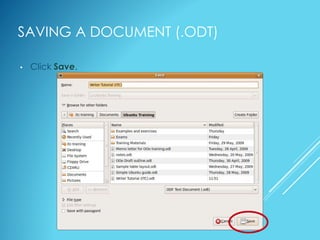
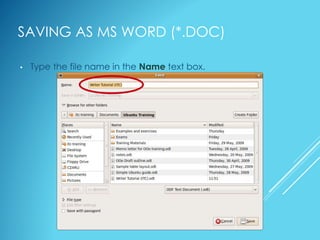
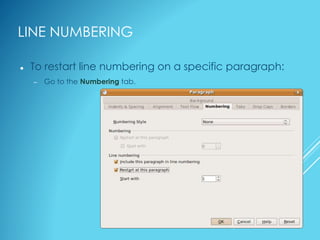
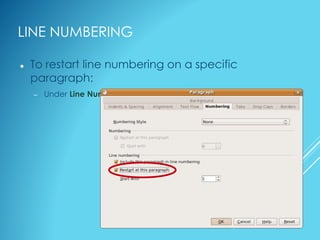
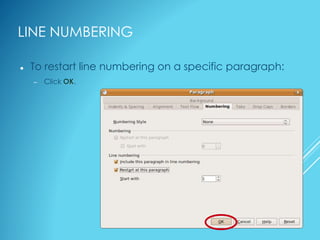
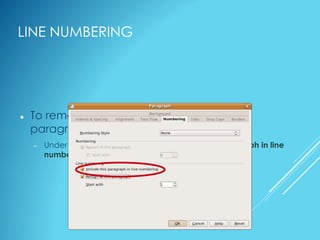
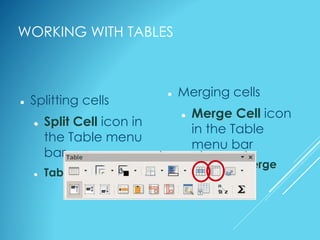
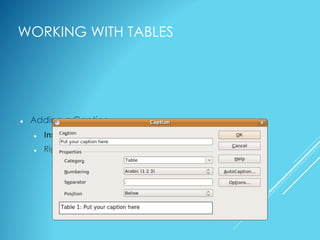
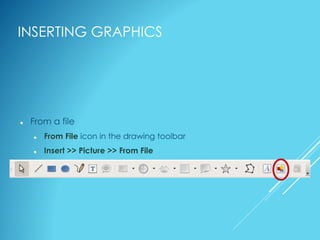
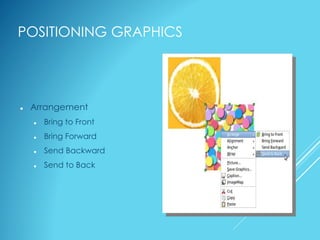
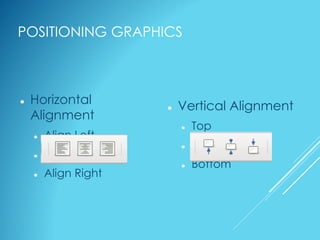
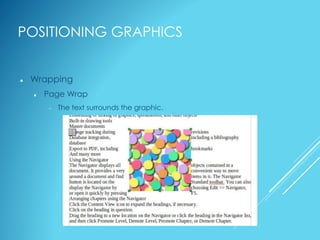
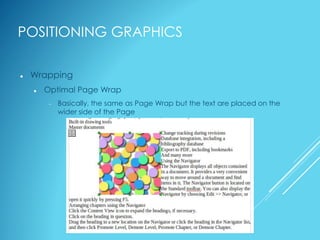
OpenOffice.org
Writer
PART I
Introducing OpenOffice.org
What is Writer?
Working with Writer
Formatting in Writer
WHAT IS OPENOFFICE.ORG?
 An office application suite distributed as a free software
 Free alternative to MS Office
 Installed by default in Ubuntu
THE OPENOFFICE.ORG SUITE
 Writer (word processor)
 Calc (spreadsheet)
 Impress (presentation)
 Base (database)
 Formula (equation editor)
 Draw (vector graphics)
WHY USE OPENOFFICE.ORG?
 No licensing fees
 Cross platform
 Easy to use
 File compatibility
WHAT IS
WRITER?
WHAT IS WRITER?
 The word processor component of OpenOffice.org
 Free alternative to Windows' MS Word
 Can be used to create documents such as reports and letters
 File extension is .odt
GETTING STARTED WITH WRITER
 Opening Writer
 Applications >> Office >> OpenOffice.org Word Processor
 Double-click on the desktop shortcut
 Click on the icon on the panel
THE WRITER INTERFACE
Title Bar
Menu Bar Standard
Toolbar Formatting
Toolbar
Status Bar
WORK AREA
WORKING WITH
WRITER
CREATING A NEW DOCUMENT
 File >> New >> Text
Document
 New icon in the standard
toolbar.
 Ctrl + N
OPENING AN EXISTING DOCUMENT
• File >> Open
 Open icon in the standard
toolbar
 Ctrl + O
OPENING AN EXISTING DOCUMENT
• Choose which file to open.
OPENING AN EXISTING DOCUMENT
• Click OK.
SAVING A DOCUMENT (.ODT)
• File >> Save
Save icon in the standard
toolbar
Ctrl + S
SAVING A DOCUMENT (.ODT)
• Type the file name in the Name text box.
SAVING A DOCUMENT (.ODT)
• Choose in which folder to save.
SAVING A DOCUMENT (.ODT)
• Click Save.
SAVING AS MS WORD (*.DOC)
• File >> Save As
SAVING AS MS WORD (*.DOC)
• Type the file name in the Name text box.
SAVING AS MS WORD (*.DOC)
• Choose in which folder to save.
SAVING AS MS WORD (*.DOC)
• Choose the file type.
SAVING CHANGES
 Save icon in the standard
toolbar
 Ctrl + S
VIEWING IN WRITER
 Zooming controls
 Zoom drop-down menu in the standard toolbar
 Page Preview
 Page Preview icon in the standard toolbar
 File >> Page Preview
PRINTING A DOCUMENT
 File >> Print
 The Print File Directly icon in
the standard toolbar
UNDOING & REDOING CHANGES
 Redo
 Redo icon in the
standard toolbar
 Ctrl + Y
 Edit >> Redo
 Undo
 Undo icon in the
standard toolbar
 Ctrl + Z
 Edit >> Undo
WORKING WITH TEXT
 Selecting text
 Just click and drag on the texts you want to highlight
 Non-consecutive texts
 Hold down Ctrl key
 Select All
 Ctrl + A
WORKING WITH TEXT
 Copying texts
 Copy icon in the
standard toolbar
 Right-click >> Copy
 Edit >> Copy
 Ctrl + C
 Pasting texts
 Paste icon in the
standard toolbar
 Right-click >> Paste
 Edit >> Paste
 Ctrl + V
WORKING WITH TEXT
 Cutting text
 Cut icon in the standard toolbar
 Right-click >> Cut
 Edit >> Cut
 Ctrl + X
FORMATTING IN
WRITER
FORMATTING CHARACTERS &
PARAGRAPHS
 Using the Formatting toolbar
 Inserting special characters
 Insert >> Special Character
 Use the applet Character Palette (if you are using
OpenOffice for Ubuntu)
 Alt + 164 (if you are using OpenOffice for Windows)
FORMATTING PARAGRAPHS
 Format >> Paragraph
BULLETS AND NUMBERING
 Bullets On/Off or Numbering On/Off icon in the formatting
toolbar
 Format >> Bullets and Numbering
 Right-click >> Numbering/Bullets
LINE NUMBERING
 Tools >> Line Numbering
LINE NUMBERING
 To restart line numbering on a specific
paragraph:
– Click on the line where you want to restart the line numbering.
– Go to Format >> Paragraph.
LINE NUMBERING
 To restart line numbering on a specific paragraph:
– Go to the Numbering tab.
LINE NUMBERING
 To restart line numbering on a specific
paragraph:
– Under Line Numbering, check Restart at this paragraph.
LINE NUMBERING
 To restart line numbering on a specific paragraph:
– Click OK.
LINE NUMBERING
 To remove line numbering on a specific
paragraph:
– Select the block of paragraphs or text where you want to remove
the line numbering.
– Go to Format >> Paragraph.
– Go to the Numbering tab.
LINE NUMBERING
 To remove line numbering on a specific
paragraph:
– Under Line Numbering, uncheck Include this paragraph in line
numbering.
LINE NUMBERING
 To remove line numbering on a specific paragraph:
– Click OK.
TOOLS IN WRITER
 Find and Replace
 Edit >> Find and Replace
 Ctrl + F
 Word count
 Tools >> Word Count
FORMATTING PAGES
 Format >> Page
 Inserting page break
 Insert >> Manual Break
 Ctrl + Enter
INSERTING PAGE NUMBERS
• Insert a header or a footer.
 Insert >> Header (or Footer) >> Default (or All)
INSERTING PAGE NUMBERS
• Put the cursor inside the header or footer.
INSERTING PAGE NUMBERS
• Insert >> Fields >> Page Number
PART II
Working with Tables
Working with Graphics
WORKING WITH
TABLES
INSERTING TABLES
 Insert >> Table
 Ctrl + F12
 Table icon in the standard
toolbar.
THE TABLE MENU BAR
MOVING BETWEEN CELLS
 Press the tab key or the arrow keys.
SORTING DATA
• Sort icon in the Table menu bar; or
Table >> Sort
SORTING DATA
• Check the appropriate boxes and click OK.
DELETING TABLES
 Table >> Delete >> Table
ROWS AND COLUMNS
 Inserting Columns
 The Insert Column
icon in the Table
menu bar
 Right-click >>
Column >> Insert
 Table >> Insert >>
Column
 Inserting Rows
 The Insert Row icon
in the Table menu
bar
 Right-click >> Row
>> Insert
 Table >> Insert >>
Row
ROWS AND COLUMNS
 Deleting Columns
 The Delete Column
icon
 Right-click >>
Column >> Delete
 Table >> Delete >>
Column
 Deleting Rows
 The Delete Row
icon
 Right-click >> Row
>> Delete
 Table >> Delete >>
Row
ROWS AND COLUMNS
 Adjusting row height or column width
 Drag the side borders of the row or column
 Right-click >> Row (or Column) >> Height (or Width)
 Right-click >> Row (or Column) >> Space Equally
 Right-click >> Row >> Optimal Height
FORMATTING TABLES
 Using the Table menu bar
 Table Properties
 Table icon in the Table menu bar
 Table >> Table Properties
 Right-click >> Table
WORKING WITH TABLES
 Merging cells
 Merge Cell icon
in the Table
menu bar
 Table >> Merge
Cells
 Splitting cells
 Split Cell icon in
the Table menu
bar
 Table >> Split Cells
WORKING WITH TABLES
 Adding a Caption
 Insert >> Caption
 Right-click >> Caption
WORKING WITH
GRAPHICS
INSERTING GRAPHICS
 From a file
 From File icon in the drawing toolbar
 Insert >> Picture >> From File
FORMATTING GRAPHICS
 Resizing
 Unscaled
 Simply drag the green handles of the picture to the size you want.
 Scaled
 While dragging the handles, press and hold the Shift key.
 Moving
 Adding captions
 Insert >> Caption
 Right-click >> Caption
POSITIONING GRAPHICS
 Arrangement
 Bring to Front
 Bring Forward
 Send Backward
 Send to Back
POSITIONING GRAPHICS
 Vertical Alignment
 Top
 Middle
 Bottom
 Horizontal
Alignment
 Align Left
 Center
 Align Right
POSITIONING GRAPHICS
 Wrapping
 No Wrap
 Paragraphs and graphics cannot be contained in the same line.
POSITIONING GRAPHICS
 Wrapping
 Page Wrap
 The text surrounds the graphic.
POSITIONING GRAPHICS
 Wrapping
 Optimal Page Wrap
 Basically, the same as Page Wrap but the text are placed on the
wider side of the Page
POSITIONING GRAPHICS
 Wrapping
 Wrap Through
 The graphic is above the text.
POSITIONING GRAPHICS
 Wrapping
 In Background
 The graphic is behind the text.
WRITER'S DRAWING TOOLS
 Accessed through the Drawing toolbar
NOTE: To change the properties of the shapes,
you may use the formatting toolbar.
FONTWORK
 Equivalent to MS Office's WordArt
 Fontwork icon in the drawing toolbar.
WORKING WITH
STYLES
WHAT ARE STYLES?
 A set of formats that you can apply to selected pages, text,
frames, and other elements in your document to quickly
change their appearance.
 Format >> Styles and Formatting
 Styles and Formatting icon in the standard toolbar
 F11

Openoffice writer