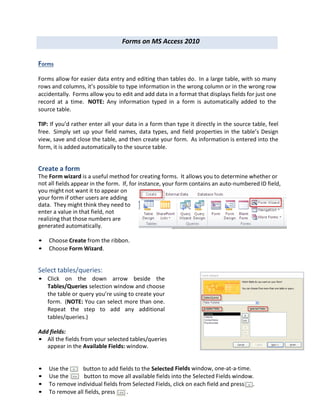
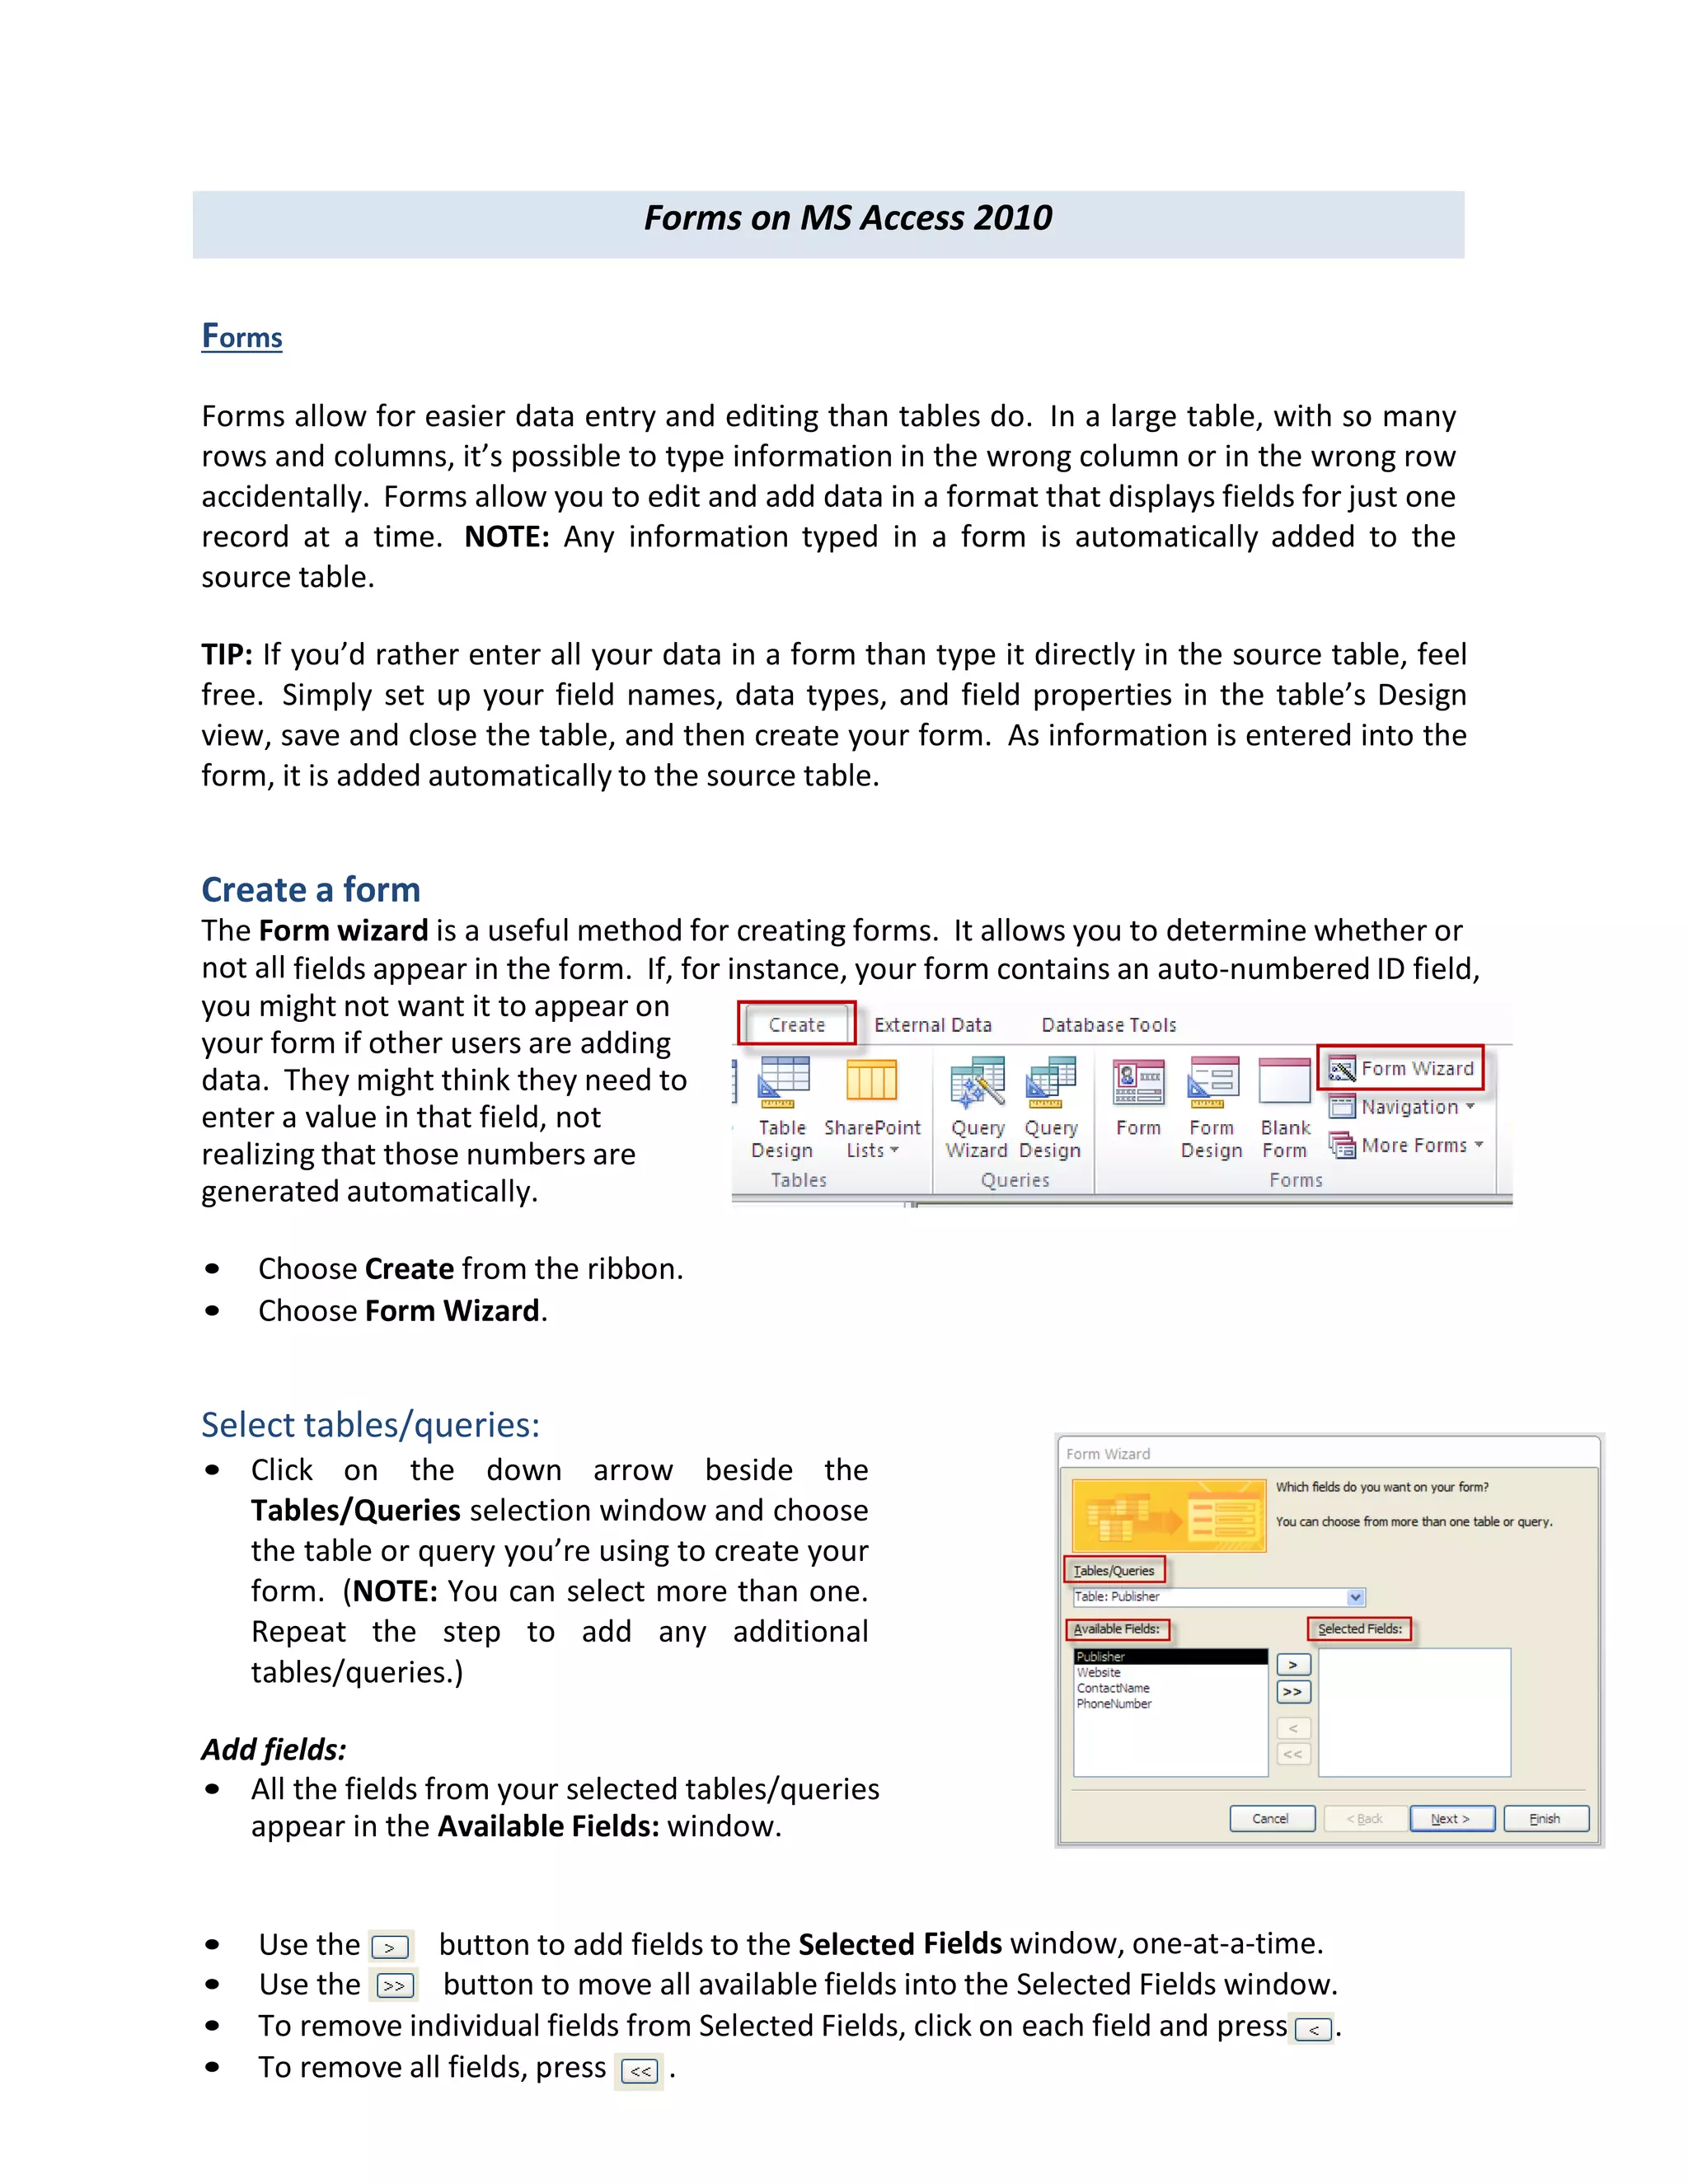
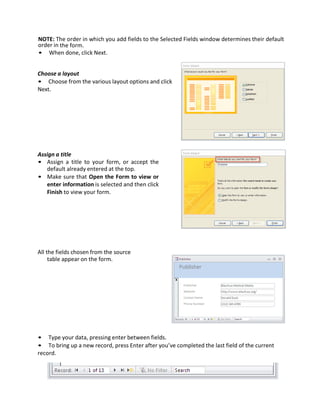
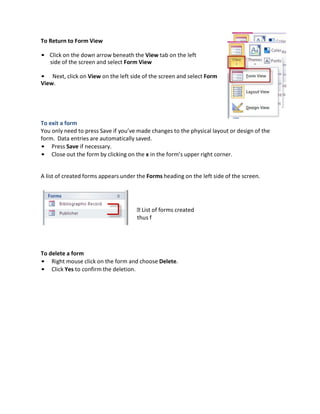
Forms on MS Access 2010
Forms
Forms allow for easier data entry and editing than tables do. In a large table, with so many
rows and columns, it’s possible to type information in the wrong column or in the wrong row
accidentally. Forms allow you to edit and add data in a format that displays fields for just one
record at a time. NOTE: Any information typed in a form is automatically added to the
source table.
TIP: If you’d rather enter all your data in a form than type it directly in the source table, feel
free. Simply set up your field names, data types, and field properties in the table’s Design
view, save and close the table, and then create your form. As information is entered into the
form, it is added automatically to the source table.
Create a form
The Form wizard is a useful method for creating forms. It allows you to determine whether or
not all fields appear in the form. If, for instance, your form contains an auto-numbered ID field,
you might not want it to appear on
your form if other users are adding
data. They might think they need to
enter a value in that field, not
realizing that those numbers are
generated automatically.
• Choose Create from the ribbon.
• Choose Form Wizard.
Select tables/queries:
• Click on the down arrow beside the
Tables/Queries selection window and choose
the table or query you’re using to create your
form. (NOTE: You can select more than one.
Repeat the step to add any additional
tables/queries.)
Add fields:
• All the fields from your selected tables/queries
appear in the Available Fields: window.
• Use the button to add fields to the Selected Fields window, one-at-a-time.
• Use the button to move all available fields into the Selected Fields window.
• To remove individual fields from Selected Fields, click on each field and press .
• To remove all fields, press .
NOTE: The order in which you add fields to the Selected Fields window determines their default
order in the form.
• When done, click Next.
Choose a layout
• Choose from the various layout options and click
Next.
Assign a title
• Assign a title to your form, or accept the
default already entered at the top.
• Make sure that Open the Form to view or
enter information is selected and then click
Finish to view your form.
All the fields chosen from the source
table appear on the form.
• Type your data, pressing enter between fields.
• To bring up a new record, press Enter after you’ve completed the last field of the current
record.
The record navigator at the bottom of the form allows you to move from record to
record, or to create a new record into which you can enter information (see diagram
below).
Navigate through a form
Move forward or backward between records.
Move to the first or last record.
Create a new record.
Type a record number in this box and press Enter to locate that record.
Change the look of your form
You can change the look of your form, as well as the placement of fields within the form. For
example:
 Click on the down arrow beneath the View tab on the
left side of the screen and select Layout View.
 Select from list of thumbnails to
change the form’s design.
To Return to Form View
• Click on the down arrow beneath the View tab on the left
side of the screen and select Form View
• Next, click on View on the left side of the screen and select Form
View.
To exit a form
You only need to press Save if you’ve made changes to the physical layout or design of the
form. Data entries are automatically saved.
• Press Save if necessary.
• Close out the form by clicking on the x in the form’s upper right corner.
A list of created forms appears under the Forms heading on the left side of the screen.
List of forms created
thus f
To delete a form
• Right mouse click on the form and choose Delete.
• Click Yes to confirm the deletion.

MS Access 2010 tutorial 4

  • 1.
    Forms on MSAccess 2010 Forms Forms allow for easier data entry and editing than tables do. In a large table, with so many rows and columns, it’s possible to type information in the wrong column or in the wrong row accidentally. Forms allow you to edit and add data in a format that displays fields for just one record at a time. NOTE: Any information typed in a form is automatically added to the source table. TIP: If you’d rather enter all your data in a form than type it directly in the source table, feel free. Simply set up your field names, data types, and field properties in the table’s Design view, save and close the table, and then create your form. As information is entered into the form, it is added automatically to the source table. Create a form The Form wizard is a useful method for creating forms. It allows you to determine whether or not all fields appear in the form. If, for instance, your form contains an auto-numbered ID field, you might not want it to appear on your form if other users are adding data. They might think they need to enter a value in that field, not realizing that those numbers are generated automatically. • Choose Create from the ribbon. • Choose Form Wizard. Select tables/queries: • Click on the down arrow beside the Tables/Queries selection window and choose the table or query you’re using to create your form. (NOTE: You can select more than one. Repeat the step to add any additional tables/queries.) Add fields: • All the fields from your selected tables/queries appear in the Available Fields: window. • Use the button to add fields to the Selected Fields window, one-at-a-time. • Use the button to move all available fields into the Selected Fields window. • To remove individual fields from Selected Fields, click on each field and press . • To remove all fields, press .
  • 2.
    NOTE: The orderin which you add fields to the Selected Fields window determines their default order in the form. • When done, click Next. Choose a layout • Choose from the various layout options and click Next. Assign a title • Assign a title to your form, or accept the default already entered at the top. • Make sure that Open the Form to view or enter information is selected and then click Finish to view your form. All the fields chosen from the source table appear on the form. • Type your data, pressing enter between fields. • To bring up a new record, press Enter after you’ve completed the last field of the current record.
  • 3.
    The record navigatorat the bottom of the form allows you to move from record to record, or to create a new record into which you can enter information (see diagram below). Navigate through a form Move forward or backward between records. Move to the first or last record. Create a new record. Type a record number in this box and press Enter to locate that record. Change the look of your form You can change the look of your form, as well as the placement of fields within the form. For example:  Click on the down arrow beneath the View tab on the left side of the screen and select Layout View.  Select from list of thumbnails to change the form’s design.
  • 4.
    To Return toForm View • Click on the down arrow beneath the View tab on the left side of the screen and select Form View • Next, click on View on the left side of the screen and select Form View. To exit a form You only need to press Save if you’ve made changes to the physical layout or design of the form. Data entries are automatically saved. • Press Save if necessary. • Close out the form by clicking on the x in the form’s upper right corner. A list of created forms appears under the Forms heading on the left side of the screen. List of forms created thus f To delete a form • Right mouse click on the form and choose Delete. • Click Yes to confirm the deletion.