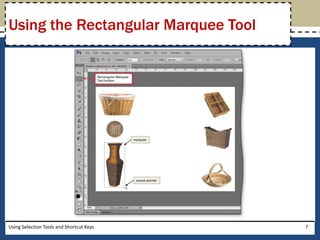
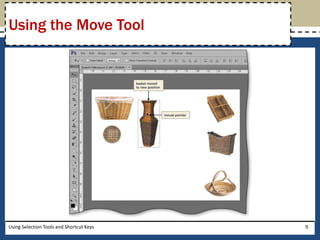
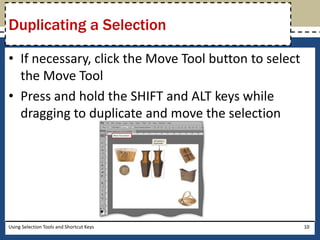
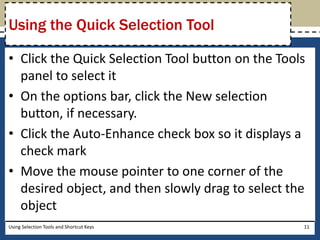
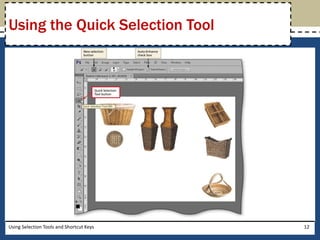
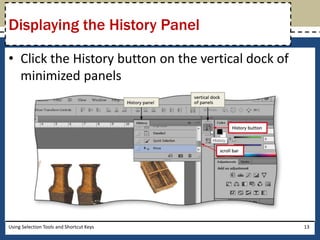
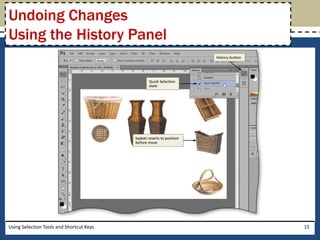
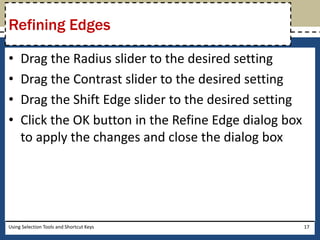
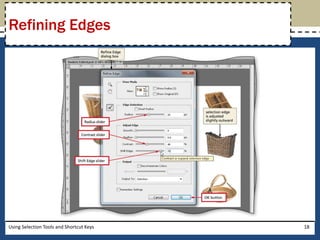
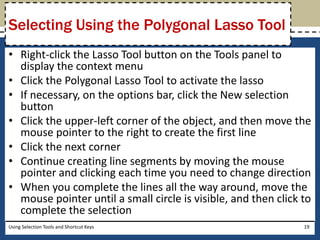
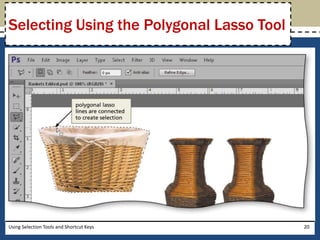
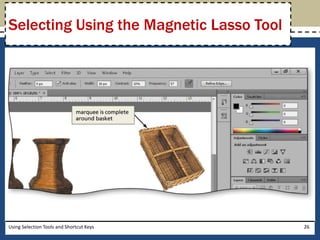
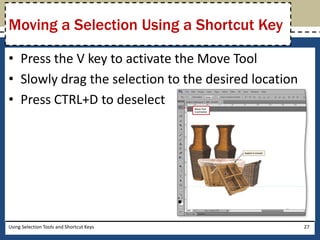
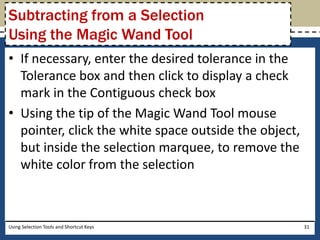
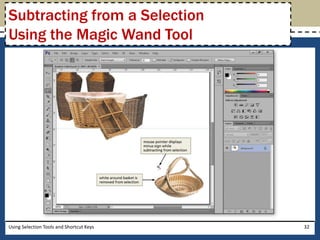
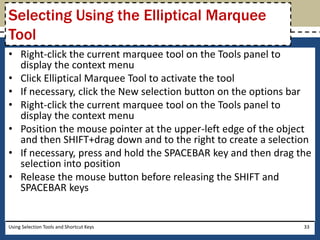
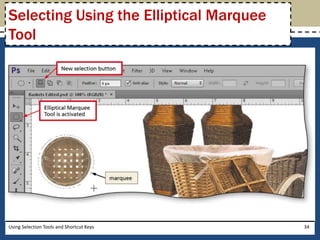
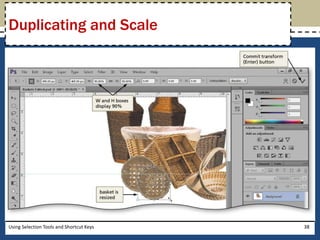
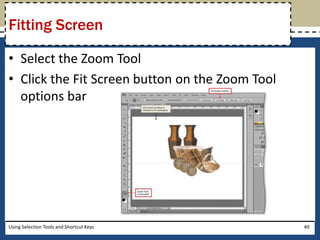
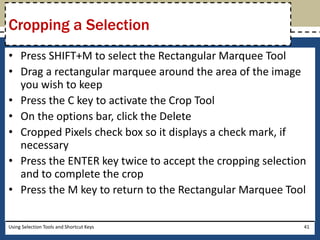
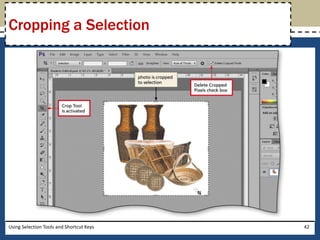
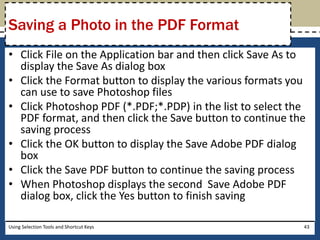
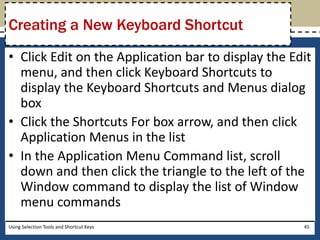
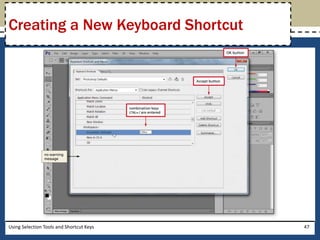
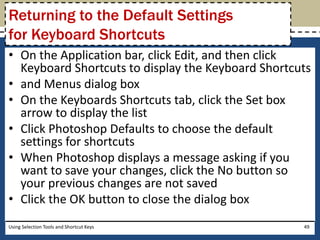
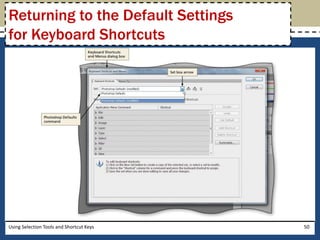
Adobe® 
Photoshop® CS6 
Chapter 2 
Using Selection Tools 
and Shortcut Keys
Objectives 
• Explain the terms layout, perspective, and 
storyboard 
• Describe selection tools 
• Select objects using the marquee tools 
• Move and duplicate selections 
• Use the History panel 
• Use the Grow command and Refine Edges to 
adjust selections 
Using Selection Tools and Shortcut Keys 2
Objectives 
• Employ the lasso tools 
• Subtract areas from selections 
• Use grids, guides, and snapping 
• Select objects using the Quick Selection and 
Magic Wand tools 
• Print to a PDF file 
• Create and test new keyboard shortcuts 
Using Selection Tools and Shortcut Keys 3
Project – Advertisement Graphic 
Using Selection Tools and Shortcut Keys 4
General Project Guidelines 
• Choose the correct tool 
• Plan your duplications 
• Use grids and guides 
• Create files in portable formats 
Using Selection Tools and Shortcut Keys 5
Using the Rectangular Marquee Tool 
• With the Rectangular Marquee Tool selected on 
the Tools panel, drag to draw a rectangle around 
the desired object to create a marquee selection 
Using Selection Tools and Shortcut Keys 6
Using the Rectangular Marquee Tool 
Using Selection Tools and Shortcut Keys 7
Using the Move Tool 
• With the object selected, click the Move Tool button 
on the Tools panel to activate the Move Tool 
• If necessary, on the options bar, click the Auto-Select 
check box so it does not display a check mark. If 
necessary, click the Show Transform Controls check 
box so it does not display a check mark 
• Position your mouse pointer over the item within the 
marquee, and then drag the selection to the desired 
position 
Using Selection Tools and Shortcut Keys 8
Using the Move Tool 
Using Selection Tools and Shortcut Keys 9
Duplicating a Selection 
• If necessary, click the Move Tool button to select 
the Move Tool 
• Press and hold the SHIFT and ALT keys while 
dragging to duplicate and move the selection 
Using Selection Tools and Shortcut Keys 10
Using the Quick Selection Tool 
• Click the Quick Selection Tool button on the Tools 
panel to select it 
• On the options bar, click the New selection 
button, if necessary. 
• Click the Auto-Enhance check box so it displays a 
check mark 
• Move the mouse pointer to one corner of the 
desired object, and then slowly drag to select the 
object 
Using Selection Tools and Shortcut Keys 11
Using the Quick Selection Tool 
Using Selection Tools and Shortcut Keys 12
Displaying the History Panel 
• Click the History button on the vertical dock of 
minimized panels 
Using Selection Tools and Shortcut Keys 13
Undoing Changes 
Using the History Panel 
• Scroll down in the History panel to display the last 
few states 
• Click the desired state in the History panel to go 
back the desired number of steps 
Using Selection Tools and Shortcut Keys 14
Undoing Changes 
Using the History Panel 
Using Selection Tools and Shortcut Keys 15
Refining Edges 
• On the Tools panel, click the Quick Selection Tool 
button to select it 
• On the Quick Selection Tool options bar, click the 
Refine Edge button to display the Refine Edge 
dialog box 
• Click the View button to display the refine edge 
views 
• Double-click Marching Ants to view the selection 
as a marquee 
Using Selection Tools and Shortcut Keys 16
Refining Edges 
• Drag the Radius slider to the desired setting 
• Drag the Contrast slider to the desired setting 
• Drag the Shift Edge slider to the desired setting 
• Click the OK button in the Refine Edge dialog box 
to apply the changes and close the dialog box 
Using Selection Tools and Shortcut Keys 17
Refining Edges 
Using Selection Tools and Shortcut Keys 18
Selecting Using the Polygonal Lasso Tool 
• Right-click the Lasso Tool button on the Tools panel to 
display the context menu 
• Click the Polygonal Lasso Tool to activate the lasso 
• If necessary, on the options bar, click the New selection 
button 
• Click the upper-left corner of the object, and then move the 
mouse pointer to the right to create the first line 
• Click the next corner 
• Continue creating line segments by moving the mouse 
pointer and clicking each time you need to change direction 
• When you complete the lines all the way around, move the 
mouse pointer until a small circle is visible, and then click to 
complete the selection 
Using Selection Tools and Shortcut Keys 19
Selecting Using the Polygonal Lasso Tool 
Using Selection Tools and Shortcut Keys 20
Growing the Selection 
• Click Select on the 
Application bar to 
display the Select 
menu 
• Click Grow to 
increase the 
selection border 
Using Selection Tools and Shortcut Keys 21
Displaying a Grid 
• On the Application bar, click View to display the 
View menu, and then point to Show to display the 
Show submenu 
• Click the Show Grids command to display the grid 
Using Selection Tools and Shortcut Keys 22
Creating a Guide 
• Position the mouse pointer in the horizontal ruler 
at the top of the document window 
• Drag down into the image to create a guide at the 
desired location 
• Release the mouse button 
Using Selection Tools and Shortcut Keys 23
Creating a Guide 
Using Selection Tools and Shortcut Keys 24
Selecting Using the Magnetic Lasso Tool 
• Right-click the current lasso tool button and then click 
Magnetic Lasso Tool to select it from the context menu 
• If necessary, on the options bar, click the New selection 
button to select the tool 
• Click the upper-left edge of the object to start the selection 
• Move, rather than drag, the mouse pointer slowly along the 
edge of the object to create the selection marquee. Click 
the mouse when turning a corner to create an extra 
fastening point 
• When you get all the way around the object, double-click to 
finish the lasso 
Using Selection Tools and Shortcut Keys 25
Selecting Using the Magnetic Lasso Tool 
Using Selection Tools and Shortcut Keys 26
Moving a Selection Using a Shortcut Key 
• Press the V key to activate the Move Tool 
• Slowly drag the selection to the desired location 
• Press CTRL+D to deselect 
Using Selection Tools and Shortcut Keys 27
Selecting Using the Lasso Tool 
• Right-click the current lasso tool button on the 
Tools panel to display the context menu, and then 
click Lasso Tool to select it 
• If necessary, on the options bar, click the New 
selection button 
• Drag around the desired object to create a 
completed lasso and then release the mouse 
button to connect the beginning and end points 
Using Selection Tools and Shortcut Keys 28
Selecting Using the Lasso Tool 
Using Selection Tools and Shortcut Keys 29
Subtracting from a Selection 
Using the Magic Wand Tool 
• With the object selected, right-click the Quick 
Selection Tool button on the Tools panel to display 
the context menu 
• Click Magic Wand Tool to activate it 
• On the options bar, click the ‘Subtract from 
selection’ button. Click the Anti-alias check box so 
it does not display a check mark 
Using Selection Tools and Shortcut Keys 30
Subtracting from a Selection 
Using the Magic Wand Tool 
• If necessary, enter the desired tolerance in the 
Tolerance box and then click to display a check 
mark in the Contiguous check box 
• Using the tip of the Magic Wand Tool mouse 
pointer, click the white space outside the object, 
but inside the selection marquee, to remove the 
white color from the selection 
Using Selection Tools and Shortcut Keys 31
Subtracting from a Selection 
Using the Magic Wand Tool 
Using Selection Tools and Shortcut Keys 32
Selecting Using the Elliptical Marquee 
Tool 
• Right-click the current marquee tool on the Tools panel to 
display the context menu 
• Click Elliptical Marquee Tool to activate the tool 
• If necessary, click the New selection button on the options bar 
• Right-click the current marquee tool on the Tools panel to 
display the context menu 
• Position the mouse pointer at the upper-left edge of the object 
and then SHIFT+drag down and to the right to create a selection 
• If necessary, press and hold the SPACEBAR key and then drag the 
selection into position 
• Release the mouse button before releasing the SHIFT and 
SPACEBAR keys 
Using Selection Tools and Shortcut Keys 33
Selecting Using the Elliptical Marquee 
Tool 
Using Selection Tools and Shortcut Keys 34
Subtracting Noncontiguous Pixels 
of the Same Color 
• On the Tools panel, click the Magic Wand Tool 
button to select it 
• On the options bar, click the ‘Subtract from 
selection’ button if necessary. Double-click the 
Tolerance box and then type the desired value to 
replace the current setting 
• Click the Contiguous check box to remove its 
check mark 
• Click the desired area in the selection 
Using Selection Tools and Shortcut Keys 35
Subtracting Noncontiguous Pixels 
of the Same Color 
Using Selection Tools and Shortcut Keys 36
Duplicating and Scale 
• With the Move Tool selected, ALT+drag the 
selection to the desired location 
• On the options bar, click the Show Transform 
Controls check box to display a check mark 
• SHIFT+drag a corner sizing handle toward or away 
from the center of the selection to scale it 
• On the options bar click the ‘Commit transform 
(Enter)’ button to accept the transformation 
• Press CTRL+D to deselect 
Using Selection Tools and Shortcut Keys 37
Duplicating and Scale 
Using Selection Tools and Shortcut Keys 38
Reselecting 
• Click Select on the Application bar to display the 
Select menu 
• Click Reselect to display the previous selection 
Using Selection Tools and Shortcut Keys 39
Fitting Screen 
• Select the Zoom Tool 
• Click the Fit Screen button on the Zoom Tool 
options bar 
Using Selection Tools and Shortcut Keys 40
Cropping a Selection 
• Press SHIFT+M to select the Rectangular Marquee Tool 
• Drag a rectangular marquee around the area of the image 
you wish to keep 
• Press the C key to activate the Crop Tool 
• On the options bar, click the Delete 
• Cropped Pixels check box so it displays a check mark, if 
necessary 
• Press the ENTER key twice to accept the cropping selection 
and to complete the crop 
• Press the M key to return to the Rectangular Marquee Tool 
Using Selection Tools and Shortcut Keys 41
Cropping a Selection 
Using Selection Tools and Shortcut Keys 42
Saving a Photo in the PDF Format 
• Click File on the Application bar and then click Save As to 
display the Save As dialog box 
• Click the Format button to display the various formats you 
can use to save Photoshop files 
• Click Photoshop PDF (*.PDF;*.PDP) in the list to select the 
PDF format, and then click the Save button to continue the 
saving process 
• Click the OK button to display the Save Adobe PDF dialog 
box 
• Click the Save PDF button to continue the saving process 
• When Photoshop displays the second Save Adobe PDF 
dialog box, click the Yes button to finish saving 
Using Selection Tools and Shortcut Keys 43
Saving a Photo in the PDF Format 
Using Selection Tools and Shortcut Keys 44
Creating a New Keyboard Shortcut 
• Click Edit on the Application bar to display the Edit 
menu, and then click Keyboard Shortcuts to 
display the Keyboard Shortcuts and Menus dialog 
box 
• Click the Shortcuts For box arrow, and then click 
Application Menus in the list 
• In the Application Menu Command list, scroll 
down and then click the triangle to the left of the 
Window command to display the list of Window 
menu commands 
Using Selection Tools and Shortcut Keys 45
Creating a New Keyboard Shortcut 
• Scroll down and then click the desired command 
to display a shortcut key box 
• Press the desired shortcut key to enter a new 
shortcut keystroke for the selected command 
• Click the Accept button to set the shortcut key 
• Click the OK button to close the dialog box 
Using Selection Tools and Shortcut Keys 46
Creating a New Keyboard Shortcut 
Using Selection Tools and Shortcut Keys 47
Testing a New Keyboard Shortcut 
• Press the shortcut key to test the shortcut 
Using Selection Tools and Shortcut Keys 48
Returning to the Default Settings 
for Keyboard Shortcuts 
• On the Application bar, click Edit, and then click 
Keyboard Shortcuts to display the Keyboard Shortcuts 
• and Menus dialog box 
• On the Keyboards Shortcuts tab, click the Set box 
arrow to display the list 
• Click Photoshop Defaults to choose the default 
settings for shortcuts 
• When Photoshop displays a message asking if you 
want to save your changes, click the No button so 
your previous changes are not saved 
• Click the OK button to close the dialog box 
Using Selection Tools and Shortcut Keys 49
Returning to the Default Settings 
for Keyboard Shortcuts 
Using Selection Tools and Shortcut Keys 50
Chapter Summary 
• Explain the terms layout, perspective, and 
storyboard 
• Describe selection tools 
• Select objects using the marquee tools 
• Move and duplicate selections 
• Use the History panel 
• Use the Grow command and Refine Edges to 
adjust selections 
Using Selection Tools and Shortcut Keys 51
Chapter Summary 
• Employ the lasso tools 
• Subtract areas from selections 
• Use grids, guides, and snapping 
• Select objects using the Quick Selection and 
Magic Wand tools 
• Print to a PDF file 
• Create and test new keyboard shortcuts 
Using Selection Tools and Shortcut Keys 52
Adobe® 
Photoshop® CS6 
Chapter 2 Complete

PS CS6 Chapter 2

  • 1.
    Adobe® Photoshop® CS6 Chapter 2 Using Selection Tools and Shortcut Keys
  • 2.
    Objectives • Explainthe terms layout, perspective, and storyboard • Describe selection tools • Select objects using the marquee tools • Move and duplicate selections • Use the History panel • Use the Grow command and Refine Edges to adjust selections Using Selection Tools and Shortcut Keys 2
  • 3.
    Objectives • Employthe lasso tools • Subtract areas from selections • Use grids, guides, and snapping • Select objects using the Quick Selection and Magic Wand tools • Print to a PDF file • Create and test new keyboard shortcuts Using Selection Tools and Shortcut Keys 3
  • 4.
    Project – AdvertisementGraphic Using Selection Tools and Shortcut Keys 4
  • 5.
    General Project Guidelines • Choose the correct tool • Plan your duplications • Use grids and guides • Create files in portable formats Using Selection Tools and Shortcut Keys 5
  • 6.
    Using the RectangularMarquee Tool • With the Rectangular Marquee Tool selected on the Tools panel, drag to draw a rectangle around the desired object to create a marquee selection Using Selection Tools and Shortcut Keys 6
  • 7.
    Using the RectangularMarquee Tool Using Selection Tools and Shortcut Keys 7
  • 8.
    Using the MoveTool • With the object selected, click the Move Tool button on the Tools panel to activate the Move Tool • If necessary, on the options bar, click the Auto-Select check box so it does not display a check mark. If necessary, click the Show Transform Controls check box so it does not display a check mark • Position your mouse pointer over the item within the marquee, and then drag the selection to the desired position Using Selection Tools and Shortcut Keys 8
  • 9.
    Using the MoveTool Using Selection Tools and Shortcut Keys 9
  • 10.
    Duplicating a Selection • If necessary, click the Move Tool button to select the Move Tool • Press and hold the SHIFT and ALT keys while dragging to duplicate and move the selection Using Selection Tools and Shortcut Keys 10
  • 11.
    Using the QuickSelection Tool • Click the Quick Selection Tool button on the Tools panel to select it • On the options bar, click the New selection button, if necessary. • Click the Auto-Enhance check box so it displays a check mark • Move the mouse pointer to one corner of the desired object, and then slowly drag to select the object Using Selection Tools and Shortcut Keys 11
  • 12.
    Using the QuickSelection Tool Using Selection Tools and Shortcut Keys 12
  • 13.
    Displaying the HistoryPanel • Click the History button on the vertical dock of minimized panels Using Selection Tools and Shortcut Keys 13
  • 14.
    Undoing Changes Usingthe History Panel • Scroll down in the History panel to display the last few states • Click the desired state in the History panel to go back the desired number of steps Using Selection Tools and Shortcut Keys 14
  • 15.
    Undoing Changes Usingthe History Panel Using Selection Tools and Shortcut Keys 15
  • 16.
    Refining Edges •On the Tools panel, click the Quick Selection Tool button to select it • On the Quick Selection Tool options bar, click the Refine Edge button to display the Refine Edge dialog box • Click the View button to display the refine edge views • Double-click Marching Ants to view the selection as a marquee Using Selection Tools and Shortcut Keys 16
  • 17.
    Refining Edges •Drag the Radius slider to the desired setting • Drag the Contrast slider to the desired setting • Drag the Shift Edge slider to the desired setting • Click the OK button in the Refine Edge dialog box to apply the changes and close the dialog box Using Selection Tools and Shortcut Keys 17
  • 18.
    Refining Edges UsingSelection Tools and Shortcut Keys 18
  • 19.
    Selecting Using thePolygonal Lasso Tool • Right-click the Lasso Tool button on the Tools panel to display the context menu • Click the Polygonal Lasso Tool to activate the lasso • If necessary, on the options bar, click the New selection button • Click the upper-left corner of the object, and then move the mouse pointer to the right to create the first line • Click the next corner • Continue creating line segments by moving the mouse pointer and clicking each time you need to change direction • When you complete the lines all the way around, move the mouse pointer until a small circle is visible, and then click to complete the selection Using Selection Tools and Shortcut Keys 19
  • 20.
    Selecting Using thePolygonal Lasso Tool Using Selection Tools and Shortcut Keys 20
  • 21.
    Growing the Selection • Click Select on the Application bar to display the Select menu • Click Grow to increase the selection border Using Selection Tools and Shortcut Keys 21
  • 22.
    Displaying a Grid • On the Application bar, click View to display the View menu, and then point to Show to display the Show submenu • Click the Show Grids command to display the grid Using Selection Tools and Shortcut Keys 22
  • 23.
    Creating a Guide • Position the mouse pointer in the horizontal ruler at the top of the document window • Drag down into the image to create a guide at the desired location • Release the mouse button Using Selection Tools and Shortcut Keys 23
  • 24.
    Creating a Guide Using Selection Tools and Shortcut Keys 24
  • 25.
    Selecting Using theMagnetic Lasso Tool • Right-click the current lasso tool button and then click Magnetic Lasso Tool to select it from the context menu • If necessary, on the options bar, click the New selection button to select the tool • Click the upper-left edge of the object to start the selection • Move, rather than drag, the mouse pointer slowly along the edge of the object to create the selection marquee. Click the mouse when turning a corner to create an extra fastening point • When you get all the way around the object, double-click to finish the lasso Using Selection Tools and Shortcut Keys 25
  • 26.
    Selecting Using theMagnetic Lasso Tool Using Selection Tools and Shortcut Keys 26
  • 27.
    Moving a SelectionUsing a Shortcut Key • Press the V key to activate the Move Tool • Slowly drag the selection to the desired location • Press CTRL+D to deselect Using Selection Tools and Shortcut Keys 27
  • 28.
    Selecting Using theLasso Tool • Right-click the current lasso tool button on the Tools panel to display the context menu, and then click Lasso Tool to select it • If necessary, on the options bar, click the New selection button • Drag around the desired object to create a completed lasso and then release the mouse button to connect the beginning and end points Using Selection Tools and Shortcut Keys 28
  • 29.
    Selecting Using theLasso Tool Using Selection Tools and Shortcut Keys 29
  • 30.
    Subtracting from aSelection Using the Magic Wand Tool • With the object selected, right-click the Quick Selection Tool button on the Tools panel to display the context menu • Click Magic Wand Tool to activate it • On the options bar, click the ‘Subtract from selection’ button. Click the Anti-alias check box so it does not display a check mark Using Selection Tools and Shortcut Keys 30
  • 31.
    Subtracting from aSelection Using the Magic Wand Tool • If necessary, enter the desired tolerance in the Tolerance box and then click to display a check mark in the Contiguous check box • Using the tip of the Magic Wand Tool mouse pointer, click the white space outside the object, but inside the selection marquee, to remove the white color from the selection Using Selection Tools and Shortcut Keys 31
  • 32.
    Subtracting from aSelection Using the Magic Wand Tool Using Selection Tools and Shortcut Keys 32
  • 33.
    Selecting Using theElliptical Marquee Tool • Right-click the current marquee tool on the Tools panel to display the context menu • Click Elliptical Marquee Tool to activate the tool • If necessary, click the New selection button on the options bar • Right-click the current marquee tool on the Tools panel to display the context menu • Position the mouse pointer at the upper-left edge of the object and then SHIFT+drag down and to the right to create a selection • If necessary, press and hold the SPACEBAR key and then drag the selection into position • Release the mouse button before releasing the SHIFT and SPACEBAR keys Using Selection Tools and Shortcut Keys 33
  • 34.
    Selecting Using theElliptical Marquee Tool Using Selection Tools and Shortcut Keys 34
  • 35.
    Subtracting Noncontiguous Pixels of the Same Color • On the Tools panel, click the Magic Wand Tool button to select it • On the options bar, click the ‘Subtract from selection’ button if necessary. Double-click the Tolerance box and then type the desired value to replace the current setting • Click the Contiguous check box to remove its check mark • Click the desired area in the selection Using Selection Tools and Shortcut Keys 35
  • 36.
    Subtracting Noncontiguous Pixels of the Same Color Using Selection Tools and Shortcut Keys 36
  • 37.
    Duplicating and Scale • With the Move Tool selected, ALT+drag the selection to the desired location • On the options bar, click the Show Transform Controls check box to display a check mark • SHIFT+drag a corner sizing handle toward or away from the center of the selection to scale it • On the options bar click the ‘Commit transform (Enter)’ button to accept the transformation • Press CTRL+D to deselect Using Selection Tools and Shortcut Keys 37
  • 38.
    Duplicating and Scale Using Selection Tools and Shortcut Keys 38
  • 39.
    Reselecting • ClickSelect on the Application bar to display the Select menu • Click Reselect to display the previous selection Using Selection Tools and Shortcut Keys 39
  • 40.
    Fitting Screen •Select the Zoom Tool • Click the Fit Screen button on the Zoom Tool options bar Using Selection Tools and Shortcut Keys 40
  • 41.
    Cropping a Selection • Press SHIFT+M to select the Rectangular Marquee Tool • Drag a rectangular marquee around the area of the image you wish to keep • Press the C key to activate the Crop Tool • On the options bar, click the Delete • Cropped Pixels check box so it displays a check mark, if necessary • Press the ENTER key twice to accept the cropping selection and to complete the crop • Press the M key to return to the Rectangular Marquee Tool Using Selection Tools and Shortcut Keys 41
  • 42.
    Cropping a Selection Using Selection Tools and Shortcut Keys 42
  • 43.
    Saving a Photoin the PDF Format • Click File on the Application bar and then click Save As to display the Save As dialog box • Click the Format button to display the various formats you can use to save Photoshop files • Click Photoshop PDF (*.PDF;*.PDP) in the list to select the PDF format, and then click the Save button to continue the saving process • Click the OK button to display the Save Adobe PDF dialog box • Click the Save PDF button to continue the saving process • When Photoshop displays the second Save Adobe PDF dialog box, click the Yes button to finish saving Using Selection Tools and Shortcut Keys 43
  • 44.
    Saving a Photoin the PDF Format Using Selection Tools and Shortcut Keys 44
  • 45.
    Creating a NewKeyboard Shortcut • Click Edit on the Application bar to display the Edit menu, and then click Keyboard Shortcuts to display the Keyboard Shortcuts and Menus dialog box • Click the Shortcuts For box arrow, and then click Application Menus in the list • In the Application Menu Command list, scroll down and then click the triangle to the left of the Window command to display the list of Window menu commands Using Selection Tools and Shortcut Keys 45
  • 46.
    Creating a NewKeyboard Shortcut • Scroll down and then click the desired command to display a shortcut key box • Press the desired shortcut key to enter a new shortcut keystroke for the selected command • Click the Accept button to set the shortcut key • Click the OK button to close the dialog box Using Selection Tools and Shortcut Keys 46
  • 47.
    Creating a NewKeyboard Shortcut Using Selection Tools and Shortcut Keys 47
  • 48.
    Testing a NewKeyboard Shortcut • Press the shortcut key to test the shortcut Using Selection Tools and Shortcut Keys 48
  • 49.
    Returning to theDefault Settings for Keyboard Shortcuts • On the Application bar, click Edit, and then click Keyboard Shortcuts to display the Keyboard Shortcuts • and Menus dialog box • On the Keyboards Shortcuts tab, click the Set box arrow to display the list • Click Photoshop Defaults to choose the default settings for shortcuts • When Photoshop displays a message asking if you want to save your changes, click the No button so your previous changes are not saved • Click the OK button to close the dialog box Using Selection Tools and Shortcut Keys 49
  • 50.
    Returning to theDefault Settings for Keyboard Shortcuts Using Selection Tools and Shortcut Keys 50
  • 51.
    Chapter Summary •Explain the terms layout, perspective, and storyboard • Describe selection tools • Select objects using the marquee tools • Move and duplicate selections • Use the History panel • Use the Grow command and Refine Edges to adjust selections Using Selection Tools and Shortcut Keys 51
  • 52.
    Chapter Summary •Employ the lasso tools • Subtract areas from selections • Use grids, guides, and snapping • Select objects using the Quick Selection and Magic Wand tools • Print to a PDF file • Create and test new keyboard shortcuts Using Selection Tools and Shortcut Keys 52
  • 53.
    Adobe® Photoshop® CS6 Chapter 2 Complete