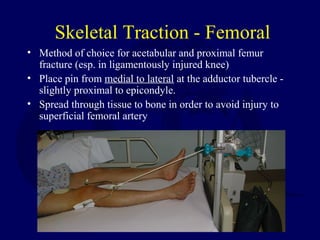
This document discusses principles and techniques for closed reduction, traction, and casting of fractures. It describes how adequate analgesia, axial traction, and restoration of length, rotation and angulation are critical for successful closed reduction. Common techniques like Bier blocks, hematoma blocks, splinting and casting are outlined. Complications of immobilization like pressure sores, joint stiffness and thromboembolism are also reviewed. The use of skin traction, skeletal traction using pins, and halo fixation are described.
2. Principles of Closed Reduction
• All displaced fractures, including those
which will undergo ORIF should be
reduced to minimize soft tissue
complications
• Splints must respect soft tissue condition
– Pad all bony prominences
– Allow for swelling
3. Principles of Closed Reduction
• Adequate analgesia and muscle relaxation are
critical for success
• Axial traction and reversal of mechanism of injury
• Attempt to correct/restore length, rotation, and
angulation
• Reduction maneuvers - often specific for
particular location
• Immobilize - joint above and joint below
4. Principles of closed reduction
Three point contact
and stabilization is
necessary to maintain
most closed reductions
Removal of any of the three
forces results in loss of reduction
Figure from: Rockwood and Green: Fractures
in Adults, 4th
ed, Lippincott, 1996.
5. Common closed reductions
Distal Radius
Longitudinal traction
Local or regional block
Exaggerate deformity
Push for length and reversal
of deformity
Apply splint or cast
Figure from: Rockwood and Green: Fractures in
Adults, 4th
ed, Lippincott, 1996.
6. Common closed reductions
• Elbow Dislocation - traction, flexion, and
direct manual push
Figures from Rockwood and Green, 5th
ed.
7. Common closed reductions
• Shoulder - relaxation, traction, gentle
rotation if necessary
Figures from Rockwood and Green, 5th
ed.
8. Common closed reductions
Hip dislocation
• Relaxation, flexion,
traction, and rotation
• gentle and atraumatic
Relocation should be palpable and permit significantly
improved ROM. This often requires very deep sedation.
Figures from Rockwood and Green, 5th ed.
9. Anesthesia for closed reductions
• Bier Block - superior pain relief, greater
relaxation, less premedication needed. Double
tourniquet is inflated on proximal arm and venous
system is filled with local.
– Lidocaine preferred for fast onset
– Volume = 40cc
– Adults 2-3 mg/kg Children 1.5 mg/kg
– If tourniquet is deflated in< 40 min then deflate for 3
sec and reinflate for 3 min - repeat twice
– Watch closely for cardiac and CNS side effects,
especially in the elderly.
10. Anesthesia for closed reduction
• Hematoma Block - aspirate hematoma and
place 10cc of Lidocaine at fracture site
– Less reliable
– Fast and easy
– Theoretically converts closed fx to open fx but
there is no documented increase in infection
with these blocks
11. Anesthesia for closed reduction
• Versed - 0.5-1mg IV q 3 min up to 5mg
• Morphine - 0.1mg/kg
• Demerol - 1-2mg/kg up to 150 mg
– Beware of pulmonary complications with deep
conscious sedation - consider anesthesia service
assistance if there is concern
– Pulse oximeter and close nursing supervision
are recommended
12. Common Splinting Techniques
• “Bulky” Jones
• Sugartong
• Coaptation
• Ulnar gutter
• Volar/Dorsal hand
• Thumb spica
• Posterior slab (ankle) +/- U splint
• Posterior slab (thigh)
13.
14. Humerus fracture with
coaptation splint in place
•Note the splint ends in the
axilla medially and should
be well padded there to avoid
skin breakdown.
• Also note the lateral aspect of
the splint extends over the deltoid.
Figure from Rockwood and Green, 4th
ed.
15. Sugar Tong Splint
• Splint extends around the
distal humerus to provide
rotational control
• Padding should be at least
3-4 layers thick with several
extra layers at the elbow
16. Fracture Bracing
• Allows for early functional ROM and
weight bearing
• Relies on intact soft tissues and muscle
envelope to maintain alignment and length
• Most commonly used for humeral shaft and
tibial shaft fractures
17. Humerus fracture converted
to fracture brace at 10 days -
Allows for early ROM of
elbow with support of fracture
via principle of hydrostatic
column.
•Co-contractions
•Snug brace during the day
•Do not rest elbow on table
NOTE: PATIENT
MUST TOLERATE A SNUG
FIT FOR BRACE TO
REMAIN FUNCTIONAL Figure from Rockwood and Green, 4th ed.
18. Casting
• Goal of semi-rigid immobilization while
avoiding pressure/skin complications
• Often a poor choice in the treatment of
acute fractures due to swelling and soft
tissue complications
• Extremely technique dependent in order to
achieve predictable results
19. Casting Techniques
• Stockinette - may require 2 different sizes
to avoid overtight or loose coverage
• Padding - distal to proximal with 50%
overlap - min 2 layers - extra padding at
fibular head, malleoli, patella, and
olecranon
20. • Plaster - Cold water will maximize molding time
– 6 inch for thigh
– 4-6 inch for leg
– 4-6 inch for arm
– 2-4 inch for forearm
• Fiberglass - width selection generally the
same as plaster
– more difficult to mold but more resistant to water and
use breakdown
– generally 2-3 times stronger for any given thickness
21. Below Knee Cast
• Support MT heads
• Ankle in neutral - apply with knee flexion
• Ensure freedom of toes
• Build up heel for walking casts - fiberglass
much preferred for durability
23. Padded fibular
head
Flexed knee
Neutral ankle
position Toes free
Assistant or foot stand required to maintain ankle position
Figure from: Browner and Jupiter: Skeletal Trauma, 2nd
ed, Saunders, 1998.
24.
25. Above Knee Cast
• Apply below knee first
• Knee flexion at 5-20 degrees
• Mold supracondylar femur for improved
rotational stability
• Apply extra padding anterior to patella
27. Forearm Casts/Splints
• MCP joints should be free - do not go past
proximal palmar crease
• Thumb should be free to base of MC -
opposition to 5th digit should be
unobstructed
28.
29. • Even pressure applied
to achieve best mold
• Avoid molding with
anything but the heels
of the palm in order to
avoid pressure points
31. Complications of casts/splints
• Loss of reduction
• Pressure necrosis - as fast as 2 hrs
• Tight cast/compartment syndrome -
univalving = 30% pressure drop
bivalving = 60% pressure
drop
Cutting cast padding further reduces pressure
32. Complications of casts/splints
• Thermal Injury - avoid plaster > 10 ply, water
>24C. Unusual with fiberglass
• Cuts and burns during removal
• Thrombophlebitis/PE - increases in lower
extremity fracture and immobilization but
prophylaxis is debated
• Joint stiffness - leave joints free when possible (ie.
Thumb MCP for below elbow cast) and place in
position of function when possible
33. Examples -Position of Function
• Ankle - Neutral dorsiflexion - NO EQUINUS
• Hand - MCP flexed (70-90degrees), IP’s in
extension
70-90 degrees
Figure from Rockwood and Green, 5th
ed.
34. Traction
• Allows constant controlled force for initial
stabilization of long bone fractures and aids
in reduction during operative procedure
• Option for skeletal vs skin traction is case
dependent
35. Skin Traction
• Limited force can be applied - generally not to
exceed 10 lbs
• Can cause soft tissue problems especially in
elderly or rheumatoid type skin
• Not as powerful when used during operative
procedure for both length or rotational control
• “Bucks Traction” - soft dressing around calf and
foot attached to weight off foot of bed
36. Skin Traction - “Bucks”
• An option to provide temporary comfort in
intertrochanteric hip fractures
• Max of 10 lbs of traction
• Watch closely for skin problems, especially
in elderly or rheumatoid patients
37. Skeletal Traction
• More powerful with greater control than skin
traction
• Permits pull up to 20% of body weight for the
lower extremity
• Requires local anesthesia for pin insertion if
patient is awake
• Preferred method of temporizing long bone,
pelvic, and acetabular fractures until operative
treatment can be performed
38. Skeletal Traction
• Choice of thin wire vs Steinman pin - thin
wire is more difficult to insert with hand
drill and requires a tension traction bow
TENSION BOWSTANDARD
BOW
39. Traction Pin Selection
• Steinmann pin may be either smooth or
threaded
– smooth is stronger but can slide if angulated
– Threaded pin is weaker, will bend easier with
increasing weights, but will not slide and will
advance more easily during insertion.
• In general the largest pin available is
chosen, especially if a threaded pin is
selected.
40. Skeletal Traction - Tibial
• Pin is placed 2 cm posterior and 1 cm distal
to tubercle - may go more distal in
osteopenic bone
• Place pin from lateral to medial, cut skin
and try to stay out of anterior compartment -
use hemostat to push muscle posterior
• Apply sterile dressing next to skin -
consider closing if removed <24 hrs
41. Skeletal Traction - Femoral
• Method of choice for acetabular and proximal femur
fracture (esp. in ligamentously injured knee)
• Place pin from medial to lateral at the adductor tubercle -
slightly proximal to epicondyle.
• Spread through tissue to bone in order to avoid injury to
superficial femoral artery
42. Balanced Skeletal Traction
• Allows for suspension of leg with
longitudinal traction
• Requires overhead trapeze, traction cord,
and pulleys
• Often helpful in initial stabilization of
femur fractures in traction
43. •One of many options for setting up balanced suspension.
• In general the thigh support only requires 5-10 lbs of weight.
• Note the use of double pulleys at the foot to decrease the total
weight suspended off the bottom of the bed.
Figure from: Rockwood and Green: Fractures in Adults, 4th
ed, Lippincott, 1996.
44. Calcaneal Traction
• Most commonly used with a spanning ex
fix for “travelling traction” or may be used
with a Bohler-Braun frame
• Place pin medial to lateral 2-2.5 cm
posterior and inferior to medial malleolus
45. Olecranon Traction
• Used rarely today
• Small to medium sized pin placed from
medial to lateral in proximal olecranon -
enter bone 1.5 cm from tip of olecranon and
walk pin up and down to confirm
midsubstance location.
• Support forearm and wrist with skin traction
- elbow at 90 degrees
46. Gardner Wells Tongs
• Used for C spine reduction/traction
• Pins are placed 1 finger breadth above
pinna, slightly posterior to external auditory
meatus.
• Apply traction beginning at 5 lbs and
increasing in 5 lb increments with serial
radiographs and clinical exam
47. HALO
• Indicated for certain cervical fractures as
definitive treatment or supplementary
protection to internal fixation
• Disadvantages
– Pin problems
– Respiratory compromise
48. HALO
• Technique
– Position patient maintaining spine
precautions
– Fit HALO ring
– Prep pin sites
• Anterior—outer half above eyebrow avoiding
supraorbital artery, nerve, and sinus
• Posterior—superior and posterior to ear
– Tighten pins to 6-8ft-lb
– Retighten if loose
• Pins only once at 24 h
• Frame prn
Figure from: Rockwood and Green:
Fractures in Adults, 4th ed, Lippincott, 1996.
Figure from: Rockwood and Green: Fractures in Adults, 4th ed, Lippincott, 1996.
Figures from Rockwood and Green, 5th ed
Figures from Rockwood and Green, 5th ed..
Figures from Rockwood and Green, 5th ed.
Figure from Rockwood and Green, 4th ed.
Figure from:Figure from: Browner and Jupiter: Skeletal Trauma, 2nd ed, Saunders, p 2221 1998.
Figure from:Figure from: Browner and Jupiter: Skeletal Trauma, 2nd ed, Saunders, p 2221, 1998.
Loss of reduction is the most common complication of cast treatment as the swelling decreases and the padding compresses while the patient regains mobility. Careful casting technique can avoid this (careful molding, attention to detail—deforming forces:gravity and muscle). Appropriately time radiographic reevaluation and correction of problems will lead to a satisfactory outcome.
Figure from Rockwood and Green, 5th ed.
Figure from: Rockwood and Green: Fractures in Adults, 4th ed, Lippincott, 1996.