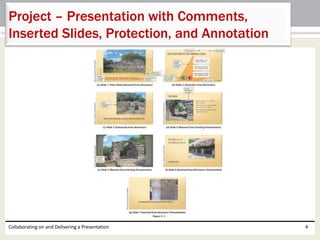
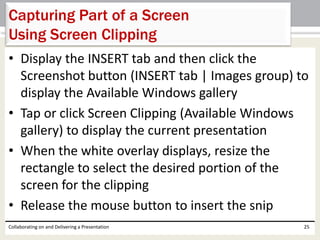
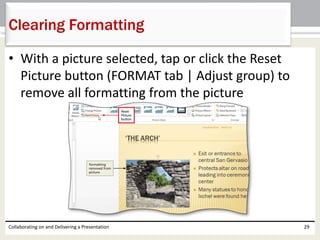
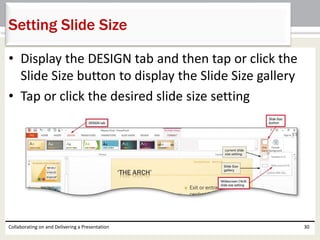
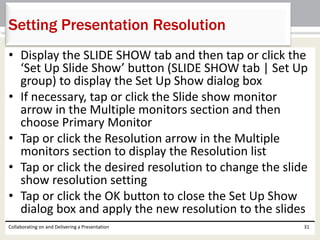
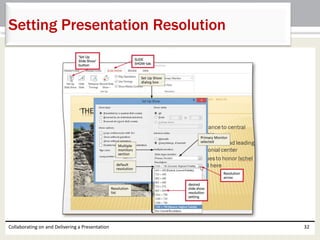
Chapter 5
Collaborating on and
Delivering a Presentation
Microsoft
PowerPoint 2013
• Combine PowerPoint files
• Accept and reject a reviewer’s proposed changes
• Delete, reply to, and insert comments
• Reuse slides from an existing presentation
• Capture part of a slide using screen clipping
• Insert slide footer content
Collaborating on and Delivering a Presentation 2
Objectives
• Set slide size and presentation resolution
• Save files as a PowerPoint show
• Package a presentation for storage on a compact
disc
• Save a presentation in a previous PowerPoint
format
• Inspect and protect files
• Use presentation tools to navigate and annotate
slide shows
Collaborating on and Delivering a Presentation 3
Objectives
Collaborating on and Delivering a Presentation 4
Project – Presentation with Comments,
Inserted Slides, Protection, and Annotation
• Collaborate on a presentation by using comments
• Set slide size and slide show resolution
• Save and package a presentation
• Protect and secure a presentation
• Use presentation tools to navigate and annotate
slides during a presentation
Collaborating on and Delivering a Presentation 5
Roadmap
• With one presentation active, display the REVIEW
tab
• Tap or click the Compare button (REVIEW tab |
Compare group) to display the Choose File to
Merge with Current Presentation dialog box
• Navigate to the location of the presentation you
wish to merge, and tap or click to select the file
name
• Tap or click the Merge button to merge the
presentations and display the Revisions task pane
Collaborating on and Delivering a Presentation 6
Merging a Presentation
Collaborating on and Delivering a Presentation 7
Merging a Presentation
• Open the Backstage view and then tap or click the
Print tab to display the Print gallery
• Tap or click ‘Full Page Slides’ to display print
layouts
• If necessary, tap or click ‘Print Comments and Ink
Markup’ to select this option
• Tap or click the Print button to print the pages
Collaborating on and Delivering a Presentation 8
Printing Comments
Collaborating on and Delivering a Presentation 9
Printing Comments
• If necessary, display the REVIEW tab. With Slide 1
displaying, tap or click the SLIDES tab in the
Revisions pane to display a thumbnail of merged
Slide 1
• Tap or click the check box above the thumbnail to
view the proposed changes in the slide
• Tap or click the check box again to undo the
changes
Collaborating on and Delivering a Presentation 10
Previewing Presentation Changes
Collaborating on and Delivering a Presentation 11
Previewing Presentation Changes
• Tap or click the DETAILS tab in the Revisions pane
• Click the change marker to view an explanation of the
proposed change
• Tap or click the check box next to the proposed change to
accept the change, and clear the check box to reject the
change
Collaborating on and Delivering a Presentation 12
Reviewing, Accepting, and Rejecting
Presentation Changes
• Tap or click the slide with the changes to display
the box with the proposed changes
• Click the All changes check box to preview all
proposed changes to the slide
• Remove the check mark from check boxes for
changes you do not want to review
Collaborating on and Delivering a Presentation 13
Reviewing, Accepting, and Rejecting
Slide Changes
Collaborating on and Delivering a Presentation 14
Reviewing, Accepting, and Rejecting
Slide Changes
• Tap or click the comment in the Slide Changes
section
• Read the comment and then tap or click the Next
button to select the next comment
Collaborating on and Delivering a Presentation 15
Reviewing Comments
• Select the comment to which you want to reply
• Tap or click the Reply box to place the insertion
point in the Reply box
• Type the desired reply and then press the ENTER
key
Collaborating on and Delivering a Presentation 16
Replying to a Comment
• Tap or click the Insert Comment button, which has
the label New, to open a comment box in the
Comments pane
• Tap or click the comment box, type the comment
text, and then press the ENTER key
Collaborating on and Delivering a Presentation 17
Inserting a Comment
• Tap or click to select the comment you want to
delete
• Tap or click the Delete button to delete the
comment
Collaborating on and Delivering a Presentation 18
Deleting a Comment
• Display Slide 1 and then tap or click the Reading
View button on the status bar to display Slide 1 in
this view
• Tap or click the Next and Previous buttons to
review the changes on each slide
Collaborating on and Delivering a Presentation 19
Running the Revised Presentation
in Reading View
• Tap or click the End Review button (REVIEW tab | Compare
group) to display the Microsoft PowerPoint dialog box
• Tap or click the Yes button to apply the changes you
accepted and discard the changes you rejected
• Tap or click the Show Comments arrow to display the Show
Comments menu
• Tap or click Comments Pane in the menu to close the
Comments pane
• Tap or click the Show Comments arrow to display the Show
Comments menu again
• Tap or click Show Markup in the menu to hide comments
on the slide
Collaborating on and Delivering a Presentation 20
Ending the Review and Hiding Markup
Collaborating on and Delivering a Presentation 21
Ending the Review and Hiding Markup
• Tap or click the New Slide arrow (HOME tab | Slides
group) to display the layout gallery
• Tap or click Reuse Slides in the layout gallery to
display the Reuse Slides pane
• Tap or click the Browse button
• Tap or click Browse File to display the Browse dialog
box
• Navigate to the location containing the file to reuse,
and then tap or click to select the file
• Tap or click the Open button to display thumbnails of
the slides in the Reuse Slides pane
Collaborating on and Delivering a Presentation 22
Reusing Slides from an Existing
Presentation
• Tap or click the thumbnails to insert into the
presentation
• Tap or click the ‘Keep source formatting’ check
box at the bottom of the Reuse Slides pane to
preserve the slide formatting
• Tap or click the Close button in the Reuse Slides
pane so that it no longer is displayed
Collaborating on and Delivering a Presentation 23
Reusing Slides from an Existing
Presentation
Collaborating on and Delivering a Presentation 24
Reusing Slides from an Existing
Presentation
• Display the INSERT tab and then click the
Screenshot button (INSERT tab | Images group) to
display the Available Windows gallery
• Tap or click Screen Clipping (Available Windows
gallery) to display the current presentation
• When the white overlay displays, resize the
rectangle to select the desired portion of the
screen for the clipping
• Release the mouse button to insert the snip
Collaborating on and Delivering a Presentation 25
Capturing Part of a Screen
Using Screen Clipping
Collaborating on and Delivering a Presentation 26
Capturing Part of a Screen
Using Screen Clipping
• Tap or click the Header & Footer button (INSERT
tab | Text group) to display the Header and Footer
dialog box
• If necessary, tap or click the Slide tab to display
the Slide sheet
• Select which information to include on the slide
• Tap or click the Apply to All button to apply the
footer to all slides
Collaborating on and Delivering a Presentation 27
Adding a Footer with Fixed Information
Collaborating on and Delivering a Presentation 28
Adding a Footer with Fixed Information
• With a picture selected, tap or click the Reset
Picture button (FORMAT tab | Adjust group) to
remove all formatting from the picture
Collaborating on and Delivering a Presentation 29
Clearing Formatting
• Display the DESIGN tab and then tap or click the
Slide Size button to display the Slide Size gallery
• Tap or click the desired slide size setting
Collaborating on and Delivering a Presentation 30
Setting Slide Size
• Display the SLIDE SHOW tab and then tap or click the
‘Set Up Slide Show’ button (SLIDE SHOW tab | Set Up
group) to display the Set Up Show dialog box
• If necessary, tap or click the Slide show monitor
arrow in the Multiple monitors section and then
choose Primary Monitor
• Tap or click the Resolution arrow in the Multiple
monitors section to display the Resolution list
• Tap or click the desired resolution to change the slide
show resolution setting
• Tap or click the OK button to close the Set Up Show
dialog box and apply the new resolution to the slides
Collaborating on and Delivering a Presentation 31
Setting Presentation Resolution
Collaborating on and Delivering a Presentation 32
Setting Presentation Resolution
• Open the Backstage view, display the Export tab, and
then tap or click ‘Change File Type’ to display the
Change File Type section
• Tap or click PowerPoint Show in the Presentation File
Types area
• Tap or click the Save As button to display the Save As
dialog box
• Type the desired file name in the File name box
• Tap or click the Save button to save the presentation
as a PowerPoint show
Collaborating on and Delivering a Presentation 33
Saving a File as a PowerPoint Show
Collaborating on and Delivering a Presentation 34
Saving a File as a PowerPoint Show
• Open the Backstage view, display the Export tab, and then
click ‘Change File Type’ to display the Change File Type
section
• Tap or click ‘JPEG File Interchange Format’ in the Image File
Types area
• Tap or click the Save As button to display the Save As dialog
box
• Type the desired file name in the File name box
• Tap or click the Save button to display the Microsoft
PowerPoint dialog box
• Tap or click the ‘Just This One’ button to save only the
selected slide
Collaborating on and Delivering a Presentation 35
Saving a Slide as an Image
Collaborating on and Delivering a Presentation 36
Saving a Slide as an Image
• Insert a CD-RW or DVD-RW or a blank CD-R or
DVD-R into your CD or DVD drive
• Open the Backstage view, display the Export tab,
and then tap or click ‘Package Presentation for CD’
• Tap or click the ‘Package for CD’ button in the
Package Presentation for CD section to display the
Package for CD dialog box
• Type the desired name in the ‘Name the CD’ box
Collaborating on and Delivering a Presentation 37
Packing a Presentation for Storage
on a Compact Disc
• Tap or click the ‘Copy to CD’ button to begin
packaging the presentation files and to display the
Microsoft PowerPoint dialog box
• Tap or click the No button to not include linked
files and to display another Microsoft PowerPoint
dialog box
• Tap or click the Continue button to continue
copying the presentation to a CD without the
comments added to the slides
Collaborating on and Delivering a Presentation 38
Packing a Presentation for Storage
on a Compact Disc
• When the files have been written, tap or click the
No button to not copy the files to another CD
• Tap or click the Close button to finish saving the
presentation to a CD
Collaborating on and Delivering a Presentation 39
Packing a Presentation for Storage
on a Compact Disc
Collaborating on and Delivering a Presentation 40
Packing a Presentation for Storage
on a Compact Disc
• Open the Backstage view, display the Export tab,
and then click ‘Change File Type’ in the
Presentation File Types section
• Tap or click ‘PowerPoint 97–2003 Presentation’ in
the Presentation File Types area
• Tap or click the Save As button to display the Save
As dialog box
• Type the desired file name in the File name box
Collaborating on and Delivering a Presentation 41
Saving a File in a Previous
PowerPoint Format
• Tap or click the Save button to save the
presentation as a .ppt type and display the
Microsoft PowerPoint Compatibility Checker
• Tap or click the Continue button to continue to
save the presentation
Collaborating on and Delivering a Presentation 42
Saving a File in a Previous
PowerPoint Format
Collaborating on and Delivering a Presentation 43
Saving a File in a Previous
PowerPoint Format
• Open the Backstage view and then tap or click the
‘Check for Issues’ button in the Info tab to display the
Check for Issues menu
• Tap or click Check Compatibility to display the
Microsoft PowerPoint Compatibility Checker dialog
box
• In the Summary area, view the comments regarding
the features that are not supported by earlier
versions of PowerPoint
• Tap or click the OK button to close the dialog box and
return to the presentation
Collaborating on and Delivering a Presentation 44
Identifying Presentation Features Not
Supported by Previous Versions
Collaborating on and Delivering a Presentation 45
Identifying Presentation Features Not
Supported by Previous Versions
• Open the Backstage view and then tap or click the
‘Check for Issues’ button to display the Check for
Issues menu
• Tap or click Inspect Document to display the
Document Inspector dialog box
• Tap or click the Inspect button to check the document
and display the inspection results
• Tap or click the Remove All button in the appropriate
areas to remove the inappropriate information from
the presentation
• Tap or click the Close button to close the dialog box
Collaborating on and Delivering a Presentation 46
Removing Inappropriate Information
Collaborating on and Delivering a Presentation 47
Removing Inappropriate Information
• With the Backstage view open and the Info tab
displaying, tap or click the Protect Presentation
button to display the Protect Presentation menu
• Tap or click ‘Encrypt with Password’ to display the
Encrypt Document dialog box
• Type the desired password in the Password box
• Tap or click the OK button to display the Confirm
Password dialog box
• Retype the password in the Reenter password box
• Tap or click the OK button in the Confirm Password
dialog box
Collaborating on and Delivering a Presentation 48
Setting a Password
Collaborating on and Delivering a Presentation 49
Setting a Password
• With the Backstage view open and the Info tab
displaying, tap or click Protect Presentation to display
the Protect Presentation menu
• Tap or click ‘Mark as Final’ to display the Microsoft
PowerPoint dialog box indicating that the
presentation will be saved as a final document
• Tap or click the OK button to save the file and to
display another Microsoft PowerPoint dialog box with
information about a final version of a document and
indicating that the presentation is final
• Tap or click the OK button
Collaborating on and Delivering a Presentation 50
Marking a Presentation as Final
Collaborating on and Delivering a Presentation 51
Marking a Presentation as Final
• Run the slide show
• If the control bar is not visible in the lower-left
corner of the slide, move the pointer on the slide
• Tap or click ‘Pen and laser pointer tools’ on the
control bar to display a menu
• Tap or click Highlighter and then drag over the
desired words
Collaborating on and Delivering a Presentation 52
Highlighting Items on a Slide
Collaborating on and Delivering a Presentation 53
Highlighting Items on a Slide
• Tap or click the ‘Pen and laser pointer tools’
button on the control bar and then tap or click
Pen on the menu
• Tap or click the ‘Pen and laser pointer tools’
button on the control bar and then point to the
desired color
• Tap or click the desired color
• Drag the pointer around the screen
Collaborating on and Delivering a Presentation 54
Changing Ink Color
Collaborating on and Delivering a Presentation 55
Changing Ink Color
• Combine PowerPoint files
• Accept and reject a reviewer’s proposed changes
• Delete, reply to, and insert comments
• Reuse slides from an existing presentation
• Capture part of a slide using screen clipping
• Insert slide footer content
Collaborating on and Delivering a Presentation 56
Chapter Summary
• Set slide size and presentation resolution
• Save files as a PowerPoint show
• Package a presentation for storage on a compact
disc
• Save a presentation in a previous PowerPoint
format
• Inspect and protect files
• Use presentation tools to navigate and annotate
slide shows
Collaborating on and Delivering a Presentation 57
Chapter Summary
Chapter 5 Complete
Microsoft
PowerPoint 2013

PowerPoint 2013 ch05

  • 1.
    Chapter 5 Collaborating onand Delivering a Presentation Microsoft PowerPoint 2013
  • 2.
    • Combine PowerPointfiles • Accept and reject a reviewer’s proposed changes • Delete, reply to, and insert comments • Reuse slides from an existing presentation • Capture part of a slide using screen clipping • Insert slide footer content Collaborating on and Delivering a Presentation 2 Objectives
  • 3.
    • Set slidesize and presentation resolution • Save files as a PowerPoint show • Package a presentation for storage on a compact disc • Save a presentation in a previous PowerPoint format • Inspect and protect files • Use presentation tools to navigate and annotate slide shows Collaborating on and Delivering a Presentation 3 Objectives
  • 4.
    Collaborating on andDelivering a Presentation 4 Project – Presentation with Comments, Inserted Slides, Protection, and Annotation
  • 5.
    • Collaborate ona presentation by using comments • Set slide size and slide show resolution • Save and package a presentation • Protect and secure a presentation • Use presentation tools to navigate and annotate slides during a presentation Collaborating on and Delivering a Presentation 5 Roadmap
  • 6.
    • With onepresentation active, display the REVIEW tab • Tap or click the Compare button (REVIEW tab | Compare group) to display the Choose File to Merge with Current Presentation dialog box • Navigate to the location of the presentation you wish to merge, and tap or click to select the file name • Tap or click the Merge button to merge the presentations and display the Revisions task pane Collaborating on and Delivering a Presentation 6 Merging a Presentation
  • 7.
    Collaborating on andDelivering a Presentation 7 Merging a Presentation
  • 8.
    • Open theBackstage view and then tap or click the Print tab to display the Print gallery • Tap or click ‘Full Page Slides’ to display print layouts • If necessary, tap or click ‘Print Comments and Ink Markup’ to select this option • Tap or click the Print button to print the pages Collaborating on and Delivering a Presentation 8 Printing Comments
  • 9.
    Collaborating on andDelivering a Presentation 9 Printing Comments
  • 10.
    • If necessary,display the REVIEW tab. With Slide 1 displaying, tap or click the SLIDES tab in the Revisions pane to display a thumbnail of merged Slide 1 • Tap or click the check box above the thumbnail to view the proposed changes in the slide • Tap or click the check box again to undo the changes Collaborating on and Delivering a Presentation 10 Previewing Presentation Changes
  • 11.
    Collaborating on andDelivering a Presentation 11 Previewing Presentation Changes
  • 12.
    • Tap orclick the DETAILS tab in the Revisions pane • Click the change marker to view an explanation of the proposed change • Tap or click the check box next to the proposed change to accept the change, and clear the check box to reject the change Collaborating on and Delivering a Presentation 12 Reviewing, Accepting, and Rejecting Presentation Changes
  • 13.
    • Tap orclick the slide with the changes to display the box with the proposed changes • Click the All changes check box to preview all proposed changes to the slide • Remove the check mark from check boxes for changes you do not want to review Collaborating on and Delivering a Presentation 13 Reviewing, Accepting, and Rejecting Slide Changes
  • 14.
    Collaborating on andDelivering a Presentation 14 Reviewing, Accepting, and Rejecting Slide Changes
  • 15.
    • Tap orclick the comment in the Slide Changes section • Read the comment and then tap or click the Next button to select the next comment Collaborating on and Delivering a Presentation 15 Reviewing Comments
  • 16.
    • Select thecomment to which you want to reply • Tap or click the Reply box to place the insertion point in the Reply box • Type the desired reply and then press the ENTER key Collaborating on and Delivering a Presentation 16 Replying to a Comment
  • 17.
    • Tap orclick the Insert Comment button, which has the label New, to open a comment box in the Comments pane • Tap or click the comment box, type the comment text, and then press the ENTER key Collaborating on and Delivering a Presentation 17 Inserting a Comment
  • 18.
    • Tap orclick to select the comment you want to delete • Tap or click the Delete button to delete the comment Collaborating on and Delivering a Presentation 18 Deleting a Comment
  • 19.
    • Display Slide1 and then tap or click the Reading View button on the status bar to display Slide 1 in this view • Tap or click the Next and Previous buttons to review the changes on each slide Collaborating on and Delivering a Presentation 19 Running the Revised Presentation in Reading View
  • 20.
    • Tap orclick the End Review button (REVIEW tab | Compare group) to display the Microsoft PowerPoint dialog box • Tap or click the Yes button to apply the changes you accepted and discard the changes you rejected • Tap or click the Show Comments arrow to display the Show Comments menu • Tap or click Comments Pane in the menu to close the Comments pane • Tap or click the Show Comments arrow to display the Show Comments menu again • Tap or click Show Markup in the menu to hide comments on the slide Collaborating on and Delivering a Presentation 20 Ending the Review and Hiding Markup
  • 21.
    Collaborating on andDelivering a Presentation 21 Ending the Review and Hiding Markup
  • 22.
    • Tap orclick the New Slide arrow (HOME tab | Slides group) to display the layout gallery • Tap or click Reuse Slides in the layout gallery to display the Reuse Slides pane • Tap or click the Browse button • Tap or click Browse File to display the Browse dialog box • Navigate to the location containing the file to reuse, and then tap or click to select the file • Tap or click the Open button to display thumbnails of the slides in the Reuse Slides pane Collaborating on and Delivering a Presentation 22 Reusing Slides from an Existing Presentation
  • 23.
    • Tap orclick the thumbnails to insert into the presentation • Tap or click the ‘Keep source formatting’ check box at the bottom of the Reuse Slides pane to preserve the slide formatting • Tap or click the Close button in the Reuse Slides pane so that it no longer is displayed Collaborating on and Delivering a Presentation 23 Reusing Slides from an Existing Presentation
  • 24.
    Collaborating on andDelivering a Presentation 24 Reusing Slides from an Existing Presentation
  • 25.
    • Display theINSERT tab and then click the Screenshot button (INSERT tab | Images group) to display the Available Windows gallery • Tap or click Screen Clipping (Available Windows gallery) to display the current presentation • When the white overlay displays, resize the rectangle to select the desired portion of the screen for the clipping • Release the mouse button to insert the snip Collaborating on and Delivering a Presentation 25 Capturing Part of a Screen Using Screen Clipping
  • 26.
    Collaborating on andDelivering a Presentation 26 Capturing Part of a Screen Using Screen Clipping
  • 27.
    • Tap orclick the Header & Footer button (INSERT tab | Text group) to display the Header and Footer dialog box • If necessary, tap or click the Slide tab to display the Slide sheet • Select which information to include on the slide • Tap or click the Apply to All button to apply the footer to all slides Collaborating on and Delivering a Presentation 27 Adding a Footer with Fixed Information
  • 28.
    Collaborating on andDelivering a Presentation 28 Adding a Footer with Fixed Information
  • 29.
    • With apicture selected, tap or click the Reset Picture button (FORMAT tab | Adjust group) to remove all formatting from the picture Collaborating on and Delivering a Presentation 29 Clearing Formatting
  • 30.
    • Display theDESIGN tab and then tap or click the Slide Size button to display the Slide Size gallery • Tap or click the desired slide size setting Collaborating on and Delivering a Presentation 30 Setting Slide Size
  • 31.
    • Display theSLIDE SHOW tab and then tap or click the ‘Set Up Slide Show’ button (SLIDE SHOW tab | Set Up group) to display the Set Up Show dialog box • If necessary, tap or click the Slide show monitor arrow in the Multiple monitors section and then choose Primary Monitor • Tap or click the Resolution arrow in the Multiple monitors section to display the Resolution list • Tap or click the desired resolution to change the slide show resolution setting • Tap or click the OK button to close the Set Up Show dialog box and apply the new resolution to the slides Collaborating on and Delivering a Presentation 31 Setting Presentation Resolution
  • 32.
    Collaborating on andDelivering a Presentation 32 Setting Presentation Resolution
  • 33.
    • Open theBackstage view, display the Export tab, and then tap or click ‘Change File Type’ to display the Change File Type section • Tap or click PowerPoint Show in the Presentation File Types area • Tap or click the Save As button to display the Save As dialog box • Type the desired file name in the File name box • Tap or click the Save button to save the presentation as a PowerPoint show Collaborating on and Delivering a Presentation 33 Saving a File as a PowerPoint Show
  • 34.
    Collaborating on andDelivering a Presentation 34 Saving a File as a PowerPoint Show
  • 35.
    • Open theBackstage view, display the Export tab, and then click ‘Change File Type’ to display the Change File Type section • Tap or click ‘JPEG File Interchange Format’ in the Image File Types area • Tap or click the Save As button to display the Save As dialog box • Type the desired file name in the File name box • Tap or click the Save button to display the Microsoft PowerPoint dialog box • Tap or click the ‘Just This One’ button to save only the selected slide Collaborating on and Delivering a Presentation 35 Saving a Slide as an Image
  • 36.
    Collaborating on andDelivering a Presentation 36 Saving a Slide as an Image
  • 37.
    • Insert aCD-RW or DVD-RW or a blank CD-R or DVD-R into your CD or DVD drive • Open the Backstage view, display the Export tab, and then tap or click ‘Package Presentation for CD’ • Tap or click the ‘Package for CD’ button in the Package Presentation for CD section to display the Package for CD dialog box • Type the desired name in the ‘Name the CD’ box Collaborating on and Delivering a Presentation 37 Packing a Presentation for Storage on a Compact Disc
  • 38.
    • Tap orclick the ‘Copy to CD’ button to begin packaging the presentation files and to display the Microsoft PowerPoint dialog box • Tap or click the No button to not include linked files and to display another Microsoft PowerPoint dialog box • Tap or click the Continue button to continue copying the presentation to a CD without the comments added to the slides Collaborating on and Delivering a Presentation 38 Packing a Presentation for Storage on a Compact Disc
  • 39.
    • When thefiles have been written, tap or click the No button to not copy the files to another CD • Tap or click the Close button to finish saving the presentation to a CD Collaborating on and Delivering a Presentation 39 Packing a Presentation for Storage on a Compact Disc
  • 40.
    Collaborating on andDelivering a Presentation 40 Packing a Presentation for Storage on a Compact Disc
  • 41.
    • Open theBackstage view, display the Export tab, and then click ‘Change File Type’ in the Presentation File Types section • Tap or click ‘PowerPoint 97–2003 Presentation’ in the Presentation File Types area • Tap or click the Save As button to display the Save As dialog box • Type the desired file name in the File name box Collaborating on and Delivering a Presentation 41 Saving a File in a Previous PowerPoint Format
  • 42.
    • Tap orclick the Save button to save the presentation as a .ppt type and display the Microsoft PowerPoint Compatibility Checker • Tap or click the Continue button to continue to save the presentation Collaborating on and Delivering a Presentation 42 Saving a File in a Previous PowerPoint Format
  • 43.
    Collaborating on andDelivering a Presentation 43 Saving a File in a Previous PowerPoint Format
  • 44.
    • Open theBackstage view and then tap or click the ‘Check for Issues’ button in the Info tab to display the Check for Issues menu • Tap or click Check Compatibility to display the Microsoft PowerPoint Compatibility Checker dialog box • In the Summary area, view the comments regarding the features that are not supported by earlier versions of PowerPoint • Tap or click the OK button to close the dialog box and return to the presentation Collaborating on and Delivering a Presentation 44 Identifying Presentation Features Not Supported by Previous Versions
  • 45.
    Collaborating on andDelivering a Presentation 45 Identifying Presentation Features Not Supported by Previous Versions
  • 46.
    • Open theBackstage view and then tap or click the ‘Check for Issues’ button to display the Check for Issues menu • Tap or click Inspect Document to display the Document Inspector dialog box • Tap or click the Inspect button to check the document and display the inspection results • Tap or click the Remove All button in the appropriate areas to remove the inappropriate information from the presentation • Tap or click the Close button to close the dialog box Collaborating on and Delivering a Presentation 46 Removing Inappropriate Information
  • 47.
    Collaborating on andDelivering a Presentation 47 Removing Inappropriate Information
  • 48.
    • With theBackstage view open and the Info tab displaying, tap or click the Protect Presentation button to display the Protect Presentation menu • Tap or click ‘Encrypt with Password’ to display the Encrypt Document dialog box • Type the desired password in the Password box • Tap or click the OK button to display the Confirm Password dialog box • Retype the password in the Reenter password box • Tap or click the OK button in the Confirm Password dialog box Collaborating on and Delivering a Presentation 48 Setting a Password
  • 49.
    Collaborating on andDelivering a Presentation 49 Setting a Password
  • 50.
    • With theBackstage view open and the Info tab displaying, tap or click Protect Presentation to display the Protect Presentation menu • Tap or click ‘Mark as Final’ to display the Microsoft PowerPoint dialog box indicating that the presentation will be saved as a final document • Tap or click the OK button to save the file and to display another Microsoft PowerPoint dialog box with information about a final version of a document and indicating that the presentation is final • Tap or click the OK button Collaborating on and Delivering a Presentation 50 Marking a Presentation as Final
  • 51.
    Collaborating on andDelivering a Presentation 51 Marking a Presentation as Final
  • 52.
    • Run theslide show • If the control bar is not visible in the lower-left corner of the slide, move the pointer on the slide • Tap or click ‘Pen and laser pointer tools’ on the control bar to display a menu • Tap or click Highlighter and then drag over the desired words Collaborating on and Delivering a Presentation 52 Highlighting Items on a Slide
  • 53.
    Collaborating on andDelivering a Presentation 53 Highlighting Items on a Slide
  • 54.
    • Tap orclick the ‘Pen and laser pointer tools’ button on the control bar and then tap or click Pen on the menu • Tap or click the ‘Pen and laser pointer tools’ button on the control bar and then point to the desired color • Tap or click the desired color • Drag the pointer around the screen Collaborating on and Delivering a Presentation 54 Changing Ink Color
  • 55.
    Collaborating on andDelivering a Presentation 55 Changing Ink Color
  • 56.
    • Combine PowerPointfiles • Accept and reject a reviewer’s proposed changes • Delete, reply to, and insert comments • Reuse slides from an existing presentation • Capture part of a slide using screen clipping • Insert slide footer content Collaborating on and Delivering a Presentation 56 Chapter Summary
  • 57.
    • Set slidesize and presentation resolution • Save files as a PowerPoint show • Package a presentation for storage on a compact disc • Save a presentation in a previous PowerPoint format • Inspect and protect files • Use presentation tools to navigate and annotate slide shows Collaborating on and Delivering a Presentation 57 Chapter Summary
  • 58.