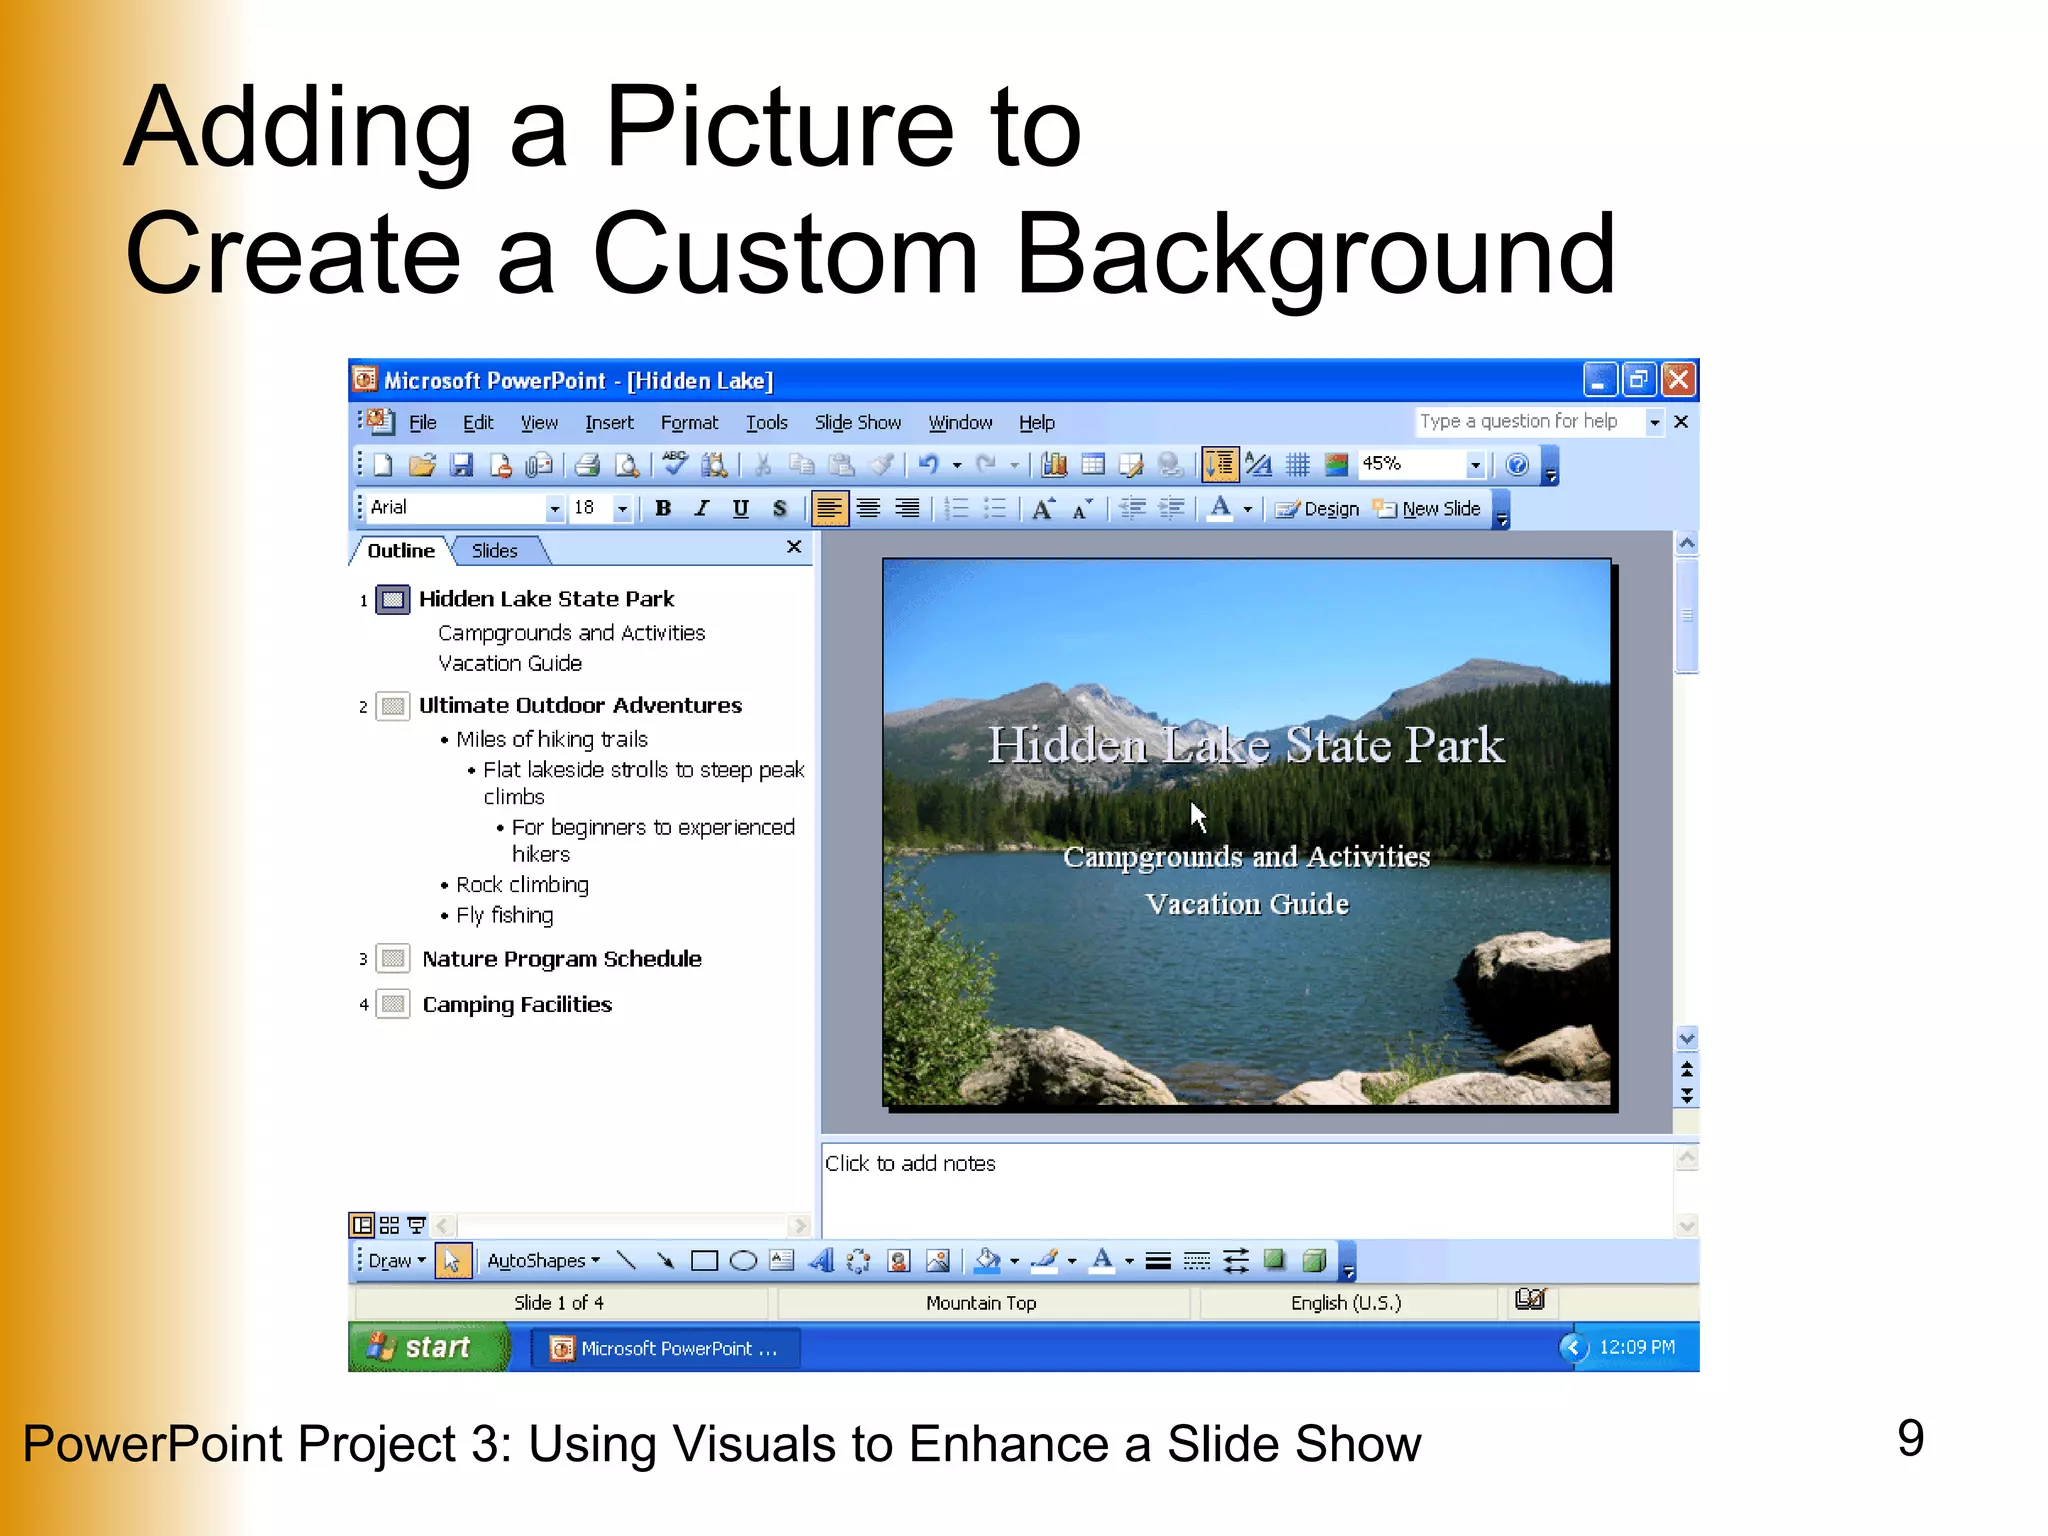
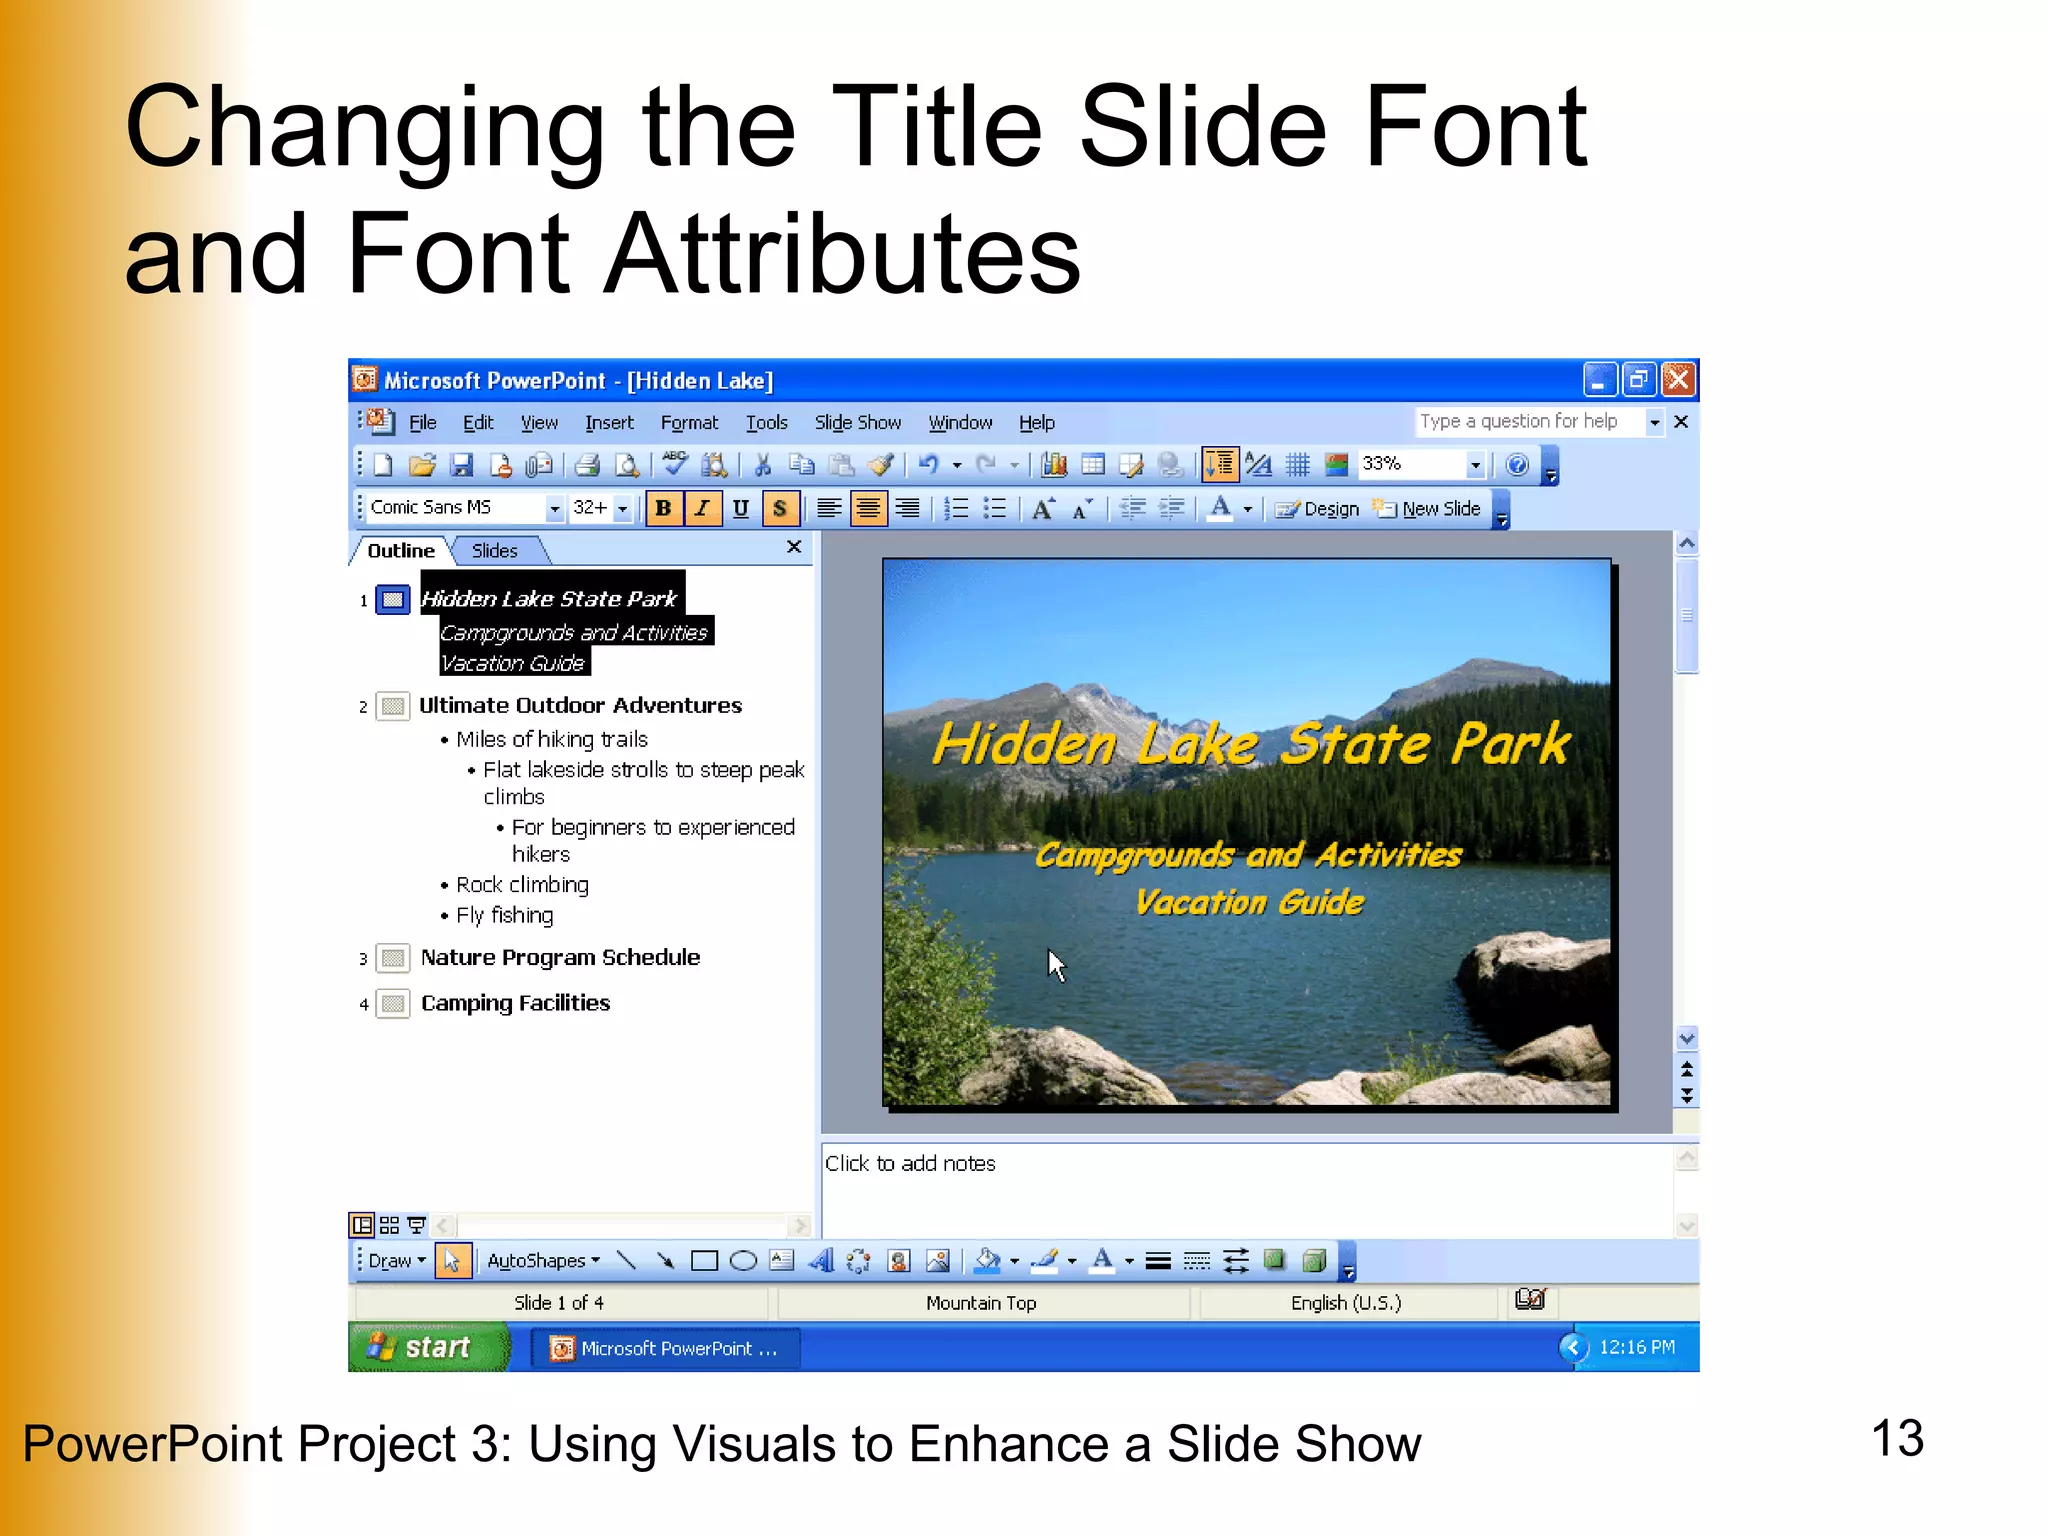
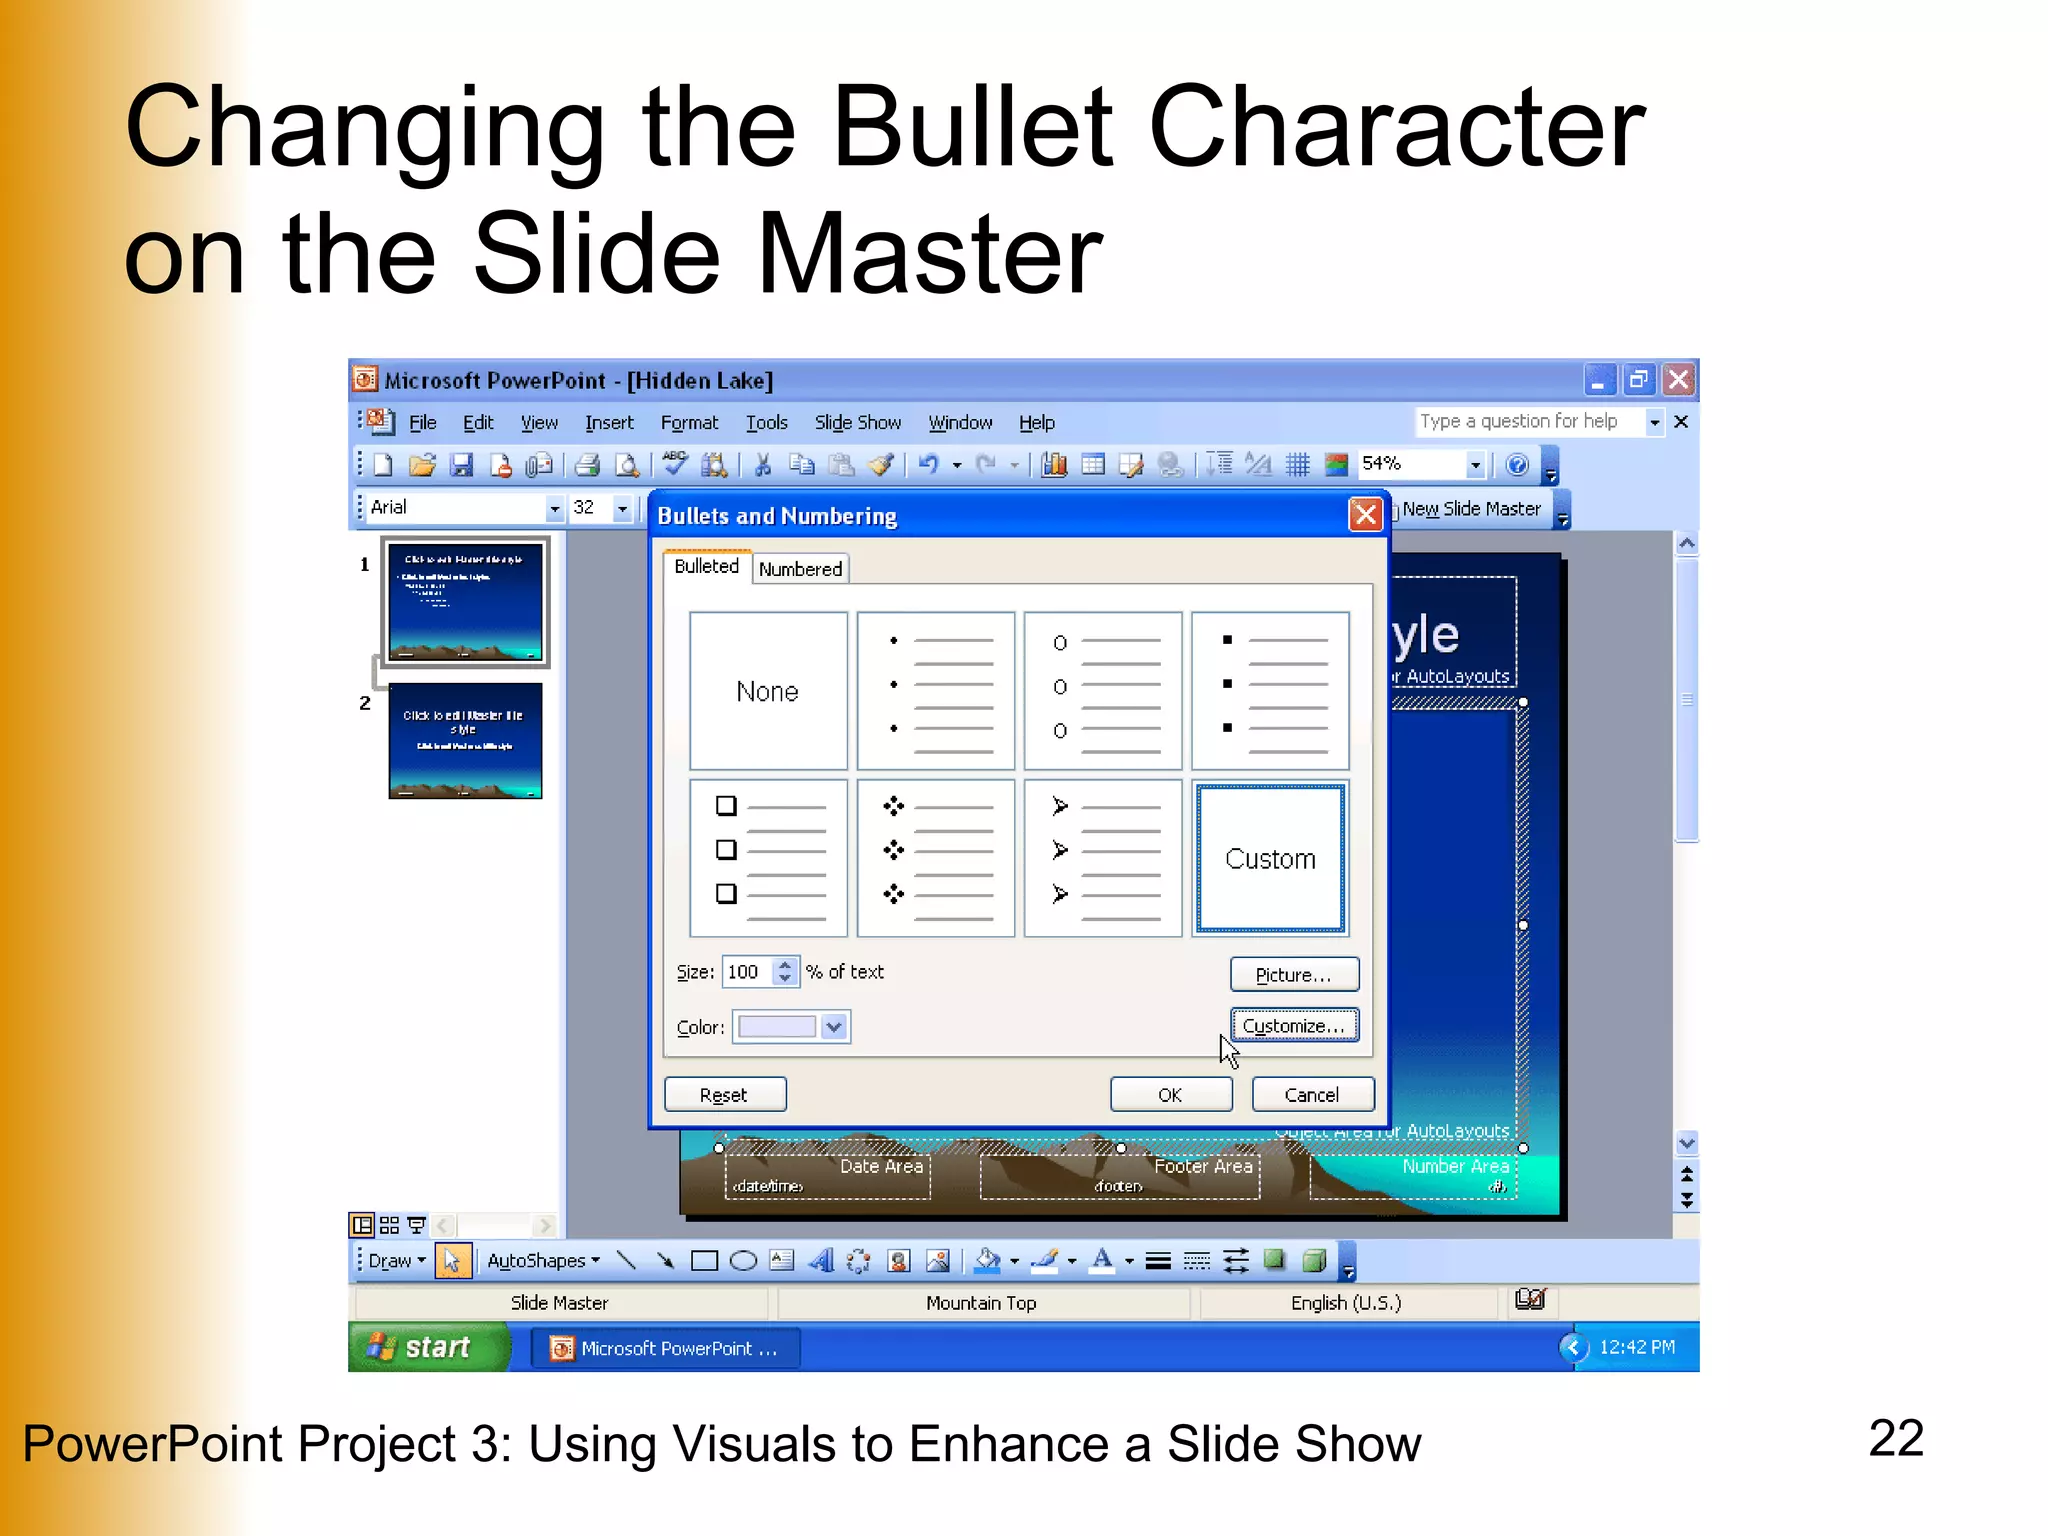
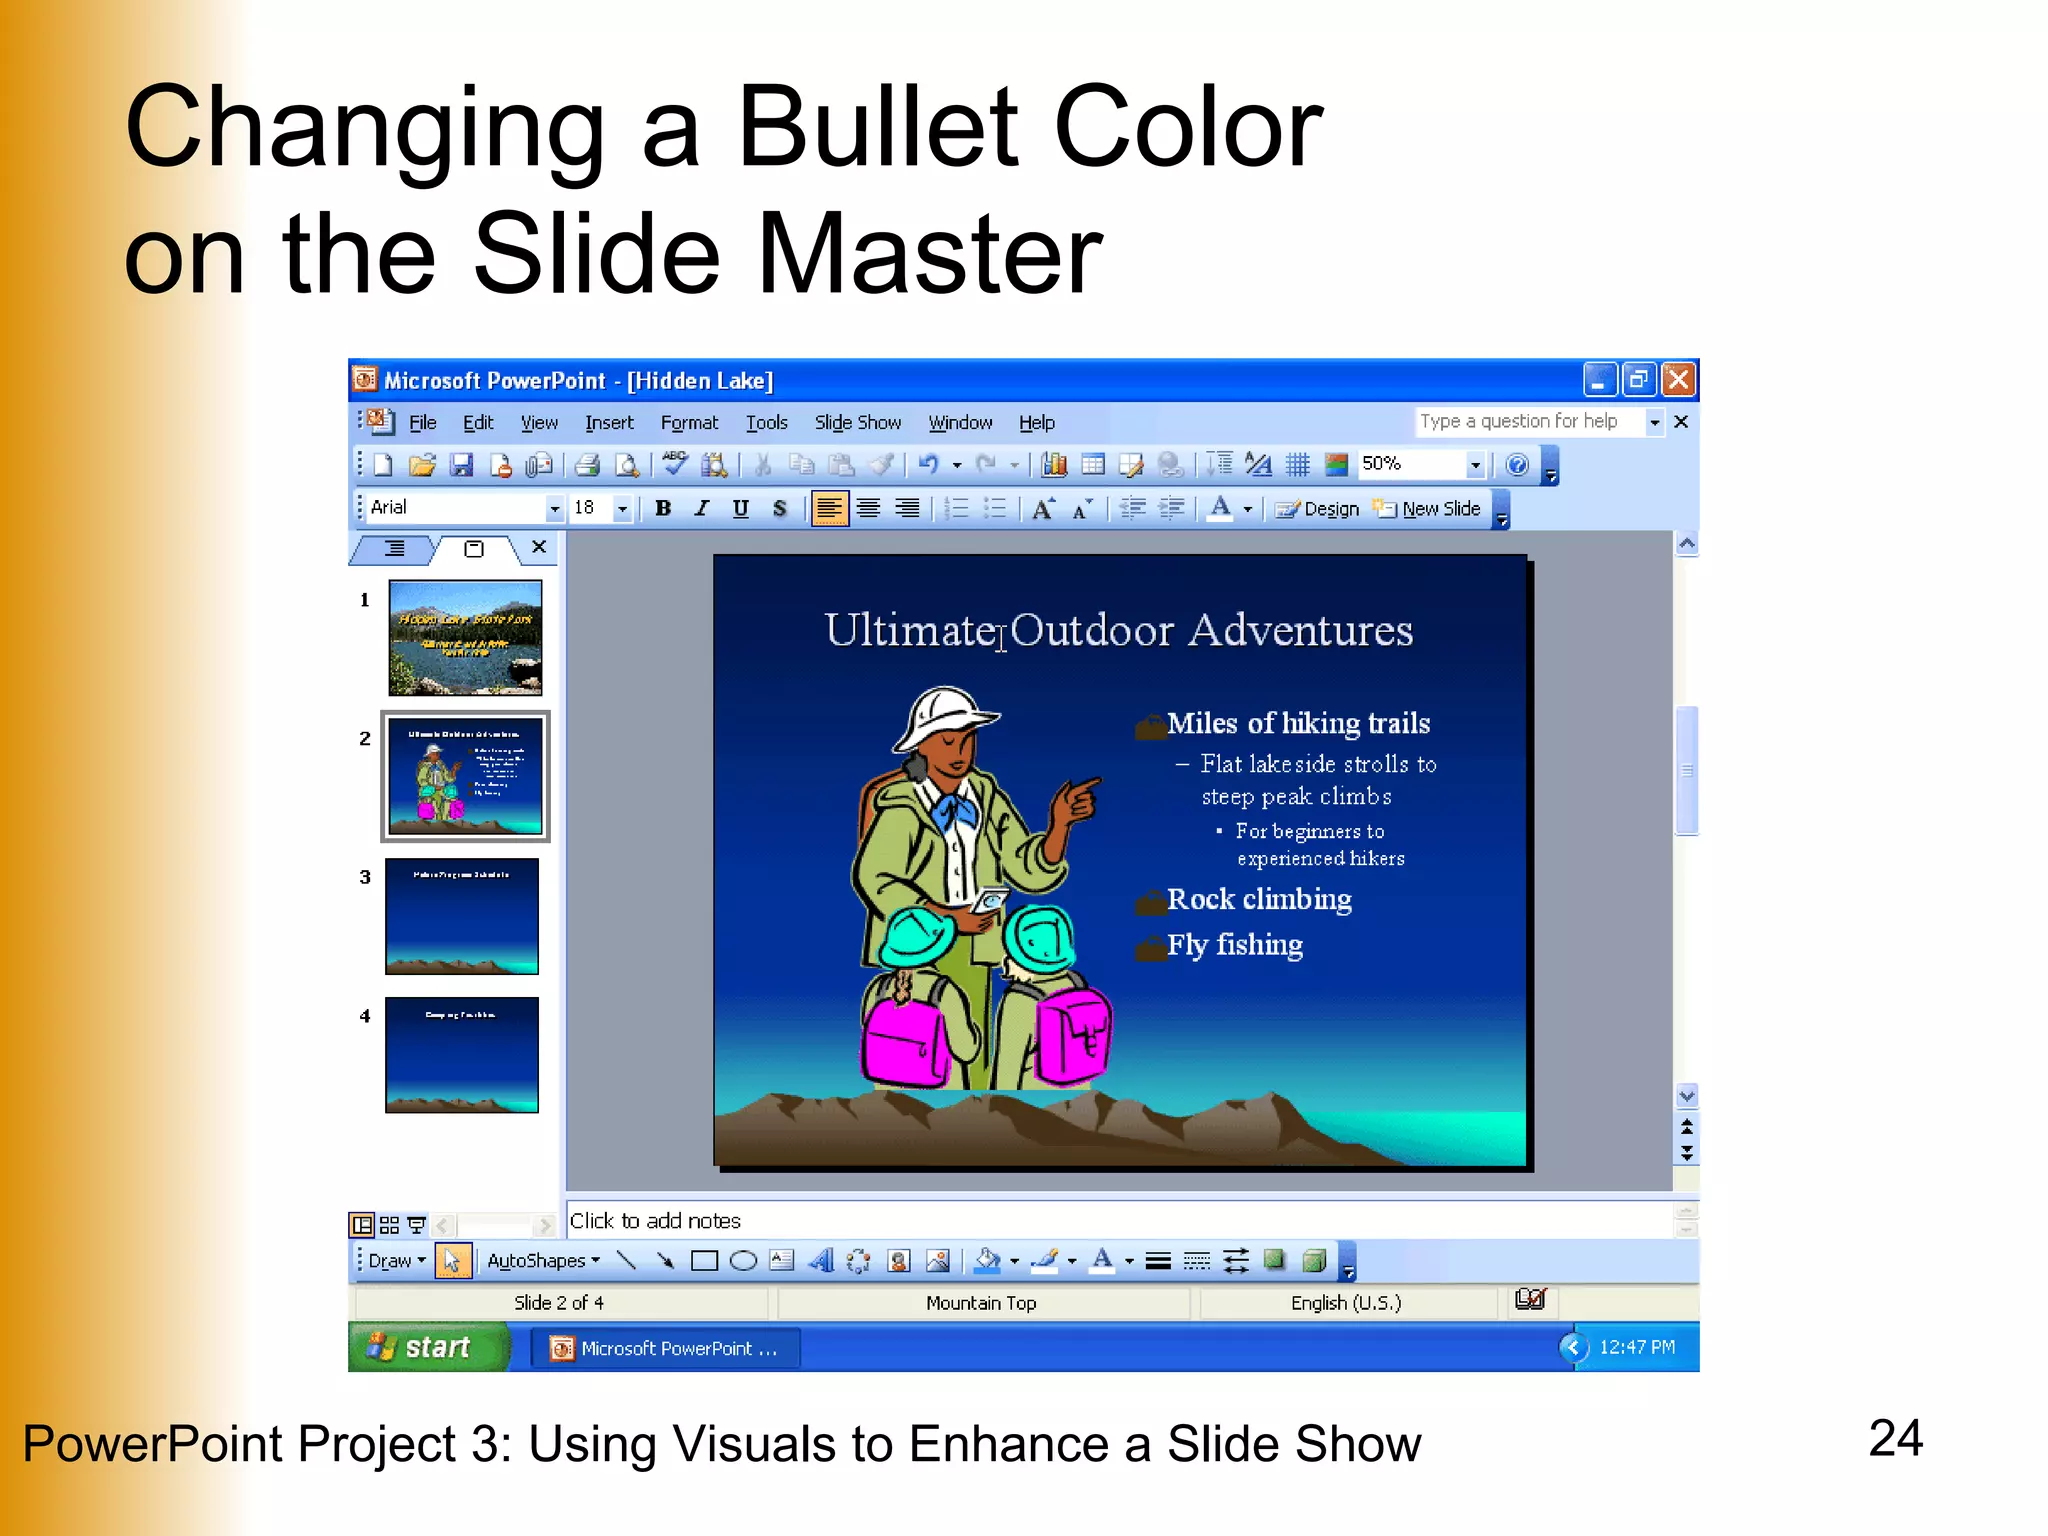
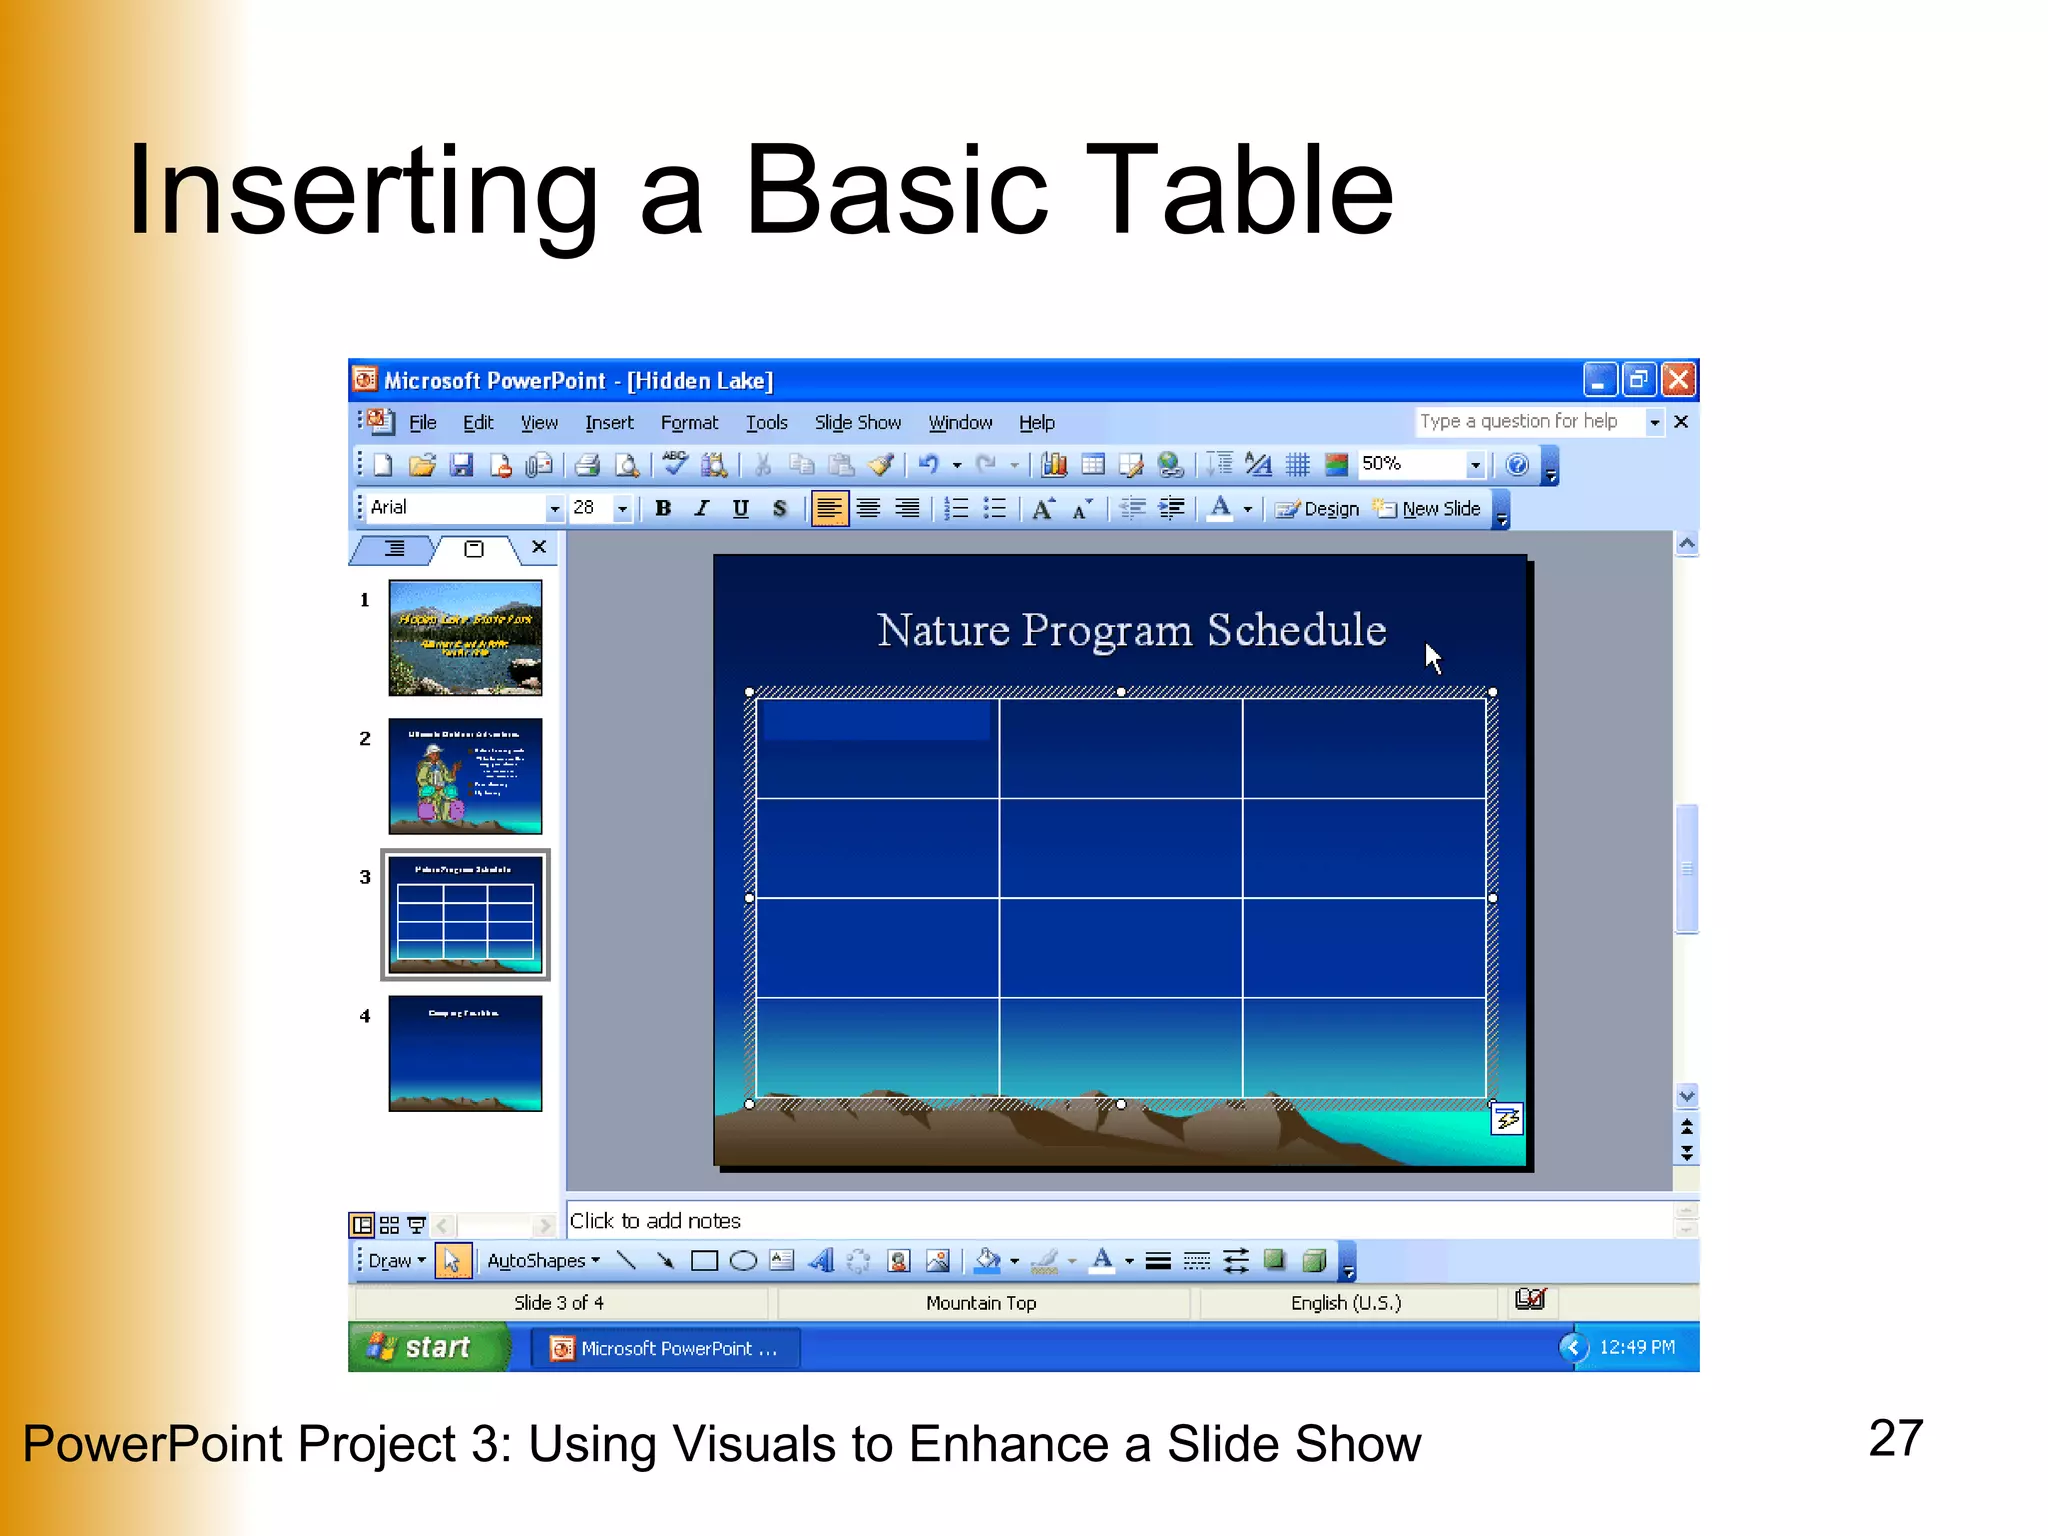
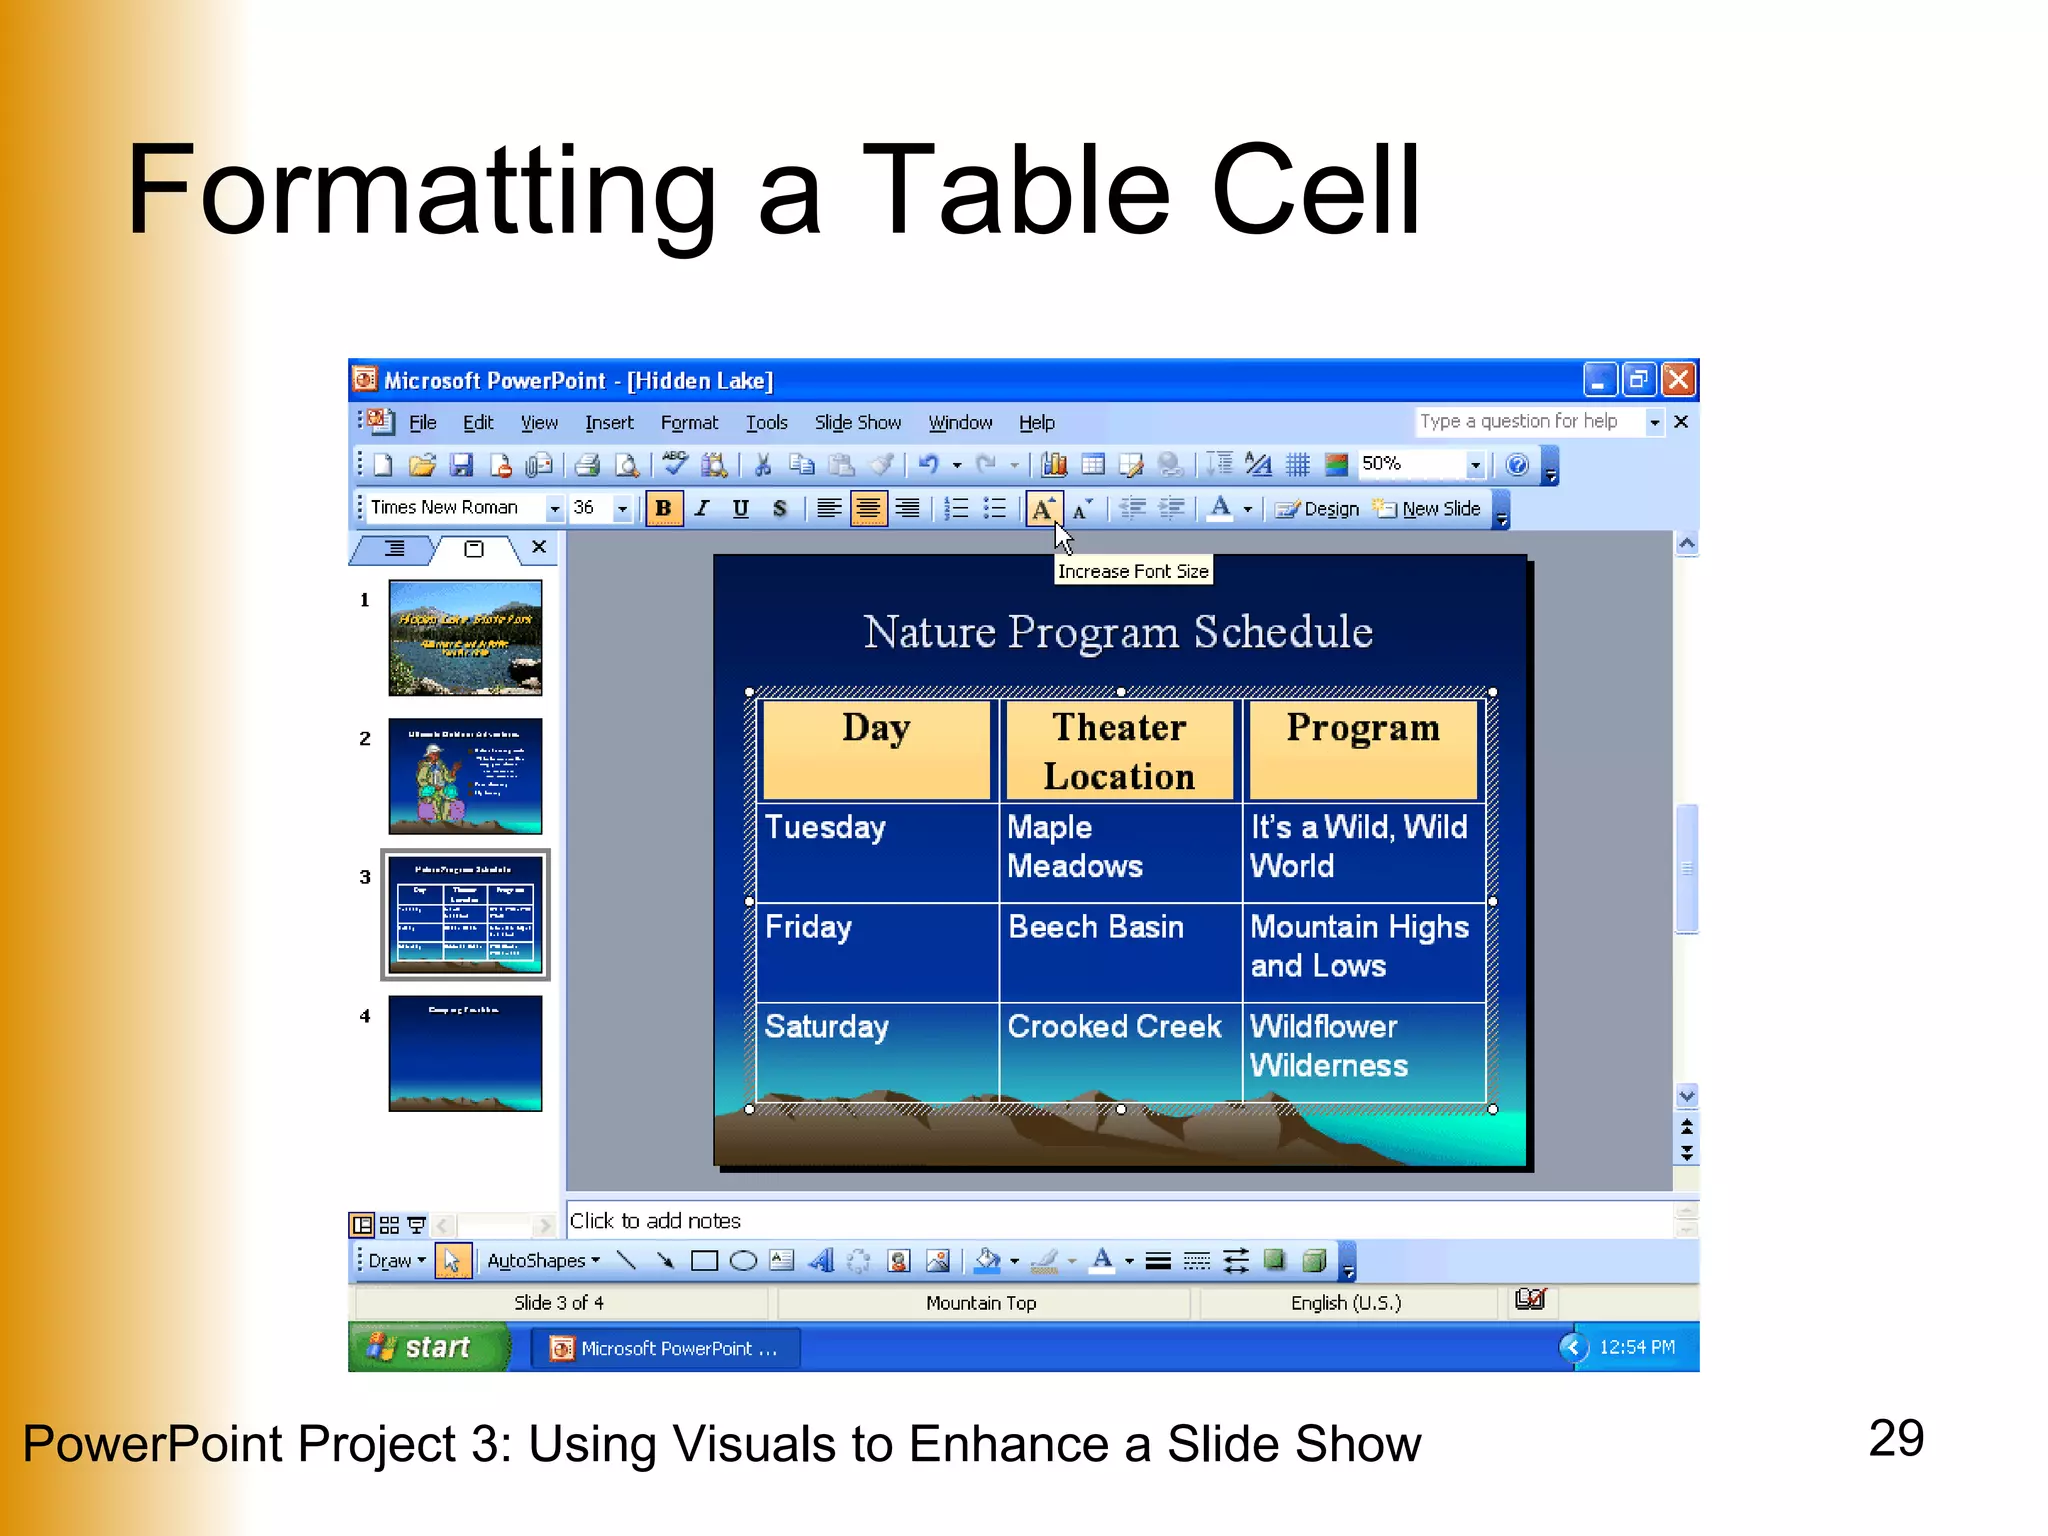
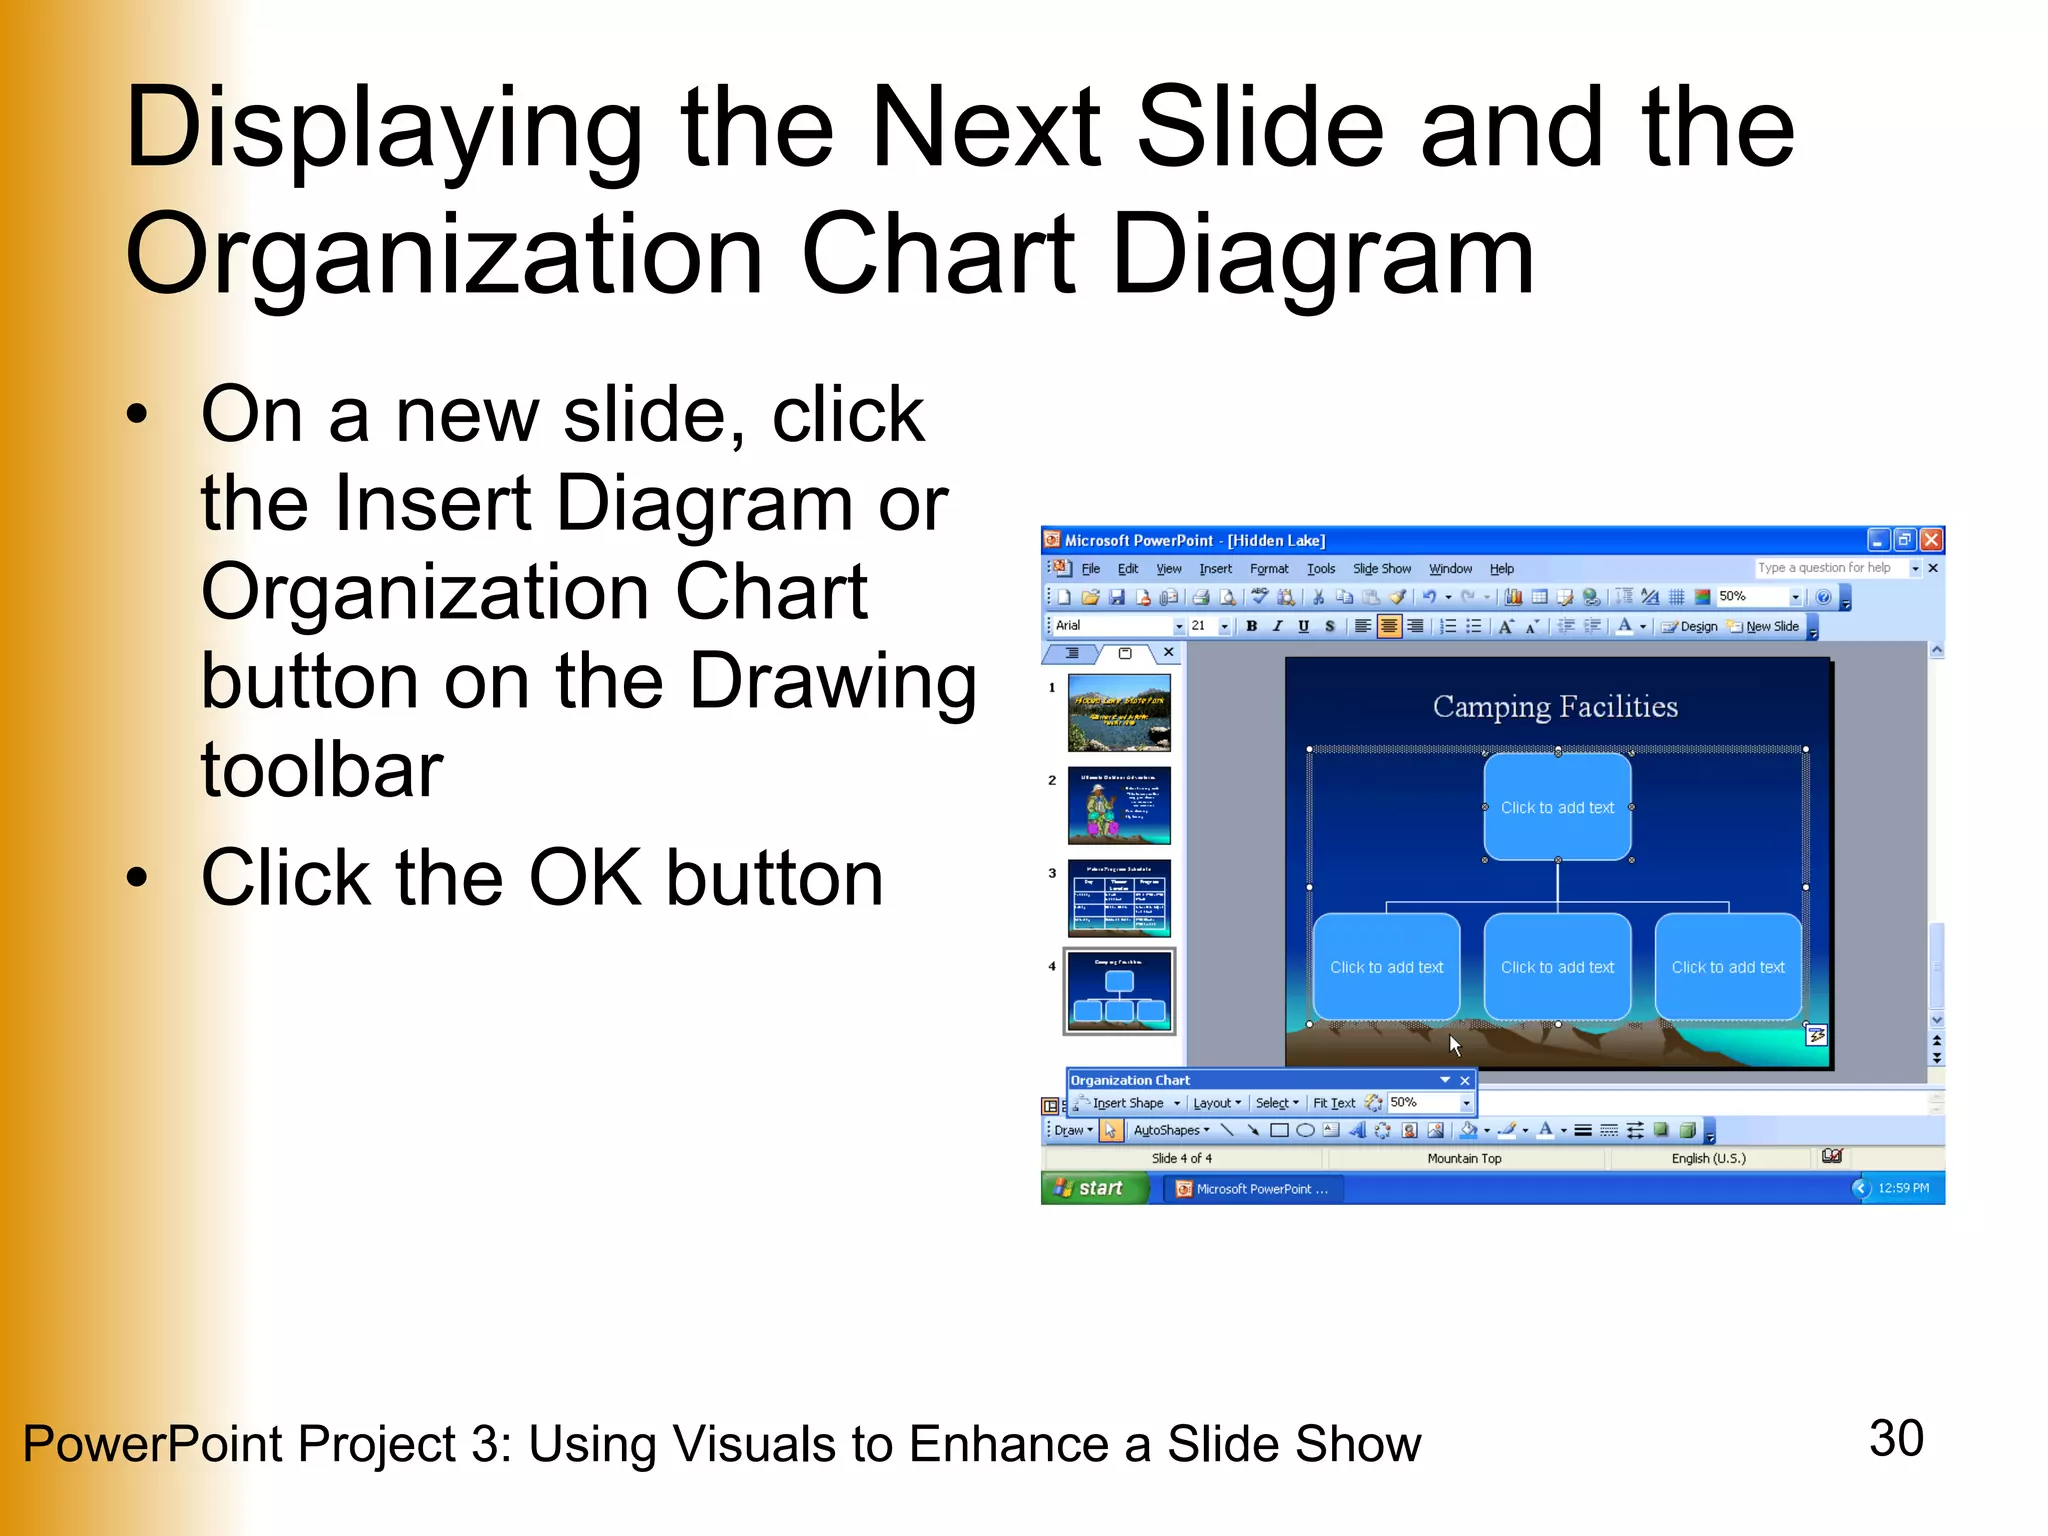
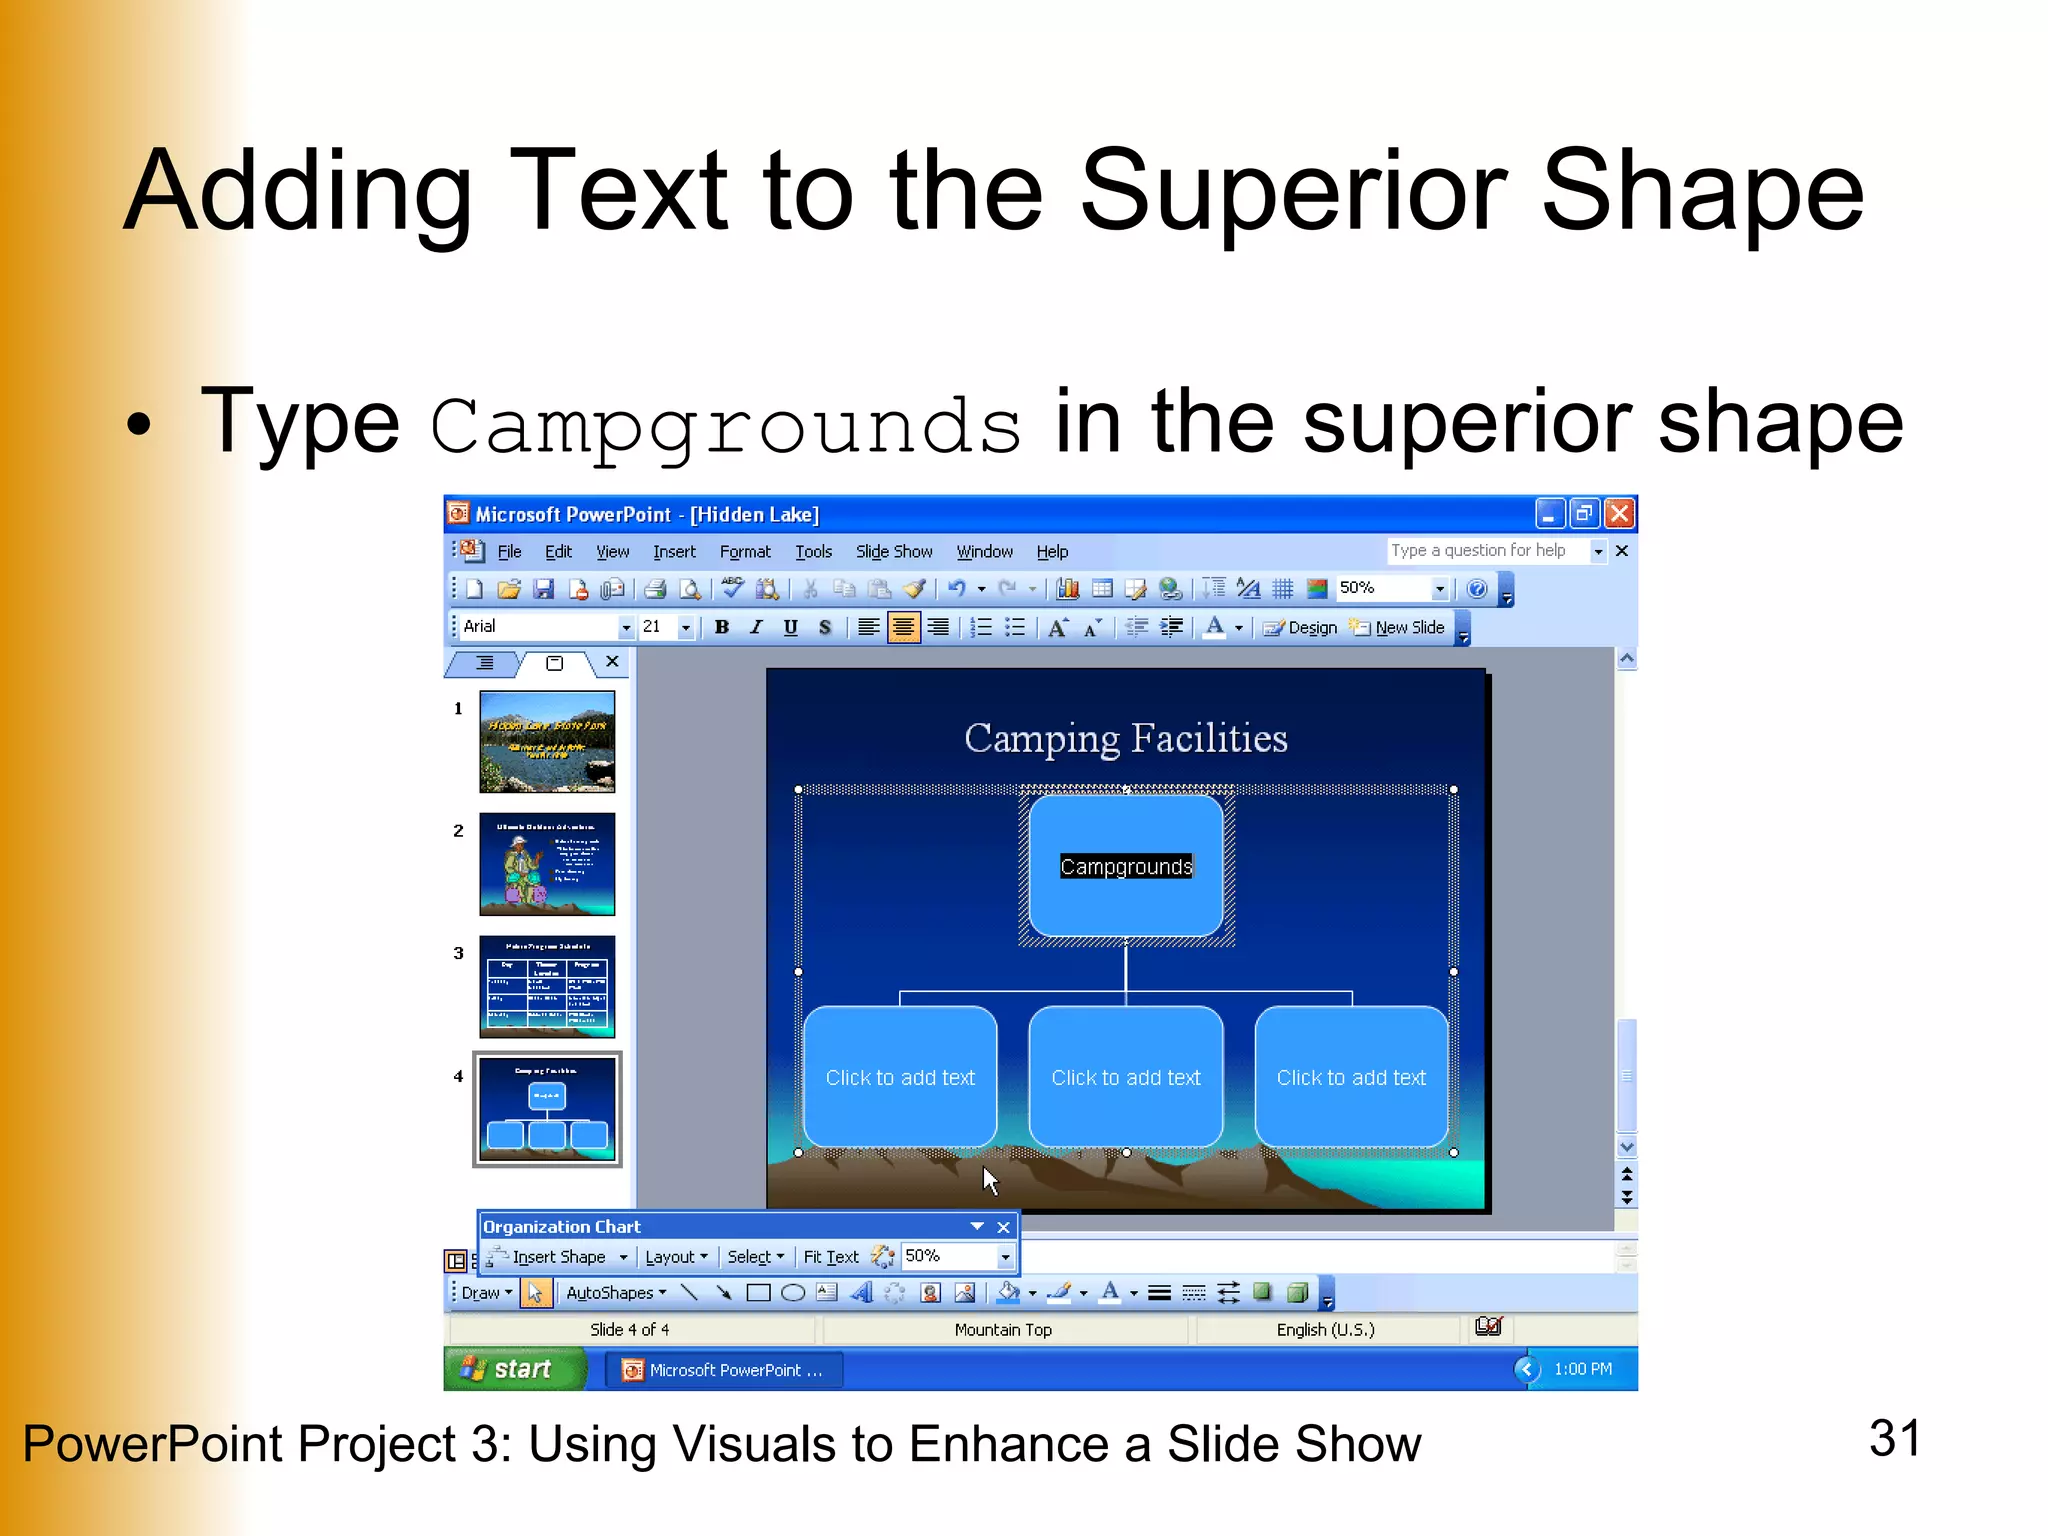
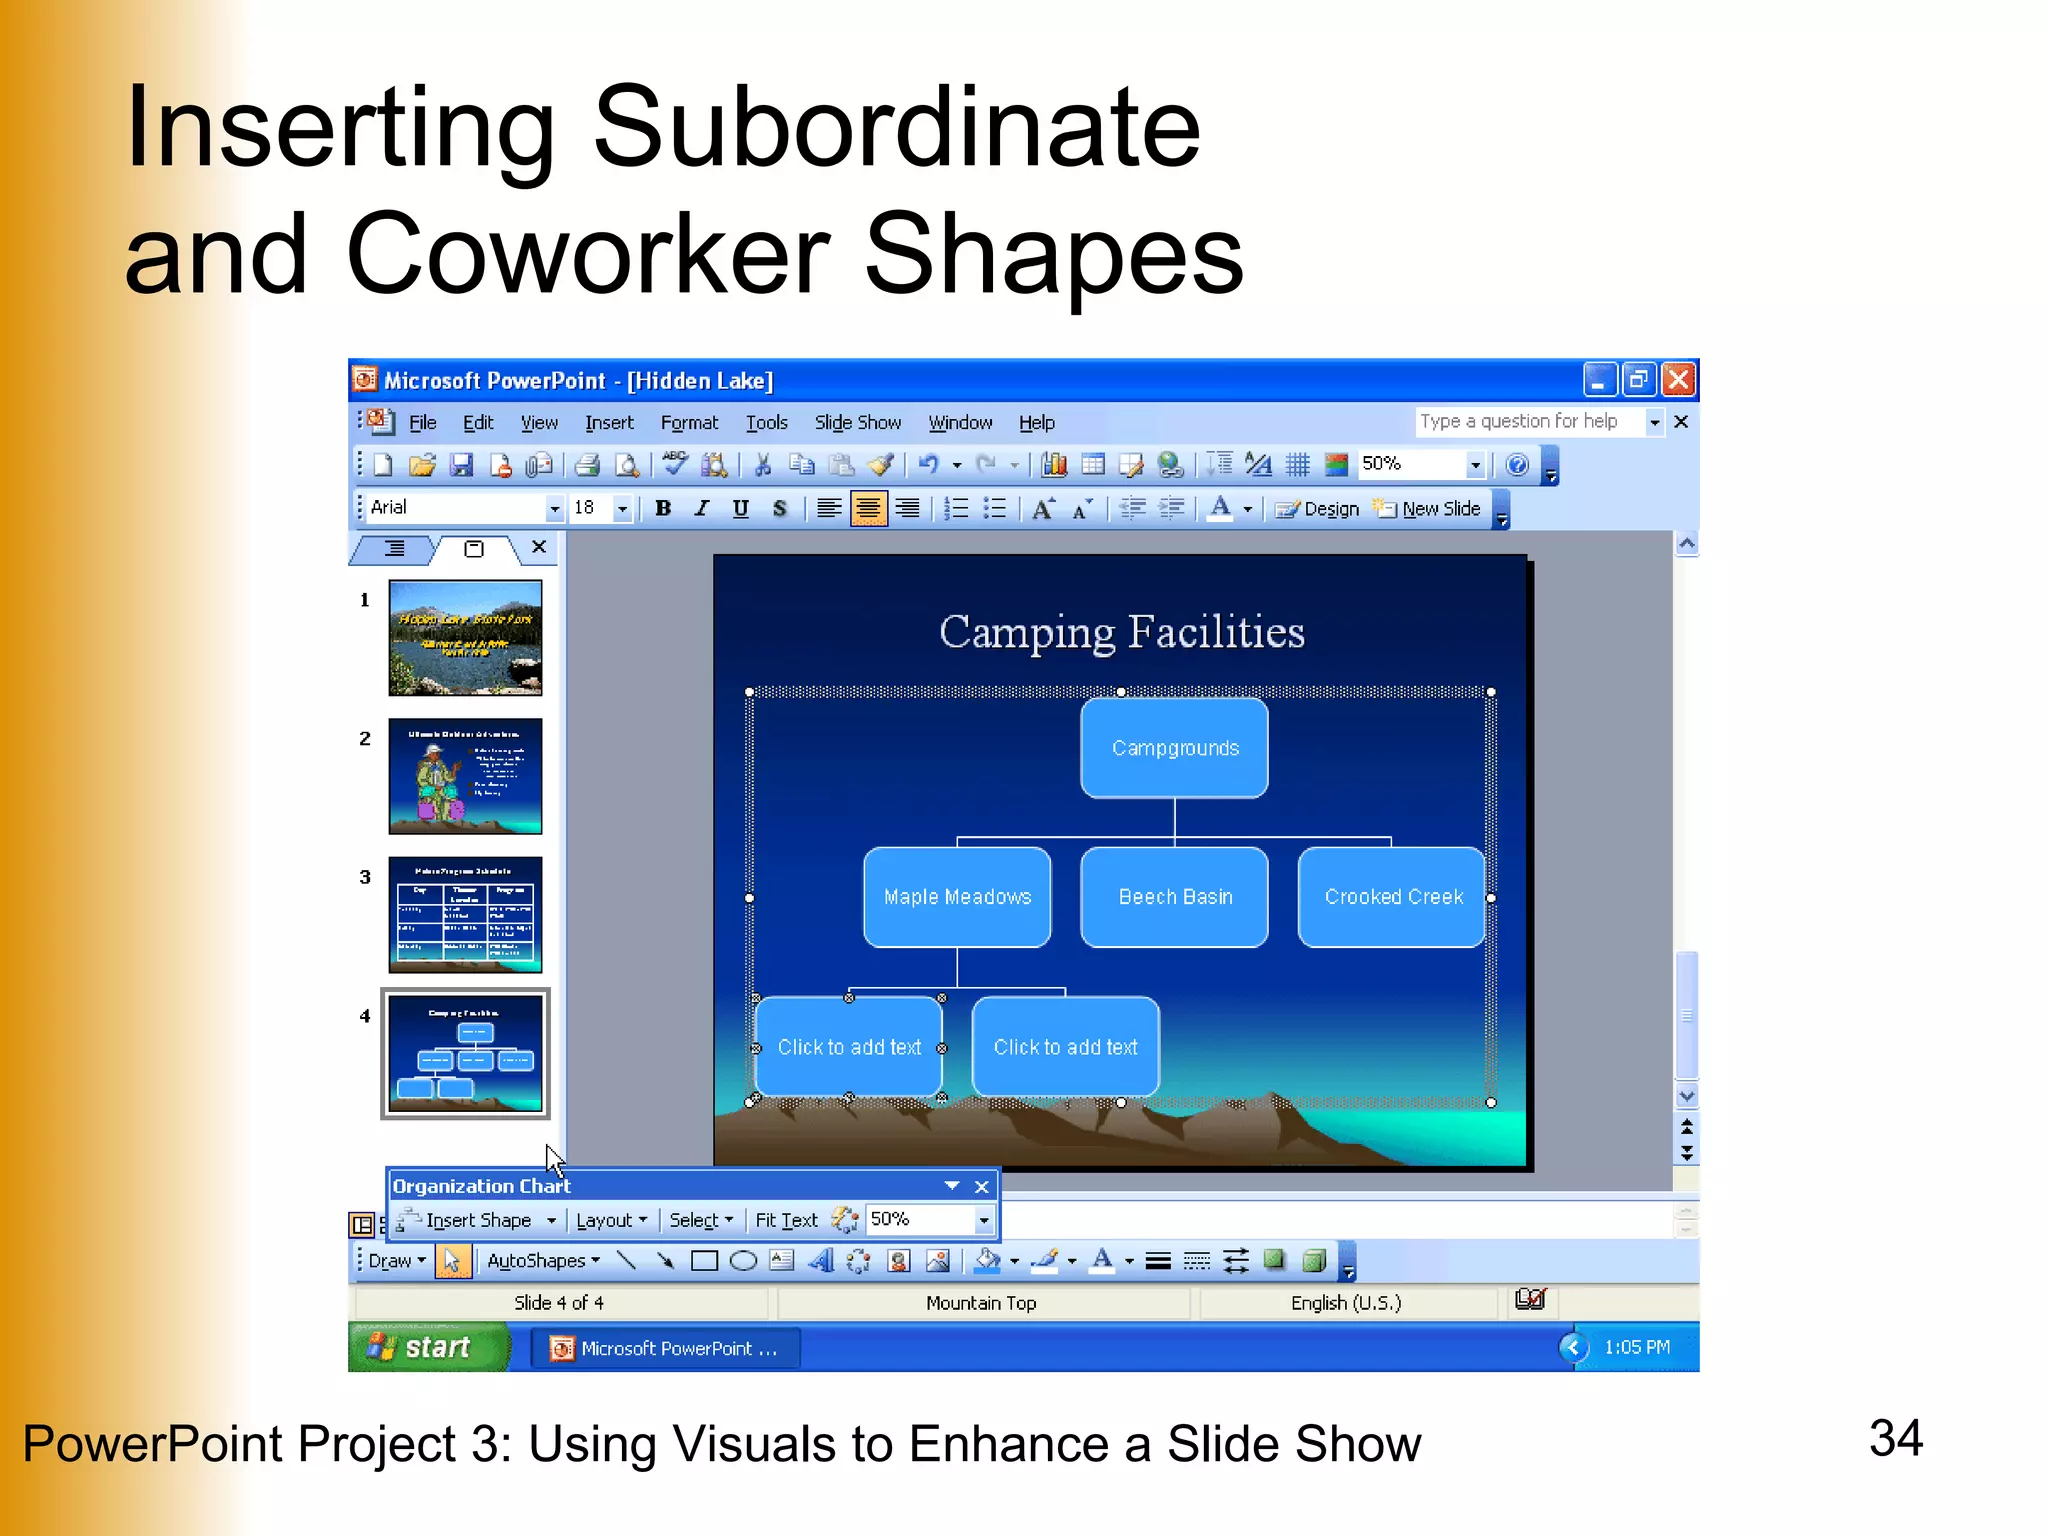
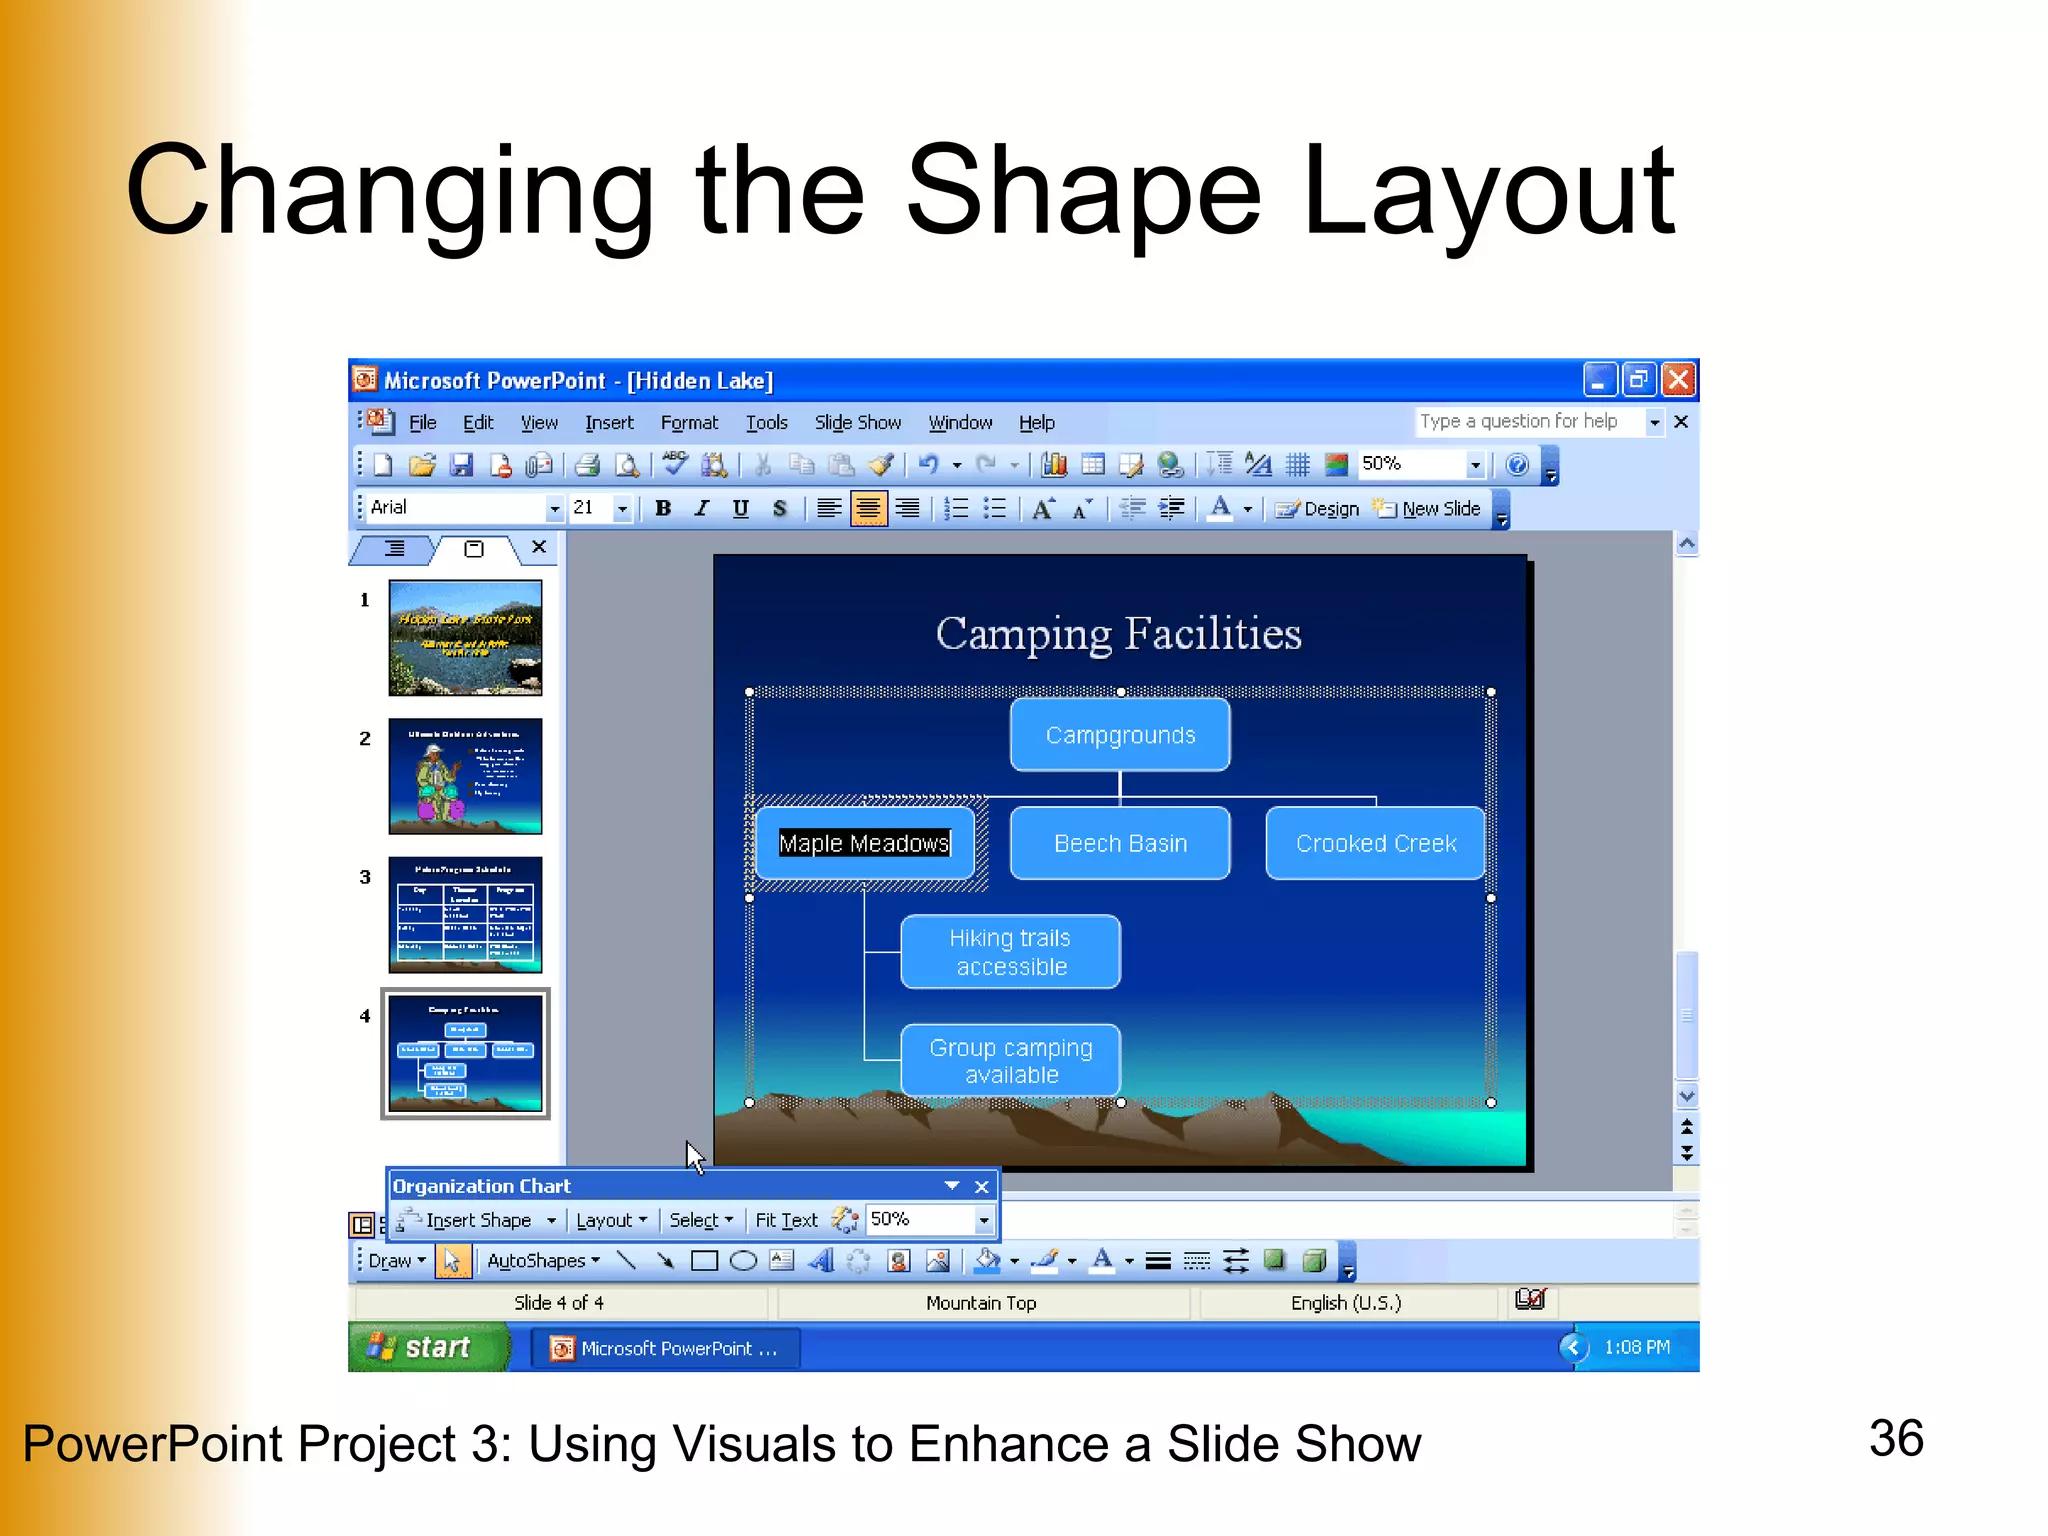
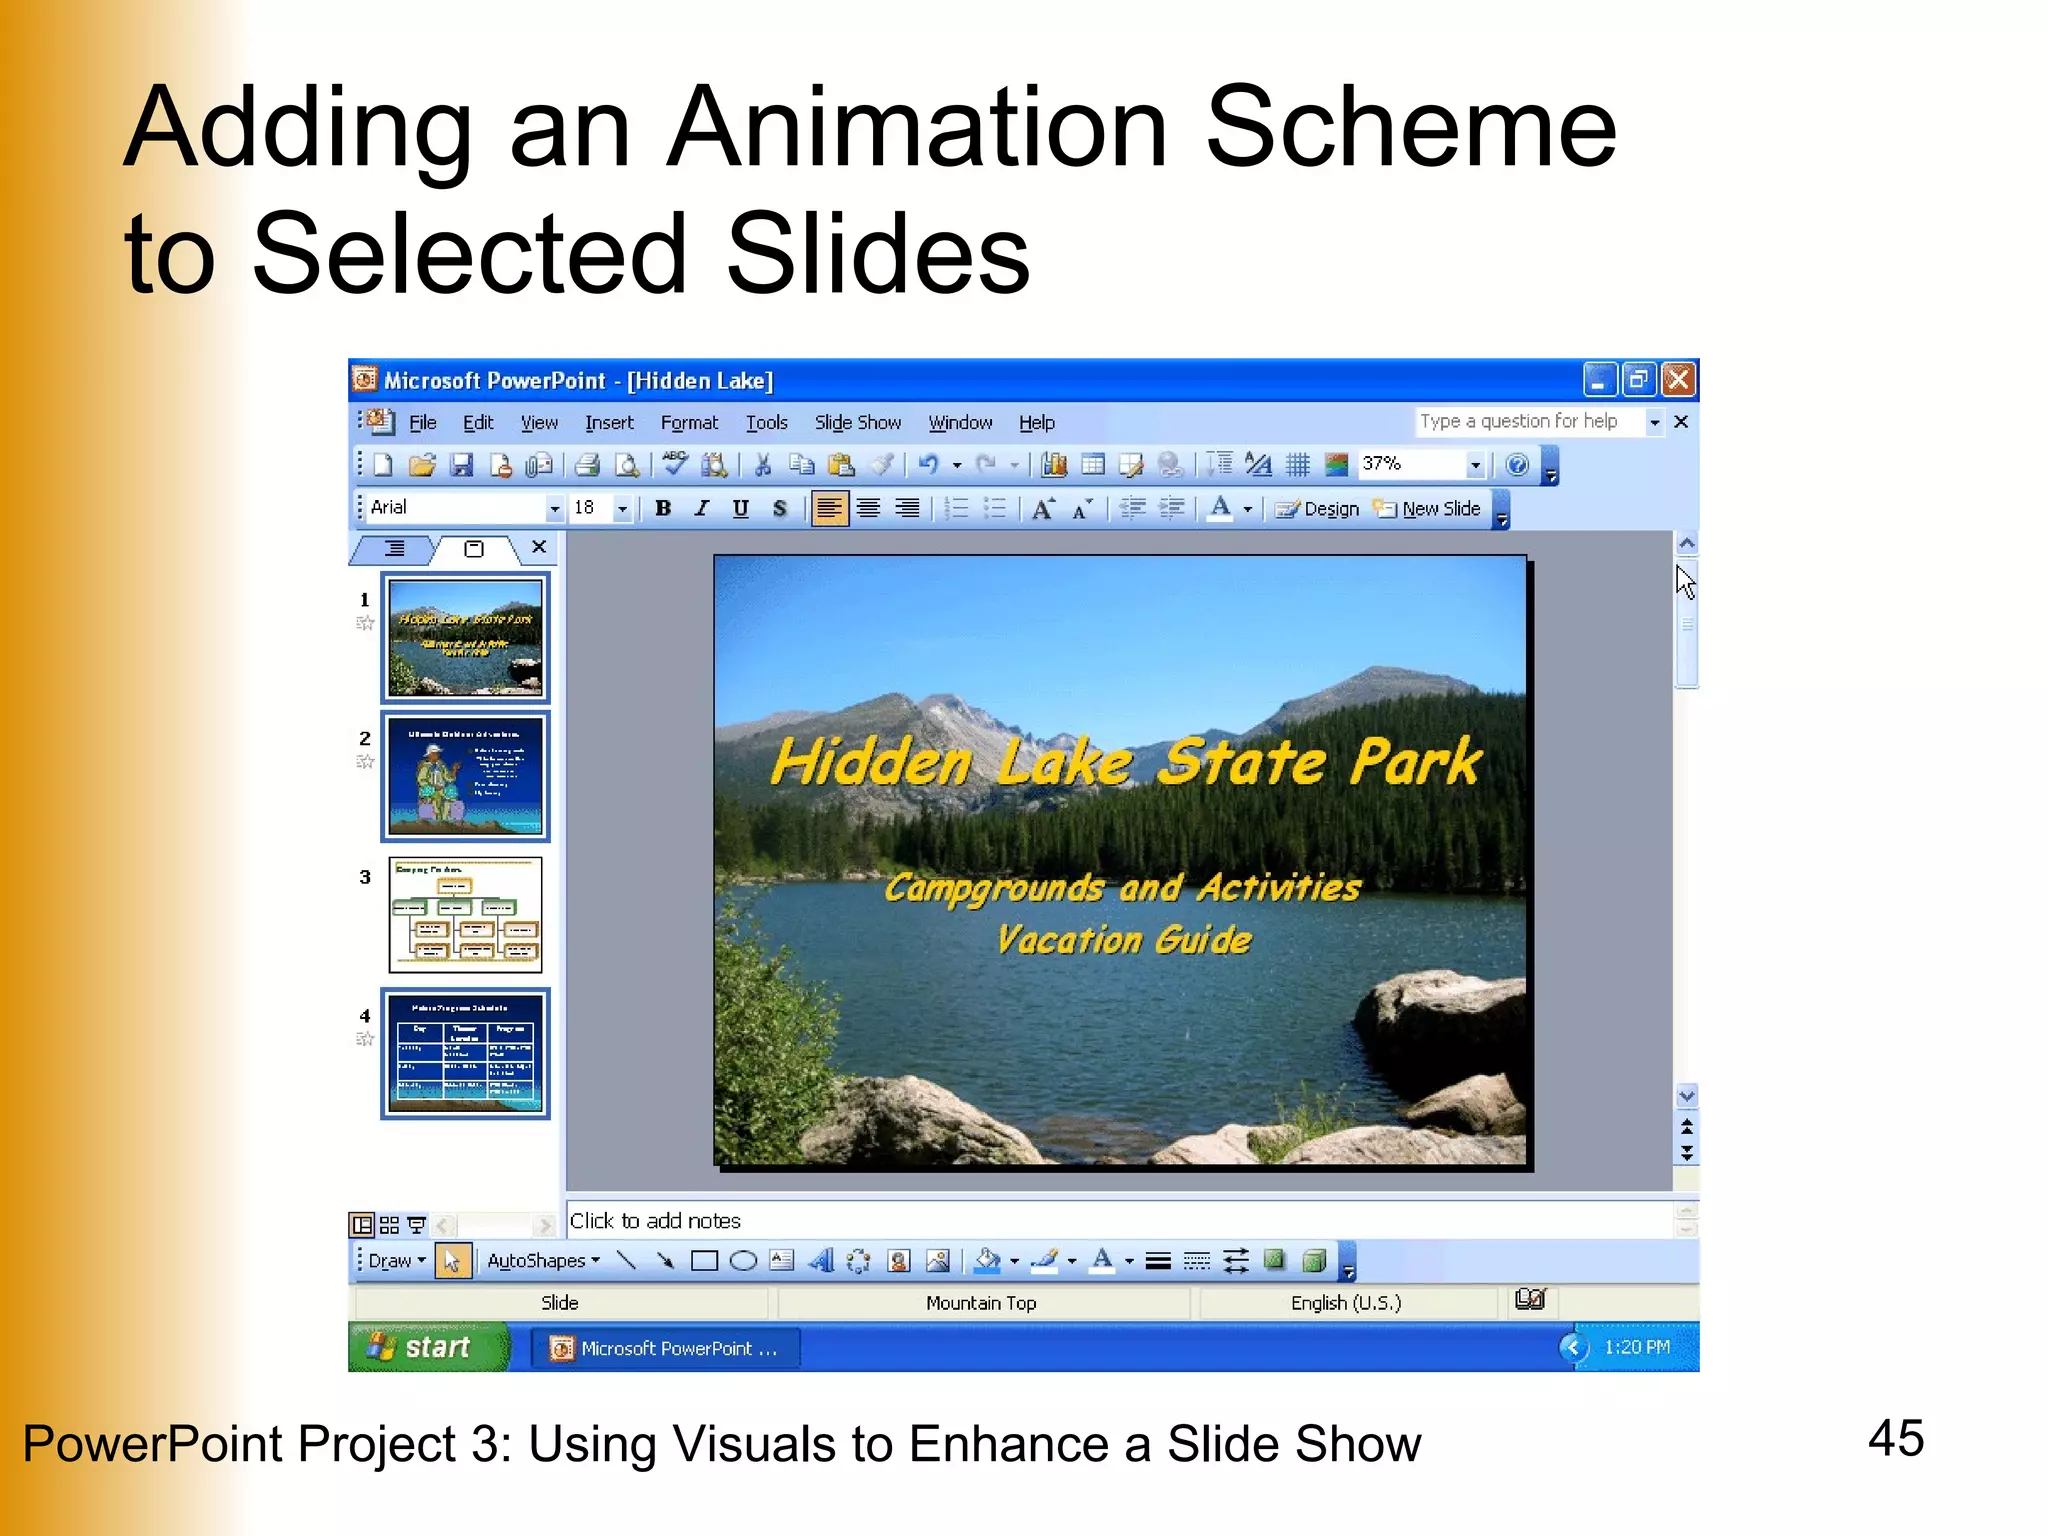
PowerPoint Project 3 Using Visuals to  Enhance a Slide Show
Objectives Create presentations using visuals Open a Microsoft Word outline as a presentation Add a picture to create a custom background Format text-based content
Objectives Insert and modify a clip Customize bullets using the slide master Insert and format a table Create and format an organizational chart
Objectives Apply a new design template to a single slide Rearrange slides Add an animation scheme to selected slides Print slides as handouts
Opening a Microsoft Word Outline as a Presentation Open a new presentation and apply the Mountain Top template With your Data Disk in drive A, click Insert on the menu bar and then click Slides from Outline In the Insert Outline dialog box, select the Hidden Lake Outline located on the floppy disk Click the Insert button
Opening a Microsoft Word Outline as a Presentation
Adding a Picture to  Create a Custom Background Right-click anywhere on the slide, except a text placeholder, and click Background on the shortcut menu Click the Background fill box arrow in the Background dialog box and then click Fill Effects.  If necessary, click the Picture tab Click the Select Picture button Select the Hidden Lake thumbnail picture located on the floppy drive
Adding a Picture to  Create a Custom Background Click the Insert button When the picture is displayed in the Fill Effects dialog box, click the OK button When the Background dialog box is displayed, click the Omit background graphics from master check box Click the Apply button
Adding a Picture to  Create a Custom Background
Changing the Title Slide Font  and Font Attributes Position the mouse pointer before the word, Hidden, in Slide 1 on the Outline tab Click and then drag through the title slide text and subtitle text Right-click the highlighted text and then click Font on the shortcut menu Click the Font box up arrow Scroll up the list until the font name, Comic Sans MS, is displayed in the Font list
Changing the Title Slide Font  and Font Attributes Click Comic Sans MS Click Bold Italic in the Font style list Click the Color box arrow Click More Colors in the Color list If necessary, click the Standard tab in the Colors dialog box
Changing the Title Slide Font  and Font Attributes Click the color, gold, on the Standard tab Click the OK button in the Colors dialog box Click the Preview button in the Font dialog box Click the OK button in the Font dialog box
Changing the Title Slide Font  and Font Attributes
Inserting a Clip  into a Content Placeholder Click the Insert Clip Art button in the content placeholder Type  backpackers  in the Search text text box and then click the Go button If necessary, scroll down to display the desired clip, click the clip to select it, and then click the OK button
Inserting a Clip  into a Content Placeholder
Sizing and Moving a Clip Right-click the clip and then click Format Picture on the shortcut menu Click the Size tab in the Format Picture dialog box Click and hold down the mouse button on the Height box up arrow in the Scale area until 250% is displayed and then release the mouse button Click the OK button Drag the clip up so the bottom of the clip is where you desire
Sizing and Moving a Clip
Ungrouping a Clip With the clip selected, right-click the clip Point to Grouping on the shortcut menu, and then point to Ungroup on the Grouping submenu Click Ungroup Click the Yes button in the Microsoft PowerPoint dialog box Right-click the Clip, point to Grouping on the shortcut menu, and then click Ungroup
Ungrouping a Clip
Changing the Bullet Character  on the Slide Master On the slide master, click the paragraph, Click to edit Master text styles Click Format on the menu bar, and select Bullets and Numbering If necessary, click the Bulleted tab when the Bullets and Numbering dialog box is displayed Click the Customize button in the Bullets and Numbering dialog box Click the Font arrow in the Symbol dialog box
Changing the Bullet Character  on the Slide Master Scroll through the list until Webdings is displayed Click Webdings Click the mountain symbol Click the OK button in the Symbol dialog box
Changing the Bullet Character  on the Slide Master
Changing a Bullet Color  on the Slide Master With the Bullets and Numbering dialog box displaying, click the Color box arrow Click the color dark brown in the row of available colors Click the OK button Point to the Close Master View button on the Slide Master View toolbar Click the Close Master View button
Changing a Bullet Color  on the Slide Master
Inserting a Basic Table On the slide for which you wish to insert the table, click the Insert Table button on the Standard toolbar Point to the upper-left square in the grid Move the mouse pointer two squares to the right so the first three squares in the grid are selected
Inserting a Basic Table Move the mouse pointer down to select four rows in the grid Click the selected square at the bottom-right corner of the grid Click the Close button on the Tables and Borders toolbar
Inserting a Basic Table
Formatting a Table Cell Click the top-left cell.  Press and hold the SHIFT key and then click the top-right cell Release the SHIFT key Select the font, Times New Roman, from the Font box on the Formatting toolbar Click the Bold and Center buttons on the Formatting toolbar Click the Increase Font Size button on the Formatting toolbar twice
Formatting a Table Cell
Displaying the Next Slide and the Organization Chart Diagram On a new slide, click the Insert Diagram or Organization Chart button on the Drawing toolbar Click the OK button
Adding Text to the Superior Shape Type  Campgrounds  in the superior shape
Adding Text to the  Subordinate Shapes Click the text placeholders in each of the subordinate shapes you wish to add text to, and type the text you wish to add
Inserting Subordinate  and Coworker Shapes Click the shape you wish to add a subordinate to and click the Insert Shape button on the Organization Chart toolbar Click the new subordinate shape Click the Insert shape button arrow on the Organization Chart toolbar Click Coworker on the Insert Shape menu
Inserting Subordinate  and Coworker Shapes
Changing the Shape Layout Click the shape for which you wish to change the layout Click the Layout button on the Organization Chart toolbar Click Right Hanging on the Layout menu
Changing the Shape Layout
Changing the Preset  Design Scheme Point to the Autoformat button on the Organization Chart toolbar Click the Autoformat button and then click the 3-D Color diagram style in the Diagram Style list Click the OK button in the Organization Chart Style Gallery dialog box Click the Close button on the Organization Chart toolbar
Changing the Preset  Design Scheme
Scaling an Organization Chart Right-click a blank area of the chart placeholder and then right-click Format Organization Chart on the shortcut menu Click the Size tab.  In the Scale area, double-click 100 in the Height text box.  Type  110  as the entry Click the OK button Use the UP and LEFT ARROW keys to move the organization chart to the desired location on the slide
Scaling an Organization Chart
Applying a New Design Template to a Single Slide Display the slide for which you wish to apply the new design template and click the Slide Design button on the Formatting toolbar When the Slide Design task pane is displayed, click the down scroll arrow in the Apply a design template list until the Edge template is displayed in the Available For Use area Click the button arrow on the right side of the Edge template Click Apply to Selected Slides Click the Close button in the Slide Design task pane
Applying a New Design Template to a Single Slide
Rearranging Slides In the tabs pane, click the slide you wish to move Drag the slide to the location you wish to insert it
Adding an Animation Scheme  to Selected Slides Select the slides for which you wish to add the animation scheme, using the CTRL key for nonadjacent selections Click Slide Show on the menu bar and then click Animation Schemes Scroll down the Apply to selected slides list and then click Rise Up in the Moderate category Click the Close button in the Slide Design task pane
Adding an Animation Scheme  to Selected Slides
Printing Slides as Handouts Ready the printer and select Print from the File menu Click the Print what box arrow and then click Handouts in the list Click the Slides per page box arrow in the Handouts area and then click 4 in the list.  Verify the Horizontal option button is selected.  If it is not selected, then click to select it If Grayscale is not displayed in the Color/grayscale box, click the Color/grayscale arrow and then click Grayscale Click the OK button
Printing Slides as Handouts
Summary Create presentations using visuals Open a Microsoft Word outline as a presentation Add a picture to create a custom background Format text-based content
Summary Insert and modify a clip Customize bullets using the slide master Insert and format a table Create and format an organizational chart
Summary Apply a new design template to a single slide Rearrange slides Add an animation scheme to selected slides Print slides as handouts
PowerPoint Project 3 Complete

Power Point Project 3

  • 1.
    PowerPoint Project 3Using Visuals to Enhance a Slide Show
  • 2.
    Objectives Create presentationsusing visuals Open a Microsoft Word outline as a presentation Add a picture to create a custom background Format text-based content
  • 3.
    Objectives Insert andmodify a clip Customize bullets using the slide master Insert and format a table Create and format an organizational chart
  • 4.
    Objectives Apply anew design template to a single slide Rearrange slides Add an animation scheme to selected slides Print slides as handouts
  • 5.
    Opening a MicrosoftWord Outline as a Presentation Open a new presentation and apply the Mountain Top template With your Data Disk in drive A, click Insert on the menu bar and then click Slides from Outline In the Insert Outline dialog box, select the Hidden Lake Outline located on the floppy disk Click the Insert button
  • 6.
    Opening a MicrosoftWord Outline as a Presentation
  • 7.
    Adding a Pictureto Create a Custom Background Right-click anywhere on the slide, except a text placeholder, and click Background on the shortcut menu Click the Background fill box arrow in the Background dialog box and then click Fill Effects. If necessary, click the Picture tab Click the Select Picture button Select the Hidden Lake thumbnail picture located on the floppy drive
  • 8.
    Adding a Pictureto Create a Custom Background Click the Insert button When the picture is displayed in the Fill Effects dialog box, click the OK button When the Background dialog box is displayed, click the Omit background graphics from master check box Click the Apply button
  • 9.
    Adding a Pictureto Create a Custom Background
  • 10.
    Changing the TitleSlide Font and Font Attributes Position the mouse pointer before the word, Hidden, in Slide 1 on the Outline tab Click and then drag through the title slide text and subtitle text Right-click the highlighted text and then click Font on the shortcut menu Click the Font box up arrow Scroll up the list until the font name, Comic Sans MS, is displayed in the Font list
  • 11.
    Changing the TitleSlide Font and Font Attributes Click Comic Sans MS Click Bold Italic in the Font style list Click the Color box arrow Click More Colors in the Color list If necessary, click the Standard tab in the Colors dialog box
  • 12.
    Changing the TitleSlide Font and Font Attributes Click the color, gold, on the Standard tab Click the OK button in the Colors dialog box Click the Preview button in the Font dialog box Click the OK button in the Font dialog box
  • 13.
    Changing the TitleSlide Font and Font Attributes
  • 14.
    Inserting a Clip into a Content Placeholder Click the Insert Clip Art button in the content placeholder Type backpackers in the Search text text box and then click the Go button If necessary, scroll down to display the desired clip, click the clip to select it, and then click the OK button
  • 15.
    Inserting a Clip into a Content Placeholder
  • 16.
    Sizing and Movinga Clip Right-click the clip and then click Format Picture on the shortcut menu Click the Size tab in the Format Picture dialog box Click and hold down the mouse button on the Height box up arrow in the Scale area until 250% is displayed and then release the mouse button Click the OK button Drag the clip up so the bottom of the clip is where you desire
  • 17.
  • 18.
    Ungrouping a ClipWith the clip selected, right-click the clip Point to Grouping on the shortcut menu, and then point to Ungroup on the Grouping submenu Click Ungroup Click the Yes button in the Microsoft PowerPoint dialog box Right-click the Clip, point to Grouping on the shortcut menu, and then click Ungroup
  • 19.
  • 20.
    Changing the BulletCharacter on the Slide Master On the slide master, click the paragraph, Click to edit Master text styles Click Format on the menu bar, and select Bullets and Numbering If necessary, click the Bulleted tab when the Bullets and Numbering dialog box is displayed Click the Customize button in the Bullets and Numbering dialog box Click the Font arrow in the Symbol dialog box
  • 21.
    Changing the BulletCharacter on the Slide Master Scroll through the list until Webdings is displayed Click Webdings Click the mountain symbol Click the OK button in the Symbol dialog box
  • 22.
    Changing the BulletCharacter on the Slide Master
  • 23.
    Changing a BulletColor on the Slide Master With the Bullets and Numbering dialog box displaying, click the Color box arrow Click the color dark brown in the row of available colors Click the OK button Point to the Close Master View button on the Slide Master View toolbar Click the Close Master View button
  • 24.
    Changing a BulletColor on the Slide Master
  • 25.
    Inserting a BasicTable On the slide for which you wish to insert the table, click the Insert Table button on the Standard toolbar Point to the upper-left square in the grid Move the mouse pointer two squares to the right so the first three squares in the grid are selected
  • 26.
    Inserting a BasicTable Move the mouse pointer down to select four rows in the grid Click the selected square at the bottom-right corner of the grid Click the Close button on the Tables and Borders toolbar
  • 27.
  • 28.
    Formatting a TableCell Click the top-left cell. Press and hold the SHIFT key and then click the top-right cell Release the SHIFT key Select the font, Times New Roman, from the Font box on the Formatting toolbar Click the Bold and Center buttons on the Formatting toolbar Click the Increase Font Size button on the Formatting toolbar twice
  • 29.
  • 30.
    Displaying the NextSlide and the Organization Chart Diagram On a new slide, click the Insert Diagram or Organization Chart button on the Drawing toolbar Click the OK button
  • 31.
    Adding Text tothe Superior Shape Type Campgrounds in the superior shape
  • 32.
    Adding Text tothe Subordinate Shapes Click the text placeholders in each of the subordinate shapes you wish to add text to, and type the text you wish to add
  • 33.
    Inserting Subordinate and Coworker Shapes Click the shape you wish to add a subordinate to and click the Insert Shape button on the Organization Chart toolbar Click the new subordinate shape Click the Insert shape button arrow on the Organization Chart toolbar Click Coworker on the Insert Shape menu
  • 34.
    Inserting Subordinate and Coworker Shapes
  • 35.
    Changing the ShapeLayout Click the shape for which you wish to change the layout Click the Layout button on the Organization Chart toolbar Click Right Hanging on the Layout menu
  • 36.
  • 37.
    Changing the Preset Design Scheme Point to the Autoformat button on the Organization Chart toolbar Click the Autoformat button and then click the 3-D Color diagram style in the Diagram Style list Click the OK button in the Organization Chart Style Gallery dialog box Click the Close button on the Organization Chart toolbar
  • 38.
    Changing the Preset Design Scheme
  • 39.
    Scaling an OrganizationChart Right-click a blank area of the chart placeholder and then right-click Format Organization Chart on the shortcut menu Click the Size tab. In the Scale area, double-click 100 in the Height text box. Type 110 as the entry Click the OK button Use the UP and LEFT ARROW keys to move the organization chart to the desired location on the slide
  • 40.
  • 41.
    Applying a NewDesign Template to a Single Slide Display the slide for which you wish to apply the new design template and click the Slide Design button on the Formatting toolbar When the Slide Design task pane is displayed, click the down scroll arrow in the Apply a design template list until the Edge template is displayed in the Available For Use area Click the button arrow on the right side of the Edge template Click Apply to Selected Slides Click the Close button in the Slide Design task pane
  • 42.
    Applying a NewDesign Template to a Single Slide
  • 43.
    Rearranging Slides Inthe tabs pane, click the slide you wish to move Drag the slide to the location you wish to insert it
  • 44.
    Adding an AnimationScheme to Selected Slides Select the slides for which you wish to add the animation scheme, using the CTRL key for nonadjacent selections Click Slide Show on the menu bar and then click Animation Schemes Scroll down the Apply to selected slides list and then click Rise Up in the Moderate category Click the Close button in the Slide Design task pane
  • 45.
    Adding an AnimationScheme to Selected Slides
  • 46.
    Printing Slides asHandouts Ready the printer and select Print from the File menu Click the Print what box arrow and then click Handouts in the list Click the Slides per page box arrow in the Handouts area and then click 4 in the list. Verify the Horizontal option button is selected. If it is not selected, then click to select it If Grayscale is not displayed in the Color/grayscale box, click the Color/grayscale arrow and then click Grayscale Click the OK button
  • 47.
  • 48.
    Summary Create presentationsusing visuals Open a Microsoft Word outline as a presentation Add a picture to create a custom background Format text-based content
  • 49.
    Summary Insert andmodify a clip Customize bullets using the slide master Insert and format a table Create and format an organizational chart
  • 50.
    Summary Apply anew design template to a single slide Rearrange slides Add an animation scheme to selected slides Print slides as handouts
  • 51.