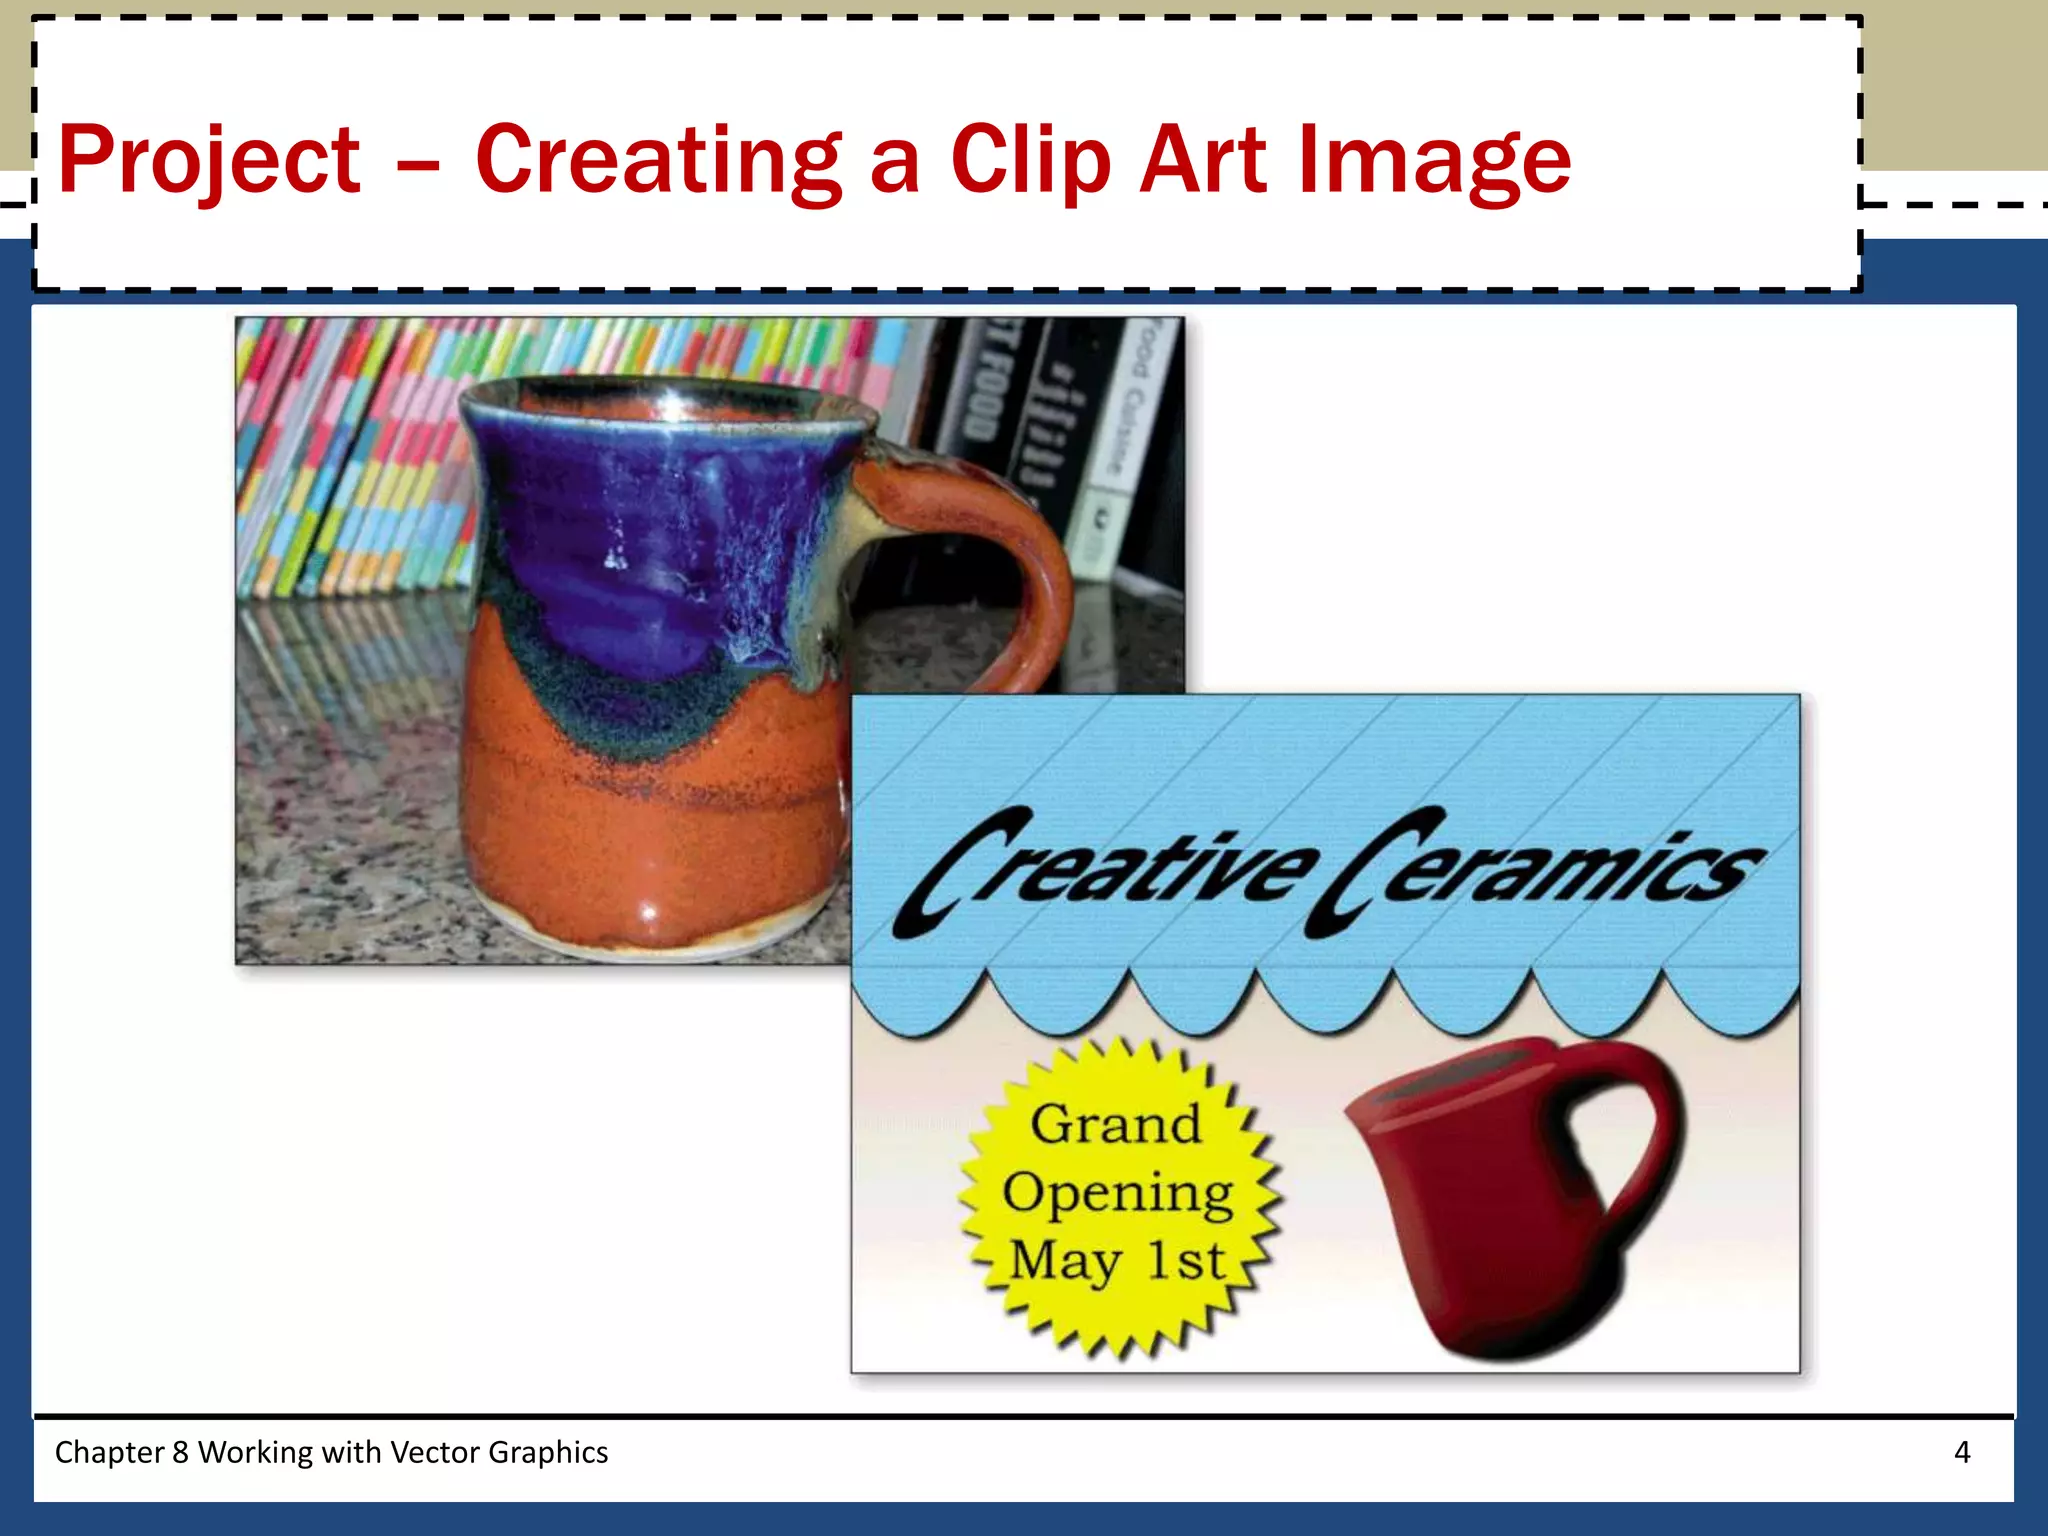
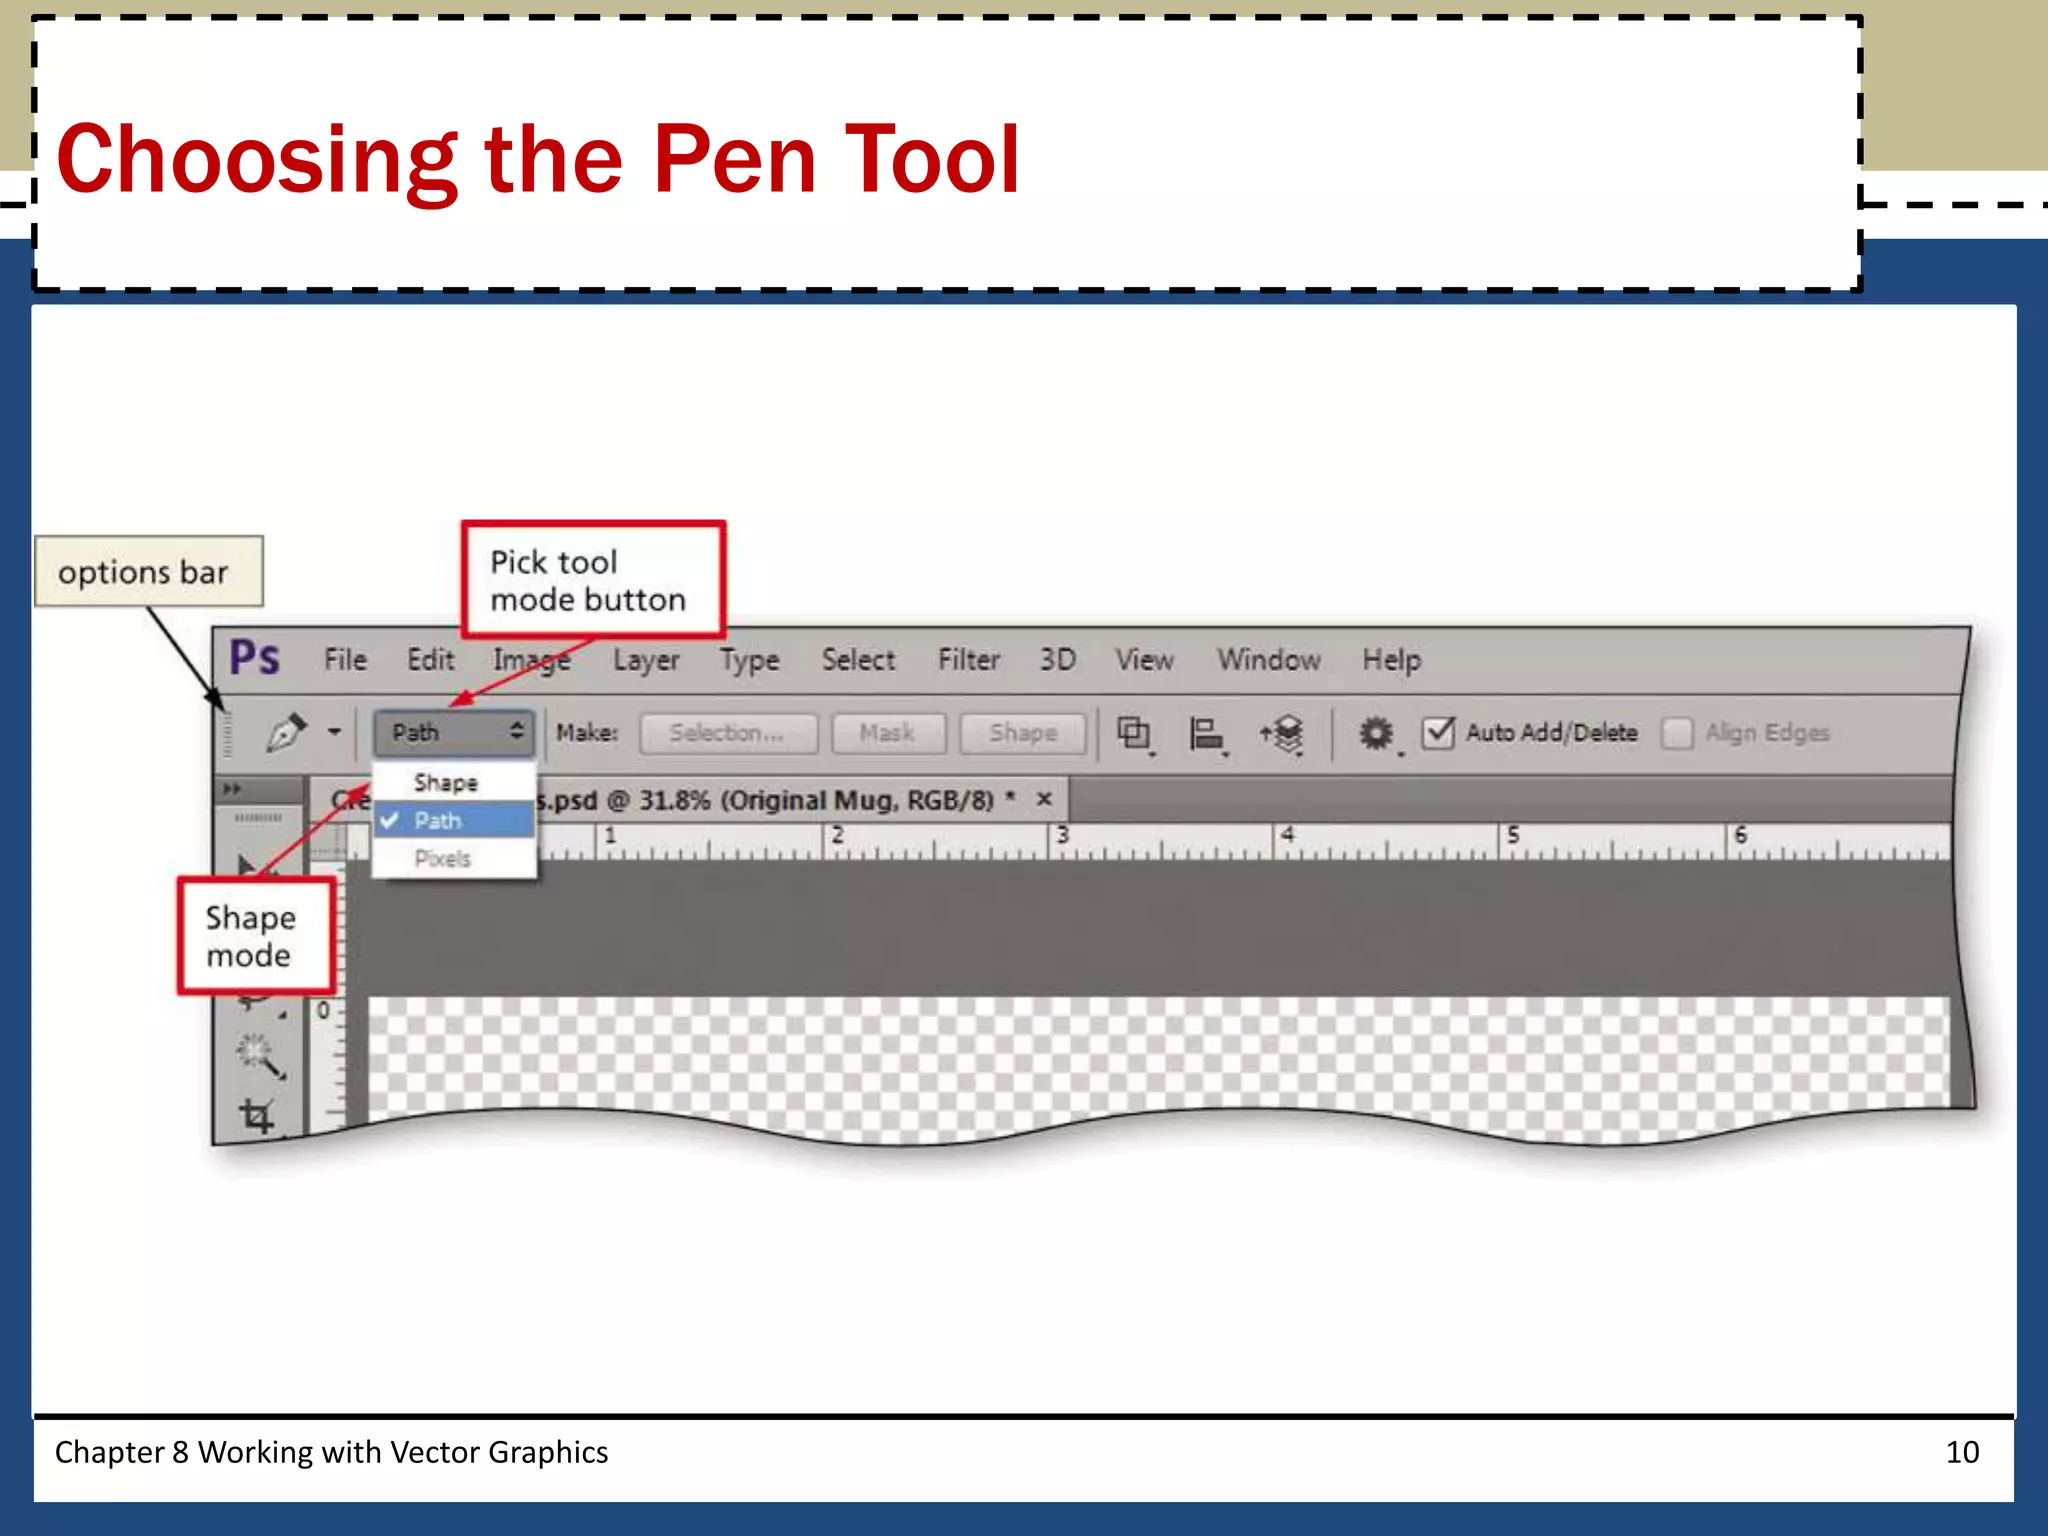
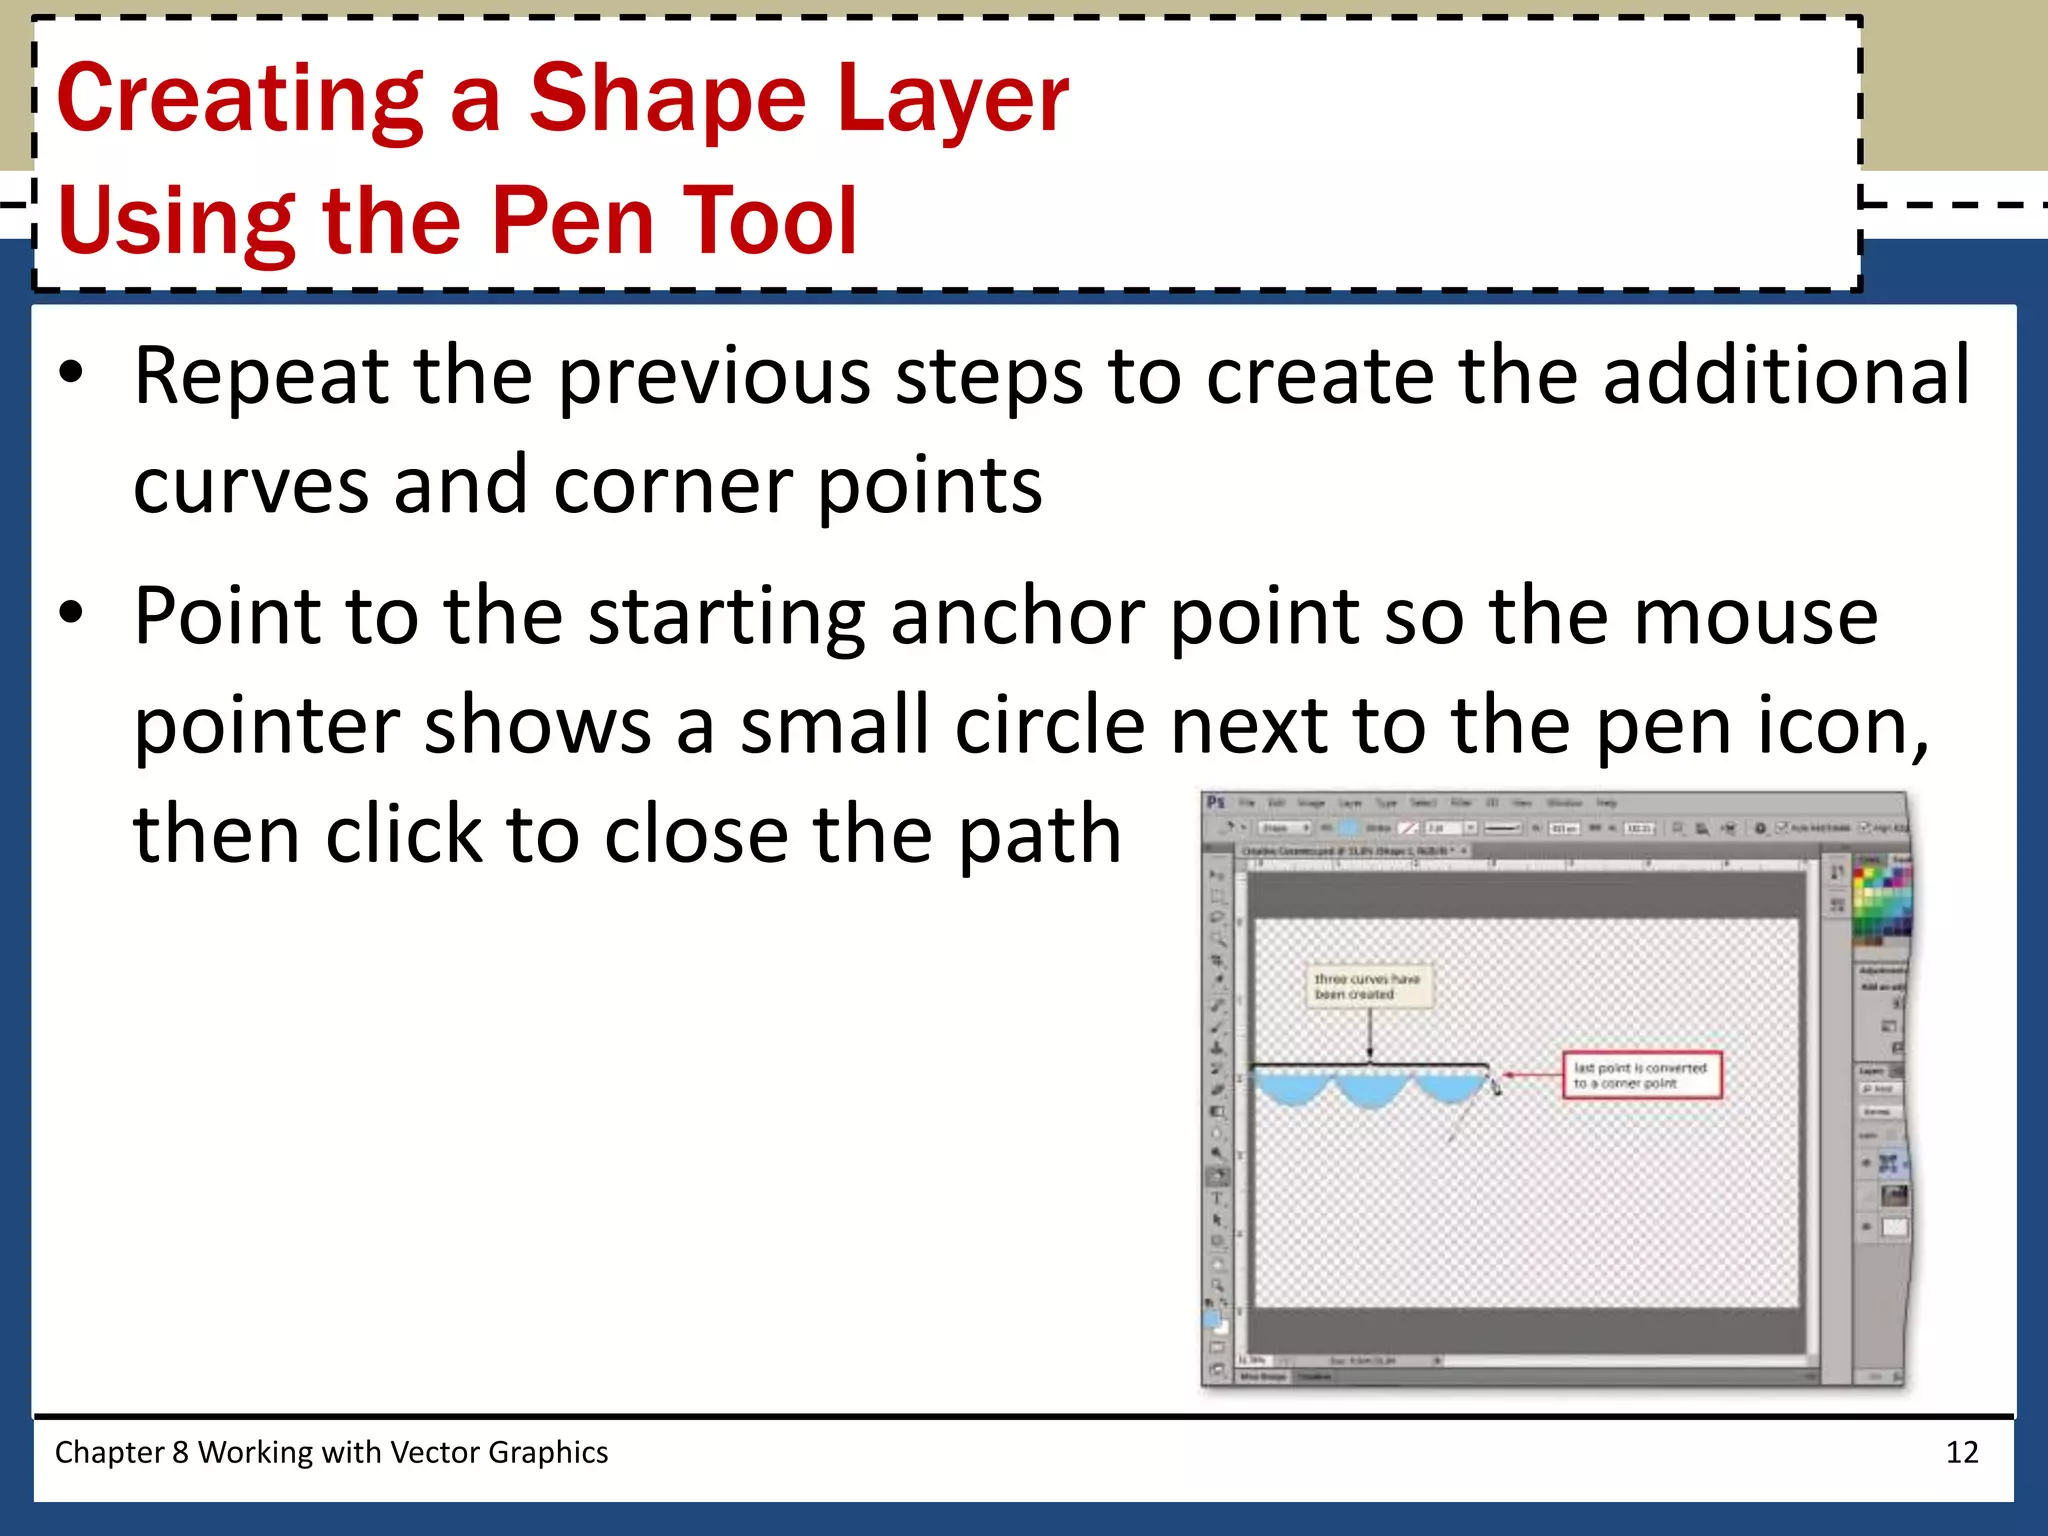
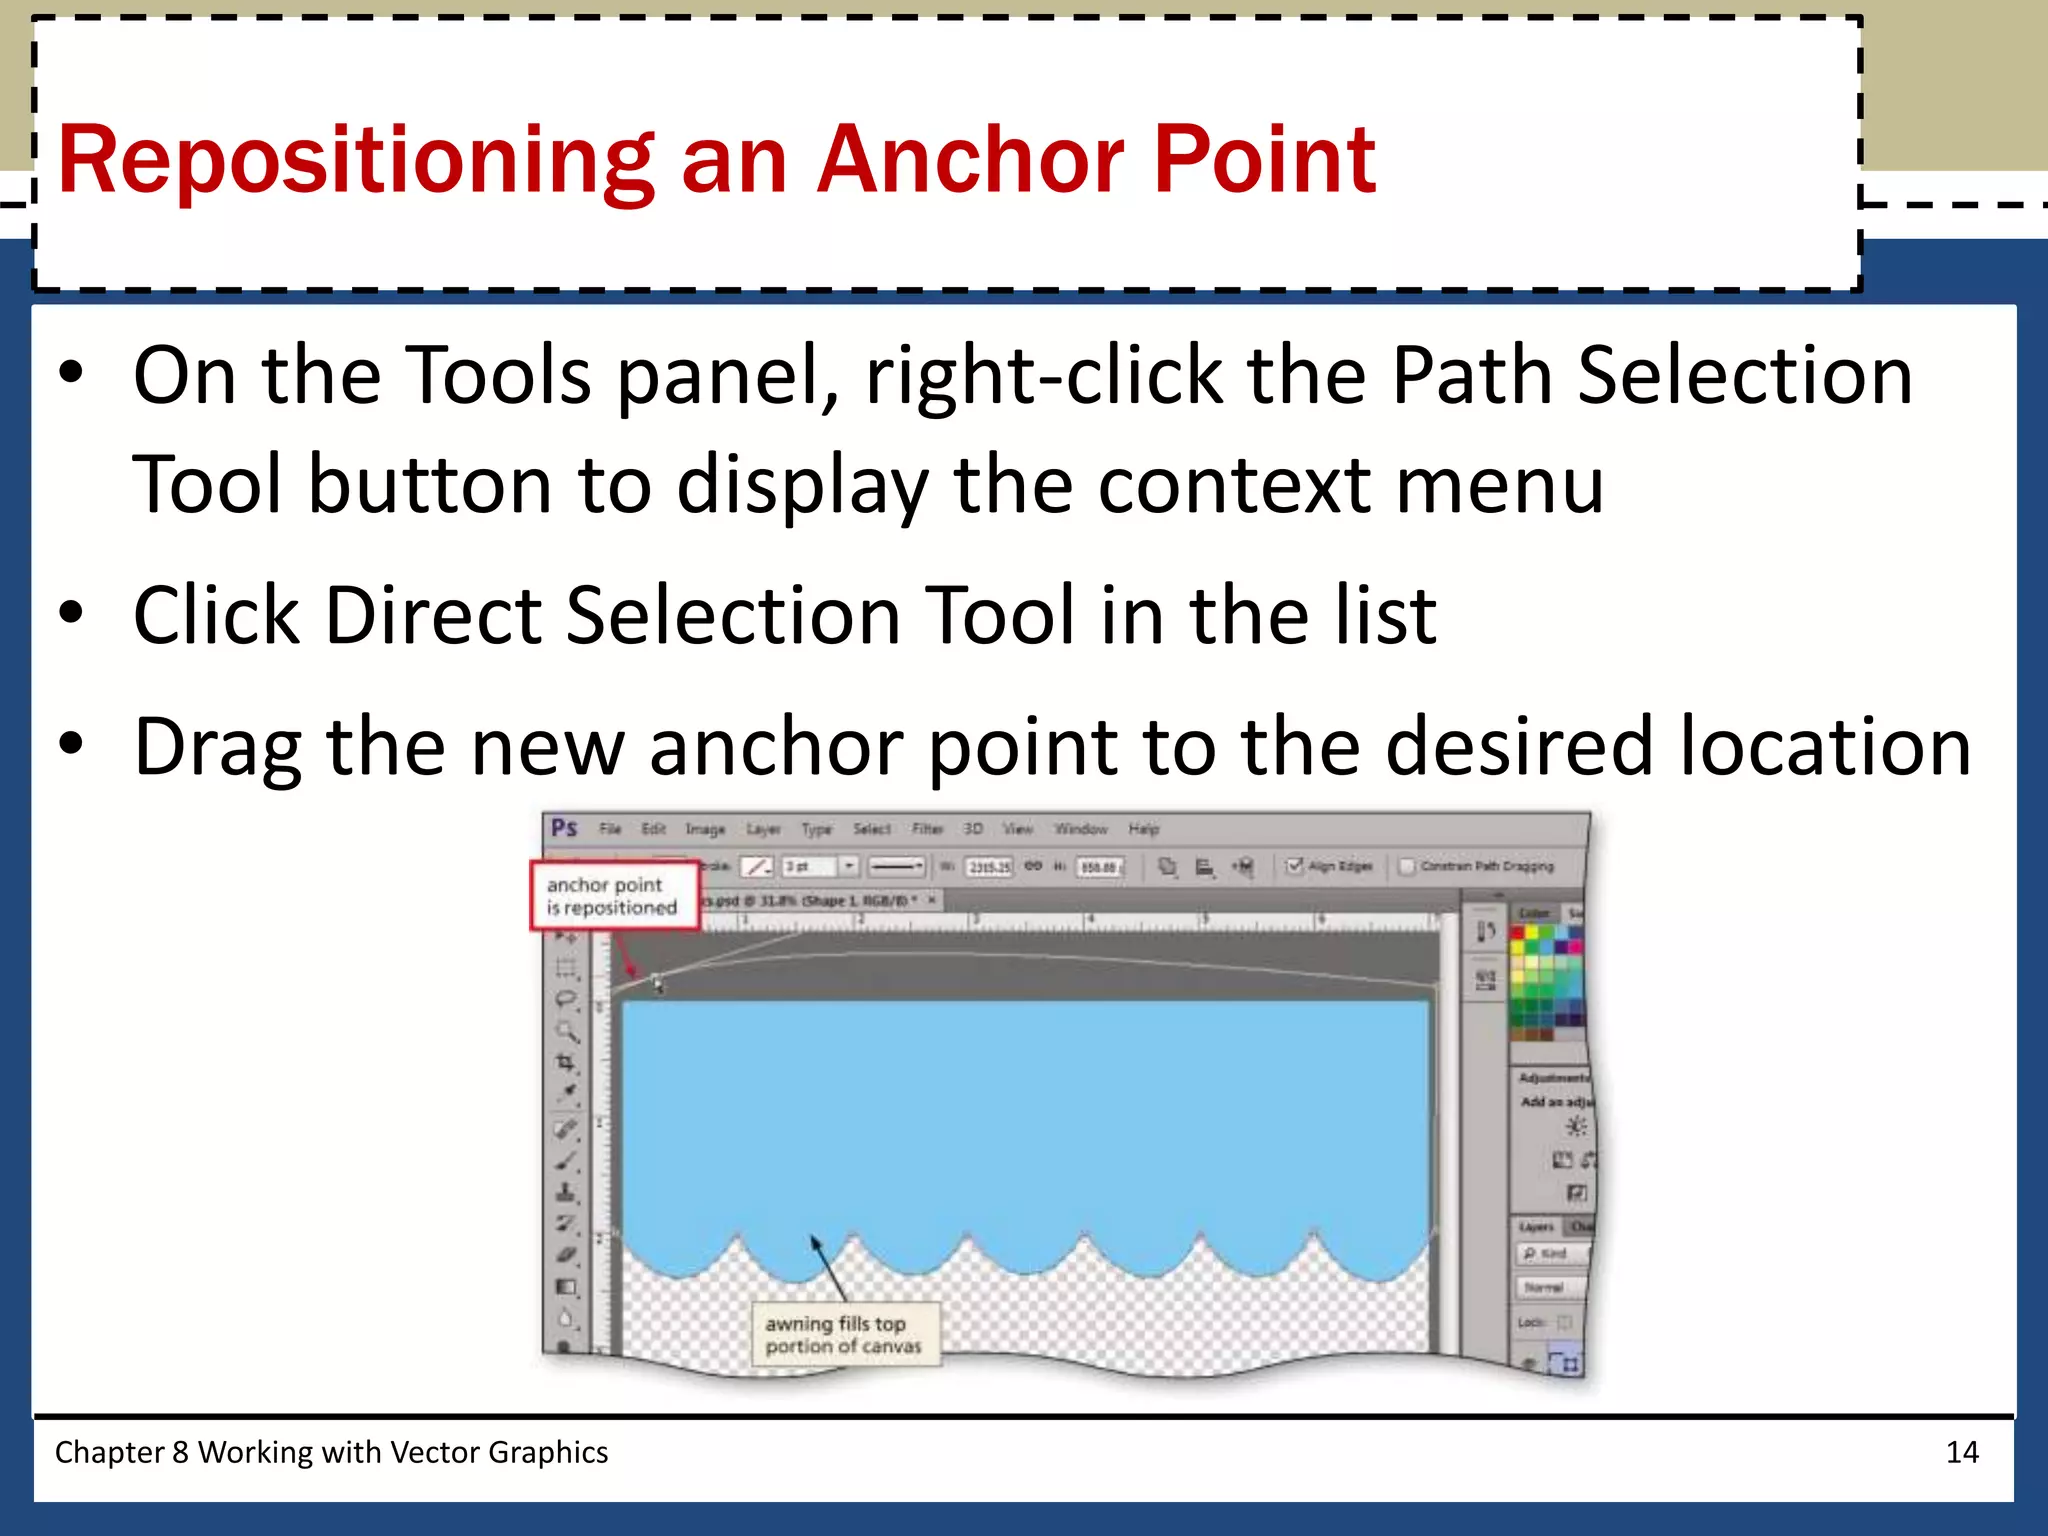
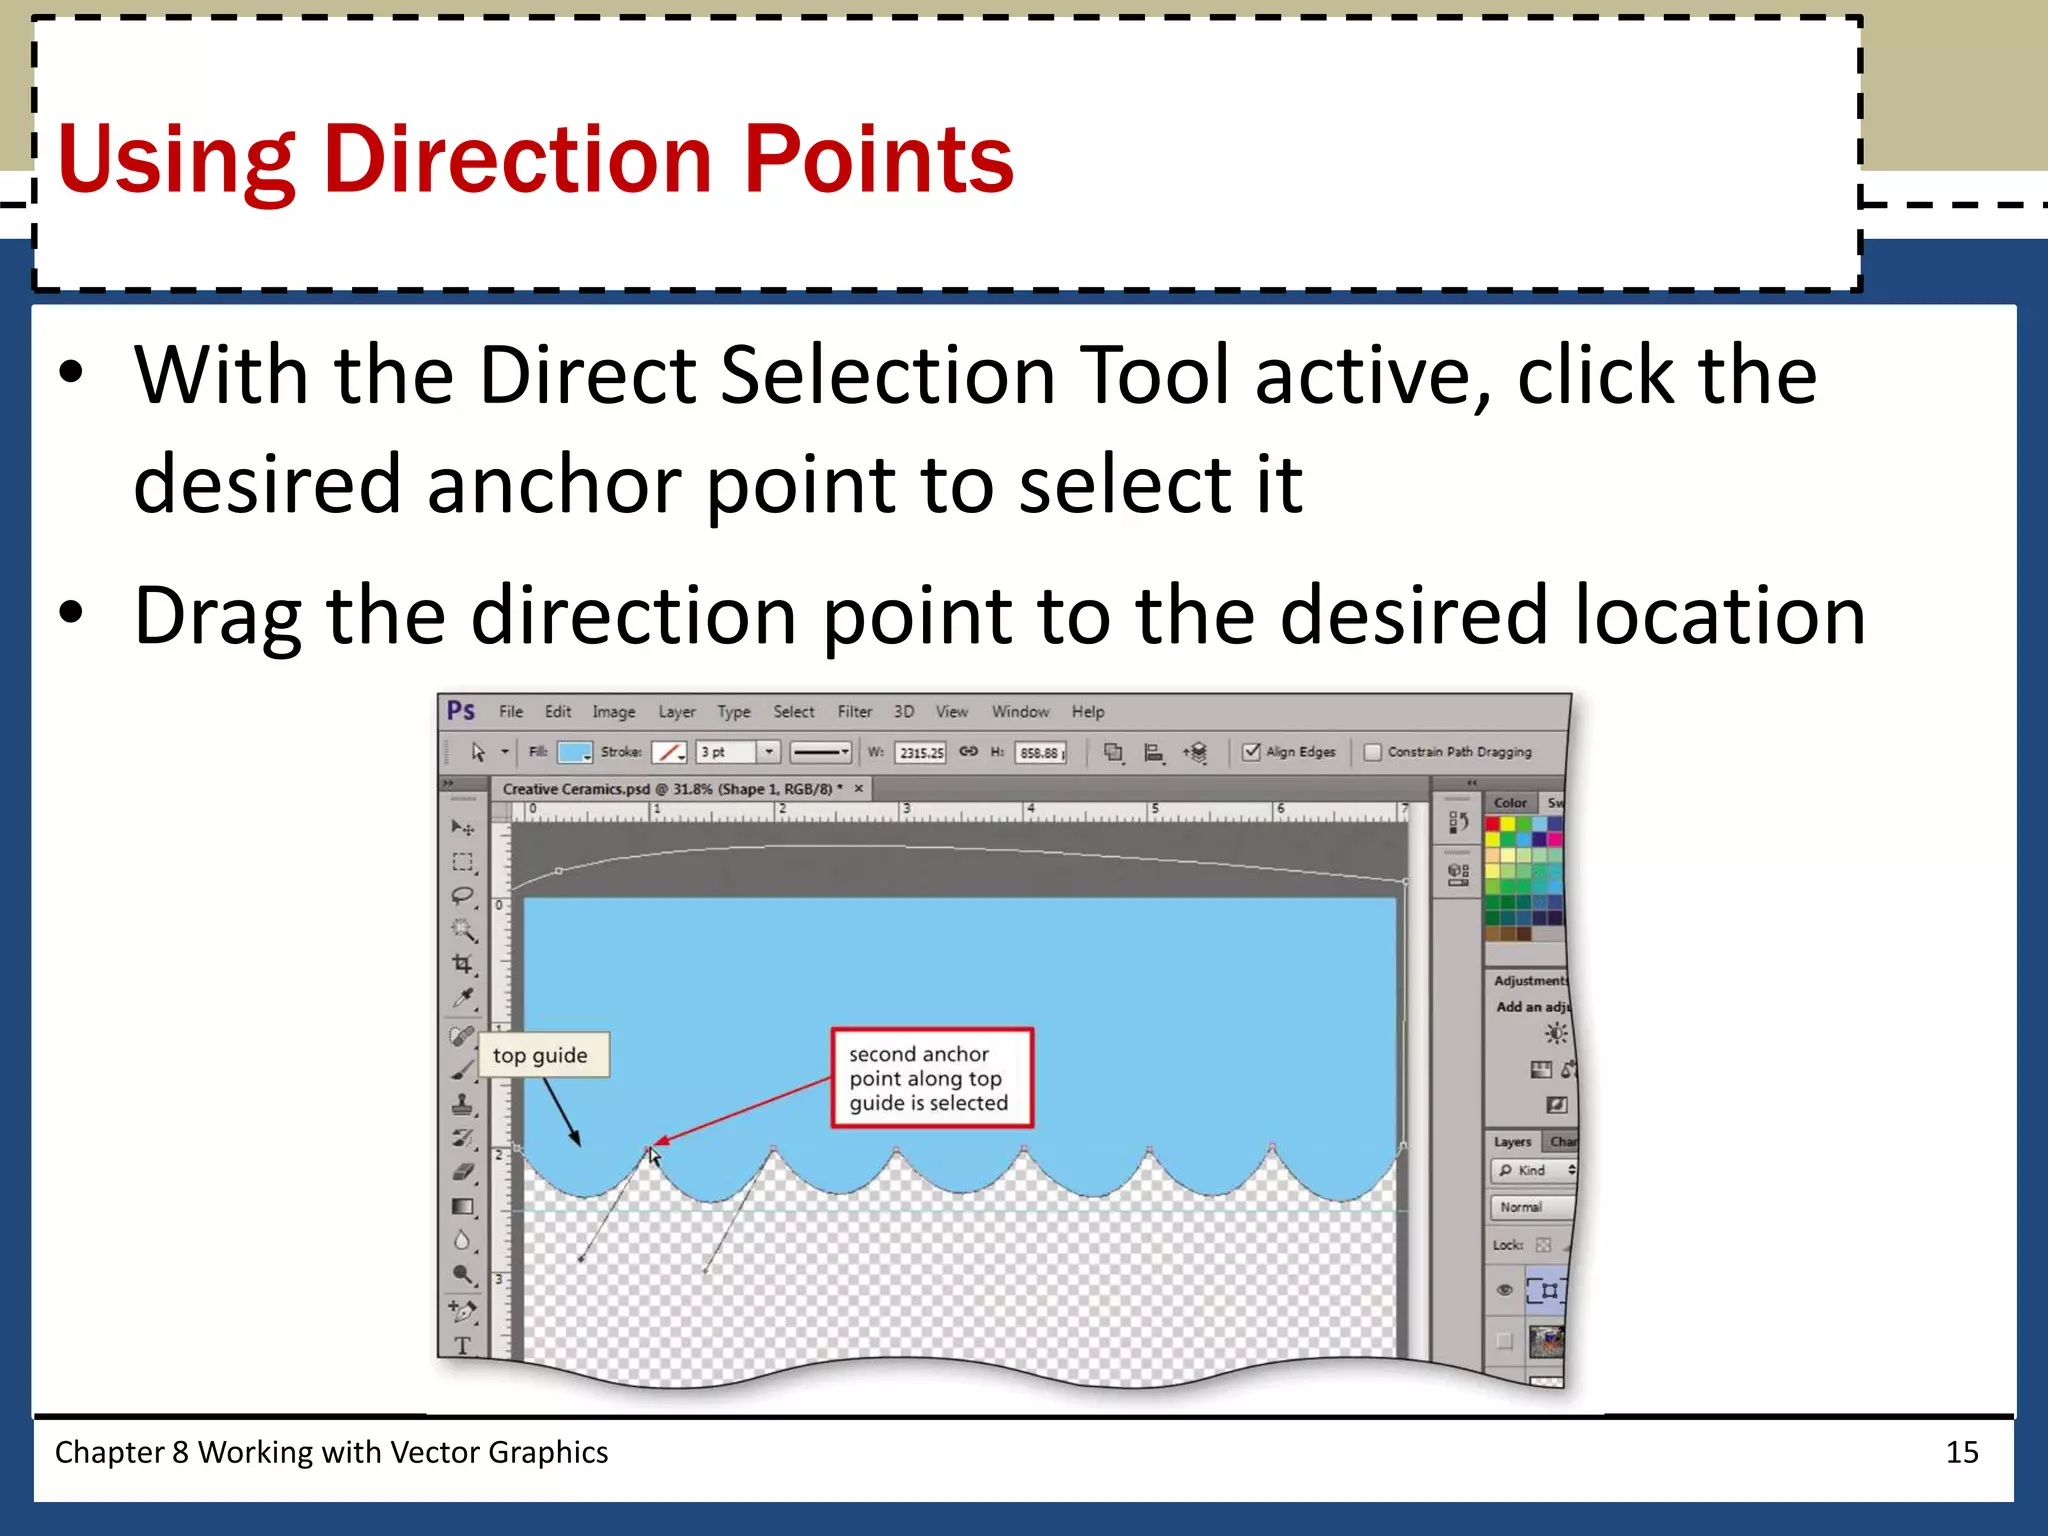
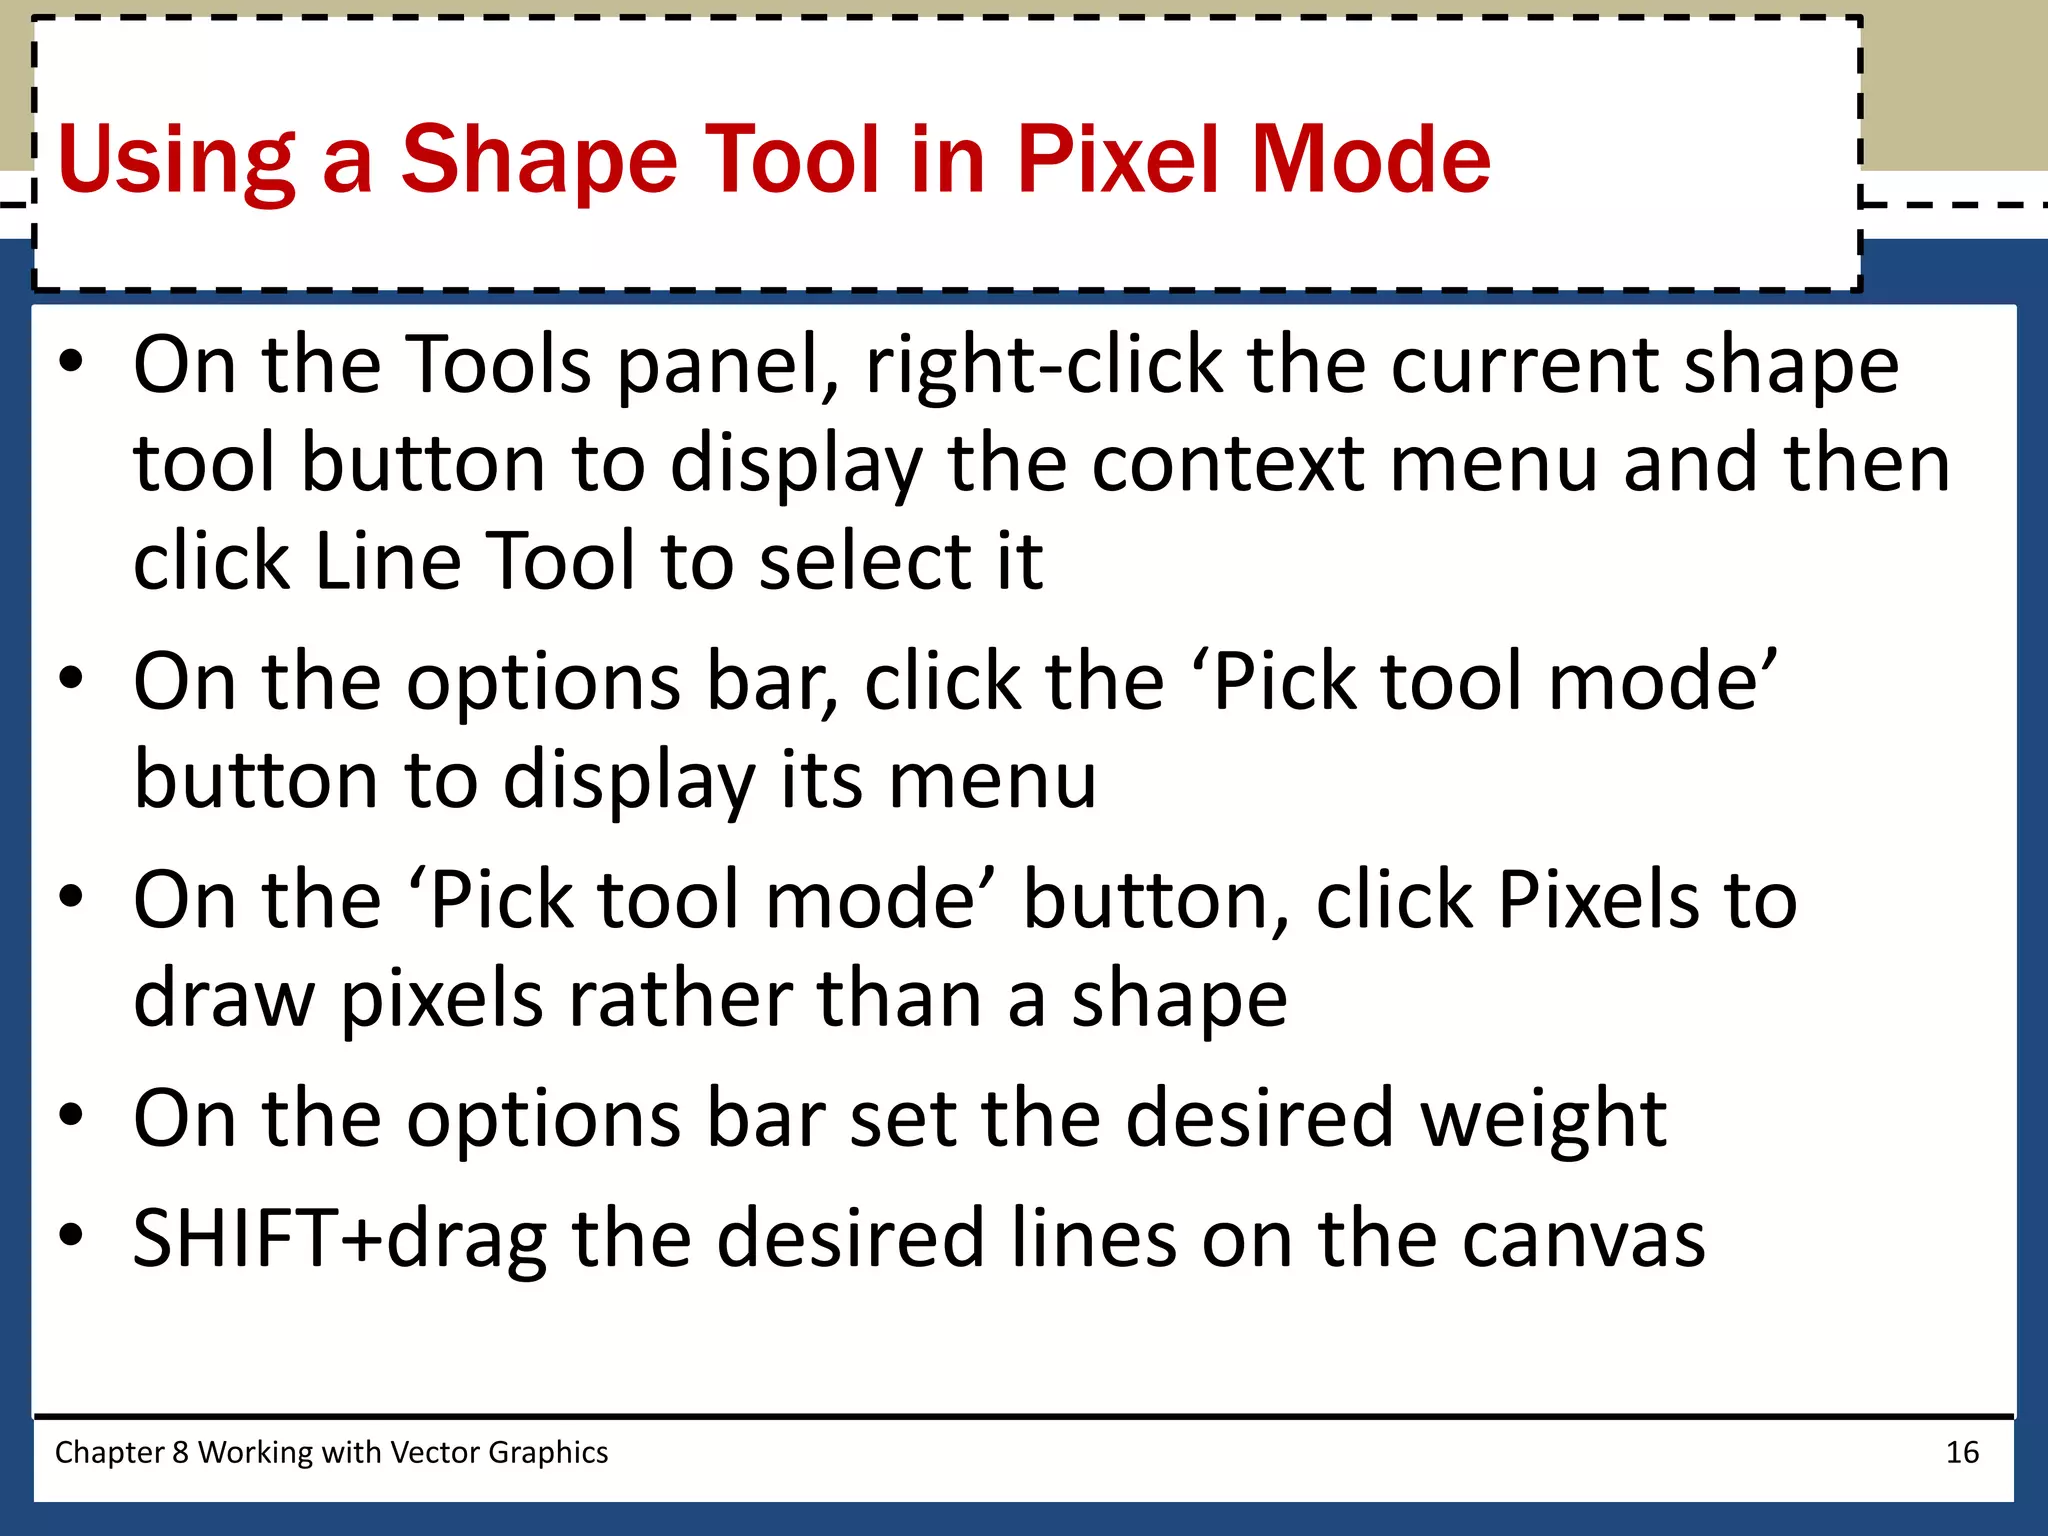
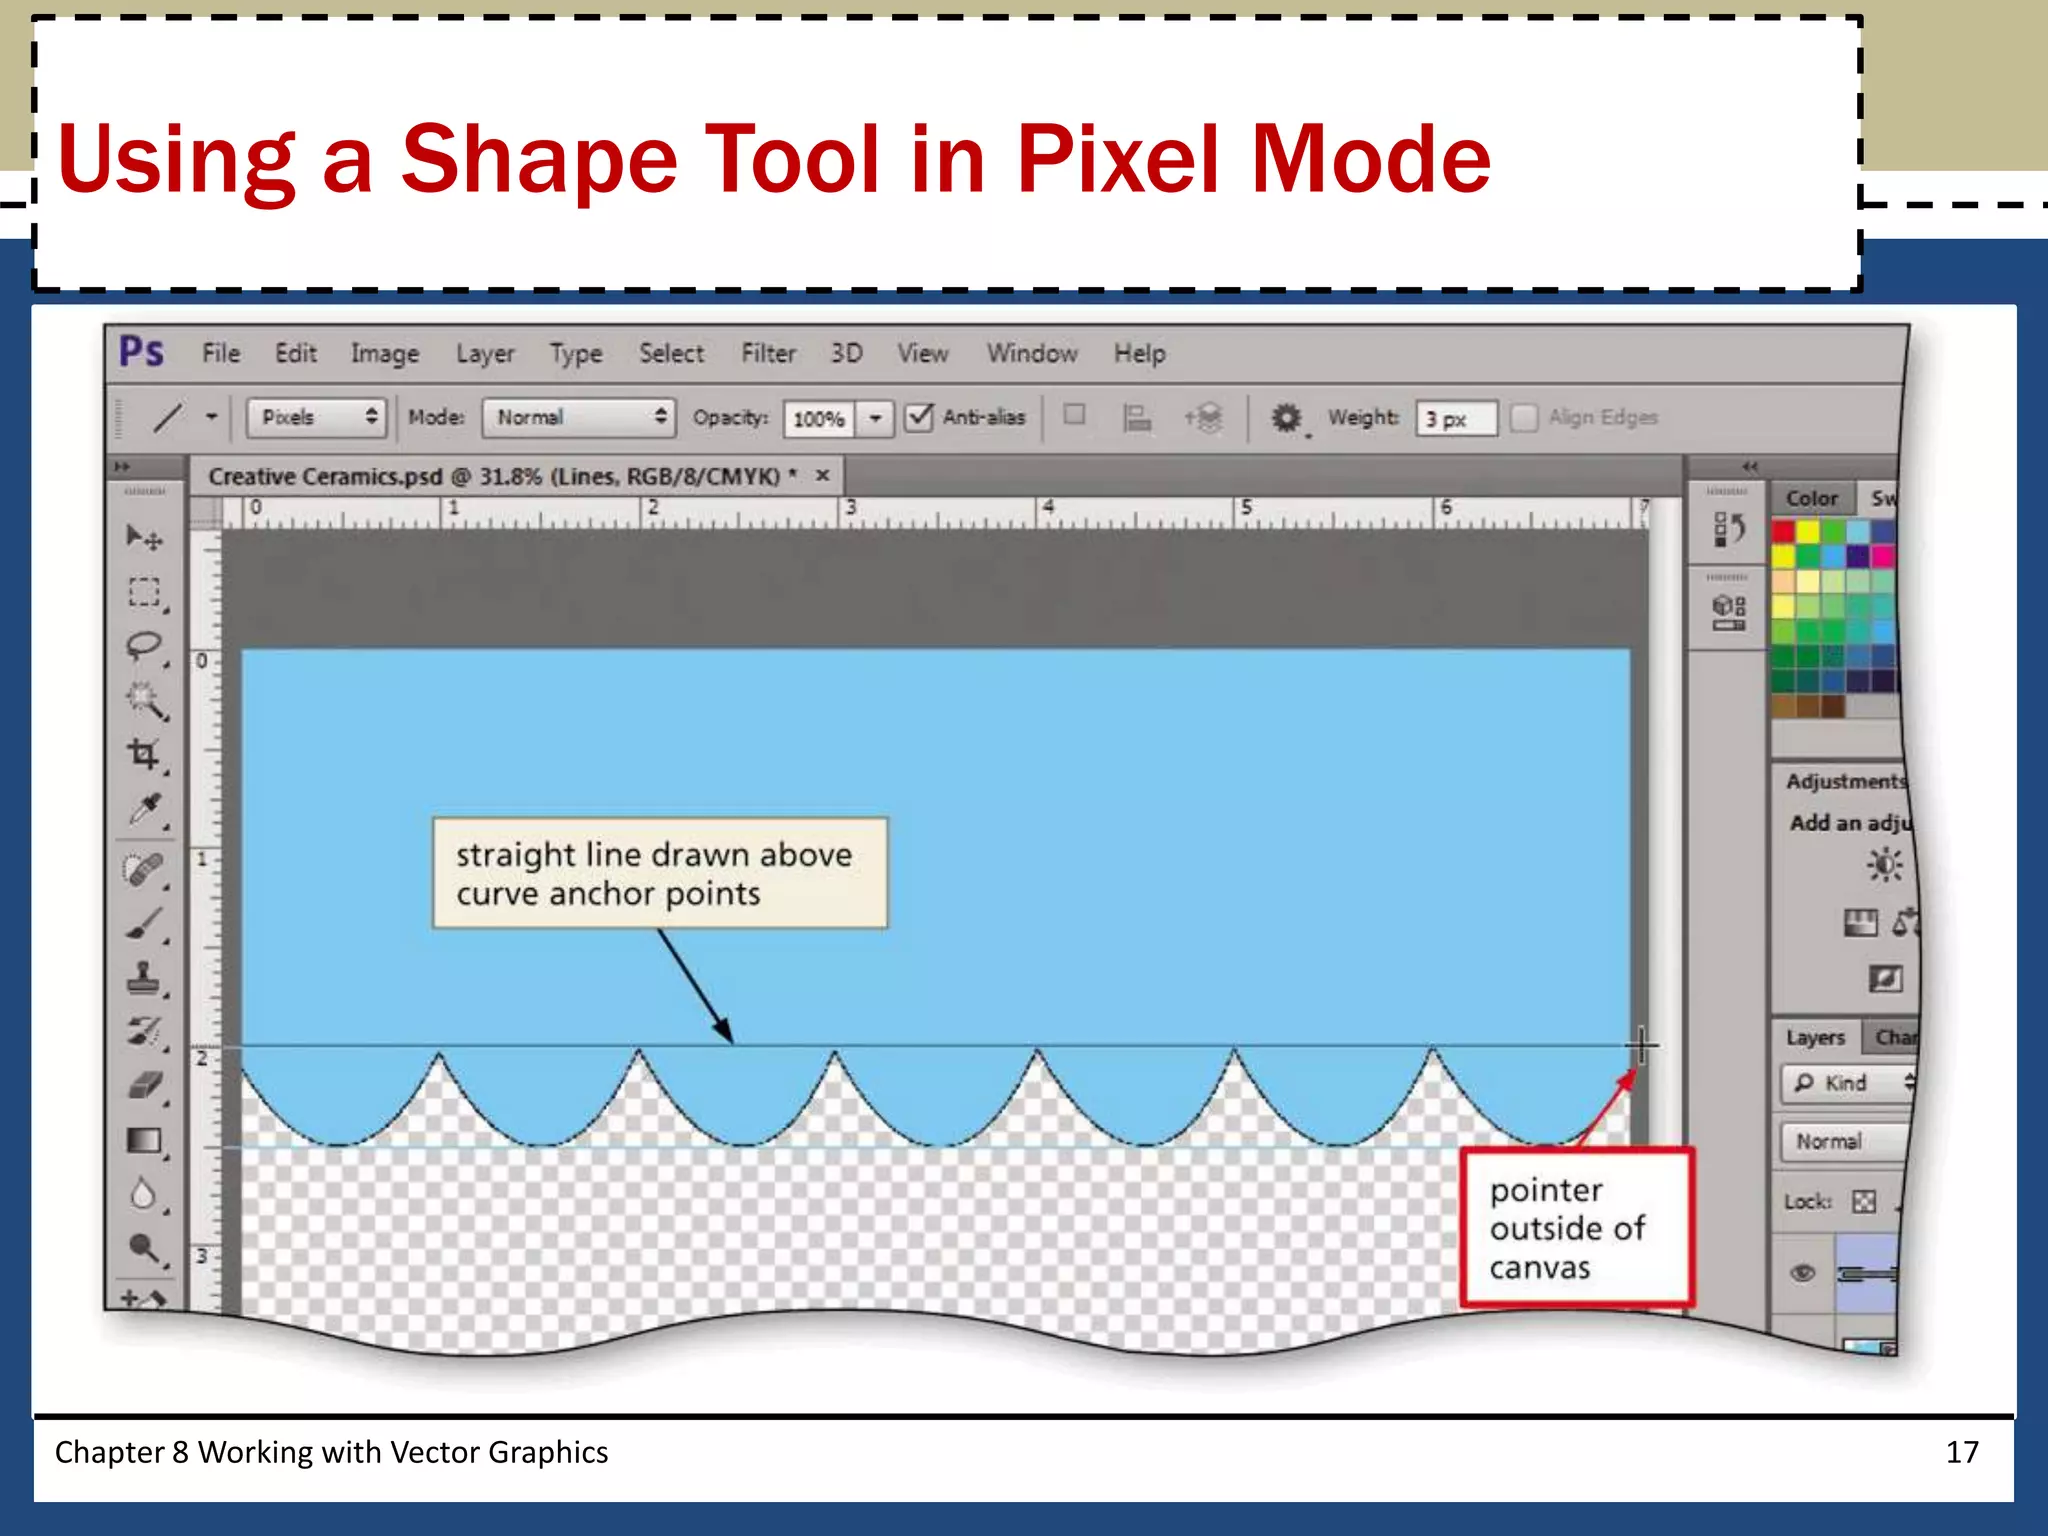
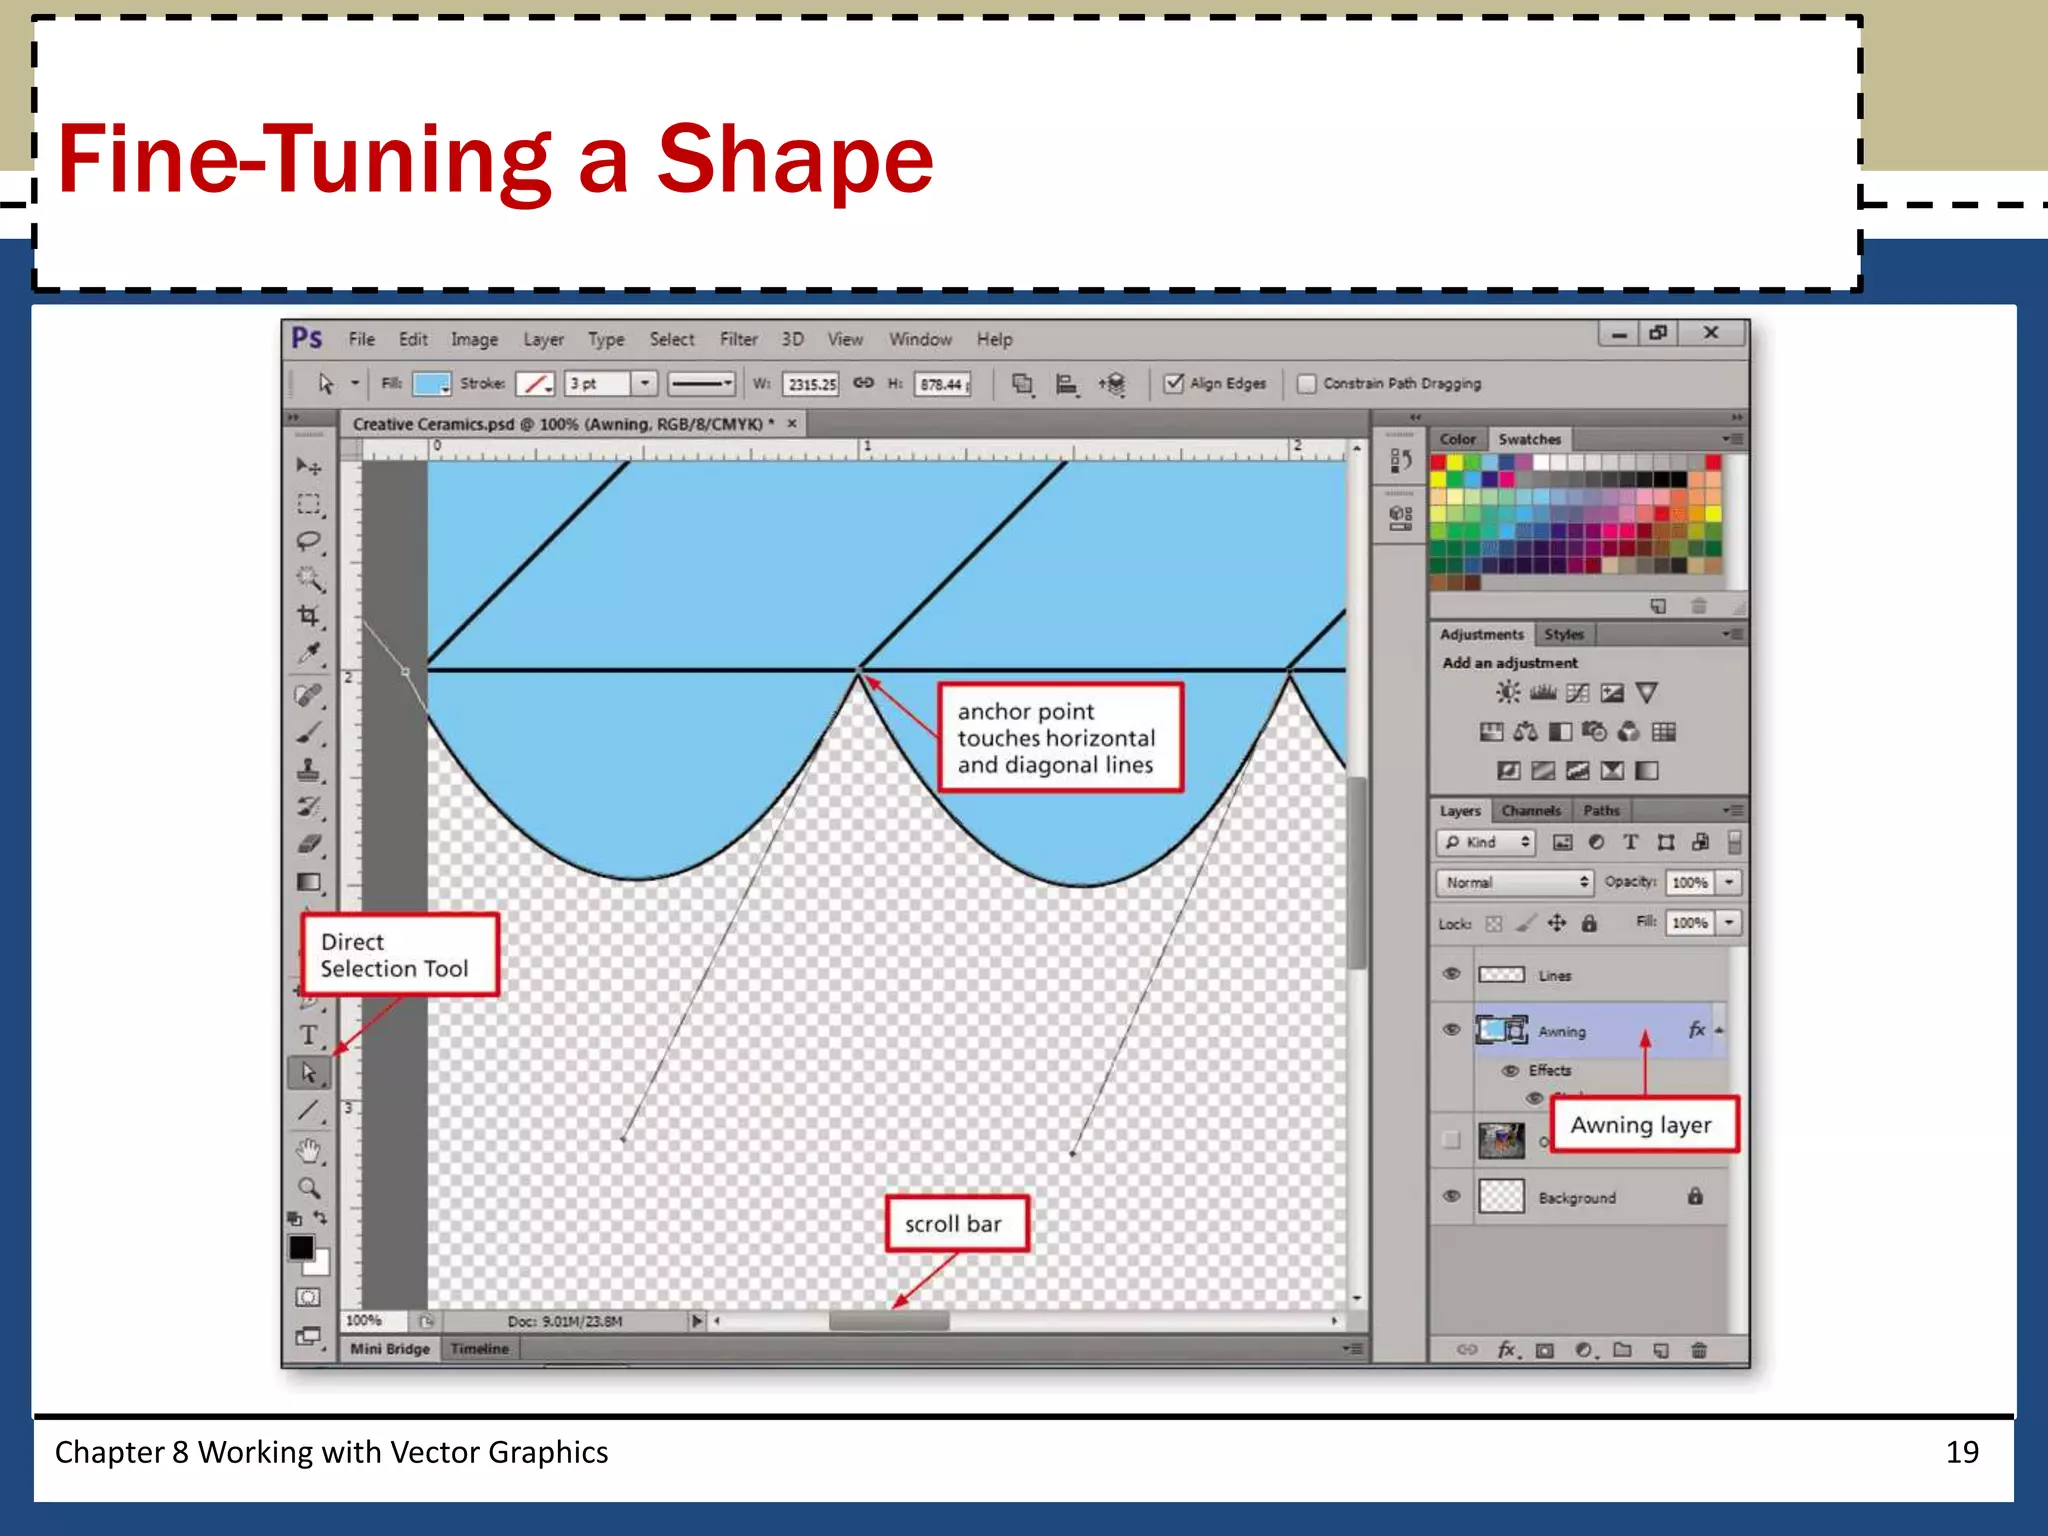
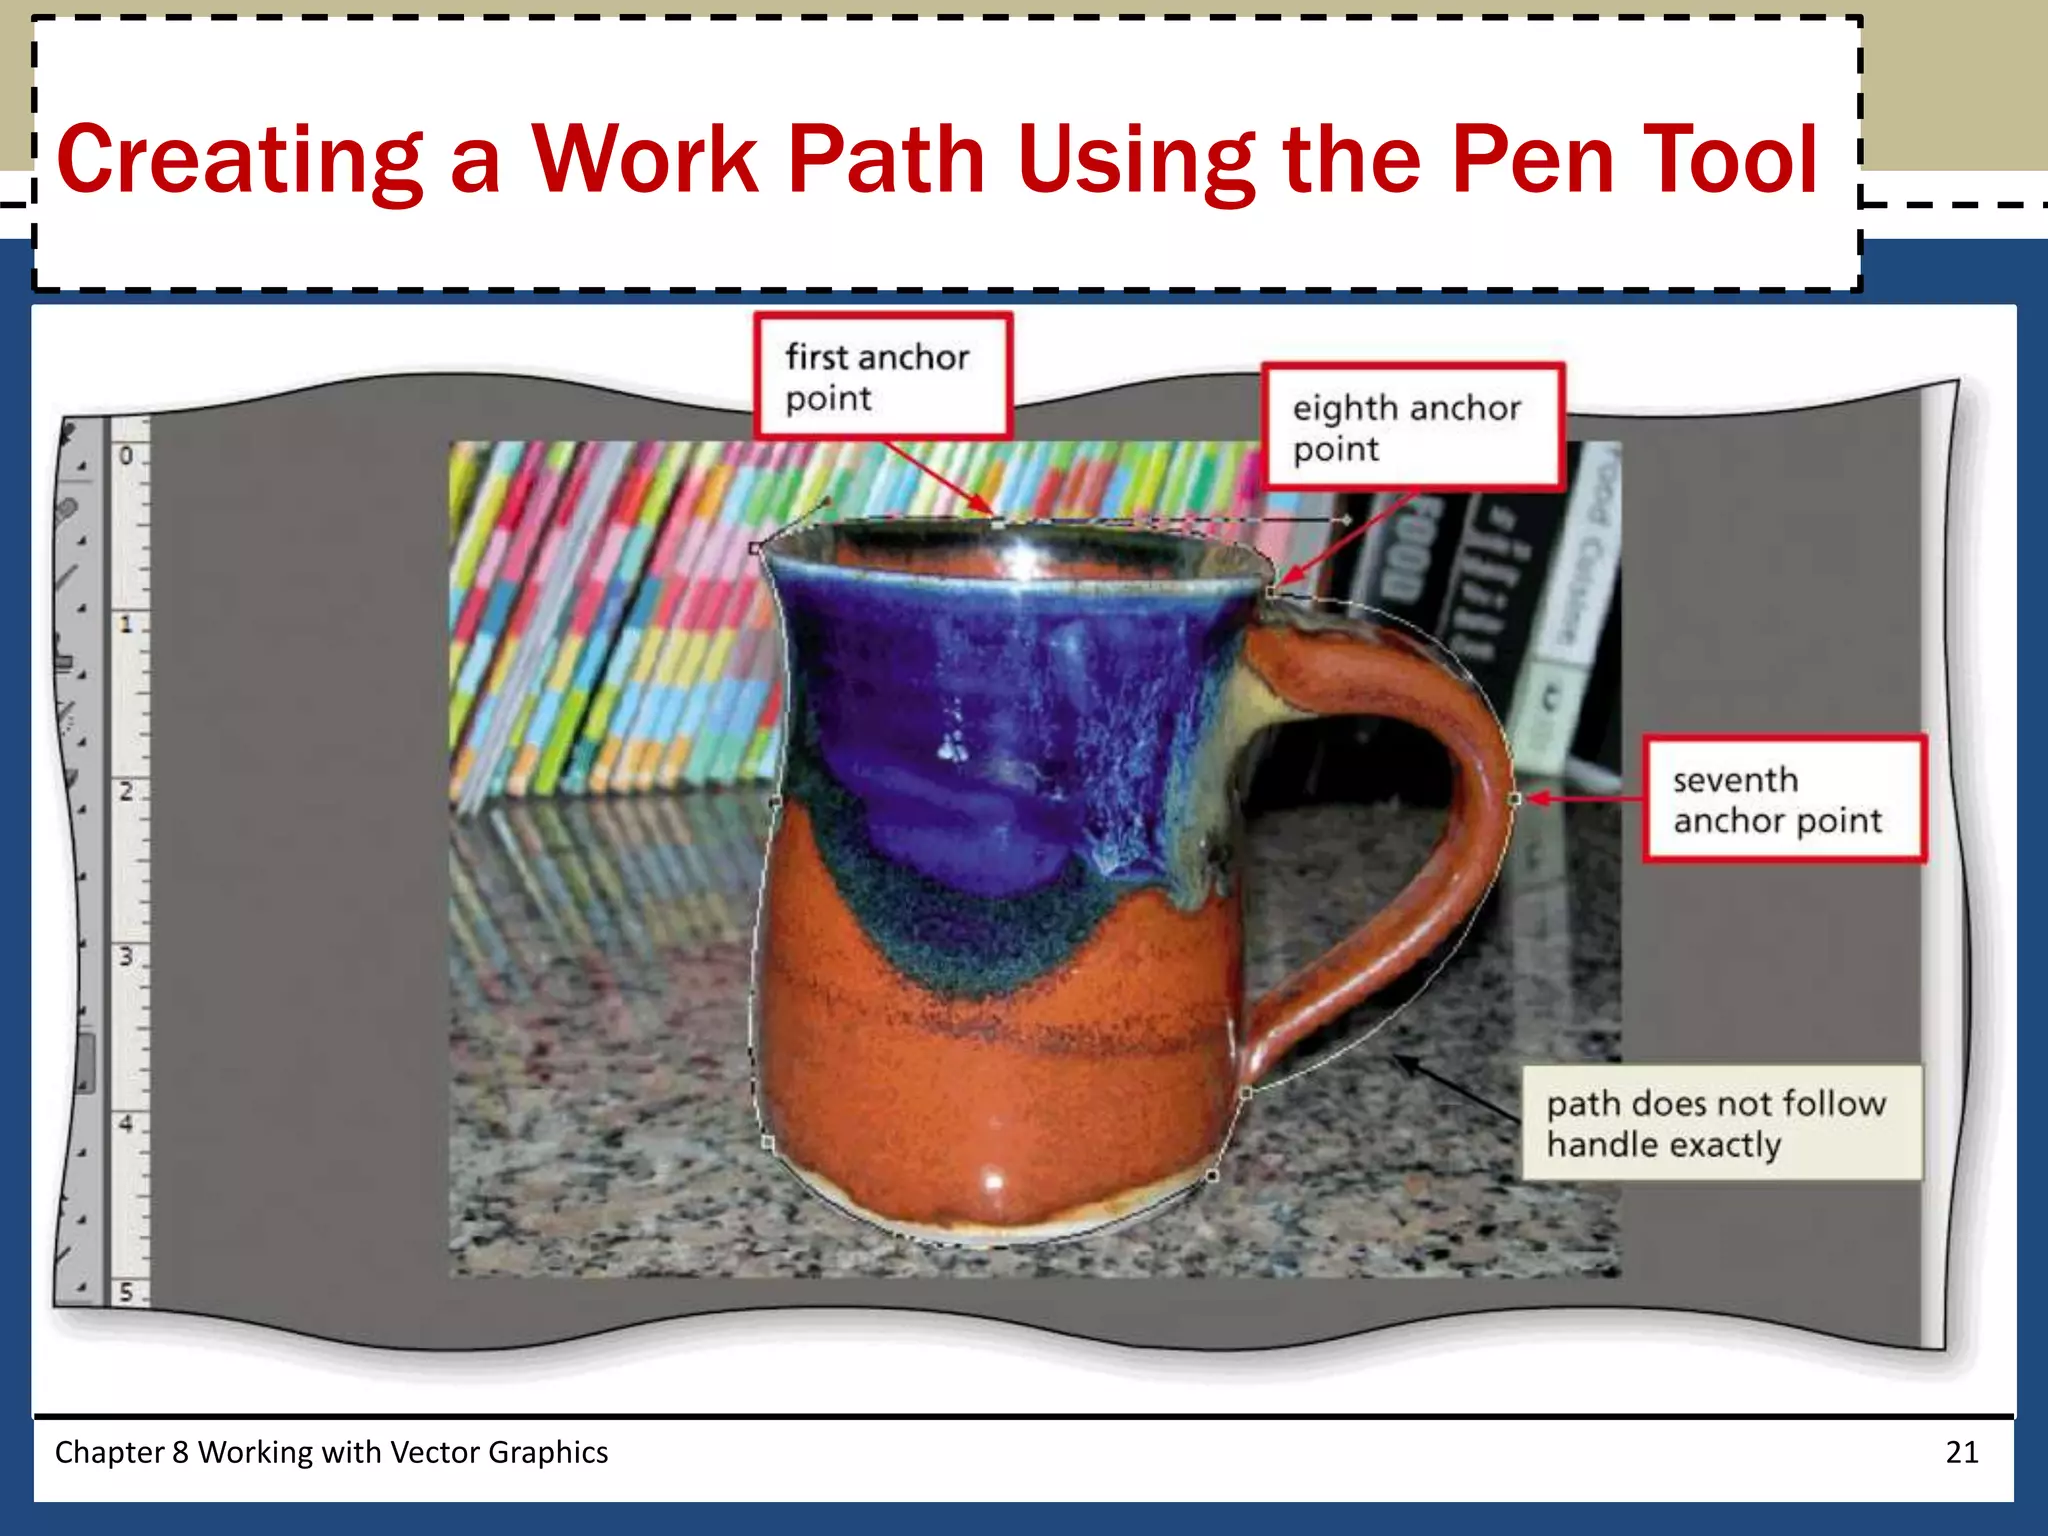
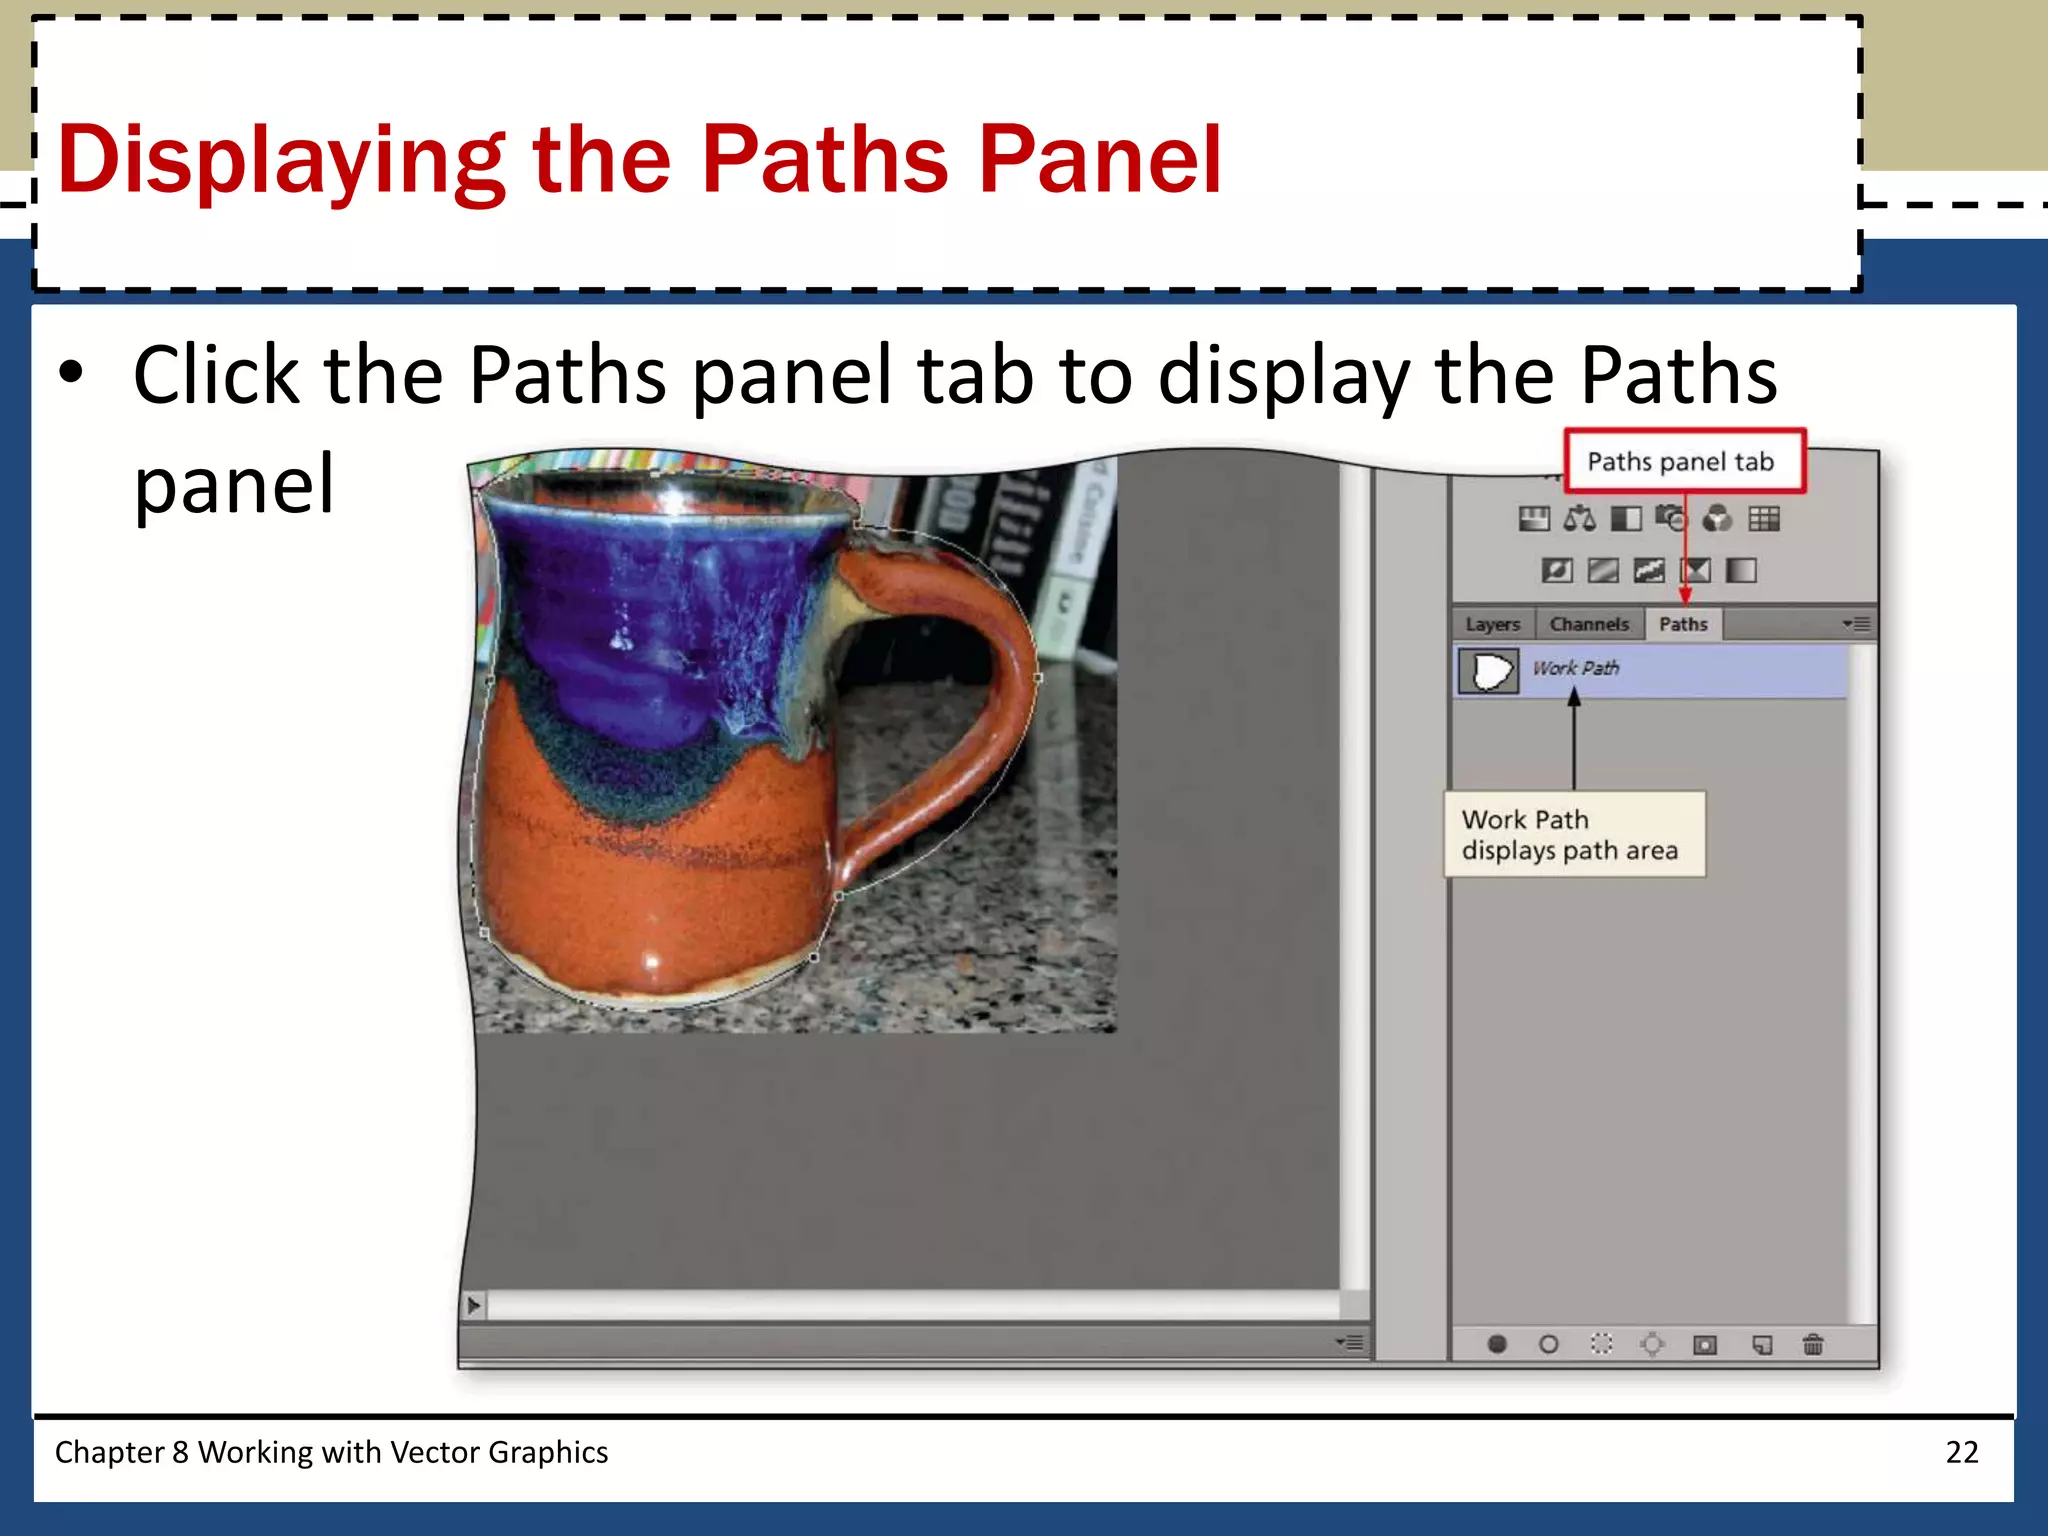
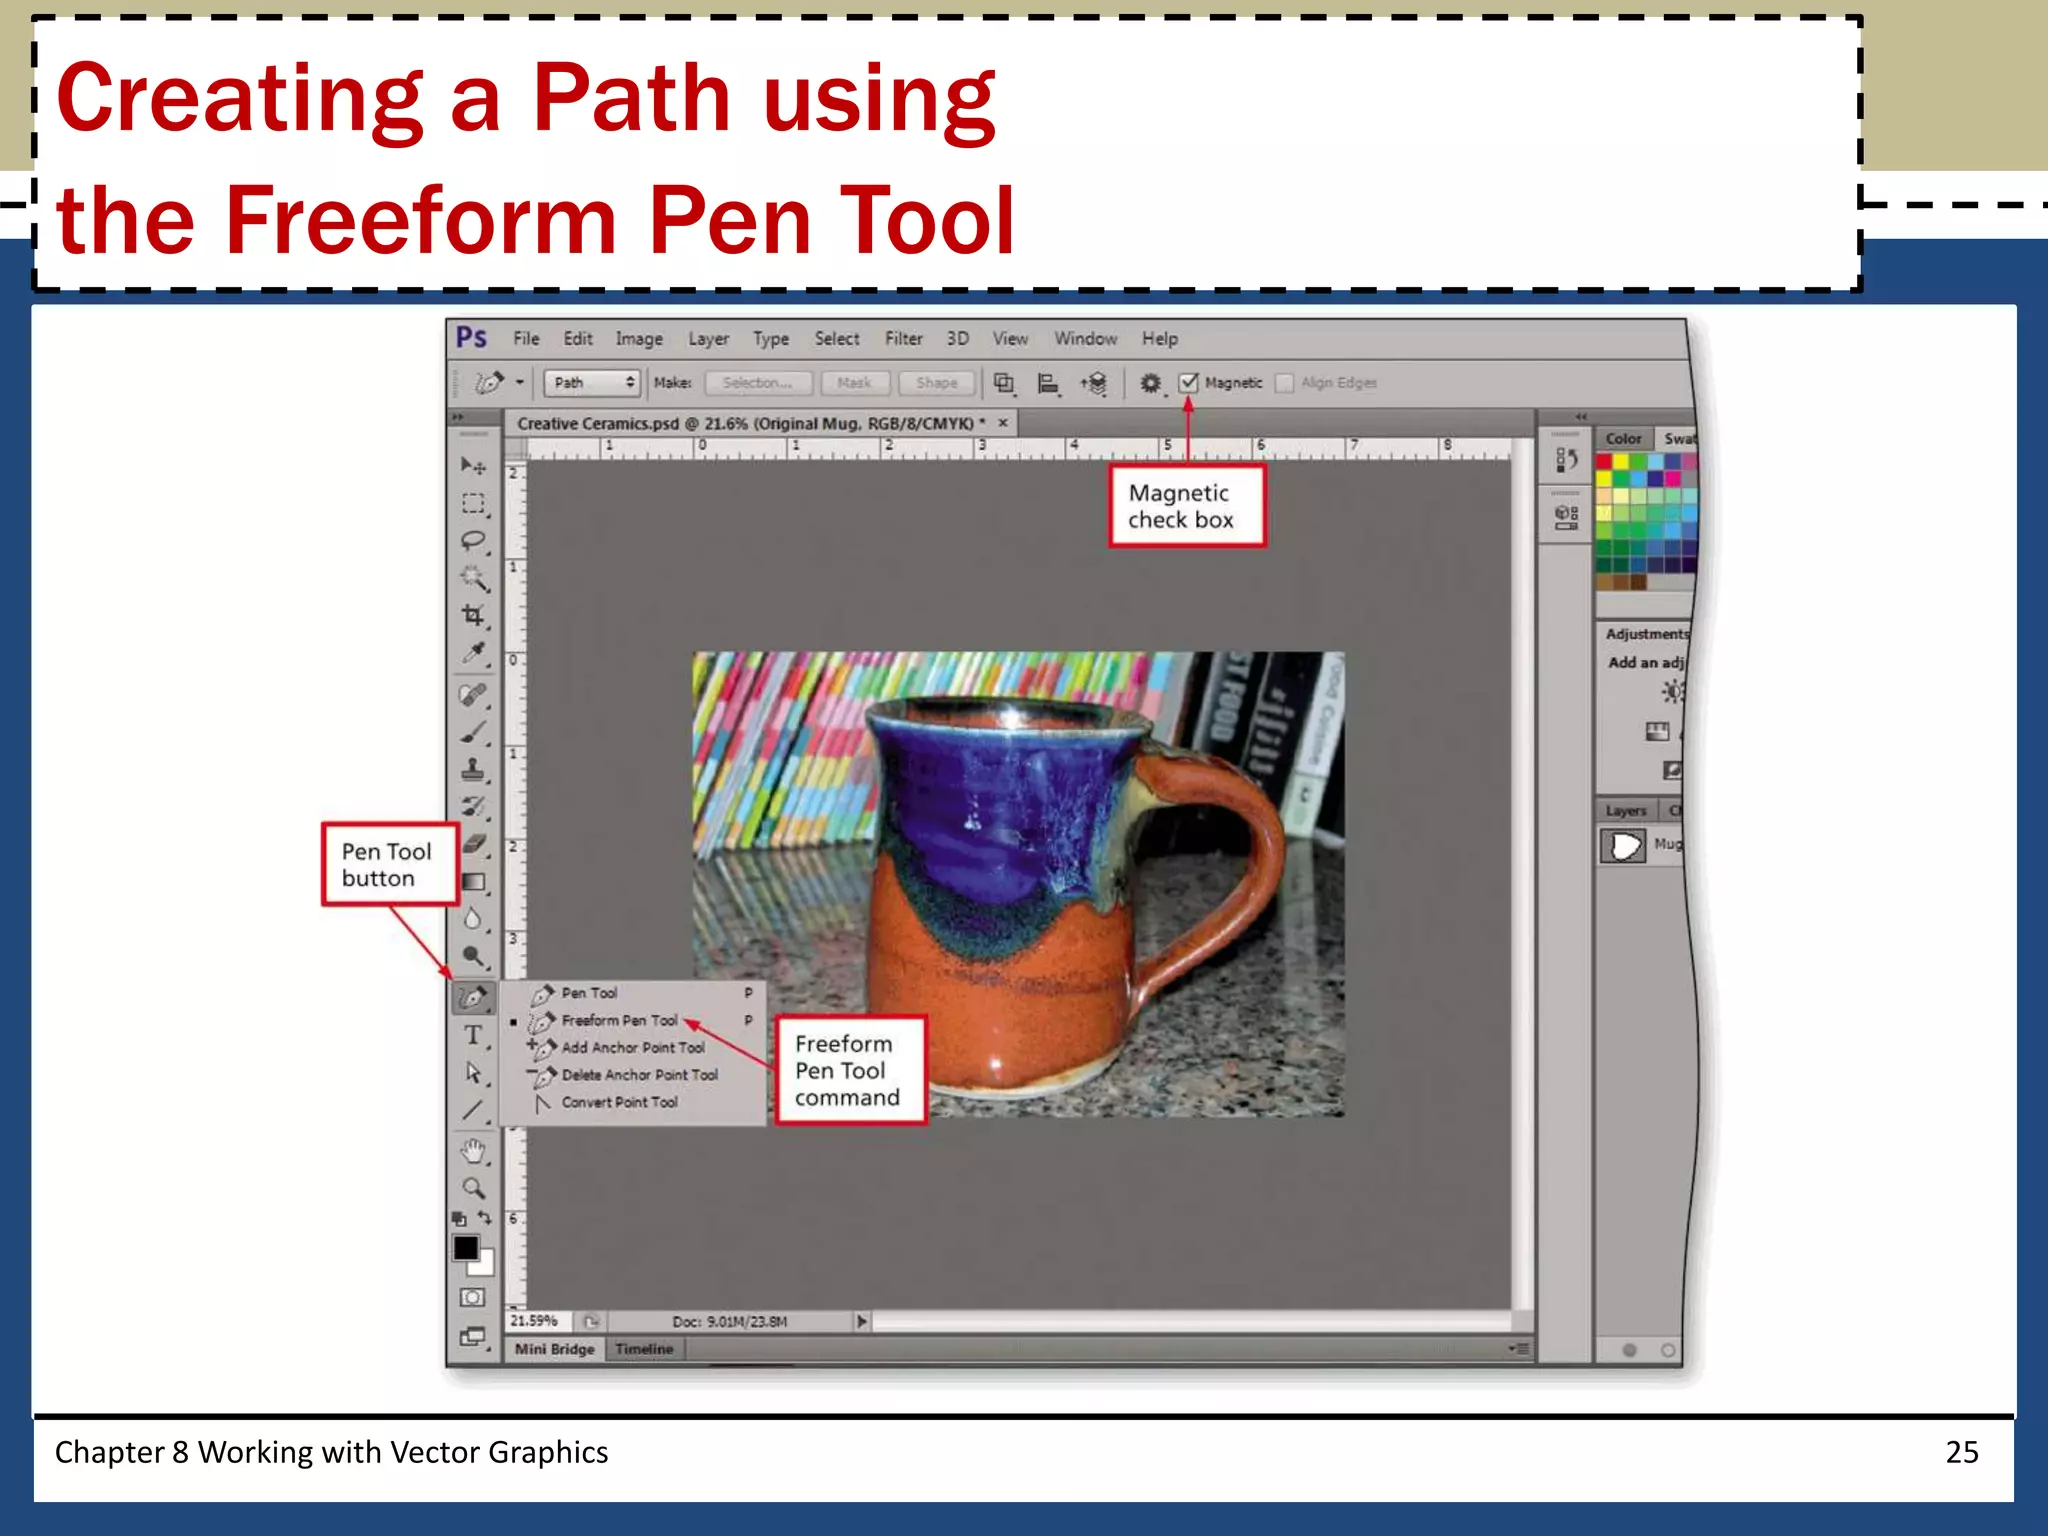
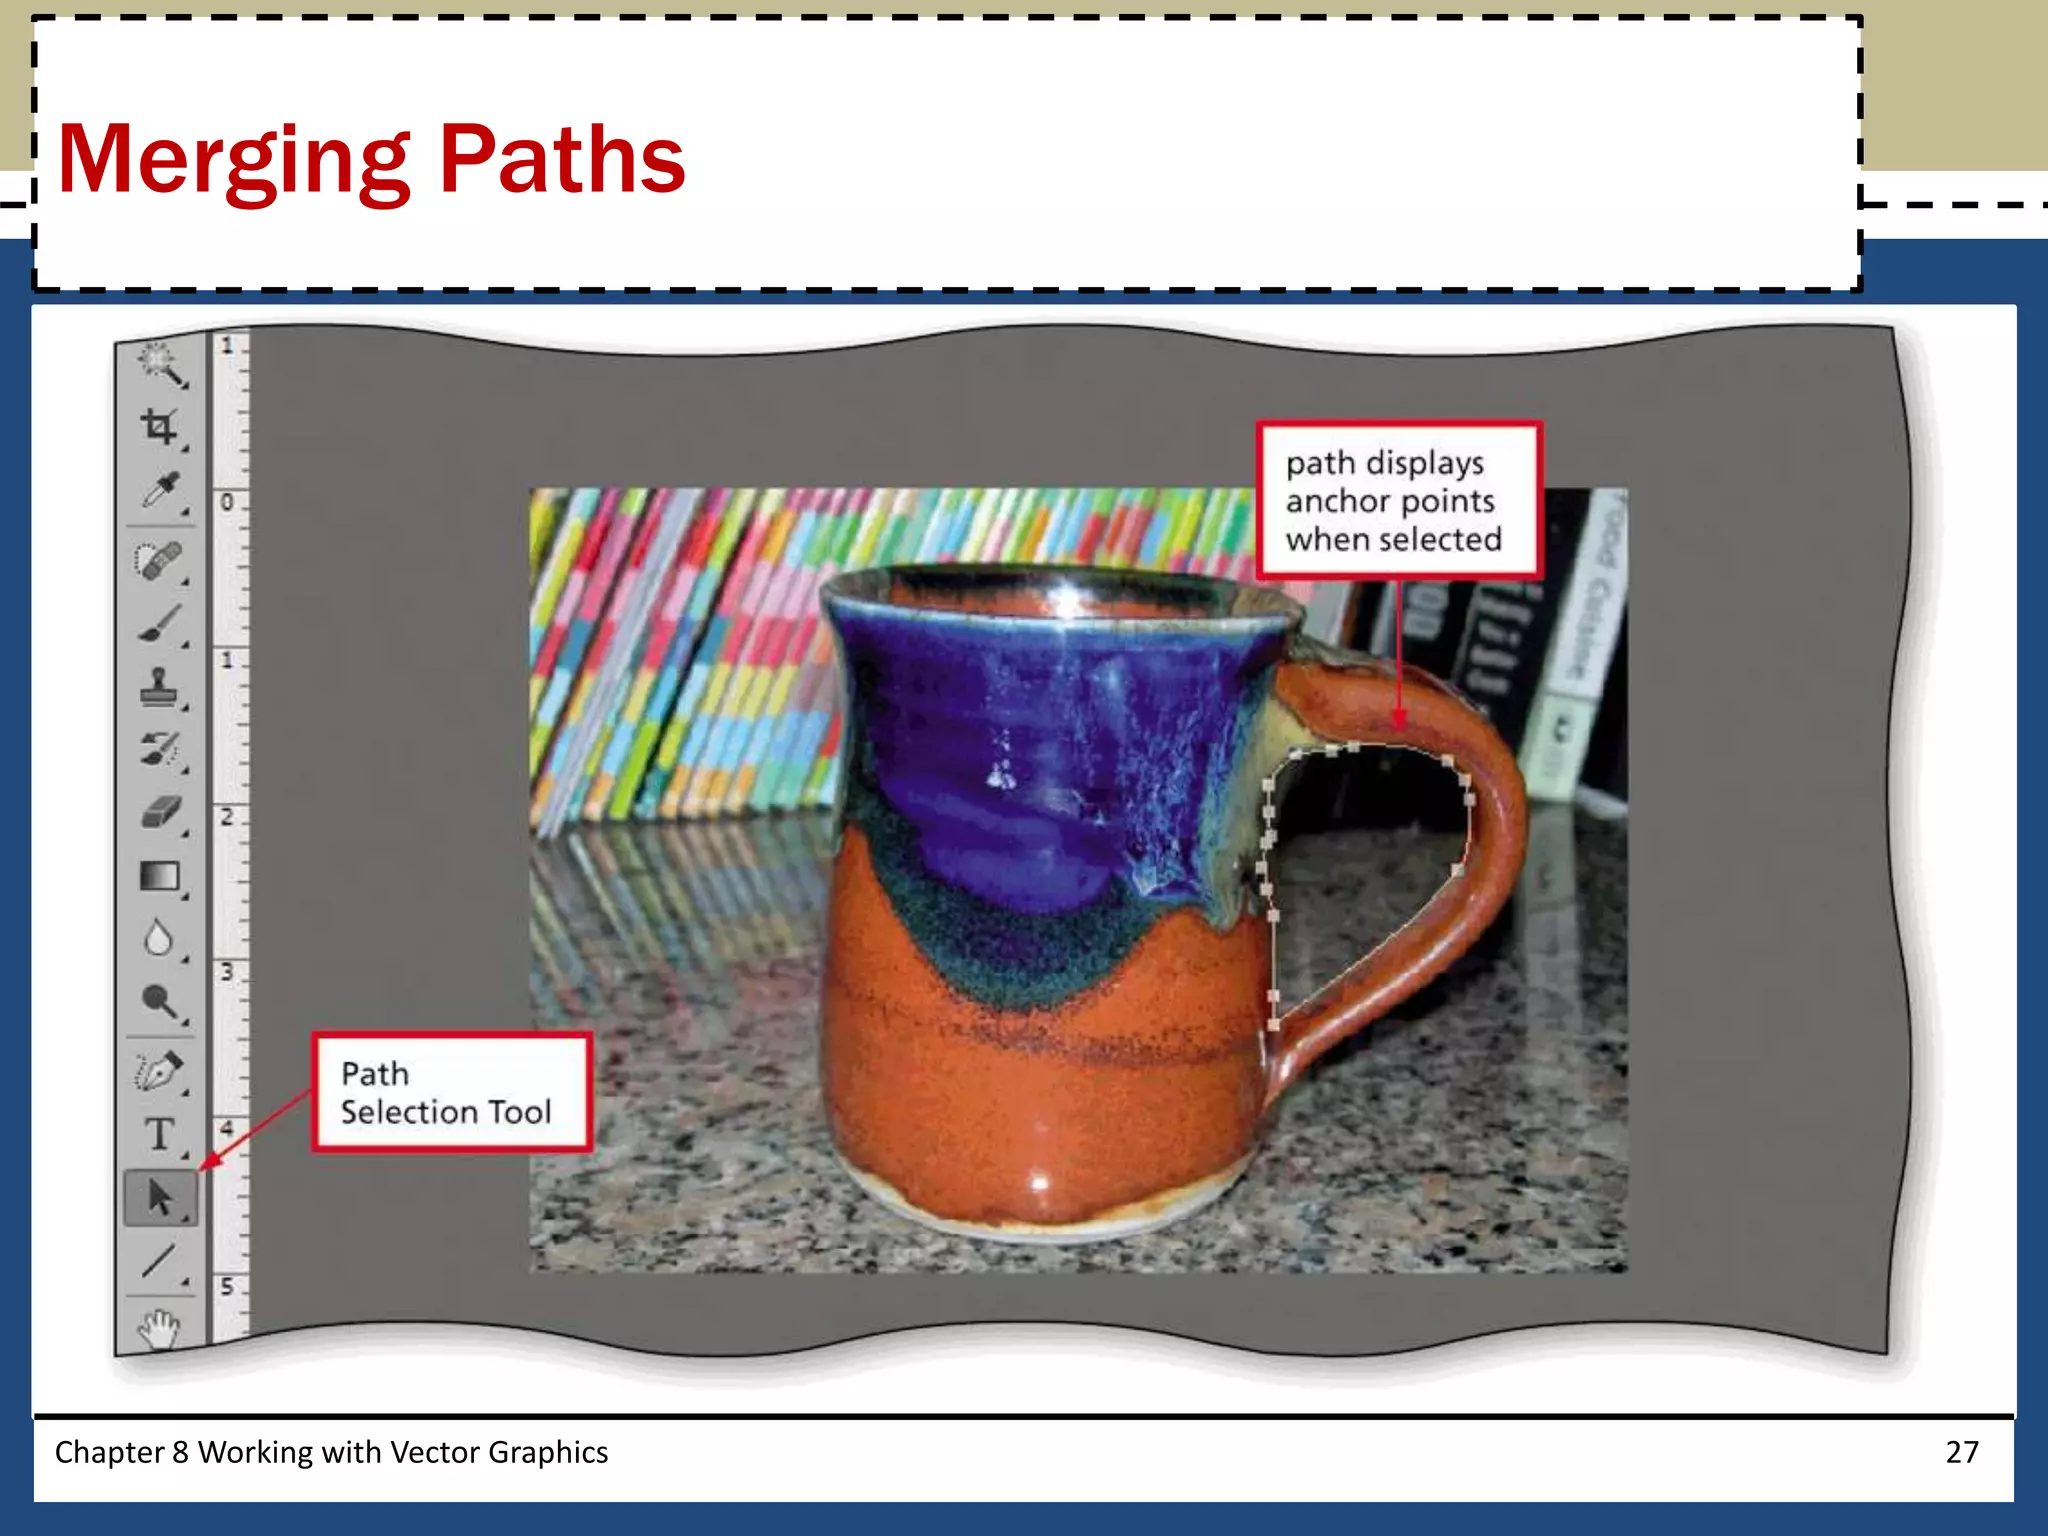
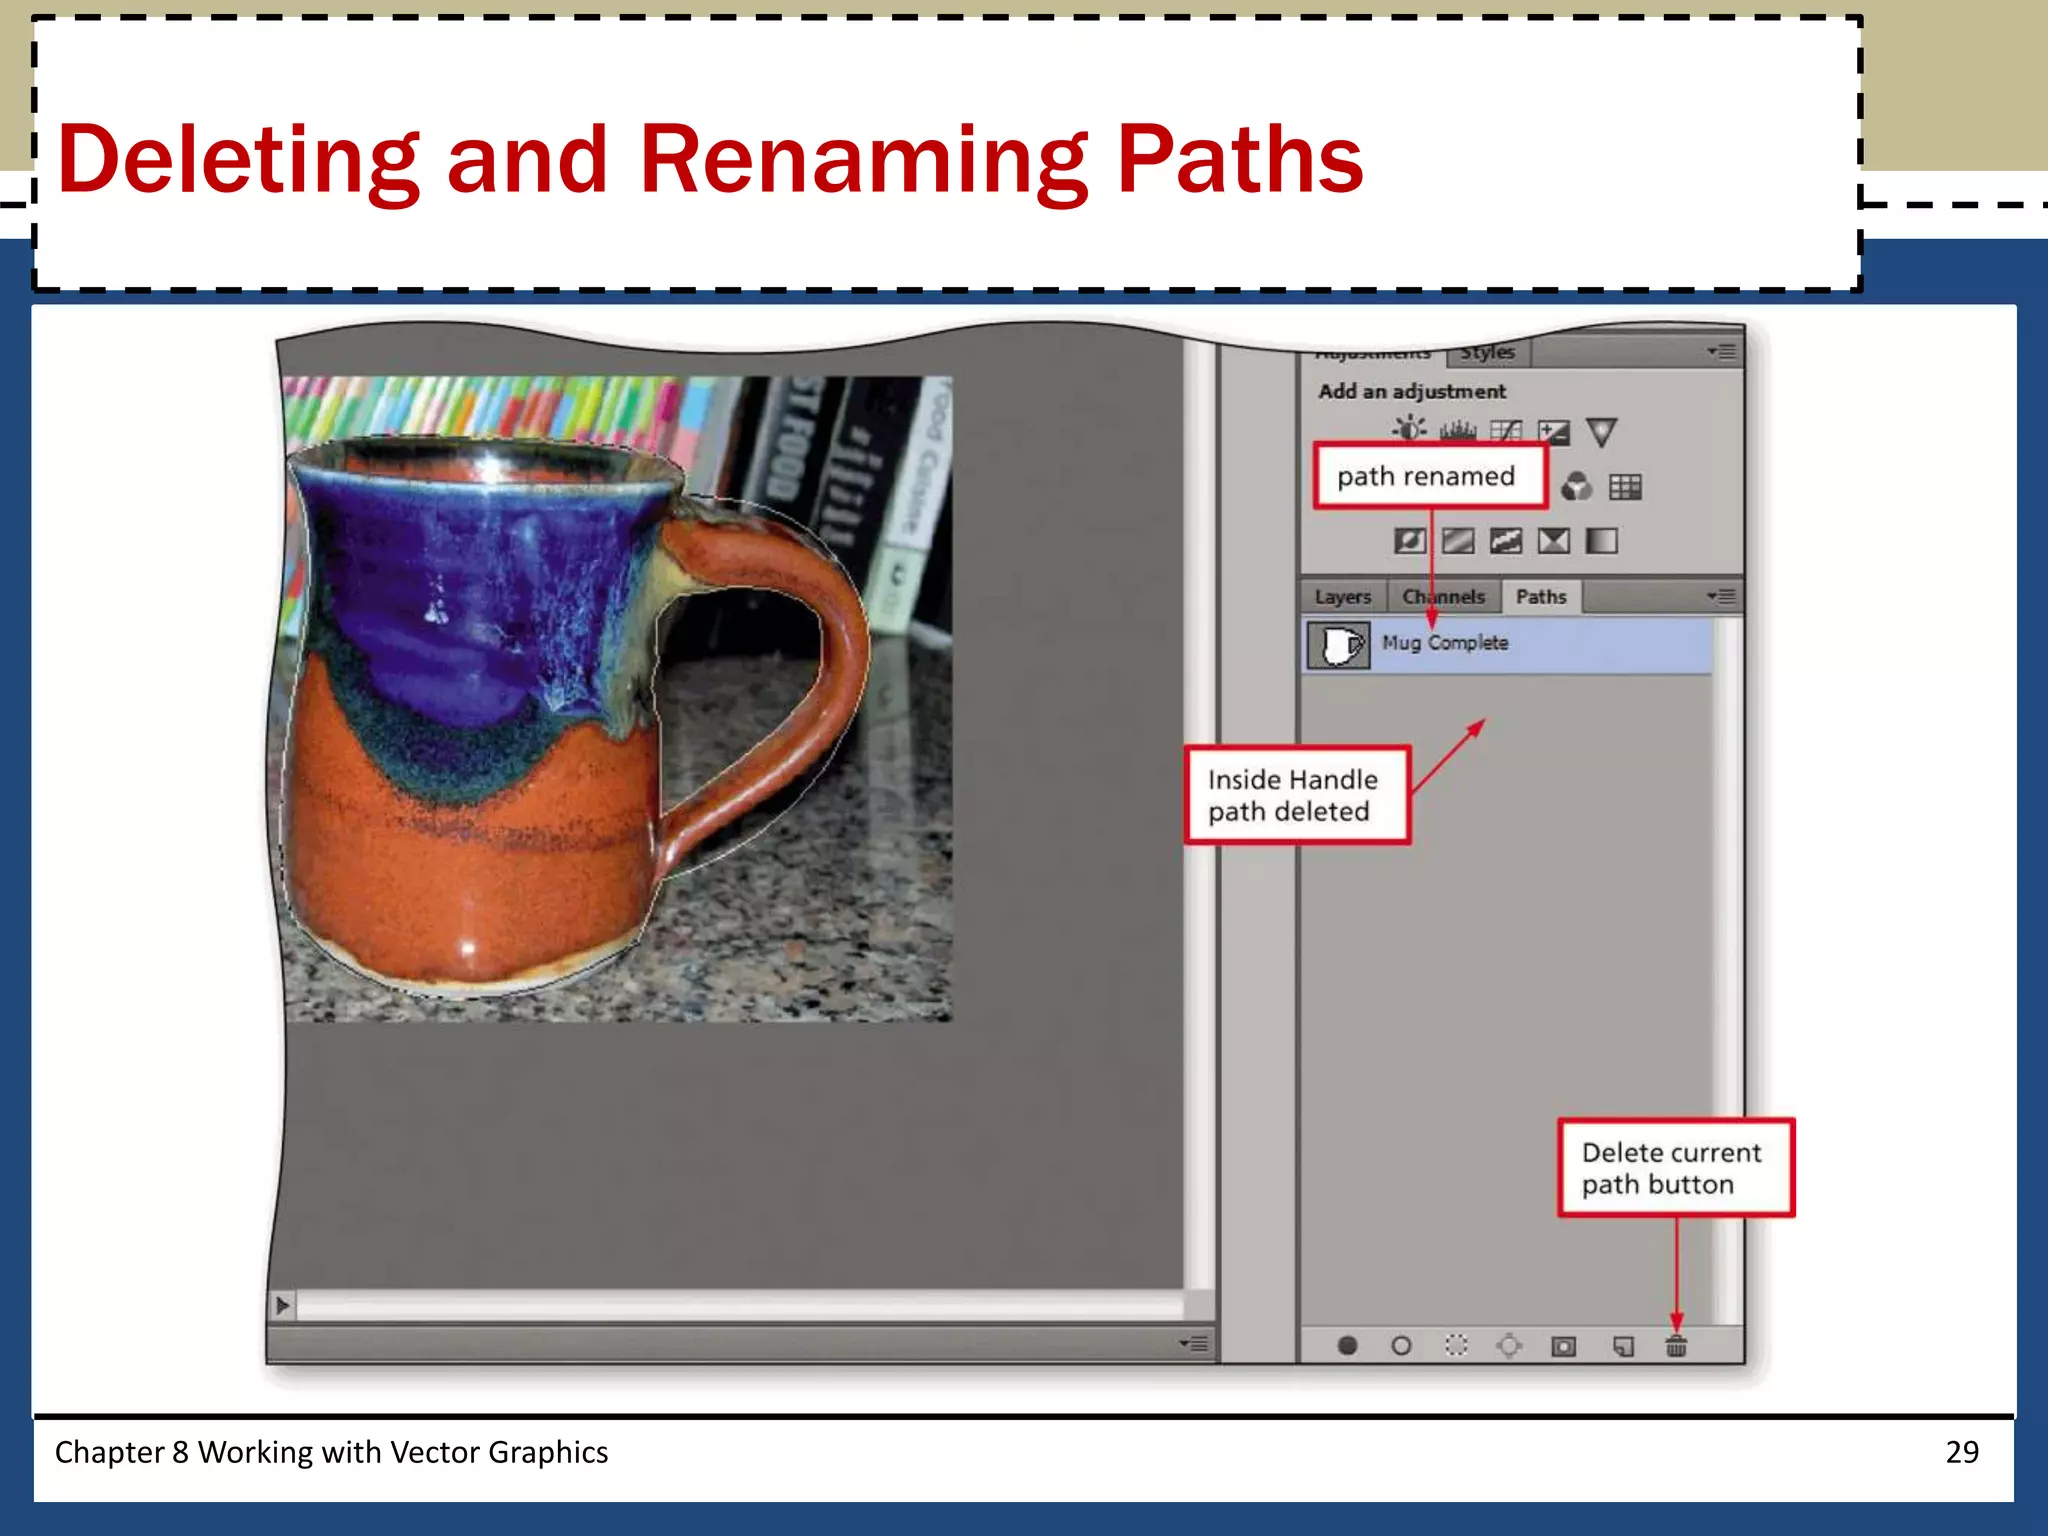
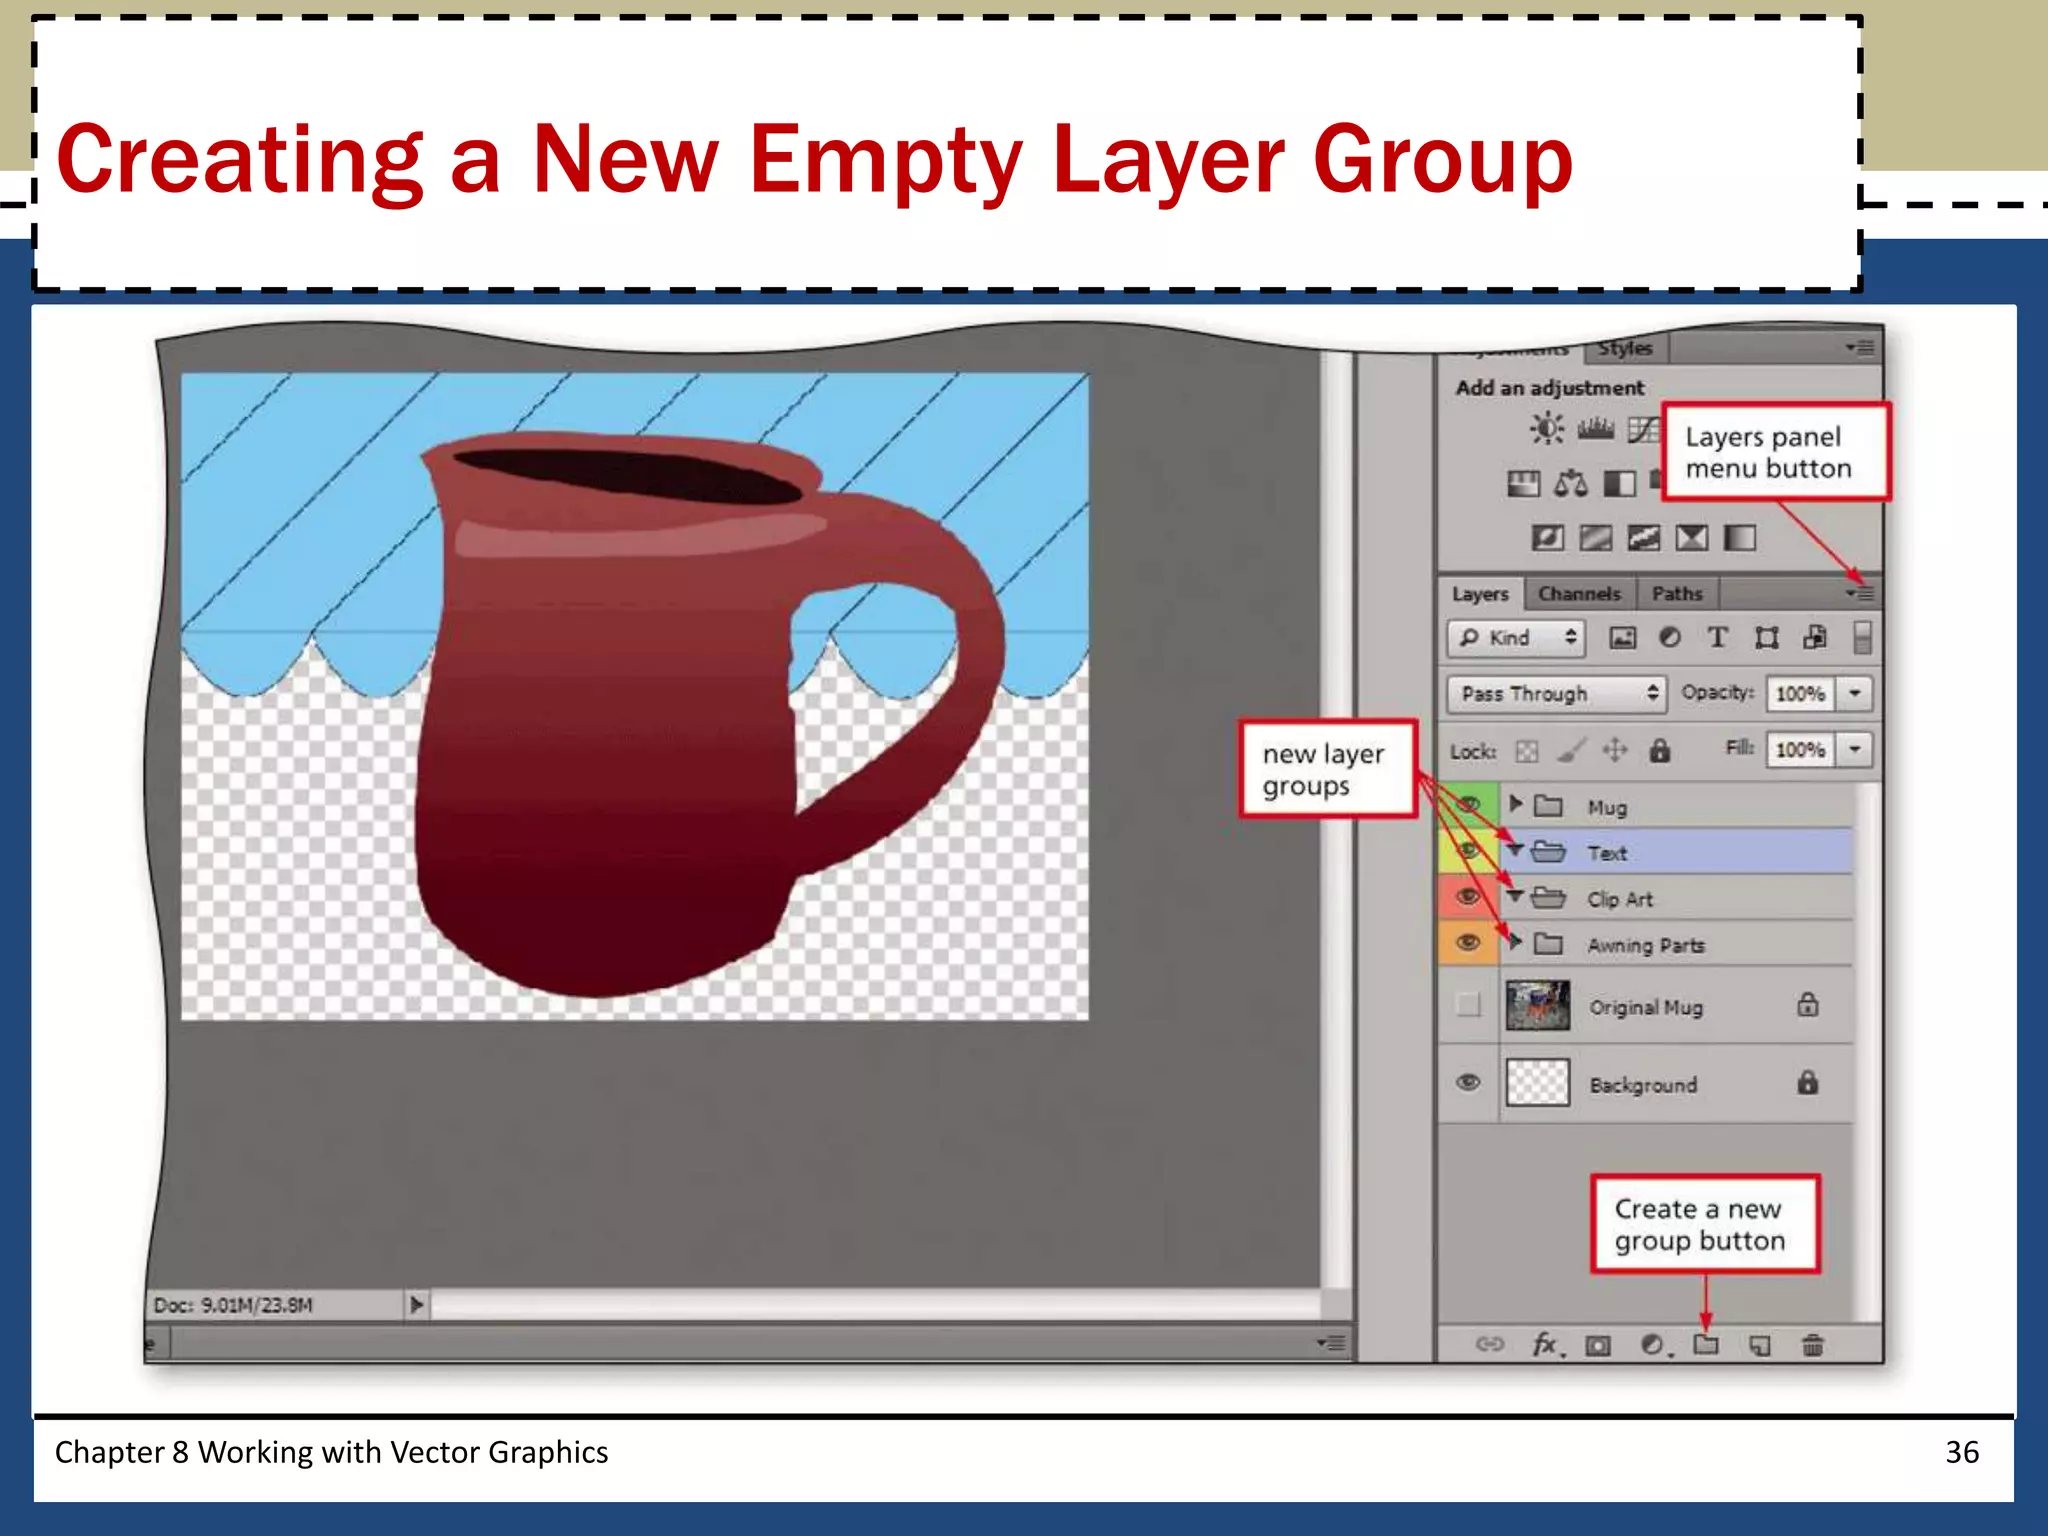
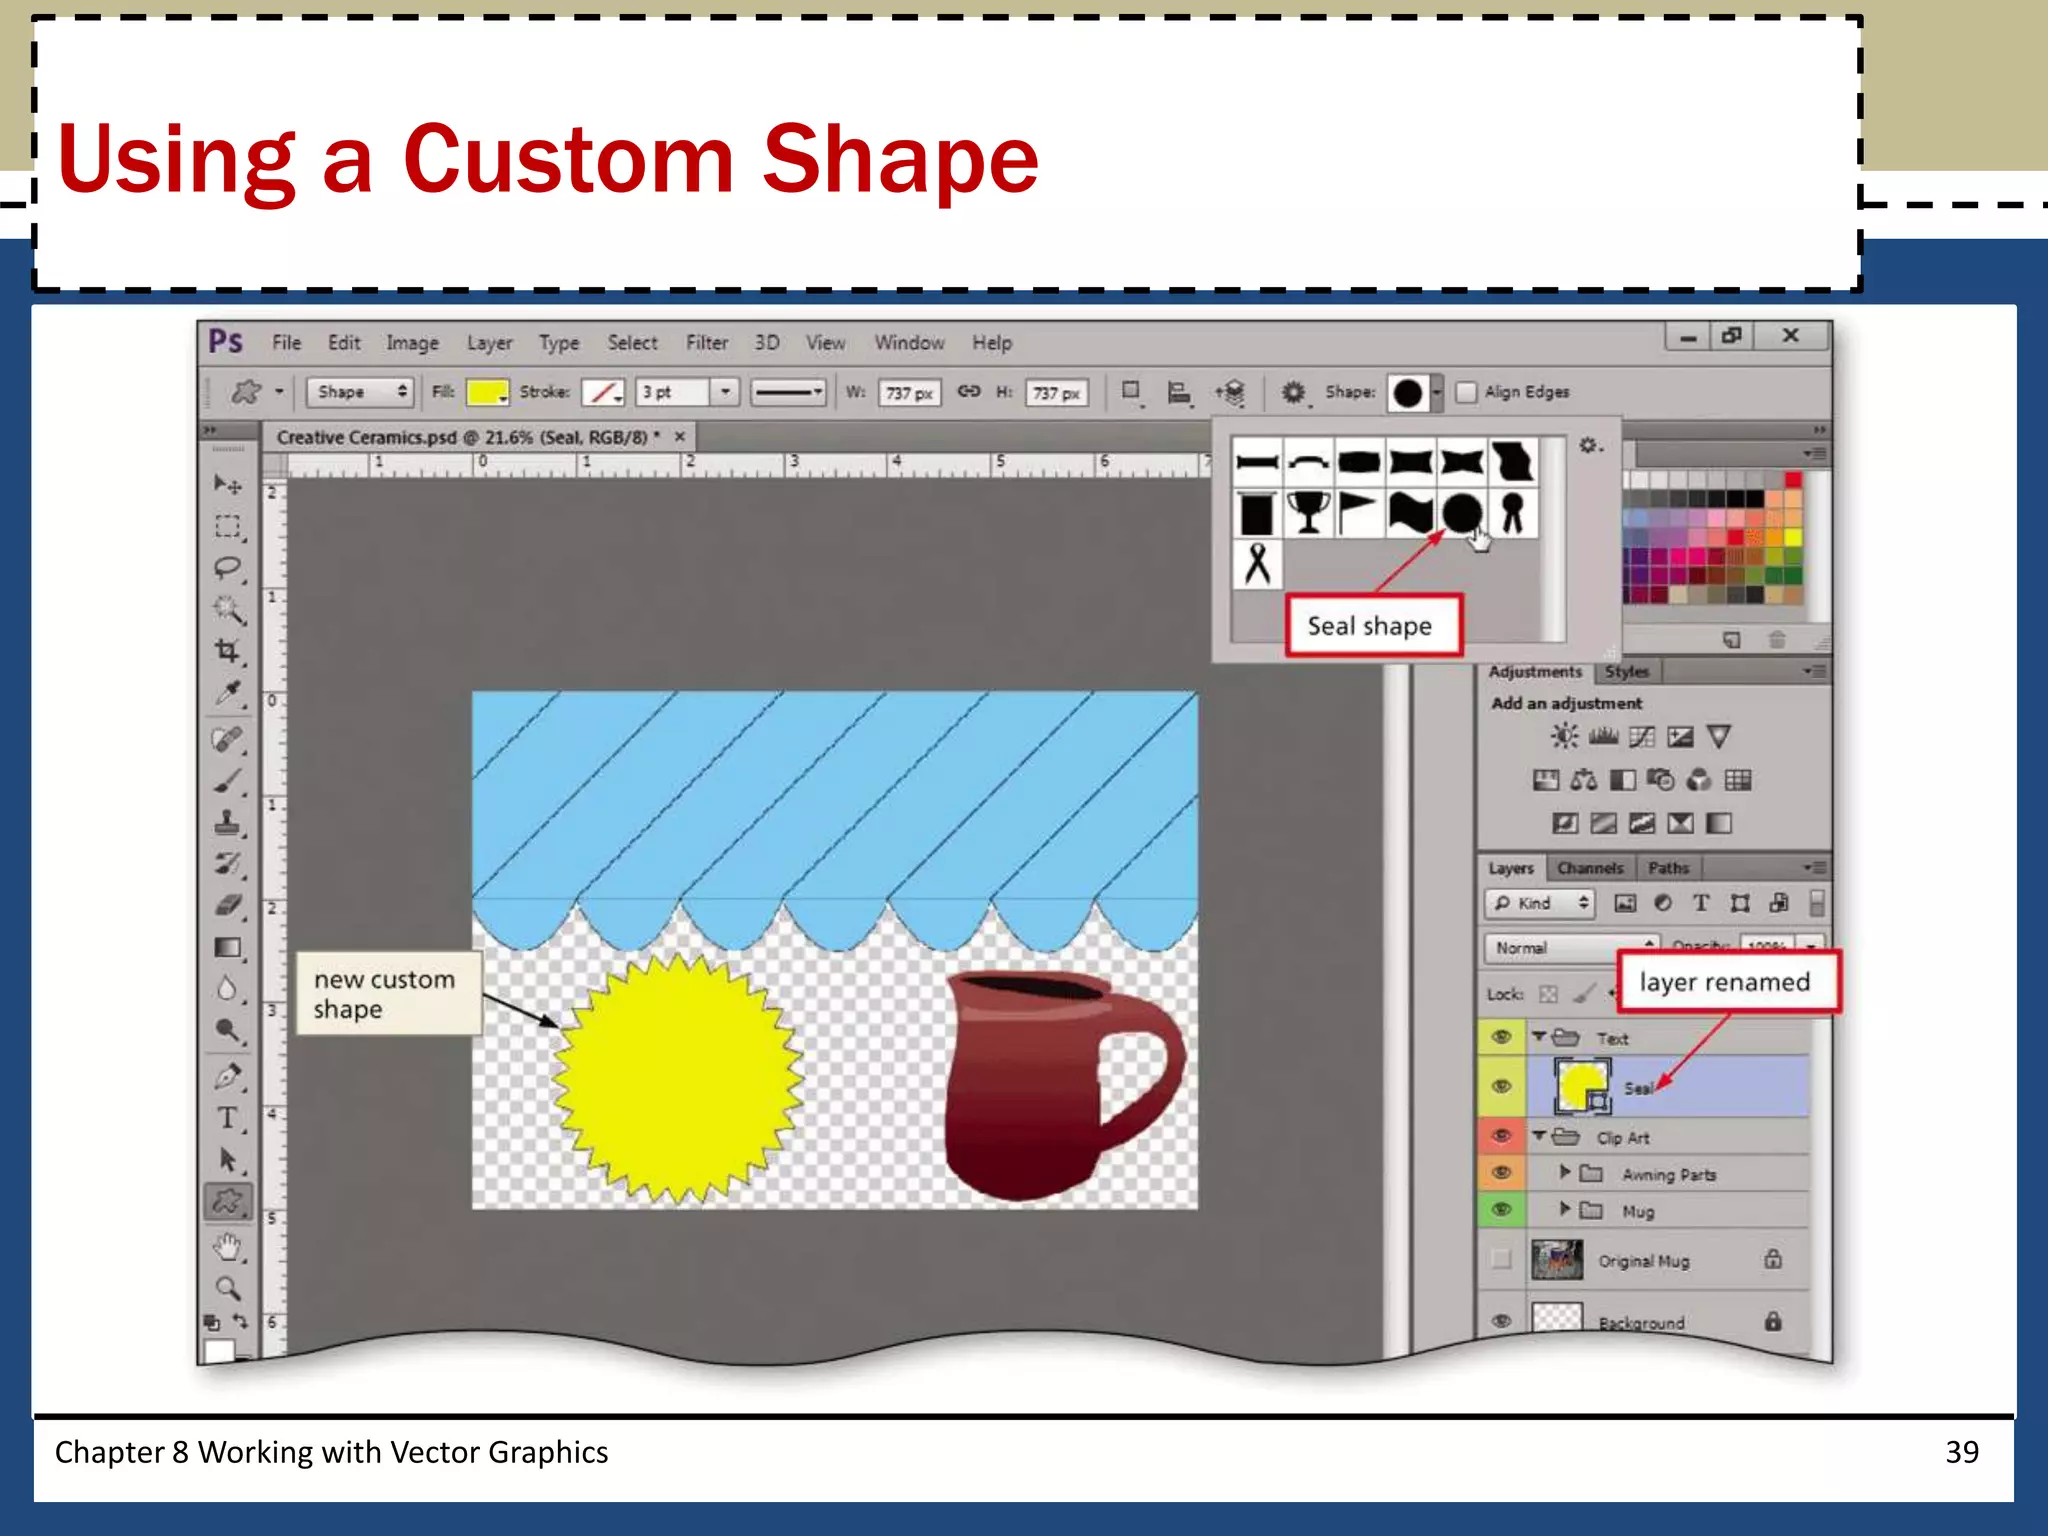
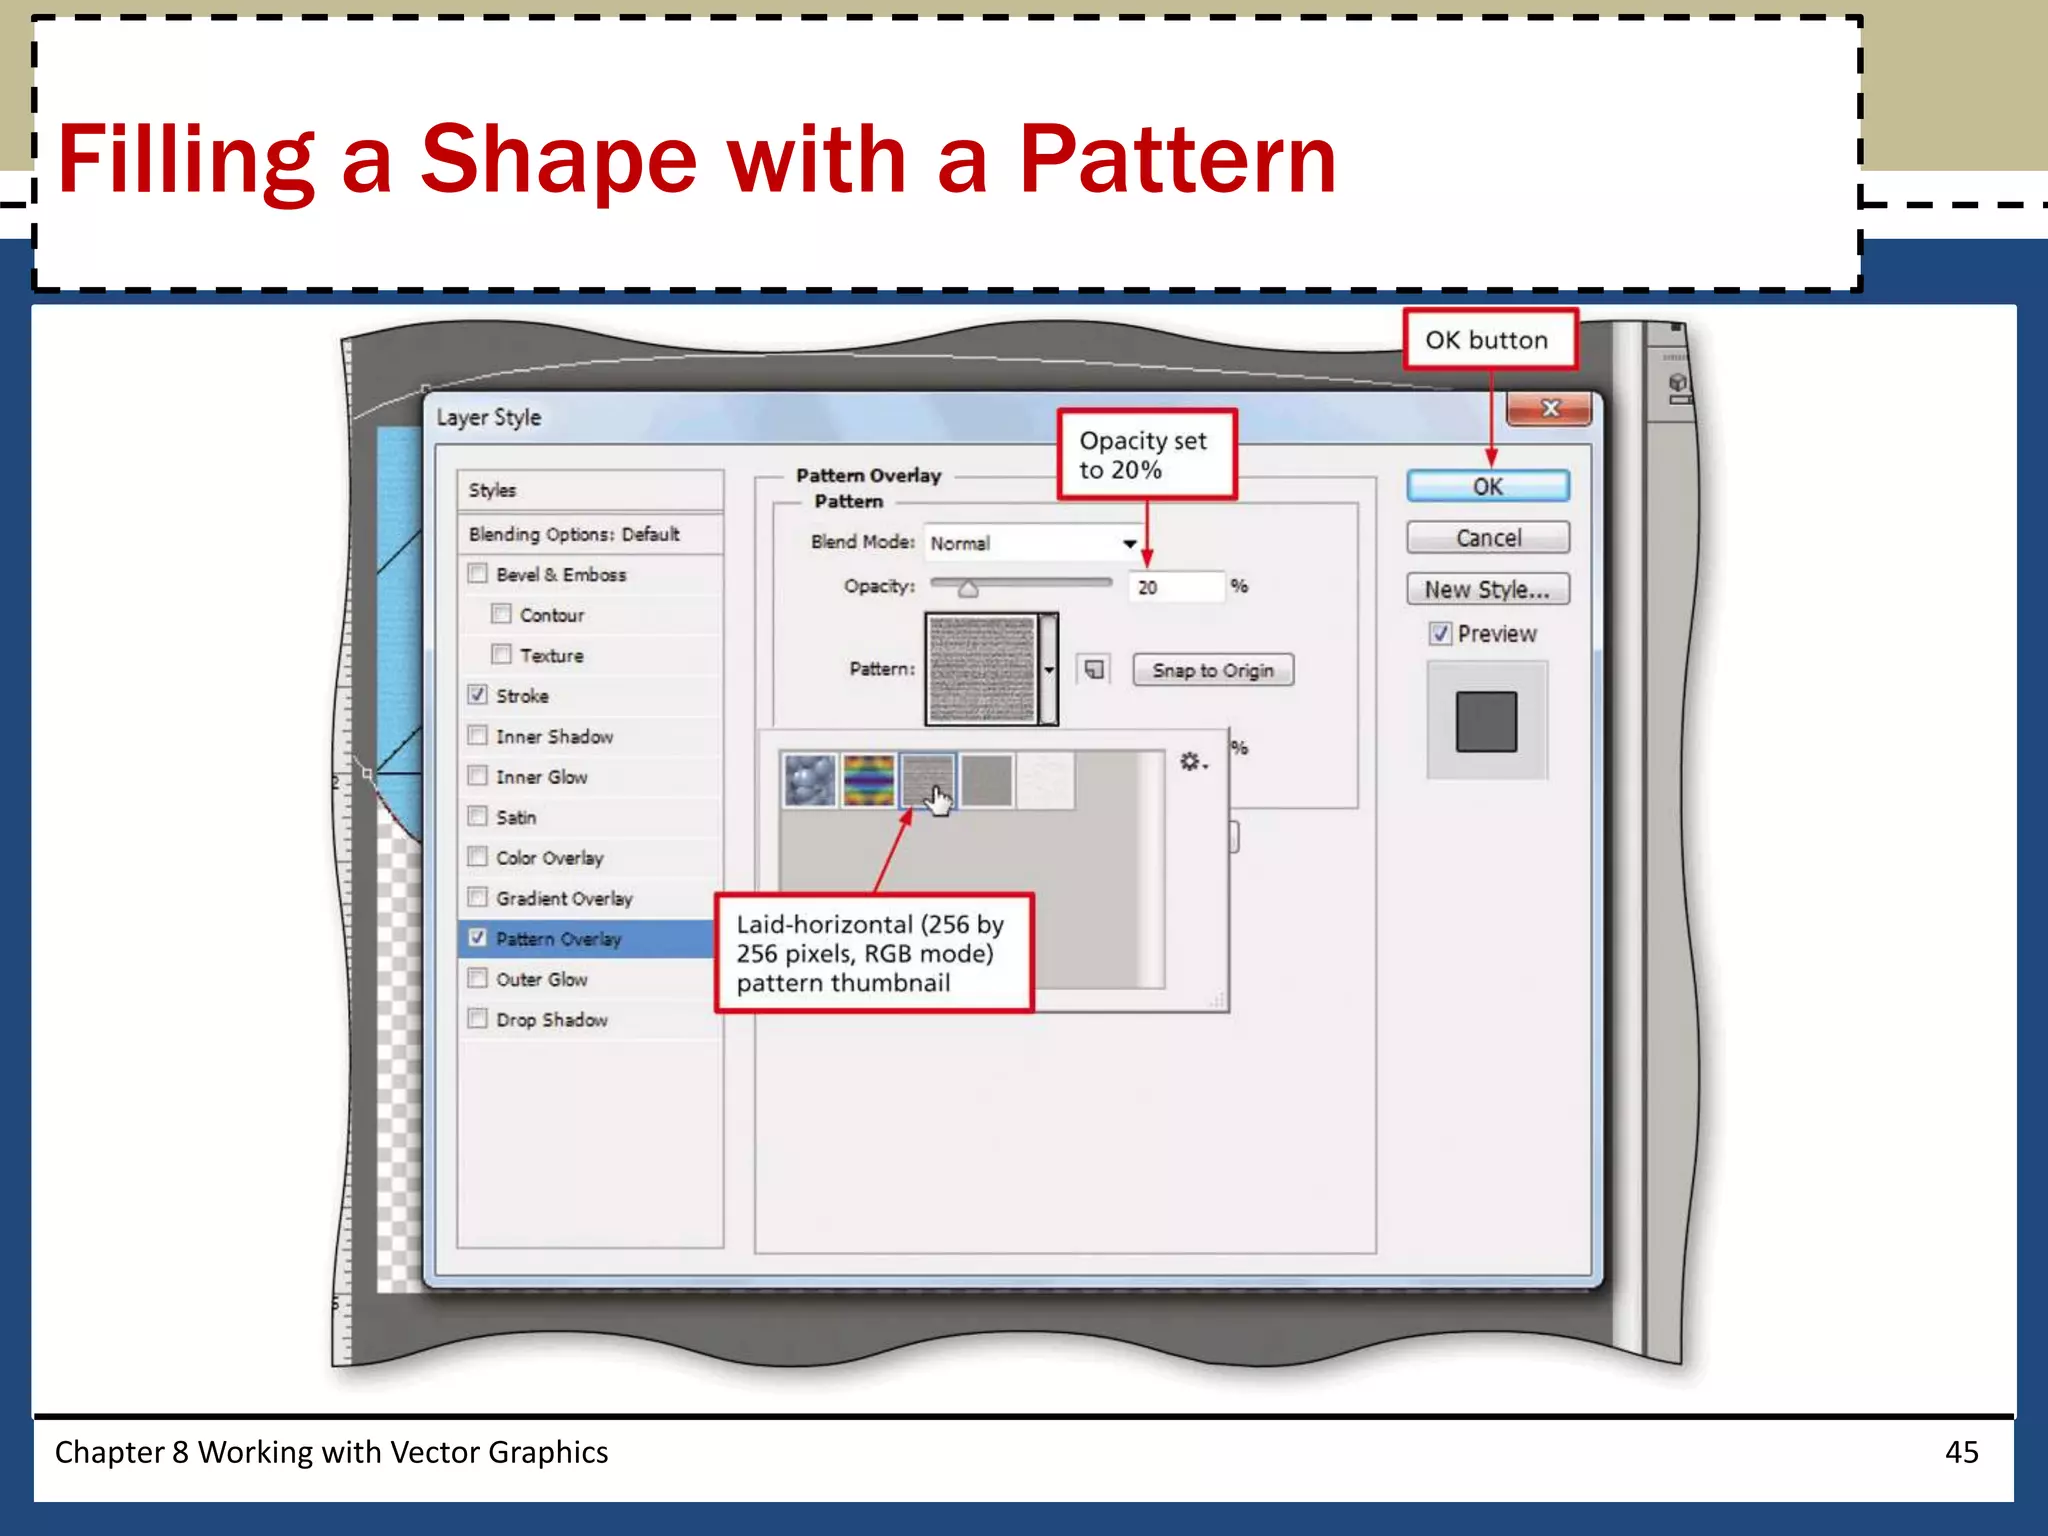
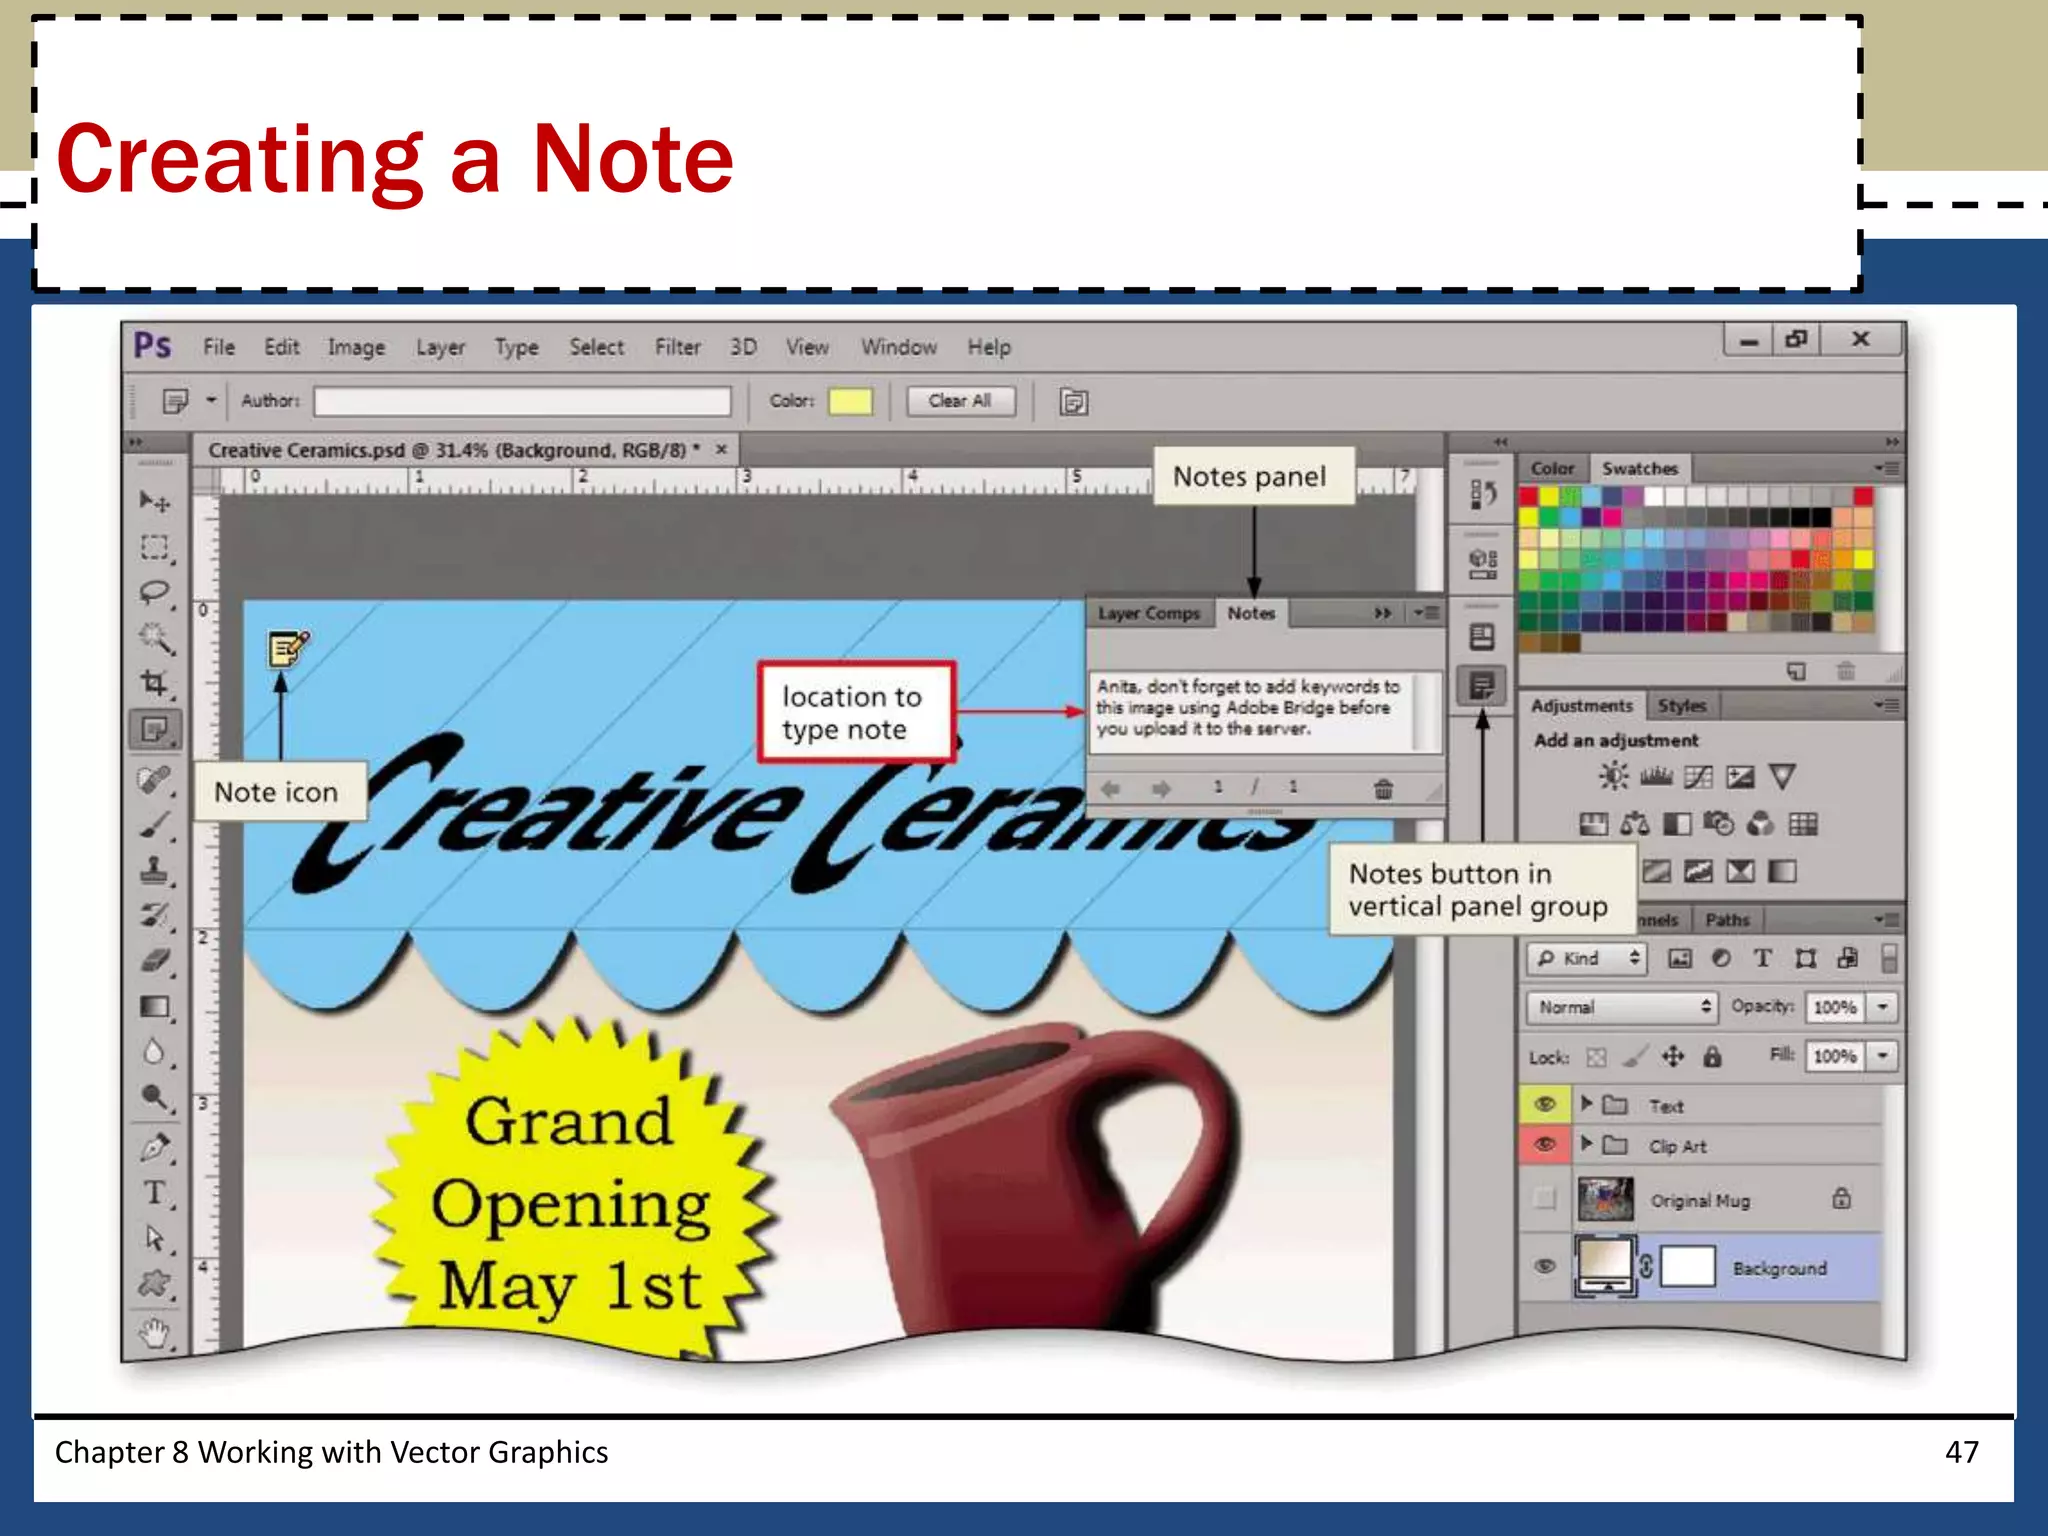
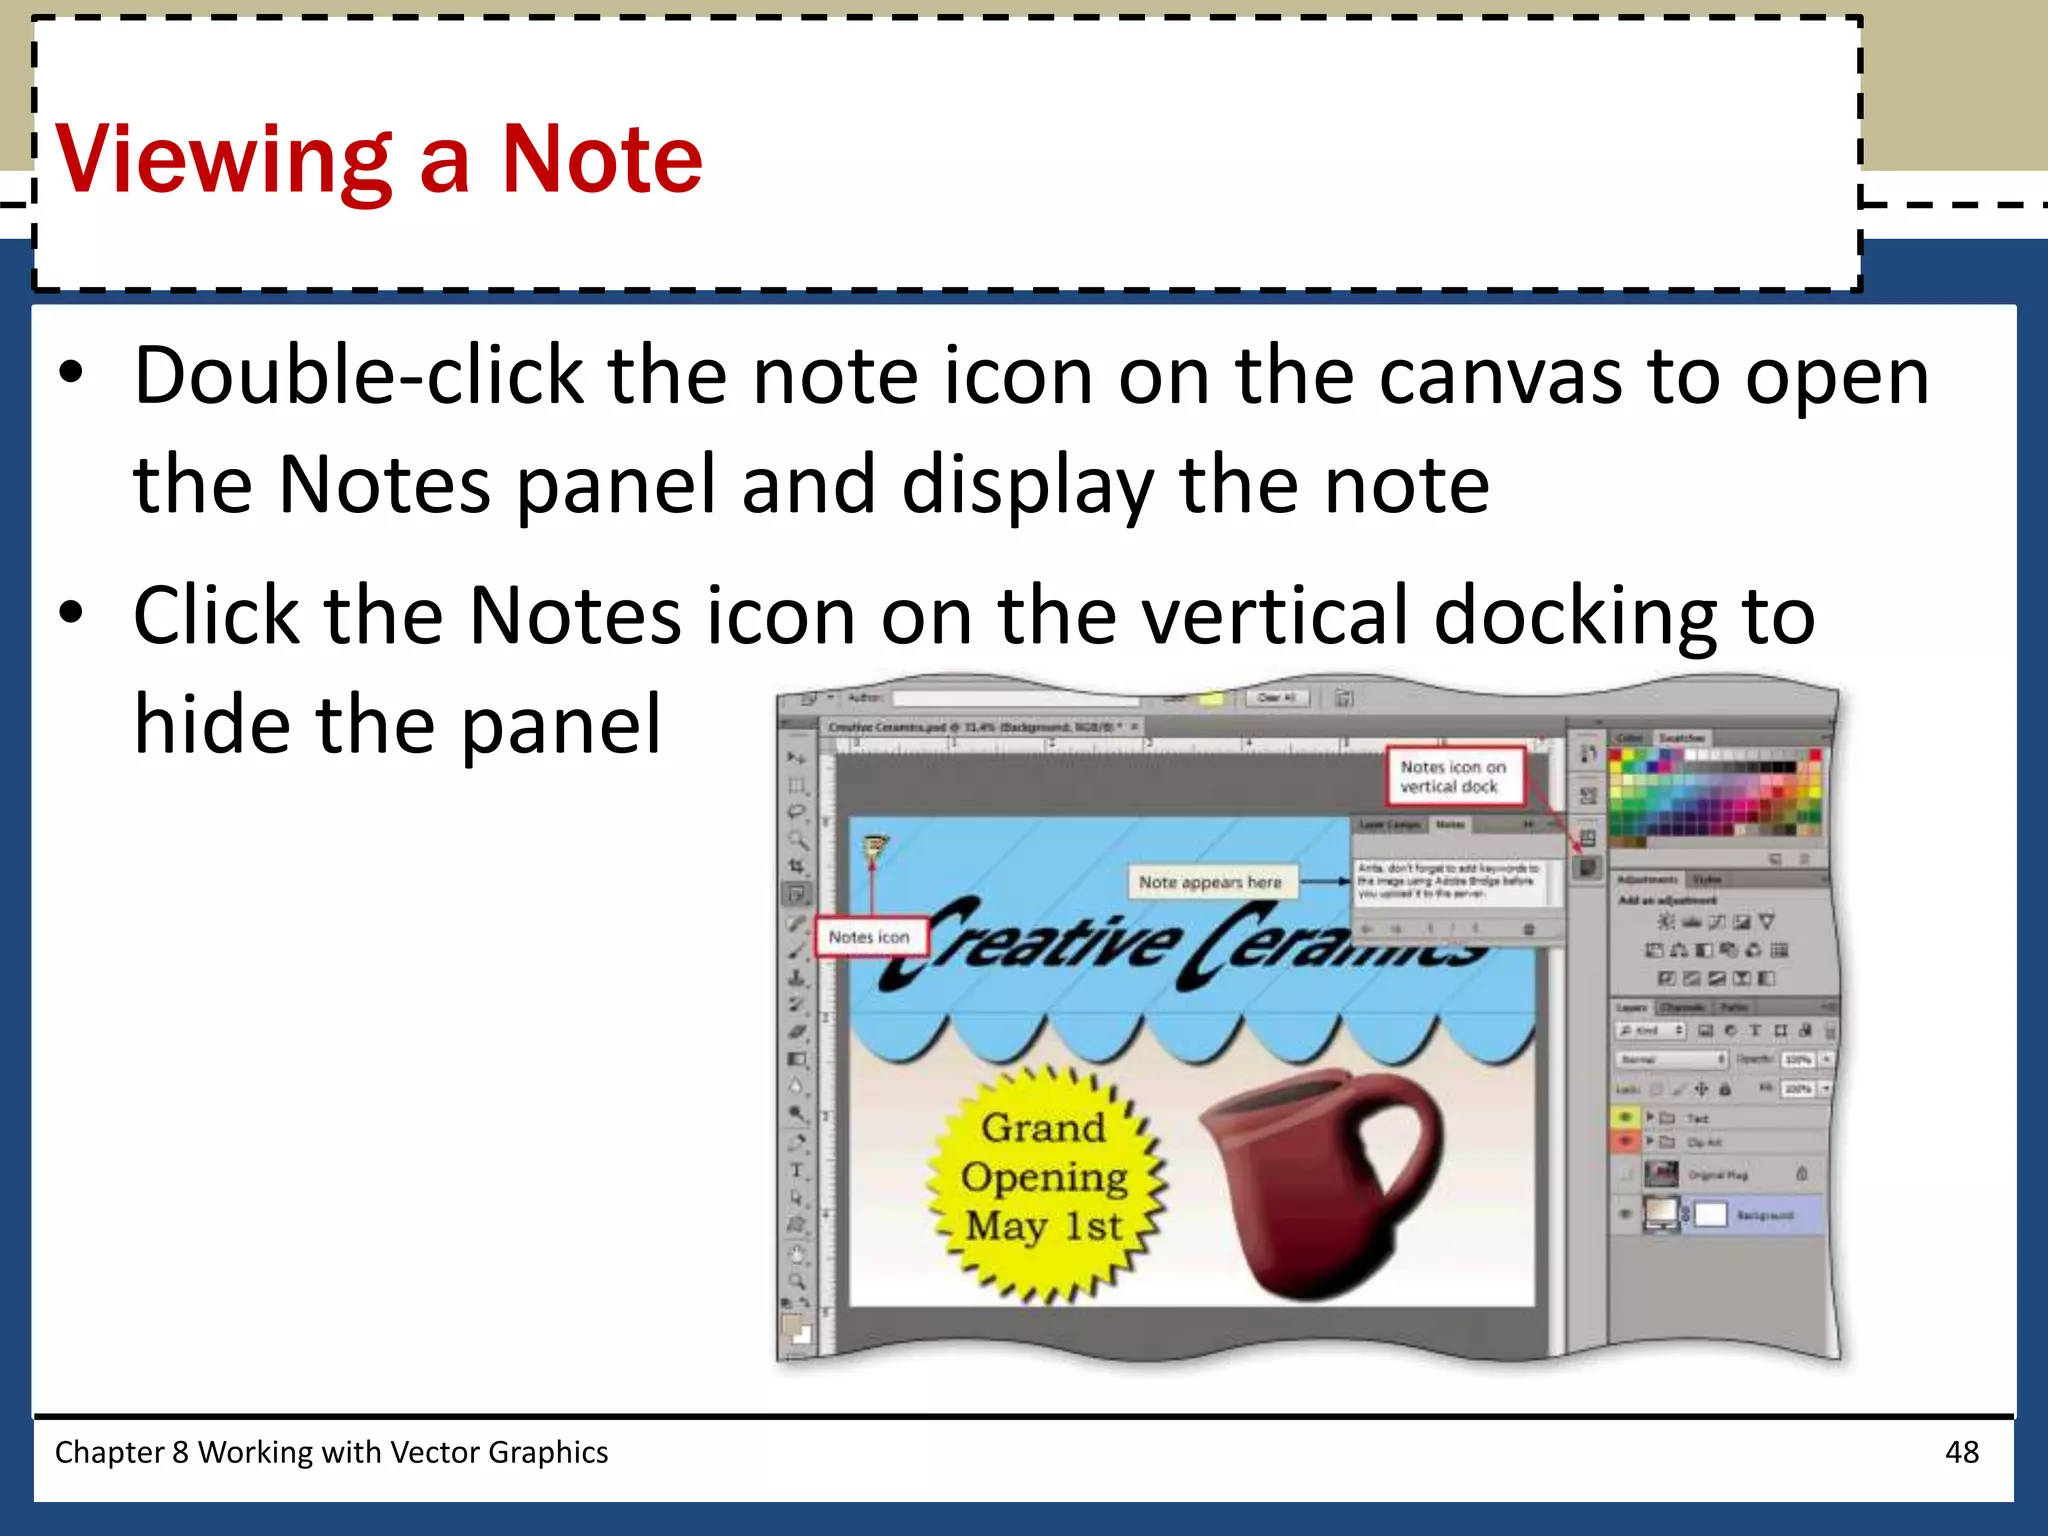
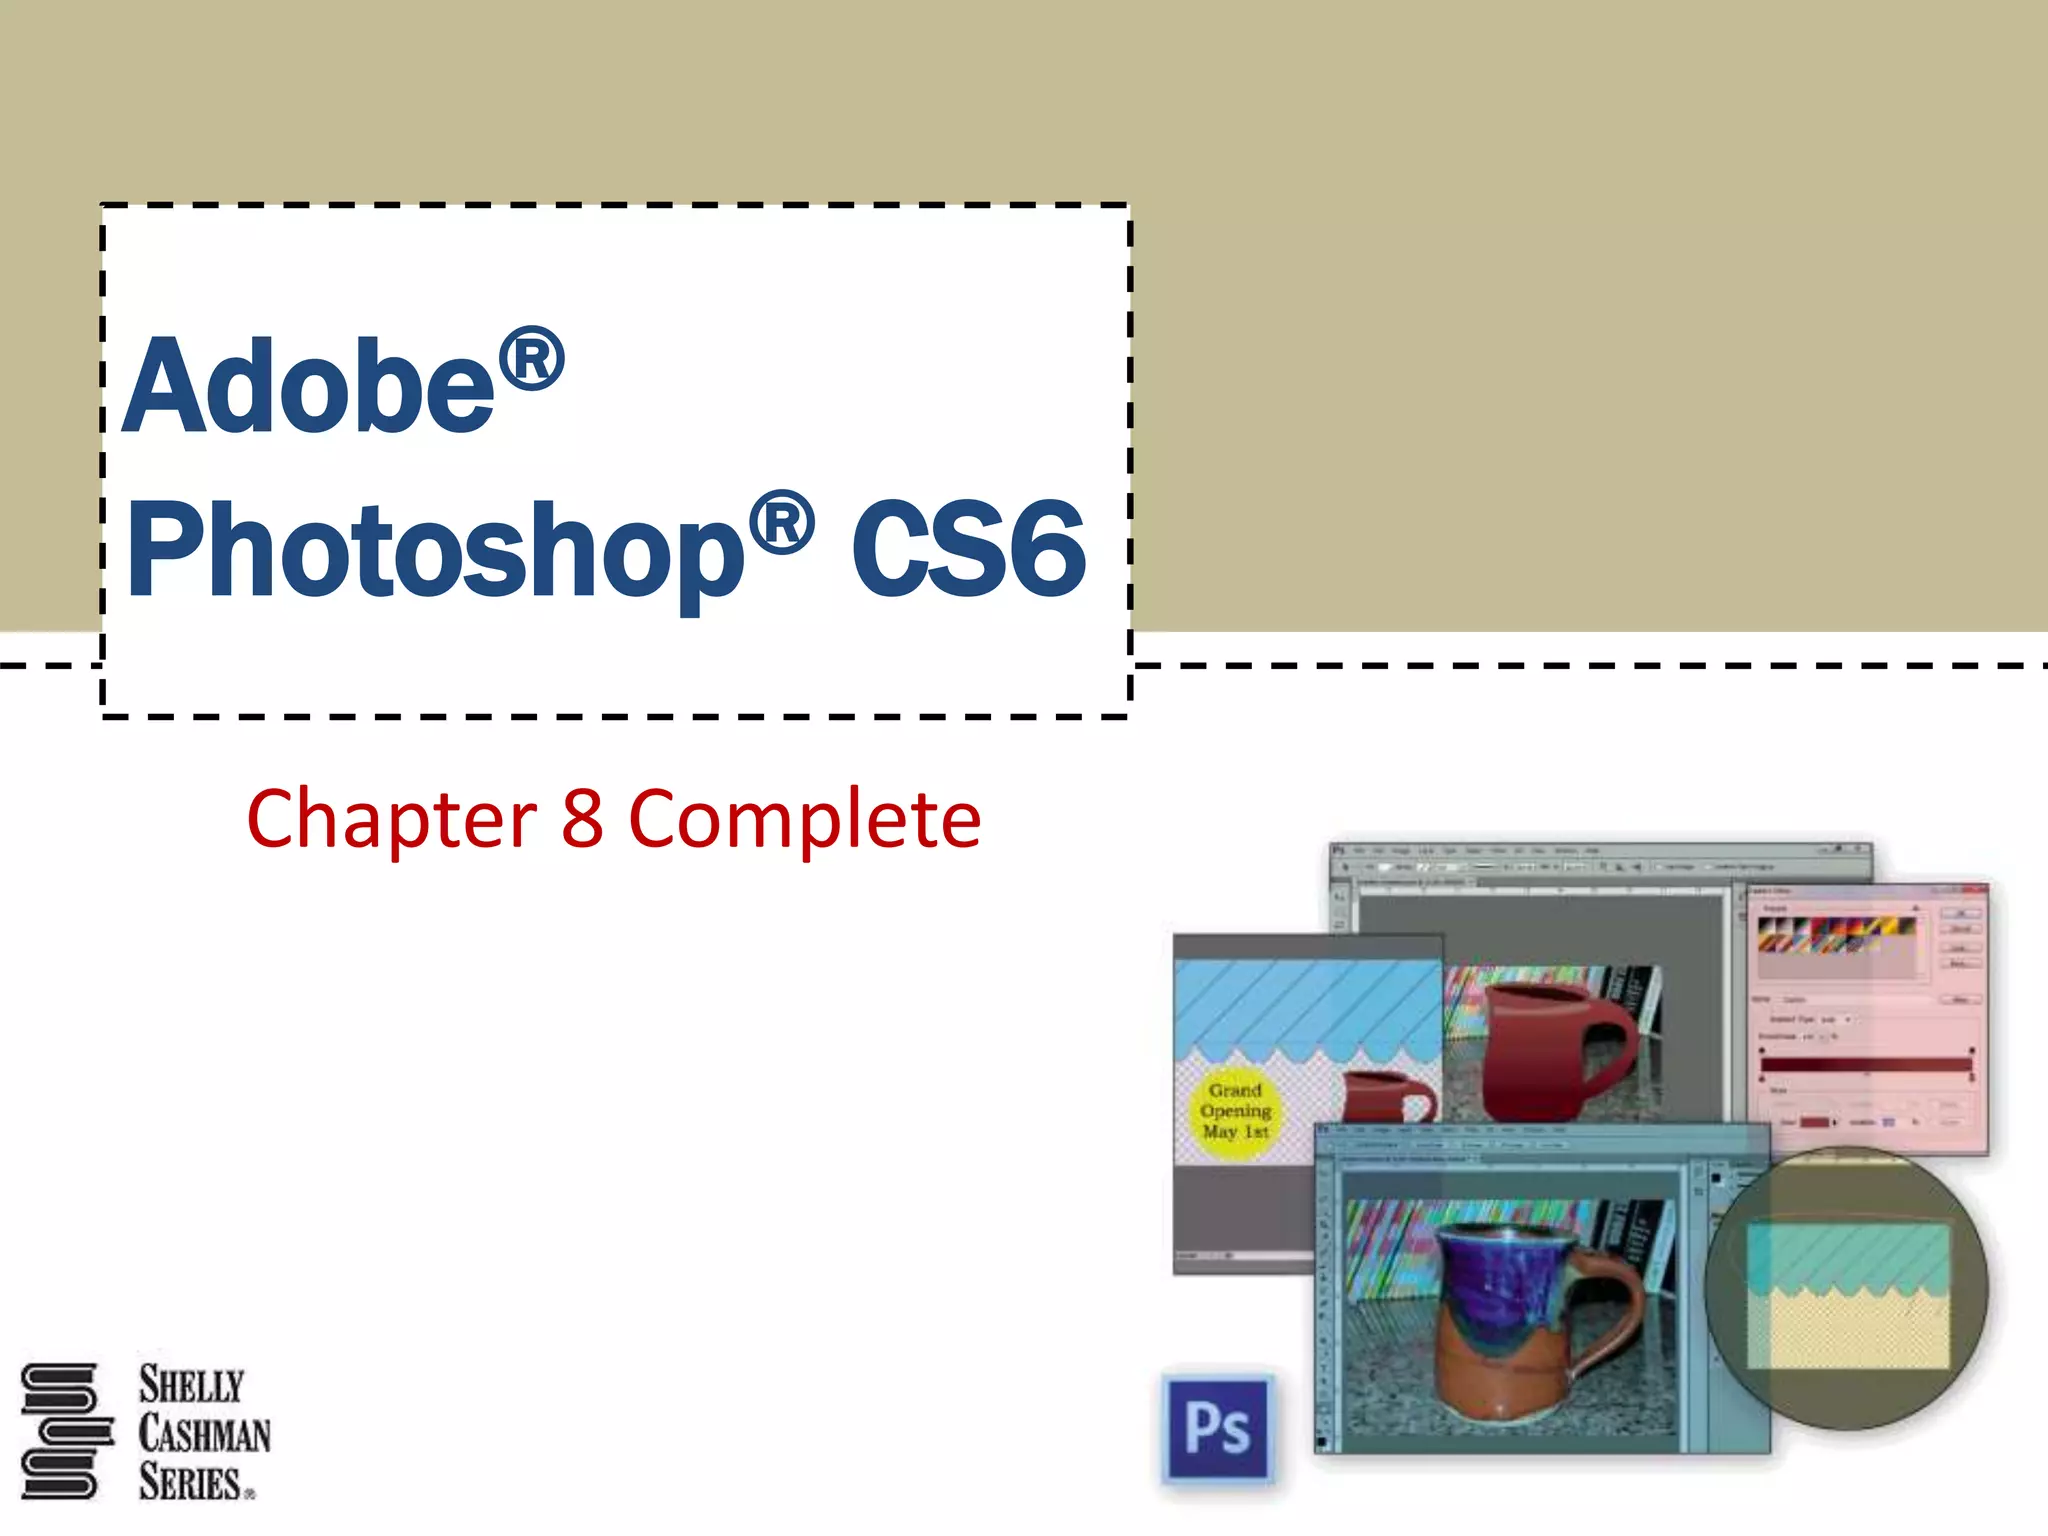
SlideShare a Scribd company logo
Adobe®
Photoshop® CS6
Chapter 8
Working with Vector
Graphics
• Describe the characteristics of clip art and vector
graphics
• Create and manage layer groups using the Layers
panel
• Differentiate between vector and raster graphic
images
• Create shape layers and paths with the Pen Tool
• Draw line segments and curved paths
• Add and convert anchor points
Chapter 8 Working with Vector Graphics 2
Objectives
• Move and modify paths using the Path Selection
and Direct Selection Tools
• Use the Freeform Pen Tool with the magnetic pen
option
• Add detail to clip art images
• Use the Note Tool
• Enter text in a custom shape
• Apply effects to optimize clip art
Objectives
Chapter 8 Working with Vector Graphics 3
Chapter 8 Working with Vector Graphics 4
Project – Creating a Clip Art Image
• Plan and organize layers
• Use vector graphics for clip art
• Add detail to enhance clip art
• Annotate graphics within the file
Chapter 8 Working with Vector Graphics 5
General Project Guidelines
Chapter 8 Working with Vector Graphics 6
Locking Layers
• On the Layers panel, select the layer to lock
• Click the Lock all button to lock the layer and to
display the solid lock icon
Chapter 8 Working with Vector Graphics 7
Locking Layers
Chapter 8 Working with Vector Graphics 8
Path Lines and Anchor Points
• On the Layers panel, select the layer
• On the Tools panel, right-click the current Pen
Tool button to display the context menu
• Click Pen Tool to select it
• On the options bar, click the ‘Pick tool mode’
button to display the mode options
• Click Shape to set the Pen Tool to draw in Shape
mode
Chapter 8 Working with Vector Graphics 9
Choosing the Pen Tool
Chapter 8 Working with Vector Graphics 10
Choosing the Pen Tool
• In the document window, click the location of the first
anchor point
• Move the mouse pointer to the location of the second
anchor point, and then click and drag the mouse pointer as
desired to create the first curve
• Move the mouse pointer to the location of the third anchor
point, and then click and drag the mouse pointer as desired
to create another curve
• Press the BACKSPACE key to delete the third anchor point
• Click the second anchor point to reestablish the path
• ALT+click the second anchor point to remove the direction
point and convert the point to a corner point
• Drag as desired to create another curve
Chapter 8 Working with Vector Graphics 11
Creating a Shape Layer
Using the Pen Tool
• Repeat the previous steps to create the additional
curves and corner points
• Point to the starting anchor point so the mouse
pointer shows a small circle next to the pen icon,
then click to close the path
Chapter 8 Working with Vector Graphics 12
Creating a Shape Layer
Using the Pen Tool
• On the Tools panel, right-click the Pen Tool button to
display the context menu
• Click Add Anchor Point Tool in the list
• In the document window, click the desired location for
the anchor point
Chapter 8 Working with Vector Graphics 13
Adding Anchor Points to a Shape
Chapter 8 Working with Vector Graphics 14
Repositioning an Anchor Point
• On the Tools panel, right-click the Path Selection
Tool button to display the context menu
• Click Direct Selection Tool in the list
• Drag the new anchor point to the desired location
• With the Direct Selection Tool active, click the
desired anchor point to select it
• Drag the direction point to the desired location
Chapter 8 Working with Vector Graphics 15
Using Direction Points
• On the Tools panel, right-click the current shape
tool button to display the context menu and then
click Line Tool to select it
• On the options bar, click the ‘Pick tool mode’
button to display its menu
• On the ‘Pick tool mode’ button, click Pixels to
draw pixels rather than a shape
• On the options bar set the desired weight
• SHIFT+drag the desired lines on the canvas
Chapter 8 Working with Vector Graphics 16
Using a Shape Tool in Pixel Mode
Chapter 8 Working with Vector Graphics 17
Using a Shape Tool in Pixel Mode
• Zoom in as necessary using the Zoom Tool on the
Tools panel
• Click the desired layer to select it
• Click the Direct Selection Tool button on the Tools
panel to select it
• Drag the anchor points to the desired locations
• When you are finished repositioning the anchor
points, double-click the Hand Tool to fit the
canvas to your screen
Chapter 8 Working with Vector Graphics 18
Fine-Tuning a Shape
Chapter 8 Working with Vector Graphics 19
Fine-Tuning a Shape
• Click the layer to select it
• Select the Pen Tool
• On the options bar, click the ‘Pick tool mode’
button and then click Path to select the mode that
creates a path on the Paths panel
• Click the desired anchor points and convert the
anchor points to corner points as necessary
• Click the starting point to close the path
Chapter 8 Working with Vector Graphics 20
Creating a Work Path Using the Pen Tool
Chapter 8 Working with Vector Graphics 21
Creating a Work Path Using the Pen Tool
• Click the Paths panel tab to display the Paths
panel
Chapter 8 Working with Vector Graphics 22
Displaying the Paths Panel
• On the Paths panel, double-click the path to
rename, type the desired name, and then press
ENTER to rename the path
Chapter 8 Working with Vector Graphics 23
Saving a Work Path as a Named Path
• On the Tools panel, right-click the current Pen Tool
button to display the context menu
• Click Freeform Pen Tool to select it
• On the options bar, click the Magnetic check box so
that it displays a check mark
• Click the location to begin drawing
• Drag slowly around the object
• When you return to the starting point, point to the
first anchor point so that the mouse pointer displays
a small circle indicating the path will be closed
• Click the first anchor point to close the path
Chapter 8 Working with Vector Graphics 24
Creating a Path using
the Freeform Pen Tool
Chapter 8 Working with Vector Graphics 25
Creating a Path using
the Freeform Pen Tool
• On the Tools panel, right-click the Direct Selection
Tool and click the Path Selection Tool to select it
• Click the outline of the first path
• Press CTRL+C to copy the path
• Click the second path to select it
• Press CTRL+V to paste the copied path to the
selected path
Chapter 8 Working with Vector Graphics 26
Merging Paths
Chapter 8 Working with Vector Graphics 27
Merging Paths
• Click the path to delete
• Click the ‘Delete current path’ button on the Paths
panel status bar to delete the path
• Click the Yes button when prompted to confirm
the deletion
• Rename the path as desired
Chapter 8 Working with Vector Graphics 28
Deleting and Renaming Paths
Chapter 8 Working with Vector Graphics 29
Deleting and Renaming Paths
• With the path selected, click Layer on the application
bar, and then point to New Fill Layer to display the fill
choices
• Click Gradient to display the New Layer dialog box
• Type the desired layer name in the Name box
• Click the OK button to display the Gradient Fill dialog
box
• Edit the gradient as desired
• Click the OK button to close the Gradient Fill dialog
box
• Click the Layers panel to display the layers
Chapter 8 Working with Vector Graphics 30
Creating a Shape Layer from a Path
Chapter 8 Working with Vector Graphics 31
Creating a Shape Layer from a Path
Chapter 8 Working with Vector Graphics 32
Layer Groups
• Click the first layer to select it
• CTRL+click the additional layers to select
• Click the Layers panel menu button to display the
menu
• Click New Group from Layers to display the New
Group from Layers dialog box
• Type the desired layer name in the Name text box.
Click the Color box arrow, and then click the desired
color
• Click the OK button to create the new layer group
Chapter 8 Working with Vector Graphics 33
Creating a Layer Group from Layers
Chapter 8 Working with Vector Graphics 34
Creating a Layer Group from Layers
• Display the Layers panel menu and then click New
Group. Name the group and assign the desired
color
• ALT+click the ‘Create a new group’ button at the
bottom of the Layers panel to create the group
Chapter 8 Working with Vector Graphics 35
Creating a New Empty Layer Group
Chapter 8 Working with Vector Graphics 36
Creating a New Empty Layer Group
• Drag a layer onto another layer to nest it
Chapter 8 Working with Vector Graphics 37
Nesting Layer Groups
• On the Tools panel, right-click the current Shape Tool button,
and then click Custom Shape Tool
• On the options bar, click the ‘Pick tool mode’ button, and then
click Shape, if necessary, to select it
• On the options bar, click the ‘Set shape fill type’ button and then
click the desired fill color
• Click the Custom Shape picker button and then click the Custom
Shape picker menu button to display the Shapes menu
• Click the desired category to load that set of shapes
• Click the OK button when prompted to replace the current
shapes
• Click the desired shape in the Custom Shape picker
• SHIFT+drag in the document window to create the shape
Chapter 8 Working with Vector Graphics 38
Using a Custom Shape
Chapter 8 Working with Vector Graphics 39
Using a Custom Shape
• With the layer selected, press the T key to access
the current Type Tool
• Click the shape, and then type the desired text
• On the options bar, click the ‘Commit any current
edits’ button to close the text box
• On the Tools panel, click the Move Tool and
reposition the text as necessary
Chapter 8 Working with Vector Graphics 40
Creating Text within a Shape
Chapter 8 Working with Vector Graphics 41
Creating Text within a Shape
• Click Type on the Application bar to display the
Type menu
• Click Convert to Shape to convert the text to a
shape
Chapter 8 Working with Vector Graphics 42
Converting Text to a Shape
• Press the A key to select the Direct Selection Tool
• Drag the anchor points for the shape to the
desired location
Chapter 8 Working with Vector Graphics 43
Altering a Shape
• On the Tools panel, double-click the Hand Tool to fit
the document to the screen
• Select the desired layer to fill
• Click the ‘Add a layer style’ button on the Layers
panel status bar to display the list of layer styles
• Click Pattern Overlay to display the Layer Style dialog
box
• In the Layer Style dialog box, click the Pattern picker
to display thumbnails of the current patterns
• Click the desired pattern
• Click the OK button to apply the pattern
Chapter 8 Working with Vector Graphics 44
Filling a Shape with a Pattern
Chapter 8 Working with Vector Graphics 45
Filling a Shape with a Pattern
• Right-click the Eyedropper Tool to display its
context menu
• Click Note Tool in the menu
• Click the desired location the document window
to open the Notes panel
• Type the desired text in the Notes panel
• Click the Notes icon on the vertical docking to
hide the panel
Chapter 8 Working with Vector Graphics 46
Creating a Note
Chapter 8 Working with Vector Graphics 47
Creating a Note
• Double-click the note icon on the canvas to open
the Notes panel and display the note
• Click the Notes icon on the vertical docking to
hide the panel
Chapter 8 Working with Vector Graphics 48
Viewing a Note
• Describe the characteristics of clip art and vector
graphics
• Create and manage layer groups using the Layers
panel
• Differentiate between vector and raster graphic
images
• Create shape layers and paths with the Pen Tool
• Draw line segments and curved paths
• Add and convert anchor points
Chapter 8 Working with Vector Graphics 49
Chapter Summary
• Move and modify paths using the Path Selection
and Direct Selection Tools
• Use the Freeform Pen Tool with the magnetic pen
option
• Add detail to clip art images
• Use the Note Tool
• Enter text in a custom shape
• Apply effects to optimize clip art
Chapter Summary
Chapter 8 Working with Vector Graphics 50
Chapter 8 Complete
Adobe®
Photoshop® CS6

More Related Content

What's hot

Photoshop cs6
Photoshop cs6Photoshop cs6
Photoshop cs6
RohitMehra98
 
Part 3 how to make simple tarpulin in adobe photoshop cs6
Part 3 how to make simple tarpulin in adobe photoshop cs6Part 3 how to make simple tarpulin in adobe photoshop cs6
Part 3 how to make simple tarpulin in adobe photoshop cs6
bentibaldo
 
Tài liệu tự học Family trong Revit (phần 3)
Tài liệu tự học Family trong Revit (phần 3)Tài liệu tự học Family trong Revit (phần 3)
Tài liệu tự học Family trong Revit (phần 3)
congnghebim
 
Tài liệu tự học Family trong Revit (phần 2)
Tài liệu tự học Family trong Revit (phần 2)Tài liệu tự học Family trong Revit (phần 2)
Tài liệu tự học Family trong Revit (phần 2)
congnghebim
 
Tài liệu tự học Family trong Revit (phần 4)
Tài liệu tự học Family trong Revit (phần 4)Tài liệu tự học Family trong Revit (phần 4)
Tài liệu tự học Family trong Revit (phần 4)
congnghebim
 
Create a canvas banner in photoshop
Create a canvas banner in photoshopCreate a canvas banner in photoshop
Create a canvas banner in photoshop
NaomiPB
 
adobephotoshop_frerking
adobephotoshop_frerking adobephotoshop_frerking
adobephotoshop_frerking
Agung Yuwono
 
Digital Drawing Assignment Directions & Tutorial
Digital Drawing Assignment Directions & TutorialDigital Drawing Assignment Directions & Tutorial
Digital Drawing Assignment Directions & TutorialMrsM2014
 
Learning Illustrator CS6 with 100 practical exercises
Learning Illustrator CS6 with 100 practical exercisesLearning Illustrator CS6 with 100 practical exercises
Learning Illustrator CS6 with 100 practical exercises
MCB Press
 
Inkscape Tutorials: Digital Photography Flyer
Inkscape Tutorials: Digital Photography FlyerInkscape Tutorials: Digital Photography Flyer
Inkscape Tutorials: Digital Photography Flyer
Flyer Tutor
 
Inkscape Fall Fest Flyer Tutorial
Inkscape Fall Fest Flyer TutorialInkscape Fall Fest Flyer Tutorial
Inkscape Fall Fest Flyer Tutorial
Flyer Tutor
 
Inkscape Beginner Tutorial: How to Make a Yoga Class Flyer
Inkscape Beginner Tutorial: How to Make a Yoga Class FlyerInkscape Beginner Tutorial: How to Make a Yoga Class Flyer
Inkscape Beginner Tutorial: How to Make a Yoga Class Flyer
Flyer Tutor
 
Illustrator assignment 1
Illustrator assignment 1Illustrator assignment 1
Illustrator assignment 1rgosselin
 

What's hot (17)

Photoshop cs6
Photoshop cs6Photoshop cs6
Photoshop cs6
 
Part 3 how to make simple tarpulin in adobe photoshop cs6
Part 3 how to make simple tarpulin in adobe photoshop cs6Part 3 how to make simple tarpulin in adobe photoshop cs6
Part 3 how to make simple tarpulin in adobe photoshop cs6
 
Mayacompositetutorials
MayacompositetutorialsMayacompositetutorials
Mayacompositetutorials
 
Tài liệu tự học Family trong Revit (phần 3)
Tài liệu tự học Family trong Revit (phần 3)Tài liệu tự học Family trong Revit (phần 3)
Tài liệu tự học Family trong Revit (phần 3)
 
Tài liệu tự học Family trong Revit (phần 2)
Tài liệu tự học Family trong Revit (phần 2)Tài liệu tự học Family trong Revit (phần 2)
Tài liệu tự học Family trong Revit (phần 2)
 
Tài liệu tự học Family trong Revit (phần 4)
Tài liệu tự học Family trong Revit (phần 4)Tài liệu tự học Family trong Revit (phần 4)
Tài liệu tự học Family trong Revit (phần 4)
 
Create a canvas banner in photoshop
Create a canvas banner in photoshopCreate a canvas banner in photoshop
Create a canvas banner in photoshop
 
IndesignFlyer
IndesignFlyerIndesignFlyer
IndesignFlyer
 
adobephotoshop_frerking
adobephotoshop_frerking adobephotoshop_frerking
adobephotoshop_frerking
 
Digital Drawing Assignment Directions & Tutorial
Digital Drawing Assignment Directions & TutorialDigital Drawing Assignment Directions & Tutorial
Digital Drawing Assignment Directions & Tutorial
 
d_ltr_print
d_ltr_printd_ltr_print
d_ltr_print
 
Learning Illustrator CS6 with 100 practical exercises
Learning Illustrator CS6 with 100 practical exercisesLearning Illustrator CS6 with 100 practical exercises
Learning Illustrator CS6 with 100 practical exercises
 
Inkscape Tutorials: Digital Photography Flyer
Inkscape Tutorials: Digital Photography FlyerInkscape Tutorials: Digital Photography Flyer
Inkscape Tutorials: Digital Photography Flyer
 
dr_3
dr_3dr_3
dr_3
 
Inkscape Fall Fest Flyer Tutorial
Inkscape Fall Fest Flyer TutorialInkscape Fall Fest Flyer Tutorial
Inkscape Fall Fest Flyer Tutorial
 
Inkscape Beginner Tutorial: How to Make a Yoga Class Flyer
Inkscape Beginner Tutorial: How to Make a Yoga Class FlyerInkscape Beginner Tutorial: How to Make a Yoga Class Flyer
Inkscape Beginner Tutorial: How to Make a Yoga Class Flyer
 
Illustrator assignment 1
Illustrator assignment 1Illustrator assignment 1
Illustrator assignment 1
 

Similar to Pscs6 ch08 ppt

Pscs6 ch01 ppt
Pscs6 ch01 pptPscs6 ch01 ppt
Pscs6 ch01 ppt
cpashke
 
Word ch10
Word ch10Word ch10
Word ch10
Kristin Harrison
 
Gl2010 m5 wd3-presentation
Gl2010 m5 wd3-presentationGl2010 m5 wd3-presentation
Gl2010 m5 wd3-presentationTracie King
 
Corel Draw Introduction
Corel Draw IntroductionCorel Draw Introduction
Corel Draw Introduction
Rajamanickam Gomathijayam
 
Word ch11
Word ch11Word ch11
Word ch11
Kristin Harrison
 
Adobe illustrator getting started
Adobe illustrator getting startedAdobe illustrator getting started
Adobe illustrator getting started
Danielle Oser, APR
 
Access2013 ch08
Access2013 ch08Access2013 ch08
Access2013 ch08
Kristin Harrison
 
Excel chapter 01
Excel chapter 01Excel chapter 01
Excel chapter 01
teeworthy
 
SolidWorks-Tutorial.pdf
SolidWorks-Tutorial.pdfSolidWorks-Tutorial.pdf
SolidWorks-Tutorial.pdf
TanvirFaruque
 

Similar to Pscs6 ch08 ppt (20)

Pscs6 ch01 ppt
Pscs6 ch01 pptPscs6 ch01 ppt
Pscs6 ch01 ppt
 
dr_1
dr_1dr_1
dr_1
 
dr_1
dr_1dr_1
dr_1
 
Word ch10
Word ch10Word ch10
Word ch10
 
PowerPoint 2013 ch04
PowerPoint 2013 ch04PowerPoint 2013 ch04
PowerPoint 2013 ch04
 
Gl2010 m5 wd3-presentation
Gl2010 m5 wd3-presentationGl2010 m5 wd3-presentation
Gl2010 m5 wd3-presentation
 
Corel Draw Introduction
Corel Draw IntroductionCorel Draw Introduction
Corel Draw Introduction
 
dr_1
dr_1dr_1
dr_1
 
dr_1
dr_1dr_1
dr_1
 
Word ch11
Word ch11Word ch11
Word ch11
 
Chapter1
Chapter1Chapter1
Chapter1
 
Dtp
DtpDtp
Dtp
 
Adobe illustrator getting started
Adobe illustrator getting startedAdobe illustrator getting started
Adobe illustrator getting started
 
dr_3
dr_3dr_3
dr_3
 
Word ch07
Word ch07Word ch07
Word ch07
 
Ig proe-wf-5.0
Ig proe-wf-5.0Ig proe-wf-5.0
Ig proe-wf-5.0
 
Ig proe-wf-5.0
Ig proe-wf-5.0Ig proe-wf-5.0
Ig proe-wf-5.0
 
Access2013 ch08
Access2013 ch08Access2013 ch08
Access2013 ch08
 
Excel chapter 01
Excel chapter 01Excel chapter 01
Excel chapter 01
 
SolidWorks-Tutorial.pdf
SolidWorks-Tutorial.pdfSolidWorks-Tutorial.pdf
SolidWorks-Tutorial.pdf
 

More from cpashke

Chapter4
Chapter4Chapter4
Chapter4
cpashke
 
Chapter3
Chapter3Chapter3
Chapter3
cpashke
 
Web Design Chapter3
Web Design Chapter3Web Design Chapter3
Web Design Chapter3
cpashke
 
Lesson 2 Importing media
Lesson 2 Importing mediaLesson 2 Importing media
Lesson 2 Importing media
cpashke
 
Exploring Movie Maker
Exploring Movie MakerExploring Movie Maker
Exploring Movie Maker
cpashke
 
Computer Literacy Lesson 31
Computer Literacy Lesson 31Computer Literacy Lesson 31
Computer Literacy Lesson 31
cpashke
 
Computer Literacy Lesson 30
Computer Literacy Lesson 30Computer Literacy Lesson 30
Computer Literacy Lesson 30
cpashke
 
Computer Literacy Lesson 29
Computer Literacy Lesson 29Computer Literacy Lesson 29
Computer Literacy Lesson 29
cpashke
 
Computer Literacy Lesson 28
Computer Literacy Lesson 28Computer Literacy Lesson 28
Computer Literacy Lesson 28
cpashke
 
Computer Literacy Lesson 27
Computer Literacy Lesson 27Computer Literacy Lesson 27
Computer Literacy Lesson 27
cpashke
 
Computer Literacy Lesson 26
Computer Literacy Lesson 26Computer Literacy Lesson 26
Computer Literacy Lesson 26
cpashke
 
Computer Literacy Lesson 25
Computer Literacy Lesson 25Computer Literacy Lesson 25
Computer Literacy Lesson 25
cpashke
 
Computer Literacy Lesson 24
Computer Literacy Lesson 24Computer Literacy Lesson 24
Computer Literacy Lesson 24
cpashke
 
Computer Literacy Lesson 23
Computer Literacy Lesson 23Computer Literacy Lesson 23
Computer Literacy Lesson 23
cpashke
 
Computer Literacy Lesson 22
Computer Literacy Lesson 22Computer Literacy Lesson 22
Computer Literacy Lesson 22
cpashke
 
Computer Literacy Lesson 21
Computer Literacy Lesson 21Computer Literacy Lesson 21
Computer Literacy Lesson 21
cpashke
 
Computer Literacy Lesson 20
Computer Literacy Lesson 20Computer Literacy Lesson 20
Computer Literacy Lesson 20
cpashke
 
Computer Literacy Lesson 19
Computer Literacy Lesson 19Computer Literacy Lesson 19
Computer Literacy Lesson 19
cpashke
 
Computer Literacy Lesson 18
Computer Literacy Lesson 18Computer Literacy Lesson 18
Computer Literacy Lesson 18
cpashke
 
Computer Literacy Lesson 17
Computer Literacy Lesson 17Computer Literacy Lesson 17
Computer Literacy Lesson 17
cpashke
 

More from cpashke (20)

Chapter4
Chapter4Chapter4
Chapter4
 
Chapter3
Chapter3Chapter3
Chapter3
 
Web Design Chapter3
Web Design Chapter3Web Design Chapter3
Web Design Chapter3
 
Lesson 2 Importing media
Lesson 2 Importing mediaLesson 2 Importing media
Lesson 2 Importing media
 
Exploring Movie Maker
Exploring Movie MakerExploring Movie Maker
Exploring Movie Maker
 
Computer Literacy Lesson 31
Computer Literacy Lesson 31Computer Literacy Lesson 31
Computer Literacy Lesson 31
 
Computer Literacy Lesson 30
Computer Literacy Lesson 30Computer Literacy Lesson 30
Computer Literacy Lesson 30
 
Computer Literacy Lesson 29
Computer Literacy Lesson 29Computer Literacy Lesson 29
Computer Literacy Lesson 29
 
Computer Literacy Lesson 28
Computer Literacy Lesson 28Computer Literacy Lesson 28
Computer Literacy Lesson 28
 
Computer Literacy Lesson 27
Computer Literacy Lesson 27Computer Literacy Lesson 27
Computer Literacy Lesson 27
 
Computer Literacy Lesson 26
Computer Literacy Lesson 26Computer Literacy Lesson 26
Computer Literacy Lesson 26
 
Computer Literacy Lesson 25
Computer Literacy Lesson 25Computer Literacy Lesson 25
Computer Literacy Lesson 25
 
Computer Literacy Lesson 24
Computer Literacy Lesson 24Computer Literacy Lesson 24
Computer Literacy Lesson 24
 
Computer Literacy Lesson 23
Computer Literacy Lesson 23Computer Literacy Lesson 23
Computer Literacy Lesson 23
 
Computer Literacy Lesson 22
Computer Literacy Lesson 22Computer Literacy Lesson 22
Computer Literacy Lesson 22
 
Computer Literacy Lesson 21
Computer Literacy Lesson 21Computer Literacy Lesson 21
Computer Literacy Lesson 21
 
Computer Literacy Lesson 20
Computer Literacy Lesson 20Computer Literacy Lesson 20
Computer Literacy Lesson 20
 
Computer Literacy Lesson 19
Computer Literacy Lesson 19Computer Literacy Lesson 19
Computer Literacy Lesson 19
 
Computer Literacy Lesson 18
Computer Literacy Lesson 18Computer Literacy Lesson 18
Computer Literacy Lesson 18
 
Computer Literacy Lesson 17
Computer Literacy Lesson 17Computer Literacy Lesson 17
Computer Literacy Lesson 17
 

Recently uploaded

June 3, 2024 Anti-Semitism Letter Sent to MIT President Kornbluth and MIT Cor...
June 3, 2024 Anti-Semitism Letter Sent to MIT President Kornbluth and MIT Cor...June 3, 2024 Anti-Semitism Letter Sent to MIT President Kornbluth and MIT Cor...
June 3, 2024 Anti-Semitism Letter Sent to MIT President Kornbluth and MIT Cor...
Levi Shapiro
 
The Accursed House by Émile Gaboriau.pptx
The Accursed House by Émile Gaboriau.pptxThe Accursed House by Émile Gaboriau.pptx
The Accursed House by Émile Gaboriau.pptx
DhatriParmar
 
"Protectable subject matters, Protection in biotechnology, Protection of othe...
"Protectable subject matters, Protection in biotechnology, Protection of othe..."Protectable subject matters, Protection in biotechnology, Protection of othe...
"Protectable subject matters, Protection in biotechnology, Protection of othe...
SACHIN R KONDAGURI
 
Introduction to AI for Nonprofits with Tapp Network
Introduction to AI for Nonprofits with Tapp NetworkIntroduction to AI for Nonprofits with Tapp Network
Introduction to AI for Nonprofits with Tapp Network
TechSoup
 
Instructions for Submissions thorugh G- Classroom.pptx
Instructions for Submissions thorugh G- Classroom.pptxInstructions for Submissions thorugh G- Classroom.pptx
Instructions for Submissions thorugh G- Classroom.pptx
Jheel Barad
 
Mule 4.6 & Java 17 Upgrade | MuleSoft Mysore Meetup #46
Mule 4.6 & Java 17 Upgrade | MuleSoft Mysore Meetup #46Mule 4.6 & Java 17 Upgrade | MuleSoft Mysore Meetup #46
Mule 4.6 & Java 17 Upgrade | MuleSoft Mysore Meetup #46
MysoreMuleSoftMeetup
 
Synthetic Fiber Construction in lab .pptx
Synthetic Fiber Construction in lab .pptxSynthetic Fiber Construction in lab .pptx
Synthetic Fiber Construction in lab .pptx
Pavel ( NSTU)
 
special B.ed 2nd year old paper_20240531.pdf
special B.ed 2nd year old paper_20240531.pdfspecial B.ed 2nd year old paper_20240531.pdf
special B.ed 2nd year old paper_20240531.pdf
Special education needs
 
Honest Reviews of Tim Han LMA Course Program.pptx
Honest Reviews of Tim Han LMA Course Program.pptxHonest Reviews of Tim Han LMA Course Program.pptx
Honest Reviews of Tim Han LMA Course Program.pptx
timhan337
 
The basics of sentences session 5pptx.pptx
The basics of sentences session 5pptx.pptxThe basics of sentences session 5pptx.pptx
The basics of sentences session 5pptx.pptx
heathfieldcps1
 
The approach at University of Liverpool.pptx
The approach at University of Liverpool.pptxThe approach at University of Liverpool.pptx
The approach at University of Liverpool.pptx
Jisc
 
Lapbook sobre os Regimes Totalitários.pdf
Lapbook sobre os Regimes Totalitários.pdfLapbook sobre os Regimes Totalitários.pdf
Lapbook sobre os Regimes Totalitários.pdf
Jean Carlos Nunes Paixão
 
Overview on Edible Vaccine: Pros & Cons with Mechanism
Overview on Edible Vaccine: Pros & Cons with MechanismOverview on Edible Vaccine: Pros & Cons with Mechanism
Overview on Edible Vaccine: Pros & Cons with Mechanism
DeeptiGupta154
 
Model Attribute Check Company Auto Property
Model Attribute  Check Company Auto PropertyModel Attribute  Check Company Auto Property
Model Attribute Check Company Auto Property
Celine George
 
Thesis Statement for students diagnonsed withADHD.ppt
Thesis Statement for students diagnonsed withADHD.pptThesis Statement for students diagnonsed withADHD.ppt
Thesis Statement for students diagnonsed withADHD.ppt
EverAndrsGuerraGuerr
 
Adversarial Attention Modeling for Multi-dimensional Emotion Regression.pdf
Adversarial Attention Modeling for Multi-dimensional Emotion Regression.pdfAdversarial Attention Modeling for Multi-dimensional Emotion Regression.pdf
Adversarial Attention Modeling for Multi-dimensional Emotion Regression.pdf
Po-Chuan Chen
 
aaaaaaaaaaaaaaaaaaaaaaaaaaaaaaaaaaaaaaaaa
aaaaaaaaaaaaaaaaaaaaaaaaaaaaaaaaaaaaaaaaaaaaaaaaaaaaaaaaaaaaaaaaaaaaaaaaaaaaaaaaaa
aaaaaaaaaaaaaaaaaaaaaaaaaaaaaaaaaaaaaaaaa
siemaillard
 
A Strategic Approach: GenAI in Education
A Strategic Approach: GenAI in EducationA Strategic Approach: GenAI in Education
A Strategic Approach: GenAI in Education
Peter Windle
 
Supporting (UKRI) OA monographs at Salford.pptx
Supporting (UKRI) OA monographs at Salford.pptxSupporting (UKRI) OA monographs at Salford.pptx
Supporting (UKRI) OA monographs at Salford.pptx
Jisc
 
Language Across the Curriculm LAC B.Ed.
Language Across the  Curriculm LAC B.Ed.Language Across the  Curriculm LAC B.Ed.
Language Across the Curriculm LAC B.Ed.
Atul Kumar Singh
 

Recently uploaded (20)

June 3, 2024 Anti-Semitism Letter Sent to MIT President Kornbluth and MIT Cor...
June 3, 2024 Anti-Semitism Letter Sent to MIT President Kornbluth and MIT Cor...June 3, 2024 Anti-Semitism Letter Sent to MIT President Kornbluth and MIT Cor...
June 3, 2024 Anti-Semitism Letter Sent to MIT President Kornbluth and MIT Cor...
 
The Accursed House by Émile Gaboriau.pptx
The Accursed House by Émile Gaboriau.pptxThe Accursed House by Émile Gaboriau.pptx
The Accursed House by Émile Gaboriau.pptx
 
"Protectable subject matters, Protection in biotechnology, Protection of othe...
"Protectable subject matters, Protection in biotechnology, Protection of othe..."Protectable subject matters, Protection in biotechnology, Protection of othe...
"Protectable subject matters, Protection in biotechnology, Protection of othe...
 
Introduction to AI for Nonprofits with Tapp Network
Introduction to AI for Nonprofits with Tapp NetworkIntroduction to AI for Nonprofits with Tapp Network
Introduction to AI for Nonprofits with Tapp Network
 
Instructions for Submissions thorugh G- Classroom.pptx
Instructions for Submissions thorugh G- Classroom.pptxInstructions for Submissions thorugh G- Classroom.pptx
Instructions for Submissions thorugh G- Classroom.pptx
 
Mule 4.6 & Java 17 Upgrade | MuleSoft Mysore Meetup #46
Mule 4.6 & Java 17 Upgrade | MuleSoft Mysore Meetup #46Mule 4.6 & Java 17 Upgrade | MuleSoft Mysore Meetup #46
Mule 4.6 & Java 17 Upgrade | MuleSoft Mysore Meetup #46
 
Synthetic Fiber Construction in lab .pptx
Synthetic Fiber Construction in lab .pptxSynthetic Fiber Construction in lab .pptx
Synthetic Fiber Construction in lab .pptx
 
special B.ed 2nd year old paper_20240531.pdf
special B.ed 2nd year old paper_20240531.pdfspecial B.ed 2nd year old paper_20240531.pdf
special B.ed 2nd year old paper_20240531.pdf
 
Honest Reviews of Tim Han LMA Course Program.pptx
Honest Reviews of Tim Han LMA Course Program.pptxHonest Reviews of Tim Han LMA Course Program.pptx
Honest Reviews of Tim Han LMA Course Program.pptx
 
The basics of sentences session 5pptx.pptx
The basics of sentences session 5pptx.pptxThe basics of sentences session 5pptx.pptx
The basics of sentences session 5pptx.pptx
 
The approach at University of Liverpool.pptx
The approach at University of Liverpool.pptxThe approach at University of Liverpool.pptx
The approach at University of Liverpool.pptx
 
Lapbook sobre os Regimes Totalitários.pdf
Lapbook sobre os Regimes Totalitários.pdfLapbook sobre os Regimes Totalitários.pdf
Lapbook sobre os Regimes Totalitários.pdf
 
Overview on Edible Vaccine: Pros & Cons with Mechanism
Overview on Edible Vaccine: Pros & Cons with MechanismOverview on Edible Vaccine: Pros & Cons with Mechanism
Overview on Edible Vaccine: Pros & Cons with Mechanism
 
Model Attribute Check Company Auto Property
Model Attribute  Check Company Auto PropertyModel Attribute  Check Company Auto Property
Model Attribute Check Company Auto Property
 
Thesis Statement for students diagnonsed withADHD.ppt
Thesis Statement for students diagnonsed withADHD.pptThesis Statement for students diagnonsed withADHD.ppt
Thesis Statement for students diagnonsed withADHD.ppt
 
Adversarial Attention Modeling for Multi-dimensional Emotion Regression.pdf
Adversarial Attention Modeling for Multi-dimensional Emotion Regression.pdfAdversarial Attention Modeling for Multi-dimensional Emotion Regression.pdf
Adversarial Attention Modeling for Multi-dimensional Emotion Regression.pdf
 
aaaaaaaaaaaaaaaaaaaaaaaaaaaaaaaaaaaaaaaaa
aaaaaaaaaaaaaaaaaaaaaaaaaaaaaaaaaaaaaaaaaaaaaaaaaaaaaaaaaaaaaaaaaaaaaaaaaaaaaaaaaa
aaaaaaaaaaaaaaaaaaaaaaaaaaaaaaaaaaaaaaaaa
 
A Strategic Approach: GenAI in Education
A Strategic Approach: GenAI in EducationA Strategic Approach: GenAI in Education
A Strategic Approach: GenAI in Education
 
Supporting (UKRI) OA monographs at Salford.pptx
Supporting (UKRI) OA monographs at Salford.pptxSupporting (UKRI) OA monographs at Salford.pptx
Supporting (UKRI) OA monographs at Salford.pptx
 
Language Across the Curriculm LAC B.Ed.
Language Across the  Curriculm LAC B.Ed.Language Across the  Curriculm LAC B.Ed.
Language Across the Curriculm LAC B.Ed.
 

Pscs6 ch08 ppt

  • 2. • Describe the characteristics of clip art and vector graphics • Create and manage layer groups using the Layers panel • Differentiate between vector and raster graphic images • Create shape layers and paths with the Pen Tool • Draw line segments and curved paths • Add and convert anchor points Chapter 8 Working with Vector Graphics 2 Objectives
  • 3. • Move and modify paths using the Path Selection and Direct Selection Tools • Use the Freeform Pen Tool with the magnetic pen option • Add detail to clip art images • Use the Note Tool • Enter text in a custom shape • Apply effects to optimize clip art Objectives Chapter 8 Working with Vector Graphics 3
  • 4. Chapter 8 Working with Vector Graphics 4 Project – Creating a Clip Art Image
  • 5. • Plan and organize layers • Use vector graphics for clip art • Add detail to enhance clip art • Annotate graphics within the file Chapter 8 Working with Vector Graphics 5 General Project Guidelines
  • 6. Chapter 8 Working with Vector Graphics 6 Locking Layers
  • 7. • On the Layers panel, select the layer to lock • Click the Lock all button to lock the layer and to display the solid lock icon Chapter 8 Working with Vector Graphics 7 Locking Layers
  • 8. Chapter 8 Working with Vector Graphics 8 Path Lines and Anchor Points
  • 9. • On the Layers panel, select the layer • On the Tools panel, right-click the current Pen Tool button to display the context menu • Click Pen Tool to select it • On the options bar, click the ‘Pick tool mode’ button to display the mode options • Click Shape to set the Pen Tool to draw in Shape mode Chapter 8 Working with Vector Graphics 9 Choosing the Pen Tool
  • 10. Chapter 8 Working with Vector Graphics 10 Choosing the Pen Tool
  • 11. • In the document window, click the location of the first anchor point • Move the mouse pointer to the location of the second anchor point, and then click and drag the mouse pointer as desired to create the first curve • Move the mouse pointer to the location of the third anchor point, and then click and drag the mouse pointer as desired to create another curve • Press the BACKSPACE key to delete the third anchor point • Click the second anchor point to reestablish the path • ALT+click the second anchor point to remove the direction point and convert the point to a corner point • Drag as desired to create another curve Chapter 8 Working with Vector Graphics 11 Creating a Shape Layer Using the Pen Tool
  • 12. • Repeat the previous steps to create the additional curves and corner points • Point to the starting anchor point so the mouse pointer shows a small circle next to the pen icon, then click to close the path Chapter 8 Working with Vector Graphics 12 Creating a Shape Layer Using the Pen Tool
  • 13. • On the Tools panel, right-click the Pen Tool button to display the context menu • Click Add Anchor Point Tool in the list • In the document window, click the desired location for the anchor point Chapter 8 Working with Vector Graphics 13 Adding Anchor Points to a Shape
  • 14. Chapter 8 Working with Vector Graphics 14 Repositioning an Anchor Point • On the Tools panel, right-click the Path Selection Tool button to display the context menu • Click Direct Selection Tool in the list • Drag the new anchor point to the desired location
  • 15. • With the Direct Selection Tool active, click the desired anchor point to select it • Drag the direction point to the desired location Chapter 8 Working with Vector Graphics 15 Using Direction Points
  • 16. • On the Tools panel, right-click the current shape tool button to display the context menu and then click Line Tool to select it • On the options bar, click the ‘Pick tool mode’ button to display its menu • On the ‘Pick tool mode’ button, click Pixels to draw pixels rather than a shape • On the options bar set the desired weight • SHIFT+drag the desired lines on the canvas Chapter 8 Working with Vector Graphics 16 Using a Shape Tool in Pixel Mode
  • 17. Chapter 8 Working with Vector Graphics 17 Using a Shape Tool in Pixel Mode
  • 18. • Zoom in as necessary using the Zoom Tool on the Tools panel • Click the desired layer to select it • Click the Direct Selection Tool button on the Tools panel to select it • Drag the anchor points to the desired locations • When you are finished repositioning the anchor points, double-click the Hand Tool to fit the canvas to your screen Chapter 8 Working with Vector Graphics 18 Fine-Tuning a Shape
  • 19. Chapter 8 Working with Vector Graphics 19 Fine-Tuning a Shape
  • 20. • Click the layer to select it • Select the Pen Tool • On the options bar, click the ‘Pick tool mode’ button and then click Path to select the mode that creates a path on the Paths panel • Click the desired anchor points and convert the anchor points to corner points as necessary • Click the starting point to close the path Chapter 8 Working with Vector Graphics 20 Creating a Work Path Using the Pen Tool
  • 21. Chapter 8 Working with Vector Graphics 21 Creating a Work Path Using the Pen Tool
  • 22. • Click the Paths panel tab to display the Paths panel Chapter 8 Working with Vector Graphics 22 Displaying the Paths Panel
  • 23. • On the Paths panel, double-click the path to rename, type the desired name, and then press ENTER to rename the path Chapter 8 Working with Vector Graphics 23 Saving a Work Path as a Named Path
  • 24. • On the Tools panel, right-click the current Pen Tool button to display the context menu • Click Freeform Pen Tool to select it • On the options bar, click the Magnetic check box so that it displays a check mark • Click the location to begin drawing • Drag slowly around the object • When you return to the starting point, point to the first anchor point so that the mouse pointer displays a small circle indicating the path will be closed • Click the first anchor point to close the path Chapter 8 Working with Vector Graphics 24 Creating a Path using the Freeform Pen Tool
  • 25. Chapter 8 Working with Vector Graphics 25 Creating a Path using the Freeform Pen Tool
  • 26. • On the Tools panel, right-click the Direct Selection Tool and click the Path Selection Tool to select it • Click the outline of the first path • Press CTRL+C to copy the path • Click the second path to select it • Press CTRL+V to paste the copied path to the selected path Chapter 8 Working with Vector Graphics 26 Merging Paths
  • 27. Chapter 8 Working with Vector Graphics 27 Merging Paths
  • 28. • Click the path to delete • Click the ‘Delete current path’ button on the Paths panel status bar to delete the path • Click the Yes button when prompted to confirm the deletion • Rename the path as desired Chapter 8 Working with Vector Graphics 28 Deleting and Renaming Paths
  • 29. Chapter 8 Working with Vector Graphics 29 Deleting and Renaming Paths
  • 30. • With the path selected, click Layer on the application bar, and then point to New Fill Layer to display the fill choices • Click Gradient to display the New Layer dialog box • Type the desired layer name in the Name box • Click the OK button to display the Gradient Fill dialog box • Edit the gradient as desired • Click the OK button to close the Gradient Fill dialog box • Click the Layers panel to display the layers Chapter 8 Working with Vector Graphics 30 Creating a Shape Layer from a Path
  • 31. Chapter 8 Working with Vector Graphics 31 Creating a Shape Layer from a Path
  • 32. Chapter 8 Working with Vector Graphics 32 Layer Groups
  • 33. • Click the first layer to select it • CTRL+click the additional layers to select • Click the Layers panel menu button to display the menu • Click New Group from Layers to display the New Group from Layers dialog box • Type the desired layer name in the Name text box. Click the Color box arrow, and then click the desired color • Click the OK button to create the new layer group Chapter 8 Working with Vector Graphics 33 Creating a Layer Group from Layers
  • 34. Chapter 8 Working with Vector Graphics 34 Creating a Layer Group from Layers
  • 35. • Display the Layers panel menu and then click New Group. Name the group and assign the desired color • ALT+click the ‘Create a new group’ button at the bottom of the Layers panel to create the group Chapter 8 Working with Vector Graphics 35 Creating a New Empty Layer Group
  • 36. Chapter 8 Working with Vector Graphics 36 Creating a New Empty Layer Group
  • 37. • Drag a layer onto another layer to nest it Chapter 8 Working with Vector Graphics 37 Nesting Layer Groups
  • 38. • On the Tools panel, right-click the current Shape Tool button, and then click Custom Shape Tool • On the options bar, click the ‘Pick tool mode’ button, and then click Shape, if necessary, to select it • On the options bar, click the ‘Set shape fill type’ button and then click the desired fill color • Click the Custom Shape picker button and then click the Custom Shape picker menu button to display the Shapes menu • Click the desired category to load that set of shapes • Click the OK button when prompted to replace the current shapes • Click the desired shape in the Custom Shape picker • SHIFT+drag in the document window to create the shape Chapter 8 Working with Vector Graphics 38 Using a Custom Shape
  • 39. Chapter 8 Working with Vector Graphics 39 Using a Custom Shape
  • 40. • With the layer selected, press the T key to access the current Type Tool • Click the shape, and then type the desired text • On the options bar, click the ‘Commit any current edits’ button to close the text box • On the Tools panel, click the Move Tool and reposition the text as necessary Chapter 8 Working with Vector Graphics 40 Creating Text within a Shape
  • 41. Chapter 8 Working with Vector Graphics 41 Creating Text within a Shape
  • 42. • Click Type on the Application bar to display the Type menu • Click Convert to Shape to convert the text to a shape Chapter 8 Working with Vector Graphics 42 Converting Text to a Shape
  • 43. • Press the A key to select the Direct Selection Tool • Drag the anchor points for the shape to the desired location Chapter 8 Working with Vector Graphics 43 Altering a Shape
  • 44. • On the Tools panel, double-click the Hand Tool to fit the document to the screen • Select the desired layer to fill • Click the ‘Add a layer style’ button on the Layers panel status bar to display the list of layer styles • Click Pattern Overlay to display the Layer Style dialog box • In the Layer Style dialog box, click the Pattern picker to display thumbnails of the current patterns • Click the desired pattern • Click the OK button to apply the pattern Chapter 8 Working with Vector Graphics 44 Filling a Shape with a Pattern
  • 45. Chapter 8 Working with Vector Graphics 45 Filling a Shape with a Pattern
  • 46. • Right-click the Eyedropper Tool to display its context menu • Click Note Tool in the menu • Click the desired location the document window to open the Notes panel • Type the desired text in the Notes panel • Click the Notes icon on the vertical docking to hide the panel Chapter 8 Working with Vector Graphics 46 Creating a Note
  • 47. Chapter 8 Working with Vector Graphics 47 Creating a Note
  • 48. • Double-click the note icon on the canvas to open the Notes panel and display the note • Click the Notes icon on the vertical docking to hide the panel Chapter 8 Working with Vector Graphics 48 Viewing a Note
  • 49. • Describe the characteristics of clip art and vector graphics • Create and manage layer groups using the Layers panel • Differentiate between vector and raster graphic images • Create shape layers and paths with the Pen Tool • Draw line segments and curved paths • Add and convert anchor points Chapter 8 Working with Vector Graphics 49 Chapter Summary
  • 50. • Move and modify paths using the Path Selection and Direct Selection Tools • Use the Freeform Pen Tool with the magnetic pen option • Add detail to clip art images • Use the Note Tool • Enter text in a custom shape • Apply effects to optimize clip art Chapter Summary Chapter 8 Working with Vector Graphics 50