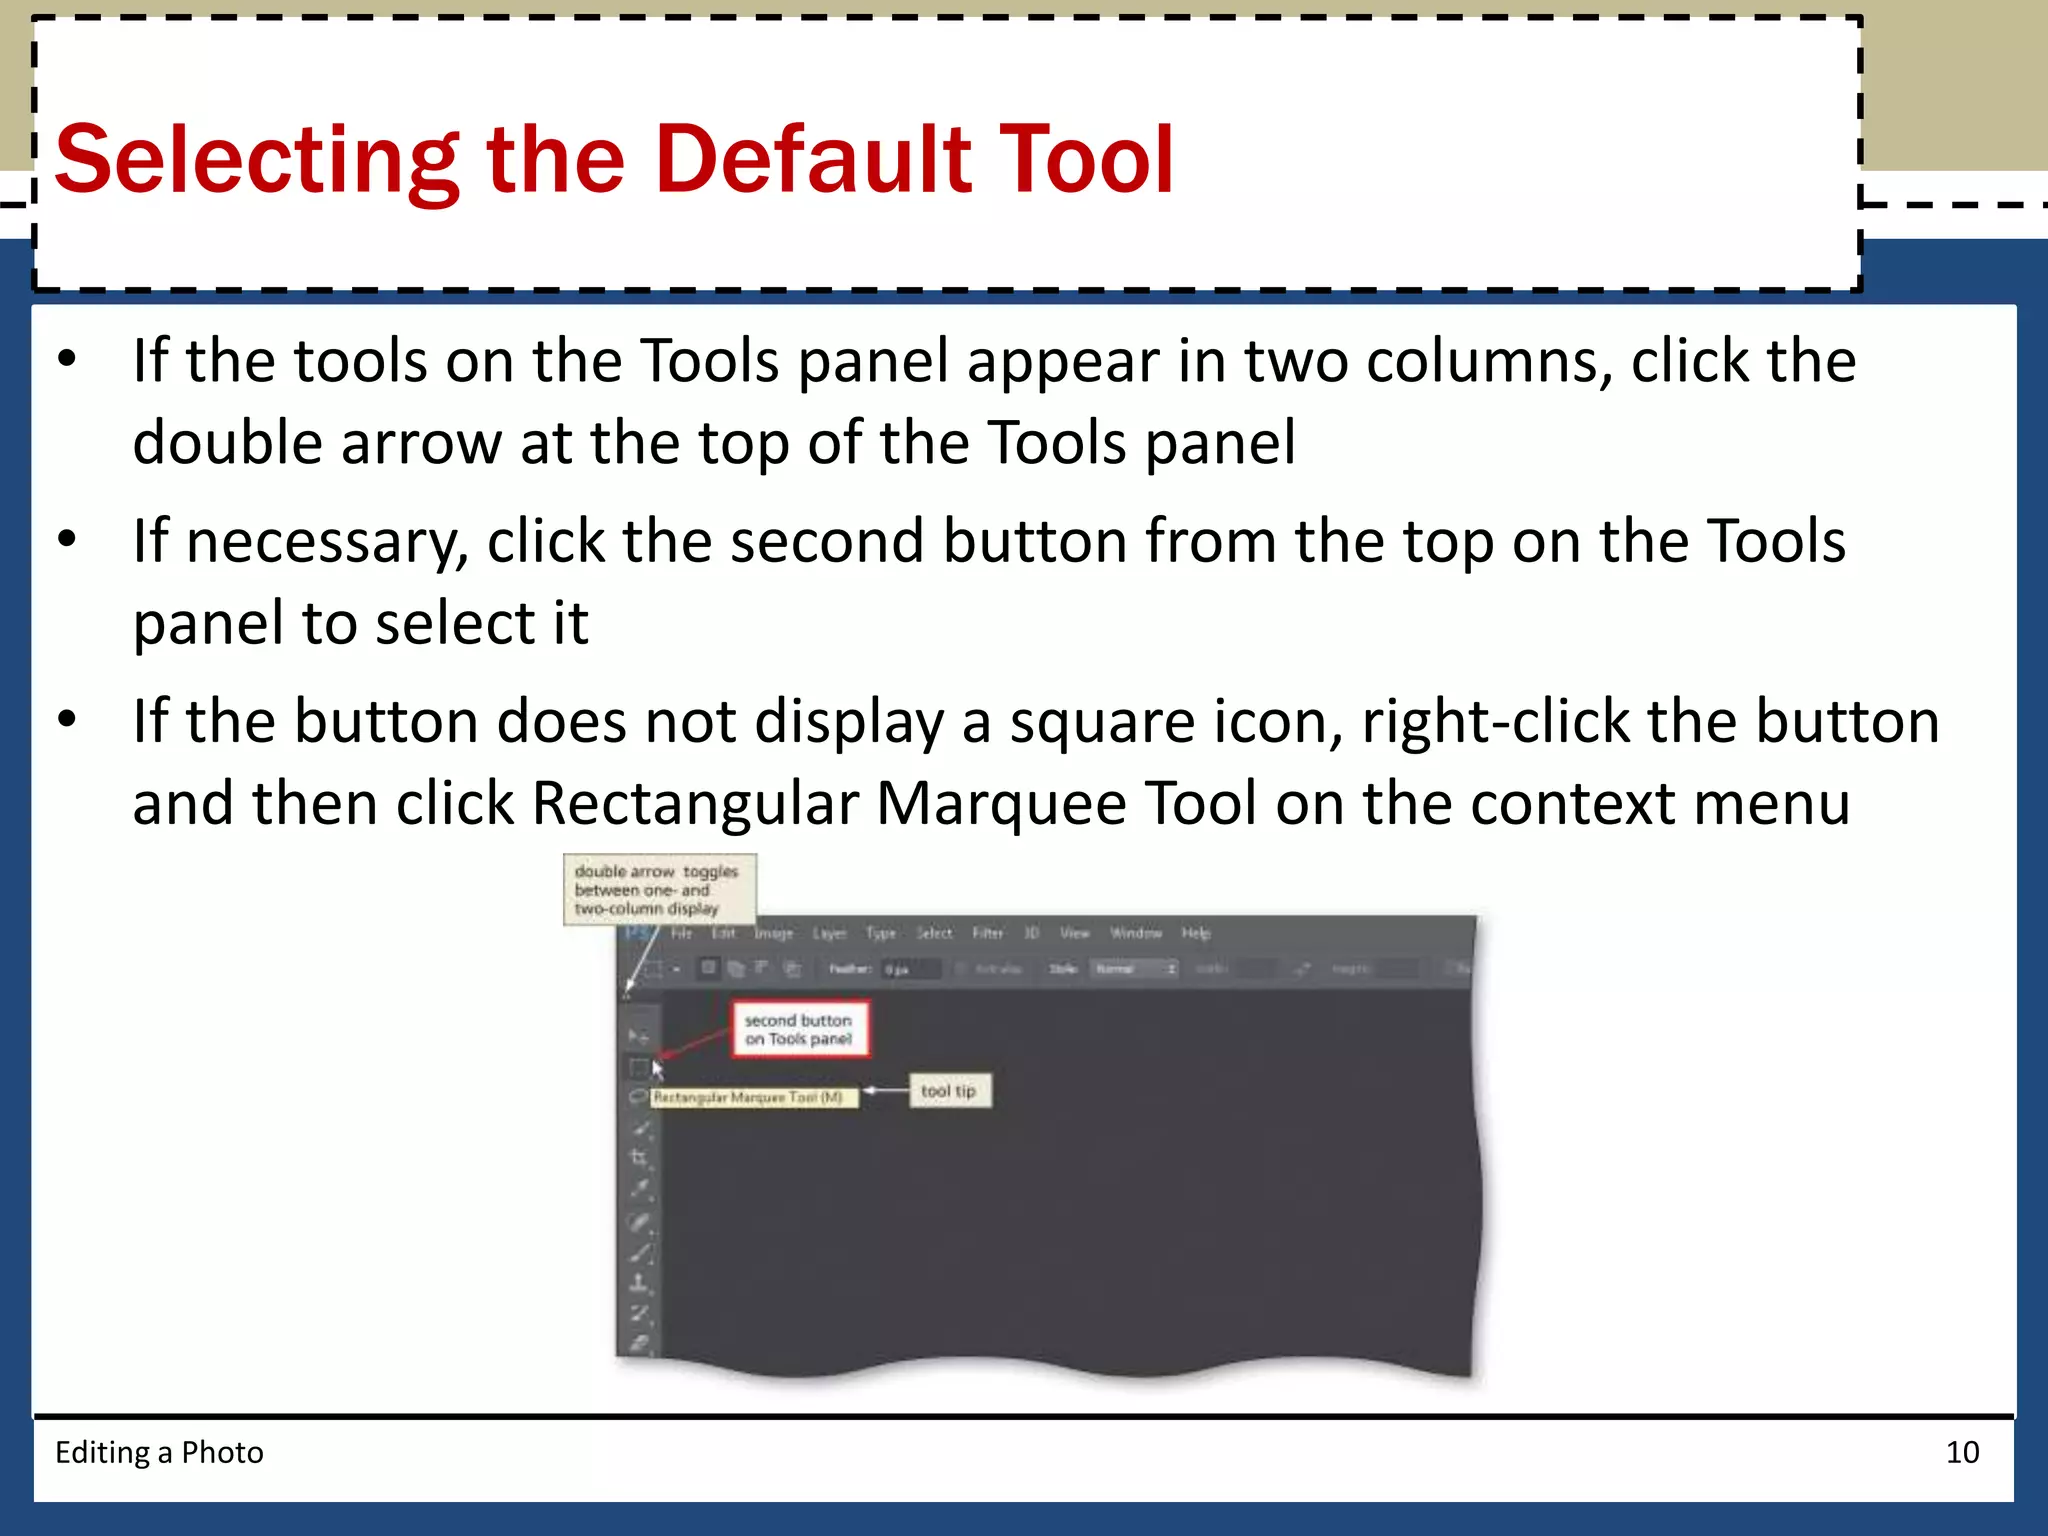
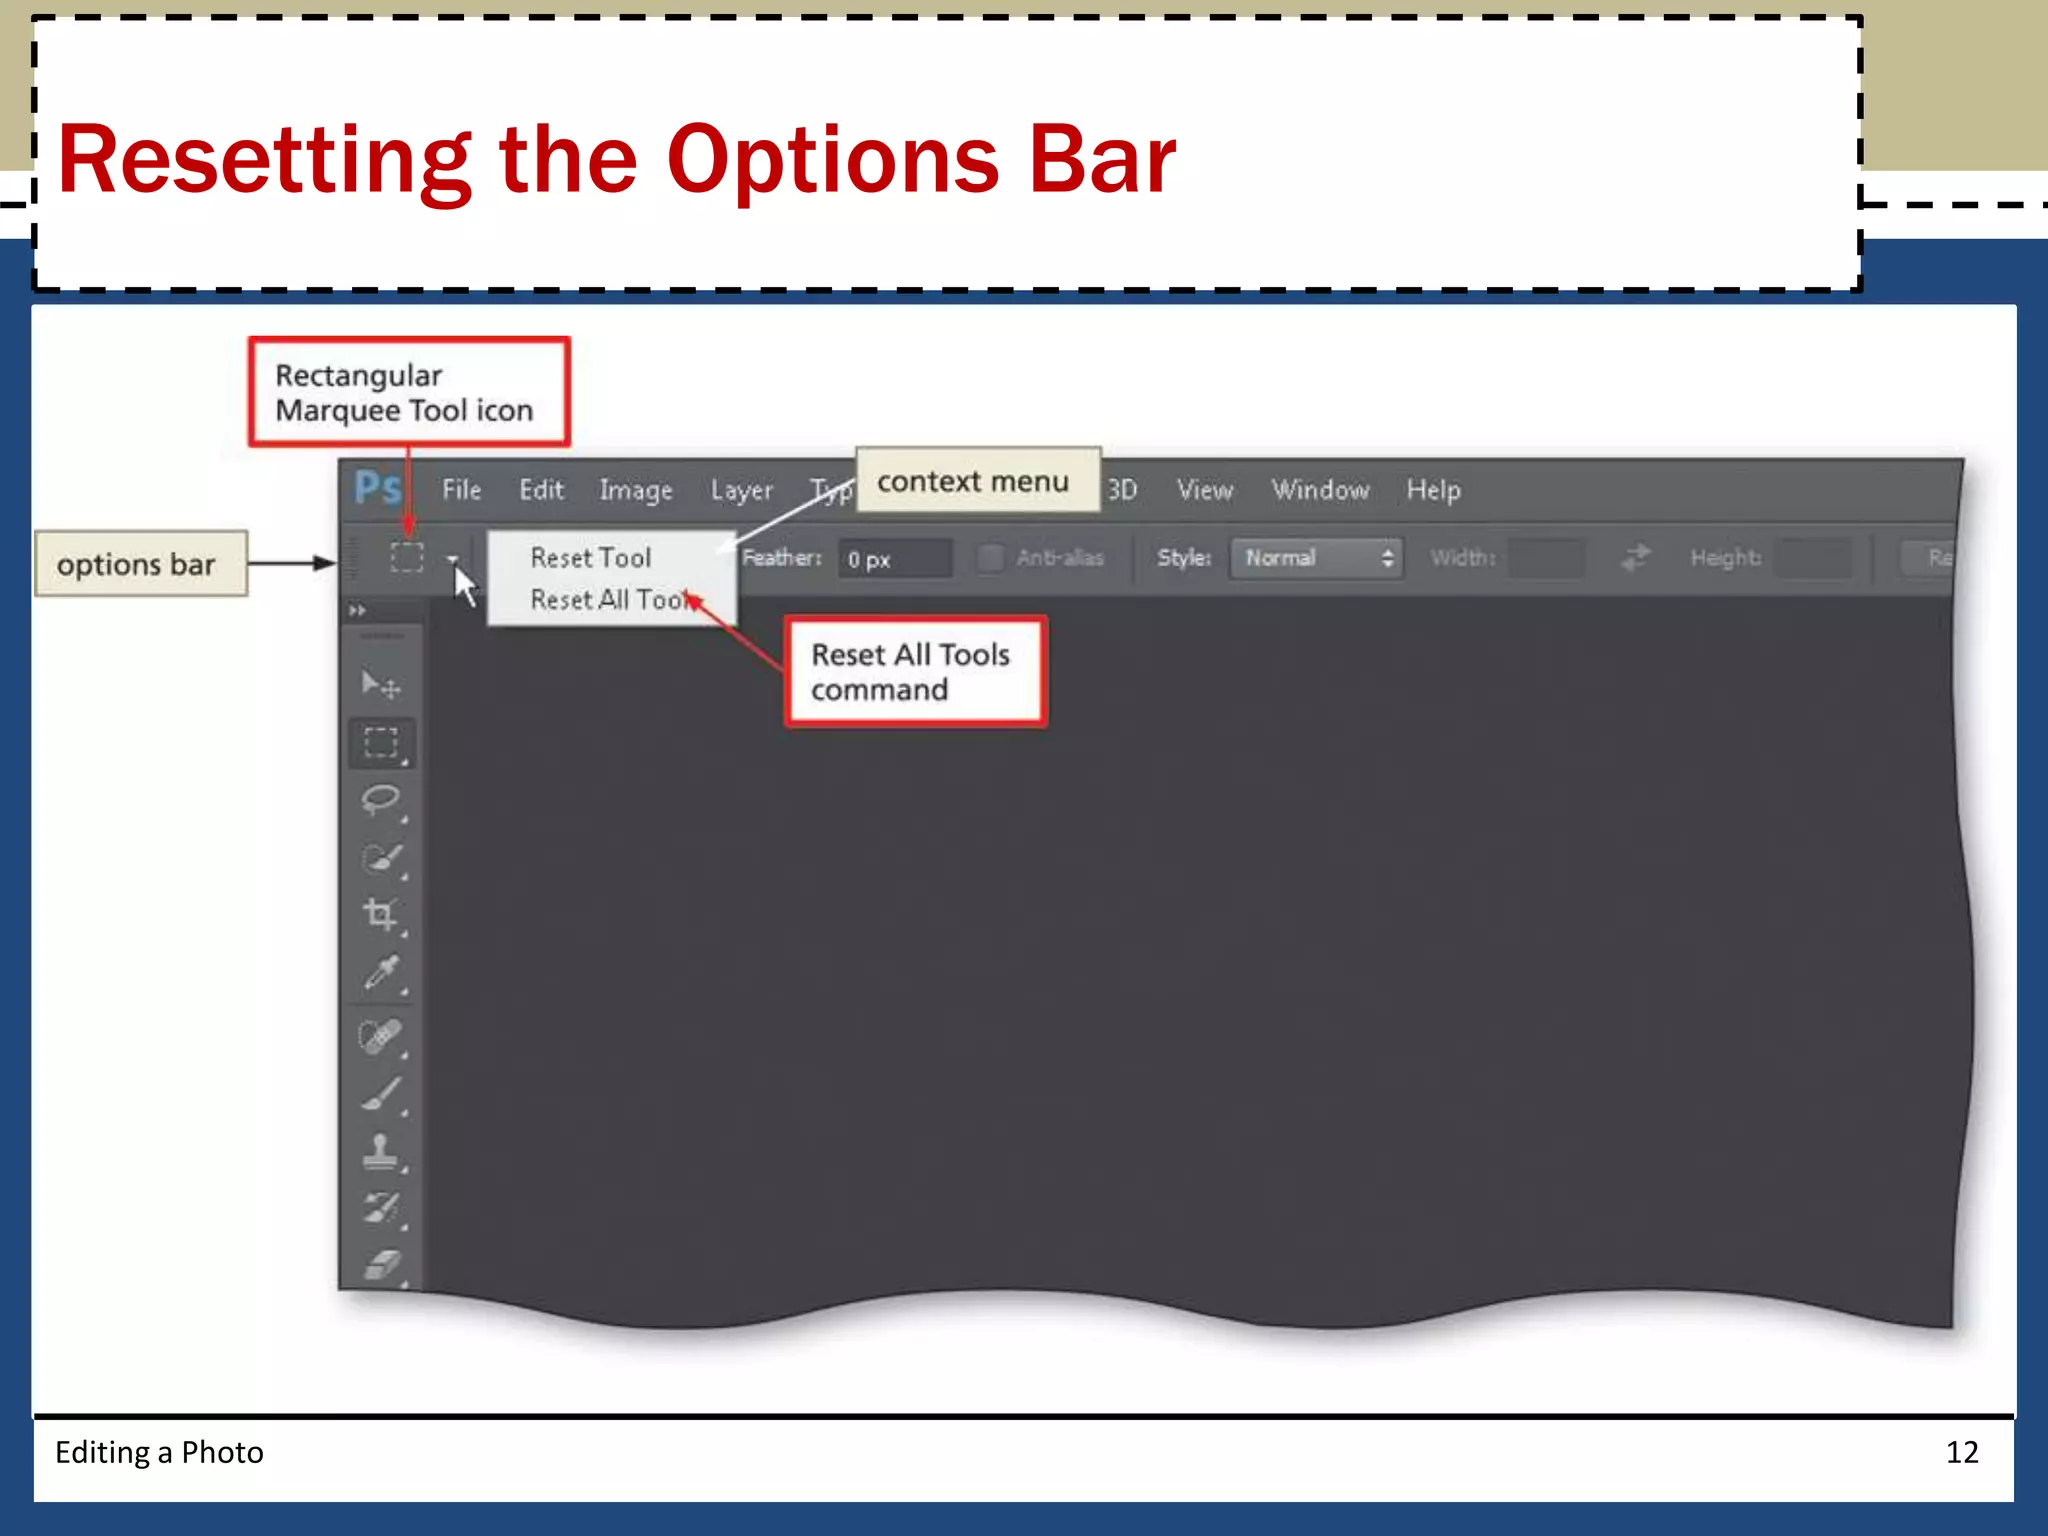
Adobe® 
Photoshop® CS6 
Chapter 1 
Editing a Photo
Objectives 
• Start Photoshop and customize the Photoshop 
workspace 
• Open a photo 
• Identify parts of the Photoshop workspace 
• Explain file types 
• Save a photo for both print and the Web 
• View a photo using the Zoom Tool, Navigator 
panel, and the Hand Tool 
• Display rulers 
Editing a Photo 2
Objectives 
• Crop a photo using the rule of thirds overlay 
• Save a photo for both print and the Web 
• Create a border 
• Open a recent file 
• Resize a photo 
• Insert text and stroke 
• Print a photo 
• Access Photoshop Help 
• Close a file and quit Photoshop 
Editing a Photo 3
Project – Postcard Graphic 
Editing a Photo 4
General Project Guidelines 
• Find an appropriate image or photo 
• Determine how to edit the photo to highlight the 
theme 
• Identify finishing touches that will further 
enhance the photo 
• Prepare for publication 
Editing a Photo 5
Starting Photoshop 
• Click the Start button on the Windows 7 taskbar to 
display the Start menu 
• Type Photoshop CS6 as the search text in the 
‘Search programs and files’ text box, and watch the 
search results appear on the Start menu 
• Click Adobe Photoshop CS6 in the search results on 
the Start menu to start Photoshop 
• After a few moments, when the Photoshop window is 
displayed, if the window is not maximized, click the 
Maximize button next to the Close button on the 
Application bar to maximize the window 
Editing a Photo 6
Starting Photoshop 
Editing a Photo 7
Selecting the Essentials Workspace 
• Click Window on the Application bar to display the 
Window menu 
• Point to Workspace on the Window menu to display 
the Workspace submenu 
• Click Essentials (Default) on the Workspace submenu 
to select the default workspace panels 
• Click Window on the Application bar and then point 
to Workspace again to display the submenu 
• Click Reset Essentials to restore the workspace to its 
default settings and reposition any panels that may 
have been moved 
Editing a Photo 8
Selecting the Essentials Workspace 
Editing a Photo 9
Selecting the Default Tool 
• If the tools on the Tools panel appear in two columns, click the 
double arrow at the top of the Tools panel 
• If necessary, click the second button from the top on the Tools 
panel to select it 
• If the button does not display a square icon, right-click the button 
and then click Rectangular Marquee Tool on the context menu 
Editing a Photo 10
Resetting the Options Bar 
• Right-click the Rectangular Marquee Tool icon on 
the options bar to display its context menu 
• Click Reset All Tools to display a confirmation 
dialog box 
• Click the OK button to restore the tools to their 
default settings 
Editing a Photo 11
Resetting the Options Bar 
Editing a Photo 12
Resetting the Interface Color 
• Click Edit on the Application bar, and then point to 
Preferences to display the Preferences submenu 
• Click Interface on the Preferences submenu to 
display the Preferences dialog box 
• In the Appearance area, click the third button, 
Medium Gray, to change the interface color 
• Click the OK button in the Preferences dialog box 
to close the dialog box and return to the 
Photoshop workspace 
Editing a Photo 13
Resetting the Interface Color 
Editing a Photo 14
Opening a Photo 
• Click File on the Application bar to display the File 
menu 
• Click Open on the File menu to display the Open 
dialog box 
• Click the Look in box arrow to display a list of 
available storage locations, and then select the 
desired storage location 
• Navigate to the location of the photo you wish to 
open, and then click the file to select it 
• Click the Open button to open the selected file and 
display the open photo in the Photoshop workspace 
Editing a Photo 15
Opening a Photo 
Editing a Photo 16
The Application Bar 
Editing a Photo 17
The Menu Bar and the Options Bar 
Editing a Photo 18
The Options Bar 
Editing a Photo 19
The Document Window 
Editing a Photo 20
Panels 
Editing a Photo 21
Saving a Photo in the PSD Format 
• Click File on the Application bar to display the File 
menu 
• Click Save As to display the Save As dialog box 
• Type the desired file name in the File name text box 
• Navigate to the desired save location 
• Click the Format button to display the list of available 
file formats 
• Click Photoshop (*.PSD, *.PDD) to select it 
• Click the Save button to save the document 
Editing a Photo 22
Saving a Photo in the PSD Format 
Editing a Photo 23
Using the Zoom Tool 
• Click the Zoom Tool button on the Tools panel to 
select the Zoom Tool 
• Move the mouse pointer into the document 
window to display the magnifying glass mouse 
pointer 
• Click the location of the photo on which you wish 
to zoom in until the photo is zoomed to the 
desired level 
Editing a Photo 24
Using the Zoom Tool 
Editing a Photo 25
Using the Navigator Panel 
• Click Window on the Application bar to display 
the Window menu 
• Click Navigator on the Window menu to display 
the Navigator panel 
• Drag the proxy view area on the Navigator Panel 
to display the desired portion of the photo 
Editing a Photo 26
Using the Navigator Panel 
Editing a Photo 27
Minimizing the Navigator Panel 
• Click the double arrow at the top of the Navigator 
panel 
Editing a Photo 28
Using the Hand Tool 
• Click the Hand Tool button on the Tools panel to 
select the Hand Tool 
• Drag in the document window to display the 
center portion of the photo 
Editing a Photo 29
Using the Hand Tool 
Editing a Photo 30
Changing the Magnification 
• Double-click the Magnification box on the status 
bar to select the current magnification 
• Type the desired magnification and then press the 
ENTER key to change the magnification 
Editing a Photo 31
Displaying Rulers 
• Click View on the Application bar to display the 
View menu 
• Click Rulers to display the rulers in the document 
window 
Editing a Photo 32
Displaying Rulers 
Editing a Photo 33
Editing the Photo 
Editing a Photo 34
Cropping a Photo 
• Click the Crop Tool button on the Tools panel to 
select the Crop Tool 
• Click the photo to display the rule of thirds grid 
• If necessary, click the Delete Cropped Pixels check 
box on the options bar, so that it displays a check 
mark 
• Drag the cropping handles to their desired 
locations 
• Press the ENTER key to complete the crop 
Editing a Photo 35
Cropping a Photo 
Editing a Photo 36
Creating a Selection 
• On the Application bar, click Select to display the 
Select menu 
• On the Select menu, click All to display the 
selection marquee around the entire photo 
Editing a Photo 37
Stroking a Selection 
• With the photograph selected, click Edit on the 
Application bar to display the Edit menu 
• Click Stroke to display the Stroke dialog box 
• Type the desired width in the Width box 
• Click the OK button to apply the stroke 
Editing a Photo 38
Stroking a Selection 
Editing a Photo 39
Modifying a Selection 
• On the Application bar, click Select, and then 
point to Modify to display the Modify submenu 
• Click Border on the Modify submenu to display 
the Border Selection dialog box 
• Type the desired width in the Width box to create 
a border selection on each side of the photo 
• Click the OK button in the Border Selection dialog 
box to define the selection 
Editing a Photo 40
Modifying a Selection 
Editing a Photo 41
Switching Foreground 
and Background Colors 
• Click the Switch Foreground and Background 
Colors button to reverse the colors 
Editing a Photo 42
Deselecting 
• Click Select on the Application bar and then click 
Deselect to remove the selection 
Editing a Photo 43
Saving a Photo 
with the Same File Name 
• Click File on the Application bar and then click 
Save to save the photo with the same file name 
Editing a Photo 44
Closing a Photo 
• Click the Close button on the document window 
tab to close the document window and the image 
file 
Editing a Photo 45
Opening a Recent File 
• Click File on the Application bar and then point to 
Open Recent to display the Open Recent submenu 
• Click the desired file on the Open Recent 
submenu to open the file 
Editing a Photo 46
Resizing the Image 
• Click Image on the Application bar to display the 
Image menu 
• Click Image Size to display the Image Size dialog 
box 
• In the Document Size area, set the desired width 
and height 
• Click the OK button to finish resizing the image 
Editing a Photo 47
Resizing the Image 
Editing a Photo 48
Selecting the Horizontal Type Tool 
• Click the Horizontal Type Tool on the Tools panel 
to select it 
• If the solid T icon does not appear on the button, 
right-click the button to display its context menu, 
then click Horizontal Type Tool in the list 
Editing a Photo 49
Setting Font Options 
• On the options bar, click the ‘Set the font family’ 
box arrow to display the list of font families 
• Scroll in the list and then click the desired font 
family 
• Click the ‘Set the font style’ box arrow to display 
the list of font styles 
• Click the desired font style 
• Select the value in the ‘Set the font size’ box, and 
then type desired size 
Editing a Photo 50
Setting Font Options 
• Click the ‘Set the text color’ box to open the Color 
Picker (Text Color) dialog box 
• Click the desired color 
• Click the OK button in the Color Picker (Text Color) 
dialog box to apply the text color 
Editing a Photo 51
Inserting Text 
• With the Horizontal Type Tool selected, drag a 
bounding box in the desired location 
• Type the desired text 
• On the options bar, click the ‘Commit any current 
edits’ button to finish the new layer 
Editing a Photo 52
Inserting Text 
Editing a Photo 53
Stroking Text 
• With the new layer still selected on the Layer’s 
panel, click the ‘Add a layer style’ button on the 
Layers panel status bar 
• Click Stroke in the list of layer styles to display the 
Layer Style dialog box 
• Type the desired stroke size in the Size box 
• Click the OK button in the Layer Style dialog box 
to accept the settings and add the stroke 
Editing a Photo 54
Stroking Text 
Editing a Photo 55
Saving a Photo with a Different Name 
• Click File on the 
Application bar 
and then click 
Save As to display 
the Save As 
dialog box 
Editing a Photo 56
Printing a Photo 
• Ready the printer according to the printer instructions 
• Click File on the Application bar and then click Print to 
display the Print dialog box 
• If necessary, click the Printer box arrow and then select 
your printer from the list. Do not change any other settings 
• In the Print dialog box, click the Print button to start the 
printing process. If your system displays a second Print 
dialog box or a Print Settings dialog box, unique to your 
printer, click its Print button 
• When the printer stops, retrieve the hard copy of the photo 
Editing a Photo 57
Printing a Photo 
Editing a Photo 58
Previewing Using the Save for 
Web Dialog Box 
• Click File on the Application bar to display the File 
menu and then click Save for Web to display the 
Save for Web dialog box 
• Click the 4-Up tab to display four versions of the 
photo 
Editing a Photo 59
Previewing Using the Save for 
Web Dialog Box 
Editing a Photo 60
Choosing a Download Speed 
• Click the upper-right preview, if necessary, to 
choose a high quality version of the photo 
• In the annotation area below the upper-right 
preview, click the ‘Select download speed’ button 
to display the list of connection speeds 
• In the list, click the desired download speed 
Editing a Photo 61
Choosing a Download Speed 
Editing a Photo 62
Previewing a Photo on the Web 
• Click the Preview button to display the photo in a 
Web browser 
• If necessary, double-click the browser’s 
application bar to maximize the browser window 
• Click the Close button on the browser’s 
application bar to close the browser window 
Editing a Photo 63
Previewing a Photo on the Web 
Editing a Photo 64
Saving a Photo for the Web 
• In the Save for Web dialog box, click the Save 
button to display the Save Optimized As dialog 
box 
• Type the desired file name in the File name text 
box 
• Navigate to the desired save location 
• Click the Save button in the Save Optimized As 
dialog box to save the file 
Editing a Photo 65
Saving a Photo for the Web 
Editing a Photo 66
Accessing Photoshop Help 
• With Photoshop open on your system, press the 
F1 key to access Photoshop Help / Help and 
tutorials page 
• If necessary, double-click the application bar to 
maximize the window 
Editing a Photo 67
Accessing Photoshop Help 
Editing a Photo 68
Using the Help Search Box 
• Click the Search box and then type the desired 
search topic 
• Press the ENTER key to display the relevant links 
• Click the desired link to display the contents 
• Scroll as necessary to read the information 
Editing a Photo 69
Using the Help Search Box 
Editing a Photo 70
Quitting Photoshop 
• Click the Close button on the right side of the 
Application bar to close the window 
• If Photoshop displays a dialog box asking you to 
save changes, click the No button 
Editing a Photo 71
Chapter Summary 
• Start Photoshop and customize the Photoshop 
workspace 
• Open a photo 
• Identify parts of the Photoshop workspace 
• Explain file types 
• Save a photo for both print and the Web 
• View a photo using the Zoom Tool, Navigator 
panel, and the Hand Tool 
• Display rulers 
Editing a Photo 72
Chapter Summary 
• Crop a photo using the rule of thirds overlay 
• Save a photo for both print and the Web 
• Create a border 
• Open a recent file 
• Resize a photo 
• Insert text and stroke 
• Print a photo 
• Access Photoshop Help 
• Close a file and quit Photoshop 
Editing a Photo 73
Adobe® 
Photoshop® CS6 
Chapter 1 Complete

Photoshop CS6 Chapter One

  • 1.
    Adobe® Photoshop® CS6 Chapter 1 Editing a Photo
  • 2.
    Objectives • StartPhotoshop and customize the Photoshop workspace • Open a photo • Identify parts of the Photoshop workspace • Explain file types • Save a photo for both print and the Web • View a photo using the Zoom Tool, Navigator panel, and the Hand Tool • Display rulers Editing a Photo 2
  • 3.
    Objectives • Cropa photo using the rule of thirds overlay • Save a photo for both print and the Web • Create a border • Open a recent file • Resize a photo • Insert text and stroke • Print a photo • Access Photoshop Help • Close a file and quit Photoshop Editing a Photo 3
  • 4.
    Project – PostcardGraphic Editing a Photo 4
  • 5.
    General Project Guidelines • Find an appropriate image or photo • Determine how to edit the photo to highlight the theme • Identify finishing touches that will further enhance the photo • Prepare for publication Editing a Photo 5
  • 6.
    Starting Photoshop •Click the Start button on the Windows 7 taskbar to display the Start menu • Type Photoshop CS6 as the search text in the ‘Search programs and files’ text box, and watch the search results appear on the Start menu • Click Adobe Photoshop CS6 in the search results on the Start menu to start Photoshop • After a few moments, when the Photoshop window is displayed, if the window is not maximized, click the Maximize button next to the Close button on the Application bar to maximize the window Editing a Photo 6
  • 7.
  • 8.
    Selecting the EssentialsWorkspace • Click Window on the Application bar to display the Window menu • Point to Workspace on the Window menu to display the Workspace submenu • Click Essentials (Default) on the Workspace submenu to select the default workspace panels • Click Window on the Application bar and then point to Workspace again to display the submenu • Click Reset Essentials to restore the workspace to its default settings and reposition any panels that may have been moved Editing a Photo 8
  • 9.
    Selecting the EssentialsWorkspace Editing a Photo 9
  • 10.
    Selecting the DefaultTool • If the tools on the Tools panel appear in two columns, click the double arrow at the top of the Tools panel • If necessary, click the second button from the top on the Tools panel to select it • If the button does not display a square icon, right-click the button and then click Rectangular Marquee Tool on the context menu Editing a Photo 10
  • 11.
    Resetting the OptionsBar • Right-click the Rectangular Marquee Tool icon on the options bar to display its context menu • Click Reset All Tools to display a confirmation dialog box • Click the OK button to restore the tools to their default settings Editing a Photo 11
  • 12.
    Resetting the OptionsBar Editing a Photo 12
  • 13.
    Resetting the InterfaceColor • Click Edit on the Application bar, and then point to Preferences to display the Preferences submenu • Click Interface on the Preferences submenu to display the Preferences dialog box • In the Appearance area, click the third button, Medium Gray, to change the interface color • Click the OK button in the Preferences dialog box to close the dialog box and return to the Photoshop workspace Editing a Photo 13
  • 14.
    Resetting the InterfaceColor Editing a Photo 14
  • 15.
    Opening a Photo • Click File on the Application bar to display the File menu • Click Open on the File menu to display the Open dialog box • Click the Look in box arrow to display a list of available storage locations, and then select the desired storage location • Navigate to the location of the photo you wish to open, and then click the file to select it • Click the Open button to open the selected file and display the open photo in the Photoshop workspace Editing a Photo 15
  • 16.
    Opening a Photo Editing a Photo 16
  • 17.
    The Application Bar Editing a Photo 17
  • 18.
    The Menu Barand the Options Bar Editing a Photo 18
  • 19.
    The Options Bar Editing a Photo 19
  • 20.
    The Document Window Editing a Photo 20
  • 21.
  • 22.
    Saving a Photoin the PSD Format • Click File on the Application bar to display the File menu • Click Save As to display the Save As dialog box • Type the desired file name in the File name text box • Navigate to the desired save location • Click the Format button to display the list of available file formats • Click Photoshop (*.PSD, *.PDD) to select it • Click the Save button to save the document Editing a Photo 22
  • 23.
    Saving a Photoin the PSD Format Editing a Photo 23
  • 24.
    Using the ZoomTool • Click the Zoom Tool button on the Tools panel to select the Zoom Tool • Move the mouse pointer into the document window to display the magnifying glass mouse pointer • Click the location of the photo on which you wish to zoom in until the photo is zoomed to the desired level Editing a Photo 24
  • 25.
    Using the ZoomTool Editing a Photo 25
  • 26.
    Using the NavigatorPanel • Click Window on the Application bar to display the Window menu • Click Navigator on the Window menu to display the Navigator panel • Drag the proxy view area on the Navigator Panel to display the desired portion of the photo Editing a Photo 26
  • 27.
    Using the NavigatorPanel Editing a Photo 27
  • 28.
    Minimizing the NavigatorPanel • Click the double arrow at the top of the Navigator panel Editing a Photo 28
  • 29.
    Using the HandTool • Click the Hand Tool button on the Tools panel to select the Hand Tool • Drag in the document window to display the center portion of the photo Editing a Photo 29
  • 30.
    Using the HandTool Editing a Photo 30
  • 31.
    Changing the Magnification • Double-click the Magnification box on the status bar to select the current magnification • Type the desired magnification and then press the ENTER key to change the magnification Editing a Photo 31
  • 32.
    Displaying Rulers •Click View on the Application bar to display the View menu • Click Rulers to display the rulers in the document window Editing a Photo 32
  • 33.
  • 34.
    Editing the Photo Editing a Photo 34
  • 35.
    Cropping a Photo • Click the Crop Tool button on the Tools panel to select the Crop Tool • Click the photo to display the rule of thirds grid • If necessary, click the Delete Cropped Pixels check box on the options bar, so that it displays a check mark • Drag the cropping handles to their desired locations • Press the ENTER key to complete the crop Editing a Photo 35
  • 36.
    Cropping a Photo Editing a Photo 36
  • 37.
    Creating a Selection • On the Application bar, click Select to display the Select menu • On the Select menu, click All to display the selection marquee around the entire photo Editing a Photo 37
  • 38.
    Stroking a Selection • With the photograph selected, click Edit on the Application bar to display the Edit menu • Click Stroke to display the Stroke dialog box • Type the desired width in the Width box • Click the OK button to apply the stroke Editing a Photo 38
  • 39.
    Stroking a Selection Editing a Photo 39
  • 40.
    Modifying a Selection • On the Application bar, click Select, and then point to Modify to display the Modify submenu • Click Border on the Modify submenu to display the Border Selection dialog box • Type the desired width in the Width box to create a border selection on each side of the photo • Click the OK button in the Border Selection dialog box to define the selection Editing a Photo 40
  • 41.
    Modifying a Selection Editing a Photo 41
  • 42.
    Switching Foreground andBackground Colors • Click the Switch Foreground and Background Colors button to reverse the colors Editing a Photo 42
  • 43.
    Deselecting • ClickSelect on the Application bar and then click Deselect to remove the selection Editing a Photo 43
  • 44.
    Saving a Photo with the Same File Name • Click File on the Application bar and then click Save to save the photo with the same file name Editing a Photo 44
  • 45.
    Closing a Photo • Click the Close button on the document window tab to close the document window and the image file Editing a Photo 45
  • 46.
    Opening a RecentFile • Click File on the Application bar and then point to Open Recent to display the Open Recent submenu • Click the desired file on the Open Recent submenu to open the file Editing a Photo 46
  • 47.
    Resizing the Image • Click Image on the Application bar to display the Image menu • Click Image Size to display the Image Size dialog box • In the Document Size area, set the desired width and height • Click the OK button to finish resizing the image Editing a Photo 47
  • 48.
    Resizing the Image Editing a Photo 48
  • 49.
    Selecting the HorizontalType Tool • Click the Horizontal Type Tool on the Tools panel to select it • If the solid T icon does not appear on the button, right-click the button to display its context menu, then click Horizontal Type Tool in the list Editing a Photo 49
  • 50.
    Setting Font Options • On the options bar, click the ‘Set the font family’ box arrow to display the list of font families • Scroll in the list and then click the desired font family • Click the ‘Set the font style’ box arrow to display the list of font styles • Click the desired font style • Select the value in the ‘Set the font size’ box, and then type desired size Editing a Photo 50
  • 51.
    Setting Font Options • Click the ‘Set the text color’ box to open the Color Picker (Text Color) dialog box • Click the desired color • Click the OK button in the Color Picker (Text Color) dialog box to apply the text color Editing a Photo 51
  • 52.
    Inserting Text •With the Horizontal Type Tool selected, drag a bounding box in the desired location • Type the desired text • On the options bar, click the ‘Commit any current edits’ button to finish the new layer Editing a Photo 52
  • 53.
  • 54.
    Stroking Text •With the new layer still selected on the Layer’s panel, click the ‘Add a layer style’ button on the Layers panel status bar • Click Stroke in the list of layer styles to display the Layer Style dialog box • Type the desired stroke size in the Size box • Click the OK button in the Layer Style dialog box to accept the settings and add the stroke Editing a Photo 54
  • 55.
  • 56.
    Saving a Photowith a Different Name • Click File on the Application bar and then click Save As to display the Save As dialog box Editing a Photo 56
  • 57.
    Printing a Photo • Ready the printer according to the printer instructions • Click File on the Application bar and then click Print to display the Print dialog box • If necessary, click the Printer box arrow and then select your printer from the list. Do not change any other settings • In the Print dialog box, click the Print button to start the printing process. If your system displays a second Print dialog box or a Print Settings dialog box, unique to your printer, click its Print button • When the printer stops, retrieve the hard copy of the photo Editing a Photo 57
  • 58.
    Printing a Photo Editing a Photo 58
  • 59.
    Previewing Using theSave for Web Dialog Box • Click File on the Application bar to display the File menu and then click Save for Web to display the Save for Web dialog box • Click the 4-Up tab to display four versions of the photo Editing a Photo 59
  • 60.
    Previewing Using theSave for Web Dialog Box Editing a Photo 60
  • 61.
    Choosing a DownloadSpeed • Click the upper-right preview, if necessary, to choose a high quality version of the photo • In the annotation area below the upper-right preview, click the ‘Select download speed’ button to display the list of connection speeds • In the list, click the desired download speed Editing a Photo 61
  • 62.
    Choosing a DownloadSpeed Editing a Photo 62
  • 63.
    Previewing a Photoon the Web • Click the Preview button to display the photo in a Web browser • If necessary, double-click the browser’s application bar to maximize the browser window • Click the Close button on the browser’s application bar to close the browser window Editing a Photo 63
  • 64.
    Previewing a Photoon the Web Editing a Photo 64
  • 65.
    Saving a Photofor the Web • In the Save for Web dialog box, click the Save button to display the Save Optimized As dialog box • Type the desired file name in the File name text box • Navigate to the desired save location • Click the Save button in the Save Optimized As dialog box to save the file Editing a Photo 65
  • 66.
    Saving a Photofor the Web Editing a Photo 66
  • 67.
    Accessing Photoshop Help • With Photoshop open on your system, press the F1 key to access Photoshop Help / Help and tutorials page • If necessary, double-click the application bar to maximize the window Editing a Photo 67
  • 68.
    Accessing Photoshop Help Editing a Photo 68
  • 69.
    Using the HelpSearch Box • Click the Search box and then type the desired search topic • Press the ENTER key to display the relevant links • Click the desired link to display the contents • Scroll as necessary to read the information Editing a Photo 69
  • 70.
    Using the HelpSearch Box Editing a Photo 70
  • 71.
    Quitting Photoshop •Click the Close button on the right side of the Application bar to close the window • If Photoshop displays a dialog box asking you to save changes, click the No button Editing a Photo 71
  • 72.
    Chapter Summary •Start Photoshop and customize the Photoshop workspace • Open a photo • Identify parts of the Photoshop workspace • Explain file types • Save a photo for both print and the Web • View a photo using the Zoom Tool, Navigator panel, and the Hand Tool • Display rulers Editing a Photo 72
  • 73.
    Chapter Summary •Crop a photo using the rule of thirds overlay • Save a photo for both print and the Web • Create a border • Open a recent file • Resize a photo • Insert text and stroke • Print a photo • Access Photoshop Help • Close a file and quit Photoshop Editing a Photo 73
  • 74.
    Adobe® Photoshop® CS6 Chapter 1 Complete