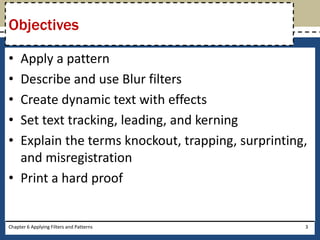
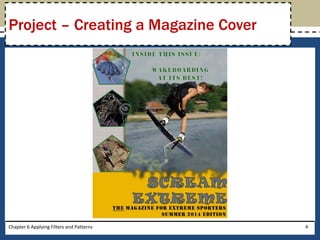
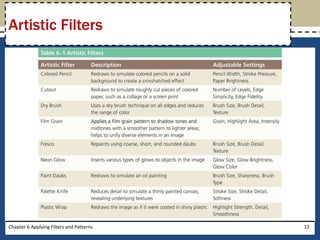
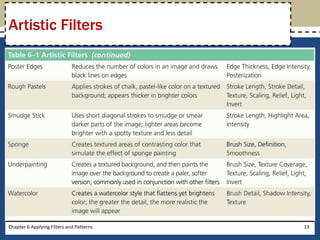
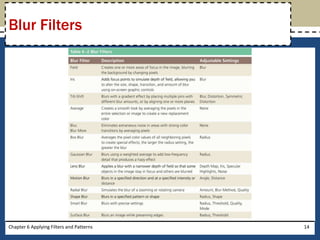
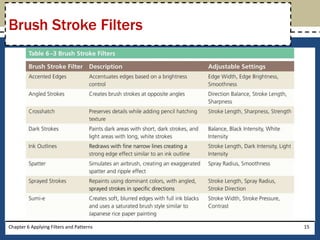
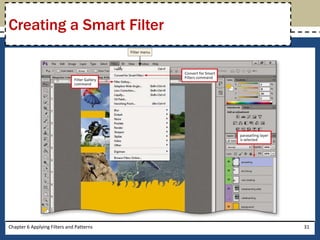
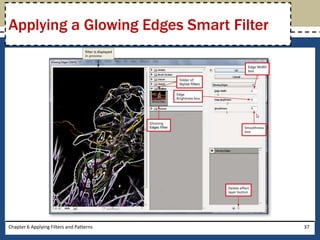
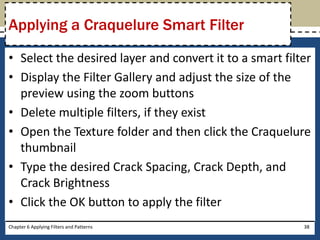
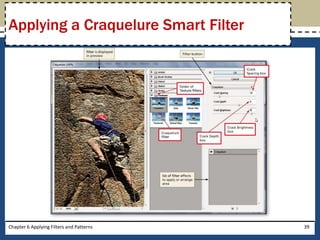
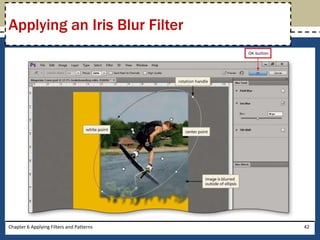
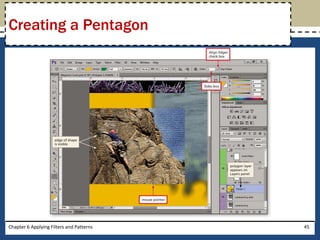
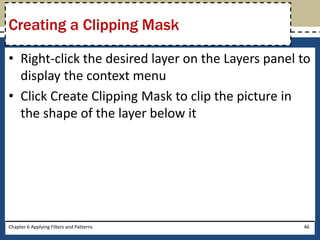
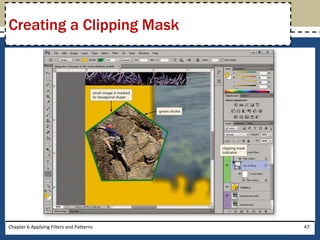
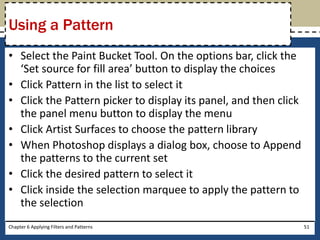
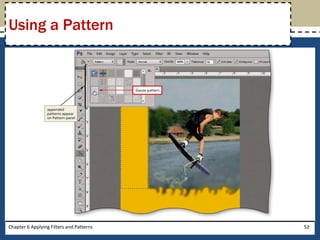
Adobe®
Photoshop® CS6
Chapter 6
Applying Filters
and Patterns
• Adjust the Color panel
• Fill with the Paint Bucket Tool
• Describe the categories of filters in Photoshop
• Use the Filter Gallery to create special effects
• Apply Plastic Wrap, Glowing Edges, and
Craquelure filters
• Create a shape clipping mask
Chapter 6 Applying Filters and Patterns 2
Objectives
• Apply a pattern
• Describe and use Blur filters
• Create dynamic text with effects
• Set text tracking, leading, and kerning
• Explain the terms knockout, trapping, surprinting,
and misregistration
• Print a hard proof
Objectives
Chapter 6 Applying Filters and Patterns 3
Chapter 6 Applying Filters and Patterns 4
Project – Creating a Magazine Cover
• Plan your use of filters
• Use type wisely
• Avoid color printing problems
• Consult with printing professionals
Chapter 6 Applying Filters and Patterns 5
General Project Guidelines
Chapter 6 Applying Filters and Patterns 6
The Color Panel
• Click the Color panel menu button to display its
menu
• Click CMYK Sliders to change the sliders in the
Color panel
• Click the menu button again, and then click CMYK
Spectrum to change the color bar, if necessary
Chapter 6 Applying Filters and Patterns 7
Changing the Sliders on the Color Panel
Chapter 6 Applying Filters and Patterns 8
Changing the Sliders on the Color Panel
Chapter 6 Applying Filters and Patterns 9
The Paint Bucket Tool
• Select the background layer
• Right-click the Gradient Tool button on the Tools
panel to display the context menu
• Click the Paint Bucket Tool button to select it
• Click the canvas to color the background layer
with the color from the Color panel
Chapter 6 Applying Filters and Patterns 10
Using the Paint Bucket Tool
Chapter 6 Applying Filters and Patterns 11
Using the Paint Bucket Tool
Chapter 6 Applying Filters and Patterns 12
Artistic Filters
Chapter 6 Applying Filters and Patterns 13
Artistic Filters
Chapter 6 Applying Filters and Patterns 14
Blur Filters
Chapter 6 Applying Filters and Patterns 15
Brush Stroke Filters
Chapter 6 Applying Filters and Patterns 16
Distort Filters
Chapter 6 Applying Filters and Patterns 17
Distort Filters
Chapter 6 Applying Filters and Patterns 18
Noise Filters
Chapter 6 Applying Filters and Patterns 19
Pixelate Filters
Chapter 6 Applying Filters and Patterns 20
Render Filters
Chapter 6 Applying Filters and Patterns 21
Sharpen Filters
Chapter 6 Applying Filters and Patterns 22
Sketch Filters
Chapter 6 Applying Filters and Patterns 23
Stylize Filters
Chapter 6 Applying Filters and Patterns 24
Texture Filters
Chapter 6 Applying Filters and Patterns 25
Liquify Filter
• With the desired layer selected, click Filter on the
Application bar to display the Filter menu
• Click Liquify to display the Liquify dialog box. If
Photoshop displays a dialog box, click the OK
button
• Make the necessary changes to the filter settings
• Click the OK button to apply the filter
Chapter 6 Applying Filters and Patterns 26
Applying the Liquify Filter
Chapter 6 Applying Filters and Patterns 27
Applying the Liquify Filter
• On the Layers panel, SHIFT+click each of the layers
to align and distribute
• On the Tools panel, select the Move Tool to
display the Move Tool options bar
• On the options bar, click the desired alignment
option to align the layers
• Click the desired distribute option to distribute
the layers
Chapter 6 Applying Filters and Patterns 28
Aligning and Distributing Layers
Chapter 6 Applying Filters and Patterns 29
Aligning and Distributing Layers
• On the Layers panel, select the desired layer
• Click Filter on the Application bar to display the
Filter menu
• Click Convert for Smart Filters to create an
adjustable smart filter. If Photoshop displays a
dialog box, click the OK button to create the smart
filter
Chapter 6 Applying Filters and Patterns 30
Creating a Smart Filter
Chapter 6 Applying Filters and Patterns 31
Creating a Smart Filter
• Select the desired layer
• Click Filter on the Application bar, and then click Filter
Gallery to display the Filter Gallery dialog box
• Click the Zoom in or Zoom out button until the entire
layer is displayed in the preview
• If more than one filter is displayed in the list of filter
effects, click the ‘Delete effect layer’ button
• Click Artistic in the list of filter groups to open the
folder. Click any other open folders to close them
Chapter 6 Applying Filters and Patterns 32
Applying a Plastic Wrap Smart Filter
• Click the Plastic Wrap thumbnail to preview the
effect
• Type the desired Highlight Strength, Detail, and
Smoothness
• Click the OK button to apply the Plastic Wrap filter
to the parasailing layer
Chapter 6 Applying Filters and Patterns 33
Applying a Plastic Wrap Smart Filter
Chapter 6 Applying Filters and Patterns 34
Applying a Plastic Wrap Smart Filter
• On the Layers panel, select the desired layer
• Click Filter on the Application bar and then click
Convert for Smart Filters. If Photoshop displays a
dialog box, click the OK button to create the smart
filter
• Click Filter on the Application bar, and then click Filter
Gallery to display the Filter Gallery dialog box. Adjust
the size of the preview using the zoom buttons
• If more than one filter is displayed in the list of filter
effects, click the ‘Delete effect layer’ button
Chapter 6 Applying Filters and Patterns 35
Applying a Glowing Edges Smart Filter
• Click Artistic in the filter list to close the Artistic
folder
• Click Stylize in the filter list to open the Stylize
folder, and then click the Glowing Edges
thumbnail
• Type the desired Edge Width, Edge Brightness,
and Smoothness in the appropriate boxes
• Click the OK button to apply the Glowing Edges
filter to the layer
Chapter 6 Applying Filters and Patterns 36
Applying a Glowing Edges Smart Filter
Chapter 6 Applying Filters and Patterns 37
Applying a Glowing Edges Smart Filter
• Select the desired layer and convert it to a smart filter
• Display the Filter Gallery and adjust the size of the
preview using the zoom buttons
• Delete multiple filters, if they exist
• Open the Texture folder and then click the Craquelure
thumbnail
• Type the desired Crack Spacing, Crack Depth, and
Crack Brightness
• Click the OK button to apply the filter
Chapter 6 Applying Filters and Patterns 38
Applying a Craquelure Smart Filter
Chapter 6 Applying Filters and Patterns 39
Applying a Craquelure Smart Filter
• Select the desired layer
• Click Filter on the Application bar and then point
to Blur to display the submenu
• Click Iris Blur to display the Blur Tools panel and
options bar
• On the Blur Tools panel, drag the Blur Slider to the
desired setting
• Drag the top rotation handle to the desired
position
Chapter 6 Applying Filters and Patterns 40
Applying an Iris Blur Filter
• Drag the blur center point to the desired location
• Drag a side rotation handle to the desired location
• Drag the white points to the desired location
• On the options bar, click the OK button to apply
the filter
Chapter 6 Applying Filters and Patterns 41
Applying an Iris Blur Filter
Chapter 6 Applying Filters and Patterns 42
Applying an Iris Blur Filter
• Select the desired layer. If necessary, increase the
magnification setting
• In the Tools panel, right-click the current Shape Tool
button
• Click the Polygon Tool in the list
• On the options bar, click the Fill button to display the
Fill panel
• Click the Color button on the Fill panel
• Click the Stroke button and then click the desired
swatch
Chapter 6 Applying Filters and Patterns 43
Creating a Pentagon
• On the options bar, type 5 in the Sides box to
create a pentagon
• Select the Align Edges check box, if necessary
• In the document window, slowly drag a pentagon
• As you drag, if you need to adjust the placement
of the pentagon, press and hold the SPACEBAR
key
Chapter 6 Applying Filters and Patterns 44
Creating a Pentagon
Chapter 6 Applying Filters and Patterns 45
Creating a Pentagon
• Right-click the desired layer on the Layers panel to
display the context menu
• Click Create Clipping Mask to clip the picture in
the shape of the layer below it
Chapter 6 Applying Filters and Patterns 46
Creating a Clipping Mask
Chapter 6 Applying Filters and Patterns 47
Creating a Clipping Mask
• On the Layers panel, select the desired layer
• Select the Move Tool, if necessary
• Press the appropriate ARROW key, as necessary,
to move the layer to the desired position
Chapter 6 Applying Filters and Patterns 48
Nudging
Chapter 6 Applying Filters and Patterns 49
Nudging
• On the Layers panel, hide all of the layers except the
background and the desired layers
• Select the background layer
• Press SHIFT+CTRL+N to create a new layer above the
desired layer
• In the New Layer dialog box, type the desired layer
name and select an identification color
• Click the OK button to close the New Layer dialog
box, creating a new pattern layer
• Select the Rectangular Marquee Tool and draw a
rectangle around the area to apply the pattern
Chapter 6 Applying Filters and Patterns 50
Using a Pattern
• Select the Paint Bucket Tool. On the options bar, click the
‘Set source for fill area’ button to display the choices
• Click Pattern in the list to select it
• Click the Pattern picker to display its panel, and then click
the panel menu button to display the menu
• Click Artist Surfaces to choose the pattern library
• When Photoshop displays a dialog box, choose to Append
the patterns to the current set
• Click the desired pattern to select it
• Click inside the selection marquee to apply the pattern to
the selection
Chapter 6 Applying Filters and Patterns 51
Using a Pattern
Chapter 6 Applying Filters and Patterns 52
Using a Pattern
• Drag to select the text to format
• On the options bar, click the Toggle the Character
and Paragraph panels button to show the panels
• Click the ‘Set the tracking’ box arrow
• Click the desired value in the list
• On the options bar, click the ‘Commit any current
edits’ button
Chapter 6 Applying Filters and Patterns 53
Setting the Tracking
Chapter 6 Applying Filters and Patterns 54
Setting the Tracking
• Highlight the word to underline
• On the Character panel, click the Underline
button
• On the options bar, click the ‘Commit any current
edits’ button
• Click the Toggle the Character and Paragraph
panels button on the options bar to hide the
panels
Chapter 6 Applying Filters and Patterns 55
Underlining Text
Chapter 6 Applying Filters and Patterns 56
Underlining Text
• With the type layer selected on the Layers panel, click
the ‘Add a layer style’ button on the Layers panel
status bar. When Photoshop displays the context
menu, click Outer Glow to open the Layer Style dialog
box
• Drag the title bar of the dialog box down so you can
view the text changes in the document window
• In the Structure area, click the Blend Mode box arrow
to display the list
• Click Linear Light to select the blending mode
• Drag the Opacity slider to the desired percentage
Chapter 6 Applying Filters and Patterns 57
Adding an Outer Glow
• Drag the Noise slider to the desired percentage
• In the Elements area, drag the Spread slider to the
desired percentage
• Click the Contour picker box arrow to display the
available contours for the glow
• Click the desired contour
• Click the OK button to close the dialog box and
apply the glow
Chapter 6 Applying Filters and Patterns 58
Adding an Outer Glow
Chapter 6 Applying Filters and Patterns 59
Adding an Outer Glow
• Click View on the Application bar, and then point to Proof
Setup to display the submenu
• If the Working CMYK command does not display a check
mark, click it
• Click File on the Application bar, and then click Print to
display the Photoshop Print Settings dialog box
• In the Color Management area, click the Color Handling box
arrow and then click Photoshop Manages Colors. Click the
Normal box arrow, and then click Hard Proofing to print a
hard proof
• In the Position and Size area, click the Scale to Fit Media
check box to scale the image
• Click the Print button to print the hard proof
Chapter 6 Applying Filters and Patterns 60
Printing a Hard Proof
• Adjust the Color panel
• Fill with the Paint Bucket Tool
• Describe the categories of filters in Photoshop
• Use the Filter Gallery to create special effects
• Apply Plastic Wrap, Glowing Edges, and
Craquelure filters
• Create a shape clipping mask
Chapter 6 Applying Filters and Patterns 61
Chapter Summary
• Apply a pattern
• Describe and use Blur filters
• Create dynamic text with effects
• Set text tracking, leading, and kerning
• Explain the terms knockout, trapping, surprinting,
and misregistration
• Print a hard proof
Chapter Summary
Chapter 6 Applying Filters and Patterns 62
Chapter 6 Complete
Adobe®
Photoshop® CS6

Pscs6 ch06 ppt

  • 1.
  • 2.
    • Adjust theColor panel • Fill with the Paint Bucket Tool • Describe the categories of filters in Photoshop • Use the Filter Gallery to create special effects • Apply Plastic Wrap, Glowing Edges, and Craquelure filters • Create a shape clipping mask Chapter 6 Applying Filters and Patterns 2 Objectives
  • 3.
    • Apply apattern • Describe and use Blur filters • Create dynamic text with effects • Set text tracking, leading, and kerning • Explain the terms knockout, trapping, surprinting, and misregistration • Print a hard proof Objectives Chapter 6 Applying Filters and Patterns 3
  • 4.
    Chapter 6 ApplyingFilters and Patterns 4 Project – Creating a Magazine Cover
  • 5.
    • Plan youruse of filters • Use type wisely • Avoid color printing problems • Consult with printing professionals Chapter 6 Applying Filters and Patterns 5 General Project Guidelines
  • 6.
    Chapter 6 ApplyingFilters and Patterns 6 The Color Panel
  • 7.
    • Click theColor panel menu button to display its menu • Click CMYK Sliders to change the sliders in the Color panel • Click the menu button again, and then click CMYK Spectrum to change the color bar, if necessary Chapter 6 Applying Filters and Patterns 7 Changing the Sliders on the Color Panel
  • 8.
    Chapter 6 ApplyingFilters and Patterns 8 Changing the Sliders on the Color Panel
  • 9.
    Chapter 6 ApplyingFilters and Patterns 9 The Paint Bucket Tool
  • 10.
    • Select thebackground layer • Right-click the Gradient Tool button on the Tools panel to display the context menu • Click the Paint Bucket Tool button to select it • Click the canvas to color the background layer with the color from the Color panel Chapter 6 Applying Filters and Patterns 10 Using the Paint Bucket Tool
  • 11.
    Chapter 6 ApplyingFilters and Patterns 11 Using the Paint Bucket Tool
  • 12.
    Chapter 6 ApplyingFilters and Patterns 12 Artistic Filters
  • 13.
    Chapter 6 ApplyingFilters and Patterns 13 Artistic Filters
  • 14.
    Chapter 6 ApplyingFilters and Patterns 14 Blur Filters
  • 15.
    Chapter 6 ApplyingFilters and Patterns 15 Brush Stroke Filters
  • 16.
    Chapter 6 ApplyingFilters and Patterns 16 Distort Filters
  • 17.
    Chapter 6 ApplyingFilters and Patterns 17 Distort Filters
  • 18.
    Chapter 6 ApplyingFilters and Patterns 18 Noise Filters
  • 19.
    Chapter 6 ApplyingFilters and Patterns 19 Pixelate Filters
  • 20.
    Chapter 6 ApplyingFilters and Patterns 20 Render Filters
  • 21.
    Chapter 6 ApplyingFilters and Patterns 21 Sharpen Filters
  • 22.
    Chapter 6 ApplyingFilters and Patterns 22 Sketch Filters
  • 23.
    Chapter 6 ApplyingFilters and Patterns 23 Stylize Filters
  • 24.
    Chapter 6 ApplyingFilters and Patterns 24 Texture Filters
  • 25.
    Chapter 6 ApplyingFilters and Patterns 25 Liquify Filter
  • 26.
    • With thedesired layer selected, click Filter on the Application bar to display the Filter menu • Click Liquify to display the Liquify dialog box. If Photoshop displays a dialog box, click the OK button • Make the necessary changes to the filter settings • Click the OK button to apply the filter Chapter 6 Applying Filters and Patterns 26 Applying the Liquify Filter
  • 27.
    Chapter 6 ApplyingFilters and Patterns 27 Applying the Liquify Filter
  • 28.
    • On theLayers panel, SHIFT+click each of the layers to align and distribute • On the Tools panel, select the Move Tool to display the Move Tool options bar • On the options bar, click the desired alignment option to align the layers • Click the desired distribute option to distribute the layers Chapter 6 Applying Filters and Patterns 28 Aligning and Distributing Layers
  • 29.
    Chapter 6 ApplyingFilters and Patterns 29 Aligning and Distributing Layers
  • 30.
    • On theLayers panel, select the desired layer • Click Filter on the Application bar to display the Filter menu • Click Convert for Smart Filters to create an adjustable smart filter. If Photoshop displays a dialog box, click the OK button to create the smart filter Chapter 6 Applying Filters and Patterns 30 Creating a Smart Filter
  • 31.
    Chapter 6 ApplyingFilters and Patterns 31 Creating a Smart Filter
  • 32.
    • Select thedesired layer • Click Filter on the Application bar, and then click Filter Gallery to display the Filter Gallery dialog box • Click the Zoom in or Zoom out button until the entire layer is displayed in the preview • If more than one filter is displayed in the list of filter effects, click the ‘Delete effect layer’ button • Click Artistic in the list of filter groups to open the folder. Click any other open folders to close them Chapter 6 Applying Filters and Patterns 32 Applying a Plastic Wrap Smart Filter
  • 33.
    • Click thePlastic Wrap thumbnail to preview the effect • Type the desired Highlight Strength, Detail, and Smoothness • Click the OK button to apply the Plastic Wrap filter to the parasailing layer Chapter 6 Applying Filters and Patterns 33 Applying a Plastic Wrap Smart Filter
  • 34.
    Chapter 6 ApplyingFilters and Patterns 34 Applying a Plastic Wrap Smart Filter
  • 35.
    • On theLayers panel, select the desired layer • Click Filter on the Application bar and then click Convert for Smart Filters. If Photoshop displays a dialog box, click the OK button to create the smart filter • Click Filter on the Application bar, and then click Filter Gallery to display the Filter Gallery dialog box. Adjust the size of the preview using the zoom buttons • If more than one filter is displayed in the list of filter effects, click the ‘Delete effect layer’ button Chapter 6 Applying Filters and Patterns 35 Applying a Glowing Edges Smart Filter
  • 36.
    • Click Artisticin the filter list to close the Artistic folder • Click Stylize in the filter list to open the Stylize folder, and then click the Glowing Edges thumbnail • Type the desired Edge Width, Edge Brightness, and Smoothness in the appropriate boxes • Click the OK button to apply the Glowing Edges filter to the layer Chapter 6 Applying Filters and Patterns 36 Applying a Glowing Edges Smart Filter
  • 37.
    Chapter 6 ApplyingFilters and Patterns 37 Applying a Glowing Edges Smart Filter
  • 38.
    • Select thedesired layer and convert it to a smart filter • Display the Filter Gallery and adjust the size of the preview using the zoom buttons • Delete multiple filters, if they exist • Open the Texture folder and then click the Craquelure thumbnail • Type the desired Crack Spacing, Crack Depth, and Crack Brightness • Click the OK button to apply the filter Chapter 6 Applying Filters and Patterns 38 Applying a Craquelure Smart Filter
  • 39.
    Chapter 6 ApplyingFilters and Patterns 39 Applying a Craquelure Smart Filter
  • 40.
    • Select thedesired layer • Click Filter on the Application bar and then point to Blur to display the submenu • Click Iris Blur to display the Blur Tools panel and options bar • On the Blur Tools panel, drag the Blur Slider to the desired setting • Drag the top rotation handle to the desired position Chapter 6 Applying Filters and Patterns 40 Applying an Iris Blur Filter
  • 41.
    • Drag theblur center point to the desired location • Drag a side rotation handle to the desired location • Drag the white points to the desired location • On the options bar, click the OK button to apply the filter Chapter 6 Applying Filters and Patterns 41 Applying an Iris Blur Filter
  • 42.
    Chapter 6 ApplyingFilters and Patterns 42 Applying an Iris Blur Filter
  • 43.
    • Select thedesired layer. If necessary, increase the magnification setting • In the Tools panel, right-click the current Shape Tool button • Click the Polygon Tool in the list • On the options bar, click the Fill button to display the Fill panel • Click the Color button on the Fill panel • Click the Stroke button and then click the desired swatch Chapter 6 Applying Filters and Patterns 43 Creating a Pentagon
  • 44.
    • On theoptions bar, type 5 in the Sides box to create a pentagon • Select the Align Edges check box, if necessary • In the document window, slowly drag a pentagon • As you drag, if you need to adjust the placement of the pentagon, press and hold the SPACEBAR key Chapter 6 Applying Filters and Patterns 44 Creating a Pentagon
  • 45.
    Chapter 6 ApplyingFilters and Patterns 45 Creating a Pentagon
  • 46.
    • Right-click thedesired layer on the Layers panel to display the context menu • Click Create Clipping Mask to clip the picture in the shape of the layer below it Chapter 6 Applying Filters and Patterns 46 Creating a Clipping Mask
  • 47.
    Chapter 6 ApplyingFilters and Patterns 47 Creating a Clipping Mask
  • 48.
    • On theLayers panel, select the desired layer • Select the Move Tool, if necessary • Press the appropriate ARROW key, as necessary, to move the layer to the desired position Chapter 6 Applying Filters and Patterns 48 Nudging
  • 49.
    Chapter 6 ApplyingFilters and Patterns 49 Nudging
  • 50.
    • On theLayers panel, hide all of the layers except the background and the desired layers • Select the background layer • Press SHIFT+CTRL+N to create a new layer above the desired layer • In the New Layer dialog box, type the desired layer name and select an identification color • Click the OK button to close the New Layer dialog box, creating a new pattern layer • Select the Rectangular Marquee Tool and draw a rectangle around the area to apply the pattern Chapter 6 Applying Filters and Patterns 50 Using a Pattern
  • 51.
    • Select thePaint Bucket Tool. On the options bar, click the ‘Set source for fill area’ button to display the choices • Click Pattern in the list to select it • Click the Pattern picker to display its panel, and then click the panel menu button to display the menu • Click Artist Surfaces to choose the pattern library • When Photoshop displays a dialog box, choose to Append the patterns to the current set • Click the desired pattern to select it • Click inside the selection marquee to apply the pattern to the selection Chapter 6 Applying Filters and Patterns 51 Using a Pattern
  • 52.
    Chapter 6 ApplyingFilters and Patterns 52 Using a Pattern
  • 53.
    • Drag toselect the text to format • On the options bar, click the Toggle the Character and Paragraph panels button to show the panels • Click the ‘Set the tracking’ box arrow • Click the desired value in the list • On the options bar, click the ‘Commit any current edits’ button Chapter 6 Applying Filters and Patterns 53 Setting the Tracking
  • 54.
    Chapter 6 ApplyingFilters and Patterns 54 Setting the Tracking
  • 55.
    • Highlight theword to underline • On the Character panel, click the Underline button • On the options bar, click the ‘Commit any current edits’ button • Click the Toggle the Character and Paragraph panels button on the options bar to hide the panels Chapter 6 Applying Filters and Patterns 55 Underlining Text
  • 56.
    Chapter 6 ApplyingFilters and Patterns 56 Underlining Text
  • 57.
    • With thetype layer selected on the Layers panel, click the ‘Add a layer style’ button on the Layers panel status bar. When Photoshop displays the context menu, click Outer Glow to open the Layer Style dialog box • Drag the title bar of the dialog box down so you can view the text changes in the document window • In the Structure area, click the Blend Mode box arrow to display the list • Click Linear Light to select the blending mode • Drag the Opacity slider to the desired percentage Chapter 6 Applying Filters and Patterns 57 Adding an Outer Glow
  • 58.
    • Drag theNoise slider to the desired percentage • In the Elements area, drag the Spread slider to the desired percentage • Click the Contour picker box arrow to display the available contours for the glow • Click the desired contour • Click the OK button to close the dialog box and apply the glow Chapter 6 Applying Filters and Patterns 58 Adding an Outer Glow
  • 59.
    Chapter 6 ApplyingFilters and Patterns 59 Adding an Outer Glow
  • 60.
    • Click Viewon the Application bar, and then point to Proof Setup to display the submenu • If the Working CMYK command does not display a check mark, click it • Click File on the Application bar, and then click Print to display the Photoshop Print Settings dialog box • In the Color Management area, click the Color Handling box arrow and then click Photoshop Manages Colors. Click the Normal box arrow, and then click Hard Proofing to print a hard proof • In the Position and Size area, click the Scale to Fit Media check box to scale the image • Click the Print button to print the hard proof Chapter 6 Applying Filters and Patterns 60 Printing a Hard Proof
  • 61.
    • Adjust theColor panel • Fill with the Paint Bucket Tool • Describe the categories of filters in Photoshop • Use the Filter Gallery to create special effects • Apply Plastic Wrap, Glowing Edges, and Craquelure filters • Create a shape clipping mask Chapter 6 Applying Filters and Patterns 61 Chapter Summary
  • 62.
    • Apply apattern • Describe and use Blur filters • Create dynamic text with effects • Set text tracking, leading, and kerning • Explain the terms knockout, trapping, surprinting, and misregistration • Print a hard proof Chapter Summary Chapter 6 Applying Filters and Patterns 62
  • 63.