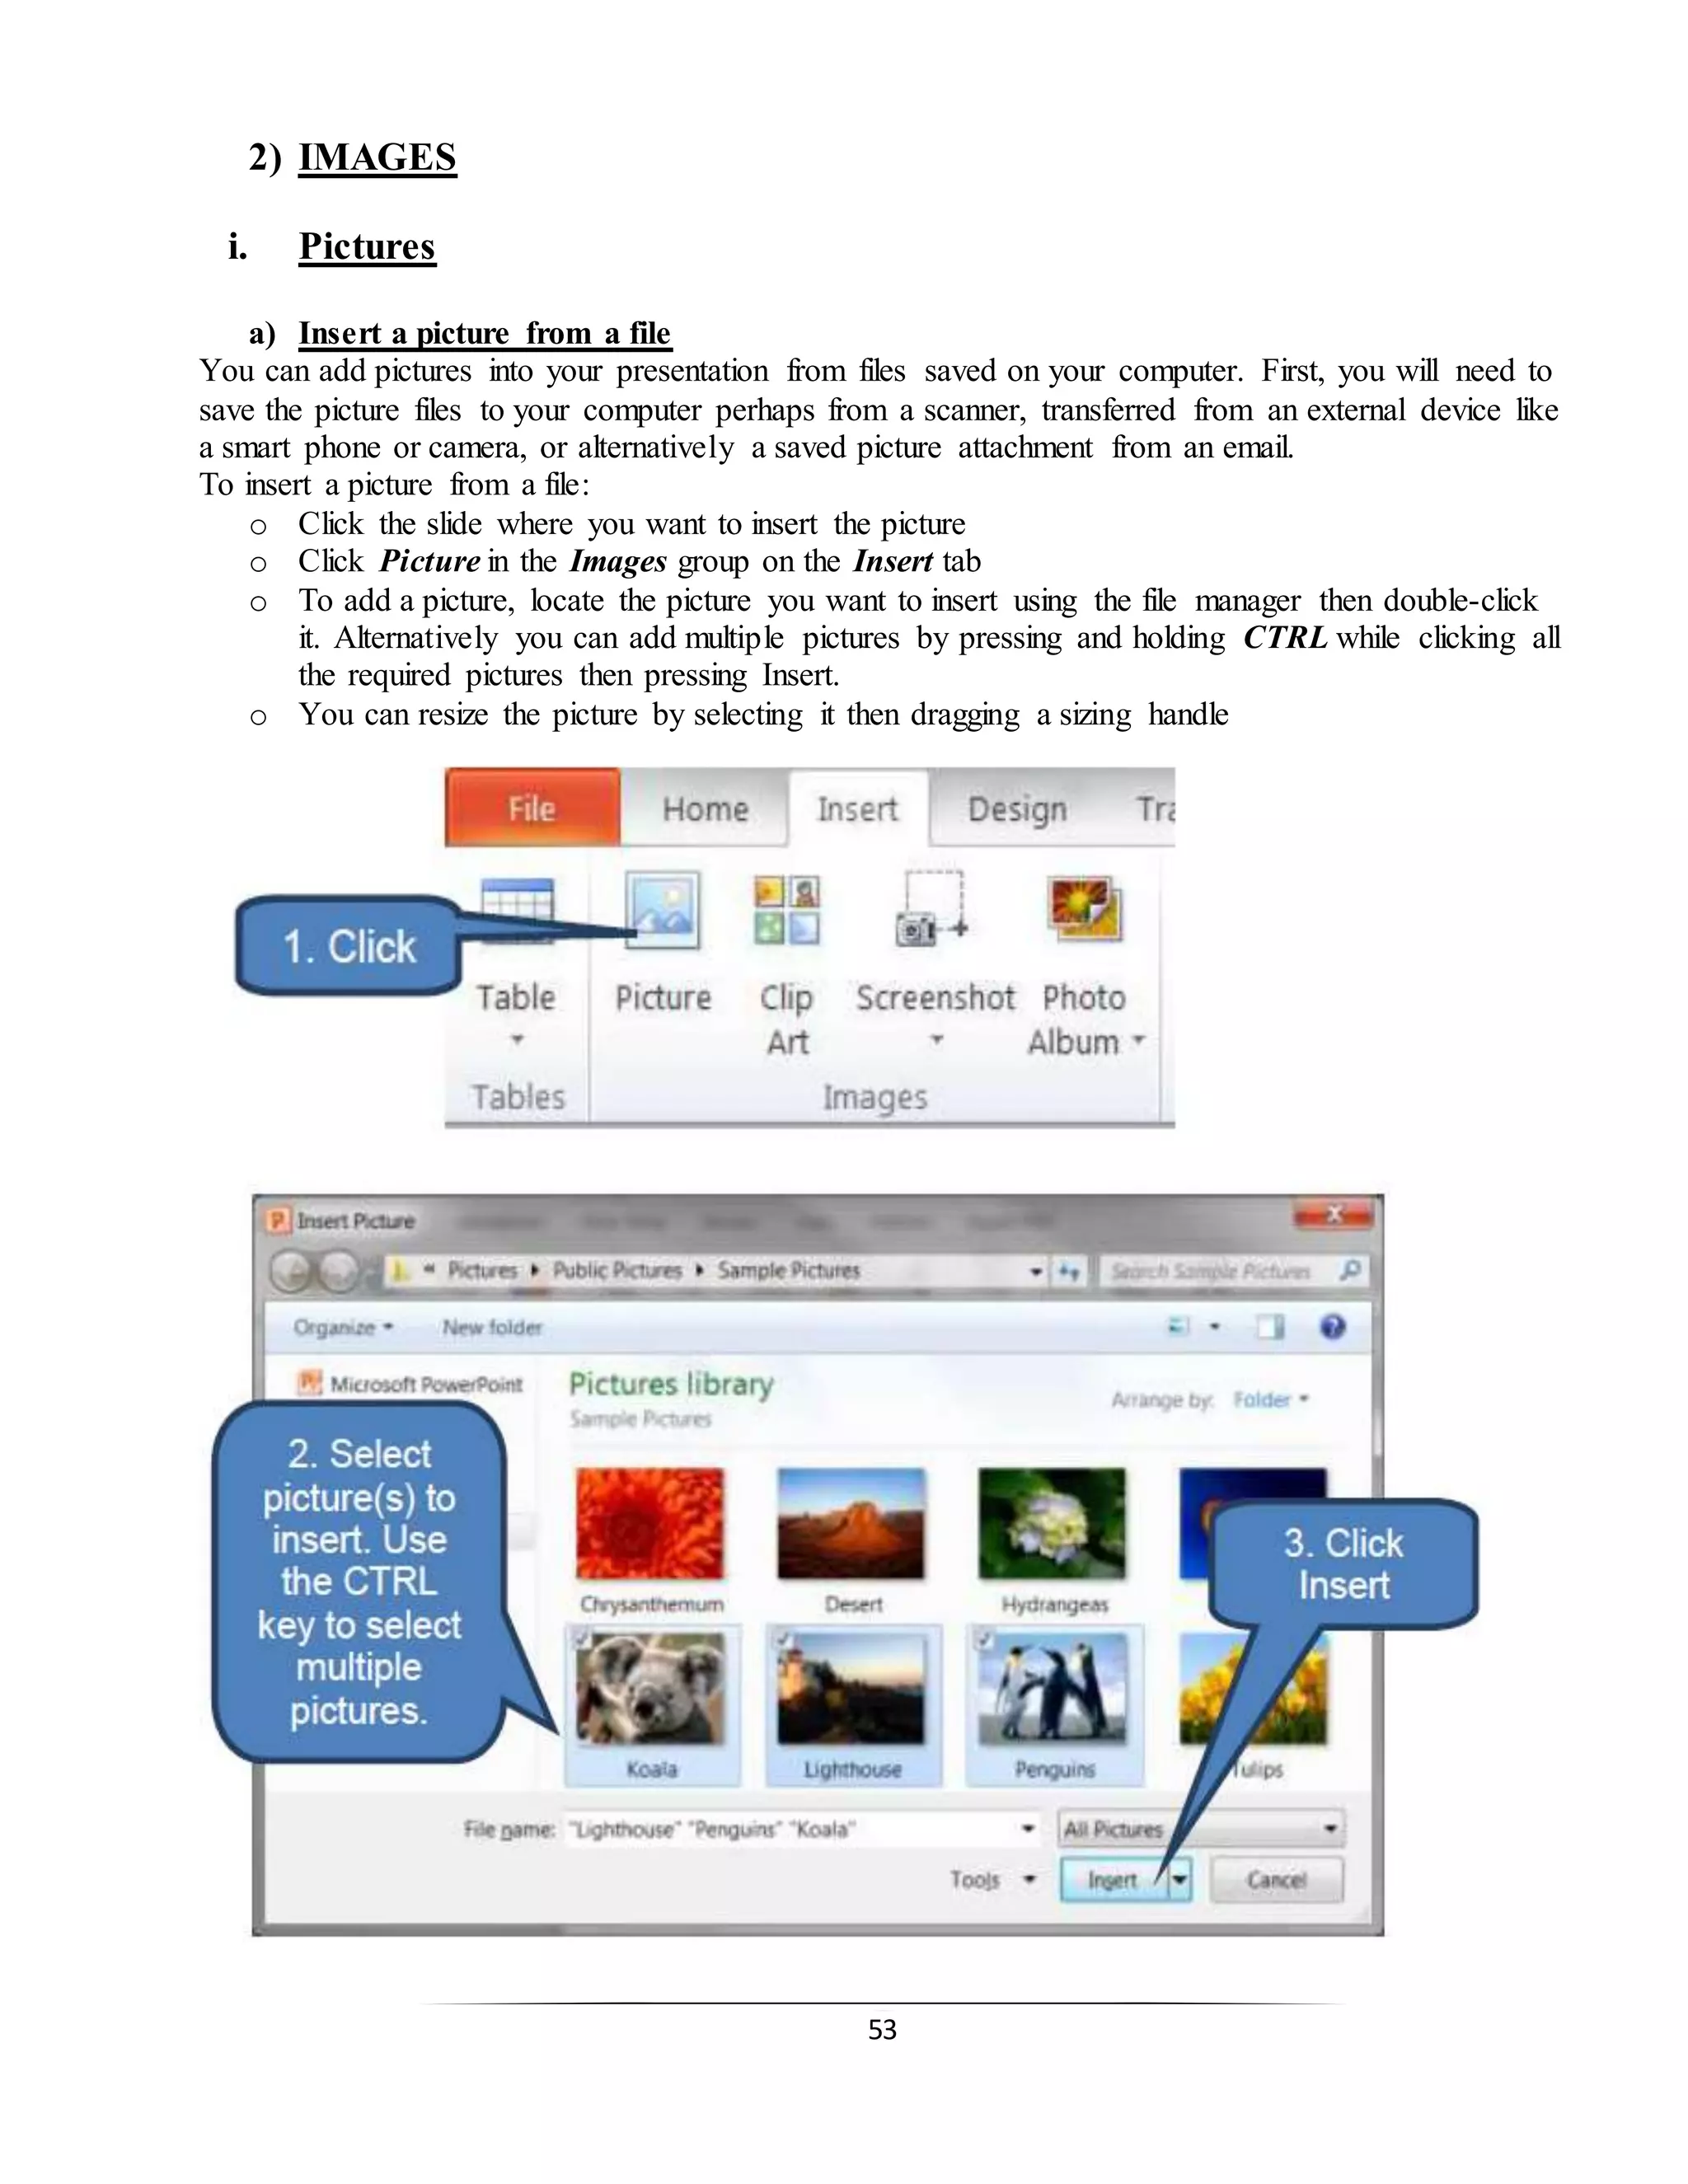
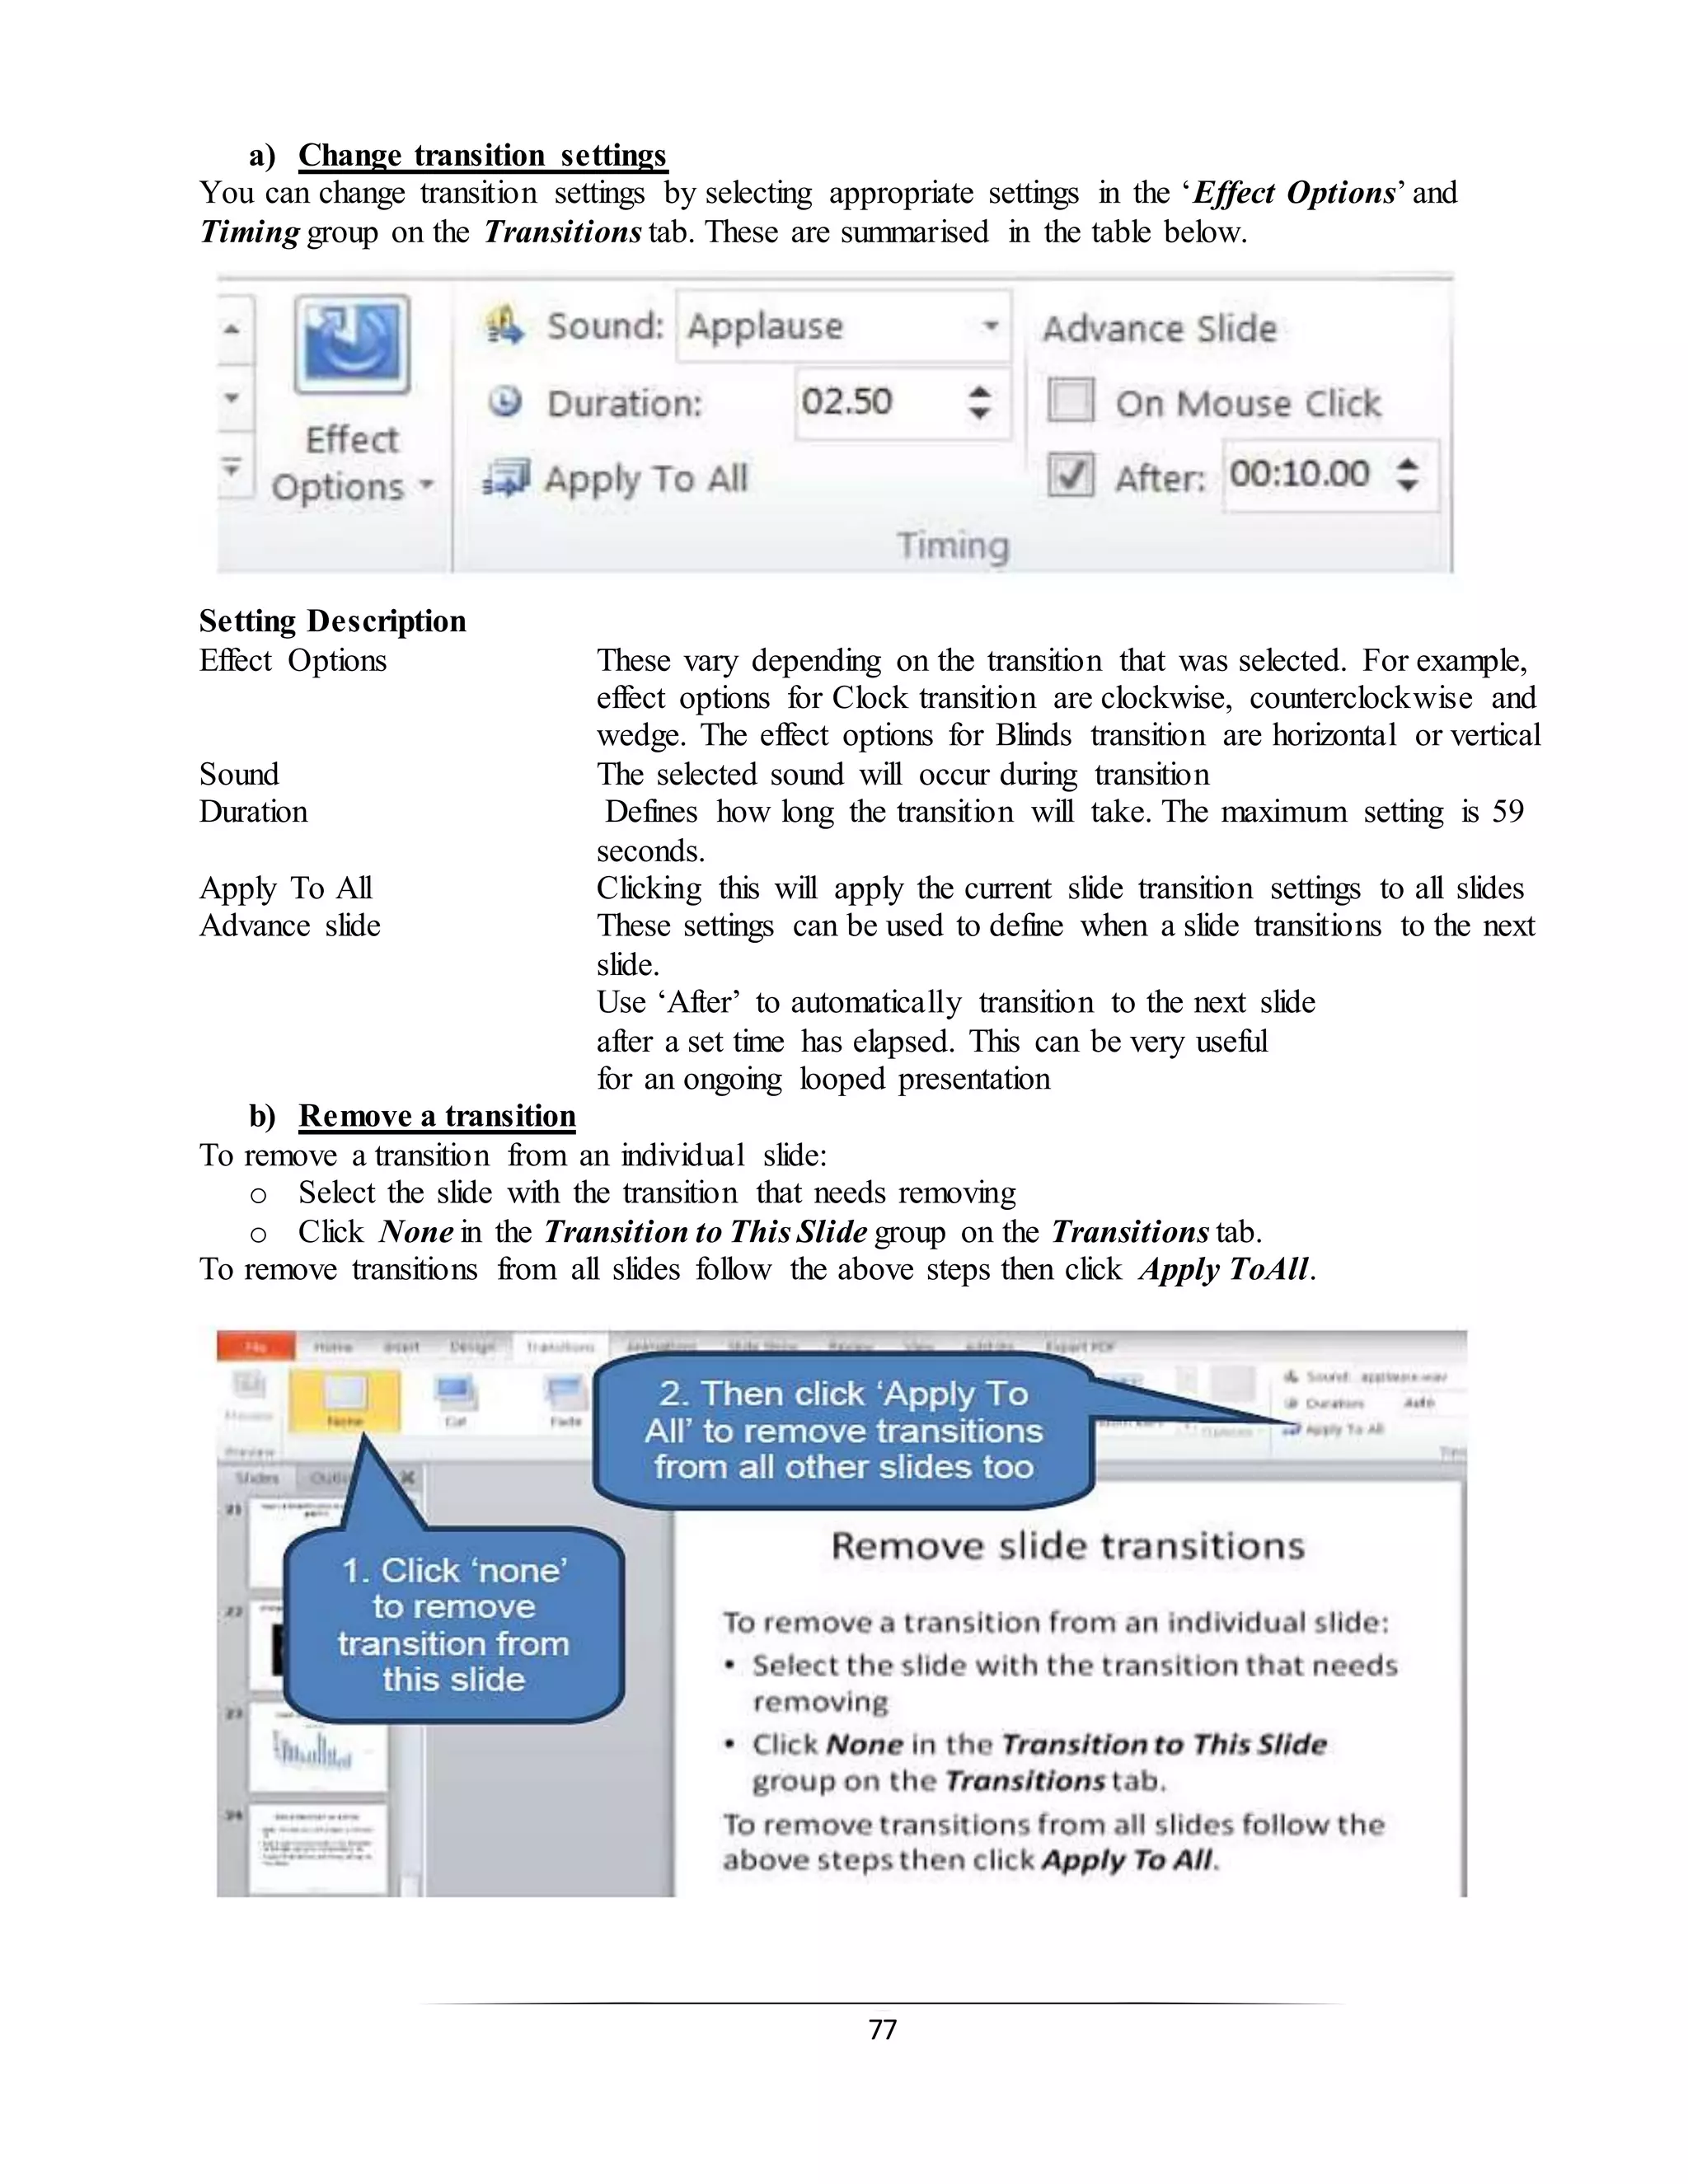
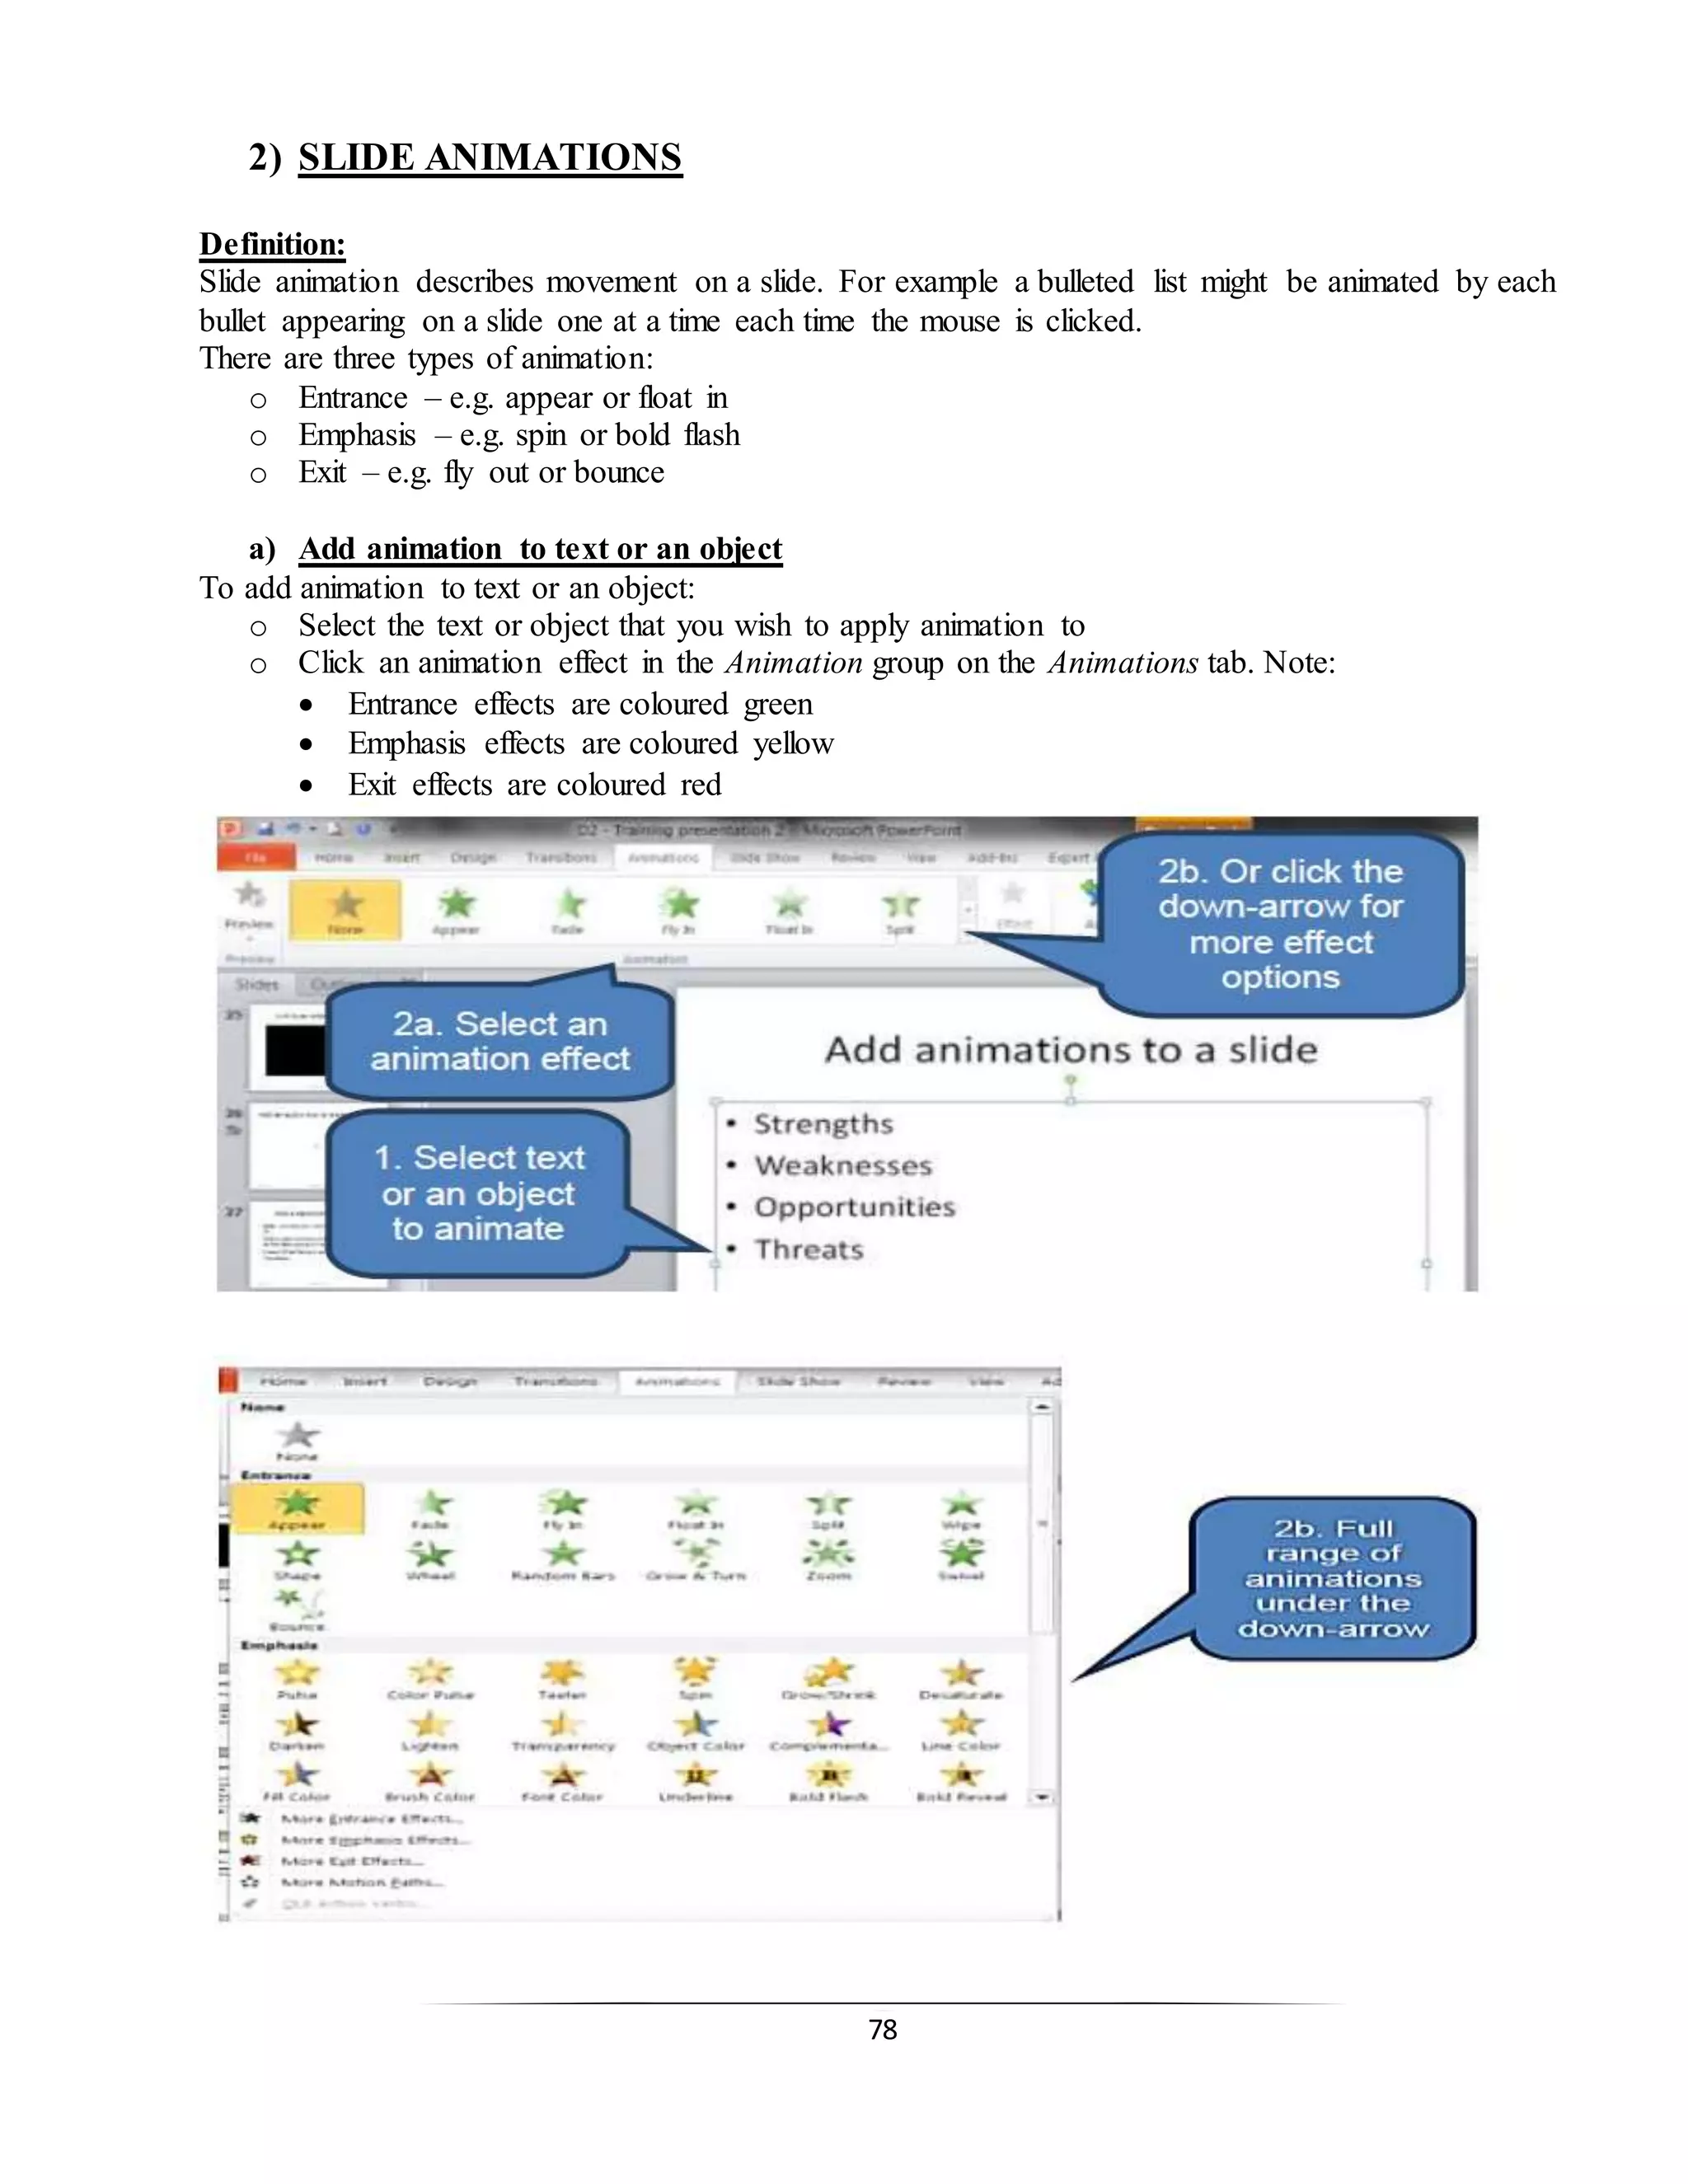
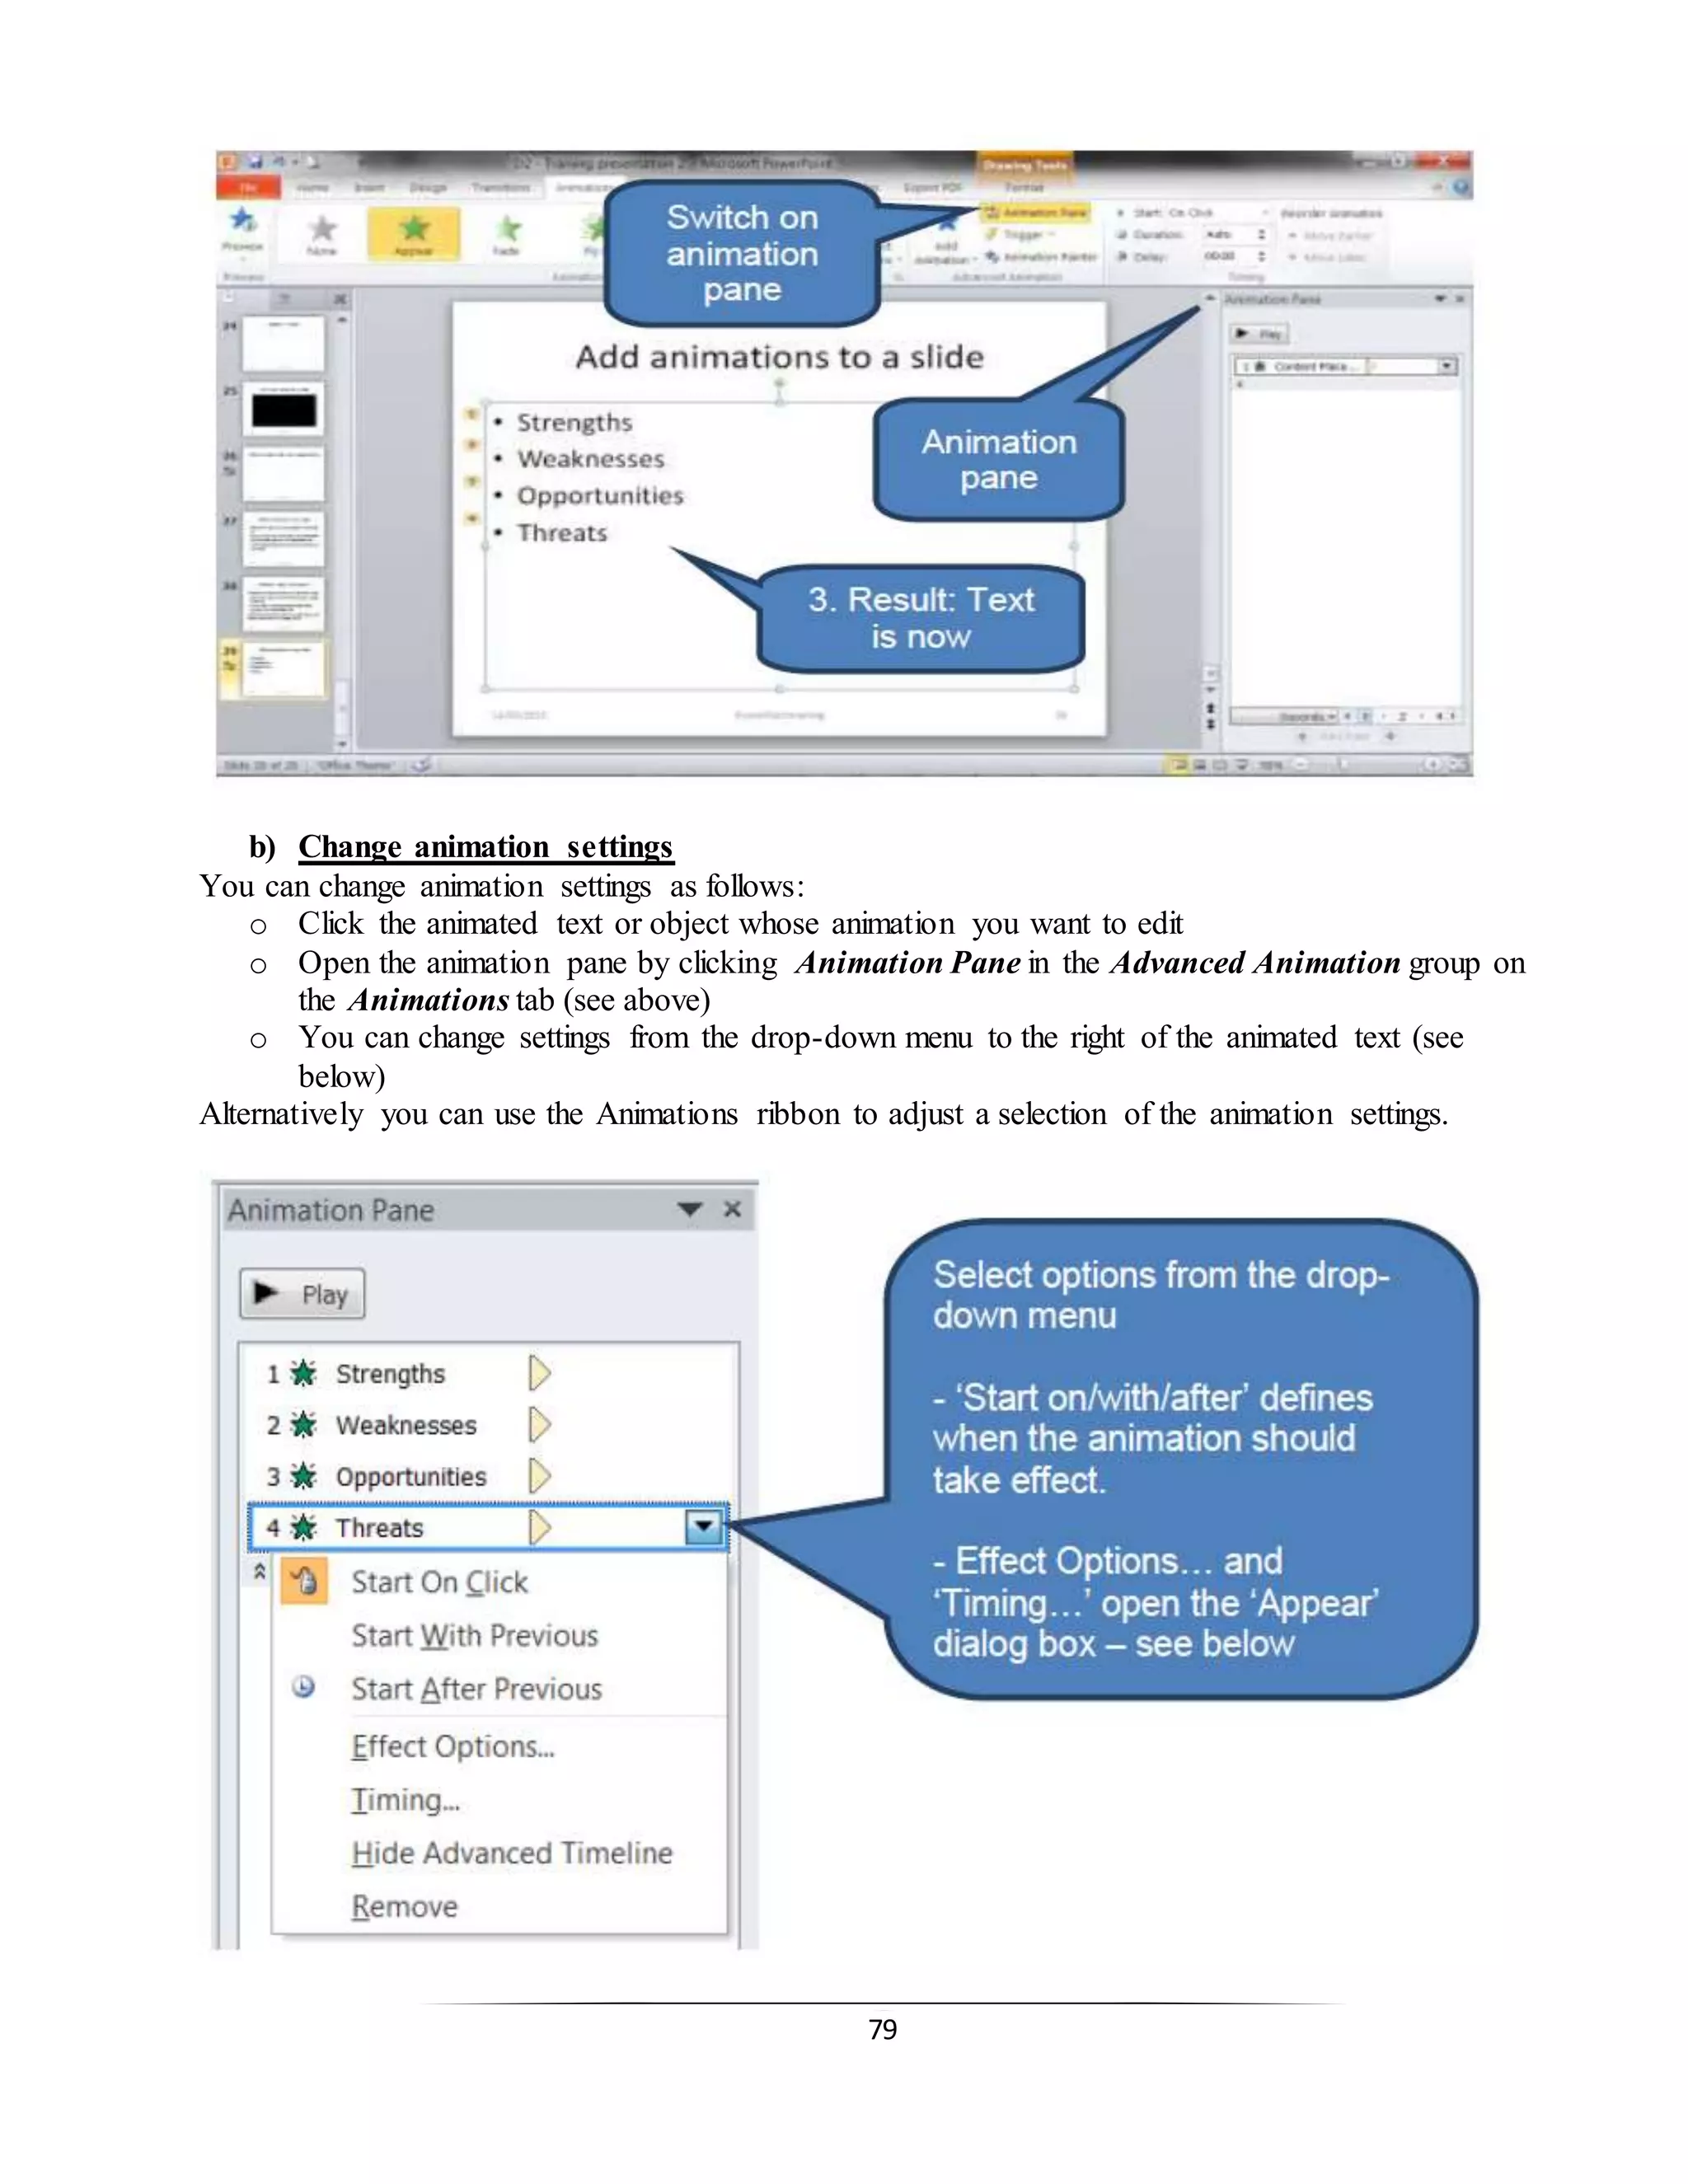
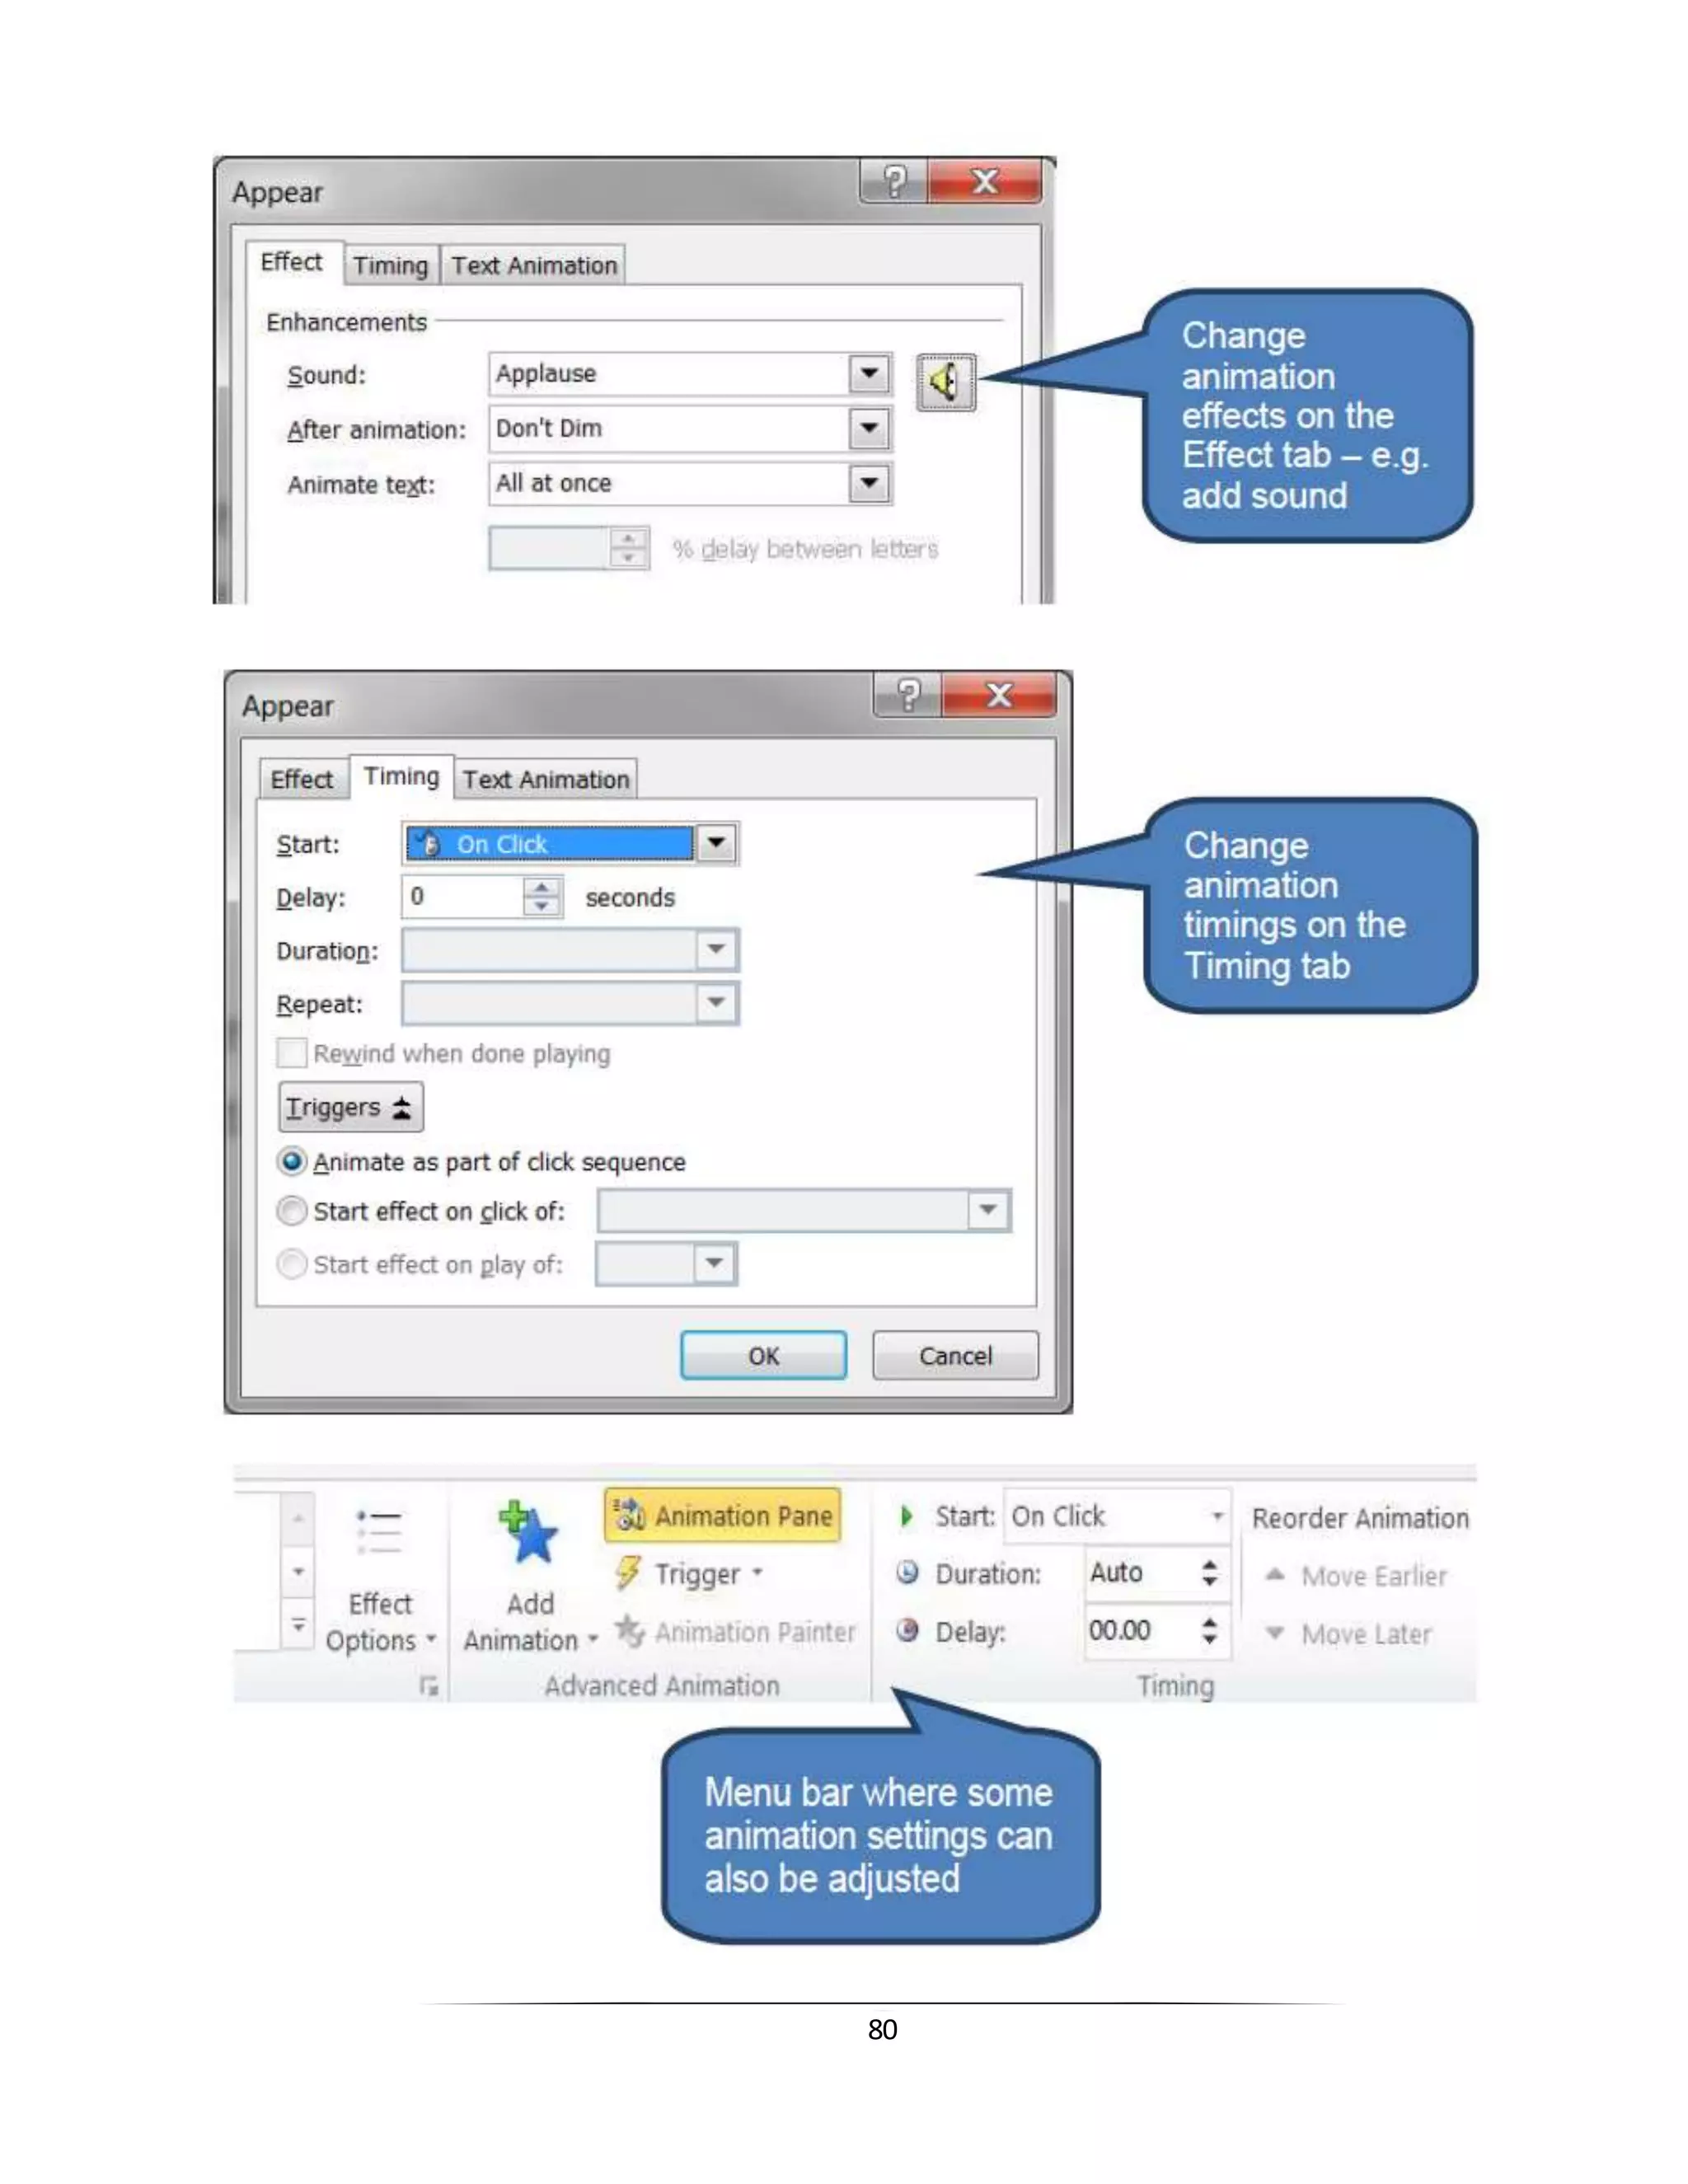
This document provides instructions on how to use various features in Microsoft PowerPoint 2010, including:
- Creating a new presentation from scratch, a template, or an existing presentation
- Inserting and formatting text using styles, colors, fonts, and other formatting options
- Adding visual elements like tables, charts, pictures, and videos
- Printing and previewing presentation slides in various layouts
The document is intended as a guide for students in an introductory computer course to learn the basic functions and formatting tools in PowerPoint 2010.
Ribbon Toolbar & Formatting
Inserting and Adding Objects
Creating Theme Color
Creating a Hyperlink
Slide Transitions
Slide Animation
Starting a Slide Show
Printing Slide
Microsoft Office Templates
Introduction to Microsoft PowerPoint 2010 for Microsoft Windows SlidesSaide OER Africa
This HIBB begins with explaining the basics of Microsoft PowerPoint, including how to start a new presentation, open an existing presentation, and save a presentation. It discusses the Ribbon toolbar and how to use it. The HIBB gives the viewer an introduction to many customizing options PowerPoint has available. The HIBB concludes with describing how to view outlines, print handouts, and view the slideshow.
At the end of this HIBB, students will be able to create a slideshow presentation with many customized features including but not limited to formatting fonts and pictures, inserting images, tables, and hyperlinks, and adding slide designs and transitions. Students will be able to view the slideshows they create and print the presentation handouts.
This is a guide to PowerPoint 2007 that I created for staff INSET. It covers lots of things from the very basics to the more complex features of the developer tab. I spent a while on this so I thought I would share in case anyone else would find this use
Microsoft PowerPoint 2019 Fundamentals.pdfMariaBatool42
This documents include the workshop related to computer fundamentals. This workshop contain each and everything related to the basics of the computer, from start to an end.
Impress is the presentation (slide show) program included in LibreOffice. You can create slides that contain many different elements, including text, bulleted and numbered lists, tables, charts, and a wide range of graphic objects such as clip-art, drawings and photographs. Impress also includes a spelling checker, a thesaurus, text styles, and background styles.
What is Impress?
Starting a presentation.
Formatting a presentation.
Design a presentation.
Working with templates.
Advantages and disadvantes of foreign aid to developmentBaseera Hashmi
There is no doubt that today’s world is more affluent and has more advanced technology than ever before ,however, there are famine, pollution, water shortages and development problems in dozens of countries. In that case, many countries and organizations are supplying aid and supporting undeveloped countries. Ordinary people who live in rich countries also have greater awareness of helping their infrastructural development. Food, technological, educational aids have become an accepted policy of advanced countries to assist in furthering the development of the human and material resources of poor countries.
Unfortunately, problems were misdiagnosed or not foreseen. It is no good taking over the aid of foreign countries uncritically. Moreover, foreign aid would make undeveloped countries lose their economy, market and other area’s independence. At the same time, as a kind of political exchange, undeveloped countries have to obey new rules which created by developed countries and further to be vassal states again. Nowadays, most countries in the world have not finished the progress of being industrialized.
Islam is not merely a religion or economic system but a Deen. It provides guidance for all aspects of individual & Collective lives. Islam means peace & submission. Peace acquired through total submission. There cannot be peace without Justice, which is the ultimate objective of sending down all Divine Books & Prophets.
Islam allows to earn income in which benefits are enjoyed by all the concerning parties on the just basis & prohibited to earn income through Bribery, Interest, Stealing & Robbery, Gambling, Wine & its business & Fraud.
Islam offers a definite economic system based on zakat, usher, Bayt al-mal, dignity of labour, equity, interest-free economy, legitimate income & avoidance of extravagance & observing rights & duties.
3.0 Project 2_ Developing My Brand Identity Kit.pptxtanyjahb
A personal brand exploration presentation summarizes an individual's unique qualities and goals, covering strengths, values, passions, and target audience. It helps individuals understand what makes them stand out, their desired image, and how they aim to achieve it.
Falcon stands out as a top-tier P2P Invoice Discounting platform in India, bridging esteemed blue-chip companies and eager investors. Our goal is to transform the investment landscape in India by establishing a comprehensive destination for borrowers and investors with diverse profiles and needs, all while minimizing risk. What sets Falcon apart is the elimination of intermediaries such as commercial banks and depository institutions, allowing investors to enjoy higher yields.
As a business owner in Delaware, staying on top of your tax obligations is paramount, especially with the annual deadline for Delaware Franchise Tax looming on March 1. One such obligation is the annual Delaware Franchise Tax, which serves as a crucial requirement for maintaining your company’s legal standing within the state. While the prospect of handling tax matters may seem daunting, rest assured that the process can be straightforward with the right guidance. In this comprehensive guide, we’ll walk you through the steps of filing your Delaware Franchise Tax and provide insights to help you navigate the process effectively.
[Note: This is a partial preview. To download this presentation, visit:
https://www.oeconsulting.com.sg/training-presentations]
Sustainability has become an increasingly critical topic as the world recognizes the need to protect our planet and its resources for future generations. Sustainability means meeting our current needs without compromising the ability of future generations to meet theirs. It involves long-term planning and consideration of the consequences of our actions. The goal is to create strategies that ensure the long-term viability of People, Planet, and Profit.
Leading companies such as Nike, Toyota, and Siemens are prioritizing sustainable innovation in their business models, setting an example for others to follow. In this Sustainability training presentation, you will learn key concepts, principles, and practices of sustainability applicable across industries. This training aims to create awareness and educate employees, senior executives, consultants, and other key stakeholders, including investors, policymakers, and supply chain partners, on the importance and implementation of sustainability.
LEARNING OBJECTIVES
1. Develop a comprehensive understanding of the fundamental principles and concepts that form the foundation of sustainability within corporate environments.
2. Explore the sustainability implementation model, focusing on effective measures and reporting strategies to track and communicate sustainability efforts.
3. Identify and define best practices and critical success factors essential for achieving sustainability goals within organizations.
CONTENTS
1. Introduction and Key Concepts of Sustainability
2. Principles and Practices of Sustainability
3. Measures and Reporting in Sustainability
4. Sustainability Implementation & Best Practices
To download the complete presentation, visit: https://www.oeconsulting.com.sg/training-presentations
The world of search engine optimization (SEO) is buzzing with discussions after Google confirmed that around 2,500 leaked internal documents related to its Search feature are indeed authentic. The revelation has sparked significant concerns within the SEO community. The leaked documents were initially reported by SEO experts Rand Fishkin and Mike King, igniting widespread analysis and discourse. For More Info:- https://news.arihantwebtech.com/search-disrupted-googles-leaked-documents-rock-the-seo-world/
Cracking the Workplace Discipline Code Main.pptxWorkforce Group
Cultivating and maintaining discipline within teams is a critical differentiator for successful organisations.
Forward-thinking leaders and business managers understand the impact that discipline has on organisational success. A disciplined workforce operates with clarity, focus, and a shared understanding of expectations, ultimately driving better results, optimising productivity, and facilitating seamless collaboration.
Although discipline is not a one-size-fits-all approach, it can help create a work environment that encourages personal growth and accountability rather than solely relying on punitive measures.
In this deck, you will learn the significance of workplace discipline for organisational success. You’ll also learn
• Four (4) workplace discipline methods you should consider
• The best and most practical approach to implementing workplace discipline.
• Three (3) key tips to maintain a disciplined workplace.
Taurus Zodiac Sign_ Personality Traits and Sign Dates.pptxmy Pandit
Explore the world of the Taurus zodiac sign. Learn about their stability, determination, and appreciation for beauty. Discover how Taureans' grounded nature and hardworking mindset define their unique personality.
India Orthopedic Devices Market: Unlocking Growth Secrets, Trends and Develop...Kumar Satyam
According to TechSci Research report, “India Orthopedic Devices Market -Industry Size, Share, Trends, Competition Forecast & Opportunities, 2030”, the India Orthopedic Devices Market stood at USD 1,280.54 Million in 2024 and is anticipated to grow with a CAGR of 7.84% in the forecast period, 2026-2030F. The India Orthopedic Devices Market is being driven by several factors. The most prominent ones include an increase in the elderly population, who are more prone to orthopedic conditions such as osteoporosis and arthritis. Moreover, the rise in sports injuries and road accidents are also contributing to the demand for orthopedic devices. Advances in technology and the introduction of innovative implants and prosthetics have further propelled the market growth. Additionally, government initiatives aimed at improving healthcare infrastructure and the increasing prevalence of lifestyle diseases have led to an upward trend in orthopedic surgeries, thereby fueling the market demand for these devices.
Attending a job Interview for B1 and B2 Englsih learnersErika906060
It is a sample of an interview for a business english class for pre-intermediate and intermediate english students with emphasis on the speking ability.
Skye Residences | Extended Stay Residences Near Toronto Airportmarketingjdass
Experience unparalleled EXTENDED STAY and comfort at Skye Residences located just minutes from Toronto Airport. Discover sophisticated accommodations tailored for discerning travelers.
Website Link :
https://skyeresidences.com/
https://skyeresidences.com/about-us/
https://skyeresidences.com/gallery/
https://skyeresidences.com/rooms/
https://skyeresidences.com/near-by-attractions/
https://skyeresidences.com/commute/
https://skyeresidences.com/contact/
https://skyeresidences.com/queen-suite-with-sofa-bed/
https://skyeresidences.com/queen-suite-with-sofa-bed-and-balcony/
https://skyeresidences.com/queen-suite-with-sofa-bed-accessible/
https://skyeresidences.com/2-bedroom-deluxe-queen-suite-with-sofa-bed/
https://skyeresidences.com/2-bedroom-deluxe-king-queen-suite-with-sofa-bed/
https://skyeresidences.com/2-bedroom-deluxe-queen-suite-with-sofa-bed-accessible/
#Skye Residences Etobicoke, #Skye Residences Near Toronto Airport, #Skye Residences Toronto, #Skye Hotel Toronto, #Skye Hotel Near Toronto Airport, #Hotel Near Toronto Airport, #Near Toronto Airport Accommodation, #Suites Near Toronto Airport, #Etobicoke Suites Near Airport, #Hotel Near Toronto Pearson International Airport, #Toronto Airport Suite Rentals, #Pearson Airport Hotel Suites
RMD24 | Retail media: hoe zet je dit in als je geen AH of Unilever bent? Heid...BBPMedia1
Grote partijen zijn al een tijdje onderweg met retail media. Ondertussen worden in dit domein ook de kansen zichtbaar voor andere spelers in de markt. Maar met die kansen ontstaan ook vragen: Zelf retail media worden of erop adverteren? In welke fase van de funnel past het en hoe integreer je het in een mediaplan? Wat is nu precies het verschil met marketplaces en Programmatic ads? In dit half uur beslechten we de dilemma's en krijg je antwoorden op wanneer het voor jou tijd is om de volgende stap te zetten.
Premium MEAN Stack Development Solutions for Modern BusinessesSynapseIndia
Stay ahead of the curve with our premium MEAN Stack Development Solutions. Our expert developers utilize MongoDB, Express.js, AngularJS, and Node.js to create modern and responsive web applications. Trust us for cutting-edge solutions that drive your business growth and success.
Know more: https://www.synapseindia.com/technology/mean-stack-development-company.html
"𝑩𝑬𝑮𝑼𝑵 𝑾𝑰𝑻𝑯 𝑻𝑱 𝑰𝑺 𝑯𝑨𝑳𝑭 𝑫𝑶𝑵𝑬"
𝐓𝐉 𝐂𝐨𝐦𝐬 (𝐓𝐉 𝐂𝐨𝐦𝐦𝐮𝐧𝐢𝐜𝐚𝐭𝐢𝐨𝐧𝐬) is a professional event agency that includes experts in the event-organizing market in Vietnam, Korea, and ASEAN countries. We provide unlimited types of events from Music concerts, Fan meetings, and Culture festivals to Corporate events, Internal company events, Golf tournaments, MICE events, and Exhibitions.
𝐓𝐉 𝐂𝐨𝐦𝐬 provides unlimited package services including such as Event organizing, Event planning, Event production, Manpower, PR marketing, Design 2D/3D, VIP protocols, Interpreter agency, etc.
Sports events - Golf competitions/billiards competitions/company sports events: dynamic and challenging
⭐ 𝐅𝐞𝐚𝐭𝐮𝐫𝐞𝐝 𝐩𝐫𝐨𝐣𝐞𝐜𝐭𝐬:
➢ 2024 BAEKHYUN [Lonsdaleite] IN HO CHI MINH
➢ SUPER JUNIOR-L.S.S. THE SHOW : Th3ee Guys in HO CHI MINH
➢FreenBecky 1st Fan Meeting in Vietnam
➢CHILDREN ART EXHIBITION 2024: BEYOND BARRIERS
➢ WOW K-Music Festival 2023
➢ Winner [CROSS] Tour in HCM
➢ Super Show 9 in HCM with Super Junior
➢ HCMC - Gyeongsangbuk-do Culture and Tourism Festival
➢ Korean Vietnam Partnership - Fair with LG
➢ Korean President visits Samsung Electronics R&D Center
➢ Vietnam Food Expo with Lotte Wellfood
"𝐄𝐯𝐞𝐫𝐲 𝐞𝐯𝐞𝐧𝐭 𝐢𝐬 𝐚 𝐬𝐭𝐨𝐫𝐲, 𝐚 𝐬𝐩𝐞𝐜𝐢𝐚𝐥 𝐣𝐨𝐮𝐫𝐧𝐞𝐲. 𝐖𝐞 𝐚𝐥𝐰𝐚𝐲𝐬 𝐛𝐞𝐥𝐢𝐞𝐯𝐞 𝐭𝐡𝐚𝐭 𝐬𝐡𝐨𝐫𝐭𝐥𝐲 𝐲𝐨𝐮 𝐰𝐢𝐥𝐥 𝐛𝐞 𝐚 𝐩𝐚𝐫𝐭 𝐨𝐟 𝐨𝐮𝐫 𝐬𝐭𝐨𝐫𝐢𝐞𝐬."
What is the TDS Return Filing Due Date for FY 2024-25.pdfseoforlegalpillers
It is crucial for the taxpayers to understand about the TDS Return Filing Due Date, so that they can fulfill your TDS obligations efficiently. Taxpayers can avoid penalties by sticking to the deadlines and by accurate filing of TDS. Timely filing of TDS will make sure about the availability of tax credits. You can also seek the professional guidance of experts like Legal Pillers for timely filing of the TDS Return.
3. 3
4th
November , 2015
INTRODUCTION TO MICROSOFT POWERPOINT 2010
Definition
Microsoft PowerPoint is a presentation software application that allows users to combine text and
graphics for on-screen presentations.
PRACTICAL USES FOR MICROSOFT POWERPOINT
Microsoft PowerPoint’s substantial power and flexibility make it a useful tool for both personal and
business use. It is typically used as a graphical approach to presentations in the form of slide shows
that accompany oral delivery of the topic.
Users create dynamic, informational slides through the use of
o Text
o Graphics
o Animation
CREATING A NEW PRESENTATION
Definition
A PowerPoint presentation is a file that contains one or more slides that collectively present various
kinds of related information in a dynamic way.
There are a number of ways to open a new, blank presentation.
o Click Microsoft PowerPoint 2010 from the start menu. This launches a new session of
PowerPoint and a new blank presentation will open automatically.
4. 4
o If PowerPoint is already open click New + Blank presentation on the File tab. This will open a
new presentation in addition to the already open presentation.
5. 5
o You can also press CTRL + N whilst in an existing presentation to quickly
create a new, blank presentation.
1) BASE A NEW PRESENTATIONON AN EXISTING PRESENTATION
You may be able to save time and effort by recycling previous work and basing a new presentation on
an existing presentation.
There are two ways to do this:
o If PowerPoint is open click New + New from existing on the File tab.
o Navigate to the existing presentation you wish to recycle via the dialog box.
Then click Create New.
2) BASE A NEW PRESENTATIONON A POWERPOINTTEMPLATE
Definition
A PowerPoint template is a preformatted presentation designed for a specific purpose such as
presenting financial summaries, preparing a SWOT analysis or creating a business plan.
To base a new presentation on a template do the following:
o Open Microsoft PowerPoint
o Click New on the File tab
o Now you have a range of options including the following:
Open a recently used template from Recent templates;
Open a template you recently saved in My templates; and
6. 6
Open an Office.com standard template.
Note: you may be offered further sub-options within a category.
For example PowerPoint presentations and slides opens a second suite of options from which you
might select Business presentations and then the Business deal presentation (see 3a, 3b and 3c
below).
To open the selected template either double click the template or click download after checking the
preview
7. 7
3) CREATE AND EDIT YOUR OWN TEMPLATES
i. Create your owntemplate
To create your own template:
o Click the File tab
o Click Save As
o In the ‘Save as type’ drop-down select PowerPoint Template, give your new template a name,
then click Save
8. 8
o Your new template will now appear as an option in My templates when you next open a new
file from the File tab using ‘My templates’
9. 9
ii. Edit your own template
To edit your own template:
o Click on the File tab
o Click Open
o Select the ‘PowerPoint Templates’ file type
o Choose the saved template you wish to re-open to edit
o Click Open
10. 10
You can now edit your previously saved template. Once finished editing simply re-save the file by
either:
o Click File tab then Save; or
o Press CRTL+S
4) SLIDE MASTER AND PLACEHOLDERS
Definition: Slide master
A slide master is the highest level slide in a hierarchy of slides that stores information about slide
layouts and themes in a presentation. The information stored includes background, fonts, positioning,
effects and placeholder sizes.
Definition: Placeholders
A placeholder is a box with dotted or hatch-marked borders that form part of most slide layouts. These
boxes hold title and body text. They can also include objects such as charts, tables and pictures.
Illustration: Apex themed master slides
The illustration below shows the Microsoft PowerPoint default master slide pack with the Apex theme
applied. No other customizations have been made. This was created by opening a new presentation
then adding the Apex theme on the slide master view.
11. 11
Create your ownslide master
To create or customize a slide master:
o Open a blank presentation
o Click Slide Master in the Master Views group on the View tab. This opens the slide master
with the default associated layouts. The slide master is identifiable as it is the largest slide in
the thumbnail pane.
To delete any of the built-in layouts right-click the slide thumbnail you wish to delete, then
click Delete Layout
Set the page orientation for all the slides in your presentation to either Portrait or
Landscape. To do this click Slide Orientation in the Page Setup group on the Slide Master
tab.
Create new layouts and customize existing layouts as necessary. For example you can
apply design or theme-based colours, fonts, effects and backgrounds.
You can also add and delete placeholders.
To add a placeholder, select the placeholder type form the Insert Placeholder drop-
down in the Master Layout group of the Slide Master tab
Draw the placeholder where you want it to appear.
To delete a placeholder select it with the mouse then click DELETE
o Click Save As on the File tab.
o Enter a name in the File name box
o Click PowerPoint Template in the Save as type list. Click Save.
o Back on the Slide Master tab, click Close Master View in the Close group.
15. 15
INSERTING AND EDITING TEXT-BASED CONTENT
1) ADD TEXT TO A PLACEHOLDER OR TEXT BOX
i. Adding text to a placeholder
As we saw in the previous section placeholders are created in the Master and Layout slides to form the
slide templates for our presentation.
When we add a new slide from the Master and Layout library we can then enter text in the pre-defined
placeholders. To do this:
o Select a slide from the thumbnail pane
o Click inside the placeholder you want to edit
o Then type, paste or edit text
Note: that the prompt text within a placeholder disappears when you click into the placeholder
to edit it.
16. 16
ii. Add text to a text box
Whilst placeholders provide a consistent look and feel to our presentation there will be times when we
need to customize a slide’s layout and enter text outside a placeholder, for example when adding a
caption to a picture. To do this we need to add what is called a text box as follows:
o Click Text Box in the Text group on the Insert tab
o Click the slide (the position will be the top-left of the resultant text box), and then drag the
pointer to draw the text box
o Click inside the text box and then type or paste text.
Note :that text is editable by all users if entered as a text box in Normal View (as above).
However, if a text box is added into a Slide Master in Slide Master view, then that text will be
permanent and un-editable outside the slide master.
18. 18
2) ADD TEXT TO SHAPES
When you insert shapes (e.g. callout balloons and block arrows) using the Shapes option in the
Illustrations group on the Insert tab, those shapes can contain text that becomes part of a shape.
To add text that becomes part of a shape:
o Select the shape by clicking it
o Type or paste text
20. 20
3) BULLETS AND NUMBERS
i. Adding bullets and numbers
Bulleted or numbered lists are an effective way of presenting lots of text or a sequential process in a
presentation. They can be added as follows:
o Click Normal in the Presentation Views group on the View tab.
o Select a slide thumbnail you want to add bulleted or numbered text to.
o Select the lines of text in a text placeholder or table that you want to add bullets or numbering
to.
o Click Bullets or Numbering in the Paragraph group on the Home tab to apply basic bullets or
numbering.
21. 21
ii. Changing the appearance ofbullets and numbers
You can make changes to the bullet or number style and also change the starting number by using the
Bullets and Numbering drop-downs as follows:
o Place the cursor anywhere on the bulleted or numbered line that you wish to change. You can
change multiple lines simultaneously by highlighting the text in all of the bullets or numbers
you want to change.
o Click the Bullets or Numbering drop-down in the Paragraph group on the Home tab.
o Select one of the visible styles from the drop-down menu or open the Bullets and Numbering
dialog box by clicking “Bullets and Numbering” for further options.
23. 23
4) INDENTS
To create an indented list within a list:
o Place cursor at the start of the line you want to indent (or highlight a number of lines to indent
multiple lines)
o Click Increase List Level in the Paragraph group on the Home tab
You can also do the reverse and move text back to a less indented level as follows:
o Place cursor at the start of the line where you want to reduce indent (or highlight a number of
lines to reduce indent on multiple lines)
o Click Decrease List Level in the Paragraph group on the Home tab
25. 25
5) COLOURS
i. Changing the colour of text on a slide
You can change the colour of specific text on a particular slide or all text on all slides. To change
colour on a particular slide:
o Select the text you want to change colour
o Click the down-arrow next to Font Colour in the Font group on the Home tab
o Click the colour you want.
Note: for more options beyond the standard theme colours click More Colours.
ii. Changing the colour of text on all slides
You can change the colour of text on all slides generated from a Master Slide or associated Layout
simultaneously as follows:
o Click Slide Master in the Master Views group on the View tab
o Select the Slide Master or Layout slide where you wish to amend text colour. Note: that if you
amend the Slide Master this will change text colour on all the associated Layout slides. If you
select one of the Layout slides this will change text colour only on slides generated from that
individual Layout slide.
o Select the text you want to change colour
26. 26
o Click the down-arrow next to Font Colour in the Font group on the Home tab
o Choose an appropriate colour. As above, click More Colours for more options beyond the
standard theme colours
iii. Changing theme colours
You can change a theme colour whilst still retaining the same theme.
o Click Colours in the Themes group on the Design tab
o Select a colour.
6) SUPERSCRIPT,SUBSCRIPT AND CAPITALIZATION
i. Superscript and subscript formats
To format text as superscript or subscript:
o Select the text you want to format
o Click the Font Dialog Box Launcher in the Font group on the Home tab
o Select Superscript or Subscript under Effects in the Font dialog box
o Click OK
o
Note that PowerPoint automatically applies a smaller font size to superscript and subscript formats. If
you wish to apply a larger font size enter a higher percentage in the Offset.
28. 28
ii. Capitalization
Change the capitalization of sentences, words or paragraphs as follows:
o Select text that needs changing
o Click the Change Case drop-down in the Font group on the Home tab.
o Select an option to apply the capitalization required.
The following table shows the effect of each of the five capitalization options
Changing the direction of text
Text can be displayed in a number of ways including:
o Vertically with stacked letters
o Horizontally
o Rotated facing right or left margin
29. 29
In order to achieve the effect do the following:
o Select the text you wish to stack or rotate
o Click Text Direction in the Paragraph group on the Home tab
o Select the direction you wish the text to take from the Text Direction dropdown. Alternatively
click More Options to launch the Format Text Effects dialog box
30. 30
The following slide illustrates the effect of each of the four main rotation and
stack options from the Text Direction drop-down.
7) FONTS
i. Changing text font on a slide
You can change the text font of specific text on a particular slide or all text on all slides.
To change font on a particular slide:
o Select the text where you want to change font
o Change font settings in the Font group on the Home tab.
31. 31
The following slide illustrates the effect of each of the main font options from the
Font group on the Home tab shown above.
32. 32
i. Changing text font on all slides
You can change the font on all slides generated from a Master Slide or associated Layout
simultaneously as follows:
o Click Slide Master in the Master Views group on the View tab
o Select the Slide Master or Layout slide where you wish to amend text font. Note: that if you
amend the Slide Master this will change font on all the associated Layout slides. If you select
one of the Layout slides this will change font only on slides generated from that individual
Layout slide.
o Select the text where you want to change font
o Choose appropriate font settings from the Font group on the Home tab.
8) PARAGRAPH SETTINGS
We’ve already seen the bulleted and numbered lists plus indent function in action from the Paragraph
group of the Home tab. Other useful functions to note include:
o Alignment – Left, center, right, justified
o Line and paragraph spacing options
This can best be illustrated with an example
33. 33
9) AUTOFIT
AutoFit helps ensure that title text and body text automatically fit in a placeholder.
This can be illustrated as follows:
Note how both the title and body placeholder contents have automatically shrunk to fit them into the
available placeholder area. This occurred after having switched on both title and body AutoFit.
To switch AutoFit functionality on or off:
o Click Options under Help on the File tab
o Click Proofing in the left pane of the PowerPoint Options dialog box
o Click AutoCorrect Options
o Select the AutoFormat As You Type tab
o Clear or check the following check boxes as applicable:
AutoFit title text to placeholder
AutoFit body text to placeholder
o Click OK then OK
34. 34
Note: how the AutoFit options impact editing behaviour across the wholepresentation as they
are global settings.
35. 35
10) FIND AND REPLACE
i. find
The Find function can be used to locate text strings with an option to make the search case sensitive.
To find a text string:
o Click Find in the Editing group on the Home tab
o Enter the text search string in the Find dialog box
o Click Find Next
ii. Replace
The replace function can be used to replace search text with replacement text asfollows:
o Open the Replace dialog box using one of the below methods:
Click Replace in the Editing group on the Home tab; or
Click the Replace button on the Find dialog box
o Enter the text search string in the Find What prompt
o Enter the replacement text in the Replace with prompt
36. 36
o Either:
Click Replace to replace instances of the search text one by one; or
Click Replace All to replace all instances of the search text at the same time
37. 37
PRINTING
1) PREVIEWING PRESENTATIONSBEFOREPRINTING
Definition
Print preview allows you to see on-screen exactly how the presentation will look when you proceed
with printing it to paper (or another output file). This saves both time and money by avoiding wasteful
print-runs when further amendments may still be required.
o To preview a presentation either click on File tab, click the Print Preview icon or press CTRL
+ F2
o Illustrative print preview screen
38. 38
2) PRINTING PRESENTATIONS
Continuing the above example once you’re in the print preview screen select appropriate print options,
double check the preview on the right hand side, then click Print.
3) PRINT EXAMPLES
Illustration 1 – Full page
40. 40
Illustration 4 – Handouts: 1 slide per page
Illustration 5 – Handouts: 2 slides per page
41. 41
Illustration 6 – Handouts: 3 slides per page
Illustration 7 – Handouts: 4 slide per page horizontal
42. 42
Illustration 8 – Handouts: 4 slides per page vertical
USING VISUAL AIDS IN PRESENTATIONS
1) TABLES
i. Create a table in MicrosoftPowerPoint
To create a table in Microsoft PowerPoint:
o Select the slide on which you want your table to appear
o Click Table in the Tables group on the Insert tab
o To create the table either:
Click and move the pointer to select the number of columns and rows you need in your
table, then release the mouse button
Click Insert Table then enter the Number of rows and Number of columns
44. 44
ii. Copy and paste a table from MicrosoftWord
To copy a table from Microsoft Word then paste it into a Microsoft PowerPoint presentation:
o In Word:
Click the table you want to copy
Click the arrow next to Select in the Table group on the Layout tab under Table Tools
Click Select Table
Click Copy in the Clipboard group on the Home tab (or press CTRL+C)
o Back in your PowerPoint presentation:
Select the slide where you want to copy the table to
Click Paste in the Clipboard group on the Home tab
Re-format the table layout and design as appropriate
46. 46
iii. Copy and paste cells from MicrosoftExcel
Similar to when we copied a table from Microsoft Word into Microsoft PowerPoint above it is also
possible to copy cells from a Microsoft Excel worksheet into a PowerPoint presentation. To do this:
o In the Excel worksheet:
Highlight the cells you want to copy (click the upper-left cell of the group then drag to
select further cells)
Click Copy in the Clipboard group on the Home tab
o Back in PowerPoint:
Click the slide where you want to paste the cells
Click Paste in the Clipboard group on the Home tab
Re-format the table layout and design as appropriate
47. 47
iv. Insert an Excelworksheetinto Microsoft PowerPoint
PowerPoint allows us to insert and embed an Excel worksheet into a presentation rather than copying
from worksheet cells then pasting them into a PowerPoint table.
48. 48
The insert and embed approach has the benefit that many Excel features are retained in the embedded
worksheet including functions, formulae and data import features.
To insert an Excel worksheet into a presentation:
o Select the slide where you want to embed a worksheet
o Click Table in the Tables group on the Insert tab
o Click Excel Spreadsheet. This opens a blank worksheet embedded in the current slide.
o To enter text in the worksheet click a cell and enter text. Edit other cells then click outside the
table once complete.
To edit the worksheet after it has been deselected, double-click the table to reactivate worksheet view.
You can also format the worksheet (e.g. fonts, shading and column widths) whilst the worksheet is
activate (double-clicked).
49. 49
v. Entering text into a cell
To enter text into a cell in a table:
o Click inside the cell
o Enter new text or edit existing text
o Click outside the table to save the text
50. 50
vi. Modifying a table’s design and layout
When part or all of a table is active (e.g. because you clicked in a cell, or highlighted a number of
rows) two new tabs appear on the PowerPoint ribbon under Table Tools:
o The Design tab
o The Layout tab
a) The Designtab
The best way to explore the Design tab is to create a table yourself then click on each of the options to
see what impact they have.
b) The Layout tab
As with the Design tab the best way to explore the Layout tab is to create a table yourself then click
on each of the options to see what impact they have .
vii. Changing column width or row height
To change the width of a column or height of a row you can use options on the Layout tab as
described above, or:
o Click one of the boundaries between cells or an outer boundary of the table
o Drag the boundary to re-size
51. 51
viii. Add a row or column to a table
To add a row to the table you can use options on the Layout tab as described above, or:
o To add a new bottom row, click inside the last cell of the last row, then press TAB; or
o To add a new row part way through a table
Highlight a row
Right-click
Select one of the options under ‘Insert’. E.g. ‘Insert Rows Above’
Note that you can add multiple rows simultaneously by highlighting multiple rows before right-
clicking. Note that the same number or rows will be added as were highlighted.
To add columns use the same process as above for adding rows, except choose one of the column
options under ‘Insert’.
52. 52
ix. Delete rows or columns from a table
To delete rows or columns from a table you can use options on the Layout tab as described above, or:
o Highlight the rows or columns to be deleted
o Right-click
o Select Delete Rows or Delete Columns as appropriate
53. 53
2) IMAGES
i. Pictures
a) Insert a picture from a file
You can add pictures into your presentation from files saved on your computer. First, you will need to
save the picture files to your computer perhaps from a scanner, transferred from an external device like
a smart phone or camera, or alternatively a saved picture attachment from an email.
To insert a picture from a file:
o Click the slide where you want to insert the picture
o Click Picture in the Images group on the Insert tab
o To add a picture, locate the picture you want to insert using the file manager then double-click
it. Alternatively you can add multiple pictures by pressing and holding CTRL while clicking all
the required pictures then pressing Insert.
o You can resize the picture by selecting it then dragging a sizing handle
54. 54
b) Insert a picture from the Web
To insert a picture from a web page:
o Right-click the picture you want on the Web page
o Click COPY from the menu
o Click the slide where you want to insert the picture
o Right-click and select the PASTE option (or press CTRL+V)
55. 55
ii. Clip art
Definition:
Clip Art describes pre-drawn pictures and symbols that users can add to their PowerPoint presentation.
Clip Art is used extensively in both personal and commercial presentations and has evolved to include
a wide variety of content, file formats and illustration styles.
Clip Art is generally composed exclusively of illustrations (hand-drawn or computer generated) rather
than photography.
To add a Clip Art image to your presentation:
o Select the slide you wish to add Clip Art to
o Click Clip Art in the Images group on the Insert tab
o Type a word or phrase describing the Clip Art you want in the Search for text box in the Clip
Art task pane – for example “Accountant” or “Presentation”
o Click Go.
o Choose an appropriate image from the results list shown. To insert it into the presentation click
the image.
o Re-size the inserted image by clicking and dragging an edge or corner
56. 56
iii. Screen-shots
Definition:
A screen-shot is a photograph of the display on a computer screen. This is typically used to
demonstrate the operation of a program or communicate what a window looks like.
A screen shot can be taken of a particular window (e.g. Microsoft Excel, PowerPoint or Word), the
whole desktop, or an area defined by the user.
57. 57
To add a screen shot to a presentation:
o Click Screenshot in the Images group on the Insert tab
o Either
Click one of the windows to insert a picture of; or
Click Screen Clipping then drag the mouse over the screen to select an area to photograph
and insert
58. 58
3) ILLUSTRATIONS
i. Shapes
Definition:
Shapes are pre-defined graphics that include lines, geometric shapes, arrows, equation shapes,
flowchart symbols, banners, stars and callouts that can be added to presentations either individually or
combined into more complex shapes.
a) Add a shape to a slide
To add a shape to a slide:
o Click Shapes in the Drawing group on the Insert tab
o Select a shape to add
o Click on the slide where you want to insert the shape
o Drag and release to place the shape
Note: to retain the pre-set dimensions of a shape press and hold the SHIFT key whilst you drag.
1
59. 59
b) Add multiple copies of same shape to a slide
To add multiple copies of same shape to a slide:
o Click Shapes in the Drawing group on the Insert tab
o Right-click the shape you wish to add multiple times
o Click Lock Drawing Mode option
o Click on the slide where you want to insert the first shape
o Drag and release to place the shape
o Repeat the above two steps until you have added all the shapes you want then press ESC to
exit Lock Drawing Mode
c) Add text to a shape
To add text to a shape:
o Click the shape you want to add text to
o Type your text
Note: you can use the font and paragraph options on the Home tab to format the text.
60. 60
d) Add a quick style to a shape
To add a quick style to a shape:
o Click a shape you want to apply a new or different Quick Style to. You can select multiple
shapes simultaneously by holding down the SHIFT key.
o Select a Quick Style in the Drawing group on the Format tab (under Drawing Tools which
appears when shapes are selected).
61. 61
e) Delete a shape
To delete a shape:
o Click the shape you want to delete
o Press the DELETE key
ii. SmartArt
Definition
The SmartArt facility enables users to create simple and effective diagrams, organization charts and
flow charts.
SmartArt offers an effective alternative method of presentation for bulleted lists and text-only slides.
This is particularly useful given that illustrations improve understanding and memory. Illustrations
also better encourage action.
a) Create a SmartArt graphic
To create a SmartArt graphic:
o Click SmartArt in the Illustrations group on the Insert tab
o Click the type and layout you want in the Choose a SmartArt Graphic dialog box then click
OK to insert the graphic
o Click the Text prompt in a SmartArt graphic component then type your text
o
62. 62
b) Add shapes to a SmartArt graphic
To add shapes to a SmartArt graphic:
o Click the SmartArt graphic you want to add another shape to
o Click an existing shape closest to where you want to add the new shape
o Click the Add Shape arrow in the Create Graphic group on the Design tab under SmartArt
Tools
o Select either Add Shape After or Add Shape Before
63. 63
c) Delete shapes from a SmartArt graphic
To delete shapes from a SmartArt graphic:
o Click the shape you want to delete then press the DELETE key.
o To delete an entire SmartArt graphic click the SmartArt graphic border and then press
DELETE
d) Change colours of an entire SmartArt graphic
To change the colours of an entire SmartArt graphic:
o Click a SmartArt graphic
o Click Change Colours in the SmartArt Styles group on the Design tab under SmartArt Tools
o Click the desired colour variation to apply a colour scheme to the selected SmartArt graphic
64. 64
e) Apply a SmartArt style to a SmartArt graphic
To apply a SmartArt style to a SmartArt graphic:
o Click a SmartArt graphic
o Select a style in the SmartArt Styles group on the Design tab under SmartArt Tools
iii. Charts and graphs
a) Add a chart or graph to a presentation
To add a chart or graph to a presentation:
o Click Chart in the Illustrations group on the Insert tab
o Select the type of chart you want in the Insert Chart dialog box then click OK
This inserts a standard default chart into the presentation and also opens an Excel worksheet with the
underlying data. You can edit the data in the worksheet then close the worksheet once complete.
66. 66
To subsequently edit the underlying data either:
o Right-click the chart or graph then click Edit Data; or
o Click Edit Data on the Chart Tools-Design tab
This will re-open the underlying Excel worksheet allowing further editing of the data values and range
67. 67
b) Insert a linked Excel chart
Rather than create a new chart in PowerPoint and enter new data you can base a chart on an existing
Excel worksheet. This creates a link between the PowerPoint presentation and the Excel worksheet.
To insert a linked Excel chart in PowerPoint:
o In Excel:
Open the Excel workbook containing the chart you want to link. Note – the workbook must
have been saved.
Select the chart by clicking it
Click Copy in the Clipboard group on the Home tab
o In PowerPoint:
Select the slide where you want to insert the chart
Click the Paste arrow in the Clipboard group on the Home tab
If you wish to retain the look and feel of the chart as it appeared in Excel select Keep
Source Formatting & Link Data
Alternatively select Use Destination Theme & Link Data
68. 68
In order to capture any changes in the underlying Excel chart the link must be refreshed. To refresh the
link:
o Click Refresh Data in the Data group on the Design tab under Chart Tools
You can also re-open the linked worksheet as follows:
o Select the chart by clicking on it
o Click Edit Data in the Data group on the Design tab under Chart Tools
c) Change the appearance of a chart or graph
When you click on a chart or graph the Chart Tools ribbon grouping is displayed.
The group includes three tabs – Design, Layout and Format.
69. 69
4) MEDIA
i. Videos
.
a) Link a video
When you link to a video you create a connection between the PowerPoint presentation and the linked
video file.
The advantage of this is that you reduce the file size of your presentation dramatically because the
video remains external to the presentation file.
70. 70
Link to an external video from your presentation
To link to an external video to your presentation:
o Ensure you are in Normal view (click Normal on the View tab)
o Click the slide where you want to add a link to a video
o Click the Video arrow in the Media group on the Insert tab
o Click Video from File
o Locate then select the file you want to link using the file manager
o Click Link to file on the Insert button
Tip: To help minimise the risk of broken links you could adopt the tactic of copying the videos to
the same folder as your presentation then link to them there.
71. 71
b) Embed a video
When you embed a video into a presentation you are literally taking a copy of the video and adding it
to the presentation file.
The advantage of this approach is that you do not need to worry about broken links and locating the
source video files.
Embed a video in your presentation
To embed a video in your presentation follow the same procedure as for linking a video as described
above apart from the final step. Here, you must select Insert rather than Link to File on the Insert
video dialog box.
72. 72
Video playback settings
There are a number of playback settings you can adjust for presentation videos which are accessible
from the Video Tools tabs.
To access the playback options:
o Click a video in your PowerPoint presentation. This will activate the Format and Playback
tabs under Video Tools.
o The Format options impact how the video appears on the slide. Examples include framing,
shape, borders and other effect.
o Playback options include:
Trim (edit) the video
Fade in and fade out (plus duration)
Volume
Whether the video should start automatically or on click
Full screen mode
Hide whilst not playing mode
Loop mode
Rewind after playing facility
Video playback settings - Format tab
Video playback settings - Playback tab
73. 73
ii. Audio
a) Add an audio clip to a presentation
To add an audio clip to a presentation:
o Select the slide in which you want to add an audio clip
o Click Audio in the Media group on the Insert tab
o Either
Click Audio from File. Once you’ve located the audio file double-click the file to add it; or
Click Clip Art Audio and browse the Clip Art task pane for an appropriate audio clip. Once
found, click an audio clip to add it; or
Click Record Audio and use the Record Sound dialog box to record your audio (i.e. click
Record followed by Stop then OK).
75. 75
b) Set the playback options for an audio clip
Similar to adding videos there are a number of playback settings you can adjust for audio clips which
are accessible from the Audio Tools tabs.
To access the playback options:
o Click an audio clip in your PowerPoint presentation. This will activate the Format and
Playback tabs under Audio Tools.
o The Format options impact how the audio icon appears on the slide. Examples include picture
styles and artistic effects.
o Playback options include:
Trim (edit) the audio
Fade in and fade out (plus duration)
Volume
Whether the audio should start automatically or on click
Full screen mode
Hide during show mode
Loop mode
Rewind after playing facility
Audio playback settings - Format tab
Audio playback settings - Playback tab
76. 76
SLIDE TRANSITIONS AND ANIMATION
Definition:
Slide transitions describe the motion between slides in Slide Show view as one slide leaves the screen
and the next slide enters. Transitions can be customized and even sound can be added.
1) ADD A TRANSITION TO A SLIDE
To add a transition to a slide:
o Select the slide you want to apply a transition to
o Click a slide transition effect in the Transition To This Slide group on the Transitions tab.
Note: click the down-arrow to display the full range of transitions to choose from.
o
77. 77
a) Change transition settings
You can change transition settings by selecting appropriate settings in the ‘Effect Options’ and
Timing group on the Transitions tab. These are summarised in the table below.
Setting Description
Effect Options These vary depending on the transition that was selected. For example,
effect options for Clock transition are clockwise, counterclockwise and
wedge. The effect options for Blinds transition are horizontal or vertical
Sound The selected sound will occur during transition
Duration Defines how long the transition will take. The maximum setting is 59
seconds.
Apply To All Clicking this will apply the current slide transition settings to all slides
Advance slide These settings can be used to define when a slide transitions to the next
slide.
Use ‘After’ to automatically transition to the next slide
after a set time has elapsed. This can be very useful
for an ongoing looped presentation
b) Remove a transition
To remove a transition from an individual slide:
o Select the slide with the transition that needs removing
o Click None in the Transition to This Slide group on the Transitions tab.
To remove transitions from all slides follow the above steps then click Apply ToAll.
78. 78
2) SLIDE ANIMATIONS
Definition:
Slide animation describes movement on a slide. For example a bulleted list might be animated by each
bullet appearing on a slide one at a time each time the mouse is clicked.
There are three types of animation:
o Entrance – e.g. appear or float in
o Emphasis – e.g. spin or bold flash
o Exit – e.g. fly out or bounce
a) Add animation to text or an object
To add animation to text or an object:
o Select the text or object that you wish to apply animation to
o Click an animation effect in the Animation group on the Animations tab. Note:
Entrance effects are coloured green
Emphasis effects are coloured yellow
Exit effects are coloured red
79. 79
b) Change animation settings
You can change animation settings as follows:
o Click the animated text or object whose animation you want to edit
o Open the animation pane by clicking Animation Pane in the Advanced Animation group on
the Animations tab (see above)
o You can change settings from the drop-down menu to the right of the animated text (see
below)
Alternatively you can use the Animations ribbon to adjust a selection of the animation settings.
81. 81
c) Remove animations
You can remove specific animation effects, all animation from a single object or all animation from all
objects on a slide.
Remove specific animation effects
To remove specific animation effects:
o Click Animation Pane in the Advanced Animation group on the Animations tab
o Right-click the animation effect you want to remove in the Animation Pane then click Remove
Remove all animation from a single object
To remove all animation from a single object:
o Select the object that you want to remove all animations from
o Select None in the Animations group on the Animation tab
82. 82
Remove all animation from a slide
To remove all animation from all objects on a slide:
o Select the slide that you want to remove all animations from
o Click Select then Select All in the Editing group on the Home tab
o Select None in the Animations group on the Animation tab