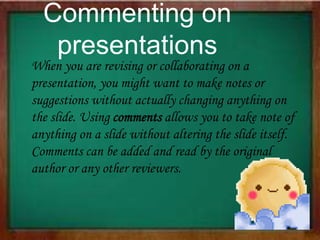
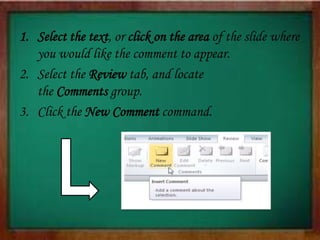
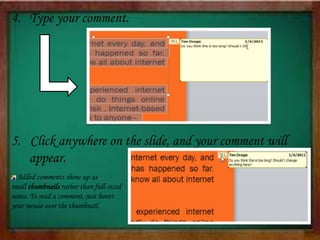
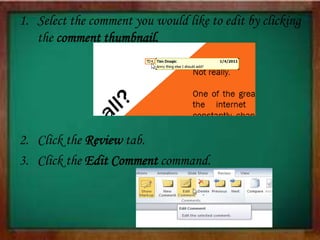
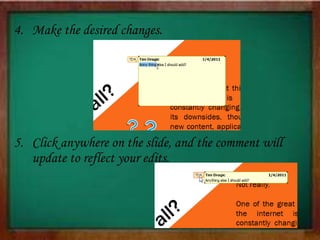
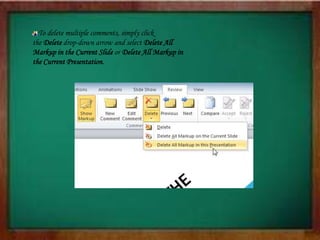
PowerPoint 2010
Reviewing Presentations
By: Christine Joy Pilapil
Introduction
Before presenting your PowerPoint
presentation, you might decide to ask someone
else to look over it. The two of you might even
collaborate on a presentation. If you were
revising a hard copy of a report, you might
add comments in the margins or compare your
rough and final drafts side by side. You can
also do these things in PowerPoint using
the Comments and Compare features.
In this lesson, you will learn how to
add Comments and Compare two versions of a
presentation.
Reviewing presentations
Have you been asked to work with someone else to
create a PowerPoint presentation? Or perhaps you've
created a slide show and would like another person to
view it to make sure everything looks polished.
PowerPoint's Comments and Compare features make
it easier for you to collaborate with others on the
content of your presentation.
When you are revising or collaborating on a
presentation, you might want to make notes or
suggestions without actually changing anything on
the slide. Using comments allows you to take note of
anything on a slide without altering the slide itself.
Comments can be added and read by the original
author or any other reviewers.
Commenting on
presentations
To add a
comment:
1. Select the text, or click on the area of the slide where
you would like the comment to appear.
2. Select the Review tab, and locate
the Comments group.
3. Click the New Comment command.
4. Type your comment.
5. Click anywhere on the slide, and your comment will
appear.
Added comments show up as
small thumbnails rather than full-sized
notes. To read a comment, just hover
your mouse over the thumbnail.
To edit a
comment:
1. Select the comment you would like to edit by clicking
the comment thumbnail.
2. Click the Review tab.
3. Click the Edit Comment command.
4. Make the desired changes.
5. Click anywhere on the slide, and the comment will
update to reflect your edits.
To respond to a
comment:
1. Right click the comment you would like to
respond to.
2. From the drop-down menu, select New
Comment.
3. Type your comment.
4. Click anywhere on the slide, and the new comment
will appear below the original comment.
To delete a
comment:
1. Select the comment you wish to delete.
2. From the Review tab, click
the Delete command.
To delete multiple comments, simply click
the Delete drop-down arrow and select Delete All
Markup in the Current Slide or Delete All Markup in
the Current Presentation.
Comparing
presentations
If you are collaborating on a presentation or even
just asking someone else to review your presentation,
you might want to use the Compare feature.
The Compare feature combines two versions of the
same presentation. This allows you to see all of the
differences between the two and decide which
changes to include in the final version of your
presentation.
To compare two
presentations:
1. Select the Review tab, and locate
the Compare group.
2. Click Compare. A dialog box will open.
3. Browse for and select the desired file.
3. Click Merge.
4. Click the buttons in the interactive below to learn how to review comments
and changes using the Compare feature.
Using the reviewing features
safely
If there are any comments in your presentation, you
should remove them before sharing the final version with
anyone you are not collaborating with. Comments can
reveal confidential information that could lead to
embarrassment or make you or your company appear
unprofessional.
It's a good idea to double-check your presentation using
the Document Inspector. The Document Inspector can
tell you if there are any comments or other hidden data in
your presentation that you may need to remove.
To use the
Document
Inspector:
1. Save your presentation.
2. Click the File tab to go to Backstage view.
3. Select Info on the left side of the page.
4. Click the Check for Issues command. A drop-down menu
will appear.
5. Select Inspect Document.
6. Click Inspect.
7. The inspection results will show an exclamation mark for any categories
where it found possibly sensitive data, and it will also have a Remove
All button for each of those categories. Click Remove All to remove the data.
8. Close the dialog box when you're done.
9. From Backstage view, click Save
to make the changes permanent
THANK YOU  !!

Power point 2010 (Reviewing Presentations)

  • 1.
  • 2.
    Introduction Before presenting yourPowerPoint presentation, you might decide to ask someone else to look over it. The two of you might even collaborate on a presentation. If you were revising a hard copy of a report, you might add comments in the margins or compare your rough and final drafts side by side. You can also do these things in PowerPoint using the Comments and Compare features. In this lesson, you will learn how to add Comments and Compare two versions of a presentation.
  • 3.
    Reviewing presentations Have youbeen asked to work with someone else to create a PowerPoint presentation? Or perhaps you've created a slide show and would like another person to view it to make sure everything looks polished. PowerPoint's Comments and Compare features make it easier for you to collaborate with others on the content of your presentation.
  • 4.
    When you arerevising or collaborating on a presentation, you might want to make notes or suggestions without actually changing anything on the slide. Using comments allows you to take note of anything on a slide without altering the slide itself. Comments can be added and read by the original author or any other reviewers. Commenting on presentations
  • 5.
  • 6.
    1. Select thetext, or click on the area of the slide where you would like the comment to appear. 2. Select the Review tab, and locate the Comments group. 3. Click the New Comment command.
  • 7.
    4. Type yourcomment. 5. Click anywhere on the slide, and your comment will appear. Added comments show up as small thumbnails rather than full-sized notes. To read a comment, just hover your mouse over the thumbnail.
  • 8.
  • 9.
    1. Select thecomment you would like to edit by clicking the comment thumbnail. 2. Click the Review tab. 3. Click the Edit Comment command.
  • 10.
    4. Make thedesired changes. 5. Click anywhere on the slide, and the comment will update to reflect your edits.
  • 11.
    To respond toa comment:
  • 12.
    1. Right clickthe comment you would like to respond to. 2. From the drop-down menu, select New Comment.
  • 13.
    3. Type yourcomment. 4. Click anywhere on the slide, and the new comment will appear below the original comment.
  • 14.
  • 15.
    1. Select thecomment you wish to delete. 2. From the Review tab, click the Delete command.
  • 16.
    To delete multiplecomments, simply click the Delete drop-down arrow and select Delete All Markup in the Current Slide or Delete All Markup in the Current Presentation.
  • 17.
    Comparing presentations If you arecollaborating on a presentation or even just asking someone else to review your presentation, you might want to use the Compare feature. The Compare feature combines two versions of the same presentation. This allows you to see all of the differences between the two and decide which changes to include in the final version of your presentation.
  • 18.
  • 19.
    1. Select theReview tab, and locate the Compare group. 2. Click Compare. A dialog box will open.
  • 20.
    3. Browse forand select the desired file. 3. Click Merge. 4. Click the buttons in the interactive below to learn how to review comments and changes using the Compare feature.
  • 21.
    Using the reviewingfeatures safely If there are any comments in your presentation, you should remove them before sharing the final version with anyone you are not collaborating with. Comments can reveal confidential information that could lead to embarrassment or make you or your company appear unprofessional. It's a good idea to double-check your presentation using the Document Inspector. The Document Inspector can tell you if there are any comments or other hidden data in your presentation that you may need to remove.
  • 22.
  • 23.
    1. Save yourpresentation. 2. Click the File tab to go to Backstage view. 3. Select Info on the left side of the page. 4. Click the Check for Issues command. A drop-down menu will appear.
  • 24.
    5. Select InspectDocument. 6. Click Inspect.
  • 25.
    7. The inspectionresults will show an exclamation mark for any categories where it found possibly sensitive data, and it will also have a Remove All button for each of those categories. Click Remove All to remove the data. 8. Close the dialog box when you're done. 9. From Backstage view, click Save to make the changes permanent
  • 26.