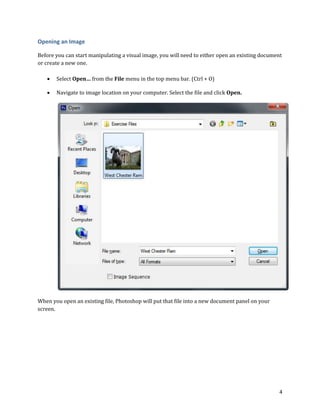
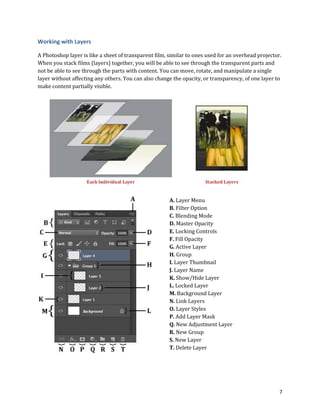
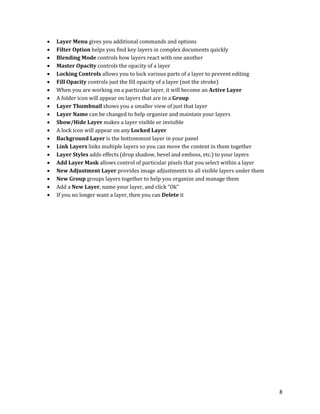
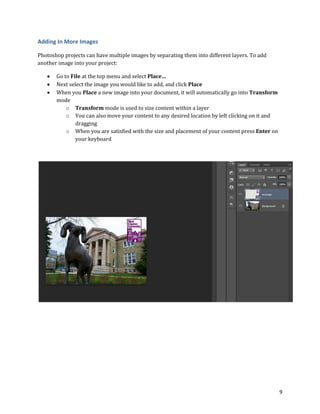
SlideShare a Scribd company logo
1 of 14
Download to read offline
Copyright 2016, Faculty and Staff Training, West Chester University.
A member of the Pennsylvania State System of Higher Education. No portion of this
document may be reproduced without the written permission of the authors.
For assistance, contact the IT Help Desk, x3350
Introduction to
Photoshop
CS6
1
Table of Contents
Introduction .................................................................................................................................... 2
Your Workspace.............................................................................................................................. 3
Opening an Image........................................................................................................................... 4
Image Size ....................................................................................................................................... 5
Color Mode ..................................................................................................................................... 6
Working with Layers ....................................................................................................................... 7
Adding In More Images................................................................................................................... 9
Cropping........................................................................................................................................ 10
Creating Areas of Solid Colors....................................................................................................... 11
Adding Text ................................................................................................................................... 12
Saving your Photoshop Image ...................................................................................................... 13
2
Introduction
Adobe Photoshop is a graphics editing program, or image editing software, that allows you to create
and manipulate visual images on the computer. Editing features in the program help in creating and
managing visual images for Internet, print, and other new media disciplines. To begin creating a
Photoshop project, start Photoshop CS6 and follow along with the steps below.
3
Your Workspace
Photoshop lays out the most important tools that you will need right on the main workspace. This
allows you to easily find the tools that you need without digging through menus. Furthermore,
Photoshop allows users to use simple keyboard shortcuts in order to get to these tools faster.
 Tool Bar – Provides access to a variety of tools with multiple image-editing functions.
o These tools typically fall under the categories of drawing; painting; measuring and
navigation; selection; typing; and retouching.
o Some tools contain a small triangle in the bottom right corner of the tool icon; these
tools can be expanded to reveal similar tools.
 Options Bar – Works in coordination with your tool bar to provide additional settings for
the tool you’re currently using.
o The options bar changes according to whichever tool you are using.
 Menu Bar – Contains menus for performing common tasks
o Consists of eleven menu options: File; Edit; Image; Layer; Type; Select; Filter; 3D;
View; Window; Help
o Menu items containing an ellipsis indicate that a dialogue box will follow that
option.
o Menu items with an arrow indicate a submenu for that particular option.
 Panels/Palettes - Helps you monitor and modify your work
o Provides groups of functionality specific to certain tools or tasks.
o You can create a custom workspace by moving and manipulating panels.
Panels
Tool Bar
Menu Bar
Options Bar
4
Opening an Image
Before you can start manipulating a visual image, you will need to either open an existing document
or create a new one.
 Select Open… from the File menu in the top menu bar. (Ctrl + O)
 Navigate to image location on your computer. Select the file and click Open.
When you open an existing file, Photoshop will put that file into a new document panel on your
screen.
5
Image Size
When working on an image in Photoshop you must first properly size the image, depending on the
media discipline you are using. This is specifically important due to images varying for Web and
Print use. Larger images on a website will actually slow the site down, making it difficult for your
viewer to see the content. Larger images are used for print in order to ensure that detail of your
visual image is present.
 To resize an image, select Image Size... from Image in the top menu. (Ctrl + Alt + I)
 *Set your Resolution according to your media discipline*
o For Web set this to 72
o For Print set this to 300
 It is important that you understand your media size when setting your height and width.
For web, you always want to ensure that your image will be viewable on any or most
screens.
Keeps your original dimensions
proportionate
Scales layers in document to
the selected size in addition to
overall document
Invents new pixels based on
resolution
Adjusts the width
Adjusts the height
6
Color Mode
It is very important to establish your color modes based on the media discipline you are using. Each media
output (computer screen, printer, etc.) interprets colors differently, so it is important to be able to set your
color mode for the output to understand it.
To change the color mode go to Image in the top menu and select Mode.
 RGB
o RGB stands for “Red, Green, Blue”
 These are the three colors on electronic devices (computers, phones, tv, etc.)
and therefore used for anything displayed on the screen
o Additive color mode
 Red, Green, and Blue add up to make White
 CMYK
o CMYK stands for “Cyan, Magenta, Yellow, Key”
 Key is black
 These are the four inks in a standard printer and therefore used for any
print materials (photographs, papers, posters, etc.)
o Subtractive color mode
 Cyan, Magenta, and Yellow add up to make Black (but not the true “Key”
black)
7
Working with Layers
A Photoshop layer is like a sheet of transparent film, similar to ones used for an overhead projector.
When you stack films (layers) together, you will be able to see through the transparent parts and
not be able to see through the parts with content. You can move, rotate, and manipulate a single
layer without affecting any others. You can also change the opacity, or transparency, of one layer to
make content partially visible.
A. Layer Menu
B. Filter Option
C. Blending Mode
D. Master Opacity
E. Locking Controls
F. Fill Opacity
G. Active Layer
H. Group
I. Layer Thumbnail
J. Layer Name
K. Show/Hide Layer
L. Locked Layer
M. Background Layer
N. Link Layers
O. Layer Styles
P. Add Layer Mask
Q. New Adjustment Layer
R. New Group
S. New Layer
T. Delete Layer
8
 Layer Menu gives you additional commands and options
 Filter Option helps you find key layers in complex documents quickly
 Blending Mode controls how layers react with one another
 Master Opacity controls the opacity of a layer
 Locking Controls allows you to lock various parts of a layer to prevent editing
 Fill Opacity controls just the fill opacity of a layer (not the stroke)
 When you are working on a particular layer, it will become an Active Layer
 A folder icon will appear on layers that are in a Group
 Layer Thumbnail shows you a smaller view of just that layer
 Layer Name can be changed to help organize and maintain your layers
 Show/Hide Layer makes a layer visible or invisible
 A lock icon will appear on any Locked Layer
 Background Layer is the bottommost layer in your panel
 Link Layers links multiple layers so you can move the content in them together
 Layer Styles adds effects (drop shadow, bevel and emboss, etc.) to your layers
 Add Layer Mask allows control of particular pixels that you select within a layer
 New Adjustment Layer provides image adjustments to all visible layers under them
 New Group groups layers together to help you organize and manage them
 Add a New Layer, name your layer, and click “Ok”
 If you no longer want a layer, then you can Delete it
9
Adding In More Images
Photoshop projects can have multiple images by separating them into different layers. To add
another image into your project:
 Go to File at the top menu and select Place…
 Next select the image you would like to add, and click Place
 When you Place a new image into your document, it will automatically go into Transform
mode
o Transform mode is used to size content within a layer
o You can also move your content to any desired location by left clicking on it and
dragging
o When you are satisfied with the size and placement of your content press Enter on
your keyboard
10
Cropping
The Crop Tool can be used to select a particular area of an image and discard everything outside
this area. Although cropping an image makes your image smaller, it is not the same as Image Size.
While Image Size allows you to control the size of a document, the Crop Tool sets the focus area of
your document.
 To crop an image select the Crop Tool located in your Tool Bar on the
left ( C )
 To crop an image, click on the dark arrows in the corners or the dark
lines on the sides, top, and bottom and drag to wherever you’d like
 Click Enter on the keyboard when ready to crop
11
Creating Areas of Solid Colors
By using the Shape Tool, located in your Tool Bar, we will be able to create a solid color on a layer.
This layer will be used as background color for text we will add later.
 Click the Shape Tool in your Tool Bar and select the Rectangle Shape Tool
 Go to your Options Bar and click on the fill option
 Click on the Color Picker button (the multicolor
button)
 In the Color Picker window type 680269 to the
“#” field and click “OK”
o This number, called a Hex Code, is a
combination of letters and numbers
that describes a color
 Using your mouse Click and Drag where you would the new solid color to be
12
Adding Text
You can add text to your Photoshop project by using the Type Tool located in the Tool Bar. Every
time you add text to your document it will automatically be created in a new layer, located in your
Layers Panel on the right.
 Select the Type Tool located in the Tool Bar
 Use your mouse and left click on your document where you want your
text to be
 By using the Options Bar located at the top of the screen, you can
adjust your text to any style you would like.
Font Color Used #FFBD07
13
Saving your Photoshop Image
After you are finished with your document, Photoshop gives you the opportunity to save your
project. You can save your project in various formats, depending on your media discipline.
 Photoshop also gives you the option of saving as a Photoshop File (.PSD) so that you can
go back and edit your project whenever you’d like.
o When you reopen a Photoshop File, all of your work will still be available, allowing
you to continue to work.
o To save as .PSD go to File in the top menu and select Save
 When saving your project for print, it is recommended to use an Image File Format (.jpg,
.png, .gif, etc.), as a Photoshop File, or a PDF.
o Go to File in the top menu and select Save
o Select the appropriate file format is the Format drop-down menu
 When saving your Photoshop project to be used on the Web, it is recommended to use .JPG
or .PNG
o Go to File in the top menu and select Save for the Web…
o Under Preset is the drop-down menu for file format
 Click on the drop-down menu and select JPEG or PNG-24 then click Save…

More Related Content

What's hot

PS cs6 ch04 ppt
PS cs6 ch04 pptPS cs6 ch04 ppt
PS cs6 ch04 pptcpashke
 
Part 3 how to make simple tarpulin in adobe photoshop cs6
Part 3 how to make simple tarpulin in adobe photoshop cs6Part 3 how to make simple tarpulin in adobe photoshop cs6
Part 3 how to make simple tarpulin in adobe photoshop cs6bentibaldo
 
Photoshop_CS_Tutorial
Photoshop_CS_TutorialPhotoshop_CS_Tutorial
Photoshop_CS_Tutorialtutorialsruby
 
Access Chapter 01
Access Chapter 01Access Chapter 01
Access Chapter 01xtin101
 
Tài liệu tự học Family trong Revit (phần 3)
Tài liệu tự học Family trong Revit (phần 3)Tài liệu tự học Family trong Revit (phần 3)
Tài liệu tự học Family trong Revit (phần 3)congnghebim
 
Customizing Your Document in PerfectForms
Customizing Your Document in PerfectFormsCustomizing Your Document in PerfectForms
Customizing Your Document in PerfectFormsKaren Hunter-Sliger
 
Tài liệu tự học Family trong Revit (phần 4)
Tài liệu tự học Family trong Revit (phần 4)Tài liệu tự học Family trong Revit (phần 4)
Tài liệu tự học Family trong Revit (phần 4)congnghebim
 
Tài liệu tự học Family trong Revit (phần 2)
Tài liệu tự học Family trong Revit (phần 2)Tài liệu tự học Family trong Revit (phần 2)
Tài liệu tự học Family trong Revit (phần 2)congnghebim
 
InDesign CS5 Tutorial
InDesign CS5 TutorialInDesign CS5 Tutorial
InDesign CS5 TutorialZaxapias
 
Adobe Illustrator CS6 Primer
Adobe Illustrator CS6 PrimerAdobe Illustrator CS6 Primer
Adobe Illustrator CS6 PrimerNYCCTfab
 
Microsoft Publisher 2013 Quickstart
Microsoft Publisher 2013 QuickstartMicrosoft Publisher 2013 Quickstart
Microsoft Publisher 2013 Quickstartcomatsg
 
Lesson 5 pictures and clip art
Lesson 5   pictures and clip artLesson 5   pictures and clip art
Lesson 5 pictures and clip artguevarra_2000
 

What's hot (18)

PS cs6 ch04 ppt
PS cs6 ch04 pptPS cs6 ch04 ppt
PS cs6 ch04 ppt
 
Part 3 how to make simple tarpulin in adobe photoshop cs6
Part 3 how to make simple tarpulin in adobe photoshop cs6Part 3 how to make simple tarpulin in adobe photoshop cs6
Part 3 how to make simple tarpulin in adobe photoshop cs6
 
Photoshop basics
Photoshop basicsPhotoshop basics
Photoshop basics
 
Nota photoshop
Nota photoshopNota photoshop
Nota photoshop
 
Tools
ToolsTools
Tools
 
Photoshop_CS_Tutorial
Photoshop_CS_TutorialPhotoshop_CS_Tutorial
Photoshop_CS_Tutorial
 
Access Chapter 01
Access Chapter 01Access Chapter 01
Access Chapter 01
 
Photoshopcs3basics1
Photoshopcs3basics1Photoshopcs3basics1
Photoshopcs3basics1
 
Tài liệu tự học Family trong Revit (phần 3)
Tài liệu tự học Family trong Revit (phần 3)Tài liệu tự học Family trong Revit (phần 3)
Tài liệu tự học Family trong Revit (phần 3)
 
Customizing Your Document in PerfectForms
Customizing Your Document in PerfectFormsCustomizing Your Document in PerfectForms
Customizing Your Document in PerfectForms
 
Tài liệu tự học Family trong Revit (phần 4)
Tài liệu tự học Family trong Revit (phần 4)Tài liệu tự học Family trong Revit (phần 4)
Tài liệu tự học Family trong Revit (phần 4)
 
Tài liệu tự học Family trong Revit (phần 2)
Tài liệu tự học Family trong Revit (phần 2)Tài liệu tự học Family trong Revit (phần 2)
Tài liệu tự học Family trong Revit (phần 2)
 
InDesign CS5 Tutorial
InDesign CS5 TutorialInDesign CS5 Tutorial
InDesign CS5 Tutorial
 
Adobe Illustrator CS6 Primer
Adobe Illustrator CS6 PrimerAdobe Illustrator CS6 Primer
Adobe Illustrator CS6 Primer
 
Microsoft Publisher 2013 Quickstart
Microsoft Publisher 2013 QuickstartMicrosoft Publisher 2013 Quickstart
Microsoft Publisher 2013 Quickstart
 
Basic tutorials
Basic tutorialsBasic tutorials
Basic tutorials
 
Using Adobe Photoshop cs
Using Adobe Photoshop csUsing Adobe Photoshop cs
Using Adobe Photoshop cs
 
Lesson 5 pictures and clip art
Lesson 5   pictures and clip artLesson 5   pictures and clip art
Lesson 5 pictures and clip art
 

Similar to Photoshop cs6

Adobe photoshop cs6
Adobe photoshop cs6Adobe photoshop cs6
Adobe photoshop cs6Ila Azmil
 
Adobe photoshop cs6
Adobe photoshop cs6Adobe photoshop cs6
Adobe photoshop cs6ilaazmil2
 
Adobe photoshop cs6 tutorial
Adobe photoshop cs6 tutorialAdobe photoshop cs6 tutorial
Adobe photoshop cs6 tutorialAgung Yuwono
 
Adobe Photoshop CS6 tutorial 2013
Adobe Photoshop CS6 tutorial 2013Adobe Photoshop CS6 tutorial 2013
Adobe Photoshop CS6 tutorial 2013Jessie Doan
 
Photoshop pdf
Photoshop pdfPhotoshop pdf
Photoshop pdfKim B
 
Photoshop notes cs-4
Photoshop notes  cs-4Photoshop notes  cs-4
Photoshop notes cs-4SirajRock
 
Photoshop cs tutorial
Photoshop cs tutorialPhotoshop cs tutorial
Photoshop cs tutorialFurqan Alley
 
Photoshop intro to basics
Photoshop intro to basicsPhotoshop intro to basics
Photoshop intro to basicsNatalie Hurd
 
photoshop_workshop_01
photoshop_workshop_01photoshop_workshop_01
photoshop_workshop_01tutorialsruby
 
photoshop_workshop_01
photoshop_workshop_01photoshop_workshop_01
photoshop_workshop_01tutorialsruby
 
Basic Photoshop Tutorial
Basic Photoshop TutorialBasic Photoshop Tutorial
Basic Photoshop TutorialMarc Dy
 
Getting started photoshop
Getting started photoshopGetting started photoshop
Getting started photoshoptomclub
 
Photoshop the whole thing
Photoshop the whole thingPhotoshop the whole thing
Photoshop the whole thingGareth Hill
 
Photoshop_CS_Tutorial
Photoshop_CS_TutorialPhotoshop_CS_Tutorial
Photoshop_CS_Tutorialtutorialsruby
 
Introduction- The Basics of Photoshop CS6
Introduction- The Basics of Photoshop CS6Introduction- The Basics of Photoshop CS6
Introduction- The Basics of Photoshop CS6Crest TechnoSoft
 

Similar to Photoshop cs6 (20)

Adobe photoshop cs6
Adobe photoshop cs6Adobe photoshop cs6
Adobe photoshop cs6
 
Adobe photoshop cs6
Adobe photoshop cs6Adobe photoshop cs6
Adobe photoshop cs6
 
Adobe photoshop cs6 tutorial
Adobe photoshop cs6 tutorialAdobe photoshop cs6 tutorial
Adobe photoshop cs6 tutorial
 
Adobe Photoshop CS6 tutorial 2013
Adobe Photoshop CS6 tutorial 2013Adobe Photoshop CS6 tutorial 2013
Adobe Photoshop CS6 tutorial 2013
 
Photoshop pdf
Photoshop pdfPhotoshop pdf
Photoshop pdf
 
Photoshop notes cs-4
Photoshop notes  cs-4Photoshop notes  cs-4
Photoshop notes cs-4
 
Photoshop cs tutorial
Photoshop cs tutorialPhotoshop cs tutorial
Photoshop cs tutorial
 
Photoshop intro to basics
Photoshop intro to basicsPhotoshop intro to basics
Photoshop intro to basics
 
teacherinset.pptx
teacherinset.pptxteacherinset.pptx
teacherinset.pptx
 
photoshop_workshop_01
photoshop_workshop_01photoshop_workshop_01
photoshop_workshop_01
 
photoshop_workshop_01
photoshop_workshop_01photoshop_workshop_01
photoshop_workshop_01
 
Basic Photoshop Tutorial
Basic Photoshop TutorialBasic Photoshop Tutorial
Basic Photoshop Tutorial
 
Getting started photoshop
Getting started photoshopGetting started photoshop
Getting started photoshop
 
Photoshop Elements
Photoshop ElementsPhotoshop Elements
Photoshop Elements
 
Photoshop the whole thing
Photoshop the whole thingPhotoshop the whole thing
Photoshop the whole thing
 
Photoshop_CS_Tutorial
Photoshop_CS_TutorialPhotoshop_CS_Tutorial
Photoshop_CS_Tutorial
 
Photoshop cs tutorial
Photoshop cs tutorialPhotoshop cs tutorial
Photoshop cs tutorial
 
Photoshop
PhotoshopPhotoshop
Photoshop
 
Introduction- The Basics of Photoshop CS6
Introduction- The Basics of Photoshop CS6Introduction- The Basics of Photoshop CS6
Introduction- The Basics of Photoshop CS6
 
Computer Science.pptx
Computer Science.pptxComputer Science.pptx
Computer Science.pptx
 

Recently uploaded

The Codex of Business Writing Software for Real-World Solutions 2.pptx
The Codex of Business Writing Software for Real-World Solutions 2.pptxThe Codex of Business Writing Software for Real-World Solutions 2.pptx
The Codex of Business Writing Software for Real-World Solutions 2.pptxMalak Abu Hammad
 
08448380779 Call Girls In Greater Kailash - I Women Seeking Men
08448380779 Call Girls In Greater Kailash - I Women Seeking Men08448380779 Call Girls In Greater Kailash - I Women Seeking Men
08448380779 Call Girls In Greater Kailash - I Women Seeking MenDelhi Call girls
 
Enhancing Worker Digital Experience: A Hands-on Workshop for Partners
Enhancing Worker Digital Experience: A Hands-on Workshop for PartnersEnhancing Worker Digital Experience: A Hands-on Workshop for Partners
Enhancing Worker Digital Experience: A Hands-on Workshop for PartnersThousandEyes
 
Injustice - Developers Among Us (SciFiDevCon 2024)
Injustice - Developers Among Us (SciFiDevCon 2024)Injustice - Developers Among Us (SciFiDevCon 2024)
Injustice - Developers Among Us (SciFiDevCon 2024)Allon Mureinik
 
Kotlin Multiplatform & Compose Multiplatform - Starter kit for pragmatics
Kotlin Multiplatform & Compose Multiplatform - Starter kit for pragmaticsKotlin Multiplatform & Compose Multiplatform - Starter kit for pragmatics
Kotlin Multiplatform & Compose Multiplatform - Starter kit for pragmaticscarlostorres15106
 
Factors to Consider When Choosing Accounts Payable Services Providers.pptx
Factors to Consider When Choosing Accounts Payable Services Providers.pptxFactors to Consider When Choosing Accounts Payable Services Providers.pptx
Factors to Consider When Choosing Accounts Payable Services Providers.pptxKatpro Technologies
 
Swan(sea) Song – personal research during my six years at Swansea ... and bey...
Swan(sea) Song – personal research during my six years at Swansea ... and bey...Swan(sea) Song – personal research during my six years at Swansea ... and bey...
Swan(sea) Song – personal research during my six years at Swansea ... and bey...Alan Dix
 
Slack Application Development 101 Slides
Slack Application Development 101 SlidesSlack Application Development 101 Slides
Slack Application Development 101 Slidespraypatel2
 
Understanding the Laravel MVC Architecture
Understanding the Laravel MVC ArchitectureUnderstanding the Laravel MVC Architecture
Understanding the Laravel MVC ArchitecturePixlogix Infotech
 
Maximizing Board Effectiveness 2024 Webinar.pptx
Maximizing Board Effectiveness 2024 Webinar.pptxMaximizing Board Effectiveness 2024 Webinar.pptx
Maximizing Board Effectiveness 2024 Webinar.pptxOnBoard
 
WhatsApp 9892124323 ✓Call Girls In Kalyan ( Mumbai ) secure service
WhatsApp 9892124323 ✓Call Girls In Kalyan ( Mumbai ) secure serviceWhatsApp 9892124323 ✓Call Girls In Kalyan ( Mumbai ) secure service
WhatsApp 9892124323 ✓Call Girls In Kalyan ( Mumbai ) secure servicePooja Nehwal
 
Presentation on how to chat with PDF using ChatGPT code interpreter
Presentation on how to chat with PDF using ChatGPT code interpreterPresentation on how to chat with PDF using ChatGPT code interpreter
Presentation on how to chat with PDF using ChatGPT code interpreternaman860154
 
Automating Business Process via MuleSoft Composer | Bangalore MuleSoft Meetup...
Automating Business Process via MuleSoft Composer | Bangalore MuleSoft Meetup...Automating Business Process via MuleSoft Composer | Bangalore MuleSoft Meetup...
Automating Business Process via MuleSoft Composer | Bangalore MuleSoft Meetup...shyamraj55
 
Unblocking The Main Thread Solving ANRs and Frozen Frames
Unblocking The Main Thread Solving ANRs and Frozen FramesUnblocking The Main Thread Solving ANRs and Frozen Frames
Unblocking The Main Thread Solving ANRs and Frozen FramesSinan KOZAK
 
SQL Database Design For Developers at php[tek] 2024
SQL Database Design For Developers at php[tek] 2024SQL Database Design For Developers at php[tek] 2024
SQL Database Design For Developers at php[tek] 2024Scott Keck-Warren
 
Integration and Automation in Practice: CI/CD in Mule Integration and Automat...
Integration and Automation in Practice: CI/CD in Mule Integration and Automat...Integration and Automation in Practice: CI/CD in Mule Integration and Automat...
Integration and Automation in Practice: CI/CD in Mule Integration and Automat...Patryk Bandurski
 
GenCyber Cyber Security Day Presentation
GenCyber Cyber Security Day PresentationGenCyber Cyber Security Day Presentation
GenCyber Cyber Security Day PresentationMichael W. Hawkins
 
Install Stable Diffusion in windows machine
Install Stable Diffusion in windows machineInstall Stable Diffusion in windows machine
Install Stable Diffusion in windows machinePadma Pradeep
 
FULL ENJOY 🔝 8264348440 🔝 Call Girls in Diplomatic Enclave | Delhi
FULL ENJOY 🔝 8264348440 🔝 Call Girls in Diplomatic Enclave | DelhiFULL ENJOY 🔝 8264348440 🔝 Call Girls in Diplomatic Enclave | Delhi
FULL ENJOY 🔝 8264348440 🔝 Call Girls in Diplomatic Enclave | Delhisoniya singh
 
Tech-Forward - Achieving Business Readiness For Copilot in Microsoft 365
Tech-Forward - Achieving Business Readiness For Copilot in Microsoft 365Tech-Forward - Achieving Business Readiness For Copilot in Microsoft 365
Tech-Forward - Achieving Business Readiness For Copilot in Microsoft 3652toLead Limited
 

Recently uploaded (20)

The Codex of Business Writing Software for Real-World Solutions 2.pptx
The Codex of Business Writing Software for Real-World Solutions 2.pptxThe Codex of Business Writing Software for Real-World Solutions 2.pptx
The Codex of Business Writing Software for Real-World Solutions 2.pptx
 
08448380779 Call Girls In Greater Kailash - I Women Seeking Men
08448380779 Call Girls In Greater Kailash - I Women Seeking Men08448380779 Call Girls In Greater Kailash - I Women Seeking Men
08448380779 Call Girls In Greater Kailash - I Women Seeking Men
 
Enhancing Worker Digital Experience: A Hands-on Workshop for Partners
Enhancing Worker Digital Experience: A Hands-on Workshop for PartnersEnhancing Worker Digital Experience: A Hands-on Workshop for Partners
Enhancing Worker Digital Experience: A Hands-on Workshop for Partners
 
Injustice - Developers Among Us (SciFiDevCon 2024)
Injustice - Developers Among Us (SciFiDevCon 2024)Injustice - Developers Among Us (SciFiDevCon 2024)
Injustice - Developers Among Us (SciFiDevCon 2024)
 
Kotlin Multiplatform & Compose Multiplatform - Starter kit for pragmatics
Kotlin Multiplatform & Compose Multiplatform - Starter kit for pragmaticsKotlin Multiplatform & Compose Multiplatform - Starter kit for pragmatics
Kotlin Multiplatform & Compose Multiplatform - Starter kit for pragmatics
 
Factors to Consider When Choosing Accounts Payable Services Providers.pptx
Factors to Consider When Choosing Accounts Payable Services Providers.pptxFactors to Consider When Choosing Accounts Payable Services Providers.pptx
Factors to Consider When Choosing Accounts Payable Services Providers.pptx
 
Swan(sea) Song – personal research during my six years at Swansea ... and bey...
Swan(sea) Song – personal research during my six years at Swansea ... and bey...Swan(sea) Song – personal research during my six years at Swansea ... and bey...
Swan(sea) Song – personal research during my six years at Swansea ... and bey...
 
Slack Application Development 101 Slides
Slack Application Development 101 SlidesSlack Application Development 101 Slides
Slack Application Development 101 Slides
 
Understanding the Laravel MVC Architecture
Understanding the Laravel MVC ArchitectureUnderstanding the Laravel MVC Architecture
Understanding the Laravel MVC Architecture
 
Maximizing Board Effectiveness 2024 Webinar.pptx
Maximizing Board Effectiveness 2024 Webinar.pptxMaximizing Board Effectiveness 2024 Webinar.pptx
Maximizing Board Effectiveness 2024 Webinar.pptx
 
WhatsApp 9892124323 ✓Call Girls In Kalyan ( Mumbai ) secure service
WhatsApp 9892124323 ✓Call Girls In Kalyan ( Mumbai ) secure serviceWhatsApp 9892124323 ✓Call Girls In Kalyan ( Mumbai ) secure service
WhatsApp 9892124323 ✓Call Girls In Kalyan ( Mumbai ) secure service
 
Presentation on how to chat with PDF using ChatGPT code interpreter
Presentation on how to chat with PDF using ChatGPT code interpreterPresentation on how to chat with PDF using ChatGPT code interpreter
Presentation on how to chat with PDF using ChatGPT code interpreter
 
Automating Business Process via MuleSoft Composer | Bangalore MuleSoft Meetup...
Automating Business Process via MuleSoft Composer | Bangalore MuleSoft Meetup...Automating Business Process via MuleSoft Composer | Bangalore MuleSoft Meetup...
Automating Business Process via MuleSoft Composer | Bangalore MuleSoft Meetup...
 
Unblocking The Main Thread Solving ANRs and Frozen Frames
Unblocking The Main Thread Solving ANRs and Frozen FramesUnblocking The Main Thread Solving ANRs and Frozen Frames
Unblocking The Main Thread Solving ANRs and Frozen Frames
 
SQL Database Design For Developers at php[tek] 2024
SQL Database Design For Developers at php[tek] 2024SQL Database Design For Developers at php[tek] 2024
SQL Database Design For Developers at php[tek] 2024
 
Integration and Automation in Practice: CI/CD in Mule Integration and Automat...
Integration and Automation in Practice: CI/CD in Mule Integration and Automat...Integration and Automation in Practice: CI/CD in Mule Integration and Automat...
Integration and Automation in Practice: CI/CD in Mule Integration and Automat...
 
GenCyber Cyber Security Day Presentation
GenCyber Cyber Security Day PresentationGenCyber Cyber Security Day Presentation
GenCyber Cyber Security Day Presentation
 
Install Stable Diffusion in windows machine
Install Stable Diffusion in windows machineInstall Stable Diffusion in windows machine
Install Stable Diffusion in windows machine
 
FULL ENJOY 🔝 8264348440 🔝 Call Girls in Diplomatic Enclave | Delhi
FULL ENJOY 🔝 8264348440 🔝 Call Girls in Diplomatic Enclave | DelhiFULL ENJOY 🔝 8264348440 🔝 Call Girls in Diplomatic Enclave | Delhi
FULL ENJOY 🔝 8264348440 🔝 Call Girls in Diplomatic Enclave | Delhi
 
Tech-Forward - Achieving Business Readiness For Copilot in Microsoft 365
Tech-Forward - Achieving Business Readiness For Copilot in Microsoft 365Tech-Forward - Achieving Business Readiness For Copilot in Microsoft 365
Tech-Forward - Achieving Business Readiness For Copilot in Microsoft 365
 

Photoshop cs6

  • 1. Copyright 2016, Faculty and Staff Training, West Chester University. A member of the Pennsylvania State System of Higher Education. No portion of this document may be reproduced without the written permission of the authors. For assistance, contact the IT Help Desk, x3350 Introduction to Photoshop CS6
  • 2. 1 Table of Contents Introduction .................................................................................................................................... 2 Your Workspace.............................................................................................................................. 3 Opening an Image........................................................................................................................... 4 Image Size ....................................................................................................................................... 5 Color Mode ..................................................................................................................................... 6 Working with Layers ....................................................................................................................... 7 Adding In More Images................................................................................................................... 9 Cropping........................................................................................................................................ 10 Creating Areas of Solid Colors....................................................................................................... 11 Adding Text ................................................................................................................................... 12 Saving your Photoshop Image ...................................................................................................... 13
  • 3. 2 Introduction Adobe Photoshop is a graphics editing program, or image editing software, that allows you to create and manipulate visual images on the computer. Editing features in the program help in creating and managing visual images for Internet, print, and other new media disciplines. To begin creating a Photoshop project, start Photoshop CS6 and follow along with the steps below.
  • 4. 3 Your Workspace Photoshop lays out the most important tools that you will need right on the main workspace. This allows you to easily find the tools that you need without digging through menus. Furthermore, Photoshop allows users to use simple keyboard shortcuts in order to get to these tools faster.  Tool Bar – Provides access to a variety of tools with multiple image-editing functions. o These tools typically fall under the categories of drawing; painting; measuring and navigation; selection; typing; and retouching. o Some tools contain a small triangle in the bottom right corner of the tool icon; these tools can be expanded to reveal similar tools.  Options Bar – Works in coordination with your tool bar to provide additional settings for the tool you’re currently using. o The options bar changes according to whichever tool you are using.  Menu Bar – Contains menus for performing common tasks o Consists of eleven menu options: File; Edit; Image; Layer; Type; Select; Filter; 3D; View; Window; Help o Menu items containing an ellipsis indicate that a dialogue box will follow that option. o Menu items with an arrow indicate a submenu for that particular option.  Panels/Palettes - Helps you monitor and modify your work o Provides groups of functionality specific to certain tools or tasks. o You can create a custom workspace by moving and manipulating panels. Panels Tool Bar Menu Bar Options Bar
  • 5. 4 Opening an Image Before you can start manipulating a visual image, you will need to either open an existing document or create a new one.  Select Open… from the File menu in the top menu bar. (Ctrl + O)  Navigate to image location on your computer. Select the file and click Open. When you open an existing file, Photoshop will put that file into a new document panel on your screen.
  • 6. 5 Image Size When working on an image in Photoshop you must first properly size the image, depending on the media discipline you are using. This is specifically important due to images varying for Web and Print use. Larger images on a website will actually slow the site down, making it difficult for your viewer to see the content. Larger images are used for print in order to ensure that detail of your visual image is present.  To resize an image, select Image Size... from Image in the top menu. (Ctrl + Alt + I)  *Set your Resolution according to your media discipline* o For Web set this to 72 o For Print set this to 300  It is important that you understand your media size when setting your height and width. For web, you always want to ensure that your image will be viewable on any or most screens. Keeps your original dimensions proportionate Scales layers in document to the selected size in addition to overall document Invents new pixels based on resolution Adjusts the width Adjusts the height
  • 7. 6 Color Mode It is very important to establish your color modes based on the media discipline you are using. Each media output (computer screen, printer, etc.) interprets colors differently, so it is important to be able to set your color mode for the output to understand it. To change the color mode go to Image in the top menu and select Mode.  RGB o RGB stands for “Red, Green, Blue”  These are the three colors on electronic devices (computers, phones, tv, etc.) and therefore used for anything displayed on the screen o Additive color mode  Red, Green, and Blue add up to make White  CMYK o CMYK stands for “Cyan, Magenta, Yellow, Key”  Key is black  These are the four inks in a standard printer and therefore used for any print materials (photographs, papers, posters, etc.) o Subtractive color mode  Cyan, Magenta, and Yellow add up to make Black (but not the true “Key” black)
  • 8. 7 Working with Layers A Photoshop layer is like a sheet of transparent film, similar to ones used for an overhead projector. When you stack films (layers) together, you will be able to see through the transparent parts and not be able to see through the parts with content. You can move, rotate, and manipulate a single layer without affecting any others. You can also change the opacity, or transparency, of one layer to make content partially visible. A. Layer Menu B. Filter Option C. Blending Mode D. Master Opacity E. Locking Controls F. Fill Opacity G. Active Layer H. Group I. Layer Thumbnail J. Layer Name K. Show/Hide Layer L. Locked Layer M. Background Layer N. Link Layers O. Layer Styles P. Add Layer Mask Q. New Adjustment Layer R. New Group S. New Layer T. Delete Layer
  • 9. 8  Layer Menu gives you additional commands and options  Filter Option helps you find key layers in complex documents quickly  Blending Mode controls how layers react with one another  Master Opacity controls the opacity of a layer  Locking Controls allows you to lock various parts of a layer to prevent editing  Fill Opacity controls just the fill opacity of a layer (not the stroke)  When you are working on a particular layer, it will become an Active Layer  A folder icon will appear on layers that are in a Group  Layer Thumbnail shows you a smaller view of just that layer  Layer Name can be changed to help organize and maintain your layers  Show/Hide Layer makes a layer visible or invisible  A lock icon will appear on any Locked Layer  Background Layer is the bottommost layer in your panel  Link Layers links multiple layers so you can move the content in them together  Layer Styles adds effects (drop shadow, bevel and emboss, etc.) to your layers  Add Layer Mask allows control of particular pixels that you select within a layer  New Adjustment Layer provides image adjustments to all visible layers under them  New Group groups layers together to help you organize and manage them  Add a New Layer, name your layer, and click “Ok”  If you no longer want a layer, then you can Delete it
  • 10. 9 Adding In More Images Photoshop projects can have multiple images by separating them into different layers. To add another image into your project:  Go to File at the top menu and select Place…  Next select the image you would like to add, and click Place  When you Place a new image into your document, it will automatically go into Transform mode o Transform mode is used to size content within a layer o You can also move your content to any desired location by left clicking on it and dragging o When you are satisfied with the size and placement of your content press Enter on your keyboard
  • 11. 10 Cropping The Crop Tool can be used to select a particular area of an image and discard everything outside this area. Although cropping an image makes your image smaller, it is not the same as Image Size. While Image Size allows you to control the size of a document, the Crop Tool sets the focus area of your document.  To crop an image select the Crop Tool located in your Tool Bar on the left ( C )  To crop an image, click on the dark arrows in the corners or the dark lines on the sides, top, and bottom and drag to wherever you’d like  Click Enter on the keyboard when ready to crop
  • 12. 11 Creating Areas of Solid Colors By using the Shape Tool, located in your Tool Bar, we will be able to create a solid color on a layer. This layer will be used as background color for text we will add later.  Click the Shape Tool in your Tool Bar and select the Rectangle Shape Tool  Go to your Options Bar and click on the fill option  Click on the Color Picker button (the multicolor button)  In the Color Picker window type 680269 to the “#” field and click “OK” o This number, called a Hex Code, is a combination of letters and numbers that describes a color  Using your mouse Click and Drag where you would the new solid color to be
  • 13. 12 Adding Text You can add text to your Photoshop project by using the Type Tool located in the Tool Bar. Every time you add text to your document it will automatically be created in a new layer, located in your Layers Panel on the right.  Select the Type Tool located in the Tool Bar  Use your mouse and left click on your document where you want your text to be  By using the Options Bar located at the top of the screen, you can adjust your text to any style you would like. Font Color Used #FFBD07
  • 14. 13 Saving your Photoshop Image After you are finished with your document, Photoshop gives you the opportunity to save your project. You can save your project in various formats, depending on your media discipline.  Photoshop also gives you the option of saving as a Photoshop File (.PSD) so that you can go back and edit your project whenever you’d like. o When you reopen a Photoshop File, all of your work will still be available, allowing you to continue to work. o To save as .PSD go to File in the top menu and select Save  When saving your project for print, it is recommended to use an Image File Format (.jpg, .png, .gif, etc.), as a Photoshop File, or a PDF. o Go to File in the top menu and select Save o Select the appropriate file format is the Format drop-down menu  When saving your Photoshop project to be used on the Web, it is recommended to use .JPG or .PNG o Go to File in the top menu and select Save for the Web… o Under Preset is the drop-down menu for file format  Click on the drop-down menu and select JPEG or PNG-24 then click Save…