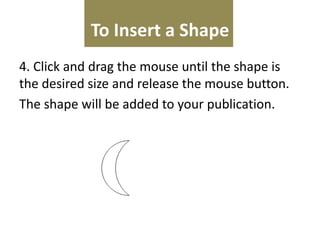
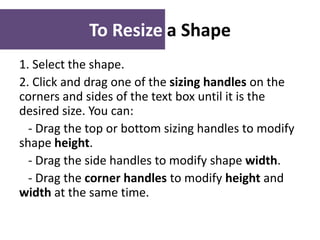
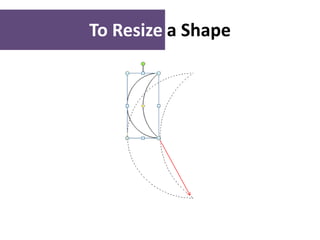
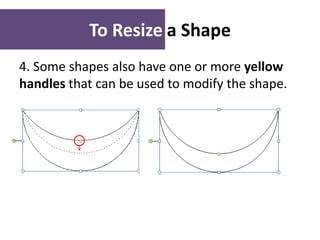
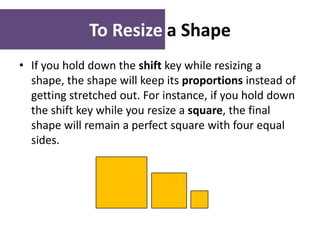
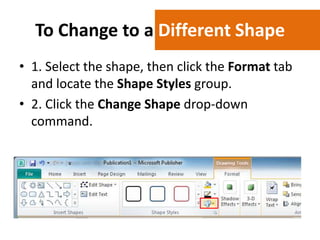
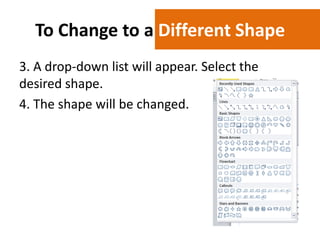
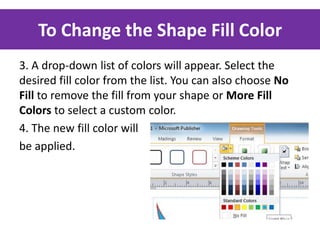
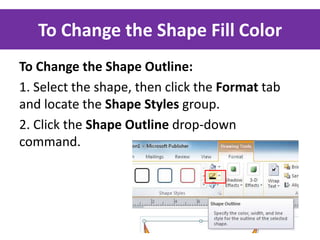
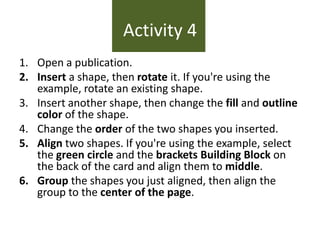
Working with Shapes and
Objects
Introduction
• In Publisher, the components of any
publication are called objects. You've already
worked with text boxes, which are one type of
object. Publisher offers decorative objects as
well, including shapes and Building Blocks.
• In this lesson, you'll learn how to create and
modify shapes and Building Blocks. You'll also
learn how to align, group, and arrange objects
of all types.
Working with Shapes
• Using shapes and objects is an easy way add
graphic design elements to your publication.
While you may not need shapes in every
publication you create, they can add visual
appeal.
To Insert a Shape
1. Select the Insert tab and locate the
Illustrations group.
2. Click the Shapes drop-down command.
To Insert a Shape
3. Select a shape from the drop-down menu.
To Insert a Shape
4. Click and drag the mouse until the shape is
the desired size and release the mouse button.
The shape will be added to your publication.
To Resize a Shape
1. Select the shape.
2. Click and drag one of the sizing handles on the
corners and sides of the text box until it is the
desired size. You can:
- Drag the top or bottom sizing handles to modify
shape height.
- Drag the side handles to modify shape width.
- Drag the corner handles to modify height and
width at the same time.
To Resize a Shape
To Resize a Shape
3. To rotate the shape, click and drag the green
handle.
To Resize a Shape
4. Some shapes also have one or more yellow
handles that can be used to modify the shape.
To Resize a Shape
• If you hold down the shift key while resizing a
shape, the shape will keep its proportions instead of
getting stretched out. For instance, if you hold down
the shift key while you resize a square, the final
shape will remain a perfect square with four equal
sides.
To Change to a Different Shape
• 1. Select the shape, then click the Format tab
and locate the Shape Styles group.
• 2. Click the Change Shape drop-down
command.
To Change to a Different Shape
3. A drop-down list will appear. Select the
desired shape.
4. The shape will be changed.
To Change Shape Style
1. Select the shape, then click the Format tab
and locate the Shape Styles group.
2. Click the More Shape Styles drop-down
arrow.
To Change Shape Style
• 3. A drop-down list of styles will appear. Move
your cursor over the styles to see a live
preview of the style in your publication, then
select the desired style.
• 4. The style will be applied to the shape.
To Change the Shape Fill Color
1. Select the shape, then click the Format tab
and locate the Shape Styles group.
2. Click the Shape Fill drop-down command.
To Change the Shape Fill Color
3. A drop-down list of colors will appear. Select the
desired fill color from the list. You can also choose No
Fill to remove the fill from your shape or More Fill
Colors to select a custom color.
4. The new fill color will
be applied.
To Change the Shape Fill Color
To Change the Shape Outline:
1. Select the shape, then click the Format tab
and locate the Shape Styles group.
2. Click the Shape Outline drop-down
command.
To Change the Shape Fill Color
3. A drop-down list of options will appear. Select
the desired outline color from the list. You can
also choose No Outline to remove the outline
from your shape or More Outline Colors to
select a custom color.
To Change the Shape Fill Color
• 4. If desired, further modify your shape
outline by changing the outline's weight
(thickness) and whether or not it is a dashed
line.
To Add a Shadow
1. Select the shape, then click the Format
tab and locate the Shadow Effects group.
2. Click the Shadow Effects drop-down
command.
To Add a Shadow
3. A drop-down menu with a list of shadow
choices will appear. Move your mouse over a
shadow effect to see a live preview of it in your
publication.
4. Click the desired shadow effect to apply it to
your shape.
To Add a Shadow
• You can select Shadow Options from the
drop-down menu and click the Color button to
select a different shadow color for your shape.
Working with Building Blocks
• Building Blocks are another type of object in
Publisher. They usually contain some
combination of text,
• shapes, and images, and are meant to
enhance the appearance of your publication.
Once you insert a Building
• Block, you can modify it to suit your needs.
Working with Building Blocks
There are four types of Building Blocks:
• Page parts, which are stylized placeholders for
your images and text.
Working with Building Blocks
• Calendars
Working with Building Blocks
• Borders & Accents
Working with Building Blocks
• Advertisements
To Insert a Building Block
1. Select the Insert tab and locate the Building
Blocks group.
2. Click one of the four Building Block dropdown commands.
To Insert a Building Block
3. A drop-down menu will appear with Building
Block styles and options. Select the desired
Building Block.
4. The Building Block will be inserted.
5. If desired, modify the Building Block's text and
formatting until you are satisfied with its
appearance.
Arranging Objects
Aligning
• You can click and drag objects to align them
manually, but this can be difficult and timeconsuming. Publisher
• includes several commands that allow you to
align your objects quickly and precisely.
Objects can be aligned to
• each other or to the page.
To Align Two or More Objects
1. Click and drag your mouse to form a selection box
around the objects you want to align. All of the objects
will now have sizing handles to show that they are
selected.
2. Click the Format tab and locate the Arrange group.
3. Click the Align drop-down command.
To Align Two or More Objects
4. Select one of the six alignment options.
5. The objects will align to each other based on
the option that you have selected.
To Align Objects to the Page
• 1. Select the object or objects you want to
align.
• 2. Click the Format tab and locate the Arrange
group.
• 3. Click the Align drop-down command.
• 4. From the drop-down list that
appears, select Relative to Margin Guides.
To Align Objects to the Page
5. Select one of the six alignment options.
6. The objects will align to the page based on
the option that you have selected.
To Group Objects
1. Select the objects you wish to group.
2. Click the Format tab and locate the Arrange group.
3. Click the Group command.
To Group Objects
4. The selected objects will now be grouped. There will
be a single box with sizing handles around the entire
group to show that they are one object.

You can ungroup grouped objects at
any time. Simply select the group,
then click the Ungroup command.
To Change the Ordering by One Level
To Change the Ordering by One Level:
1. Select the object you wish to move.
2. Click the Format tab and locate the Arrange
group.
3. Click the Bring Forward or Send Backward
command to change the object's ordering by one
level. If the object overlaps with more than one
other object, you may need to click the command
several times to achieve the desired ordering.
4. The objects will reorder themselves.
Activity 4
1. Open a publication.
2. Insert a shape, then rotate it. If you're using the
example, rotate an existing shape.
3. Insert another shape, then change the fill and outline
color of the shape.
4. Change the order of the two shapes you inserted.
5. Align two shapes. If you're using the example, select
the green circle and the brackets Building Block on
the back of the card and align them to middle.
6. Group the shapes you just aligned, then align the
group to the center of the page.

Working with shapes and objects

  • 1.
  • 2.
    Introduction • In Publisher,the components of any publication are called objects. You've already worked with text boxes, which are one type of object. Publisher offers decorative objects as well, including shapes and Building Blocks. • In this lesson, you'll learn how to create and modify shapes and Building Blocks. You'll also learn how to align, group, and arrange objects of all types.
  • 3.
    Working with Shapes •Using shapes and objects is an easy way add graphic design elements to your publication. While you may not need shapes in every publication you create, they can add visual appeal.
  • 4.
    To Insert aShape 1. Select the Insert tab and locate the Illustrations group. 2. Click the Shapes drop-down command.
  • 5.
    To Insert aShape 3. Select a shape from the drop-down menu.
  • 6.
    To Insert aShape 4. Click and drag the mouse until the shape is the desired size and release the mouse button. The shape will be added to your publication.
  • 7.
    To Resize aShape 1. Select the shape. 2. Click and drag one of the sizing handles on the corners and sides of the text box until it is the desired size. You can: - Drag the top or bottom sizing handles to modify shape height. - Drag the side handles to modify shape width. - Drag the corner handles to modify height and width at the same time.
  • 8.
  • 9.
    To Resize aShape 3. To rotate the shape, click and drag the green handle.
  • 10.
    To Resize aShape 4. Some shapes also have one or more yellow handles that can be used to modify the shape.
  • 11.
    To Resize aShape • If you hold down the shift key while resizing a shape, the shape will keep its proportions instead of getting stretched out. For instance, if you hold down the shift key while you resize a square, the final shape will remain a perfect square with four equal sides.
  • 12.
    To Change toa Different Shape • 1. Select the shape, then click the Format tab and locate the Shape Styles group. • 2. Click the Change Shape drop-down command.
  • 13.
    To Change toa Different Shape 3. A drop-down list will appear. Select the desired shape. 4. The shape will be changed.
  • 14.
    To Change ShapeStyle 1. Select the shape, then click the Format tab and locate the Shape Styles group. 2. Click the More Shape Styles drop-down arrow.
  • 15.
    To Change ShapeStyle • 3. A drop-down list of styles will appear. Move your cursor over the styles to see a live preview of the style in your publication, then select the desired style. • 4. The style will be applied to the shape.
  • 16.
    To Change theShape Fill Color 1. Select the shape, then click the Format tab and locate the Shape Styles group. 2. Click the Shape Fill drop-down command.
  • 17.
    To Change theShape Fill Color 3. A drop-down list of colors will appear. Select the desired fill color from the list. You can also choose No Fill to remove the fill from your shape or More Fill Colors to select a custom color. 4. The new fill color will be applied.
  • 18.
    To Change theShape Fill Color To Change the Shape Outline: 1. Select the shape, then click the Format tab and locate the Shape Styles group. 2. Click the Shape Outline drop-down command.
  • 19.
    To Change theShape Fill Color 3. A drop-down list of options will appear. Select the desired outline color from the list. You can also choose No Outline to remove the outline from your shape or More Outline Colors to select a custom color.
  • 20.
    To Change theShape Fill Color • 4. If desired, further modify your shape outline by changing the outline's weight (thickness) and whether or not it is a dashed line.
  • 21.
    To Add aShadow 1. Select the shape, then click the Format tab and locate the Shadow Effects group. 2. Click the Shadow Effects drop-down command.
  • 22.
    To Add aShadow 3. A drop-down menu with a list of shadow choices will appear. Move your mouse over a shadow effect to see a live preview of it in your publication. 4. Click the desired shadow effect to apply it to your shape.
  • 23.
    To Add aShadow • You can select Shadow Options from the drop-down menu and click the Color button to select a different shadow color for your shape.
  • 24.
    Working with BuildingBlocks • Building Blocks are another type of object in Publisher. They usually contain some combination of text, • shapes, and images, and are meant to enhance the appearance of your publication. Once you insert a Building • Block, you can modify it to suit your needs.
  • 25.
    Working with BuildingBlocks There are four types of Building Blocks: • Page parts, which are stylized placeholders for your images and text.
  • 26.
    Working with BuildingBlocks • Calendars
  • 27.
    Working with BuildingBlocks • Borders & Accents
  • 28.
    Working with BuildingBlocks • Advertisements
  • 29.
    To Insert aBuilding Block 1. Select the Insert tab and locate the Building Blocks group. 2. Click one of the four Building Block dropdown commands.
  • 30.
    To Insert aBuilding Block 3. A drop-down menu will appear with Building Block styles and options. Select the desired Building Block. 4. The Building Block will be inserted. 5. If desired, modify the Building Block's text and formatting until you are satisfied with its appearance.
  • 31.
    Arranging Objects Aligning • Youcan click and drag objects to align them manually, but this can be difficult and timeconsuming. Publisher • includes several commands that allow you to align your objects quickly and precisely. Objects can be aligned to • each other or to the page.
  • 32.
    To Align Twoor More Objects 1. Click and drag your mouse to form a selection box around the objects you want to align. All of the objects will now have sizing handles to show that they are selected. 2. Click the Format tab and locate the Arrange group. 3. Click the Align drop-down command.
  • 34.
    To Align Twoor More Objects 4. Select one of the six alignment options. 5. The objects will align to each other based on the option that you have selected.
  • 35.
    To Align Objectsto the Page • 1. Select the object or objects you want to align. • 2. Click the Format tab and locate the Arrange group. • 3. Click the Align drop-down command. • 4. From the drop-down list that appears, select Relative to Margin Guides.
  • 36.
    To Align Objectsto the Page
  • 37.
    To Align Objectsto the Page 5. Select one of the six alignment options. 6. The objects will align to the page based on the option that you have selected.
  • 38.
    To Group Objects 1.Select the objects you wish to group. 2. Click the Format tab and locate the Arrange group. 3. Click the Group command.
  • 39.
    To Group Objects 4.The selected objects will now be grouped. There will be a single box with sizing handles around the entire group to show that they are one object. You can ungroup grouped objects at any time. Simply select the group, then click the Ungroup command.
  • 40.
    To Change theOrdering by One Level To Change the Ordering by One Level: 1. Select the object you wish to move. 2. Click the Format tab and locate the Arrange group. 3. Click the Bring Forward or Send Backward command to change the object's ordering by one level. If the object overlaps with more than one other object, you may need to click the command several times to achieve the desired ordering. 4. The objects will reorder themselves.
  • 42.
    Activity 4 1. Opena publication. 2. Insert a shape, then rotate it. If you're using the example, rotate an existing shape. 3. Insert another shape, then change the fill and outline color of the shape. 4. Change the order of the two shapes you inserted. 5. Align two shapes. If you're using the example, select the green circle and the brackets Building Block on the back of the card and align them to middle. 6. Group the shapes you just aligned, then align the group to the center of the page.