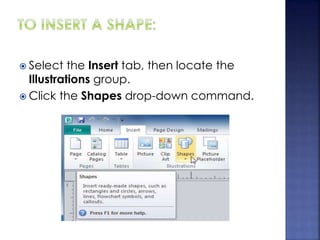
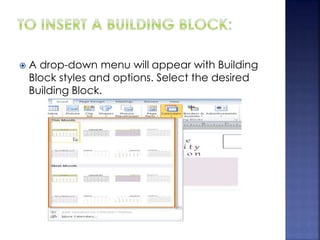
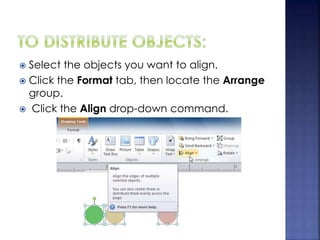
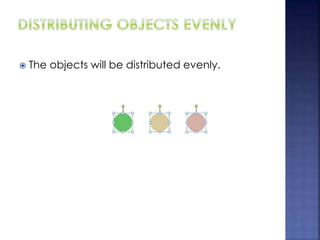
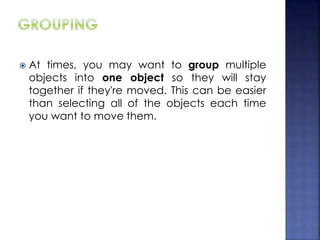
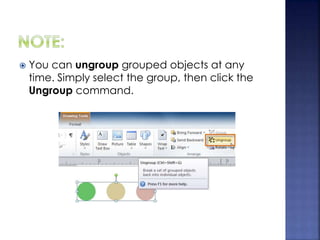
Lecture No 5
 In Publisher, the components of any publication are
called objects. You've already worked with text boxes,
which are one type of object. Publisher offers
decorative objects as well, including shapes and
Building Blocks.
 In this lesson, you'll learn how to create and modify
shapes and Building Blocks. You'll also learn how to
align, group, and arrange objects of all types.
 Using shapes and objects is an easy way
add graphic design elements to your
publication. While you may not need
shapes in every publication you create,
they can add visual appeal.
 Select the Insert tab, then locate the
Illustrations group.
 Click the Shapes drop-down command.
 Select a shape from the drop-down
menu.
 Click and drag the mouse until the shape
is the desired size.
 Release the mouse button. The shape will
be added to your publication.
 Select the shape. Click and drag one of the sizing
handles on the corners and sides of the text box until it
is the desired size. You can:
 Drag the top or bottom sizing handles to modify shape
height
 Drag the side handles to modify shape width
 Drag the corner handles to modify height and width at
the same time
 To rotate the shape, click and drag the green handle.
 Some shapes also have one or more yellow handles
that can be used to modify the shape.
For example, with this sun shape you can adjust
the diameter of the center circle and
the length of the points.
 If you hold down the shift key while resizing a shape,
the shape will keep its proportions instead of getting
stretched out. For instance, if you hold down the shift
key while you resize a square, the final shape will
remain a perfect square with four equal sides.
 To change to a different shape:
 Select the shape, then click the Format tab
and locate the Shape Styles group.
 Click the Change Shape drop-down
command.
 A drop-down list will appear. Select the
desired shape.
 The shape will be
changed.
 Select the shape, then click the Format tab and locate
the Shape Styles group.
 Click the More Shape Styles drop-down arrow.
 A drop-down list of styles will appear. Move your cursor
over the styles to see a live preview of the style in your
publication, then select the desired style.
 The style will be applied to the shape.
 Select the shape, then click the Format tab and locate
the Shape Styles group.
 Click the Shape Fill drop-down command.
 A drop-down list of colors will appear. Select the
desired fill color from the list. You can also choose No
Fill to remove the fill from your shape or More Fill Colors
to select a custom color.
 The new fill color will be applied.
 Select the shape, then click the Format tab and locate
the Shape Styles group.
 Click the Shape Outline drop-down command.
 A drop-down list of options will appear. Select the
desired outline color from the list. You can also choose
No Outline to remove the outline from your shape or
More Outline Colors to select a custom color.
 If desired, further modify your shape outline by
changing the outline's weight (thickness) and whether
or not it is a dashed line.
 The shape outline will be modified.
 Select the shape, then click the Format tab and locate
the Shadow Effects group.
 Click the Shadow Effects drop-down command
 A drop-down menu with a list of shadow choices will
appear. Move your mouse over a shadow effect to
see a live preview of it in your publication.
 Click the desired shadow effect to apply it to your
shape.
 Note: You can select Shadow Options from the drop-
down menu and click the Color
button to select a different
shadow color for your shape.
 Building Blocks are another type of object in
Publisher. They usually contain some
combination of text, shapes, and images,
and they're meant to enhance the
appearance of your publication. Once you
insert a Building Block, you can modify it to
suit your needs.
 Types of Building Blocks
 Page parts
 Calendars
 Borders and Accents
 Advertisements
 Which are stylized placeholders for your
images and text
 Select the Insert tab, then locate the Building
Blocks group.
 Click one of the four Building Block drop-
down commands.
 A drop-down menu will appear with Building
Block styles and options. Select the desired
Building Block.
 The Building Block will be inserted.
 If desired, modify the Building Block's text
and formatting until you are satisfied with
its appearance.
 Publisher offers a number of tools to help you
arrange and order your objects. These tools
work for any object, and they can help you
lay out your pages quickly and precisely.
 You can click and drag objects to align them
manually, but this can be difficult and time
consuming. Publisher includes several
commands that allow you to align your
objects quickly and precisely. Objects can be
aligned to each other or to the page.
 Click and drag your mouse to form a
selection box around the objects you want to
align. All of the objects will now have sizing
handles to show that they are selected.
 Click the Format tab, then locate the Arrange
group.
 Click the Align drop-down command.
 Select one of the six alignment options.
 The objects will align to each other based on
the option you have selected.
 Note:
Another way to select multiple objects at once
is to simply hold down the shift key and click
each object you wish to select.
 Select the object or objects you want to
align.
 Click the Format tab, then locate the Arrange
group.
 Click the Align drop-down command.
 From the drop-down list that appears, select
Relative to Margin Guides.
 Select one of the six alignment options.
 The objects will align to the page based on
the option you have selected.
 If you have arranged objects in a row or
column, you may want them to be an equal
distance from one another for a neater
appearance. You can do this by distributing
the objects horizontally or vertically.
 Select the objects you want to align.
 Click the Format tab, then locate the Arrange
group.
 Click the Align drop-down command.
 From the drop-down menu that appears,
select Distribute Horizontally or Distribute
Vertically.
 The objects will be distributed evenly.
 At times, you may want to group multiple
objects into one object so they will stay
together if they're moved. This can be easier
than selecting all of the objects each time
you want to move them.
 Select the objects you wish to group.
 Click the Format tab, then locate the
Arrange group.
 Click the Group command.
 The selected objects will now be grouped.
There will be a single box with sizing handles
around the entire group to show that they're
one object.
 You can ungroup grouped objects at any
time. Simply select the group, then click the
Ungroup command.
 In addition to aligning and grouping objects,
Publisher gives you the ability to arrange
objects in a specific order. Ordering is
important when two or more objects overlap,
as it will determine which objects are in the
front or the back.
 Select the object you wish to move. Click the Format tab,
then locate the Arrange group.
 Click the Bring Forward or Send Backward command to
change the object's ordering by one level.
 If the object overlaps with more than one other object, you
may need to click the command several times to achieve
the desired ordering.
 The objects will reorder themselves.
 If you want to move an object behind or in
front of several objects, it's usually faster to
bring it to front or send it to back rather than
clicking the ordering commands multiple
times.
 Select the object you wish to move.
 Click the Format tab, then locate the Arrange
group.
 Click the Bring Forward or Send Backward
drop-down command
 From the drop-down menu, select Bring to
Front or Send to Back.
 The objects will reorder themselves.
 Open a publication. If you want, you can use the
example in the students folder.
 Insert a shape, then rotate it. If you're using the
example, rotate an existing shape.
 Insert another shape, then change the fill and outline
color of the shape. If you're using the example, add an
outline to the green box on the front of the card.
 Change the order of the two shapes you inserted. If
you're using the example, select the dark gray
rectangle on the front of the card and send it to the
back.
 Align two shapes. If you're using the example, select
the green circle and the brackets Building Block on
the back of the card and align them to middle.
 Group the shapes you just aligned, then align the
group to the center of the page.

Publisher lec 5

  • 1.
  • 2.
     In Publisher,the components of any publication are called objects. You've already worked with text boxes, which are one type of object. Publisher offers decorative objects as well, including shapes and Building Blocks.  In this lesson, you'll learn how to create and modify shapes and Building Blocks. You'll also learn how to align, group, and arrange objects of all types.
  • 3.
     Using shapesand objects is an easy way add graphic design elements to your publication. While you may not need shapes in every publication you create, they can add visual appeal.
  • 4.
     Select theInsert tab, then locate the Illustrations group.  Click the Shapes drop-down command.
  • 5.
     Select ashape from the drop-down menu.
  • 6.
     Click anddrag the mouse until the shape is the desired size.  Release the mouse button. The shape will be added to your publication.
  • 7.
     Select theshape. Click and drag one of the sizing handles on the corners and sides of the text box until it is the desired size. You can:  Drag the top or bottom sizing handles to modify shape height  Drag the side handles to modify shape width  Drag the corner handles to modify height and width at the same time
  • 8.
     To rotatethe shape, click and drag the green handle.  Some shapes also have one or more yellow handles that can be used to modify the shape. For example, with this sun shape you can adjust the diameter of the center circle and the length of the points.
  • 9.
     If youhold down the shift key while resizing a shape, the shape will keep its proportions instead of getting stretched out. For instance, if you hold down the shift key while you resize a square, the final shape will remain a perfect square with four equal sides.
  • 10.
     To changeto a different shape:  Select the shape, then click the Format tab and locate the Shape Styles group.  Click the Change Shape drop-down command.
  • 11.
     A drop-downlist will appear. Select the desired shape.  The shape will be changed.
  • 12.
     Select theshape, then click the Format tab and locate the Shape Styles group.  Click the More Shape Styles drop-down arrow.
  • 13.
     A drop-downlist of styles will appear. Move your cursor over the styles to see a live preview of the style in your publication, then select the desired style.
  • 14.
     The stylewill be applied to the shape.
  • 15.
     Select theshape, then click the Format tab and locate the Shape Styles group.  Click the Shape Fill drop-down command.
  • 16.
     A drop-downlist of colors will appear. Select the desired fill color from the list. You can also choose No Fill to remove the fill from your shape or More Fill Colors to select a custom color.
  • 17.
     The newfill color will be applied.
  • 18.
     Select theshape, then click the Format tab and locate the Shape Styles group.  Click the Shape Outline drop-down command.
  • 19.
     A drop-downlist of options will appear. Select the desired outline color from the list. You can also choose No Outline to remove the outline from your shape or More Outline Colors to select a custom color.
  • 20.
     If desired,further modify your shape outline by changing the outline's weight (thickness) and whether or not it is a dashed line.
  • 21.
     The shapeoutline will be modified.
  • 22.
     Select theshape, then click the Format tab and locate the Shadow Effects group.  Click the Shadow Effects drop-down command
  • 23.
     A drop-downmenu with a list of shadow choices will appear. Move your mouse over a shadow effect to see a live preview of it in your publication.
  • 24.
     Click thedesired shadow effect to apply it to your shape.  Note: You can select Shadow Options from the drop- down menu and click the Color button to select a different shadow color for your shape.
  • 25.
     Building Blocksare another type of object in Publisher. They usually contain some combination of text, shapes, and images, and they're meant to enhance the appearance of your publication. Once you insert a Building Block, you can modify it to suit your needs.  Types of Building Blocks  Page parts  Calendars  Borders and Accents  Advertisements
  • 26.
     Which arestylized placeholders for your images and text
  • 30.
     Select theInsert tab, then locate the Building Blocks group.  Click one of the four Building Block drop- down commands.
  • 31.
     A drop-downmenu will appear with Building Block styles and options. Select the desired Building Block.
  • 32.
     The BuildingBlock will be inserted.
  • 33.
     If desired,modify the Building Block's text and formatting until you are satisfied with its appearance.
  • 34.
     Publisher offersa number of tools to help you arrange and order your objects. These tools work for any object, and they can help you lay out your pages quickly and precisely.
  • 35.
     You canclick and drag objects to align them manually, but this can be difficult and time consuming. Publisher includes several commands that allow you to align your objects quickly and precisely. Objects can be aligned to each other or to the page.
  • 36.
     Click anddrag your mouse to form a selection box around the objects you want to align. All of the objects will now have sizing handles to show that they are selected.
  • 37.
     Click theFormat tab, then locate the Arrange group.  Click the Align drop-down command.
  • 38.
     Select oneof the six alignment options.  The objects will align to each other based on the option you have selected.
  • 39.
     Note: Another wayto select multiple objects at once is to simply hold down the shift key and click each object you wish to select.
  • 40.
     Select theobject or objects you want to align.  Click the Format tab, then locate the Arrange group.  Click the Align drop-down command.
  • 41.
     From thedrop-down list that appears, select Relative to Margin Guides.
  • 42.
     Select oneof the six alignment options.
  • 43.
     The objectswill align to the page based on the option you have selected.
  • 44.
     If youhave arranged objects in a row or column, you may want them to be an equal distance from one another for a neater appearance. You can do this by distributing the objects horizontally or vertically.
  • 45.
     Select theobjects you want to align.  Click the Format tab, then locate the Arrange group.  Click the Align drop-down command.
  • 46.
     From thedrop-down menu that appears, select Distribute Horizontally or Distribute Vertically.
  • 47.
     The objectswill be distributed evenly.
  • 48.
     At times,you may want to group multiple objects into one object so they will stay together if they're moved. This can be easier than selecting all of the objects each time you want to move them.
  • 49.
     Select theobjects you wish to group.  Click the Format tab, then locate the Arrange group.  Click the Group command.
  • 50.
     The selectedobjects will now be grouped. There will be a single box with sizing handles around the entire group to show that they're one object.
  • 51.
     You canungroup grouped objects at any time. Simply select the group, then click the Ungroup command.
  • 52.
     In additionto aligning and grouping objects, Publisher gives you the ability to arrange objects in a specific order. Ordering is important when two or more objects overlap, as it will determine which objects are in the front or the back.
  • 53.
     Select theobject you wish to move. Click the Format tab, then locate the Arrange group.  Click the Bring Forward or Send Backward command to change the object's ordering by one level.  If the object overlaps with more than one other object, you may need to click the command several times to achieve the desired ordering.
  • 54.
     The objectswill reorder themselves.
  • 55.
     If youwant to move an object behind or in front of several objects, it's usually faster to bring it to front or send it to back rather than clicking the ordering commands multiple times.  Select the object you wish to move.  Click the Format tab, then locate the Arrange group.
  • 56.
     Click theBring Forward or Send Backward drop-down command
  • 57.
     From thedrop-down menu, select Bring to Front or Send to Back.
  • 58.
     The objectswill reorder themselves.
  • 59.
     Open apublication. If you want, you can use the example in the students folder.  Insert a shape, then rotate it. If you're using the example, rotate an existing shape.  Insert another shape, then change the fill and outline color of the shape. If you're using the example, add an outline to the green box on the front of the card.  Change the order of the two shapes you inserted. If you're using the example, select the dark gray rectangle on the front of the card and send it to the back.  Align two shapes. If you're using the example, select the green circle and the brackets Building Block on the back of the card and align them to middle.  Group the shapes you just aligned, then align the group to the center of the page.