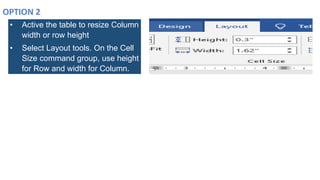
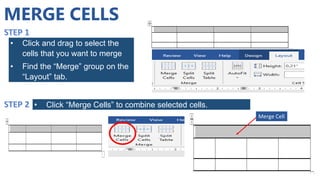
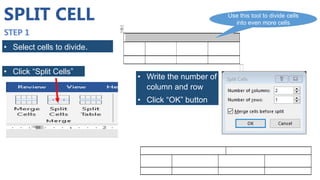
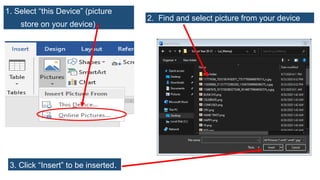
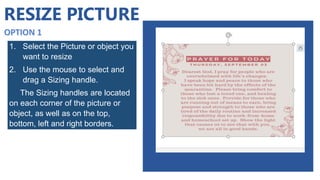
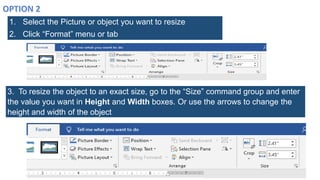
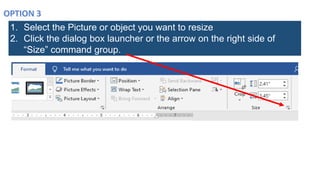
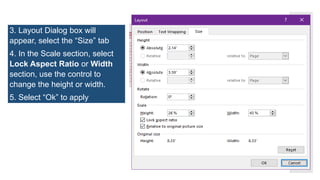
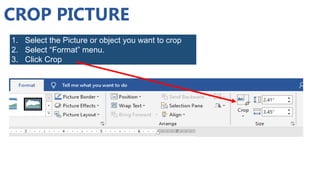
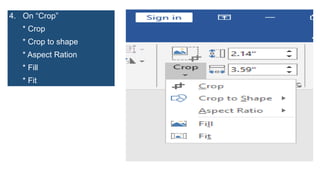
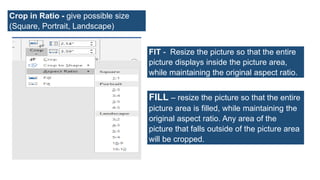
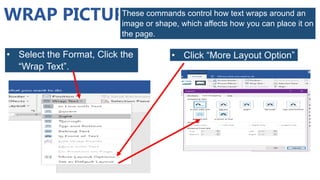
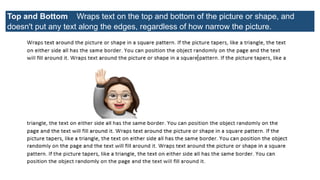
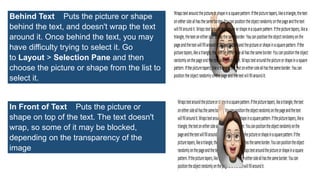
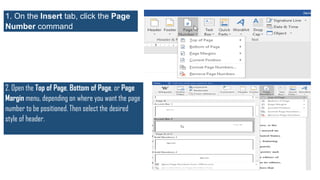
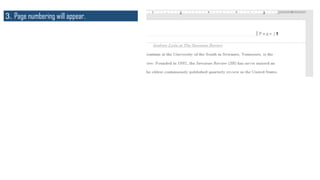
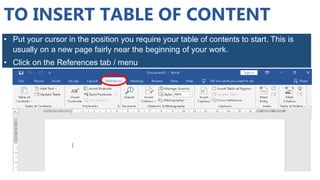
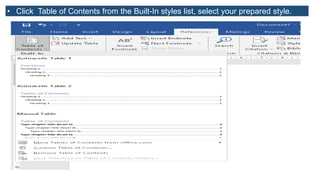
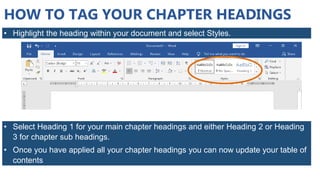
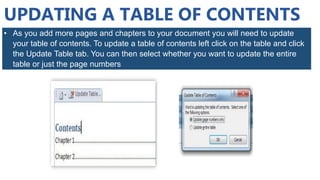
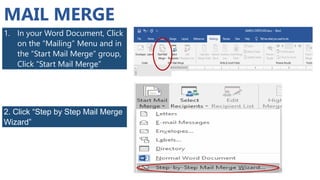
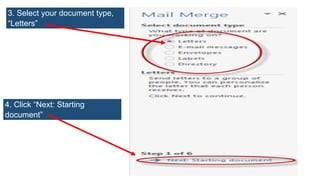
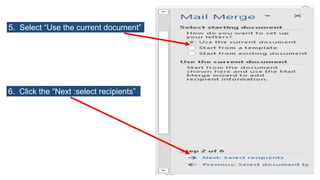
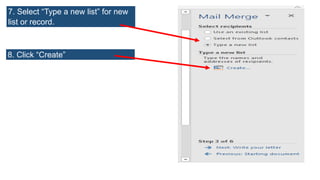
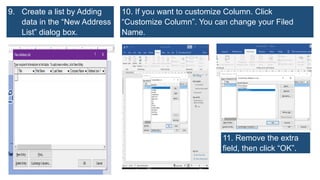
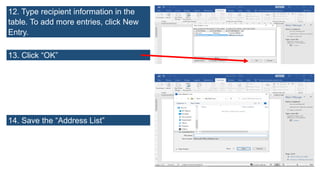
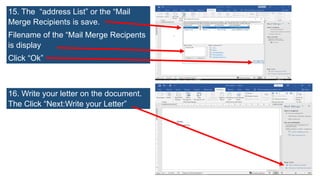
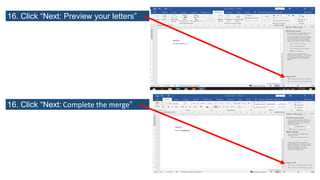
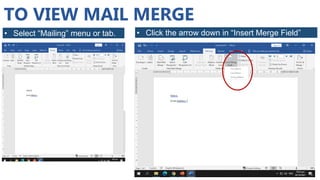
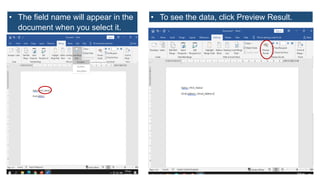
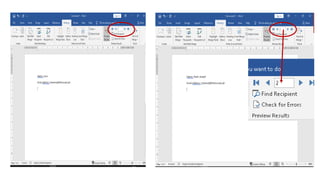
UNIT 3
Microsoft word
LESSON 3 - INSERT
Table
Picture
Page
Mail Merge
1
TABLE
A table is made up of rows and columns. The intersection of a row and column is called a
cell. Tables are often used to organize and present information, but they have a variety of other
uses as well.
So TABLE
 Basically just a Grid
* Column(Vertical)
* Row (Horizontal)
* individual (cells) boxes
 Each Cell can hold
* text
* picture
INSERT TABLE
• Click Insert Menu
• Find the “Table” icon
Click
• Click the down-arrow under
“Table”
• Drag over the grid to select the
dimensions of your table(number
of rows & columns)
• Then click to insert the Table
• Your Table appears in the word
document (Document Area)
• Notice that Word automatically
add the “Table Tools” (everything
you need to format tables)
DELETE TABLE
• Click the “Layout” under “Table Tools”
• Click the down-arrow under “Delete”
• This will delete whatever row or
column is currently selected (or
whatever row or column was last
clicked)
INSERT ROW(S)/COLUMN(S)
To add new Row or Column
• Click :
* Insert Above
* Insert Below
* Insert Left
* Insert Right
• This will add a new row / column
next to whatever row or column was
last clicked.
TEXT ALIGNMENT IN TABLE
This refers to the position of the text within the individuals cells.
• Click the Layout menu
• Within the table, select
the cell(s) you want to
format.
• Then up in the “Layout”,
click your preferred text
alignment.
ALIGN TOP LEFT – Align text to the left corner of the cell.
ALIGN TOP CENTER – center text and align it to the top of the cell.
ALIGN TOP RIGHT – Align text to the top corner of the cell.
ALIGN CENTER – center text horizontally and vertically with in the cell.
ALIGN CENTER RIGHT – center text vertically and align it to the right
side of the cell.
ALIGN CENTER LEFT – center text vertically and align it to the left
side of the cell.
ALIGN BOTTOM LEFT – align text to the bottom left corner of the
cell.
ALIGN BOTTOM CENTER – center text and align it to the bottom
of the cell
ALIGN BOTTOM RIGHT – align text to the bottom right corner of
the cell
RESIZE COLUMN WIDTH & ROW HEIGHT
• Use your mouse to hover the
table border that you want to
adjust
• The pointer cursor will change
into a re-size cursor.
• Once you have the re-size
cursor, just click and drag to
move border.
• Same process for rows and
columns.
• Active the table to resize Column
width or row height
• Select Layout tools. On the Cell
Size command group, use height
for Row and width for Column.
MERGE CELLS
• Click and drag to select the
cells that you want to merge
• Find the “Merge” group on the
“Layout” tab.
• Click “Merge Cells” to combine selected cells.
Merge Cell
SPLIT CELL
• Select cells to divide.
• Click “Split Cells”
Use this tool to divide cells
into even more cells
• Write the number of
column and row
• Click “OK” button
PICTURE
• On the “Inert Menu” Click
“Picture”.
• Insert Picture From
* this Device (picture
store on your device)
* Online Picture (Picture
from Web)
1. Select “this Device” (picture
store on your device)
2. Find and select picture from your device
3. Click “Insert” to be inserted.
RESIZE PICTURE
1. Select the Picture or object you
want to resize
2. Use the mouse to select and
drag a Sizing handle.
The Sizing handles are located
on each corner of the picture or
object, as well as on the top,
bottom, left and right borders.
1. Select the Picture or object you want to resize
2. Click “Format” menu or tab
3. To resize the object to an exact size, go to the “Size” command group and enter
the value you want in Height and Width boxes. Or use the arrows to change the
height and width of the object
1. Select the Picture or object you want to resize
2. Click the dialog box launcher or the arrow on the right side of
“Size” command group.
3. Layout Dialog box will
appear, select the “Size” tab
4. In the Scale section, select
Lock Aspect Ratio or Width
section, use the control to
change the height or width.
5. Select “Ok” to apply
CROP PICTURE
1. Select the Picture or object you want to crop
2. Select “Format” menu.
3. Click Crop
4. On “Crop”
* Crop
* Crop to shape
* Aspect Ration
* Fill
* Fit
Crop - Crop your picture to
remove any unwanted area.
Crop to Shape – crop your picture in select
shape
Crop in Ratio - give possible size
(Square, Portrait, Landscape)
FIT - Resize the picture so that the entire
picture displays inside the picture area,
while maintaining the original aspect ratio.
FILL – resize the picture so that the entire
picture area is filled, while maintaining the
original aspect ratio. Any area of the
picture that falls outside of the picture area
will be cropped.
WRAP PICTURE
These commands control how text wraps around an
image or shape, which affects how you can place it on
the page.
• Select the Format, Click the
“Wrap Text”.
• Click “More Layout Option”
IN LINE WITH TEXT - Puts the picture or shape on a paragraph, just like a line of text.
It moves with the paragraph when you add or remove text. You can move the picture
or shape to other lines as you can with text, but you're it is limited to the extent of the
line.
SQUARE - Wraps text around the picture or shape in a square pattern. If the picture
tapers, like a triangle, the text on either side all has the same border. You can position
the object randomly on the page and the text will fill around it.
TIGHT - Text wraps at a consistent distance between the edge of the picture or shape
and the text. The text follows the shape. You can position the object randomly on the
page and the text will fill around it.
THROUGH - Acts much like Tight, except that you can change the wrap points so that
text can fill in the spaces between elements in an image. If the image or shape doesn't
have any spaces, then text wrapping works just like Tight.
Top and Bottom Wraps text on the top and bottom of the picture or shape, and
doesn't put any text along the edges, regardless of how narrow the picture.
Behind Text Puts the picture or shape
behind the text, and doesn't wrap the text
around it. Once behind the text, you may
have difficulty trying to select it. Go
to Layout > Selection Pane and then
choose the picture or shape from the list to
select it.
In Front of Text Puts the picture or
shape on top of the text. The text doesn't
wrap, so some of it may be blocked,
depending on the transparency of the
image
ADD PAGE NUMBERS
1. On the Insert tab, click the Page
Number command.
2. Open the Top of Page, Bottom of Page, or Page
Margin menu, depending on where you want the page
number to be positioned. Then select the desired
style of header.
3. Page numbering will appear.
INSERT TABLE OF CONTENT
• Put your cursor in the position you require your table of contents to start. This is
usually on a new page fairly near the beginning of your work.
• Click on the References tab / menu
TO INSERT TABLE OF CONTENT
• Click Table of Contents from the Built-In styles list, select your prepared style.
HOW TO TAG YOUR CHAPTER HEADINGS
• Highlight the heading within your document and select Styles.
• Select Heading 1 for your main chapter headings and either Heading 2 or Heading
3 for chapter sub headings.
• Once you have applied all your chapter headings you can now update your table of
contents
UPDATING A TABLE OF CONTENTS
• As you add more pages and chapters to your document you will need to update
your table of contents. To update a table of contents left click on the table and click
the Update Table tab. You can then select whether you want to update the entire
table or just the page numbers
INSERT MAIL MERGE
MAIL MERGE
1. In your Word Document, Click
on the “Mailing” Menu and in
the “Start Mail Merge” group,
Click “Start Mail Merge”
2. Click “Step by Step Mail Merge
Wizard”
3. Select your document type,
“Letters”
4. Click “Next: Starting
document”
5. Select “Use the current document”
6. Click the “Next :select recipients”
7. Select “Type a new list” for new
list or record.
8. Click “Create”
9. Create a list by Adding
data in the “New Address
List” dialog box.
10. If you want to customize Column. Click
“Customize Column”. You can change your Filed
Name.
11. Remove the extra
field, then click “OK”.
12. Type recipient information in the
table. To add more entries, click New
Entry.
13. Click “OK”
14. Save the “Address List”
15. The “address List” or the “Mail
Merge Recipients is save.
Filename of the “Mail Merge Recipents
is display
Click “Ok”
16. Write your letter on the document.
The Click “Next:Write your Letter”
16. Click “Next: Preview your letters”
16. Click “Next: Complete the merge”
TO VIEW MAIL MERGE
• Select “Mailing” menu or tab. • Click the arrow down in “Insert Merge Field”
• The field name will appear in the
document when you select it.
• To see the data, click Preview Result.
https://support.office.com/en-us/article/RZ001200716?CorrelationId=e84e6f69-317b-49c6-a24f-b364702fd132. view
Last April 2020
Office.com Online Course : “Create & Format Basic Table”
https://support.microsoft.com/en-us/office/insert-a-table-a138f745-73ef-4879-b99a-
2f3d38be612a?ocmsassetid=ha010034300&correlationid=62bb8e09-54f3-4589-863c-81b351919a74&ui=en-
us&rs=en-us&ad=us. view Last April 2020
Office.com Article: “Insert of Create a Table”
Layout options : Word for Microsoft 365 Word for the web Word 2019 Word 2016 Word
2013 Word 2010
https://support.microsoft.com/en-us/office/layout-options-a0f53857-b501-46c6-ba8b-68ba51e0e3cc?ui=en-
US&rs=en-US&ad=US#ID0EAABAAA=Text_Wrapping view Last April 2020
https://www.webucator.com/how-to/how-use-mail-merge-microsoft-word.cfm view last April 2020
Webucator : How to Use Mail Merge in Microsoft Word

W4_MSWORD-Part-2.pdf

  • 1.
  • 2.
    LESSON 3 -INSERT Table Picture Page Mail Merge 1
  • 3.
    TABLE A table ismade up of rows and columns. The intersection of a row and column is called a cell. Tables are often used to organize and present information, but they have a variety of other uses as well. So TABLE  Basically just a Grid * Column(Vertical) * Row (Horizontal) * individual (cells) boxes  Each Cell can hold * text * picture
  • 4.
    INSERT TABLE • ClickInsert Menu • Find the “Table” icon Click • Click the down-arrow under “Table” • Drag over the grid to select the dimensions of your table(number of rows & columns) • Then click to insert the Table
  • 5.
    • Your Tableappears in the word document (Document Area) • Notice that Word automatically add the “Table Tools” (everything you need to format tables)
  • 6.
    DELETE TABLE • Clickthe “Layout” under “Table Tools” • Click the down-arrow under “Delete” • This will delete whatever row or column is currently selected (or whatever row or column was last clicked)
  • 7.
    INSERT ROW(S)/COLUMN(S) To addnew Row or Column • Click : * Insert Above * Insert Below * Insert Left * Insert Right • This will add a new row / column next to whatever row or column was last clicked.
  • 8.
    TEXT ALIGNMENT INTABLE This refers to the position of the text within the individuals cells. • Click the Layout menu • Within the table, select the cell(s) you want to format. • Then up in the “Layout”, click your preferred text alignment.
  • 9.
    ALIGN TOP LEFT– Align text to the left corner of the cell. ALIGN TOP CENTER – center text and align it to the top of the cell. ALIGN TOP RIGHT – Align text to the top corner of the cell. ALIGN CENTER – center text horizontally and vertically with in the cell. ALIGN CENTER RIGHT – center text vertically and align it to the right side of the cell. ALIGN CENTER LEFT – center text vertically and align it to the left side of the cell.
  • 10.
    ALIGN BOTTOM LEFT– align text to the bottom left corner of the cell. ALIGN BOTTOM CENTER – center text and align it to the bottom of the cell ALIGN BOTTOM RIGHT – align text to the bottom right corner of the cell
  • 11.
    RESIZE COLUMN WIDTH& ROW HEIGHT • Use your mouse to hover the table border that you want to adjust • The pointer cursor will change into a re-size cursor. • Once you have the re-size cursor, just click and drag to move border. • Same process for rows and columns.
  • 12.
    • Active thetable to resize Column width or row height • Select Layout tools. On the Cell Size command group, use height for Row and width for Column.
  • 13.
    MERGE CELLS • Clickand drag to select the cells that you want to merge • Find the “Merge” group on the “Layout” tab. • Click “Merge Cells” to combine selected cells. Merge Cell
  • 14.
    SPLIT CELL • Selectcells to divide. • Click “Split Cells” Use this tool to divide cells into even more cells • Write the number of column and row • Click “OK” button
  • 15.
  • 16.
    • On the“Inert Menu” Click “Picture”. • Insert Picture From * this Device (picture store on your device) * Online Picture (Picture from Web)
  • 17.
    1. Select “thisDevice” (picture store on your device) 2. Find and select picture from your device 3. Click “Insert” to be inserted.
  • 18.
    RESIZE PICTURE 1. Selectthe Picture or object you want to resize 2. Use the mouse to select and drag a Sizing handle. The Sizing handles are located on each corner of the picture or object, as well as on the top, bottom, left and right borders.
  • 19.
    1. Select thePicture or object you want to resize 2. Click “Format” menu or tab 3. To resize the object to an exact size, go to the “Size” command group and enter the value you want in Height and Width boxes. Or use the arrows to change the height and width of the object
  • 20.
    1. Select thePicture or object you want to resize 2. Click the dialog box launcher or the arrow on the right side of “Size” command group.
  • 21.
    3. Layout Dialogbox will appear, select the “Size” tab 4. In the Scale section, select Lock Aspect Ratio or Width section, use the control to change the height or width. 5. Select “Ok” to apply
  • 22.
    CROP PICTURE 1. Selectthe Picture or object you want to crop 2. Select “Format” menu. 3. Click Crop
  • 23.
    4. On “Crop” *Crop * Crop to shape * Aspect Ration * Fill * Fit
  • 24.
    Crop - Cropyour picture to remove any unwanted area. Crop to Shape – crop your picture in select shape
  • 25.
    Crop in Ratio- give possible size (Square, Portrait, Landscape) FIT - Resize the picture so that the entire picture displays inside the picture area, while maintaining the original aspect ratio. FILL – resize the picture so that the entire picture area is filled, while maintaining the original aspect ratio. Any area of the picture that falls outside of the picture area will be cropped.
  • 26.
    WRAP PICTURE These commandscontrol how text wraps around an image or shape, which affects how you can place it on the page. • Select the Format, Click the “Wrap Text”. • Click “More Layout Option”
  • 27.
    IN LINE WITHTEXT - Puts the picture or shape on a paragraph, just like a line of text. It moves with the paragraph when you add or remove text. You can move the picture or shape to other lines as you can with text, but you're it is limited to the extent of the line.
  • 28.
    SQUARE - Wrapstext around the picture or shape in a square pattern. If the picture tapers, like a triangle, the text on either side all has the same border. You can position the object randomly on the page and the text will fill around it.
  • 29.
    TIGHT - Textwraps at a consistent distance between the edge of the picture or shape and the text. The text follows the shape. You can position the object randomly on the page and the text will fill around it.
  • 30.
    THROUGH - Actsmuch like Tight, except that you can change the wrap points so that text can fill in the spaces between elements in an image. If the image or shape doesn't have any spaces, then text wrapping works just like Tight.
  • 31.
    Top and BottomWraps text on the top and bottom of the picture or shape, and doesn't put any text along the edges, regardless of how narrow the picture.
  • 32.
    Behind Text Putsthe picture or shape behind the text, and doesn't wrap the text around it. Once behind the text, you may have difficulty trying to select it. Go to Layout > Selection Pane and then choose the picture or shape from the list to select it. In Front of Text Puts the picture or shape on top of the text. The text doesn't wrap, so some of it may be blocked, depending on the transparency of the image
  • 33.
  • 34.
    1. On theInsert tab, click the Page Number command. 2. Open the Top of Page, Bottom of Page, or Page Margin menu, depending on where you want the page number to be positioned. Then select the desired style of header.
  • 35.
    3. Page numberingwill appear.
  • 36.
  • 37.
    • Put yourcursor in the position you require your table of contents to start. This is usually on a new page fairly near the beginning of your work. • Click on the References tab / menu TO INSERT TABLE OF CONTENT
  • 38.
    • Click Tableof Contents from the Built-In styles list, select your prepared style.
  • 39.
    HOW TO TAGYOUR CHAPTER HEADINGS • Highlight the heading within your document and select Styles. • Select Heading 1 for your main chapter headings and either Heading 2 or Heading 3 for chapter sub headings. • Once you have applied all your chapter headings you can now update your table of contents
  • 40.
    UPDATING A TABLEOF CONTENTS • As you add more pages and chapters to your document you will need to update your table of contents. To update a table of contents left click on the table and click the Update Table tab. You can then select whether you want to update the entire table or just the page numbers
  • 41.
  • 42.
    MAIL MERGE 1. Inyour Word Document, Click on the “Mailing” Menu and in the “Start Mail Merge” group, Click “Start Mail Merge” 2. Click “Step by Step Mail Merge Wizard”
  • 43.
    3. Select yourdocument type, “Letters” 4. Click “Next: Starting document”
  • 44.
    5. Select “Usethe current document” 6. Click the “Next :select recipients”
  • 45.
    7. Select “Typea new list” for new list or record. 8. Click “Create”
  • 46.
    9. Create alist by Adding data in the “New Address List” dialog box. 10. If you want to customize Column. Click “Customize Column”. You can change your Filed Name. 11. Remove the extra field, then click “OK”.
  • 47.
    12. Type recipientinformation in the table. To add more entries, click New Entry. 13. Click “OK” 14. Save the “Address List”
  • 48.
    15. The “addressList” or the “Mail Merge Recipients is save. Filename of the “Mail Merge Recipents is display Click “Ok” 16. Write your letter on the document. The Click “Next:Write your Letter”
  • 49.
    16. Click “Next:Preview your letters” 16. Click “Next: Complete the merge”
  • 50.
    TO VIEW MAILMERGE • Select “Mailing” menu or tab. • Click the arrow down in “Insert Merge Field”
  • 51.
    • The fieldname will appear in the document when you select it. • To see the data, click Preview Result.
  • 54.
    https://support.office.com/en-us/article/RZ001200716?CorrelationId=e84e6f69-317b-49c6-a24f-b364702fd132. view Last April2020 Office.com Online Course : “Create & Format Basic Table” https://support.microsoft.com/en-us/office/insert-a-table-a138f745-73ef-4879-b99a- 2f3d38be612a?ocmsassetid=ha010034300&correlationid=62bb8e09-54f3-4589-863c-81b351919a74&ui=en- us&rs=en-us&ad=us. view Last April 2020 Office.com Article: “Insert of Create a Table” Layout options : Word for Microsoft 365 Word for the web Word 2019 Word 2016 Word 2013 Word 2010 https://support.microsoft.com/en-us/office/layout-options-a0f53857-b501-46c6-ba8b-68ba51e0e3cc?ui=en- US&rs=en-US&ad=US#ID0EAABAAA=Text_Wrapping view Last April 2020 https://www.webucator.com/how-to/how-use-mail-merge-microsoft-word.cfm view last April 2020 Webucator : How to Use Mail Merge in Microsoft Word