Download to read offline

![4
Figure 2. Document Setup dialog box
+HUH RX ZLOO EH DEOH WR QDPH RXU ÀOH VHW XS WKH FRUUHFW SDJH VL]H DQG RULHQWDWLRQ IRU RXU GRFXPHQW
Options include, but are not limited to:
Page Size and Orientation
KDQJH WKH SDJH VL]H E WSLQJ LQ QHZ YDOXHV IRU ZLGWK DQG KHLJKW 3DJH VL]H UHSUHVHQWV WKH ÀQDO VL]H
you want after bleeds or trimming other marks outside the page. In the Preset dropdown menu you
FDQ ÀQG VXFK FRPPRQ VL]HV DV OHWWHU OHJDO WDEORLG HWF7SLQJ LQ H[DFW YDOXHV IRU Height andWidth gives
you more control over the size and orientation of your page.
Resolution
Resolution is the number of pixels on a printed area of an image.The higher the resolution, the more
pixels there are on the page, the better the quality of the image. However, high resolution increases
WKH VL]H RI WKH ÀOH7KH VWDQGDUG UHFRPPHQGHG UHVROXWLRQ IRU SULQWHG LPDJHV LV IRU :HE LP
ages it is 72.
Color Mode
KRRVH D FRORU PRGH WKDW ZLOO EHVW ÀW RXU SURMHFW )RU H[DPSOH ZKHQ PDNLQJ D JUDSKLF IRU D ZHE VLWH
choose RGB.When making an image for print choose CMYK.
Background Contents
Choose the background: white, color or transparent.When you have entered all of your document
settings click Ok.
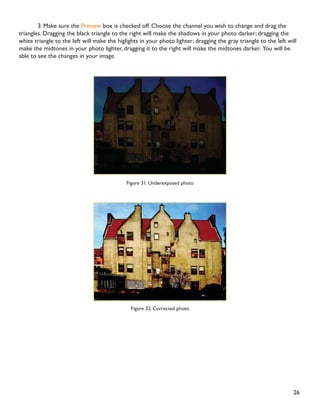
Opening an image from a disk
If the image you have is saved on a disk, select File Open, and then navigate to the disk drive where your
LPDJH LV VDYHG KRRVH WKH LPDJH ÀOH DQG FOLFN Open.At this point, you may want to save your image under a
GLIIHUHQW QDPH VR WKDW RX FDQ DOZDV KDYH WKH RULJLQDO WR IDOO EDFN RQ LQ FDVH RI D PLVWDNH7R VDYH RXU ÀOH
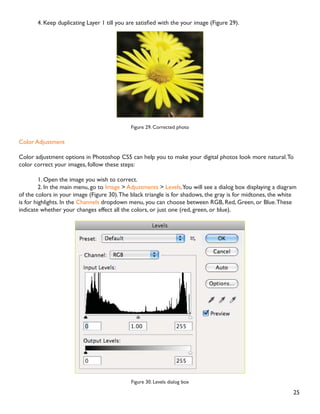
select File Save As DQG WSH LQ WKH QHZ QDPH RI WKH ÀOH LQ WKH GLDORJXH ER[](https://image.slidesharecdn.com/photoshopcs5tutorial-180713083914/85/Photoshop-CS5-Tutorial-4-320.jpg)
![15
Cropping is one of the most basic editing techniques that can improve your images. Cropping helps to bring
RXW WKH PRVW LPSRUWDQW IHDWXUHV LQ RXU LPDJH DQG IRFXV WKH YLHZHUV· DWWHQWLRQ RQ WKHVH IHDWXUHV URSSLQJ
also allows you to make your image a standard photo size.
There are several ways to crop images in Adobe Photoshop:
1. Cropping with the Crop Tool
URSSLQJ WR D VSHFLÀF VL]H
3. Cropping with the Marquee Tool
Cropping with the CropTool
The Crop Tool allows you to make a precise selection of an image you wish to edit.To crop with the Crop
Tool, follow these steps:
1. Open the image you wish to crop (see Getting Started for detailed instructions).
2. Select the Crop Tool from the Toolbox (see Selection Tools for location and description).
3. Click on your image once and drag the mouse out to make a cropping border (See Figure 11).
Figure 11. Cropping border
11. Cropping](https://image.slidesharecdn.com/photoshopcs5tutorial-180713083914/85/Photoshop-CS5-Tutorial-15-320.jpg)
![16
5HVL]H WKH ERUGHU E GUDJJLQJ WKH VTXDUHV DW WKH VLGHV DQG FRUQHUV WLOO RX DUH VDWLVÀHG ZLWK WKH ZD
your image looks.
2QFH RX DUH FRPSOHWHO VDWLVÀHG ZLWK RXU FURSSHG LPDJH SUHVV Enter.
Note:You can also rotate your cropping border. Move the cursor outside the border, you will see how it turns
into a double-headed arrow (Figure 12). Drag the arrows in the directions you wish to rotate your selection.
Figure 12. Rotating the cropping border
URSSLQJ WR D VSHFLÀF VL]H
If you wish to print your digital photos or other images on standard size photo paper, you will have to crop
RXU LPDJHV WR D VSHFLÀF VL]H VXFK DV [7R FURS DQ LPDJH WR D VSHFLÀF VL]H GR WKH IROORZLQJ
1. Open the image you wish to crop.
2. Select the Crop Tool from the Toolbox.
3. In the Options bar, specify the values for Width and Height (Figure 13).
Figure 13. Crop Tool Options bar
4. Click in your image and drag the cropping border. Notice that the border is con strained -you cannot
PDNH LW ZLGHU RU ORQJHU WKDQ WKH VSHFLÀHG YDOXHV )LJXUH](https://image.slidesharecdn.com/photoshopcs5tutorial-180713083914/85/Photoshop-CS5-Tutorial-16-320.jpg)
![)RU H[DPSOH LI RX HQWHUHG IRU Width and 10
for Height ZKDWHYHU VL]H RX PDNH WKH ERUGHU WKH DUHD ZLWKLQ LW ZLOO ÀW RQ DQ [ SKRWR](https://image.slidesharecdn.com/photoshopcs5tutorial-180713083914/85/Photoshop-CS5-Tutorial-17-320.jpg)
![17
)LJXUH URSSLQJ WR D VSHFLÀF VL]H
2QFH RX DUH FRPSOHWHO VDWLVÀHG ZLWK RXU FURSSHG LPDJH SUHVV Enter.
Cropping with the MarqueeTool
If you are in a hurry and need just a simple crop, you can use the Marquee Tool and a menu command.To crop
with the Marquee Tool, follow the steps below:
1. Open the image you wish to crop.
2. Select the Rectangular Marquee Tool from the Toolbox (see Selection Tools).
3. Click and drag the mouse to draw a marquee around the area you wish to crop (Figure 15).](https://image.slidesharecdn.com/photoshopcs5tutorial-180713083914/85/Photoshop-CS5-Tutorial-18-320.jpg)

![19
Resizing in Photoshop can help you print your images in standard photo sizes, resize and preserve the high
quality of digital photos, and enlarge small images to a poster size.
5HVL]LQJ WR D VSHFLÀF VL]H
To resize your image to a preset size, follow the steps below:
1. In the main menu, go to File New.
2. In the New dialog box, click on the Preset dropdown menu.You will see several preset sizes, such as
2x3, 4x6 and 5x7 with the preset resolution of 300 ppi (Figure 17).
Figure 17. Preset size in the New dialog box
3. Choose the size that you wish and click OK.
Note:All the preset sizes are in portrait orientation. If you wish to resize an image with the landscape orienta-
tion, you need to create your own preset.To create your own size, do the following:
1.Type in the values for Width and Height, for example 7x5.
2.Type in your desired resolution (150 ppi for high quality prints, and 72 ppi is good for web images).
3. Click the Save Preset button
12. Resizing](https://image.slidesharecdn.com/photoshopcs5tutorial-180713083914/85/Photoshop-CS5-Tutorial-20-320.jpg)
![21
Enlarging
If you want to make your digital photo into a poster size image, you can do it in the Image Size dialog box.
However, just increasing the dimensions will make the image appear blurry and pixilated. To enlarge the image
without loosing the quality, follow these steps:
1. Open the digital image you wish to enlarge.
2. In the main menu, go to Image Image Size.
3. In the Image Size dialog box, make sure the Resample Image box is checked off and choose Bicubic
Smoother from the dropdown box (Figure 20).
Figure 20. Increasing the size by 10 percent
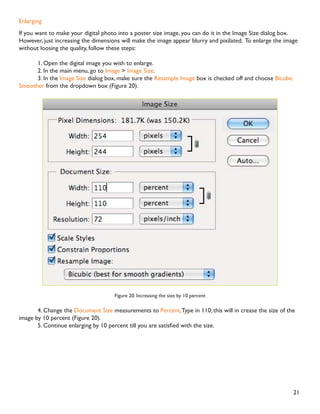
4. Change the Document Size measurements to Percent.Type in 110; this will in crease the size of the
image by 10 percent (Figure 20).
RQWLQXH HQODUJLQJ E SHUFHQW WLOO RX DUH VDWLVÀHG ZLWK WKH VL]H](https://image.slidesharecdn.com/photoshopcs5tutorial-180713083914/85/Photoshop-CS5-Tutorial-22-320.jpg)

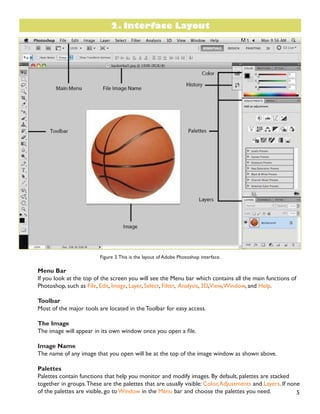
This tutorial provides an introduction to using Adobe Photoshop CS5. It discusses getting started by opening Photoshop and creating new documents. The interface is explained, including the menu bar, toolbar, image window, and main palettes for colors, layers, and adjustments. Common tools are also overviewed, such as selection, alteration and drawing tools. Basic image editing techniques like cropping, resizing and correcting are then covered.