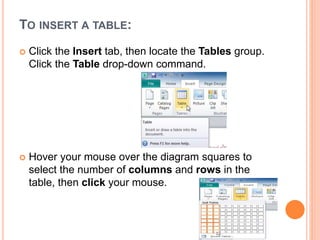
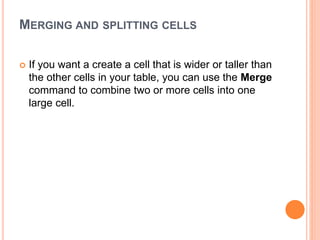
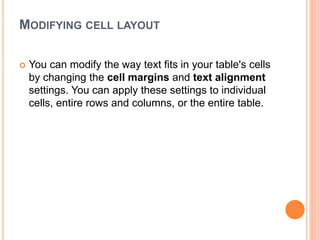
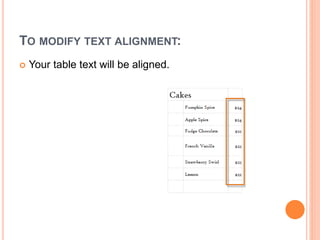
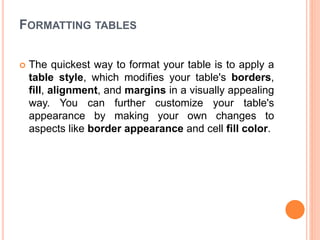
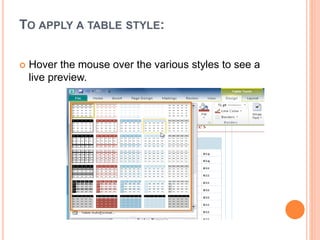
WORKING WITH TABLES
Topic No 7
INTRODUCTION
 A table is a grid of cells arranged in rows and columns.
Tables are useful for organizing information in a concise and
easily readable way. Text contained in tables is easy to space
and align, which make them ideal for presenting lists of
related information in Publisher, like store hours or products
and their prices.
 In this lesson, you will learn how to insert, modify, and
change the appearance of tables.
USING TABLES IN YOUR PUBLICATIONS
 In Publisher, tables are useful for organizing and
presenting data. Publisher allows you to customize
tables to match the look and feel of your
publication.
TO INSERT A TABLE:
 Click the Insert tab, then locate the Tables group.
Click the Table drop-down command.
 Hover your mouse over the diagram squares to
select the number of columns and rows in the
table, then click your mouse.
TO INSERT A TABLE:
 The table will be inserted.
RESIZING AND ARRANGING TABLES
 Depending on the size of the page you're working
with or the other objects you choose to add, you
may have to resize or rearrange your table. Tables
can be modified like any other objects.
MODIFYING TABLE LAYOUT
To add a row or column:
 Place the insertion point in a cell adjacent to the
location where you wish to add a row or column.
TO ADD A ROW OR COLUMN:
 Select the Table Tools Layout tab, then locate the
Rows & Columns group. Insert your new row or
column. If you would like to insert a new row, select
either Insert Above or Insert Below.
 If you would like to insert a new column, select
either Insert Left or Insert Right.
TO ADD A ROW OR COLUMN:
 The new row or column will appear.
TO DELETE A ROW OR COLUMN:
 Select the row or column you wish to delete by
placing the insertion point in any cell in that row or
column.
 Select the Table Tools Layout tab, then locate the
Rows & Columns group.
TO DELETE A ROW OR COLUMN:
 Click the Delete drop-down command.
 A drop-down menu will appear. Select Delete Rows
or Delete Columns.
TO DELETE A ROW OR COLUMN:
 The row or column will be deleted
MERGING AND SPLITTING CELLS
 If you want a create a cell that is wider or taller than
the other cells in your table, you can use the Merge
command to combine two or more cells into one
large cell.
TO MERGE CELLS:
 Select the cells you would like to merge.
 Click the Table Tools Layout tab, then locate the
Merge group.
TO MERGE CELLS:
 Click the Merge Cells command.
 The cells will be merged.
SPLIT CELLS
 You can separate merged cells by selecting them
and clicking the Split Cells command.
MODIFYING CELL LAYOUT
 You can modify the way text fits in your table's cells
by changing the cell margins and text alignment
settings. You can apply these settings to individual
cells, entire rows and columns, or the entire table.
TO MODIFY TEXT ALIGNMENT:
 Select the cells whose text you want to align. To
select the entire table, click the gray box
surrounding the outer edge of the table.
TO MODIFY TEXT ALIGNMENT:
 Click the Table Tools Layout tab, then locate the
Alignment group. Select one of the nine alignment
options.
TO MODIFY TEXT ALIGNMENT:
 Your table text will be aligned.
CELL MARGINS
 Just like your pages, the cells in your tables have
margins. By default, these are very thin. If you wish
to add extra space between text and the cells
surrounding it, you can make the cell margins
thicker.
TO MODIFY CELL MARGINS:
 Select the cells you wish to set margins for. To select the
entire table, click the gray box surrounding the outer edge of
the table.
 Click the Table Tools Layout tab, then locate the Alignment
group.
 Click the Cell Margins drop-down command.
TO MODIFY CELL MARGINS:
 A drop-down list will appear. Select the desired
margins.
TO MODIFY CELL MARGINS:
 The new margins will be applied.
FORMATTING TABLES
 The quickest way to format your table is to apply a
table style, which modifies your table's borders,
fill, alignment, and margins in a visually appealing
way. You can further customize your table's
appearance by making your own changes to
aspects like border appearance and cell fill color.
TO APPLY A TABLE STYLE:
 Click anywhere on the table, then select the Table Tools
Design tab and locate the Table Formats group.
 Click the More Table Styles drop-down arrow to see all
available table styles.
TO APPLY A TABLE STYLE:
 Hover the mouse over the various styles to see a
live preview.
TO APPLY A TABLE STYLE:
 Select the desired style. The table style will appear
in the document.
TO ADD BORDERS TO A TABLE:
 Select the cells you wish to add a border to. If you wish to add
a border to the entire table, click the gray box surrounding the
outer edge of the table. Click the Table Tools Design tab,
then locate the Borders group. Click the Borders drop-down
command.
TO ADD BORDERS TO A TABLE:
 From the drop-down menu, select the desired
border.
 The border will be applied.
TO CHANGE THE APPEARANCE OF BORDERS:
 Select the cells whose borders you wish to modify,
then click the Table Tools Design tab and locate
the Borders group.
 Click the Line Weight drop-down arrow.
TO CHANGE THE APPEARANCE OF BORDERS:
 Select a new line weight from the drop-down list
 Click the Line Color drop-down command
TO CHANGE THE APPEARANCE OF BORDERS:
 Select a new line color.
 Double-click the Borders command.
TO CHANGE THE APPEARANCE OF BORDERS:
 Changes to the border will be applied.
TO ADD A CELL FILL COLOR:
 Select the cell or cells you wish to add a fill color to, then click
the Table Tools Design tab and locate the Table Formats
group.
 Click the Fill drop-down command.
TO ADD A CELL FILL COLOR:
 Select the desired cell fill color.
 The fill color will be applied.
CHALLENGE!
 Open a publication. Use the example placed in students’
folder
 Create a table with two columns and eight rows. If you're
using the example, do this in the blank section to the right of
the existing table.
 Add text to the table. If you're using the example, you can
simply copy and paste some of the text from the existing table.
 Insert an additional column to the left of the first column.
 Merge two cells, then split them again.
 Align the text in the far right column to the bottom left.
 Apply a table style. If you're using the example, apply the
style used in the table on the left.
 Select a row of cells and apply a border and fill color. If
you're using the example, copy the border and fill style for the
"Cookies (per dozen)" row.

Publisher topic 7

  • 1.
  • 2.
    INTRODUCTION  A tableis a grid of cells arranged in rows and columns. Tables are useful for organizing information in a concise and easily readable way. Text contained in tables is easy to space and align, which make them ideal for presenting lists of related information in Publisher, like store hours or products and their prices.  In this lesson, you will learn how to insert, modify, and change the appearance of tables.
  • 3.
    USING TABLES INYOUR PUBLICATIONS  In Publisher, tables are useful for organizing and presenting data. Publisher allows you to customize tables to match the look and feel of your publication.
  • 4.
    TO INSERT ATABLE:  Click the Insert tab, then locate the Tables group. Click the Table drop-down command.  Hover your mouse over the diagram squares to select the number of columns and rows in the table, then click your mouse.
  • 5.
    TO INSERT ATABLE:  The table will be inserted.
  • 6.
    RESIZING AND ARRANGINGTABLES  Depending on the size of the page you're working with or the other objects you choose to add, you may have to resize or rearrange your table. Tables can be modified like any other objects.
  • 7.
    MODIFYING TABLE LAYOUT Toadd a row or column:  Place the insertion point in a cell adjacent to the location where you wish to add a row or column.
  • 8.
    TO ADD AROW OR COLUMN:  Select the Table Tools Layout tab, then locate the Rows & Columns group. Insert your new row or column. If you would like to insert a new row, select either Insert Above or Insert Below.  If you would like to insert a new column, select either Insert Left or Insert Right.
  • 9.
    TO ADD AROW OR COLUMN:  The new row or column will appear.
  • 10.
    TO DELETE AROW OR COLUMN:  Select the row or column you wish to delete by placing the insertion point in any cell in that row or column.  Select the Table Tools Layout tab, then locate the Rows & Columns group.
  • 11.
    TO DELETE AROW OR COLUMN:  Click the Delete drop-down command.  A drop-down menu will appear. Select Delete Rows or Delete Columns.
  • 12.
    TO DELETE AROW OR COLUMN:  The row or column will be deleted
  • 13.
    MERGING AND SPLITTINGCELLS  If you want a create a cell that is wider or taller than the other cells in your table, you can use the Merge command to combine two or more cells into one large cell.
  • 14.
    TO MERGE CELLS: Select the cells you would like to merge.  Click the Table Tools Layout tab, then locate the Merge group.
  • 15.
    TO MERGE CELLS: Click the Merge Cells command.  The cells will be merged.
  • 16.
    SPLIT CELLS  Youcan separate merged cells by selecting them and clicking the Split Cells command.
  • 17.
    MODIFYING CELL LAYOUT You can modify the way text fits in your table's cells by changing the cell margins and text alignment settings. You can apply these settings to individual cells, entire rows and columns, or the entire table.
  • 18.
    TO MODIFY TEXTALIGNMENT:  Select the cells whose text you want to align. To select the entire table, click the gray box surrounding the outer edge of the table.
  • 19.
    TO MODIFY TEXTALIGNMENT:  Click the Table Tools Layout tab, then locate the Alignment group. Select one of the nine alignment options.
  • 20.
    TO MODIFY TEXTALIGNMENT:  Your table text will be aligned.
  • 21.
    CELL MARGINS  Justlike your pages, the cells in your tables have margins. By default, these are very thin. If you wish to add extra space between text and the cells surrounding it, you can make the cell margins thicker.
  • 22.
    TO MODIFY CELLMARGINS:  Select the cells you wish to set margins for. To select the entire table, click the gray box surrounding the outer edge of the table.  Click the Table Tools Layout tab, then locate the Alignment group.  Click the Cell Margins drop-down command.
  • 23.
    TO MODIFY CELLMARGINS:  A drop-down list will appear. Select the desired margins.
  • 24.
    TO MODIFY CELLMARGINS:  The new margins will be applied.
  • 25.
    FORMATTING TABLES  Thequickest way to format your table is to apply a table style, which modifies your table's borders, fill, alignment, and margins in a visually appealing way. You can further customize your table's appearance by making your own changes to aspects like border appearance and cell fill color.
  • 26.
    TO APPLY ATABLE STYLE:  Click anywhere on the table, then select the Table Tools Design tab and locate the Table Formats group.  Click the More Table Styles drop-down arrow to see all available table styles.
  • 27.
    TO APPLY ATABLE STYLE:  Hover the mouse over the various styles to see a live preview.
  • 28.
    TO APPLY ATABLE STYLE:  Select the desired style. The table style will appear in the document.
  • 29.
    TO ADD BORDERSTO A TABLE:  Select the cells you wish to add a border to. If you wish to add a border to the entire table, click the gray box surrounding the outer edge of the table. Click the Table Tools Design tab, then locate the Borders group. Click the Borders drop-down command.
  • 30.
    TO ADD BORDERSTO A TABLE:  From the drop-down menu, select the desired border.  The border will be applied.
  • 31.
    TO CHANGE THEAPPEARANCE OF BORDERS:  Select the cells whose borders you wish to modify, then click the Table Tools Design tab and locate the Borders group.  Click the Line Weight drop-down arrow.
  • 32.
    TO CHANGE THEAPPEARANCE OF BORDERS:  Select a new line weight from the drop-down list  Click the Line Color drop-down command
  • 33.
    TO CHANGE THEAPPEARANCE OF BORDERS:  Select a new line color.  Double-click the Borders command.
  • 34.
    TO CHANGE THEAPPEARANCE OF BORDERS:  Changes to the border will be applied.
  • 35.
    TO ADD ACELL FILL COLOR:  Select the cell or cells you wish to add a fill color to, then click the Table Tools Design tab and locate the Table Formats group.  Click the Fill drop-down command.
  • 36.
    TO ADD ACELL FILL COLOR:  Select the desired cell fill color.  The fill color will be applied.
  • 37.
    CHALLENGE!  Open apublication. Use the example placed in students’ folder  Create a table with two columns and eight rows. If you're using the example, do this in the blank section to the right of the existing table.  Add text to the table. If you're using the example, you can simply copy and paste some of the text from the existing table.  Insert an additional column to the left of the first column.  Merge two cells, then split them again.  Align the text in the far right column to the bottom left.  Apply a table style. If you're using the example, apply the style used in the table on the left.  Select a row of cells and apply a border and fill color. If you're using the example, copy the border and fill style for the "Cookies (per dozen)" row.