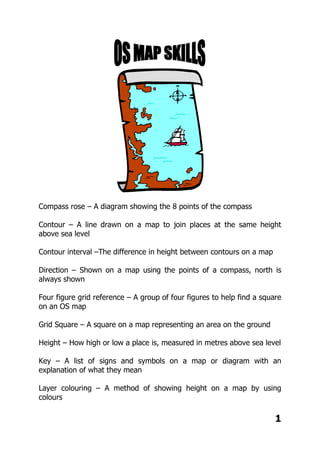
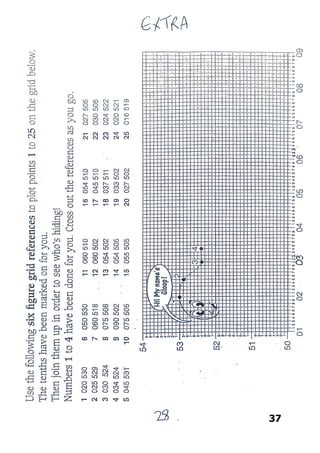
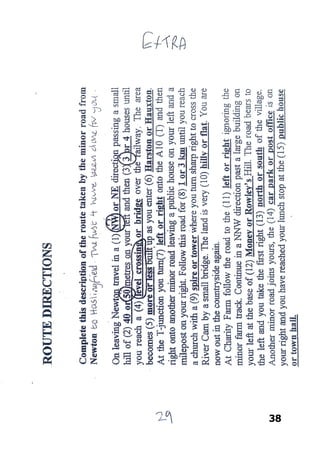
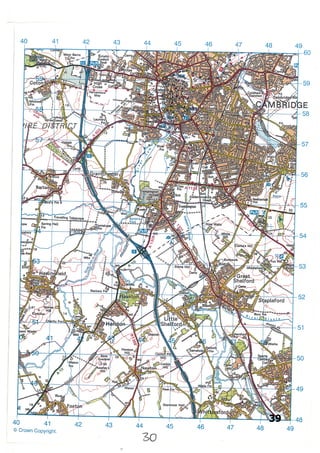
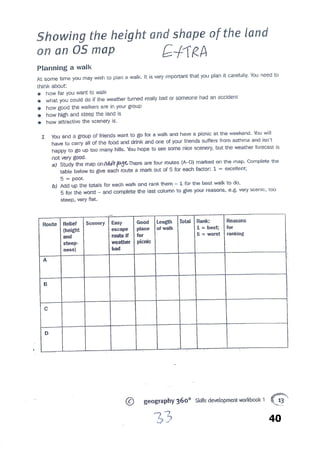
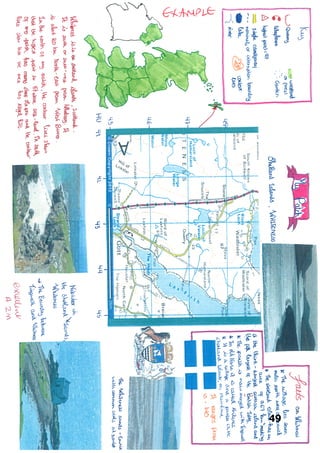
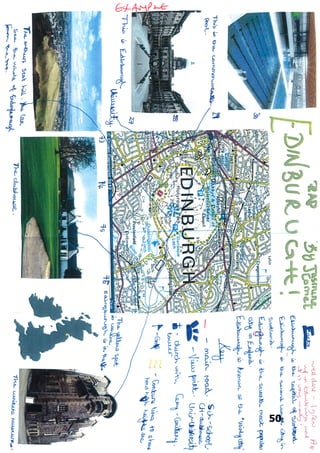
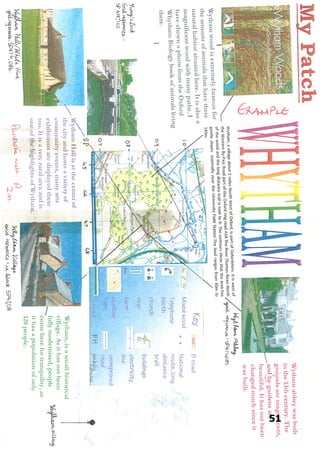
Compass rose – A diagram showing the 8 points of the compass
Contour – A line drawn on a map to join places at the same height
above sea level
Contour interval –The difference in height between contours on a map
Direction – Shown on a map using the points of a compass, north is
always shown
Four figure grid reference – A group of four figures to help find a square
on an OS map
Grid Square – A square on a map representing an area on the ground
Height – How high or low a place is, measured in metres above sea level
Key – A list of signs and symbols on a map or diagram with an
explanation of what they mean
Layer colouring – A method of showing height on a map by using
colours
1
Map – A drawing which shows part of the earths’ surface from directly
above on a reduced scale
North sign – A map will always have a north sign pointing north, usually
towards the top of the map
Ordnance survey map – The official government organisation
responsible for producing maps in the UK
Plan – A detailed map of a small area
Point of a compass – A method giving direction using north, east etc.
Relief – The shape of the land surface and its height above sea level
Scale – The link between the distance on a map and its real distance on
the ground
Scale line – A short line on a map, which shows how far real distances
are
Six figure grid references – A group of six figures used to give an exact
position on a map
Spot height – A point on a map with a number giving its height above
the sea in metres
Symbols – A simple drawing or sign used to give information and save
space on a map
Triangular pillar – A concrete pillar used by surveyors to find the exact
height and position of a place
2
3
MY LOCAL AREA
1. Go to Bing Maps
2. Enter the post code of your house
3. A street map will download, with the exact location of your home
4. Make sure you have chosen the London street map
5. Copy and paste this map into a word processing or desktop publishing
programme, or just print it out
6. Use software tools to add symbols of places or things that are familiar to
you, like bus stop, shops, park, traffic lights etc. or just draw them on by hand.
7. Mark your route from your house to school, or somewhere else that you
walk to regularly such as a park, friend's house, shop, tube etc.
8. Write a description of your route. There is no need to try to include
everything, but you must be very accurate. Describe the physical and human
features you see on your route, describe which roads you walk along and try
to use compass directions rather than left or right. E.g. walk north along
Cromwell road and turn east at the red post box next to the big tree.
4
EXAMPLE
5
REMEMBER TITLE AND DATE LESSON 1
6
REMEMBER TITLE AND DATE LESSON 1
7
8
EXTRA CREDIT
LESSON 1; 1). Pack pages 3-8; My Local Area
2). EXTRA CREDIT; Pack p8 Google Earth
DATE MARKED:
GRADE: A B C D
MERIT: 1 2
ORDER MARK:
DETENTION:
COMMENT:
TARGET:
9
How can we show direction?
Foundations p126; Draw an 8 point compass;
Foundations p127; Ex 3
10
COMPASS DIRECTIONS
STUDENT A
1. Start in the black square. Go north one square. Draw a picture of a sun in this
square.
2. Go east two squares. Draw a picture of a picnic site in this square.
3. Go south two squares. In this square write the name of the country you live in.
4. Go west two squares, then south one square. Write your teacher’s name in this
square.
5. Go back to the north-west corner square, and then go east three squares. In this
square, draw a church with a tower.
6. Go south two squares. Draw a picture of a bridge in this square.
7. Go west two squares, then north one square. In this square write today’s date.
8. In the square north of this, draw a picture of a telephone.
9. Go back to the square with the drawing of a bridge. In the square south of this,
write down the capital city of Scotland.
10. Go west three squares, then north one square. In this square draw a picture of a
forest.
11. Go to the square south of the drawing of a picnic site. In this square draw a light
house.
12. Go east two squares. In this square write the name of the ocean between Britain
and America.
STUDENT B GRID
1 2 3 4
5 6 7 8
9 10 11 12
13 14 15 16
17 18 19 20
11
COMPASS DIRECTIONS
STUDENT B
1. Start in the black square. Go south two squares. Draw a picture of a river in
this square.
2. Go east two squares. Draw a picture of a tree in this square.
3. Go north four squares. Write the name of the capital of America.
4. Go back to the square with the drawing of a river. Go north one square. Draw a
tent in this square.
5. Go west one square, then north three squares. Draw a picture of a railway in
this square.
6. In the square to the east of this, draw a picture of a footprint.
7. Go south one square, then east two squares. In this square, draw a flower.
8. Go back to the black square. Go west one square. In this square write the name
of the capital of France.
9. Go south one square. Write the name of the country where kangaroos live.
10. Go east three squares. Draw a picture of an elephant in this square.
11. Go to the square to the west of the flower. Write in this square the name of the
highest mountain in Britain.
12. Go west two squares. Write the name of your class in this square.
STUDENT A GRID
1 2 3 4 5
6 7 8 9 10
11 12 13 14 15
16 17 18 19 20
12
LESSON 2; Doddle; Direction and Location super quiz
DATE MARKED:
GRADE: A B C D
MERIT: 1 2
ORDER MARK:
DETENTION:
COMMENT:
TARGET:
13
How can we measure distance?
Foundations p128 and 129; Ex 1 to 5
14
36 earthworks 1 teacher’s resource book © JOHN MURRAY
9
LOCAL – GLOBAL WORKSHEET PUPIL’S BOOK PAGES 6–7
Journeys in the British Isles
Name ________________________________________________________________________________
Your task
For each of the journeys in the table on the right:
a) state the direction in which you would travel
b) measure the distance that you would travel
(to the nearest 25 km).
Aberdeen
Edinburgh
Glasgow
Newcastle
upon Tyne
Leeds
ManchesterLiverpool
Belfast
Nottingham
Norwich
Birmingham
Cardiff London
Dublin
Bristol
Southampton
0 100 200 300 400km
N
S
W E
NW NE
SW SE
Scale
From To Direction Distance
London Birmingham NW 200 km
Dublin Newcastle
Aberdeen Manchester
Bristol Belfast
Glasgow Leeds
Norwich Southampton
Liverpool Cardiff
Nottingham Edinburgh
15
LESSON 3; Doddle; Direction and Scale mini quiz
DATE MARKED:
GRADE: A B C D
MERIT: 1 2
ORDER MARK:
DETENTION:
COMMENT:
TARGET:
16
17
18
SYMBOLS
Look at the map of All Saints Road. The buildings are shown but some features
are missing. These are listed below the map in the key.
Your task is to complete the map by drawing the symbols in the correct places.
The symbols are given in the key.
First complete the key by writing in the meaning of each symbol. The key for the
Ordnance Survey map in your Foundations book will help you.
LESSON 4; Doddle; Maps, direction and scale skills quiz
DATE MARKED:
GRADE: A B C D
MERIT: 1 2
ORDER MARK:
DETENTION:
COMMENT:
TARGET:
19
What are grid references?
Foundations p133 Ex 1 to 5;
20
21
LESSON 5; 1. Pack p21; 4 figure grid references
2. Doddle; OS maps and grid reference skills quiz
DATE MARKED:
GRADE: A B C D
MERIT: 1 2
ORDER MARK:
DETENTION:
COMMENT:
TARGET:
22
How do we use 6 figure grid references?
Foundations p134/5 Ex 1 and 2;
23
NEW KEY GEOGRAPHY Foundations Teacher’s Resource © Nelson Thornes 2006186
Map skills NEW KEY GEOGRAPHY Foundations pages 134–135
How do we use six figure grid references?
7.7
Six figure grid references can be used to give the exact position of a place on a map.
u The first three numbers tell us how far to go along the bottom or top of the
map. The third number tells us the number of tenths of a grid square.
u The last three numbers tell us how far to go up the sides of the map.
The sixth number tells us the number of tenths of a grid square.
u On a map you will have to estimate the tenths of each grid square.
16 17 18
26
25
24
23
RRRiiivvveeerrr LLLiiinnnnnn
MillMillMill
SchSchSchPADLEYPADLEYPADLEY
Burr WoodBurr WoodBurr Wood
SchSchSch
PPP
PHPHPH
CAUSEYCAUSEYCAUSEY
Low FmLow FmLow Fm
Dingle FmDingle FmDingle Fm
ELDONELDONELDON
LCLCLC
PHPHPH
PPP
Nab FmNab FmNab Fm
26
25
24
23
16 17 18
Sch School
P Post Office
PH Public house
Fm Farm
LC Level crossing
Woodland
Church
Telephone
Picnic site
Bridge
Railway
station
Path
១1 Add the following features to the map and key above using OS map symbols.
Camp site at 168243 Caravan site at 162242
Wind pump at 178237 Youth hostel at 174235
Orchard at 169241 Train station (closed to passengers) at 174231
១2 Add three more features to the map and key.
u
u
u
Map skills NEW KEY GEOGRAPHY Foundations pages 136–137
How is height shown on a map?
7.8
NEW KEY GEOGRAPHY Foundations Teacher’s Resource © Nelson Thornes 2006187
Below is a relief map of the British Isles. The map
uses layer colouring to show height above sea level.
N
ENGLANDENGLANDENGLAND
WALESWALESWALES
SCOTLANDSCOTLANDSCOTLAND
NORTHERNNORTHERNNORTHERN
IRELANDIRELANDIRELAND
CCCoootttssswwwooolll
dddsss
CCChhhiiilllttteeerrrnnn
sss
Key
More than 300 m
100–300 m
Less than 100 m
Main towns
១1 Show height on the map by layer colouring using coloured pencils.
u Colour areas more than 300 metres dark brown.
u Colour areas 100–300 metres light brown.
u Colour areas less than 100 metres green.
u Complete the key.
១2 Name the following highland areas on the map. Pages 133 and 137 in
the pupil book will help you.
Cambrian Mountains Lake District Pennines
Scafell Pike Snowdon Southern Uplands
១3 Name the following cities and towns on the map. Page 133 in the
pupil book will help you.
Belfast Birmingham Cardiff Edinburgh Glasgow London
Manchester Newcastle upon Tyne Norwich Plymouth Southampton24
25
See next page for task 2
26
294748
276719
274722
295742
295725 273721
279743
297742
TASK 2; Draw the correct symbol into each card,
then draw it onto the correct place on the map.
26
LESSON 6; Pack p25/26; Paradise Island
DATE MARKED:
GRADE: A B C D
MERIT: 1 2
ORDER MARK:
DETENTION:
COMMENT:
TARGET:
27
28
NEW KEY GEOGRAPHY Foundations Teacher’s Resource © Nelson Thornes 2006188
1 Finish joining the dots
showing 10 to complete
the 10 metre contour.
2 Complete the 20 metre
contour by joining
the 20 dots.
3 Complete the 30 metre
contour by joining
the 30 dots.
4 Complete the 40 metre
contour by joining
the 40 dots.
5 Colour land above
40 metres in brown.
6 Colour land between
30 and 40 metres in
orange.
8 Colour land between
10 and 20 metres in
light green.
9 Colour land under
10 metres in dark
green.
10 Use coloured pencils
to complete the key.
7 Colour land between
20 and 30 metres in
yellow.
Key
Over 40 m 30–40 m 20–30 m 10–20 m Under 10 m
40
30
40
30
30
30
20
20
20
20
20
10
10
10
10
10
10
20
20
20
30
30
40
40
30
D
A
B
C
Map skills NEW KEY GEOGRAPHY Foundations pages 136–137
How can height be shown on a map?
7.9
There are three main methods of showing height above sea level on maps.
u Spot heights are numbers that show the exact height of a place.
u Contours are lines on a map which join up places which have the
same height.
u Layer colouring uses bands of different colours to show areas of
different heights.
១1 Complete the contour map below by following the instructions.
១2 Complete the following sentences:
u The height at A is _____________ metres.
u The height at B is _____________ metres.
u The height at C is _____________ metres.
u The height at D is _____________ metres.
១3 Mark the place that you think has the lowest height with an ‘X’.
Map skills NEW KEY GEOGRAPHY Foundations pages 138–139
How do contours show height and relief?
7.10
NEW KEY GEOGRAPHY Foundations Teacher’s Resource © Nelson Thornes 2006189
Contour lines are a good way of showing height and relief on a map.
Contours that are close together show steep slopes. Contours that are far
apart show gentle slopes. The pattern of the contours tells us about the
features of the land.
Match each of the landform sketches below to the correct contour
pattern by writing the correct letter in the space provided.
Landform sketch Letter
Contour pattern
29
How do contours show height and relief?
Foundations p138 and 139 Ex 1 and 2;
30
LESSON 7; 1. Pack p29; Height on maps
2. Pack p30; Foundations p139 exercise 1 and 2
DATE MARKED:
GRADE: A B C D
MERIT: 1 2
ORDER MARK:
DETENTION:
COMMENT:
TARGET:
31
32
33
34
35
36
37
38
Completethisdescriptionoftheroutetakenbythe
minorroadfromNewtontoHaslingfield.Thefirst
4havebeendoneforyou.
39
40
41
42
43
44
45
46
47
48
49
50
51
LESSON 8; 1. Revision
2. Doddle; Maps and enquiry super quiz
3. Pack p42 to 51; My Patch (due in two
weeks time)
DATE MARKED:
GRADE: A B C D
MERIT: 1 2
ORDER MARK:
DETENTION:
COMMENT:
TARGET:
52
NEW KEY GEOGRAPHY Foundations Teacher’s Resource © Nelson Thornes 2006190
Map skills NEW KEY GEOGRAPHY Foundations pages 140–141
How can we describe routes?
7.11
Maps can be used to describe routes and places. Accuracy is very important when
describing things.
A Go to the Key Geography Foundations link on the Nelson Thornes website.
B From the Map skills section, select the links to Multimap.
C Enter the postcode of your home, and click ‘Find’.
A street map will download, with the exact location of your home circled.
D Select scale 1:50 000. An Ordnance Survey map of your neighbourhood
will now download, again with your home circled.
E Copy and paste this map into a word processing or desktop publishing program.
F Use the software tools to describe and label places you know in your
neighbourhood on the map.
G Mark your route from your home to school (you may need to select a different
scale of map).
H Describe your route from your home to school. There is no need to try to
include everything, but you must be very accurate. You might first describe
the area in general and then mention both the physical features and human
features. Write out the features in the order you would pass them.
I Give six figure grid references to locate the main features observed on
your journey.
NEW KEY GEOGRAPHY Foundations Teacher’s Resource © Nelson Thornes 2006191
As you finish each section of the map skills unit you should reflect on
what you have learned. The table below will help you work out what
you can do and what you might need some more practice with. (Page
references refer to the pupil book.)
Map skills
Checklist 
Task My level of I must remember to... Teacher assessment
understanding
Direction
(pages126–127)
Distance
(pages 128–129)
Map symbols
(pages 130–131)
Four figure grid
references
(pages 132–133)
Six figure grid
references
(pages 134–135)
Height
(pages 136–137)
Contours
(pages 138–139)
Describing routes
(pages 140–141)
53
OS MAP SKILLS HOMEWORK
 Lesson 1; 1). Pack pages 3-8; My Local Area
2). EXTRA CREDIT; Pack p8 Google Earth
 Lesson 2; Doddle; Direction and Location super quiz
 Lesson 3; Doddle; Direction and Scale mini quiz
 Lesson 4; Doddle; Direction and scale skills quiz
 Lesson 5; 1. Pack p21; 4 figure grid references
2. Doddle; OS maps and grid reference skills quiz
 Lesson 6; Pack p25/26; Paradise Island
 Lesson 7; 1. Pack p29; Height on maps
2. Pack p30; Foundations p139 exercise 1 and 2
 Lesson 8; 1. Revision
2. Doddle; Maps and enquiry super quiz
3. Pack p42 to 51; My Patch (due in two weeks time)
Extra extension work/independent learning;
Doddle -browse in all resources for energy and
resources; https://www.doddlelearn.co.uk
54
SPARE PAGES
55
SPARE PAGES
56
SPARE PAGES
57

Os maps pack

  • 1.
    Compass rose –A diagram showing the 8 points of the compass Contour – A line drawn on a map to join places at the same height above sea level Contour interval –The difference in height between contours on a map Direction – Shown on a map using the points of a compass, north is always shown Four figure grid reference – A group of four figures to help find a square on an OS map Grid Square – A square on a map representing an area on the ground Height – How high or low a place is, measured in metres above sea level Key – A list of signs and symbols on a map or diagram with an explanation of what they mean Layer colouring – A method of showing height on a map by using colours 1
  • 2.
    Map – Adrawing which shows part of the earths’ surface from directly above on a reduced scale North sign – A map will always have a north sign pointing north, usually towards the top of the map Ordnance survey map – The official government organisation responsible for producing maps in the UK Plan – A detailed map of a small area Point of a compass – A method giving direction using north, east etc. Relief – The shape of the land surface and its height above sea level Scale – The link between the distance on a map and its real distance on the ground Scale line – A short line on a map, which shows how far real distances are Six figure grid references – A group of six figures used to give an exact position on a map Spot height – A point on a map with a number giving its height above the sea in metres Symbols – A simple drawing or sign used to give information and save space on a map Triangular pillar – A concrete pillar used by surveyors to find the exact height and position of a place 2
  • 3.
    3 MY LOCAL AREA 1.Go to Bing Maps 2. Enter the post code of your house 3. A street map will download, with the exact location of your home 4. Make sure you have chosen the London street map 5. Copy and paste this map into a word processing or desktop publishing programme, or just print it out 6. Use software tools to add symbols of places or things that are familiar to you, like bus stop, shops, park, traffic lights etc. or just draw them on by hand. 7. Mark your route from your house to school, or somewhere else that you walk to regularly such as a park, friend's house, shop, tube etc. 8. Write a description of your route. There is no need to try to include everything, but you must be very accurate. Describe the physical and human features you see on your route, describe which roads you walk along and try to use compass directions rather than left or right. E.g. walk north along Cromwell road and turn east at the red post box next to the big tree.
  • 4.
  • 5.
  • 6.
    REMEMBER TITLE ANDDATE LESSON 1 6
  • 7.
    REMEMBER TITLE ANDDATE LESSON 1 7
  • 8.
  • 9.
    LESSON 1; 1).Pack pages 3-8; My Local Area 2). EXTRA CREDIT; Pack p8 Google Earth DATE MARKED: GRADE: A B C D MERIT: 1 2 ORDER MARK: DETENTION: COMMENT: TARGET: 9
  • 10.
    How can weshow direction? Foundations p126; Draw an 8 point compass; Foundations p127; Ex 3 10
  • 11.
    COMPASS DIRECTIONS STUDENT A 1.Start in the black square. Go north one square. Draw a picture of a sun in this square. 2. Go east two squares. Draw a picture of a picnic site in this square. 3. Go south two squares. In this square write the name of the country you live in. 4. Go west two squares, then south one square. Write your teacher’s name in this square. 5. Go back to the north-west corner square, and then go east three squares. In this square, draw a church with a tower. 6. Go south two squares. Draw a picture of a bridge in this square. 7. Go west two squares, then north one square. In this square write today’s date. 8. In the square north of this, draw a picture of a telephone. 9. Go back to the square with the drawing of a bridge. In the square south of this, write down the capital city of Scotland. 10. Go west three squares, then north one square. In this square draw a picture of a forest. 11. Go to the square south of the drawing of a picnic site. In this square draw a light house. 12. Go east two squares. In this square write the name of the ocean between Britain and America. STUDENT B GRID 1 2 3 4 5 6 7 8 9 10 11 12 13 14 15 16 17 18 19 20 11
  • 12.
    COMPASS DIRECTIONS STUDENT B 1.Start in the black square. Go south two squares. Draw a picture of a river in this square. 2. Go east two squares. Draw a picture of a tree in this square. 3. Go north four squares. Write the name of the capital of America. 4. Go back to the square with the drawing of a river. Go north one square. Draw a tent in this square. 5. Go west one square, then north three squares. Draw a picture of a railway in this square. 6. In the square to the east of this, draw a picture of a footprint. 7. Go south one square, then east two squares. In this square, draw a flower. 8. Go back to the black square. Go west one square. In this square write the name of the capital of France. 9. Go south one square. Write the name of the country where kangaroos live. 10. Go east three squares. Draw a picture of an elephant in this square. 11. Go to the square to the west of the flower. Write in this square the name of the highest mountain in Britain. 12. Go west two squares. Write the name of your class in this square. STUDENT A GRID 1 2 3 4 5 6 7 8 9 10 11 12 13 14 15 16 17 18 19 20 12
  • 13.
    LESSON 2; Doddle;Direction and Location super quiz DATE MARKED: GRADE: A B C D MERIT: 1 2 ORDER MARK: DETENTION: COMMENT: TARGET: 13
  • 14.
    How can wemeasure distance? Foundations p128 and 129; Ex 1 to 5 14
  • 15.
    36 earthworks 1teacher’s resource book © JOHN MURRAY 9 LOCAL – GLOBAL WORKSHEET PUPIL’S BOOK PAGES 6–7 Journeys in the British Isles Name ________________________________________________________________________________ Your task For each of the journeys in the table on the right: a) state the direction in which you would travel b) measure the distance that you would travel (to the nearest 25 km). Aberdeen Edinburgh Glasgow Newcastle upon Tyne Leeds ManchesterLiverpool Belfast Nottingham Norwich Birmingham Cardiff London Dublin Bristol Southampton 0 100 200 300 400km N S W E NW NE SW SE Scale From To Direction Distance London Birmingham NW 200 km Dublin Newcastle Aberdeen Manchester Bristol Belfast Glasgow Leeds Norwich Southampton Liverpool Cardiff Nottingham Edinburgh 15
  • 16.
    LESSON 3; Doddle;Direction and Scale mini quiz DATE MARKED: GRADE: A B C D MERIT: 1 2 ORDER MARK: DETENTION: COMMENT: TARGET: 16
  • 17.
  • 18.
    18 SYMBOLS Look at themap of All Saints Road. The buildings are shown but some features are missing. These are listed below the map in the key. Your task is to complete the map by drawing the symbols in the correct places. The symbols are given in the key. First complete the key by writing in the meaning of each symbol. The key for the Ordnance Survey map in your Foundations book will help you.
  • 19.
    LESSON 4; Doddle;Maps, direction and scale skills quiz DATE MARKED: GRADE: A B C D MERIT: 1 2 ORDER MARK: DETENTION: COMMENT: TARGET: 19
  • 20.
    What are gridreferences? Foundations p133 Ex 1 to 5; 20
  • 21.
  • 22.
    LESSON 5; 1.Pack p21; 4 figure grid references 2. Doddle; OS maps and grid reference skills quiz DATE MARKED: GRADE: A B C D MERIT: 1 2 ORDER MARK: DETENTION: COMMENT: TARGET: 22
  • 23.
    How do weuse 6 figure grid references? Foundations p134/5 Ex 1 and 2; 23
  • 24.
    NEW KEY GEOGRAPHYFoundations Teacher’s Resource © Nelson Thornes 2006186 Map skills NEW KEY GEOGRAPHY Foundations pages 134–135 How do we use six figure grid references? 7.7 Six figure grid references can be used to give the exact position of a place on a map. u The first three numbers tell us how far to go along the bottom or top of the map. The third number tells us the number of tenths of a grid square. u The last three numbers tell us how far to go up the sides of the map. The sixth number tells us the number of tenths of a grid square. u On a map you will have to estimate the tenths of each grid square. 16 17 18 26 25 24 23 RRRiiivvveeerrr LLLiiinnnnnn MillMillMill SchSchSchPADLEYPADLEYPADLEY Burr WoodBurr WoodBurr Wood SchSchSch PPP PHPHPH CAUSEYCAUSEYCAUSEY Low FmLow FmLow Fm Dingle FmDingle FmDingle Fm ELDONELDONELDON LCLCLC PHPHPH PPP Nab FmNab FmNab Fm 26 25 24 23 16 17 18 Sch School P Post Office PH Public house Fm Farm LC Level crossing Woodland Church Telephone Picnic site Bridge Railway station Path ១1 Add the following features to the map and key above using OS map symbols. Camp site at 168243 Caravan site at 162242 Wind pump at 178237 Youth hostel at 174235 Orchard at 169241 Train station (closed to passengers) at 174231 ១2 Add three more features to the map and key. u u u Map skills NEW KEY GEOGRAPHY Foundations pages 136–137 How is height shown on a map? 7.8 NEW KEY GEOGRAPHY Foundations Teacher’s Resource © Nelson Thornes 2006187 Below is a relief map of the British Isles. The map uses layer colouring to show height above sea level. N ENGLANDENGLANDENGLAND WALESWALESWALES SCOTLANDSCOTLANDSCOTLAND NORTHERNNORTHERNNORTHERN IRELANDIRELANDIRELAND CCCoootttssswwwooolll dddsss CCChhhiiilllttteeerrrnnn sss Key More than 300 m 100–300 m Less than 100 m Main towns ១1 Show height on the map by layer colouring using coloured pencils. u Colour areas more than 300 metres dark brown. u Colour areas 100–300 metres light brown. u Colour areas less than 100 metres green. u Complete the key. ១2 Name the following highland areas on the map. Pages 133 and 137 in the pupil book will help you. Cambrian Mountains Lake District Pennines Scafell Pike Snowdon Southern Uplands ១3 Name the following cities and towns on the map. Page 133 in the pupil book will help you. Belfast Birmingham Cardiff Edinburgh Glasgow London Manchester Newcastle upon Tyne Norwich Plymouth Southampton24
  • 25.
    25 See next pagefor task 2
  • 26.
    26 294748 276719 274722 295742 295725 273721 279743 297742 TASK 2;Draw the correct symbol into each card, then draw it onto the correct place on the map. 26
  • 27.
    LESSON 6; Packp25/26; Paradise Island DATE MARKED: GRADE: A B C D MERIT: 1 2 ORDER MARK: DETENTION: COMMENT: TARGET: 27
  • 28.
  • 29.
    NEW KEY GEOGRAPHYFoundations Teacher’s Resource © Nelson Thornes 2006188 1 Finish joining the dots showing 10 to complete the 10 metre contour. 2 Complete the 20 metre contour by joining the 20 dots. 3 Complete the 30 metre contour by joining the 30 dots. 4 Complete the 40 metre contour by joining the 40 dots. 5 Colour land above 40 metres in brown. 6 Colour land between 30 and 40 metres in orange. 8 Colour land between 10 and 20 metres in light green. 9 Colour land under 10 metres in dark green. 10 Use coloured pencils to complete the key. 7 Colour land between 20 and 30 metres in yellow. Key Over 40 m 30–40 m 20–30 m 10–20 m Under 10 m 40 30 40 30 30 30 20 20 20 20 20 10 10 10 10 10 10 20 20 20 30 30 40 40 30 D A B C Map skills NEW KEY GEOGRAPHY Foundations pages 136–137 How can height be shown on a map? 7.9 There are three main methods of showing height above sea level on maps. u Spot heights are numbers that show the exact height of a place. u Contours are lines on a map which join up places which have the same height. u Layer colouring uses bands of different colours to show areas of different heights. ១1 Complete the contour map below by following the instructions. ១2 Complete the following sentences: u The height at A is _____________ metres. u The height at B is _____________ metres. u The height at C is _____________ metres. u The height at D is _____________ metres. ១3 Mark the place that you think has the lowest height with an ‘X’. Map skills NEW KEY GEOGRAPHY Foundations pages 138–139 How do contours show height and relief? 7.10 NEW KEY GEOGRAPHY Foundations Teacher’s Resource © Nelson Thornes 2006189 Contour lines are a good way of showing height and relief on a map. Contours that are close together show steep slopes. Contours that are far apart show gentle slopes. The pattern of the contours tells us about the features of the land. Match each of the landform sketches below to the correct contour pattern by writing the correct letter in the space provided. Landform sketch Letter Contour pattern 29
  • 30.
    How do contoursshow height and relief? Foundations p138 and 139 Ex 1 and 2; 30
  • 31.
    LESSON 7; 1.Pack p29; Height on maps 2. Pack p30; Foundations p139 exercise 1 and 2 DATE MARKED: GRADE: A B C D MERIT: 1 2 ORDER MARK: DETENTION: COMMENT: TARGET: 31
  • 32.
  • 33.
  • 34.
  • 35.
  • 36.
  • 37.
  • 38.
  • 39.
  • 40.
  • 41.
  • 42.
  • 43.
  • 44.
  • 45.
  • 46.
  • 47.
  • 48.
  • 49.
  • 50.
  • 51.
  • 52.
    LESSON 8; 1.Revision 2. Doddle; Maps and enquiry super quiz 3. Pack p42 to 51; My Patch (due in two weeks time) DATE MARKED: GRADE: A B C D MERIT: 1 2 ORDER MARK: DETENTION: COMMENT: TARGET: 52
  • 53.
    NEW KEY GEOGRAPHYFoundations Teacher’s Resource © Nelson Thornes 2006190 Map skills NEW KEY GEOGRAPHY Foundations pages 140–141 How can we describe routes? 7.11 Maps can be used to describe routes and places. Accuracy is very important when describing things. A Go to the Key Geography Foundations link on the Nelson Thornes website. B From the Map skills section, select the links to Multimap. C Enter the postcode of your home, and click ‘Find’. A street map will download, with the exact location of your home circled. D Select scale 1:50 000. An Ordnance Survey map of your neighbourhood will now download, again with your home circled. E Copy and paste this map into a word processing or desktop publishing program. F Use the software tools to describe and label places you know in your neighbourhood on the map. G Mark your route from your home to school (you may need to select a different scale of map). H Describe your route from your home to school. There is no need to try to include everything, but you must be very accurate. You might first describe the area in general and then mention both the physical features and human features. Write out the features in the order you would pass them. I Give six figure grid references to locate the main features observed on your journey. NEW KEY GEOGRAPHY Foundations Teacher’s Resource © Nelson Thornes 2006191 As you finish each section of the map skills unit you should reflect on what you have learned. The table below will help you work out what you can do and what you might need some more practice with. (Page references refer to the pupil book.) Map skills Checklist Task My level of I must remember to... Teacher assessment understanding Direction (pages126–127) Distance (pages 128–129) Map symbols (pages 130–131) Four figure grid references (pages 132–133) Six figure grid references (pages 134–135) Height (pages 136–137) Contours (pages 138–139) Describing routes (pages 140–141) 53
  • 54.
    OS MAP SKILLSHOMEWORK  Lesson 1; 1). Pack pages 3-8; My Local Area 2). EXTRA CREDIT; Pack p8 Google Earth  Lesson 2; Doddle; Direction and Location super quiz  Lesson 3; Doddle; Direction and Scale mini quiz  Lesson 4; Doddle; Direction and scale skills quiz  Lesson 5; 1. Pack p21; 4 figure grid references 2. Doddle; OS maps and grid reference skills quiz  Lesson 6; Pack p25/26; Paradise Island  Lesson 7; 1. Pack p29; Height on maps 2. Pack p30; Foundations p139 exercise 1 and 2  Lesson 8; 1. Revision 2. Doddle; Maps and enquiry super quiz 3. Pack p42 to 51; My Patch (due in two weeks time) Extra extension work/independent learning; Doddle -browse in all resources for energy and resources; https://www.doddlelearn.co.uk 54
  • 55.
  • 56.
  • 57.