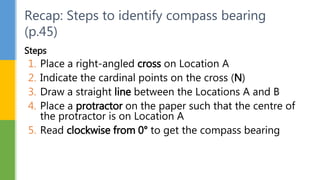
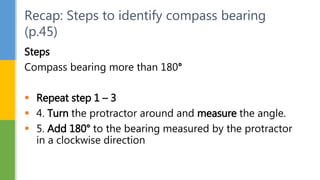
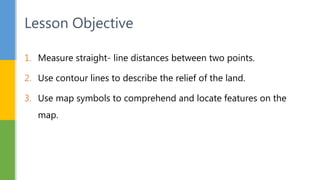
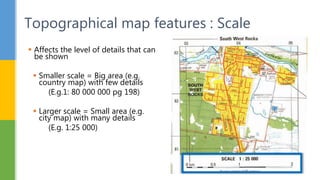
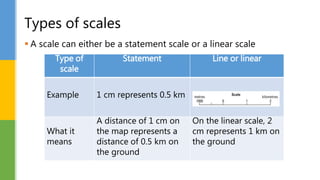
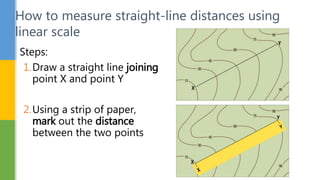
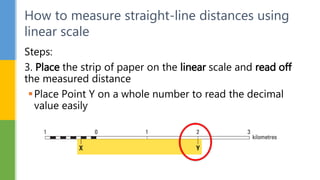
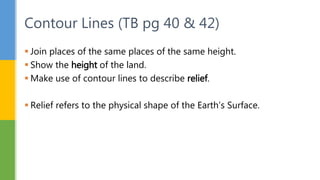
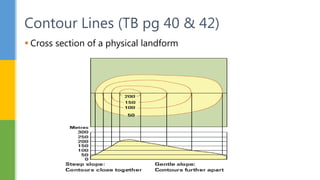
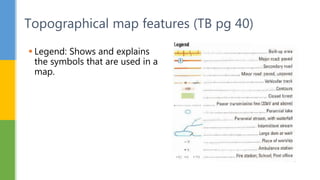
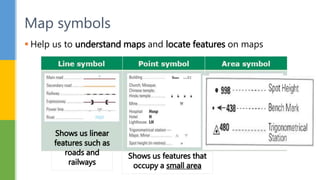
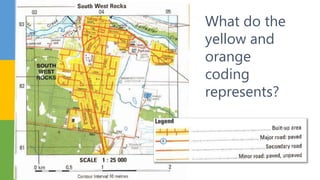
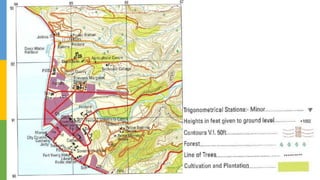
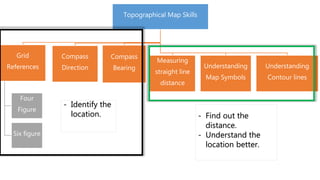
Topographical Map Skills
 Keyword: ‘from’
 When identifying direction, take
note of the word ‘from’, which
stands for the point you are taking
direction from/start point.
Recap: Identifying Compass Direction
Steps
1. Place a right-angled cross on Location A
2. Indicate the cardinal points on the cross (N)
3. Draw a straight line between the Locations A and B
4. Place a protractor on the paper such that the centre of
the protractor is on Location A
5. Read clockwise from 0° to get the compass bearing
Recap: Steps to identify compass bearing
(p.45)
Steps
Compass bearing more than 180°
 Repeat step 1 – 3
 4. Turn the protractor around and measure the angle.
 5. Add 180° to the bearing measured by the protractor
in a clockwise direction
Recap: Steps to identify compass bearing
(p.45)
1. Measure straight- line distances between two points.
2. Use contour lines to describe the relief of the land.
3. Use map symbols to comprehend and locate features on the
map.
Lesson Objective
 Scale: Ratio of distance on a
map and actual distance on
the ground
 Purpose: Use to find out the
actual distance between two
points on the ground
Topographical map features : Scale
 Affects the level of details that can
be shown
 Smaller scale = Big area (e.g.
country map) with few details
(E.g.1: 80 000 000 pg 198)
 Larger scale = Small area (e.g.
city map) with many details
(E.g. 1:25 000)
Topographical map features : Scale
Types of scales
 A scale can either be a statement scale or a linear scale
Geographical Investigations and Skills8
Type of
scale
Statement Line or linear
Example 1 cm represents 0.5 km
What it
means
A distance of 1 cm on
the map represents a
distance of 0.5 km on
the ground
On the linear scale, 2
cm represents 1 km on
the ground
Measuring Straight-Line
Distance
How to measure straight-line distances using
linear scale
Steps:
1.Draw a straight line joining
point X and point Y
2.Using a strip of paper,
mark out the distance
between the two points
10
How to measure straight-line distances using
linear scale
Steps:
3. Place the strip of paper on the linear scale and read off
the measured distance
Place Point Y on a whole number to read the decimal
value easily
Geographical Investigations and Skills11
Practice Time!
Contour Lines
 Join places of the same places of the same height.
 Show the height of the land.
 Make use of contour lines to describe relief.
 Relief refers to the physical shape of the Earth’s Surface.
Contour Lines (TB pg 40 & 42)
 Cross section of a physical landform
Contour Lines (TB pg 40 & 42)
Using Map Symbols
Topographical map features (TB pg 40)
 Legend: Shows and explains
the symbols that are used in a
map.
 Help us to understand maps and locate features on maps
Map symbols
Shows us linear
features such as
roads and
railways
Shows us features that
occupy a small area
Show us features that
occupy a wide area
Application
What do the
yellow and
orange
coding
represents?
Practice Time!
1. Measure straight- line distances between two points.
2. Use contour lines to describe the relief of the land.
3. Use map symbols to comprehend and locate features on the
map.
Recap
Topographical Map Skills
Grid
References
Four
Figure
Six figure
Compass
Direction
Compass
Bearing
Measuring
straight line
distance
Understanding
Map Symbols
Understanding
Contour lines
- Find out the
distance.
- Understand the
location better.
- Identify the
location.

Sec 2 Geography Topographical Map Skills

  • 1.
  • 2.
     Keyword: ‘from’ When identifying direction, take note of the word ‘from’, which stands for the point you are taking direction from/start point. Recap: Identifying Compass Direction
  • 3.
    Steps 1. Place aright-angled cross on Location A 2. Indicate the cardinal points on the cross (N) 3. Draw a straight line between the Locations A and B 4. Place a protractor on the paper such that the centre of the protractor is on Location A 5. Read clockwise from 0° to get the compass bearing Recap: Steps to identify compass bearing (p.45)
  • 4.
    Steps Compass bearing morethan 180°  Repeat step 1 – 3  4. Turn the protractor around and measure the angle.  5. Add 180° to the bearing measured by the protractor in a clockwise direction Recap: Steps to identify compass bearing (p.45)
  • 5.
    1. Measure straight-line distances between two points. 2. Use contour lines to describe the relief of the land. 3. Use map symbols to comprehend and locate features on the map. Lesson Objective
  • 6.
     Scale: Ratioof distance on a map and actual distance on the ground  Purpose: Use to find out the actual distance between two points on the ground Topographical map features : Scale
  • 7.
     Affects thelevel of details that can be shown  Smaller scale = Big area (e.g. country map) with few details (E.g.1: 80 000 000 pg 198)  Larger scale = Small area (e.g. city map) with many details (E.g. 1:25 000) Topographical map features : Scale
  • 8.
    Types of scales A scale can either be a statement scale or a linear scale Geographical Investigations and Skills8 Type of scale Statement Line or linear Example 1 cm represents 0.5 km What it means A distance of 1 cm on the map represents a distance of 0.5 km on the ground On the linear scale, 2 cm represents 1 km on the ground
  • 9.
  • 10.
    How to measurestraight-line distances using linear scale Steps: 1.Draw a straight line joining point X and point Y 2.Using a strip of paper, mark out the distance between the two points 10
  • 11.
    How to measurestraight-line distances using linear scale Steps: 3. Place the strip of paper on the linear scale and read off the measured distance Place Point Y on a whole number to read the decimal value easily Geographical Investigations and Skills11
  • 12.
  • 13.
  • 14.
     Join placesof the same places of the same height.  Show the height of the land.  Make use of contour lines to describe relief.  Relief refers to the physical shape of the Earth’s Surface. Contour Lines (TB pg 40 & 42)
  • 15.
     Cross sectionof a physical landform Contour Lines (TB pg 40 & 42)
  • 16.
  • 17.
    Topographical map features(TB pg 40)  Legend: Shows and explains the symbols that are used in a map.
  • 18.
     Help usto understand maps and locate features on maps Map symbols Shows us linear features such as roads and railways Shows us features that occupy a small area Show us features that occupy a wide area
  • 19.
  • 20.
    What do the yellowand orange coding represents?
  • 22.
  • 23.
    1. Measure straight-line distances between two points. 2. Use contour lines to describe the relief of the land. 3. Use map symbols to comprehend and locate features on the map. Recap
  • 24.
    Topographical Map Skills Grid References Four Figure Sixfigure Compass Direction Compass Bearing Measuring straight line distance Understanding Map Symbols Understanding Contour lines - Find out the distance. - Understand the location better. - Identify the location.

Editor's Notes

  • #9 Statement scale you can use do in your mathematical way.
  • #19 The height of an area is shown through spot height, benchmarks and trigonometrical stations. These symbols, the number associated with them provide the height of the land. Contour lines also indicate the height of the land along which the lines run. Bench mark is a mark on a stone post or other permanent feature, at a point whose exact elevation and position is known: used as a reference point in surveying. Trigonometrical station: fixed surveying station used in surveying projects in the vicinity.  Spot height is an exact point on a map with an elevation recorded beside it that represents its height above a given datum.