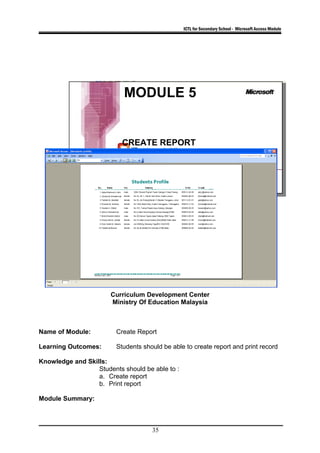
The document provides information about creating a student profile database in Microsoft Access 2003. It includes 3 activities: (1) starting Microsoft Access and creating a new database file, (2) opening an existing database, and (3) creating a table to store student profile data. The table will include fields for a student number, name, address, and IC number. The document teaches how to define the field types and insert records into the new table.
The site present the assignment to the students in well- structured manner including all the information in the simplest form, so that students need not spend extra time and effort in completion of the assignment and along with these they can also gain all the content engraved in the brain.
DeVry University
Student Lab Activity
BIS245 Database Essentials for Business with Lab
A. Student Name:
B. Lab 5A ER Matrix:
Student
Course
Student
none
Enrolls in;
Mandatory
One or more
Course
Is taken by:
Optional
One or more
none
Page 1 of 11
A. Lab # : BSBA BIS245A-5B
B. Lab 5B of 7: Completing Forms
C. Lab Overview--Scenario/Summary
TCO(s):
5. Given a physical database containing tables and relationships, create
forms which demonstrate effective user-interface design and allow for
efficient entry and retrieval of data.
Scenario/Summary
The lab begins with creating a form in Access using the Form Wizard. After the
form is created, the user can use Themes to change the appearance of the form.
The second part of the lab uses Form Design to create a form. Finally, the form
will be customized.
Upon completing this lab, you should be able to
• create a form using the Form Tool;
• create a form using Form Design; and
• create a form using the Form Wizard.
D. Deliverables
Submit the MS Access Database file that contains the forms created in this lab.
Step Deliverable Points
1 Form 1 – Form Tool - step-by-step 5
2 Form 2 – Form Design – step-by-step 5
3 Form 3 – Form Wizard—Employee/Customers Multi-Table Form
– step-by-step
5
4 Form 4 – Suppliers and Products Multi-Table Form 10
E. Lab Steps
Preparation
1. Get the Database from Doc Sharing
Page 2 of 11
a. Download the Lab5_Start.accdb Northwind database file from your
course Doc Sharing panel (Labs view), and Save the file to your local
drive.
2. Using Citrix for MS Visio and/or MS Access
a. If you are using the Citrix remote lab, follow the login instructions
located in the iLab tab in Course Home.
b. You will have to upload the Lab5_Start.accdb file to your Citrix folder.
Follow the instructions located on the iLab tab in Course Home.
3. Start MS Access
a. If you are using Citrix, click on Microsoft Office Applications folder.
b. If you are using Visio on a local computer, select Microsoft Office from your
Program Menu.
Lab
Step 1: Using the Form Tool
Select Employees table as in the following figure. You will see the Employees
table highlighted.
Click the Create tab, and then click the Form tool.
Page 3 of 11
After clicking the Form button, a new form is created by Access.
The appearance of the form can be easily modified using the Themes option on
the Design ribbon. As you move your cursor over the various themes, the form
will adjust to preview how the modified form would look. You may select any
theme for your form.
Click the Save button to save the form. Name it Lab5_Form1, and then close the
form.
Step 2: Using the Form Design
Page 4 of 11
Click the Create tab; then, click on Form Design. (Make sure that you do not
have any of the tables selected in the Tables list on the left side of the screen.).
Page 1 of 11 A. Lab # BSBA BIS245A-5B B.docxjoyjonna282
Page 1 of 11
A. Lab # : BSBA BIS245A-5B
B. Lab 5B of 7: Completing Forms
C. Lab Overview--Scenario/Summary
TCO(s):
5. Given a physical database containing tables and relationships, create
forms which demonstrate effective user-interface design and allow for
efficient entry and retrieval of data.
Scenario/Summary
The lab begins with creating a form in Access using the Form Wizard. After the
form is created, the user can use Themes to change the appearance of the form.
The second part of the lab uses Form Design to create a form. Finally, the form
will be customized.
Upon completing this lab, you should be able to
• create a form using the Form Tool;
• create a form using Form Design; and
• create a form using the Form Wizard.
D. Deliverables
Submit the MS Access Database file that contains the forms created in this lab.
Step Deliverable Points
1 Form 1 – Form Tool - step-by-step 5
2 Form 2 – Form Design – step-by-step 5
3 Form 3 – Form Wizard—Employee/Customers Multi-Table Form
– step-by-step
5
4 Form 4 – Suppliers and Products Multi-Table Form 10
E. Lab Steps
Preparation
1. Get the Database from Doc Sharing
Page 2 of 11
a. Download the Lab5_Start.accdb Northwind database file from your
course Doc Sharing panel (Labs view), and Save the file to your local
drive.
2. Using Citrix for MS Visio and/or MS Access
a. If you are using the Citrix remote lab, follow the login instructions
located in the iLab tab in Course Home.
b. You will have to upload the Lab5_Start.accdb file to your Citrix folder.
Follow the instructions located on the iLab tab in Course Home.
3. Start MS Access
a. If you are using Citrix, click on Microsoft Office Applications folder.
b. If you are using Visio on a local computer, select Microsoft Office from your
Program Menu.
Lab
Step 1: Using the Form Tool
Select Employees table as in the following figure. You will see the Employees
table highlighted.
Click the Create tab, and then click the Form tool.
Page 3 of 11
After clicking the Form button, a new form is created by Access.
The appearance of the form can be easily modified using the Themes option on
the Design ribbon. As you move your cursor over the various themes, the form
will adjust to preview how the modified form would look. You may select any
theme for your form.
Click the Save button to save the form. Name it Lab5_Form1, and then close the
form.
Step 2: Using the Form Design
Page 4 of 11
Click the Create tab; then, click on Form Design. (Make sure that you do not
have any of the tables selected in the Tables list on the left side of the screen.)
After clicking the Form Design, a new form will be shown as the following
Page 5 of 11
Click the Add Existing Fields
option, and then click Show All
Tables to show all the tables in
the database. Drag and drop
fields from the Custo ...
Access Assignments Complete List1. Acc 2 Bank Database2. Acc.docxannetnash8266
Access Assignments Complete List
1. Acc 2 Bank Database
2. Acc 2 MC Employees
3. Acc 4 MC Linksaver
4. Acc 4 MC Students
5. Acc Project Wildoutfitters
Access Assignment Readings
Tutorial 1: Introduction to Microsoft Access 2007
Learning Objectives
After reading this tutorial and completing the associated exercises, you will be able to:
·
Open MS Access.
·
Create tables using MS Access.
·
Create forms and use them to enter data into tables.
Note: Be sure to work through the examples in this tutorial as you read. This is the way you will learn by doing.
Microsoft Access: A Relational Database Application
Microsoft Access is a relational database application that is part of the Microsoft Office suite of applications. A database is an organized way to store data, and database software usually provides features that allow a user to add, delete, update, and manipulate (transform) data. A relational database, such as MS Access, stores data in tables. A table consists of rows (records) and columns (fields). Although the appearance of the records and the fields resembles the rows and columns you may have seen or may study later in a Microsoft Excel worksheet, Access is a much more powerful tool than Excel for organizing, storing, and retrieving data. Much of this additional power comes from the relational model that is implemented by MS Access.
With Excel, you can create data tables that list all data for a particular entity (customer, product, etc.) in a row of the worksheet. So, if a customer makes 100 purchases and a business tracks the customer's address in a database, that address would be listed 100 times. The relational model used by MS Access allows us to store data in separate tables and then link tables via common fields—the primary key/foreign key relationship.
A primary key in a table is a field that contains a unique value for each and every record in the table. In other words, if a field is a primary key, you can't use a specific value more than once in that column. A foreign key is a field in one table that contains values that are stored in a primary key in another table. If we look at the foreign key for a specific record, we can use the value to look up more data in the table where that field is used as a primary key. We are then guaranteed to find only one record that matches that value. Basically, a foreign key field provides a reference to a record in another table.
For example, suppose we have a Customer table, in which there is a field CustomerID that is a primary key in that table. If a copy of the CustomerID is stored as a foreign key in a CustomerLoan table, then information such as the customer's address is stored only once, in the Customer table, but can be accessed from any customer loan record. This reduces data redundancy and improves updating and other database functions.
Most of this module will be spent learning by building. First you will create a database consisting of one table, and t.
Palestine last event orientationfvgnh .pptxRaedMohamed3
An EFL lesson about the current events in Palestine. It is intended to be for intermediate students who wish to increase their listening skills through a short lesson in power point.
The Indian economy is classified into different sectors to simplify the analysis and understanding of economic activities. For Class 10, it's essential to grasp the sectors of the Indian economy, understand their characteristics, and recognize their importance. This guide will provide detailed notes on the Sectors of the Indian Economy Class 10, using specific long-tail keywords to enhance comprehension.
For more information, visit-www.vavaclasses.com
How to Split Bills in the Odoo 17 POS ModuleCeline George
Bills have a main role in point of sale procedure. It will help to track sales, handling payments and giving receipts to customers. Bill splitting also has an important role in POS. For example, If some friends come together for dinner and if they want to divide the bill then it is possible by POS bill splitting. This slide will show how to split bills in odoo 17 POS.
Welcome to TechSoup New Member Orientation and Q&A (May 2024).pdfTechSoup
In this webinar you will learn how your organization can access TechSoup's wide variety of product discount and donation programs. From hardware to software, we'll give you a tour of the tools available to help your nonprofit with productivity, collaboration, financial management, donor tracking, security, and more.
2024.06.01 Introducing a competency framework for languag learning materials ...Sandy Millin
http://sandymillin.wordpress.com/iateflwebinar2024
Published classroom materials form the basis of syllabuses, drive teacher professional development, and have a potentially huge influence on learners, teachers and education systems. All teachers also create their own materials, whether a few sentences on a blackboard, a highly-structured fully-realised online course, or anything in between. Despite this, the knowledge and skills needed to create effective language learning materials are rarely part of teacher training, and are mostly learnt by trial and error.
Knowledge and skills frameworks, generally called competency frameworks, for ELT teachers, trainers and managers have existed for a few years now. However, until I created one for my MA dissertation, there wasn’t one drawing together what we need to know and do to be able to effectively produce language learning materials.
This webinar will introduce you to my framework, highlighting the key competencies I identified from my research. It will also show how anybody involved in language teaching (any language, not just English!), teacher training, managing schools or developing language learning materials can benefit from using the framework.
Students, digital devices and success - Andreas Schleicher - 27 May 2024..pptxEduSkills OECD
Andreas Schleicher presents at the OECD webinar ‘Digital devices in schools: detrimental distraction or secret to success?’ on 27 May 2024. The presentation was based on findings from PISA 2022 results and the webinar helped launch the PISA in Focus ‘Managing screen time: How to protect and equip students against distraction’ https://www.oecd-ilibrary.org/education/managing-screen-time_7c225af4-en and the OECD Education Policy Perspective ‘Students, digital devices and success’ can be found here - https://oe.cd/il/5yV
Read| The latest issue of The Challenger is here! We are thrilled to announce that our school paper has qualified for the NATIONAL SCHOOLS PRESS CONFERENCE (NSPC) 2024. Thank you for your unwavering support and trust. Dive into the stories that made us stand out!
Unit 8 - Information and Communication Technology (Paper I).pdfThiyagu K
This slides describes the basic concepts of ICT, basics of Email, Emerging Technology and Digital Initiatives in Education. This presentations aligns with the UGC Paper I syllabus.
We all have good and bad thoughts from time to time and situation to situation. We are bombarded daily with spiraling thoughts(both negative and positive) creating all-consuming feel , making us difficult to manage with associated suffering. Good thoughts are like our Mob Signal (Positive thought) amidst noise(negative thought) in the atmosphere. Negative thoughts like noise outweigh positive thoughts. These thoughts often create unwanted confusion, trouble, stress and frustration in our mind as well as chaos in our physical world. Negative thoughts are also known as “distorted thinking”.
Synthetic Fiber Construction in lab .pptxPavel ( NSTU)
Synthetic fiber production is a fascinating and complex field that blends chemistry, engineering, and environmental science. By understanding these aspects, students can gain a comprehensive view of synthetic fiber production, its impact on society and the environment, and the potential for future innovations. Synthetic fibers play a crucial role in modern society, impacting various aspects of daily life, industry, and the environment. ynthetic fibers are integral to modern life, offering a range of benefits from cost-effectiveness and versatility to innovative applications and performance characteristics. While they pose environmental challenges, ongoing research and development aim to create more sustainable and eco-friendly alternatives. Understanding the importance of synthetic fibers helps in appreciating their role in the economy, industry, and daily life, while also emphasizing the need for sustainable practices and innovation.
The Roman Empire A Historical Colossus.pdfkaushalkr1407
The Roman Empire, a vast and enduring power, stands as one of history's most remarkable civilizations, leaving an indelible imprint on the world. It emerged from the Roman Republic, transitioning into an imperial powerhouse under the leadership of Augustus Caesar in 27 BCE. This transformation marked the beginning of an era defined by unprecedented territorial expansion, architectural marvels, and profound cultural influence.
The empire's roots lie in the city of Rome, founded, according to legend, by Romulus in 753 BCE. Over centuries, Rome evolved from a small settlement to a formidable republic, characterized by a complex political system with elected officials and checks on power. However, internal strife, class conflicts, and military ambitions paved the way for the end of the Republic. Julius Caesar’s dictatorship and subsequent assassination in 44 BCE created a power vacuum, leading to a civil war. Octavian, later Augustus, emerged victorious, heralding the Roman Empire’s birth.
Under Augustus, the empire experienced the Pax Romana, a 200-year period of relative peace and stability. Augustus reformed the military, established efficient administrative systems, and initiated grand construction projects. The empire's borders expanded, encompassing territories from Britain to Egypt and from Spain to the Euphrates. Roman legions, renowned for their discipline and engineering prowess, secured and maintained these vast territories, building roads, fortifications, and cities that facilitated control and integration.
The Roman Empire’s society was hierarchical, with a rigid class system. At the top were the patricians, wealthy elites who held significant political power. Below them were the plebeians, free citizens with limited political influence, and the vast numbers of slaves who formed the backbone of the economy. The family unit was central, governed by the paterfamilias, the male head who held absolute authority.
Culturally, the Romans were eclectic, absorbing and adapting elements from the civilizations they encountered, particularly the Greeks. Roman art, literature, and philosophy reflected this synthesis, creating a rich cultural tapestry. Latin, the Roman language, became the lingua franca of the Western world, influencing numerous modern languages.
Roman architecture and engineering achievements were monumental. They perfected the arch, vault, and dome, constructing enduring structures like the Colosseum, Pantheon, and aqueducts. These engineering marvels not only showcased Roman ingenuity but also served practical purposes, from public entertainment to water supply.
This is a presentation by Dada Robert in a Your Skill Boost masterclass organised by the Excellence Foundation for South Sudan (EFSS) on Saturday, the 25th and Sunday, the 26th of May 2024.
He discussed the concept of quality improvement, emphasizing its applicability to various aspects of life, including personal, project, and program improvements. He defined quality as doing the right thing at the right time in the right way to achieve the best possible results and discussed the concept of the "gap" between what we know and what we do, and how this gap represents the areas we need to improve. He explained the scientific approach to quality improvement, which involves systematic performance analysis, testing and learning, and implementing change ideas. He also highlighted the importance of client focus and a team approach to quality improvement.
1. KEMENTERIAN PELAJARAN MALAYSIAKEMENTERIAN PELAJARAN MALAYSIA
Self Access LearningSelf Access Learning
ModuleModule
DatabaseDatabase
ICT Literacy forICT Literacy for
Secondary SchoolSecondary School
ProgrammeProgramme
2. ICTL For Secondary School - Database Module
PUSAT PERKEMBANAGN KURIKULUM
KEMENTERIAN PELAJARAN MALAYSIA
2
3. ICTL for Secondary School - Microsoft Access Module
MODUL I
INTRODUCTION TO MICROSOFT ACCESS 2003INTRODUCTION TO MICROSOFT ACCESS 2003
Curriculum Development Centre
Ministry of Education
1
4. ICTL for Secondary School - Microsoft Access Module
Name of Module: Introduction to Microsoft Access 2003
Learning Outcomes: Students should be able to:
a. state the usage of application
b. list example which application of database is used
c. state the function of the features in database
d. create a new database
Knowledge and Skills:
a. Students known the meaning and usage of database
b. Start Microsoft Access 2003
c. Create, Name and Save database file
d. Open existing database
e. Exit database application
Module Summary:
At the end of the module, students should be able to open,
name, save file and close database.
Activity Summary: Activities in this module involved:
a. Starting Microsoft Access 2003
b. Naming and saving file database
c. Opening existing database
d. Exercises
Meaning of database
2
A database is the computer equivalent of an
organized list of information. Typically, this information has a
common subject or purpose, such as the list of employees,
phonebook guide or a classmates address book.
Microsoft Access 2003 (Access 2003) is a database system
management (database programs). It can store, manage, manipulate,
analyze, retrieve, display or publish information from database.
5. ICTL for Secondary School - Microsoft Access Module
Activity 1: Starting Microsoft Access 2003
There are two methods to start / launch your Mircosoft Access 2003.
Method 1:
1. Double click on the Mircrosoft Office Access 2003 shortcut on the Windows
desktop (see below).
Method 2:
1. Click-on the Start button, then click-on Programs, then click-on Microsoft Access
2003 (Figure 1)
2. The following Access
2003 Getting Started Task Pane will appear on
the right side of your Access 2003 screen. (refer
figure 2)
3. In the Open area of the Access 2003 Getting
Started Task Pane, click the left mouse button on
Create a new file.
Activity 2: To Name and Save Database File
Figure 1
Shortcut icon MS Access 2003
Figure 2
3
6. ICTL for Secondary School - Microsoft Access Module
1. The New File menu screen on the top will appear when you click the left mouse
button on Create a new file.
2. Click–on Blank database. (Figure 3)
A File New Database menu screen, similar to the one below, will be on your
screen. We’ll have to do several “things” to set-up this screen to save your
database. ( Figure 4 )
3. Click-on the small down arrow on the right. Choose My Documents to save by
double clicking on the folder. Your selection should now appear in the Save in :
area. (Step 1)
4. Next click-in the area to the right of File Name. Type-in the word students
profile as shown at the bottom of the above image. (Step 2)
5. Now click-on the Create button. (Step 3)
4
Figure 4
Figure 3
Step 1
Step 2 Step 3
Click here
7. ICTL for Secondary School - Microsoft Access Module
The following Students Profile: Database menu screen will appear.
( Figure 5 )
6. Click File and click Exit to end this session and to close Ms Access 2003.
Activity 3: Open Existing Access Database
There are two methods to open existing database.
Method 1:
1. Repeat Activity 1 to open Ms Access 2003. Once you have created a database,
you will see your database in the Open portion of the Task Pane.
2. Click students profile. (refer Figure 6)
Method 2:
5
Figure 5
Figure 6
Click students
profile
8. ICTL for Secondary School - Microsoft Access Module
1. Click File in the Menu Bar, then click Open. (refer figure 7)
2. When the Open menu screen appears, click the small down arrow to the right
of the Look in area and select My Documents.
3. Then click the name of your database (e.g. students profile.mdb) and then click
Open.
Note:
You will notice in the Students Profile: Database menu screen, in the left border
consist of objects bar: Tables, Queries, Forms, Report, Pages, Macros and
Modules.
6
Figure 7
Access window
title bar
Database window
menu bar
Database toolbar
Database window
toolbar bar
Select My Documents
Click students profile
9. ICTL for Secondary School - Microsoft Access Module
There are 4 important objects as stated in the table below.
Objects Bar Function
Table
A collection of records that identify a category of data, such as
Customers, Orders, or Inventory. Data inside a table is arrange
by column name field and row named Record.
Field – A single characteristic or attribute of a person,
place, object, event, or idea.
Record – A set of related field values.
Form
Use to enter new information, to edit or remove existing
information or to locate information.
Query
Used to locate information, to view, change or analyze it in
various ways. A select query retrieves data from one or more
tables and displays the result in datasheet. A select query can
be used to group record and calculate sums, counts, averages
and other types of totals.
Report
Typically used to summarize, organize and analyze information
in order to express a particular point of view to specific
audience.
4. Click File and Exit to stop this session.
At the end of this activities, you had learned how to:
i. Create a database
ii. Close a database
iii. Open an existing database
In the next module you will learn how to design table and insert data.
Exercises
7
Database window
title bar
Objects bar
Groups bar
Database window
10. ICTL for Secondary School - Microsoft Access Module
Question 1
Give two examples of database that you know.
Question 2
Create a database named Teachers Profile. Save this file in My Document
directory.
MODULE 2
STUDENTS PROFILE
8
11. ICTL for Secondary School - Microsoft Access Module
Curriculum Development Center
Ministry Of Education Malaysia
9
12. ICTL for Secondary School - Microsoft Access Module
Name of Module: Students Profile
Learning Outcomes: Student should be able to create a table, define primary
key and insert data.
Knowledge and Skills:
1. Students known how to differentiate field, record and
table
2. Students known all types of data
3. Creating table.
4. Define primary key
5. Inserting the data in the table.
Module summary:
At the end of this module, table below will be created by
students.
Activities summary:
This module involved a few activities such as;
1. Creating tables.
2. Inserting the data in the table.
3. Exercise.
10
13. Information and Communication Technology Literacy For Secondary– Data Base Module
Activity 1: Creating Table
Next you will be creating the fields that make up a database. This is similar to
creating a blank personnel form (on paper) that will be "filled-in" for each
employee (Name, Address, Phone Number, etc – are called fields in a
database). This "forms" are called records in a database. There will be a
record, or form, for each employee. All the forms, together, make up a Table
(database).
For example, students profiles table as shown below. (Figure 1)
The table above content four records. Each records have four fields which are
numbers field, students name, address and ic number. At the end of this
module, students will creating a database which is consist a table name
“students profile”.
11
Field 3
(address)
Field 1
(numbers)
record 2
Field 2
(name)
Field 4
(icno)
Figure 1
14. Information and Communication Technology Literacy For Secondary– Data Base Module
Steps Creating Table
1. Open MS Access 2003 software (Refer module 1, if needed).
2. Click File, click Open, find students profiles database file then click Open
button. (refer Figure 2)
3. Database window students profile: Database will appeared as shown below
(Figure 3) then click New button at database windows toolbar. The dialog box in
Figure 4 will appear.
12
Figure 2
Figure 3
15. ICTL for Secondary School - Microsoft Access Module
4. Click Design View , then click OK to get Datasheet view as shown at Figure 5.
Figure 5
5. At Field Name column, type in numbers and at Data type column, change value
Text to Number. (refer Figure 6)
13
Click this button to view the list of
data type, then click number
Figure 4
Design
View
Figure 6
16. ICTL for Secondary School - Microsoft Access Module
There are 10 types of data as stated in the table below;
Types Data Function
Text
You may type in any alphabetical/numerical data that you
desire-up to a maximum of 255 characters. As indicated,
this is a text field, so you can't do mathematical
calculations. Examples of Text data are: names,
addresses, stock numbers, room numbers, zip codes, etc
Memo
This field is for lots of text. You can have up to 32,000
characters.
Number
This field is for numbers where you want to add, subtract,
multiply, divide, average, and do numerical calculations.
This field can be a very large size, so when we get to
Field Properties, we'll talk about "sizing" this field so it
doesn't take up too much "space" in storage.
Date/Time
Dates and Times. You may format this later, as you may
desire.
Currency
Dollar ($). You may format this later, as you may desire.
For example Ringgit Malaysia (RM)
AutoNumber
This field is an "automatic" counter that assigns a number
each time you put data into a new field.
Yes/No This is a "True/False" or "Yes/No, 0/1” type of field.
OLE Object
This means "Object Link Embedding" which indicates you
can insert a graphic, picture, sound, etc. Pretty neat to put
a photograph in a personnel record or a picture of an
inventory item in the stock record (advanced stuff).
Hyperlink
A hyperlink is a pointer from one object to another. The
destination is frequently another Web page, but it can also
be a picture, an e-mail address, a file (such as a
multimedia file or Microsoft Office document), or a
program. The hyperlink itself can be displayed as text or
as a picture.
Lookup Wizard
This wizard creates a lookup column, which displays a list
of values you can choose from.
14
17. ICTL for Secondary School - Microsoft Access Module
7. Insert data in the Field Name, Data Types for each fields as displays (Figure
7). Students can move to the next column by press “Tab key”.
Note: Place the cursor at the address inside the Field Name, then change Field
Size value from 50 to 100.
8. Click numbers at field name column, click at Edit menu bar, then click
Primary Key or icon Primary Key . Shown at figure 8.
15
Figure 7
PRIMARY KEY means the value in the primary key fields is
need to uniquely identify each record; that’s no record can
have the same value in this field.
Primary key icon
close icon
Figure 8
2. Change Field Size
value to 100
1. Place the cursor
at address
18. ICTL for Secondary School - Microsoft Access Module
9. Click Close icon as shown at figure 8 to close the creating table session.
Then dialog box in figure 10 displayed.
10. Click Yes. Dialog box Save As in figure 11 displayed.
16
Figure 10
Figure 11Key in table name here
Figure 9
19. ICTL for Secondary School - Microsoft Access Module
11. Type students profile at Table Name and then click OK at dialog box as shown
in figure 11. Now you had finished creating one table named “students
profile:database” as shown below. (Figure 12)
Activity 2: Inserting data in the table
The students profile table that created before, not contains any data. Steps below
can be used to key in the data.
1. Click at Students Profile table then click open at database window toolbar.
(Figure 13)
17
students profile
table created
Figure 12
Figure 13
20. ICTL for Secondary School - Microsoft Access Module
2. Datasheet view Students Profile : Table as shown in figure 14 displayed.
3. Key in data at the students profile datasheet.
At the first row, type number ‘1’ at numbers column. Then, Type name Abdul
Rahman b. Idris at name column. Next, type address and ic number at address
and icno column.
18
Figure 15
Figure 14
21. ICTL for Secondary School - Microsoft Access Module
4. Insert all data in the table by repeating the same process above. As a result,
students will get the table below.
5. Click icon save to saving file. Students Profile table now contained five
records.
6. Click icon close to close the inserting data session.
7. Exit the Microsoft Access 2003 Software.
Exercises
1. Build one of your friends profile table. Named the table “Co-curriculum Data”.
That table must have fields as stated below:
• Numbers
• Student Name
• Class
• Club
• Sports
• Uniforms Unit
2. Insert 10 record in that table.
19
Figure 16
22. ICTL for Secondary School - Microsoft Access Module
MODULE 3
USING RECORD IN DATABASE
Curriculum Development Center
Ministry Of Education Malaysia
20
23. ICTL for Secondary School - Microsoft Access Module
Name of Module: Using Record In Database
Learning Outcomes: Students should be able to use and manipulate records in
database.
Knowledge and Skills:
a. Students should be able to use record in database.
b. add records
c. add field
d. edit records
e. find records from Table
Module Summary:
At the end of this module, table below will be created by
students.
Activity Summary:
Activities in this module involve:
1. add records
2. add field
3. edit records
4. find records from Table
21
24. ICTL for Secondary School - Microsoft Access Module
Activity 1: Add Records
1. Open Microsoft Access 2003
2. Click Open an Existing Database, then click file students profile and click OK.
3. In the database window, double click students profile in the Tables pane to
open the table in Datasheet view, as shown in figure 1.
4. To add new record, click on icon New Record that can be seen at
database toolbar or at the bottom of datasheet window. (refer figure 1).
5. Add five more record as below. (refer table 1)
name address icno
Alias b Mohamad No. 5, Jalan Desa Kayang 3, Desa kayang, 01000
Kangar.
950918-02-5533
Mohd Shahid b Mohd
Som
No. 39, Taman Tapah, Jalan Pahang 35000 Tapah,
Perak.
950912-05-5321
Noorul-Aini bt Ambak No 15, Jalan Limau Kasturi, 4/4A 40000 Shah Alam,
Selangor.
950212-11-5678
Noor Asiah bt Zakaria Lot 2646, Kg Simpang Tiga, Bt 6 3/4, 53100
Gombak, Selangor
950402-04-5566
Fasitah bt. Mansor No. 36, Jln. Melati, Tmn. Mewah, 31000 Batu Gajah,
Perak
950606-03-5432
Save record.
6. Close students profile : Table.
22
Table 1
Figure 1
Icon New
25. ICTL for Secondary School - Microsoft Access Module
Activity 2: Add Fields.
Method 1: Add field after the last field.
1. Click Design button at database toolbar windows Students Profile: Database,
to display all the fields.
2. Click field below icno (refer Figure 2)
3. Type in email inside the Field Name and select text as the Data Type.
4. Save the record.
Method 2: Add new field in between the two fields
1. Click Design button at database toolbar windows Students Profile: Database,
to display all the fields.
2. Click the address field ( the row will be highlight -refer Figure 3 )
3.
C
lick Insert at menu bar, then click rows. A new row will be added.
(refer Figure 4)
23
Figure 3
Figure 4
Figure 2
26. ICTL for Secondary School - Microsoft Access Module
4. Put cursor in between field name and field address.
5. Type in sex inside the blank Field Name and select text as the Data Type.
(refer Figure 5)
6. Save students profile.
7. Click to close students profile : Table.
Activity 3: Edit Record.
1. Open Students Profile table.
2. To edit record, click inside the selected field. (sex and email)
3. Insert in all the record for sex field and email field. (refer Table 2)
numbers name sex a
d
email
1 Abdul Rahman b. Idris male abd_@yahoo.com
-2 Johana bt. Muhammad female johana@hotmail.com
3 Faridah bt Abdullah Female getz@yahoo.com
4 Rosnani bt. Sembok Female rosnani@hotmail.com
5 Hassan b. Wahid Male hassan@yahoo.com
6 Alias b Mohamad Male alias@yahoo.com
7 Mohd Shahid b Mohd
Som
Male shah@hotmail.com
8 Noorul-Aini bt Ambak Female noorul@hotmail.com
24
Figure 5
27. ICTL for Secondary School - Microsoft Access Module
9 Noor Asiah bt Zakaria Female noor@yahoo.com
10 Fasitah bt. Mansor female fasitah@hotmail.com
4. Repeat step 2 above to add in 5 postcodes (see bold figure) inside the first five
record. (Refer Table 3).
Numbers name sex address
1 Abdul Rahman b.
Idris
male 2304, Rumah Rumah Tasek Gelugor, 13300
Pulau Pinang2 Johana bt.
Muhammad
femal
e
No 24, Jln 1, Taman Seri Sinar, 50600 Kulal
Lumpur3 Faridah bt Abdullah Femal
e
No 39, Jln Pinang Merah 11, 81000 Bandar
Tengg, Johor4 Rosnani bt. Sembok Femal
e
No 1005, Bukit Datu, 21200 Kuala
Terengganu, Terengganu5 Hassan b. Wahid
Choong Fook Keong
Male No 101, Taman Rapat Jaya, 41000 Kelang,
Selangor
5. Save students profile table.
Activity 4: Finding Record From Table
1. Click field name.
25
Figure 6
Icon Find
Table 2
Table 3
28. ICTL for Secondary School - Microsoft Access Module
2. Click icon Find (refer Figure 6) and dialog box Find and Replace will be
display as below (Figure 7).
3. Type in Noor* inside box Find What to find all the name starting with Noor.
4. Click Find Next button. Name Noorul-Aini bt Ambak will be highlighted at name
field (refer figure 8).
5. Click Find Next button to find similar name with Noor. Name Noor Asiah bt
Zakaria will be highlighted.
6. You can repeat step 3 to find other record.
7. Click File and Close to end this session.
Exercise Module 3
26
Figure 7
Figure 8
29. ICTL for Secondary School - Microsoft Access Module
1. Based on your exercise in module 2 (“Curriculum Data”).
a. Add 3 new records
b. Add 2 new fields
c. Find records
MODULE 4
CREATE FORM
27
30. ICTL for Secondary School - Microsoft Access Module
Curriculum Development Center
Ministry Of Education Malaysia
Name of Module: Create Form
Learning Outcomes: Students should be able to create form and add record
Knowledge and Skills: Students should be able to :
a. Create form
b. Add records
Module Summary:
At the end of this module, a form will be create by students.
28
31. ICTL for Secondary School - Microsoft Access Module
Activity Summary:
Activities in this module involve:
a. Create form
b. Add record
29
32. ICTL for Secondary School - Microsoft Access Module
Activity 1: Create Form
1. Open Microsoft Access 2003
2. Click Open an Existing Database, then click file students profile and click OK.
3.In the database window, click Form and double click Create Form by using wizard.
4.Click double arrow to select Available Fields
30
1.Click Forms
2.Click Create Form by
using wizard
1.Click here
33. ICTL for Secondary School - Microsoft Access Module
5. The selected Fields will be remove from left to right.Then click Next
6. Click Next
31
1.Click Next
1.Click Next
34. ICTL for Secondary School - Microsoft Access Module
7. Click Standard for style.Then click Next
8. Click Finish
32
1.Click Standard
2.Clik Next
1.Click Finish
35. ICTL for Secondary School - Microsoft Access Module
9. The form will display as below
Activity 2: Add Fields.
1. To add new record, click on icon New Record that can be seen at
database toolbar or at the bottom of datasheet window.
33
1.New Record
36. ICTL for Secondary School - Microsoft Access Module
2. Add one more record as below.
Numbers Name sex address icno Email
11 Wan Mohd
Sidqi Bin
Wan
Abd.Ghaffar
Male No.9
Jln.Banggol
15300 Kota
Bharu
Kelantan
950617-
03-6339
wmsidqi@gmail.com
3. The form will display as below
4. Click File and Close to end this session.
Exercise Module 4
1. Based on your exercise in module 4 (“Create Form”).
a. Create new form.
b. Add 3 new record.
34
37. ICTL for Secondary School - Microsoft Access Module
MODULE 5
CREATE REPORT
Curriculum Development Center
Ministry Of Education Malaysia
Name of Module: Create Report
Learning Outcomes: Students should be able to create report and print record
Knowledge and Skills:
Students should be able to :
a. Create report
b. Print report
Module Summary:
35
38. ICTL for Secondary School - Microsoft Access Module
At the end of this module, form below will be create by students.
Activity Summary:
Activities in this module involve:
a. Create report
b. Print report
36
39. ICTL for Secondary School - Microsoft Access Module
Activity 1: Create Report
1. Open Microsoft Access 2003
2. Click Open an Existing Database, then click file students profile and click OK.
3. In the database window, click Report and click create report by using wizard.
4. Click double arrow to select Available Fields
37
1.Click Reports
2.Click Create Report
by using wizard
1.Click here
40. ICTL for Secondary School - Microsoft Access Module
5. The selected Fields will be remove from left to right.Then click Next
6. Click Next
38
1.Click Next
1.Click Next
41. ICTL for Secondary School - Microsoft Access Module
7. Click Next
8. At the Layout click Tabular.Select Landscape at the Orientation.
Then click Next.
39
1.Click Next
1.Click Tabular
2.Click Landscape
3.Click Next
42. ICTL for Secondary School - Microsoft Access Module
9.Select the Casual style.Then click Next.
10.Click Finish
40
1.Click Next
1.Click Finish
43. ICTL for Secondary School - Microsoft Access Module
11.A dialog box report will display as below
Activity 2: Print Report.
1. To print the report,click File and print
41
1.Click File
2.Click Print
44. ICTL for Secondary School - Microsoft Access Module
2. A dialog box print will display as below.
Then click OK.
Exercise Module 5
1. Based on your exercise in module 5 (“Create Report”).
c. Create a new report
d. Print the report
42
1.Click OK
45. ICTL for Secondary School - Microsoft Access Module
MODULE 6
CREATE QUERY
Curriculum Development Center
Ministry Of Education Malaysia
Name of Module: Create Query
Learning Outcomes: Students should be able to create query
Knowledge and Skills: Students should be able to :
a. Create query
b. Save query
Module Summary:
43
46. ICTL for Secondary School - Microsoft Access Module
At the end of this module, the query below will be create by
students.
Activity Summary:
Activities in this module involve:
a. Create query
b. Save query
44
47. ICTL for Secondary School - Microsoft Access Module
Activity 1: Create Query.
1. Open Microsoft Access 2003
2. Click Open an Existing Database, then click file students profile and click OK.
3. In the database window, click Queries and click create query by using wizard.
4. Click double arrow to select Available Fields
45
1.Click Queries
2.Click Create query
by using wizard
48. ICTL for Secondary School - Microsoft Access Module
5. The selected Fields will be remove from left to right.Then click Next
6. Click Finish
46
1.Click Next
1.Click here
49. ICTL for Secondary School - Microsoft Access Module
7. A dialog box will display as below.Click icon design view.
8. A dialog box will display as below.
47
1.Click Finish
1.Click icon view
50. ICTL for Secondary School - Microsoft Access Module
9. At the row Criteria, type-in male and press Enter
10.Click icon Run
48
1.Type-in male 2.Icon Run
51. ICTL for Secondary School - Microsoft Access Module
11. A dialog box for male students will be display
Activity 2: Save Query.
1. Click File and Save As
49
52. ICTL for Secondary School - Microsoft Access Module
2. Save file as : male students profile Query
3. The file will be save as below
50
53. ICTL for Secondary School - Microsoft Access Module
4. Click File and Close to end this session.
Exercise Module 6
1. Based on your exercise in module 6 (“Create Query”).
a.Create new report for female students
b.Save the file as “ female students “
51
54. ICTL for Secondary School - Microsoft Access Module
MODULE 7
GETTING EXTERNAL DATA
Curriculum Development Center
Ministry Of Education Malaysia
Name of Module: Getting External Data
52
55. ICTL for Secondary School - Microsoft Access Module
Learning Outcomes: Students should be able to get external data
Knowledge and Skills: Students should be able to :
a.Create file
b.Import spreadsheet file
Module Summary:
At the end of this module, the students will be able to get data
and create a table as shown below
Activity Summary:
Activities in this module involve:
a.Import file
b.Create table
Activity 1: Import Spreadsheet Files
1. Open Microsoft Access 2003
2. Create new database file
53
56. ICTL for Secondary School - Microsoft Access Module
3.Click file
4.Click Get External Data
5.Click Import
6.At the Files of type,click pull down and select Microsoft Excel
7.Click any spreadsheet files as shown in example below ( Test 2007 )
8.Click Import
9.Click Next
54
1.Click File
2.Get External Data
3.Import
1.File “Test 2007 “
2.Import
57. ICTL for Secondary School - Microsoft Access Module
10.Put a tick on the box at the First Row Contain Column Headings
11.Click Next
12.Click OK
55
1.Next
1.Next
58. ICTL for Secondary School - Microsoft Access Module
13.Click In a New Table
14.Click Next
15.Click Next
56
1.Click In a New Table
2.Click Next
59. ICTL for Secondary School - Microsoft Access Module
16.Tick at the Choose my own primary key and select No
17.Click Next
57
1.Next
3.Next
1.Choose my own primary key
2.Select No.
60. ICTL for Secondary School - Microsoft Access Module
16.Click Finish
16.Now you had finished creating one table named “ Register “
17.Double click at Register
58
1.Finish
1.Click Register
61. ICTL for Secondary School - Microsoft Access Module
18.The next window will be appear
19.Click File and close
20.Click close to end this session
Exercise Module 7
1. Based on your exercise in module 7 (“Getting External Data”).
a.Get any data from spreadsheet file
b.Save the file
59
1.Click File and Close
1.Click close