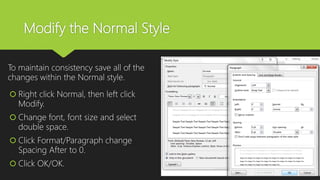
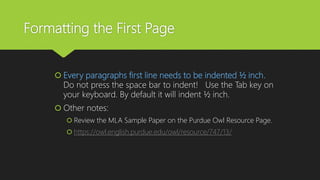
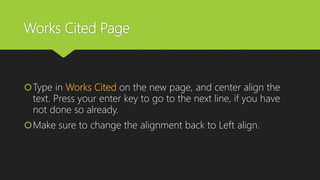
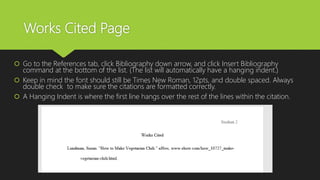
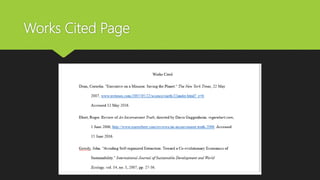
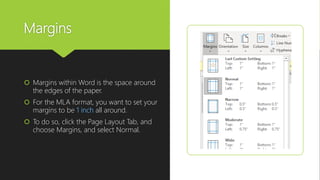
Formatting and Converting Theses and DissertationsThomas La Foe
This is a presentation on how to format and convert electronic theses and dissertations following the guidelines set forth by the Office of the Graduate School at Mississippi State University.
Word Processor with a multiple question answer presentation
If you liked it don't forget to follow me-
SlideShare-www.slideshare.net/gauravyadav65
Instagram-yadavgaurav251
Facebook-www.facebook.com/yadavgaurav251
This really motivates me too help you guys more :D
How to Create APA Headers and a Title Page in Microsoft Word 2.docxwellesleyterresa
How to Create APA Headers and a Title Page in Microsoft Word 2010
(PC-Version)
Step-by-Step Directions
How to Create the Title Page Header
Within a Microsoft (MS) Word document:
1. Double-click the header area (the upper portion) of your first page. You did this step correctly if a
green tab titled “Header & Footer Tools” opens on the top of your MS Word Menu Bar as
illustrated below.
2. Under the Header and Footer Tools, in the “Options” section, place a checkmark next to the
“Different First Page” box.
3. Next, move over to the “Header & Footer” section, click “Header,” and then choose the second
option, which is “Blank (Three Columns).”
4. Double-click the middle “[Type text],” make sure it is highlighted blue, and delete it by clicking
the “Delete” key on your keyboard.
5. Then click the left “[Type text],” make sure it is highlighted blue, and type Running head:
(make sure it has a capital R, a lowercase h, and that you use a colon). Then type in your title.
The title should be in all CAPS. To do this function, hold down the “Shift” key on your keyboard
as you type your title. Your header title needs to be 50 characters or less. If you have a long title,
use only a shortened version for your header. Your header should look like: Running head:
SHORTENED TITLE OF YOUR PAPER.
6. Then click the right most “[Type text]” area and click the “Page Number” button in the
“Header & Footer” section, click “Current Position,” and then select “Simple Plain Number.”
7. Highlight the header and page number (to do this step, double-click until a blue highlight goes
from the title to the page number), and change the font to Times New Roman and the font size to
12.
• Note: To change the font size and style, click the “Home” tab, and in the “Font” section
change Calibri to Times New Roman. Then change the size 11 font to size 12 by
clicking on the small downward arrow next to the font name and size.
How to Create the Title Page Content
1. Double-click out of the header to the main area of your document.
2. Hit the “Enter” key on your keyboard approximately 5 times.
• Note: this number is not really set, but you do want it positioned so all of your
information is in the middle of your title page.
3. Under the “Home” tab, in the “Paragraph” section, click on the “Center” alignment button (a
shortcut to do this is by clicking Ctrl + e on your keyboard) and add:
• Your paper’s title
Note: the first letter in each major word should be capitalized
• Your first name and your last name
• Your course Name and Number and Title
For example: ENG 121: English Composition I
• Your instructor’s name
• The date you will turn in the paper.
Note: The date should read: Month Day, Year --all spelled out. For example:
January 1, 2014.
Proprietary Information of Ashford University, Created by Academics, CR 215590.
4. Once your information is typed in, you need ...
This powerpoint details the steps you need to take in order to automatically generate a table of contents or a table of authorities in your Word documents on a Mac computer.
This is a presentation by Dada Robert in a Your Skill Boost masterclass organised by the Excellence Foundation for South Sudan (EFSS) on Saturday, the 25th and Sunday, the 26th of May 2024.
He discussed the concept of quality improvement, emphasizing its applicability to various aspects of life, including personal, project, and program improvements. He defined quality as doing the right thing at the right time in the right way to achieve the best possible results and discussed the concept of the "gap" between what we know and what we do, and how this gap represents the areas we need to improve. He explained the scientific approach to quality improvement, which involves systematic performance analysis, testing and learning, and implementing change ideas. He also highlighted the importance of client focus and a team approach to quality improvement.
Read| The latest issue of The Challenger is here! We are thrilled to announce that our school paper has qualified for the NATIONAL SCHOOLS PRESS CONFERENCE (NSPC) 2024. Thank you for your unwavering support and trust. Dive into the stories that made us stand out!
Ethnobotany and Ethnopharmacology:
Ethnobotany in herbal drug evaluation,
Impact of Ethnobotany in traditional medicine,
New development in herbals,
Bio-prospecting tools for drug discovery,
Role of Ethnopharmacology in drug evaluation,
Reverse Pharmacology.
Synthetic Fiber Construction in lab .pptxPavel ( NSTU)
Synthetic fiber production is a fascinating and complex field that blends chemistry, engineering, and environmental science. By understanding these aspects, students can gain a comprehensive view of synthetic fiber production, its impact on society and the environment, and the potential for future innovations. Synthetic fibers play a crucial role in modern society, impacting various aspects of daily life, industry, and the environment. ynthetic fibers are integral to modern life, offering a range of benefits from cost-effectiveness and versatility to innovative applications and performance characteristics. While they pose environmental challenges, ongoing research and development aim to create more sustainable and eco-friendly alternatives. Understanding the importance of synthetic fibers helps in appreciating their role in the economy, industry, and daily life, while also emphasizing the need for sustainable practices and innovation.
The Roman Empire A Historical Colossus.pdfkaushalkr1407
The Roman Empire, a vast and enduring power, stands as one of history's most remarkable civilizations, leaving an indelible imprint on the world. It emerged from the Roman Republic, transitioning into an imperial powerhouse under the leadership of Augustus Caesar in 27 BCE. This transformation marked the beginning of an era defined by unprecedented territorial expansion, architectural marvels, and profound cultural influence.
The empire's roots lie in the city of Rome, founded, according to legend, by Romulus in 753 BCE. Over centuries, Rome evolved from a small settlement to a formidable republic, characterized by a complex political system with elected officials and checks on power. However, internal strife, class conflicts, and military ambitions paved the way for the end of the Republic. Julius Caesar’s dictatorship and subsequent assassination in 44 BCE created a power vacuum, leading to a civil war. Octavian, later Augustus, emerged victorious, heralding the Roman Empire’s birth.
Under Augustus, the empire experienced the Pax Romana, a 200-year period of relative peace and stability. Augustus reformed the military, established efficient administrative systems, and initiated grand construction projects. The empire's borders expanded, encompassing territories from Britain to Egypt and from Spain to the Euphrates. Roman legions, renowned for their discipline and engineering prowess, secured and maintained these vast territories, building roads, fortifications, and cities that facilitated control and integration.
The Roman Empire’s society was hierarchical, with a rigid class system. At the top were the patricians, wealthy elites who held significant political power. Below them were the plebeians, free citizens with limited political influence, and the vast numbers of slaves who formed the backbone of the economy. The family unit was central, governed by the paterfamilias, the male head who held absolute authority.
Culturally, the Romans were eclectic, absorbing and adapting elements from the civilizations they encountered, particularly the Greeks. Roman art, literature, and philosophy reflected this synthesis, creating a rich cultural tapestry. Latin, the Roman language, became the lingua franca of the Western world, influencing numerous modern languages.
Roman architecture and engineering achievements were monumental. They perfected the arch, vault, and dome, constructing enduring structures like the Colosseum, Pantheon, and aqueducts. These engineering marvels not only showcased Roman ingenuity but also served practical purposes, from public entertainment to water supply.
The Indian economy is classified into different sectors to simplify the analysis and understanding of economic activities. For Class 10, it's essential to grasp the sectors of the Indian economy, understand their characteristics, and recognize their importance. This guide will provide detailed notes on the Sectors of the Indian Economy Class 10, using specific long-tail keywords to enhance comprehension.
For more information, visit-www.vavaclasses.com
The French Revolution, which began in 1789, was a period of radical social and political upheaval in France. It marked the decline of absolute monarchies, the rise of secular and democratic republics, and the eventual rise of Napoleon Bonaparte. This revolutionary period is crucial in understanding the transition from feudalism to modernity in Europe.
For more information, visit-www.vavaclasses.com
Home assignment II on Spectroscopy 2024 Answers.pdf
Using Word to set up the MLA Format
1. Setting up the MLA
format within
Microsoft Word
Review Word: Chapter 3 from your Textbook for more Info on the MLA Format.
2. Why use MLA Format
In some of your classes, you will be required to write a research
paper or an essay. MLA format is the preferred format. When all
students use the same format, it keeps all submissions easy to read,
and consistent! The key is to keep a consistent formatting for all
students.
The other advantage of using MLA, it allows the reader to follow
your ideas, as well as find a topic of interest.
Go to References tab and click the Style: down arrow, then select
MLA, if not already selected.
3. Margins
Margins within Word is the space around
the edges of the paper.
For the MLA format, you want to set your
margins to be 1 inch all around.
To do so, click the Page Layout Tab, and
choose Margins, and select Normal.
4. Font and Font Size
Change
the font size
and font face
of the document, as well as line spacing.
Hold down your
[Ctrl] key and press A(Windows)
[CMD] + A(Mac)
Click the Home tab, and change the Font to Times New Roman,
and 12 pts. Change Line Spacing to Double.
5. Modify the Normal Style
To maintain consistency save all of the
changes within the Normal style.
Right click Normal, then left click
Modify.
Change font, font size and select
double space.
Click Format/Paragraph change
Spacing After to 0.
Click OK/OK.
6. Headers
At the top of every page will have your last name followed by the
page number and will be aligned on the right side of the page.
Click the Insert tab, choose Header down arrow, and then select
Blank.
In the header, right align text (Ctrl + R) , type in your last name,
and press the space bar one time.
7. Headers
Click the Page
Numbers button,
and choose Current
Position, Plain
Number
Double click
anywhere in the
body of the
document to close
the Header area.
8. Formatting the First Page
In the upper left-hand corner
of the first page, list your
name, your instructor's name,
the course, and the date.
Again, be sure to double-
spaced text. For the date,
typically we right the day first,
followed by the Month.
1
Type in the title of the page,
and center align the
title.(Home tab, and Center)
2
When you press enter after
typing in the title, you will now
need to change the alignment
back to Left. (Align Text Left)
3
10. Formatting the First Page
Every paragraphs first line needs to be indented ½ inch.
Do not press the space bar to indent! Use the Tab key on
your keyboard. By default it will indent ½ inch.
Other notes:
Review the MLA Sample Paper on the Purdue Owl Resource Page.
https://owl.english.purdue.edu/owl/resource/747/13/
11. Works Cited Page
The Works Cited page must start on its own page, and at the
end of your paper. You can do so by adding a Page Break within
Word.
First, make sure you have clicked at the end of the last piece of
text within your paper.
Click the Insert tab and choose Page Break (Ctrl + Enter). This
will force a page break.
12. Works Cited Page
Type in Works Cited on the new page, and center align the
text. Press your enter key to go to the next line, if you have
not done so already.
Make sure to change the alignment back to Left align.
13. Works Cited Page
Go to the References tab, click Bibliography down arrow, and click Insert Bibliography
command at the bottom of the list. (The list will automatically have a hanging indent.)
Keep in mind the font should still be Times New Roman, 12pts, and double spaced. Always
double check to make sure the citations are formatted correctly.
A Hanging Indent is where the first line hangs over the rest of the lines within the citation.
14. Works Cited Page
When it comes to citing sources, make sure to follow
the guidelines set up via Purdue Owls Website.
Depending on your source, there are a variety of ways
to cite.
https://owl.english.purdue.edu/owl/resource/747/12/
Facilitator- I use the slides as guidelines to what I will be talking about. I set up the slides so students can follow step by step without me there.
Discussion- Discuss why it important to follow a format when it comes to writing.
Facilitator- Show students how to change the margins
Facilitator- Show students how to change the format of their document.
Facilitator- Show how to add a header.
Discussion- Also explain what a header is, and as well as a footer.
Facilitator- Show how to add page numbers
Facilitator- Setting up the first page correctly with the correct title information.
This is to show them what it will look like after the title information has been added.
Facilitator- Show how to indent the first line of a paragraph.
Discussion- Explain the Purdue Owl Website, and how it can be used.
Facilitator- Show how to add a Page Break.
Facilitator- Show how to set up the Works Cited page.
Facilitator- Explain what a hanging indent is.
Facilitator- Show how to set up a hanging indent.
Discussion- In general will discuss that there are a variety of ways to cite depending on the source. It is important to review the steps on citing a source.
Facilitator- Showing an example of what the cited page looks like.