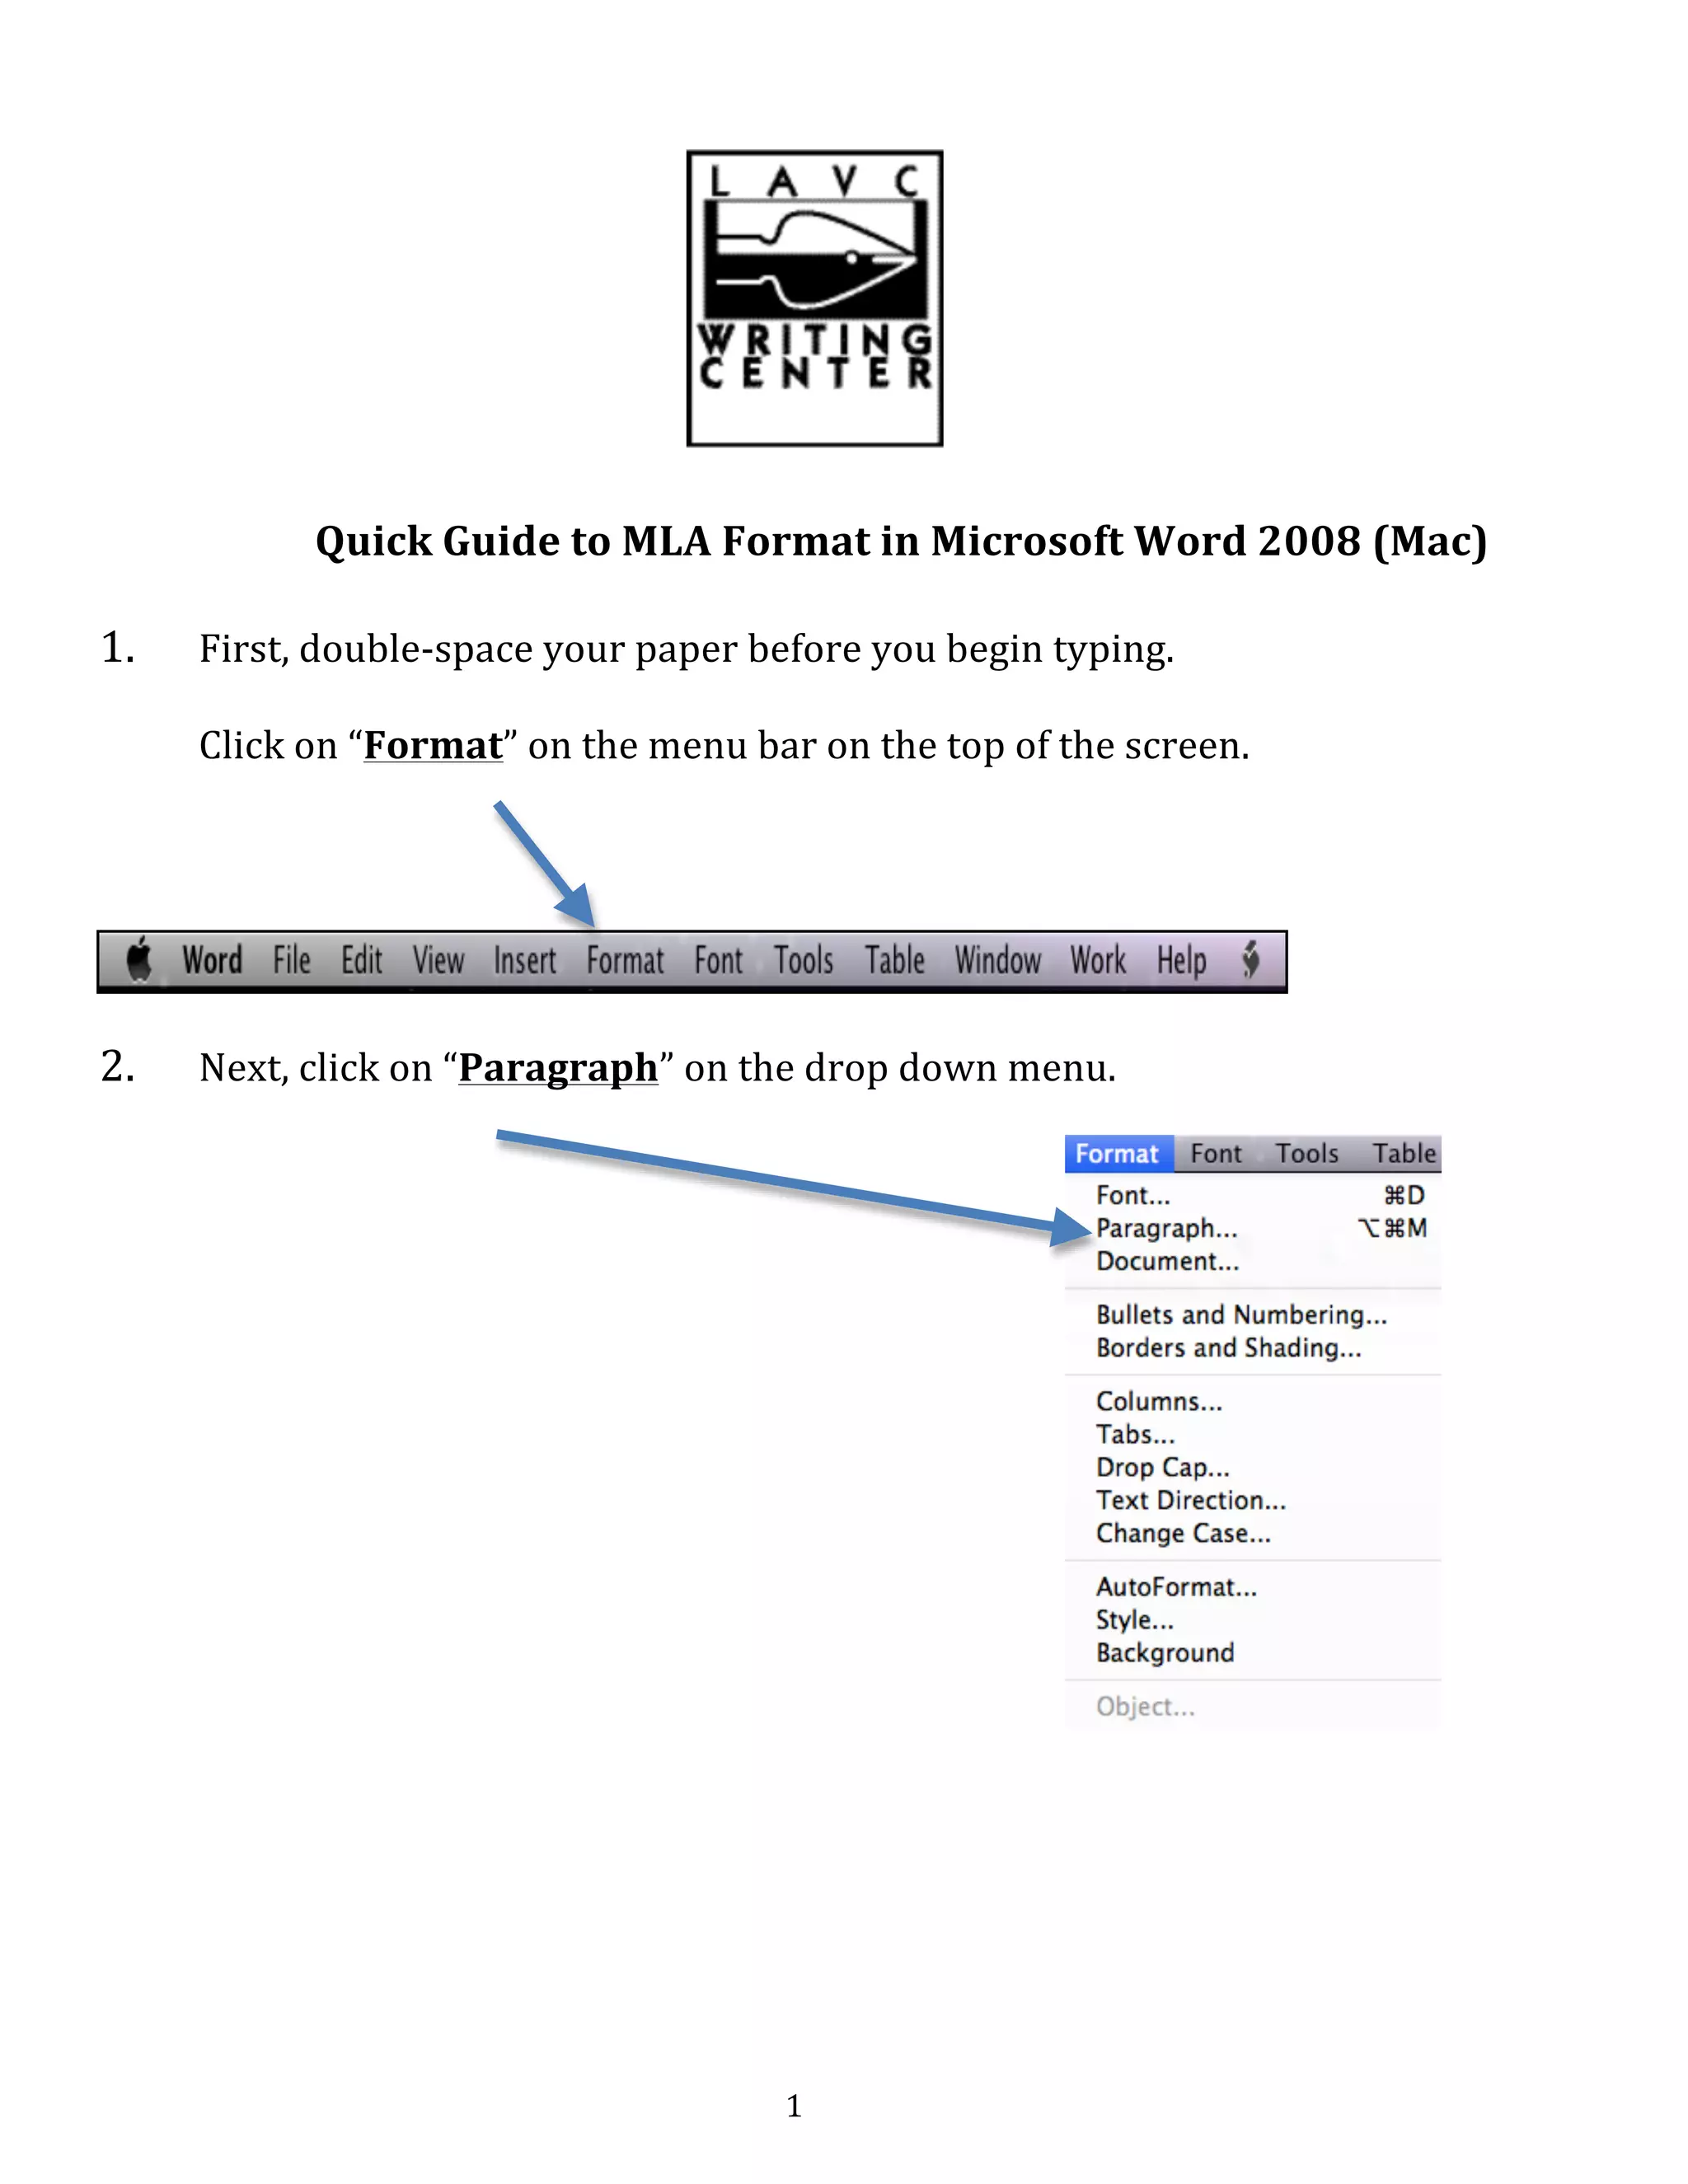
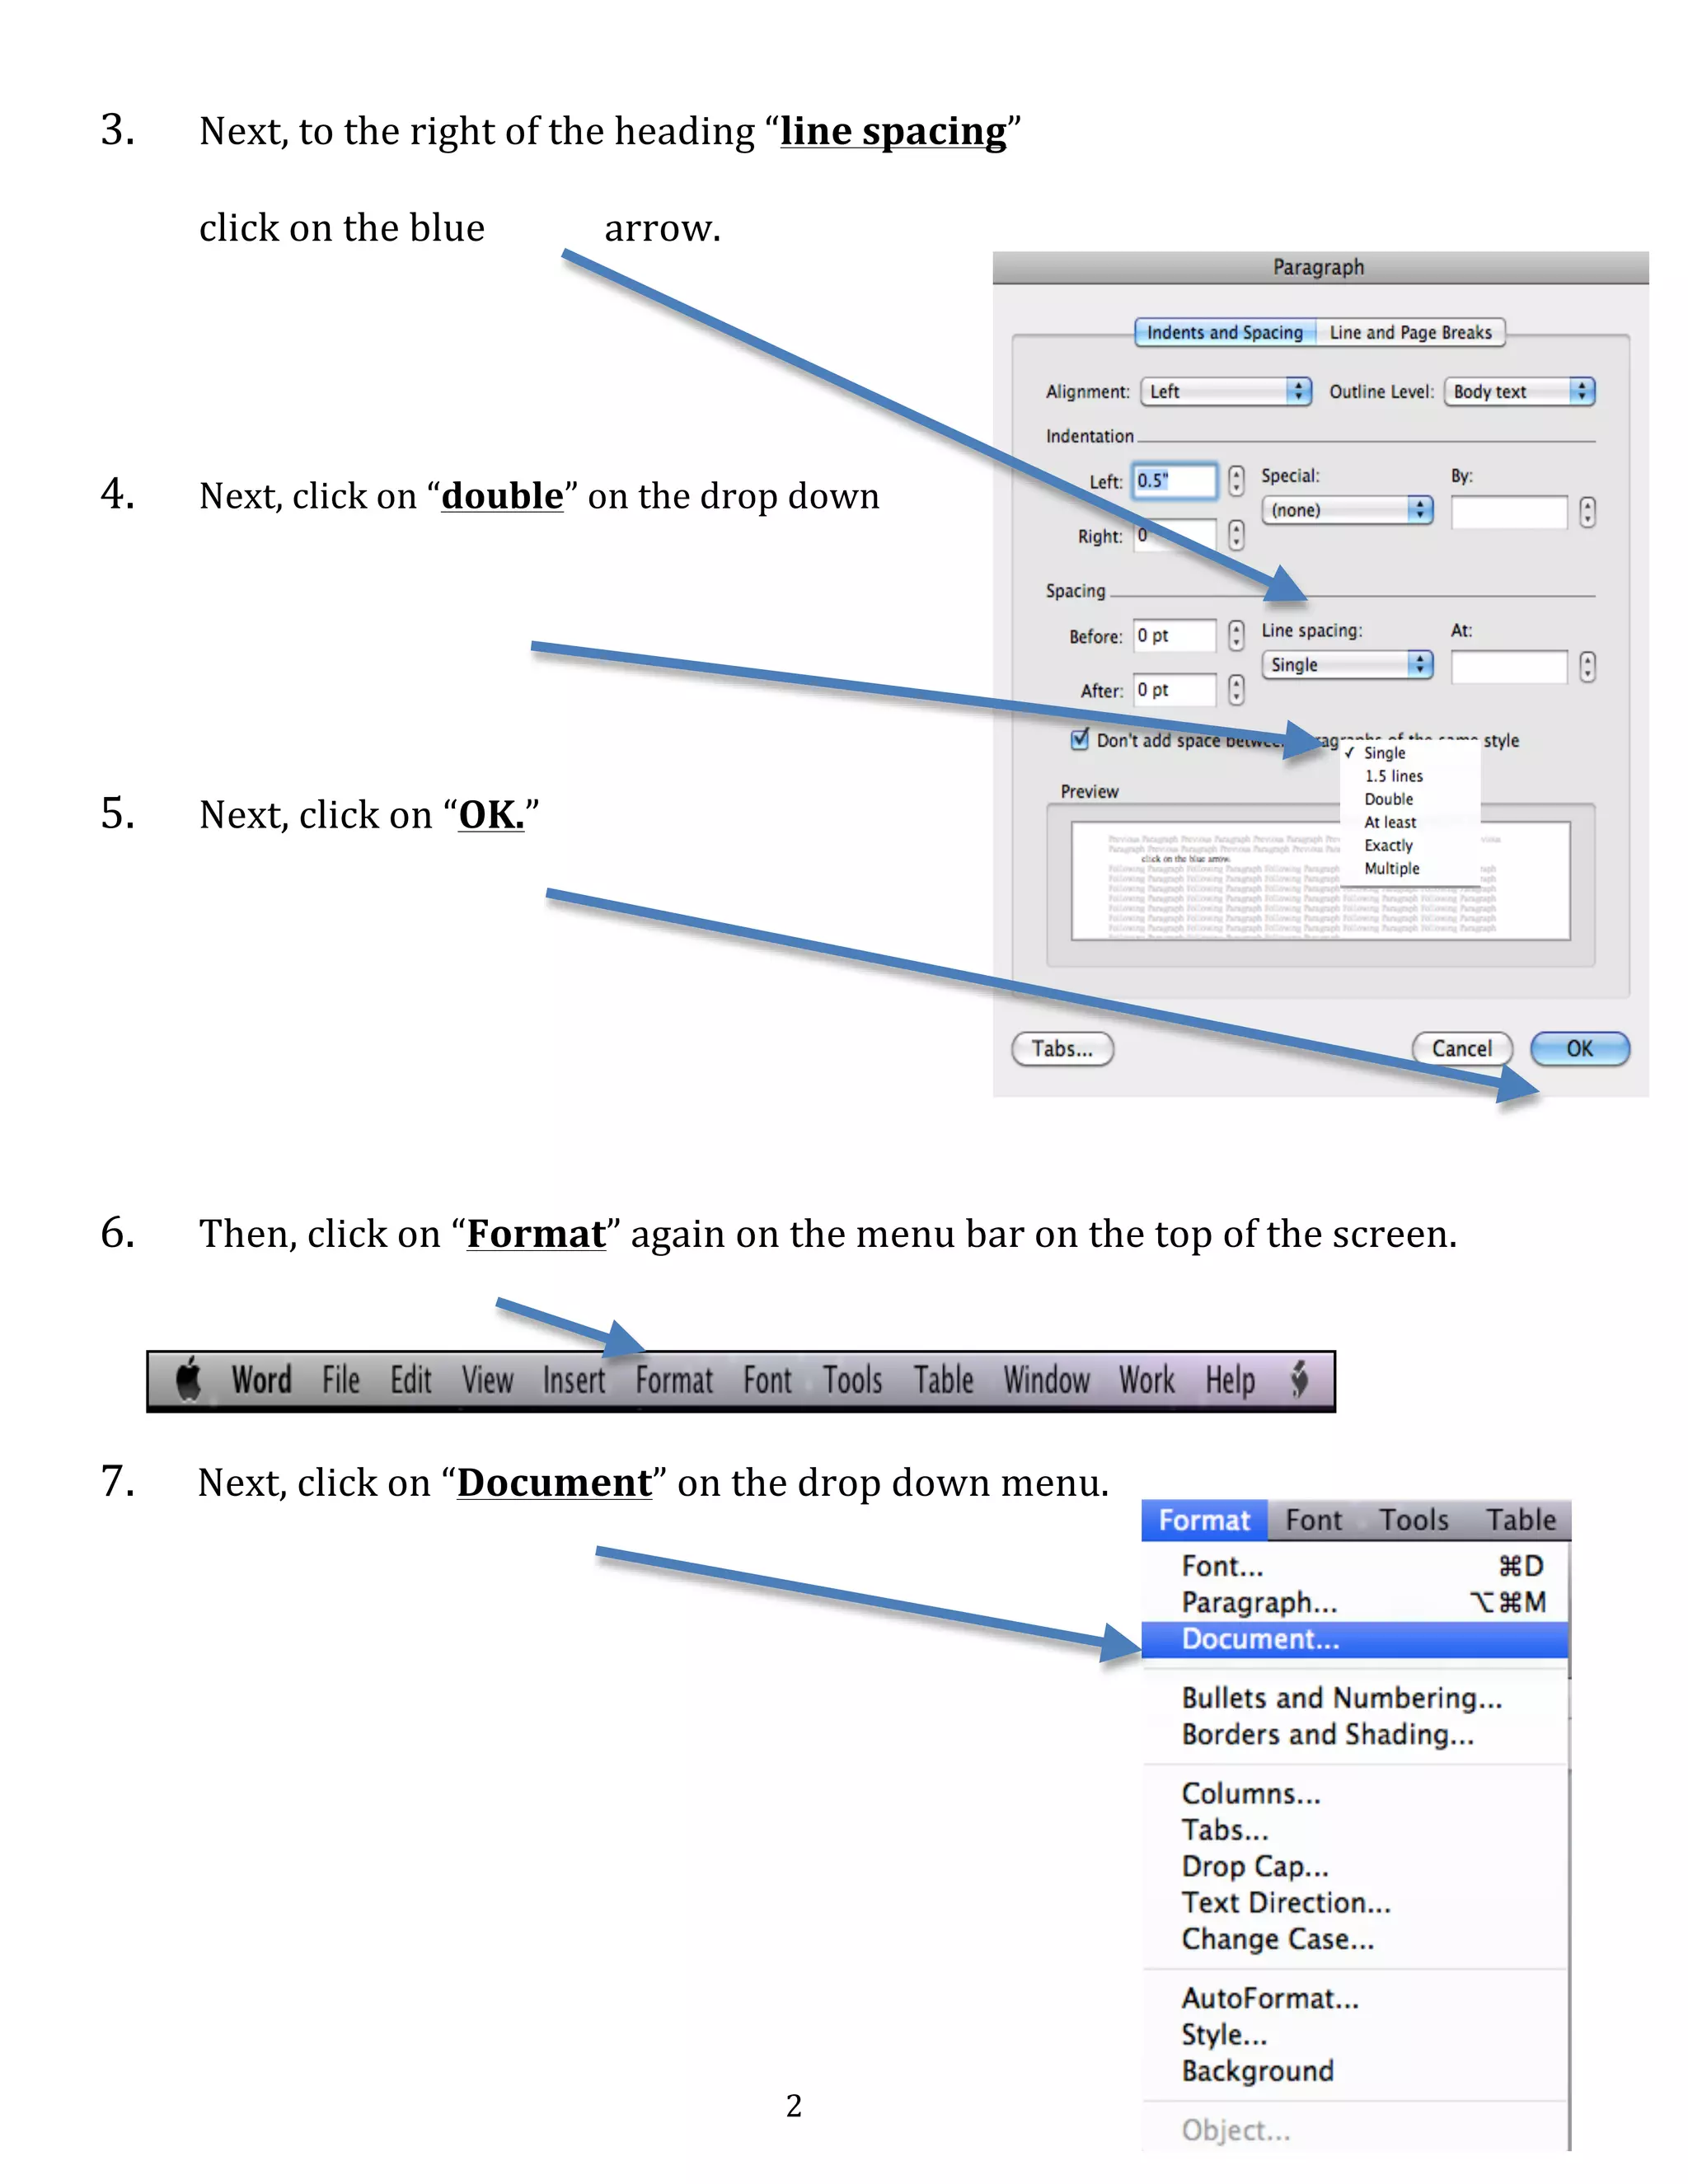
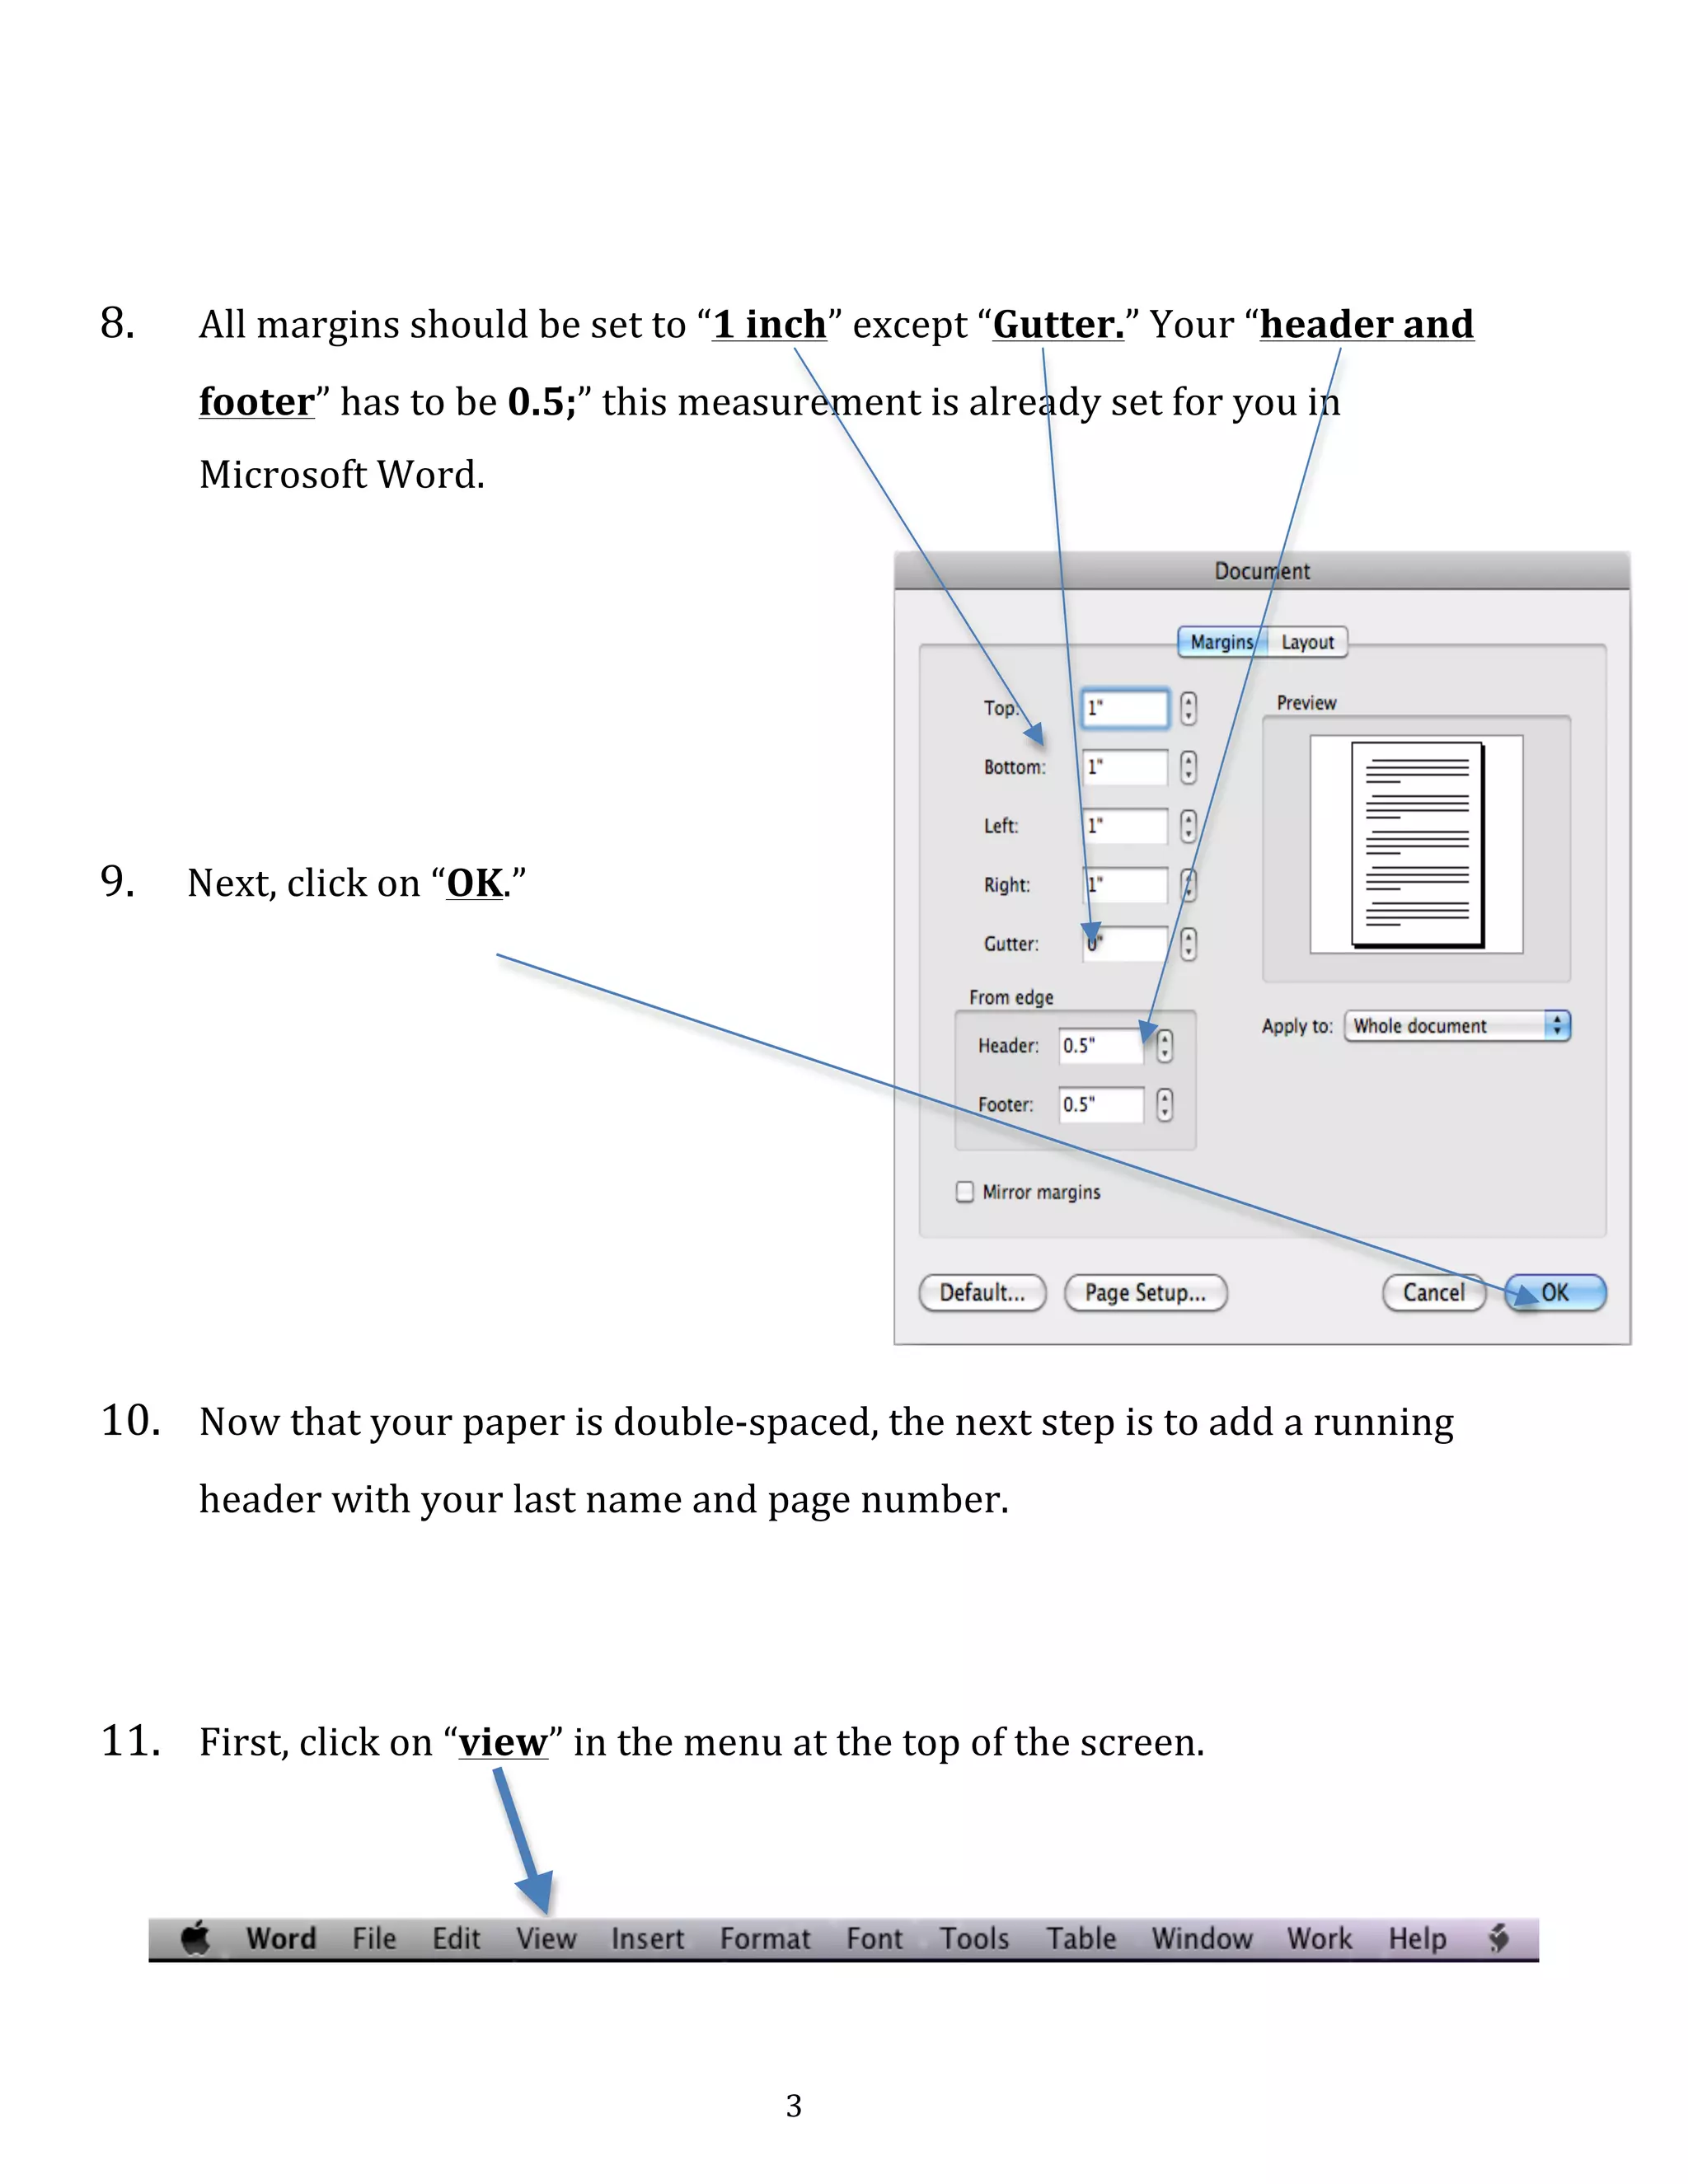
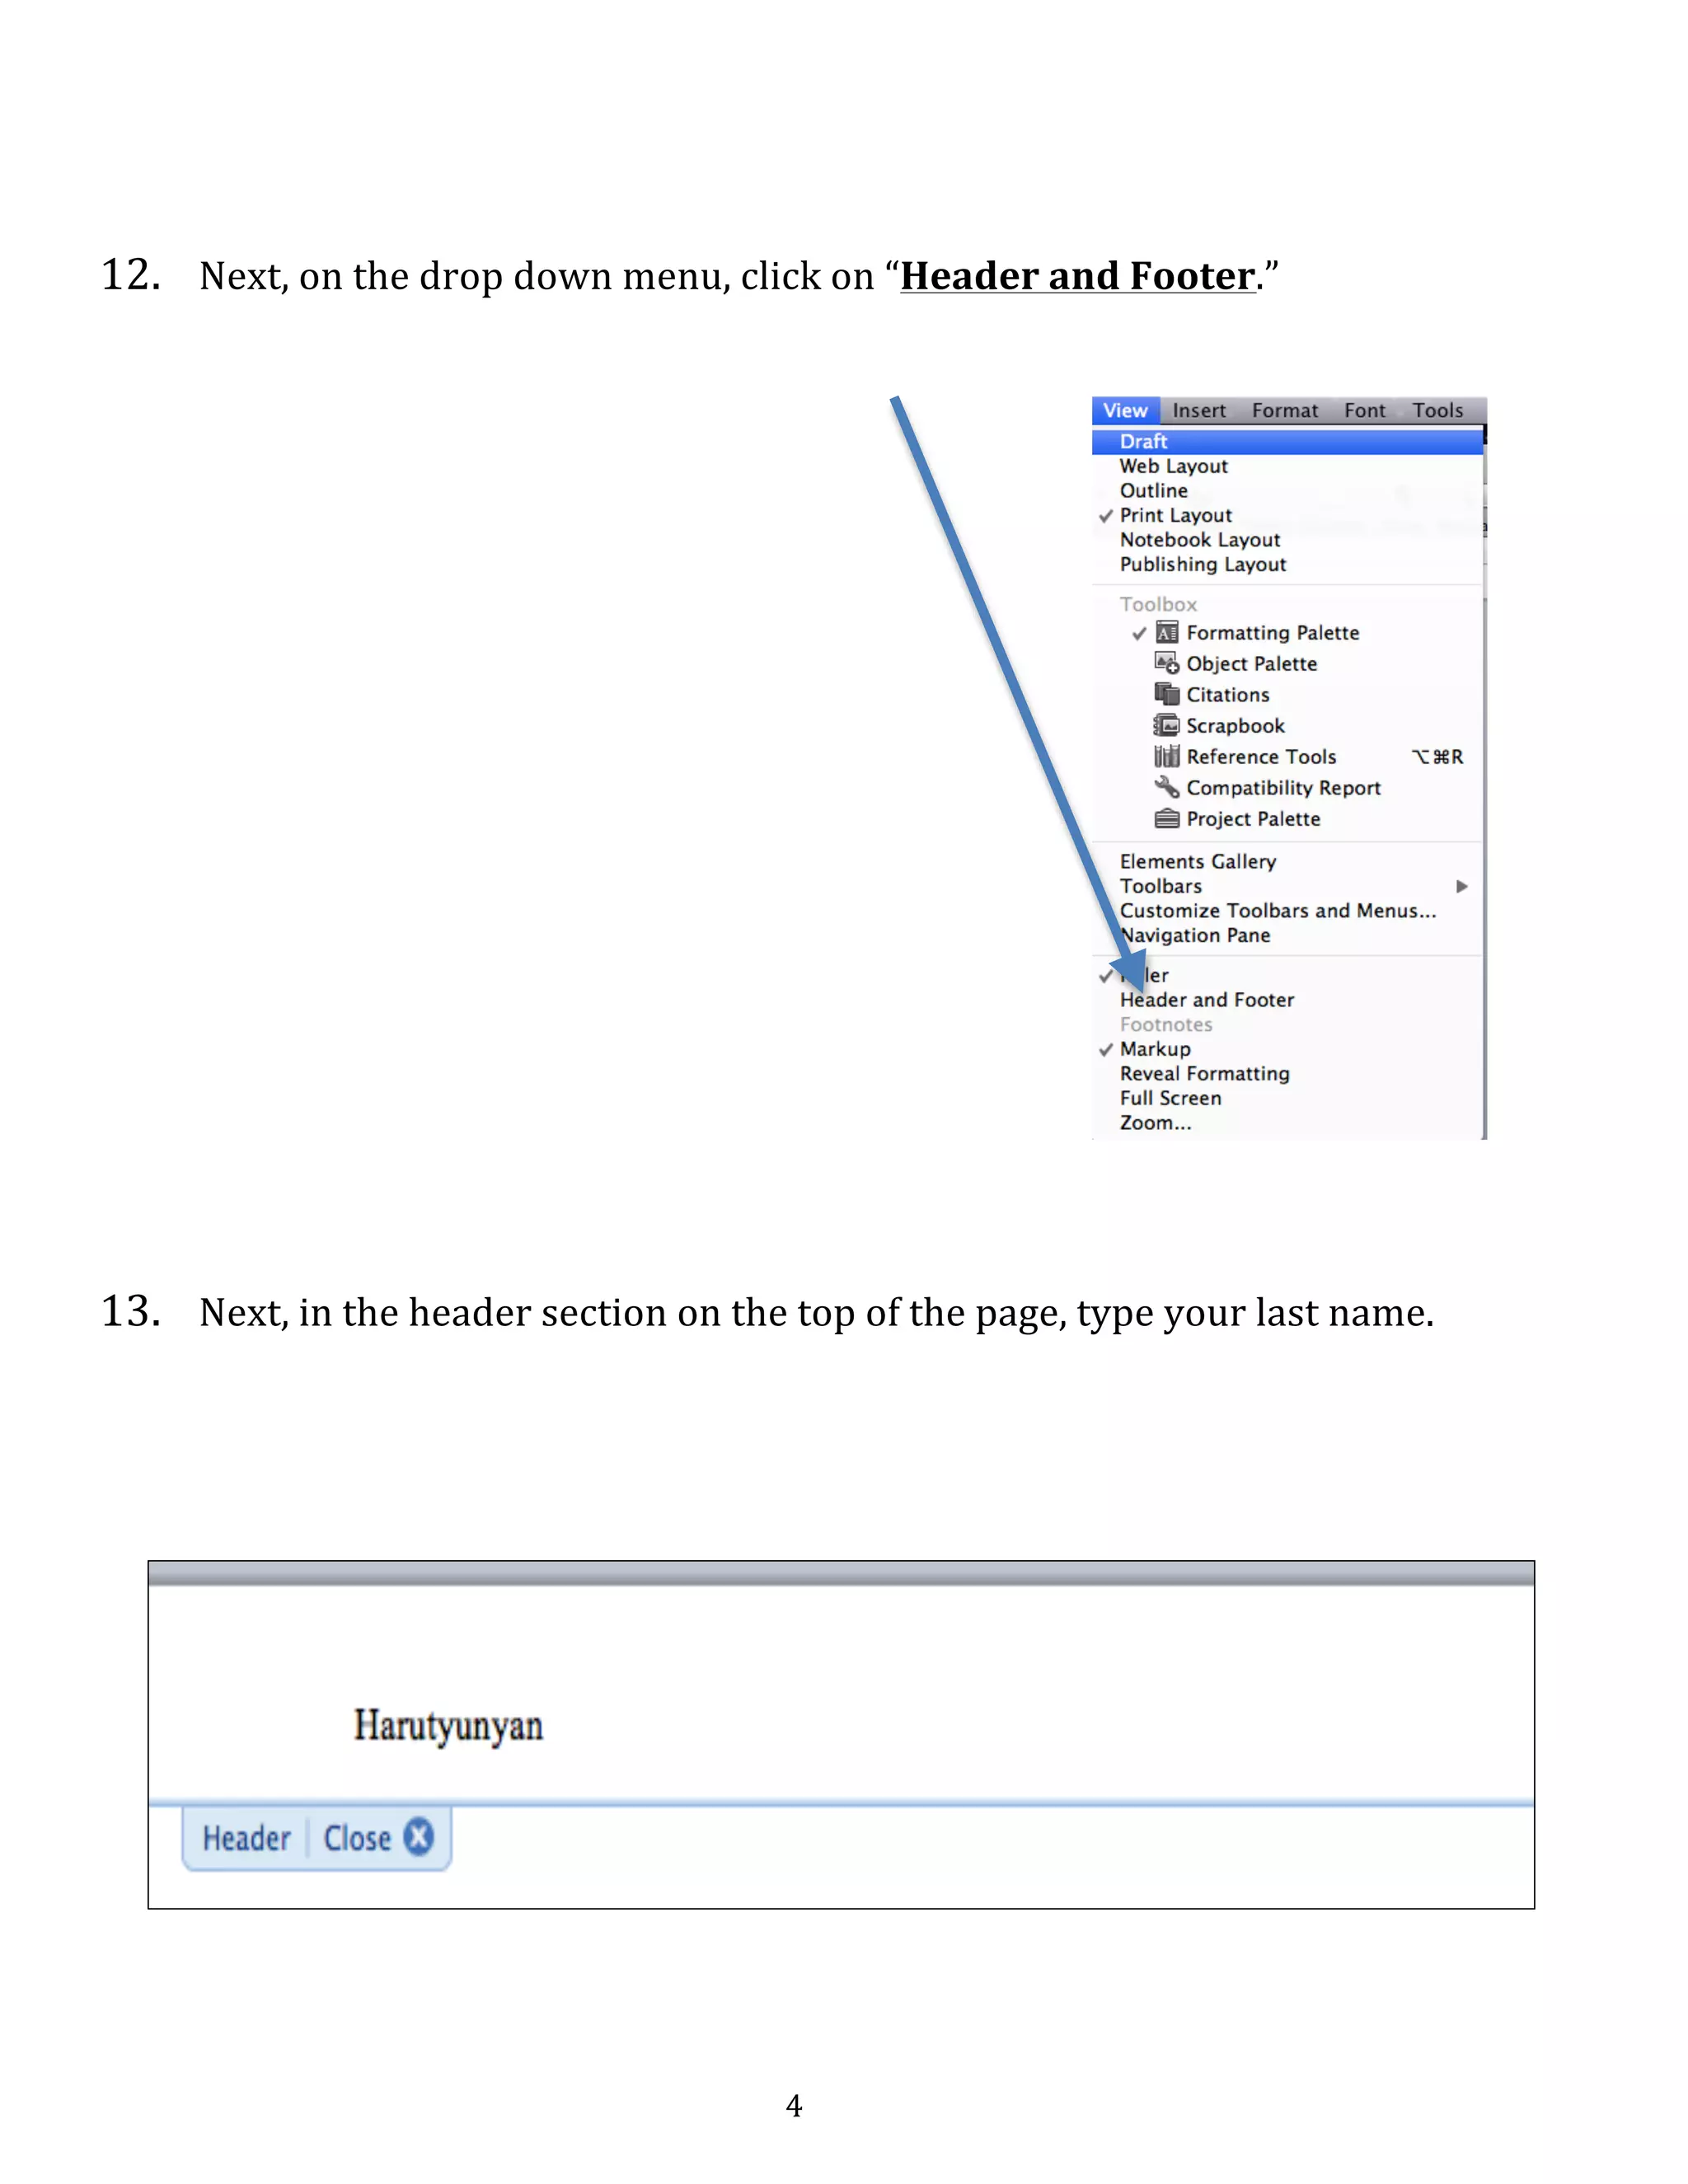
This document provides step-by-step instructions for properly formatting a paper in MLA style using Microsoft Word 2008 on a Mac. It details how to double space, set margins to 1 inch, add a running header with the author's last name and page number, and insert a title centered at the top of the page. The 20 steps cover formatting the document, headings, page numbers, and other essential MLA formatting requirements.
Learning the Basics of Microsoft Word 2010 for Microsoft Windows TranscriptSaide OER Africa
This HIBB begins with a general introduction to the Microsoft Word interface, then introduces various standard tasks including creating new documents, opening existing documents, saving documents, working with text, formatting various parts of documents, inserting non-text items into the document, proofreading the document, printing and closing individual documents. The HIBB also introduces and explains the new ribbon menu system used by the recent versions of Microsoft Office suite products, including Microsoft Word.
At the end of this HIBB, students will be able to complete basic tasks that Microsoft Word has to offer including the ability to create and open a document, save a document, and print a document. In addition to these basic tasks, students will be able to add formatting and customizing elements to their documents, such as inserting pictures, tables, links, and headers and footers.
Step by Step Microsoft Word 2010.
-Explore Word 2010 & Customize Ribbon
-Change the Look of Text
-Organize Information in Columns and Tables
-Insert and Modify Charts
-Use Other Visual Elements - Adding Watermarks
-Adding Bookmarks
-Work with Mail Merge
Aligning Text in a Microsoft Word Document can be a tedious task if you try to do it
using only Tabs and Spaces.
Fortunately, Word has a Table feature which you can
use to present the same information but in a more structured and easy-to-read
format.
MS Word Table Feature helps Creating
Tabular Data, Managing their Structures and Dimensions, Formatting them, and
Displaying them in a form that you most desire.
How to Create APA Headers and a Title Page in Microsoft Word 2.docxwellesleyterresa
How to Create APA Headers and a Title Page in Microsoft Word 2010
(PC-Version)
Step-by-Step Directions
How to Create the Title Page Header
Within a Microsoft (MS) Word document:
1. Double-click the header area (the upper portion) of your first page. You did this step correctly if a
green tab titled “Header & Footer Tools” opens on the top of your MS Word Menu Bar as
illustrated below.
2. Under the Header and Footer Tools, in the “Options” section, place a checkmark next to the
“Different First Page” box.
3. Next, move over to the “Header & Footer” section, click “Header,” and then choose the second
option, which is “Blank (Three Columns).”
4. Double-click the middle “[Type text],” make sure it is highlighted blue, and delete it by clicking
the “Delete” key on your keyboard.
5. Then click the left “[Type text],” make sure it is highlighted blue, and type Running head:
(make sure it has a capital R, a lowercase h, and that you use a colon). Then type in your title.
The title should be in all CAPS. To do this function, hold down the “Shift” key on your keyboard
as you type your title. Your header title needs to be 50 characters or less. If you have a long title,
use only a shortened version for your header. Your header should look like: Running head:
SHORTENED TITLE OF YOUR PAPER.
6. Then click the right most “[Type text]” area and click the “Page Number” button in the
“Header & Footer” section, click “Current Position,” and then select “Simple Plain Number.”
7. Highlight the header and page number (to do this step, double-click until a blue highlight goes
from the title to the page number), and change the font to Times New Roman and the font size to
12.
• Note: To change the font size and style, click the “Home” tab, and in the “Font” section
change Calibri to Times New Roman. Then change the size 11 font to size 12 by
clicking on the small downward arrow next to the font name and size.
How to Create the Title Page Content
1. Double-click out of the header to the main area of your document.
2. Hit the “Enter” key on your keyboard approximately 5 times.
• Note: this number is not really set, but you do want it positioned so all of your
information is in the middle of your title page.
3. Under the “Home” tab, in the “Paragraph” section, click on the “Center” alignment button (a
shortcut to do this is by clicking Ctrl + e on your keyboard) and add:
• Your paper’s title
Note: the first letter in each major word should be capitalized
• Your first name and your last name
• Your course Name and Number and Title
For example: ENG 121: English Composition I
• Your instructor’s name
• The date you will turn in the paper.
Note: The date should read: Month Day, Year --all spelled out. For example:
January 1, 2014.
Proprietary Information of Ashford University, Created by Academics, CR 215590.
4. Once your information is typed in, you need ...
it a pdf document about APA style for microsoft 2007 just open your doc word and follow the instructions in this document and you will have the necessary setup
BOSCO-Uganda ICT Training handbook (II): Office applicationsTom Loughran
This is the second part of the BOSCO-Uganda ICT Training manual, covering material presented at the user level. This second part covers Office applications.
Operation “Blue Star” is the only event in the history of Independent India where the state went into war with its own people. Even after about 40 years it is not clear if it was culmination of states anger over people of the region, a political game of power or start of dictatorial chapter in the democratic setup.
The people of Punjab felt alienated from main stream due to denial of their just demands during a long democratic struggle since independence. As it happen all over the word, it led to militant struggle with great loss of lives of military, police and civilian personnel. Killing of Indira Gandhi and massacre of innocent Sikhs in Delhi and other India cities was also associated with this movement.
A Strategic Approach: GenAI in EducationPeter Windle
Artificial Intelligence (AI) technologies such as Generative AI, Image Generators and Large Language Models have had a dramatic impact on teaching, learning and assessment over the past 18 months. The most immediate threat AI posed was to Academic Integrity with Higher Education Institutes (HEIs) focusing their efforts on combating the use of GenAI in assessment. Guidelines were developed for staff and students, policies put in place too. Innovative educators have forged paths in the use of Generative AI for teaching, learning and assessments leading to pockets of transformation springing up across HEIs, often with little or no top-down guidance, support or direction.
This Gasta posits a strategic approach to integrating AI into HEIs to prepare staff, students and the curriculum for an evolving world and workplace. We will highlight the advantages of working with these technologies beyond the realm of teaching, learning and assessment by considering prompt engineering skills, industry impact, curriculum changes, and the need for staff upskilling. In contrast, not engaging strategically with Generative AI poses risks, including falling behind peers, missed opportunities and failing to ensure our graduates remain employable. The rapid evolution of AI technologies necessitates a proactive and strategic approach if we are to remain relevant.
How to Make a Field invisible in Odoo 17Celine George
It is possible to hide or invisible some fields in odoo. Commonly using “invisible” attribute in the field definition to invisible the fields. This slide will show how to make a field invisible in odoo 17.
Acetabularia Information For Class 9 .docxvaibhavrinwa19
Acetabularia acetabulum is a single-celled green alga that in its vegetative state is morphologically differentiated into a basal rhizoid and an axially elongated stalk, which bears whorls of branching hairs. The single diploid nucleus resides in the rhizoid.
Introduction to AI for Nonprofits with Tapp NetworkTechSoup
Dive into the world of AI! Experts Jon Hill and Tareq Monaur will guide you through AI's role in enhancing nonprofit websites and basic marketing strategies, making it easy to understand and apply.
Biological screening of herbal drugs: Introduction and Need for
Phyto-Pharmacological Screening, New Strategies for evaluating
Natural Products, In vitro evaluation techniques for Antioxidants, Antimicrobial and Anticancer drugs. In vivo evaluation techniques
for Anti-inflammatory, Antiulcer, Anticancer, Wound healing, Antidiabetic, Hepatoprotective, Cardio protective, Diuretics and
Antifertility, Toxicity studies as per OECD guidelines
Macroeconomics- Movie Location
This will be used as part of your Personal Professional Portfolio once graded.
Objective:
Prepare a presentation or a paper using research, basic comparative analysis, data organization and application of economic information. You will make an informed assessment of an economic climate outside of the United States to accomplish an entertainment industry objective.
Honest Reviews of Tim Han LMA Course Program.pptxtimhan337
Personal development courses are widely available today, with each one promising life-changing outcomes. Tim Han’s Life Mastery Achievers (LMA) Course has drawn a lot of interest. In addition to offering my frank assessment of Success Insider’s LMA Course, this piece examines the course’s effects via a variety of Tim Han LMA course reviews and Success Insider comments.
Palestine last event orientationfvgnh .pptxRaedMohamed3
An EFL lesson about the current events in Palestine. It is intended to be for intermediate students who wish to increase their listening skills through a short lesson in power point.
1. 1
Quick
Guide
to
MLA
Format
in
Microsoft
Word
2008
(Mac)
1. First,
double-‐space
your
paper
before
you
begin
typing.
Click
on
“Format”
on
the
menu
bar
on
the
top
of
the
screen.
2. Next,
click
on
“Paragraph”
on
the
drop
down
menu.
2. 2
3. Next,
to
the
right
of
the
heading
“line
spacing”
click
on
the
blue
arrow.
4. Next,
click
on
“double”
on
the
drop
down
menu.
5. Next,
click
on
“OK.”
6.
Then,
click
on
“Format”
again
on
the
menu
bar
on
the
top
of
the
screen.
7.
Next,
click
on
“Document”
on
the
drop
down
menu.
3. 3
8.
All
margins
should
be
set
to
“1
inch”
except
“Gutter.”
Your
“header
and
footer”
has
to
be
0.5;”
this
measurement
is
already
set
for
you
in
Microsoft
Word.
9.
Next,
click
on
“OK.”
10.
Now
that
your
paper
is
double-‐spaced,
the
next
step
is
to
add
a
running
header
with
your
last
name
and
page
number.
11.
First,
click
on
“view”
in
the
menu
at
the
top
of
the
screen.
4. 4
12.
Next,
on
the
drop
down
menu,
click
on
“Header
and
Footer.”
13.
Next,
in
the
header
section
on
the
top
of
the
page,
type
your
last
name.
5. 5
14.
Next,
click
on
“view”
in
the
menu
at
the
top
of
the
screen,
then
click
on
“toolbars,”
finally
click
on
“formatting.”
15.
Next,
click
on
“right
align”
in
the
tool
bar
at
the
top
of
the
screen.
This
will
automatically
move
your
name
over
to
the
right
corner.
6. 6
Next,
click
on
“close.”
16.
Next,
click
on
“insert”
in
the
menu
on
the
top
of
the
screen.
17.
Next,
on
the
drop
down
menu,
click
on
“page
numbers.”
18.
Next,
in
the
“page
numbers”
menu,
under
“position”
click
on
the
blue
arrow
and
change
from
“bottom
of
page”
to
“top
of
page”
and
click
on
“ok.”
7. 7
19.
Next,
add
your
first
and
last
name,
professor’s
last
name,
class,
and
date
in
the
format
you
see
below.
Notice
that
it
is
aligned
to
the
left.
20.
Lastly,
add
the
title
to
your
document.
To
enter
the
title,
click
on
“align
center”
in
the
tool
bar
at
the
top
of
your
screen.