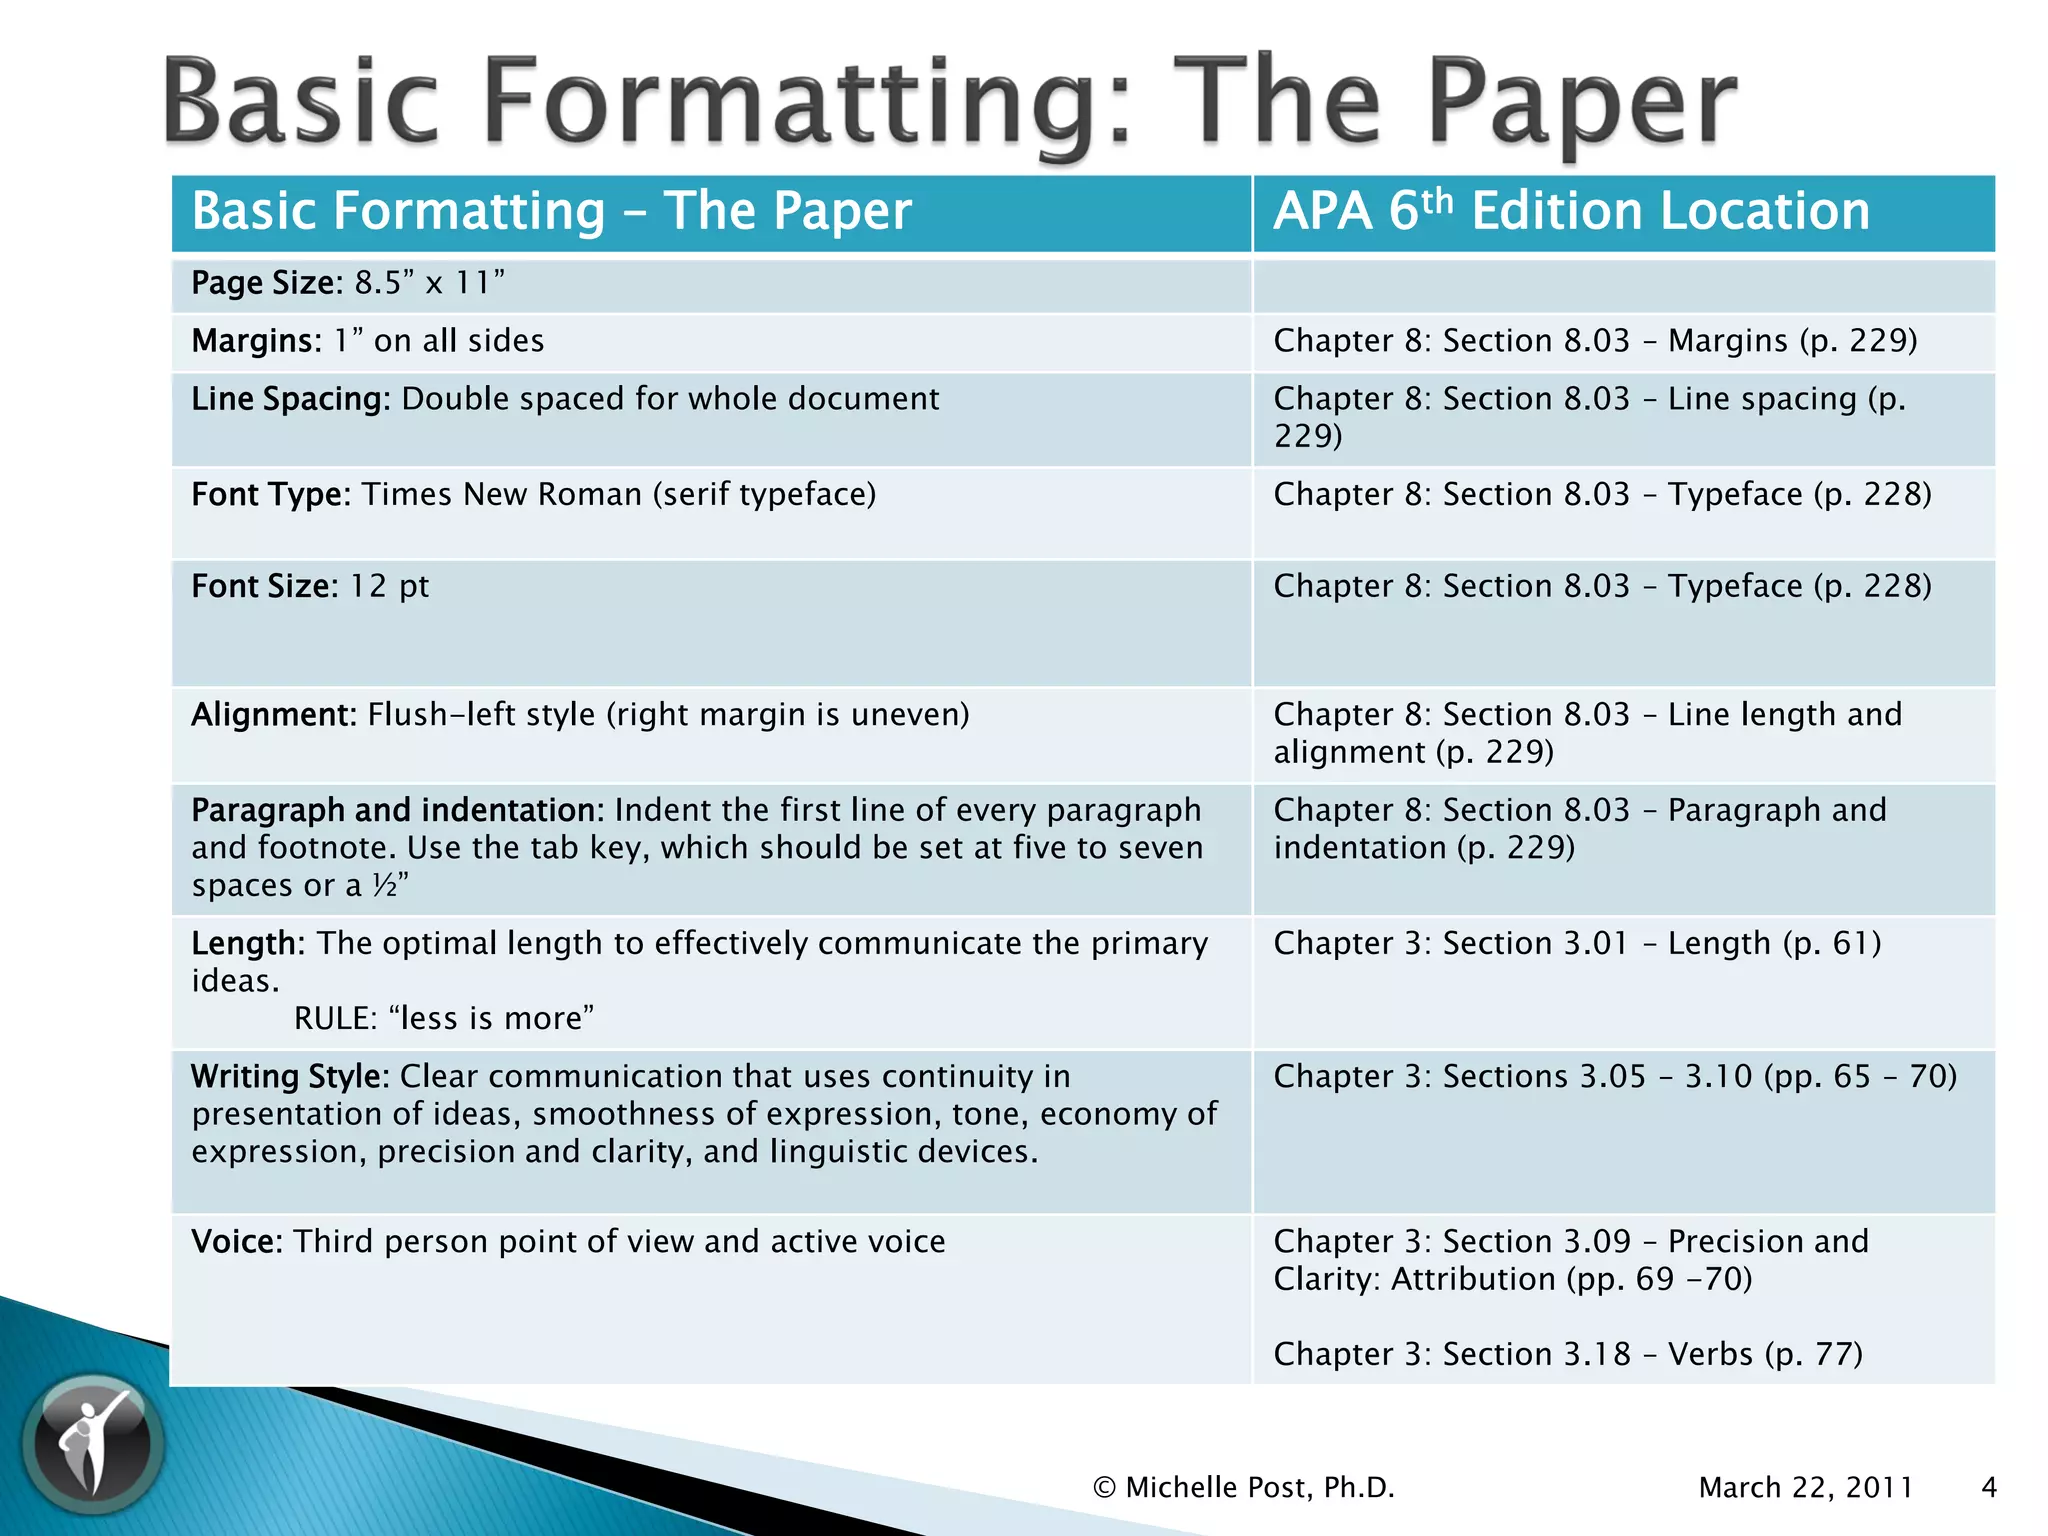
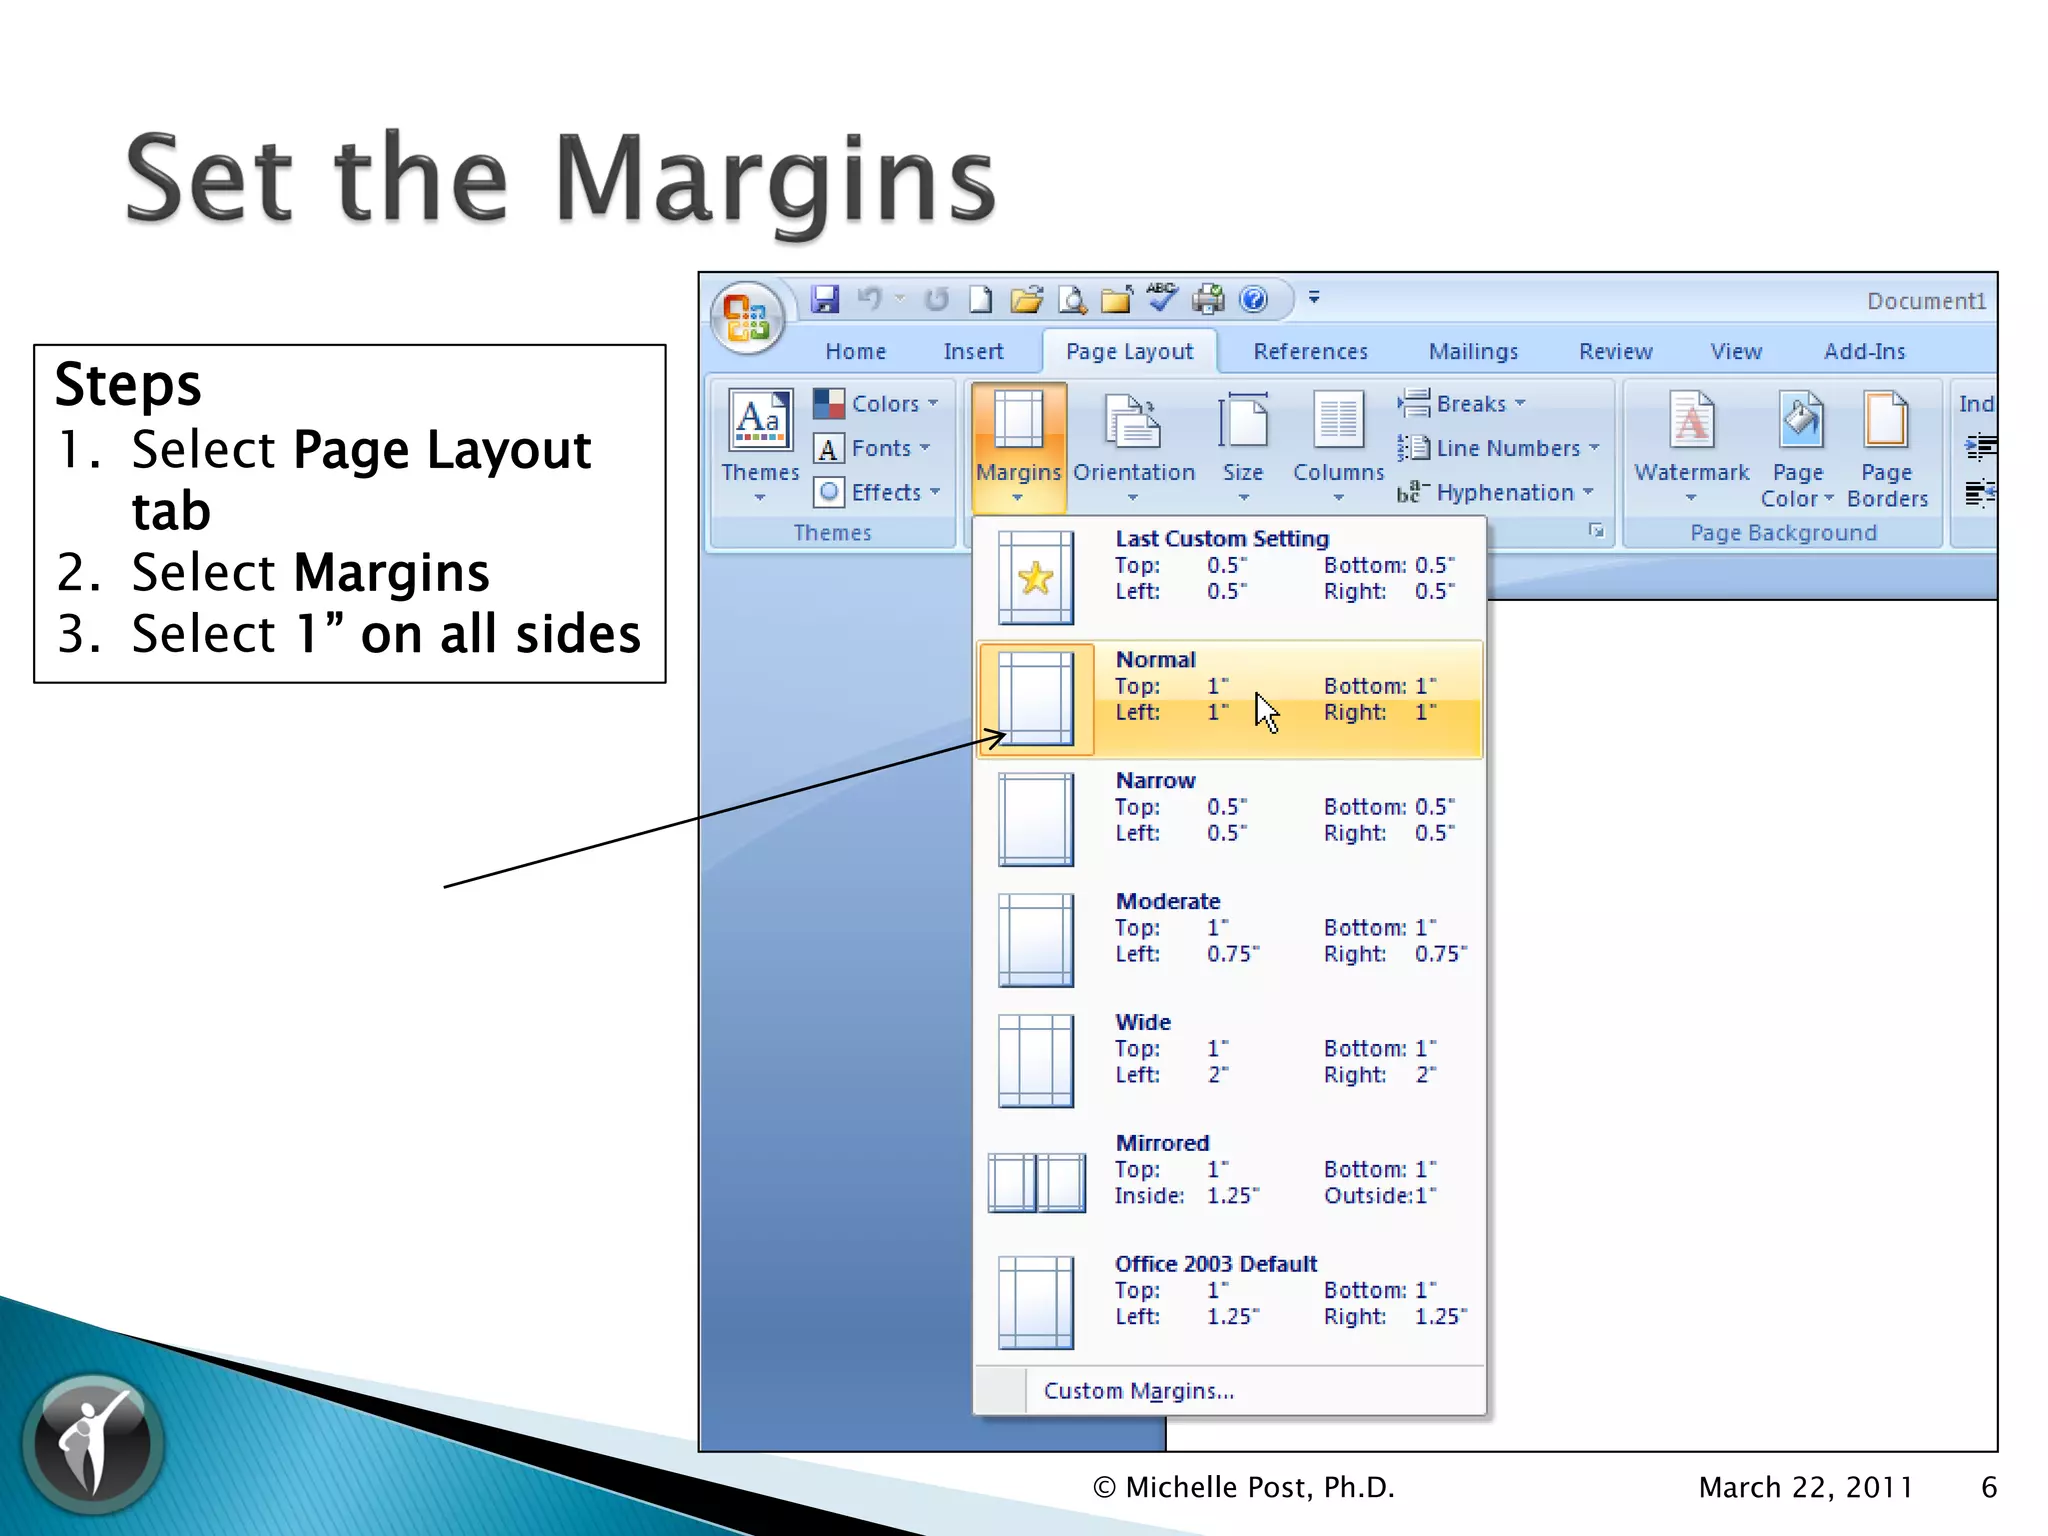
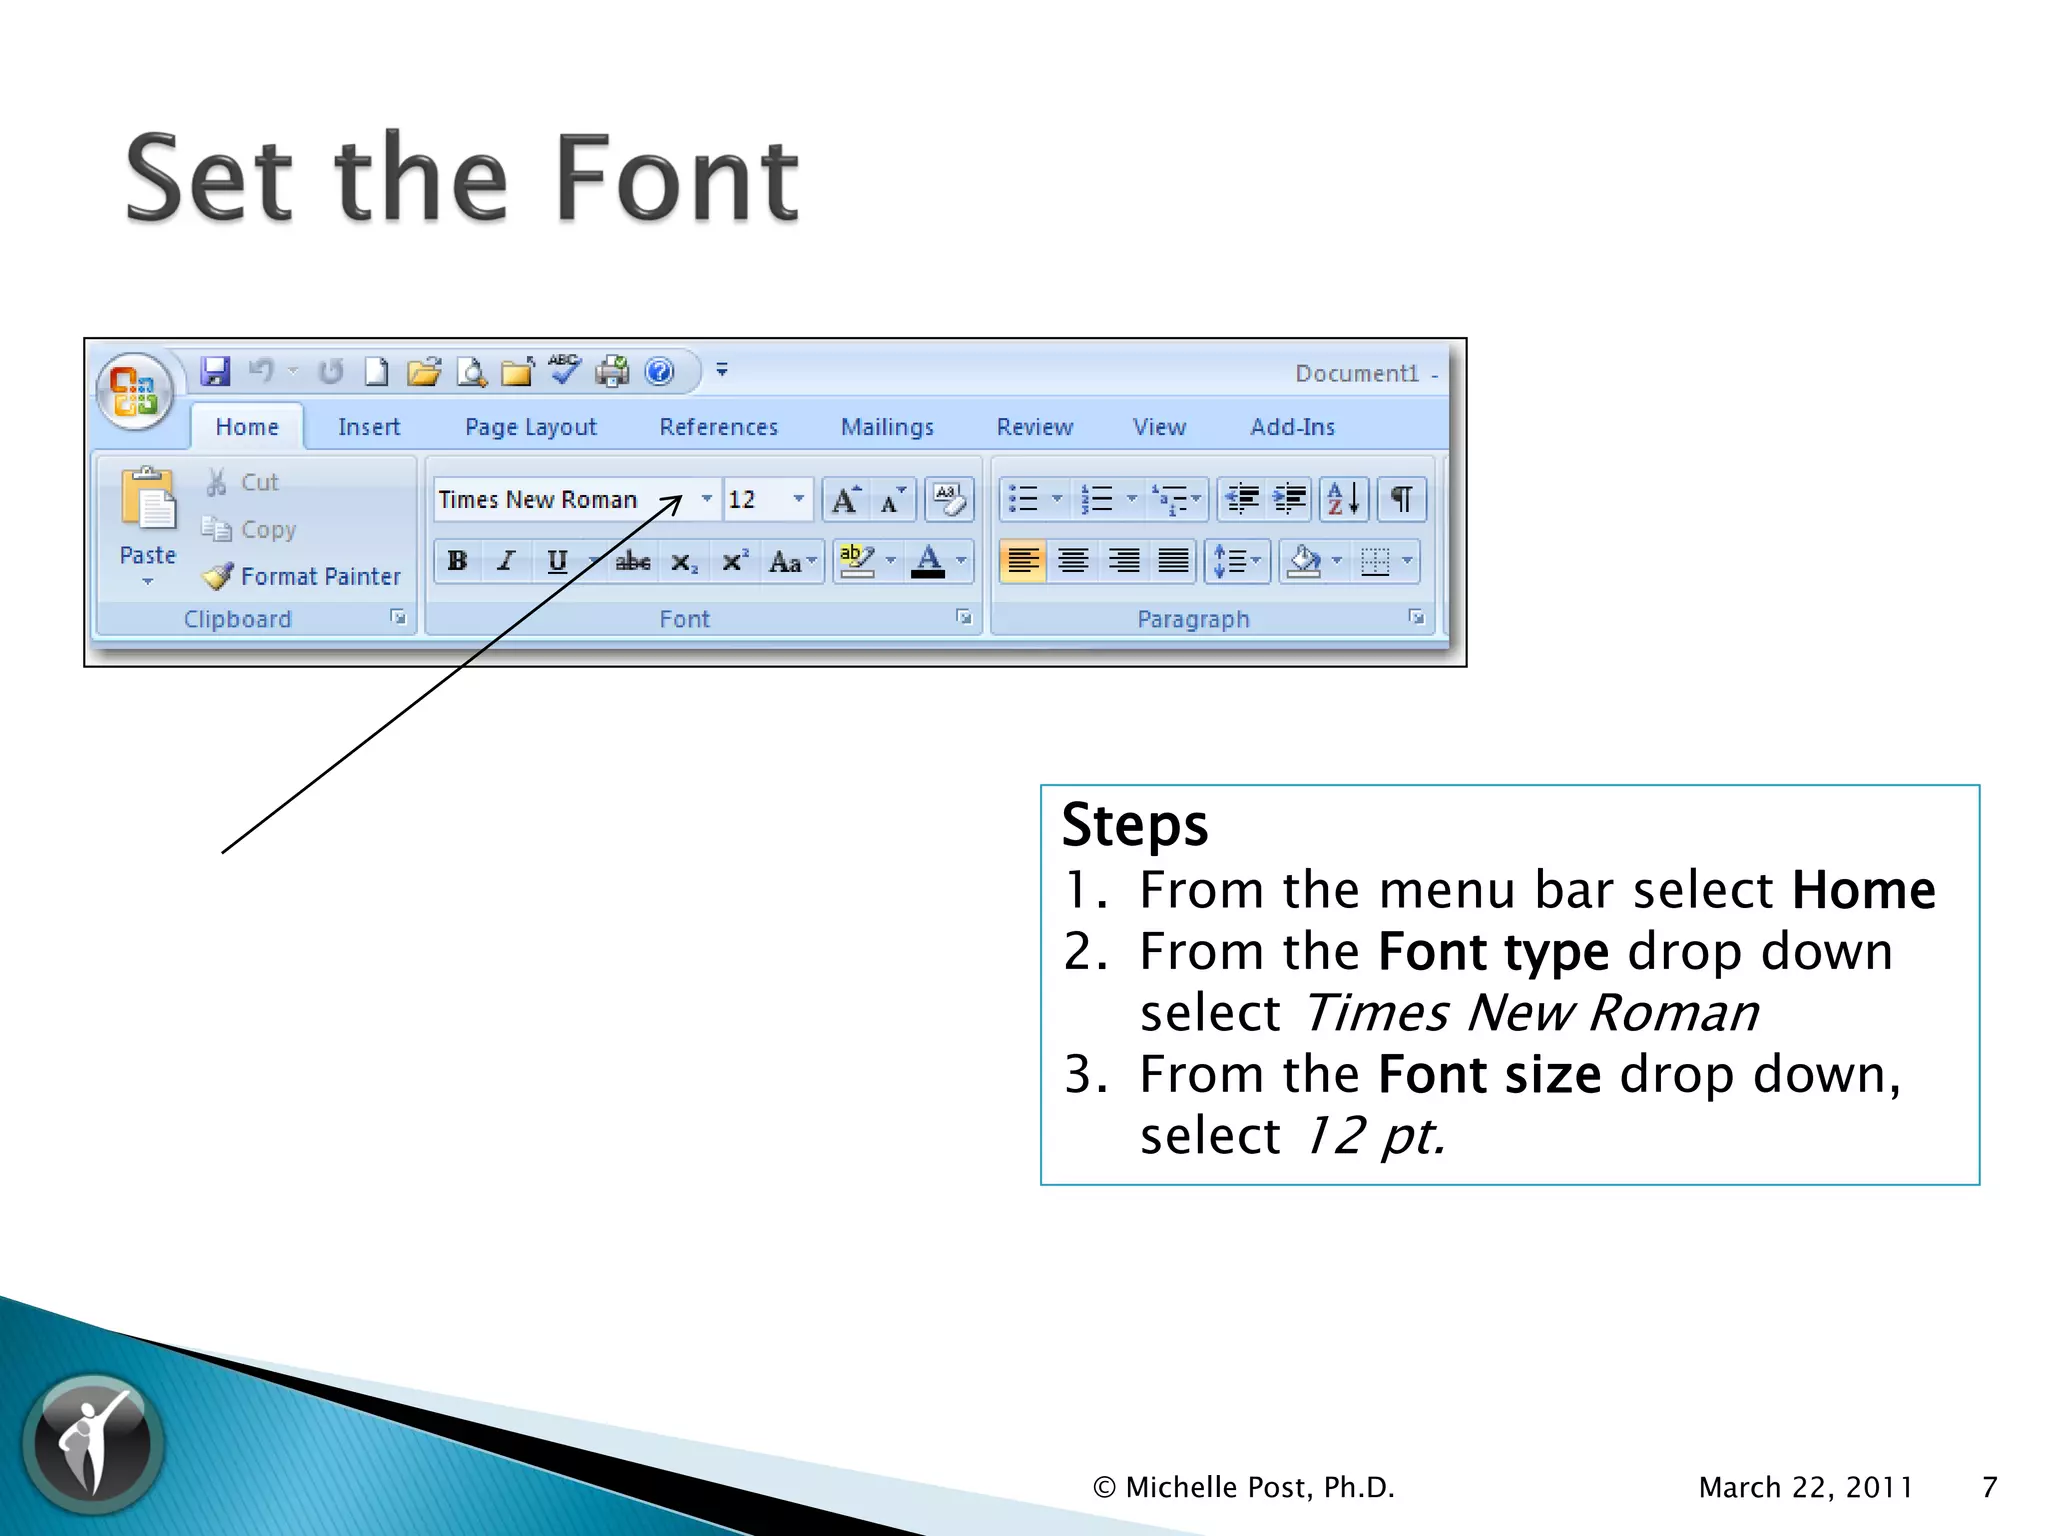
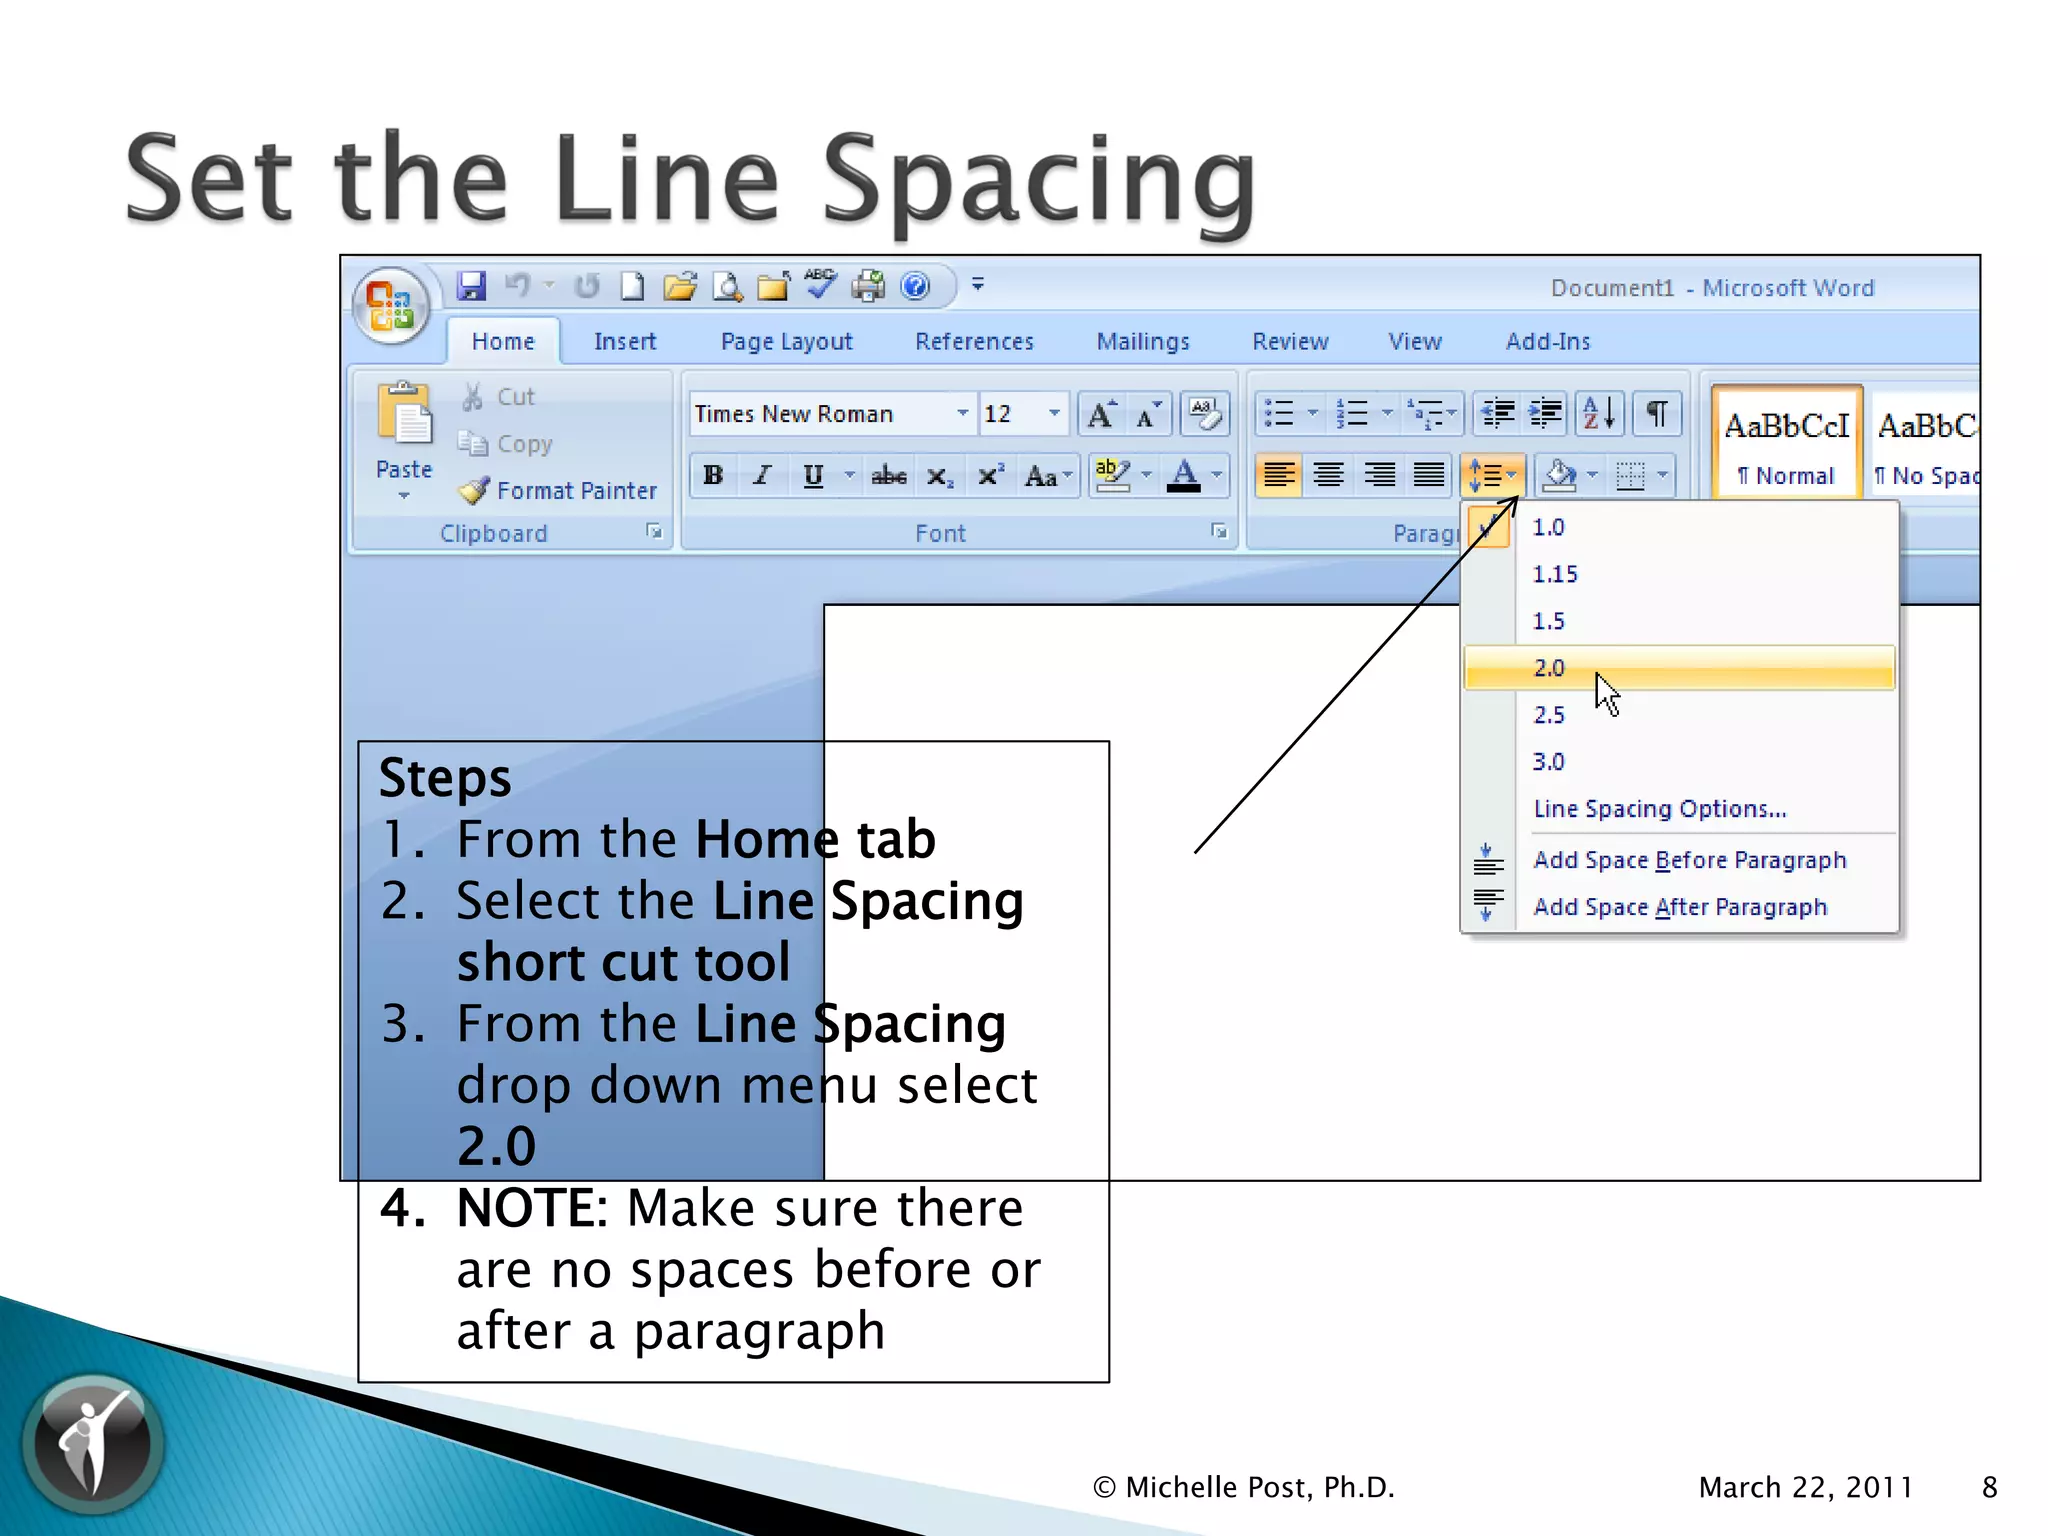
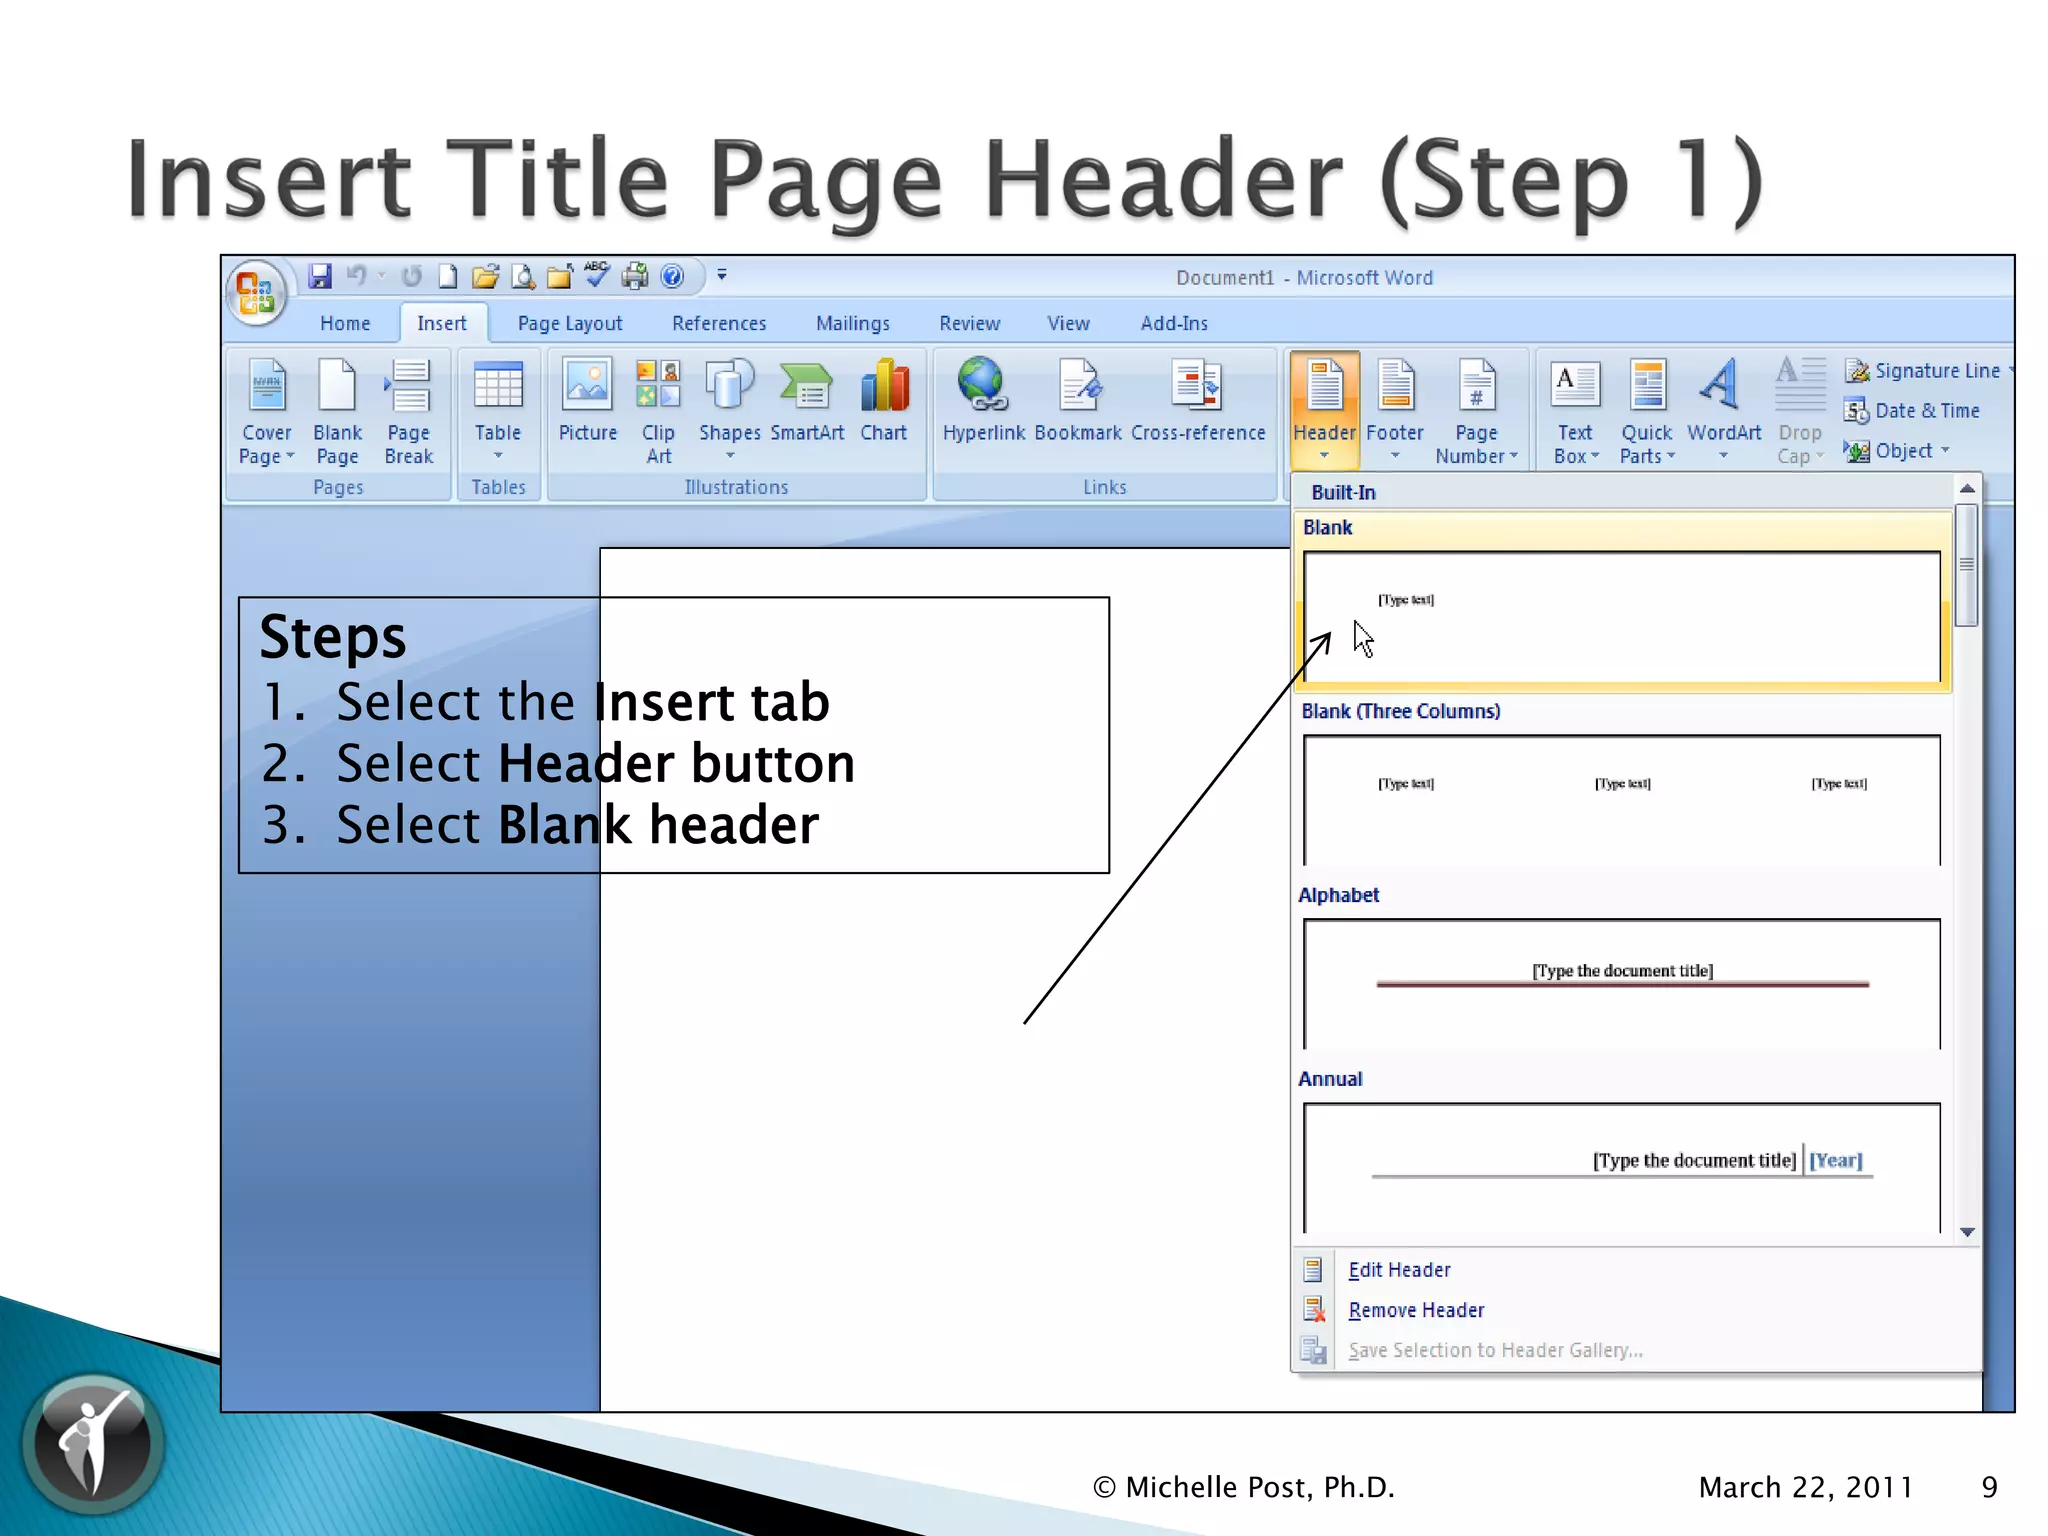
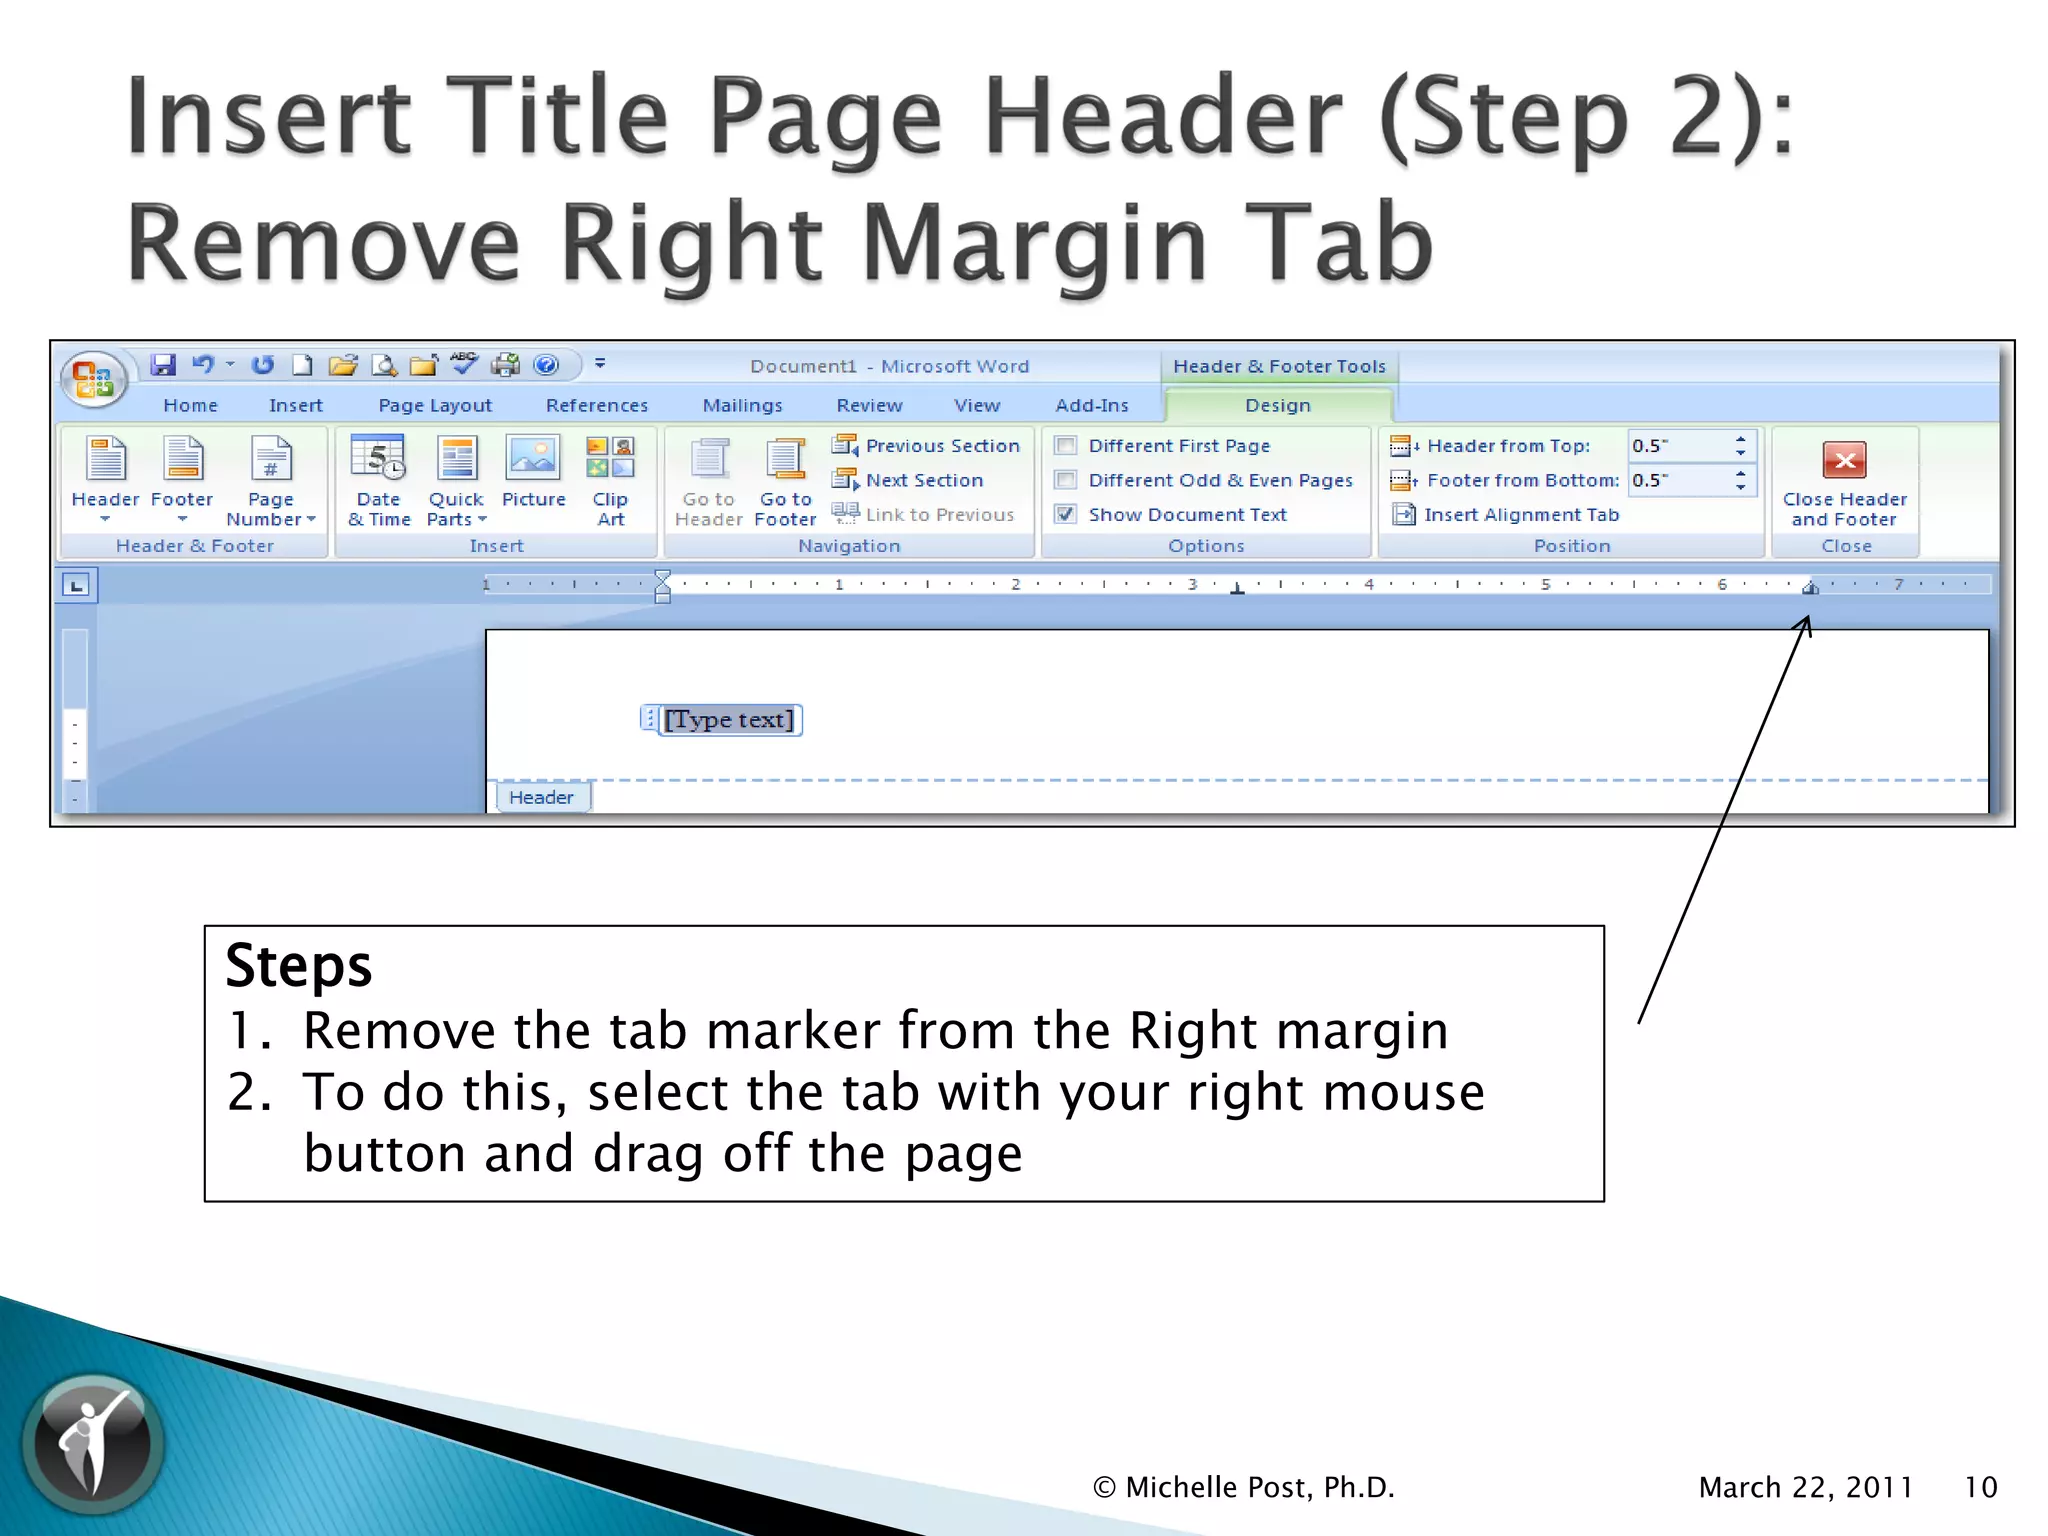
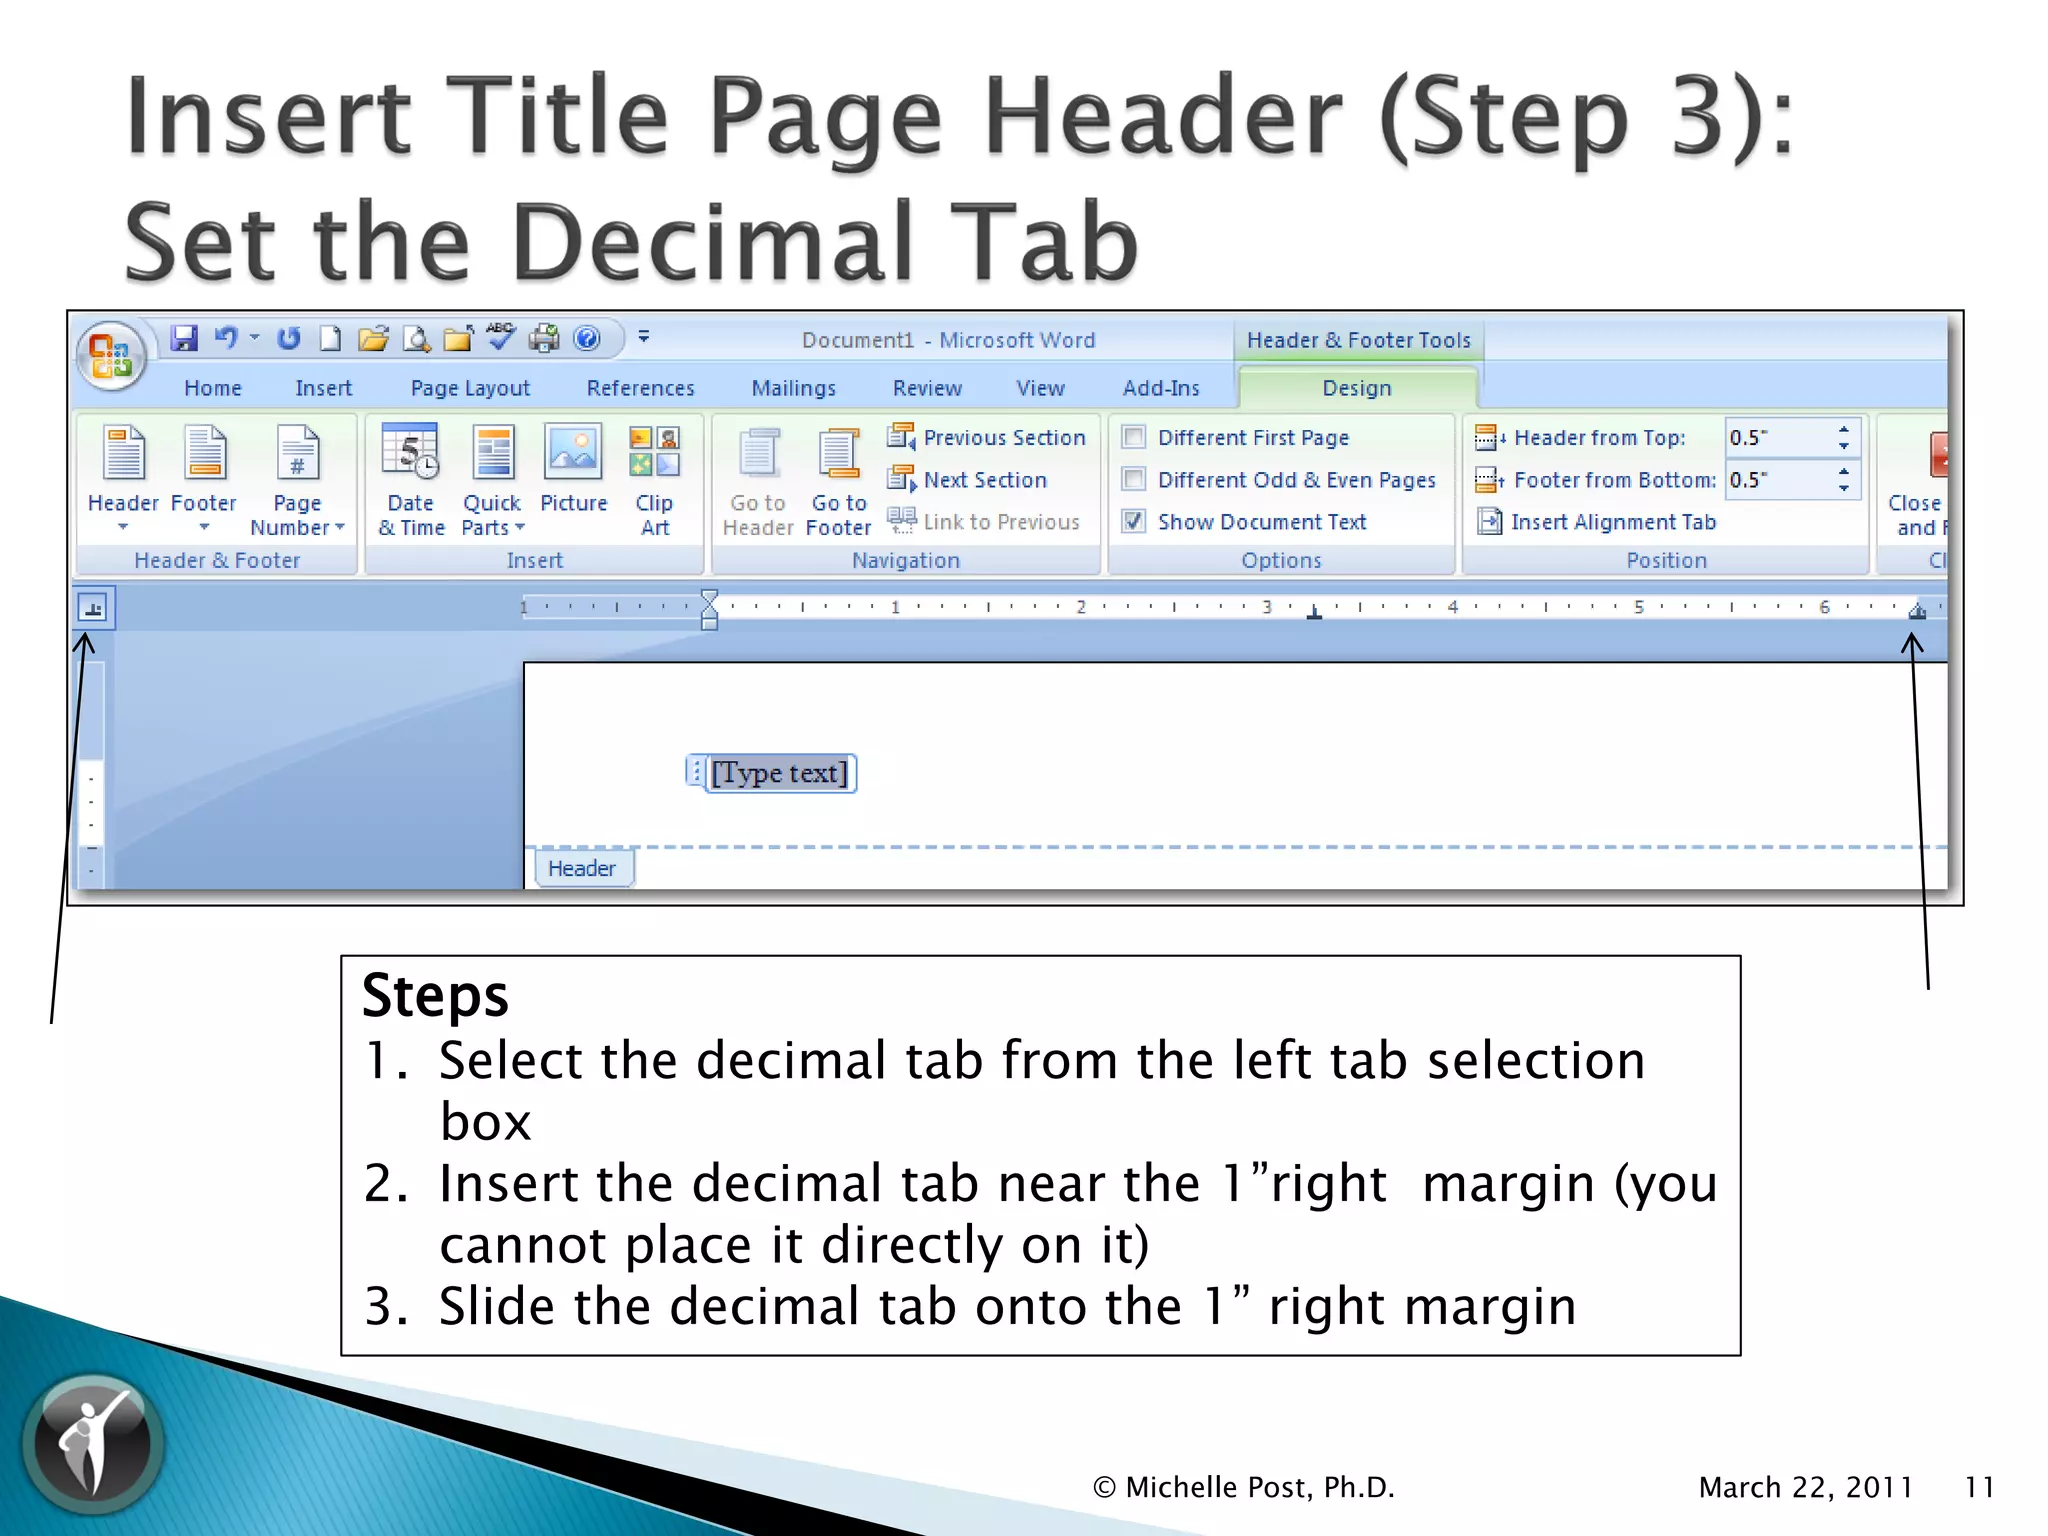
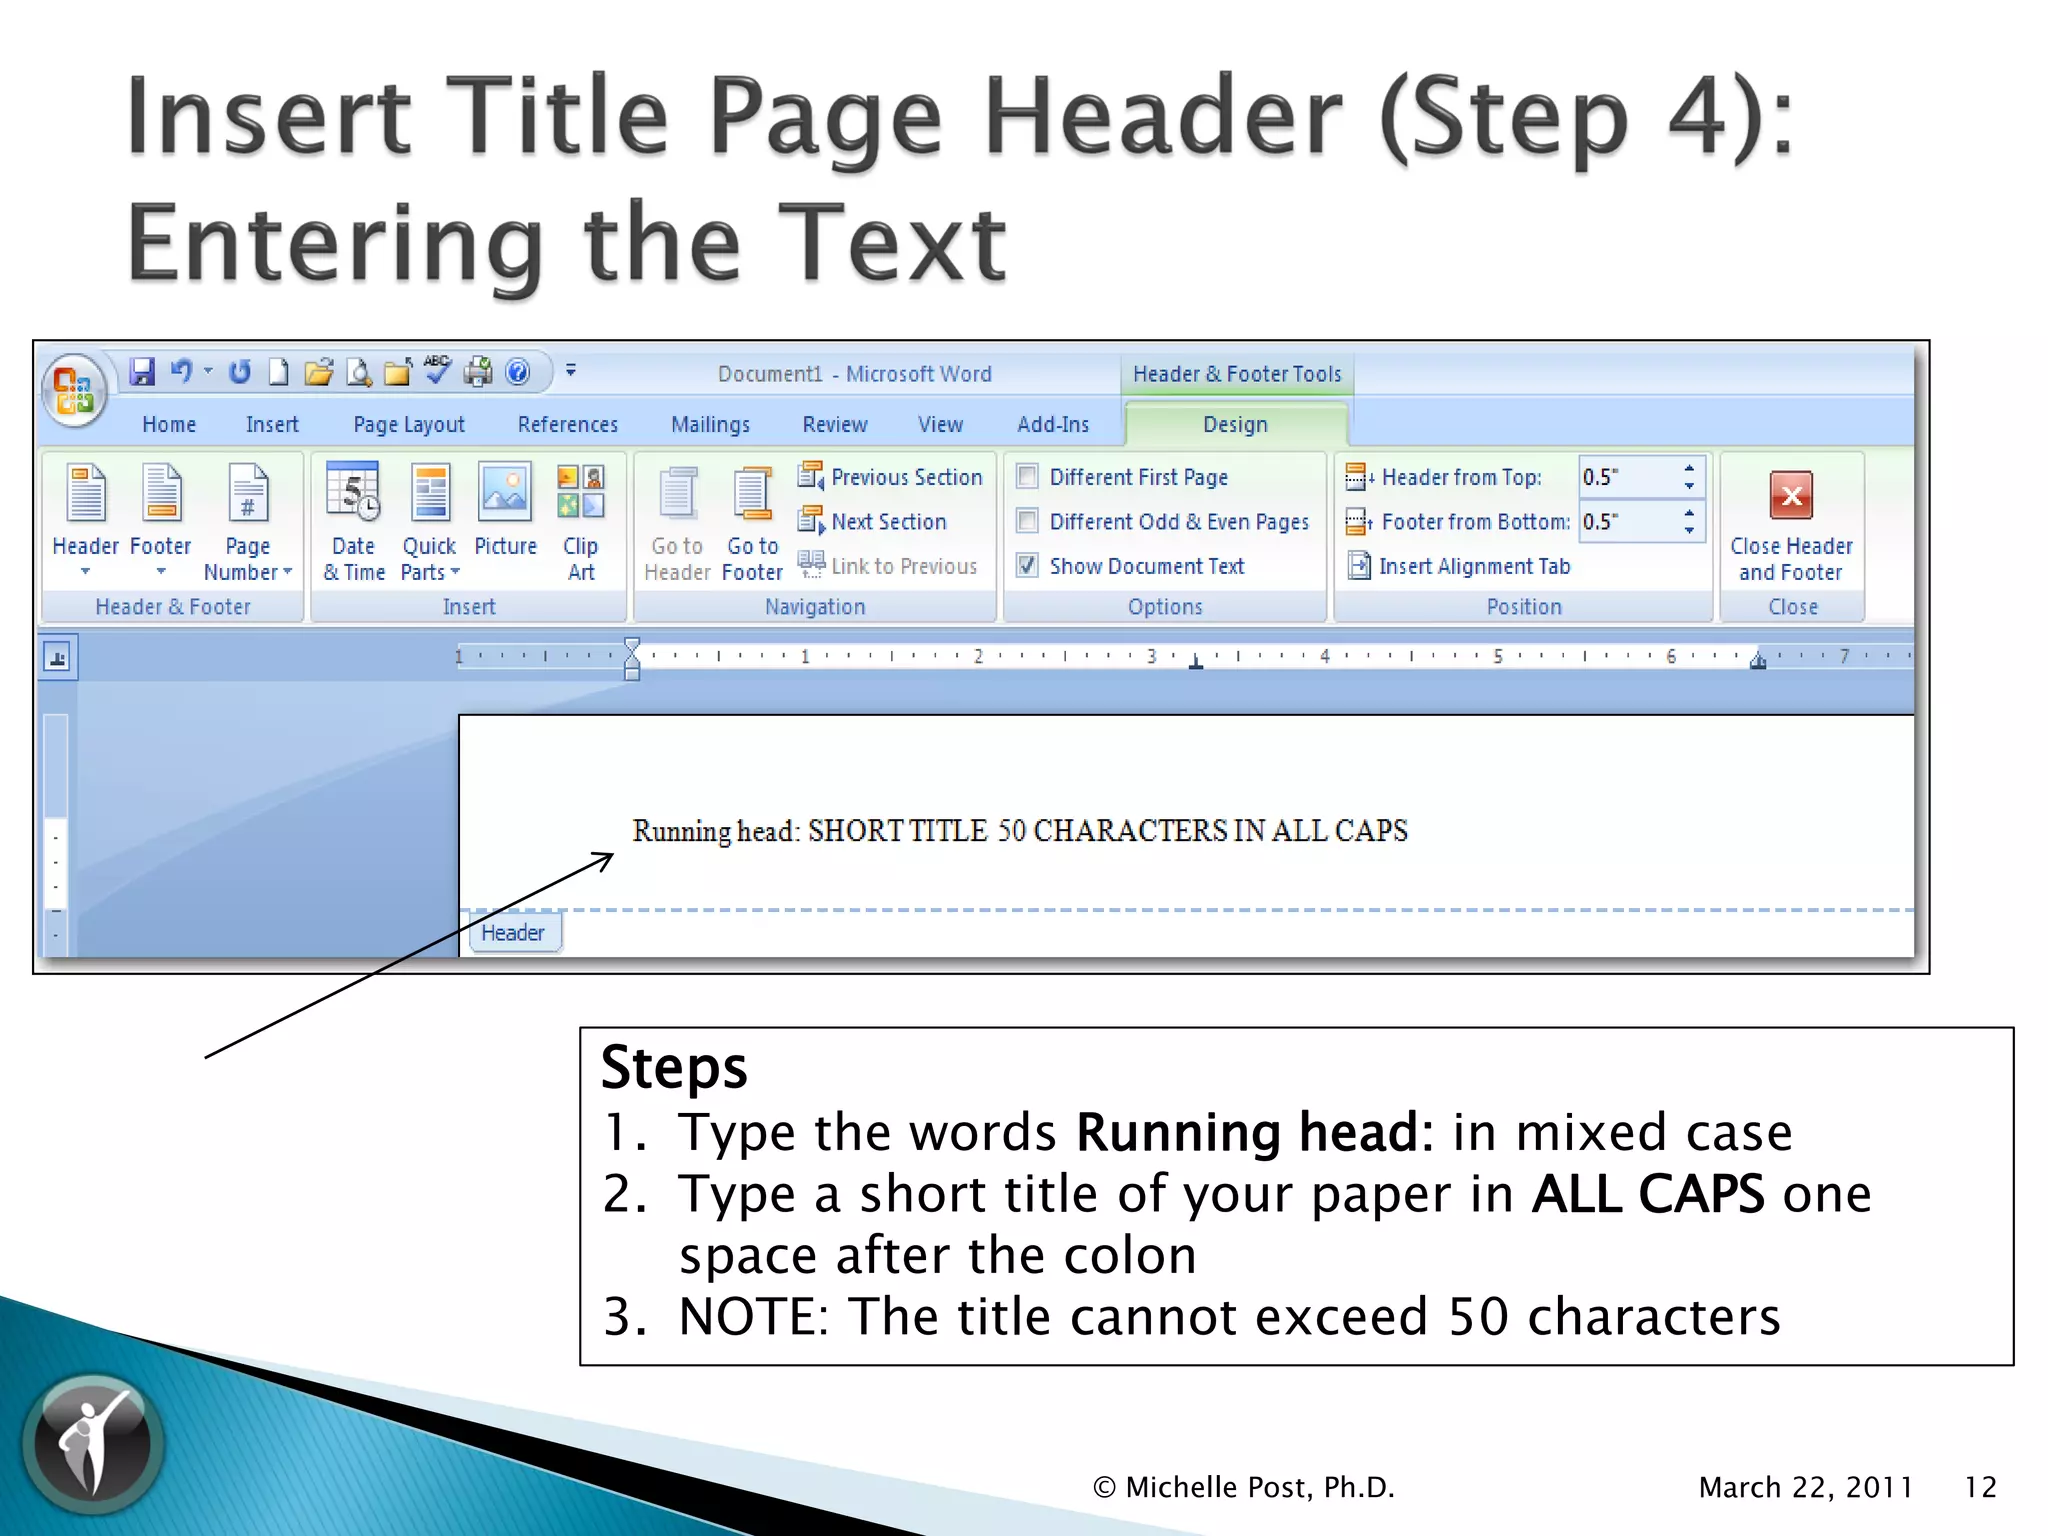
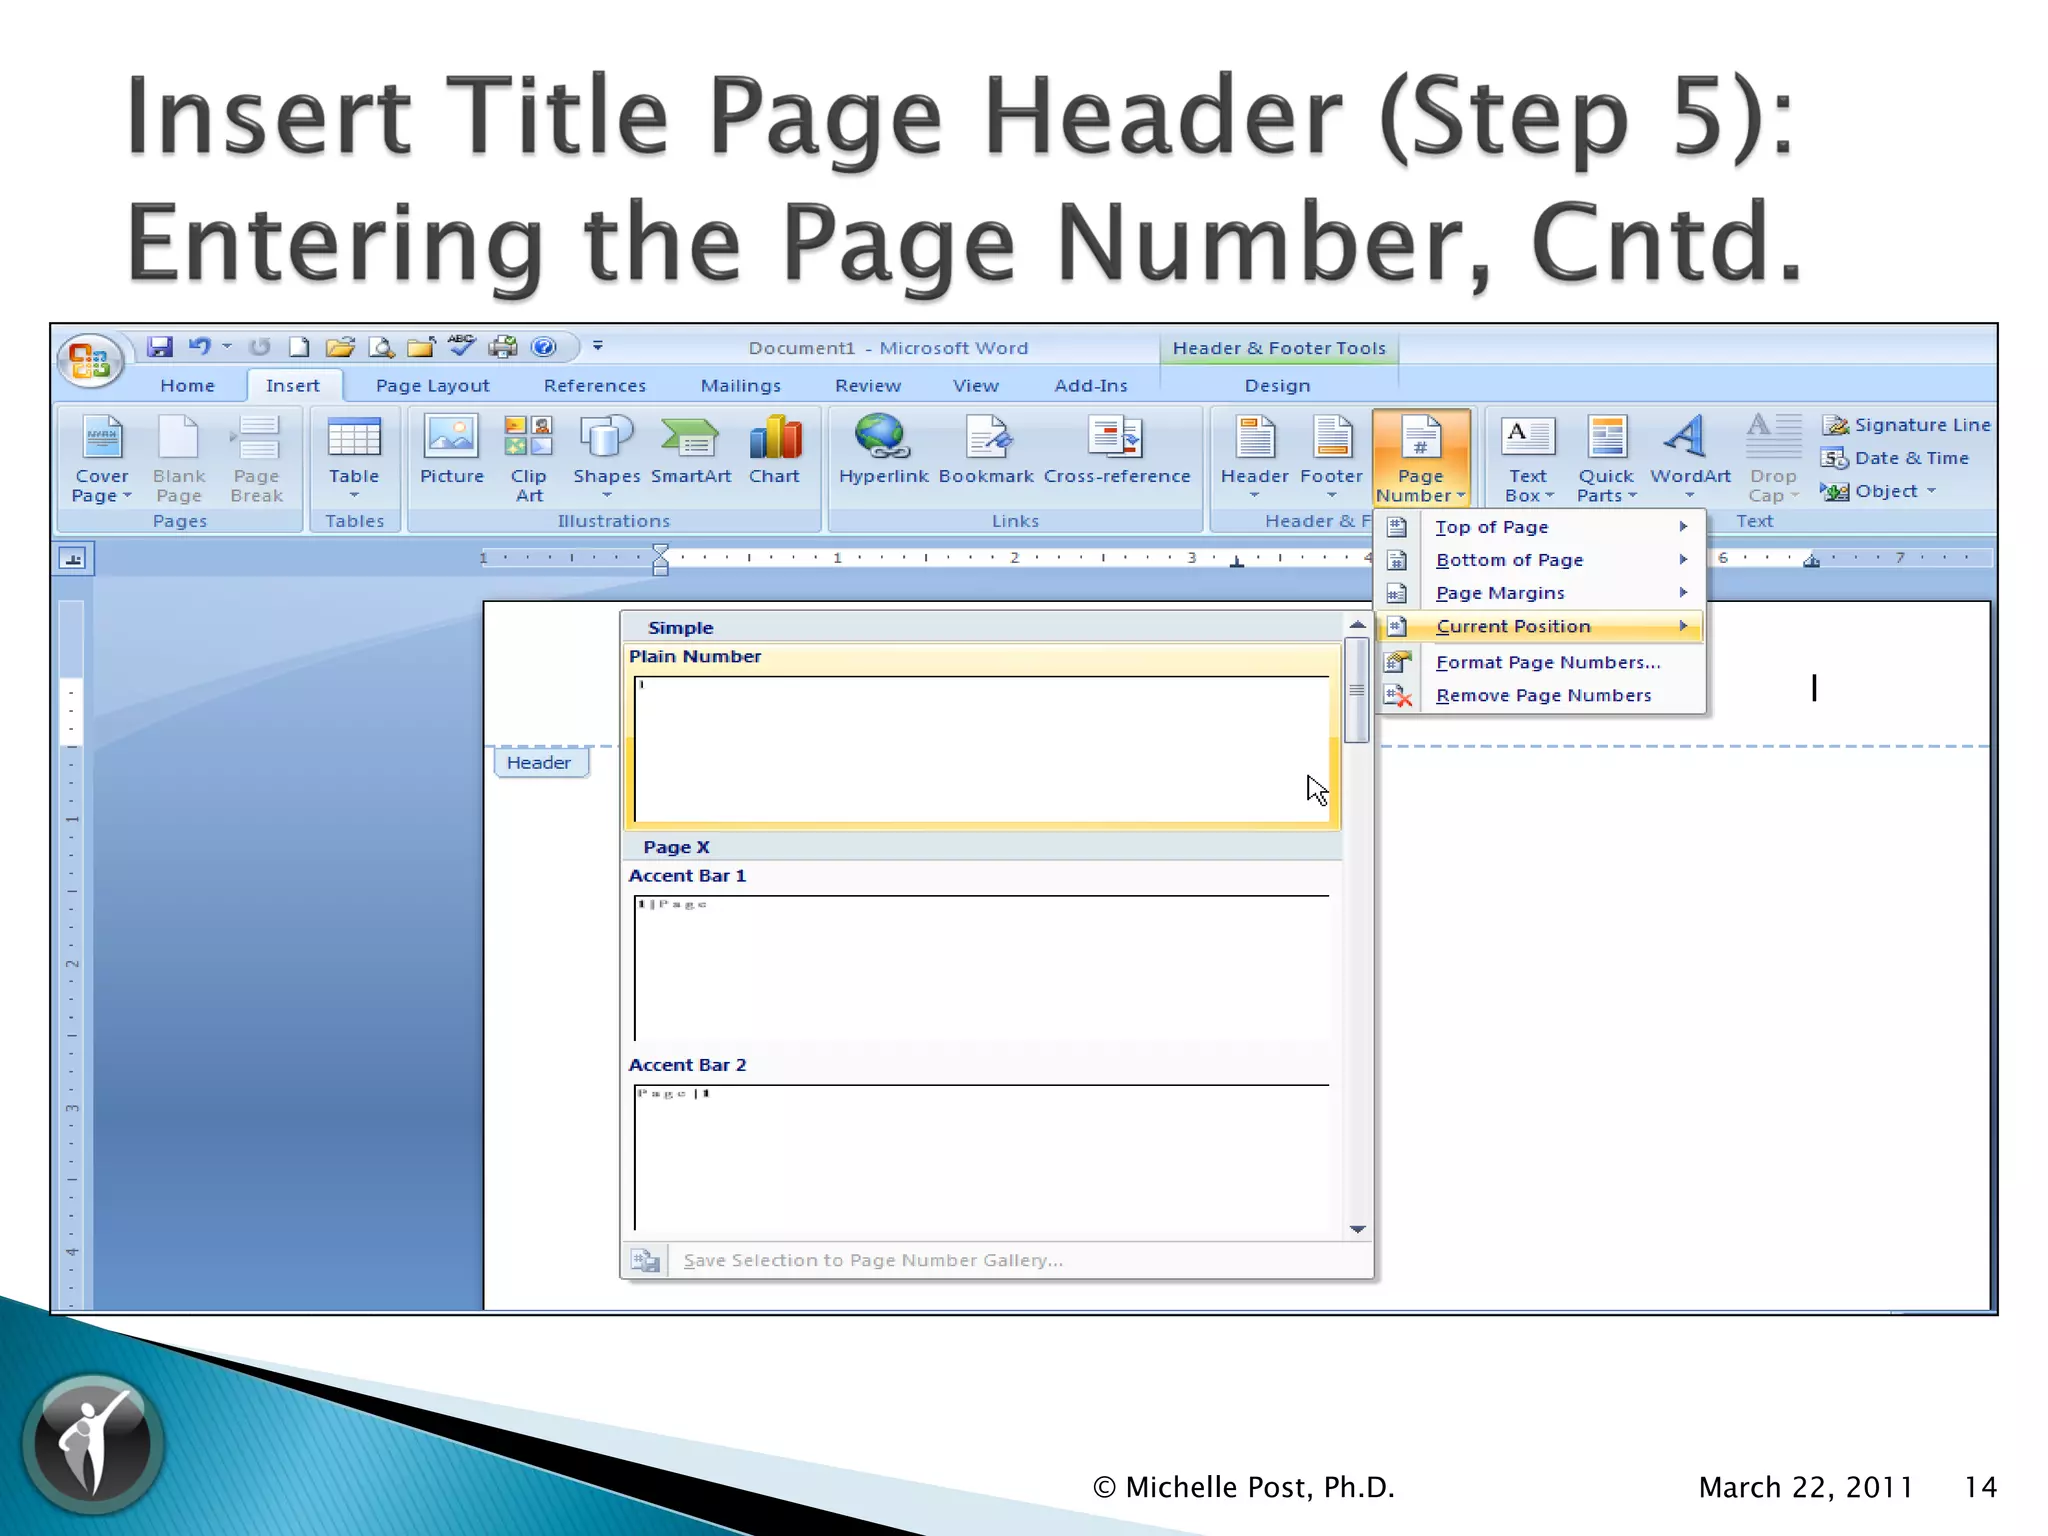
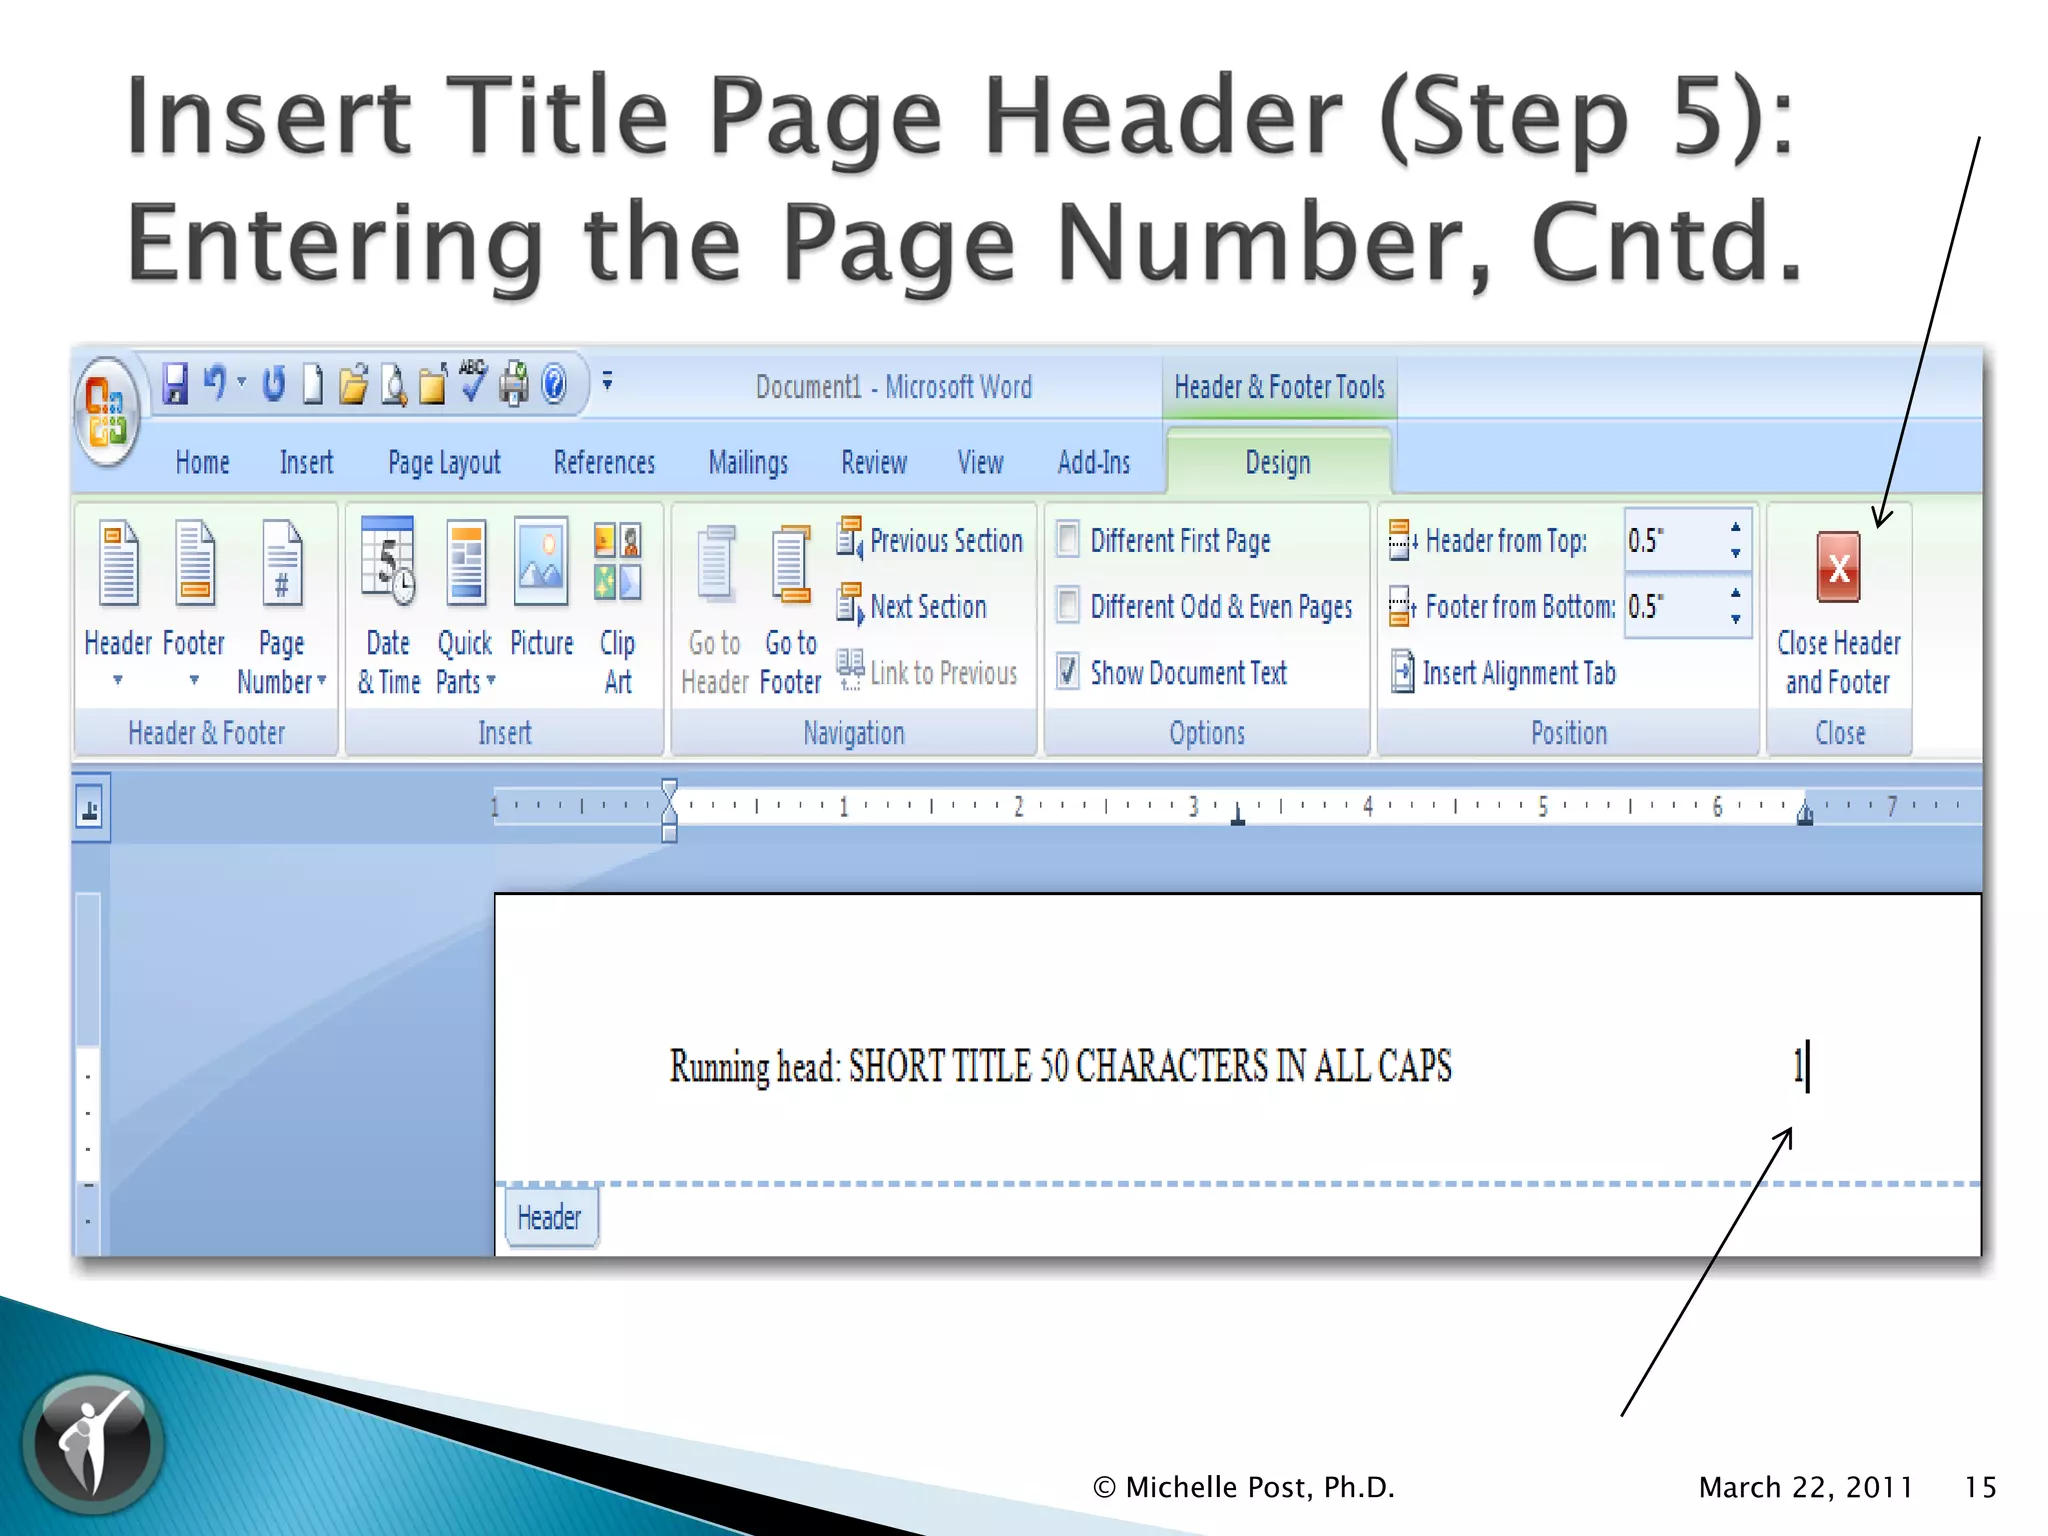
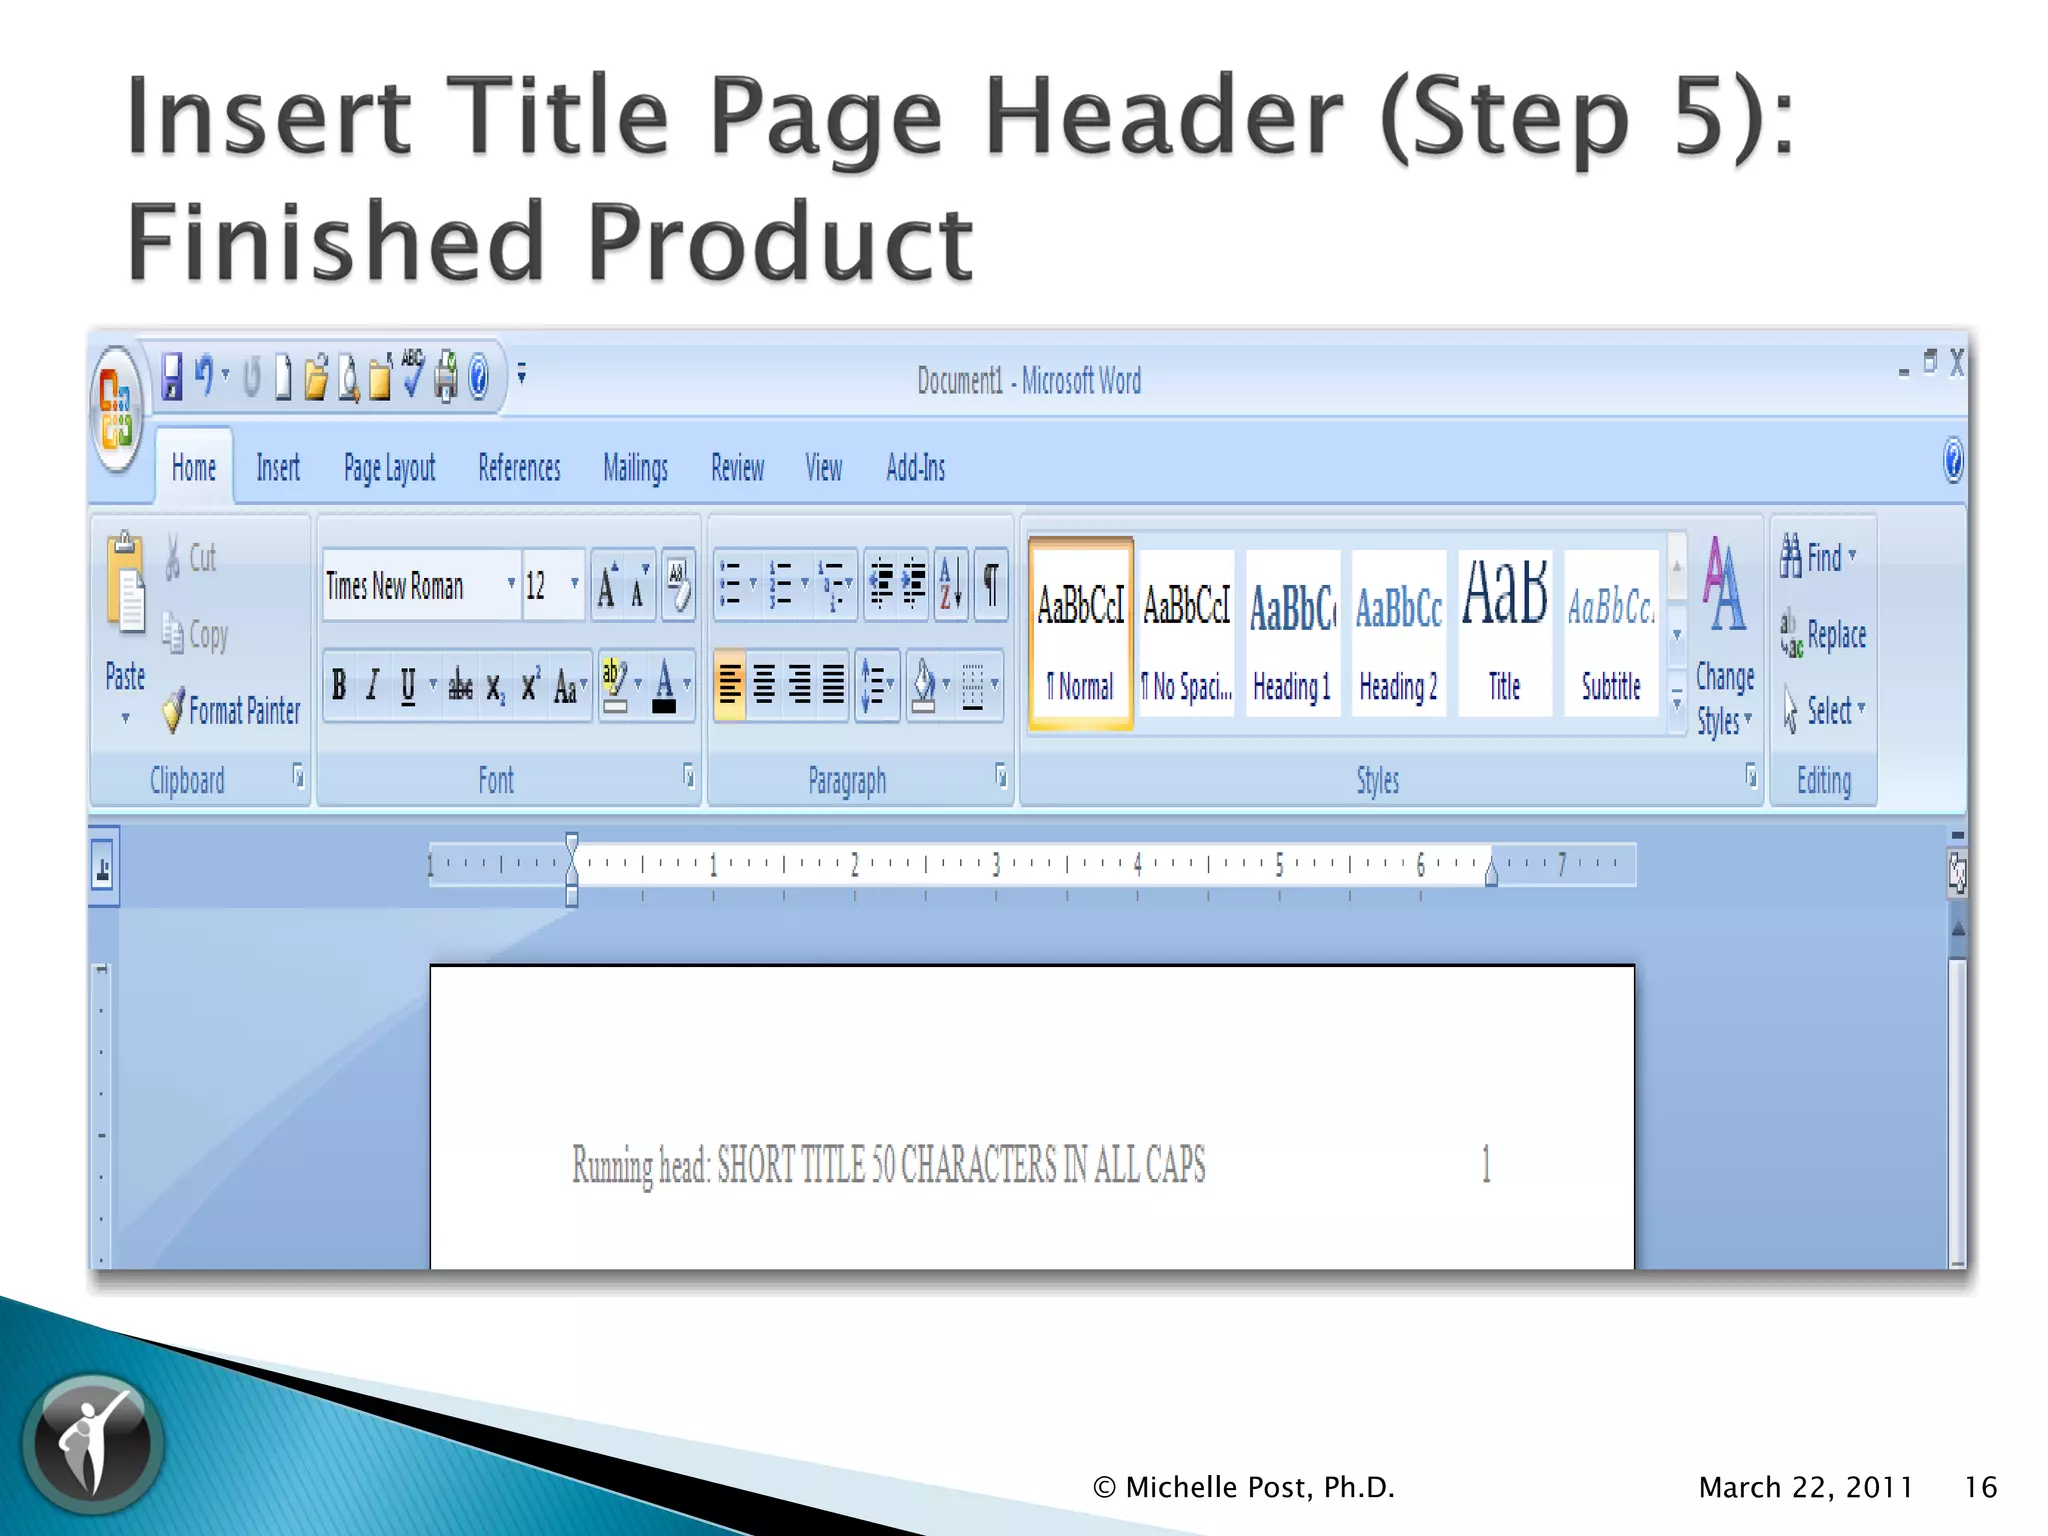
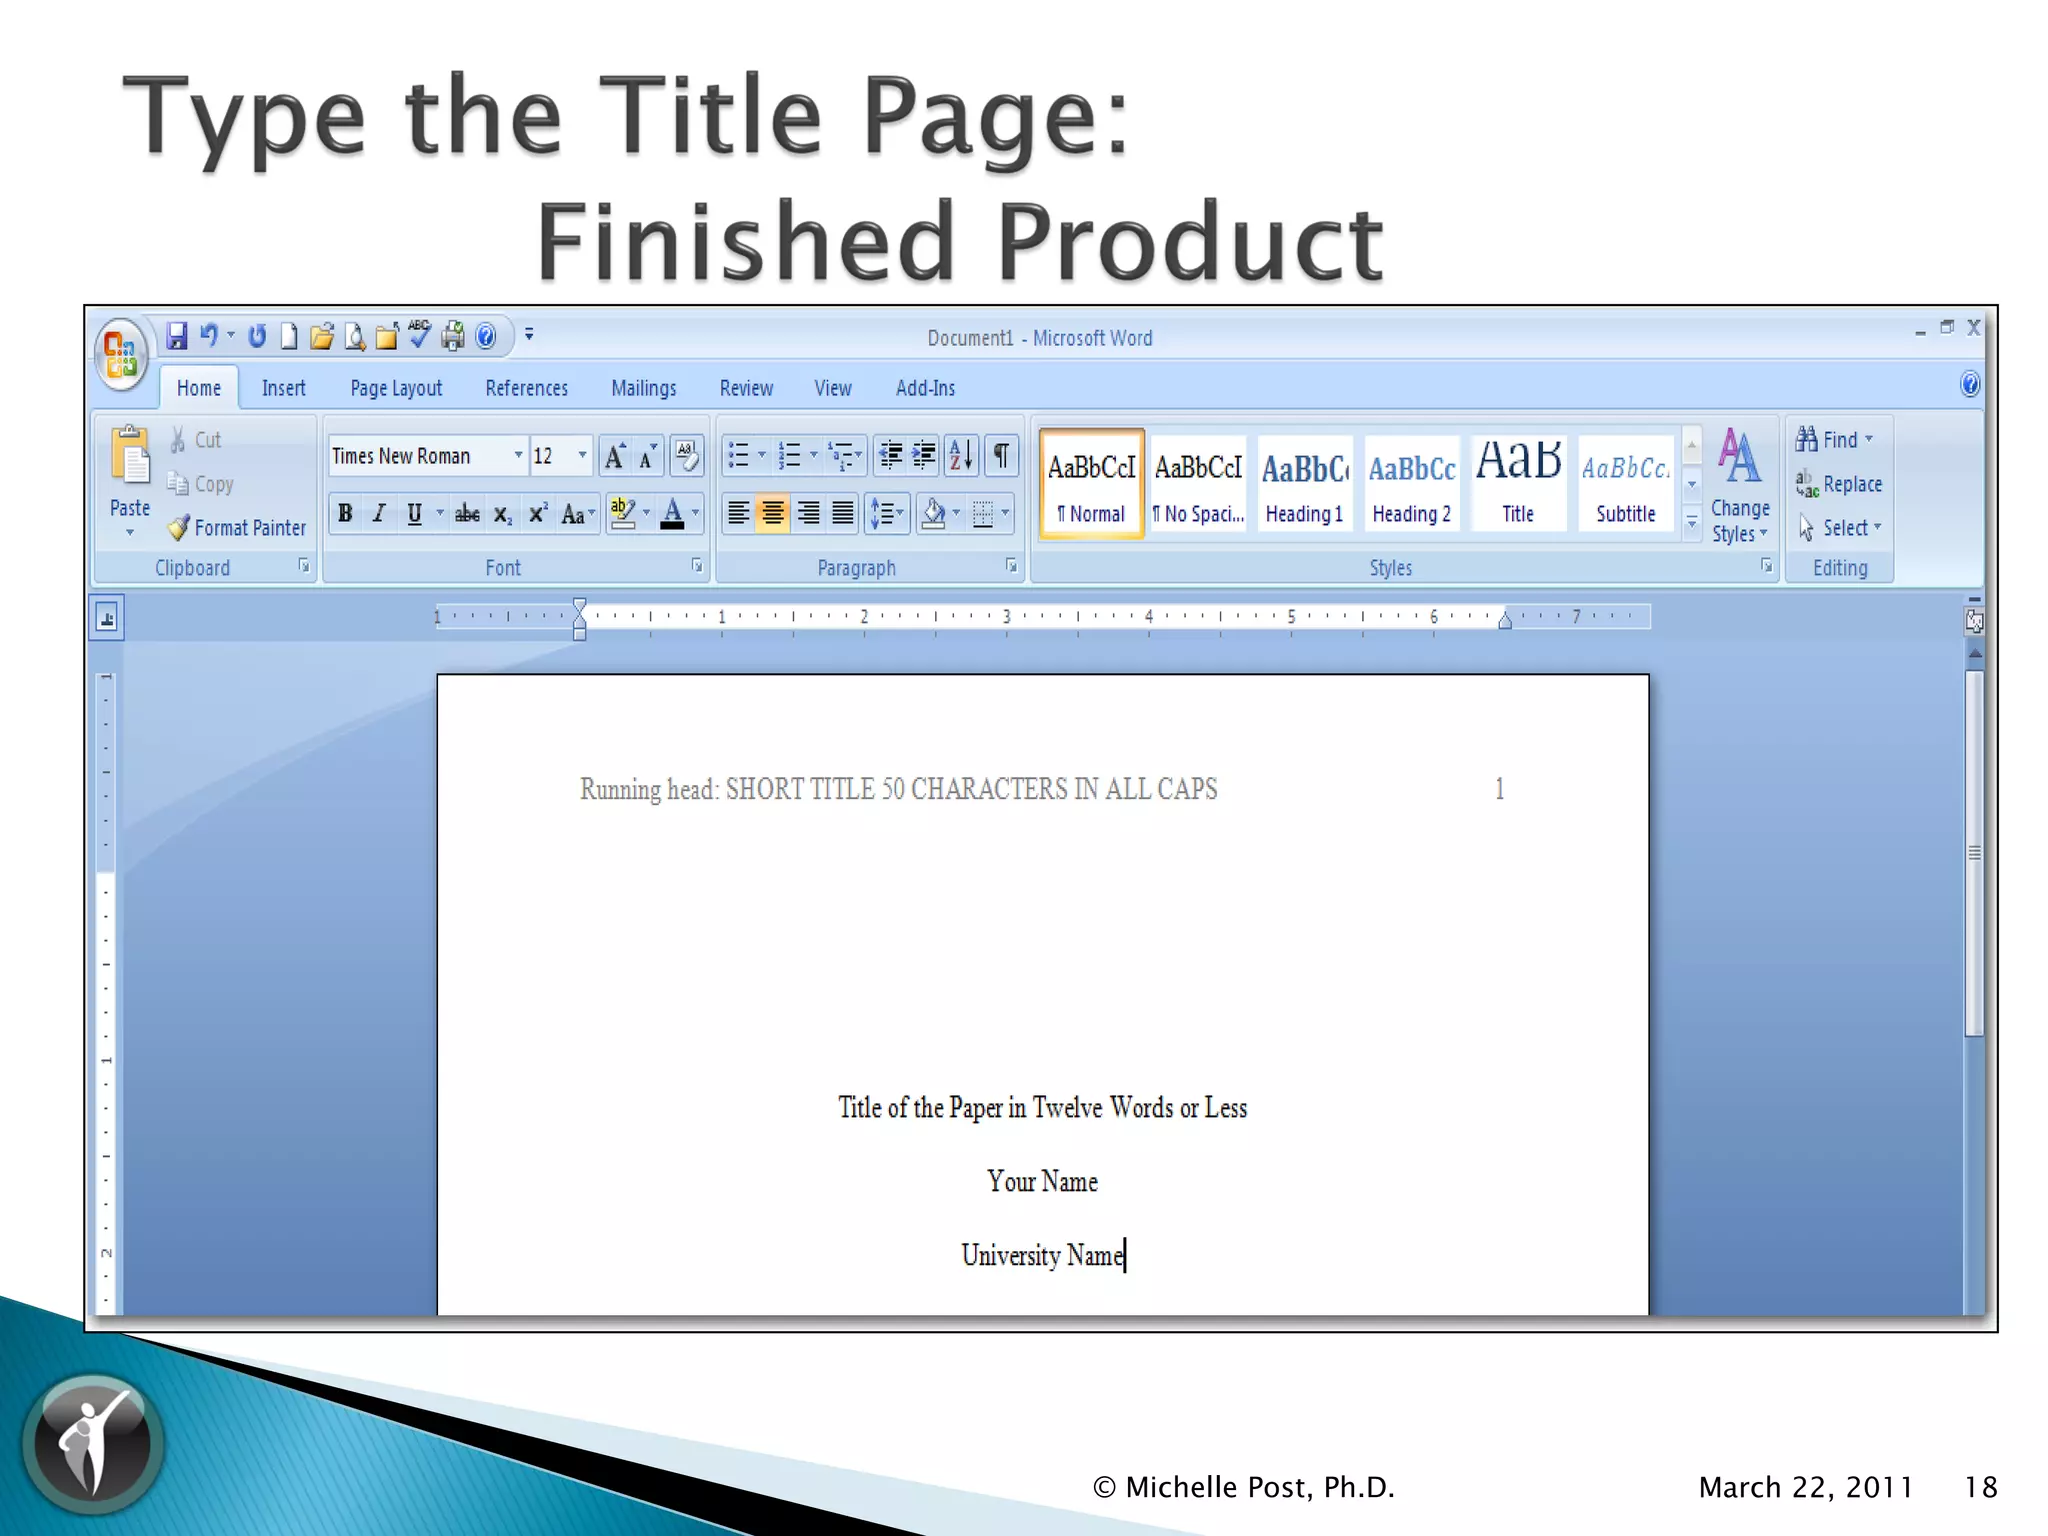
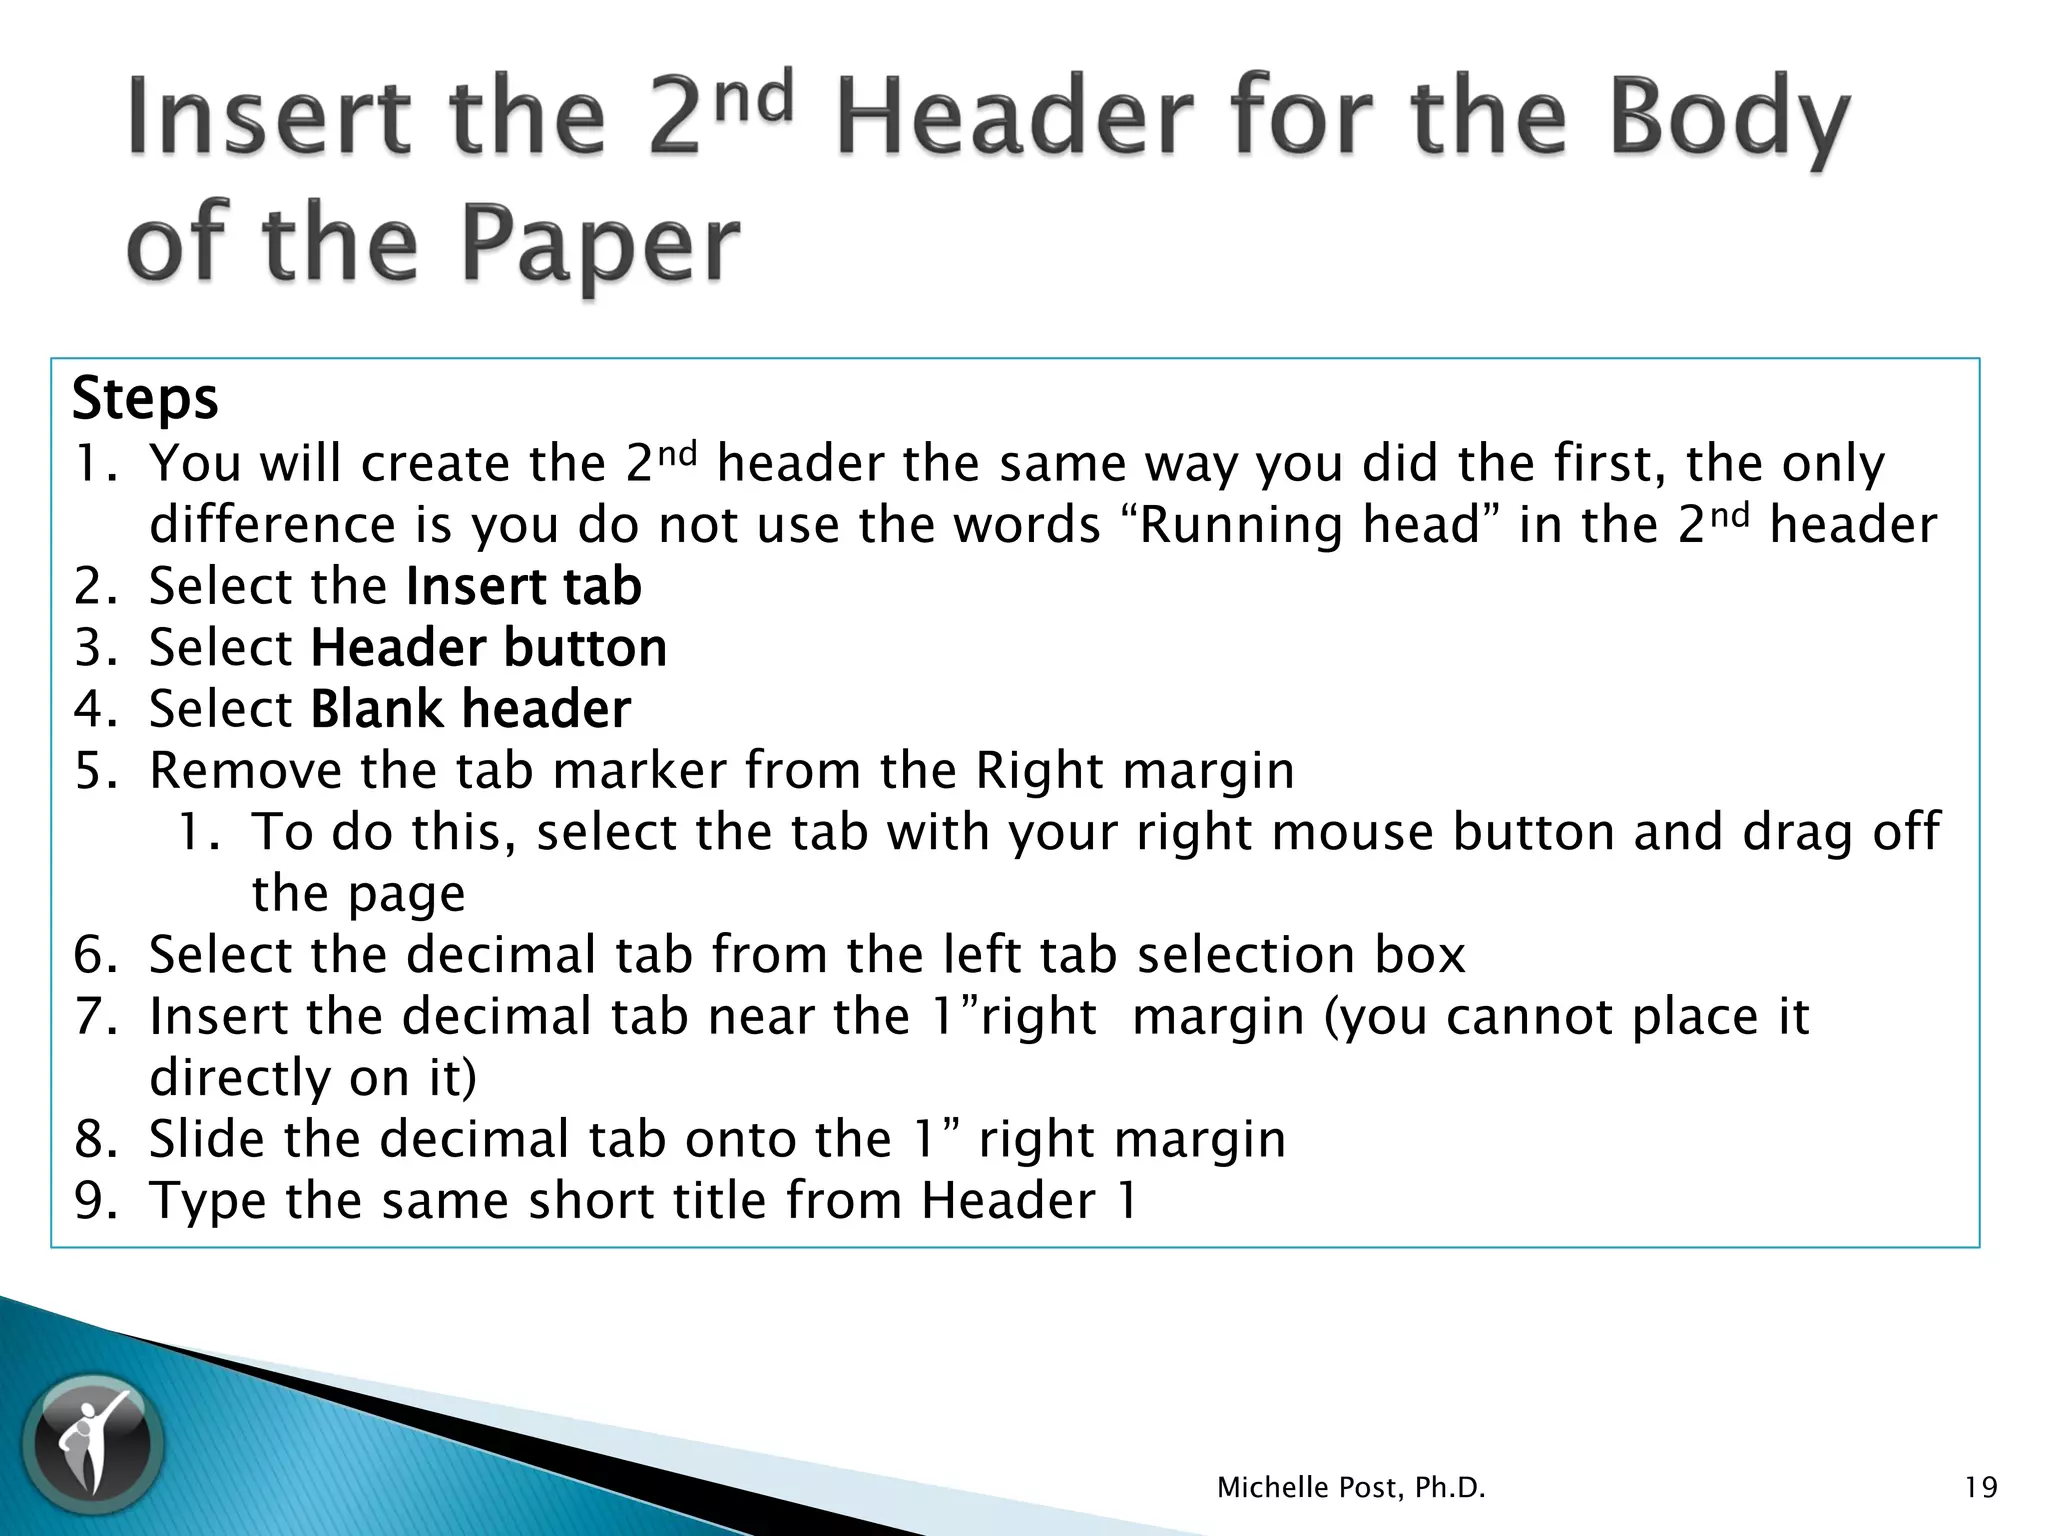
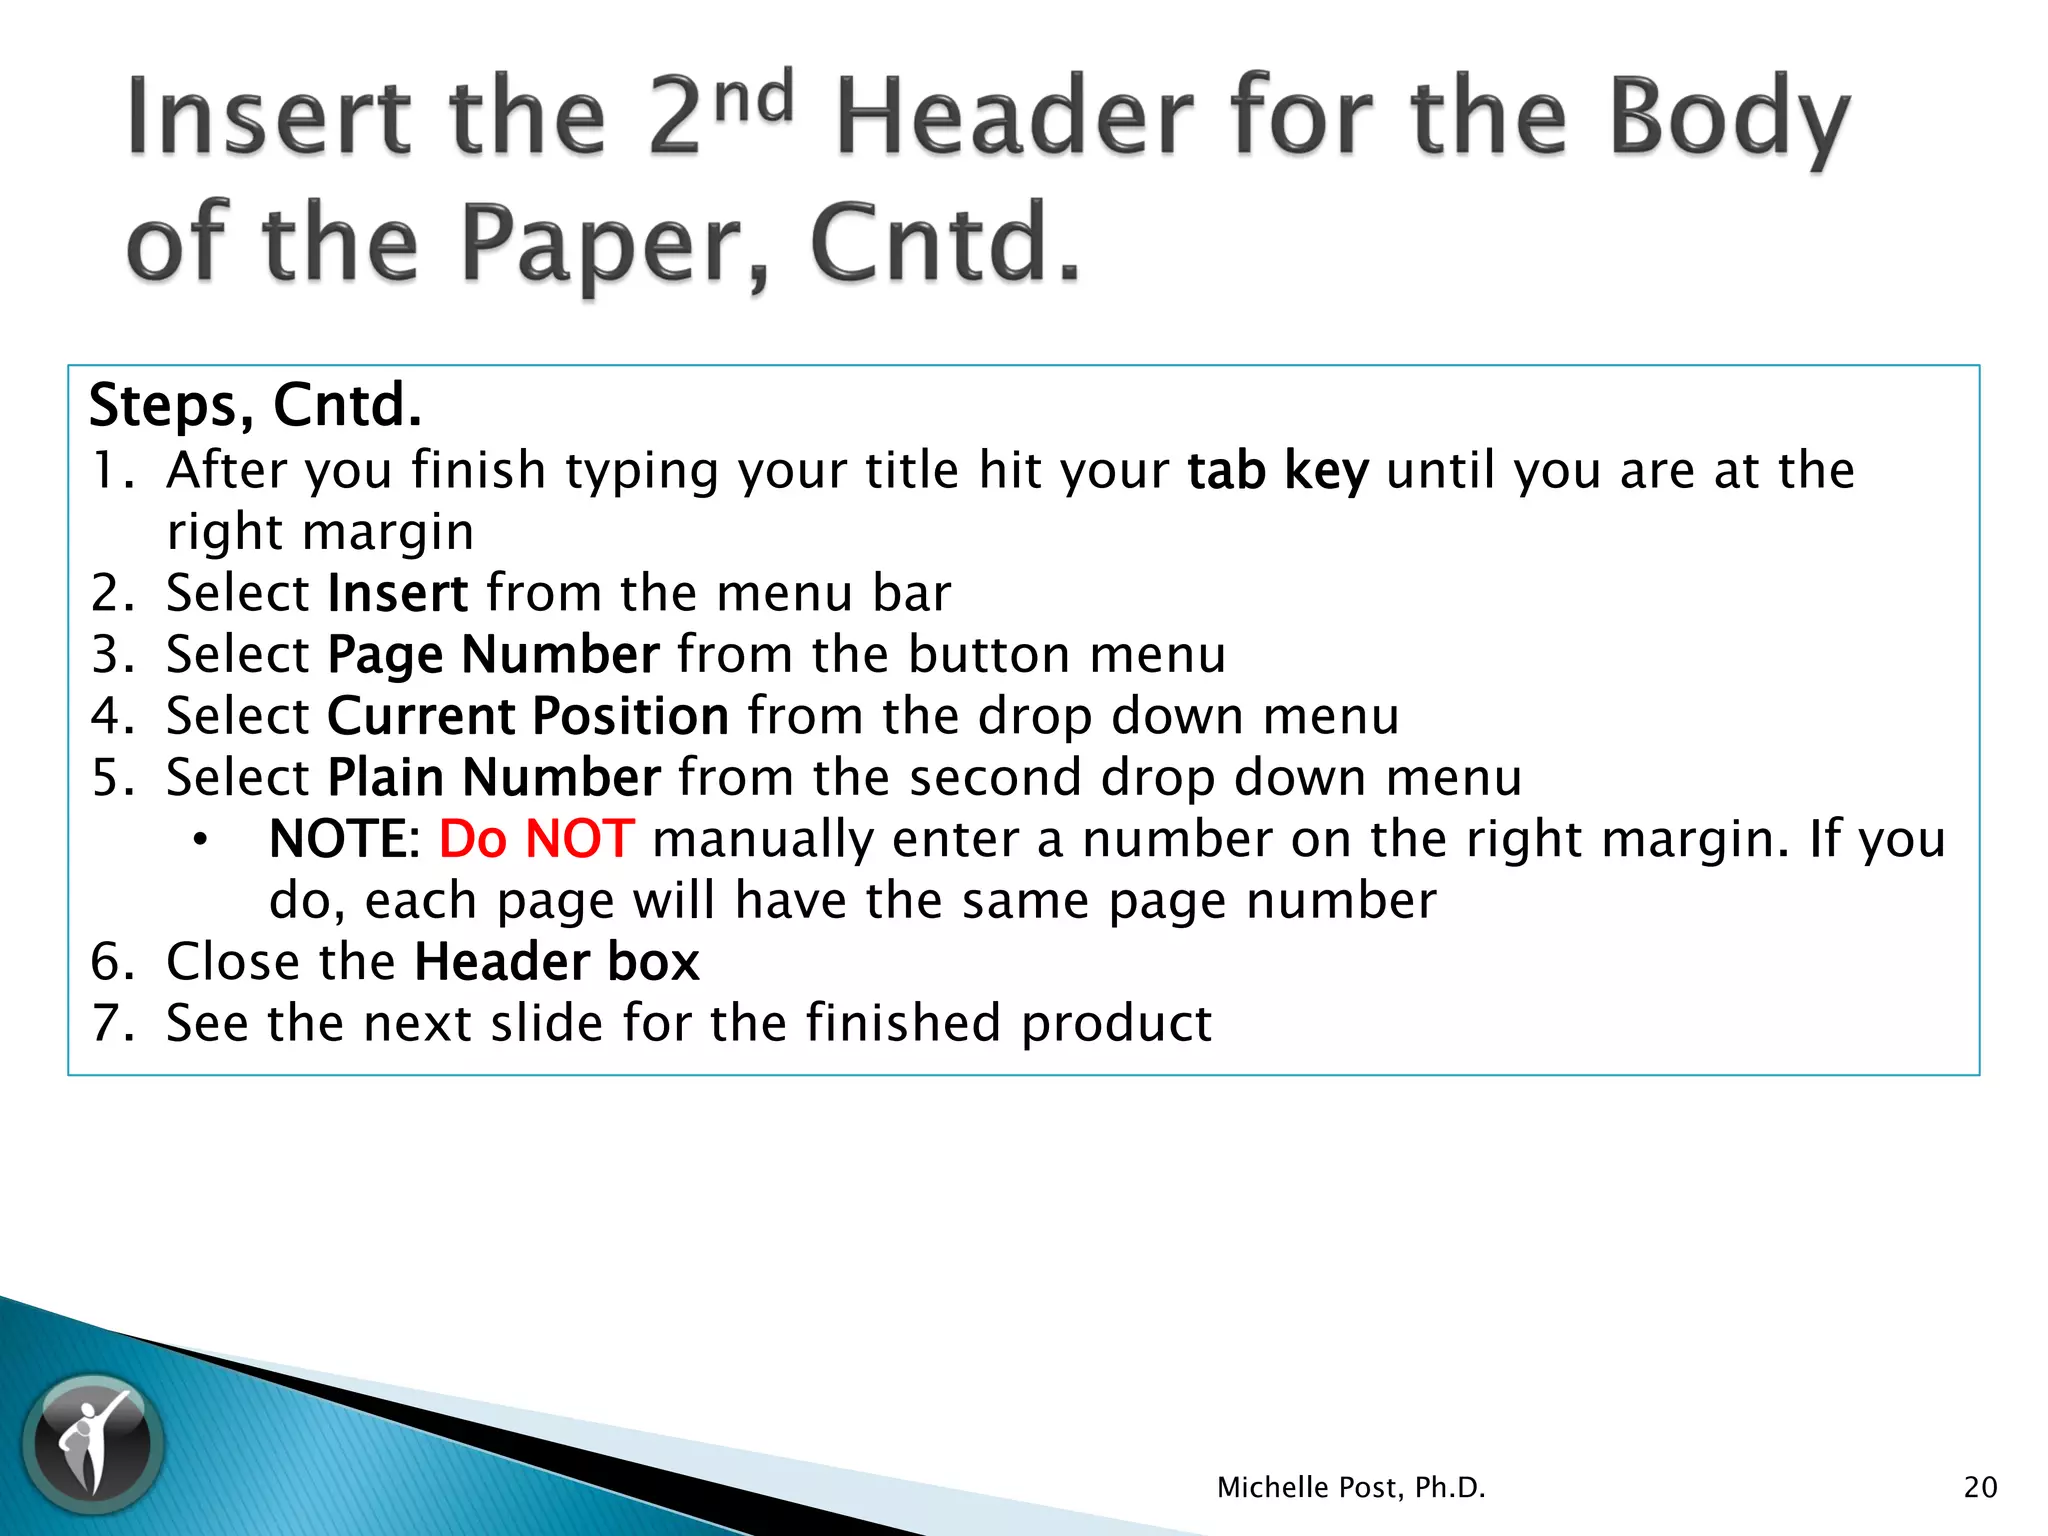
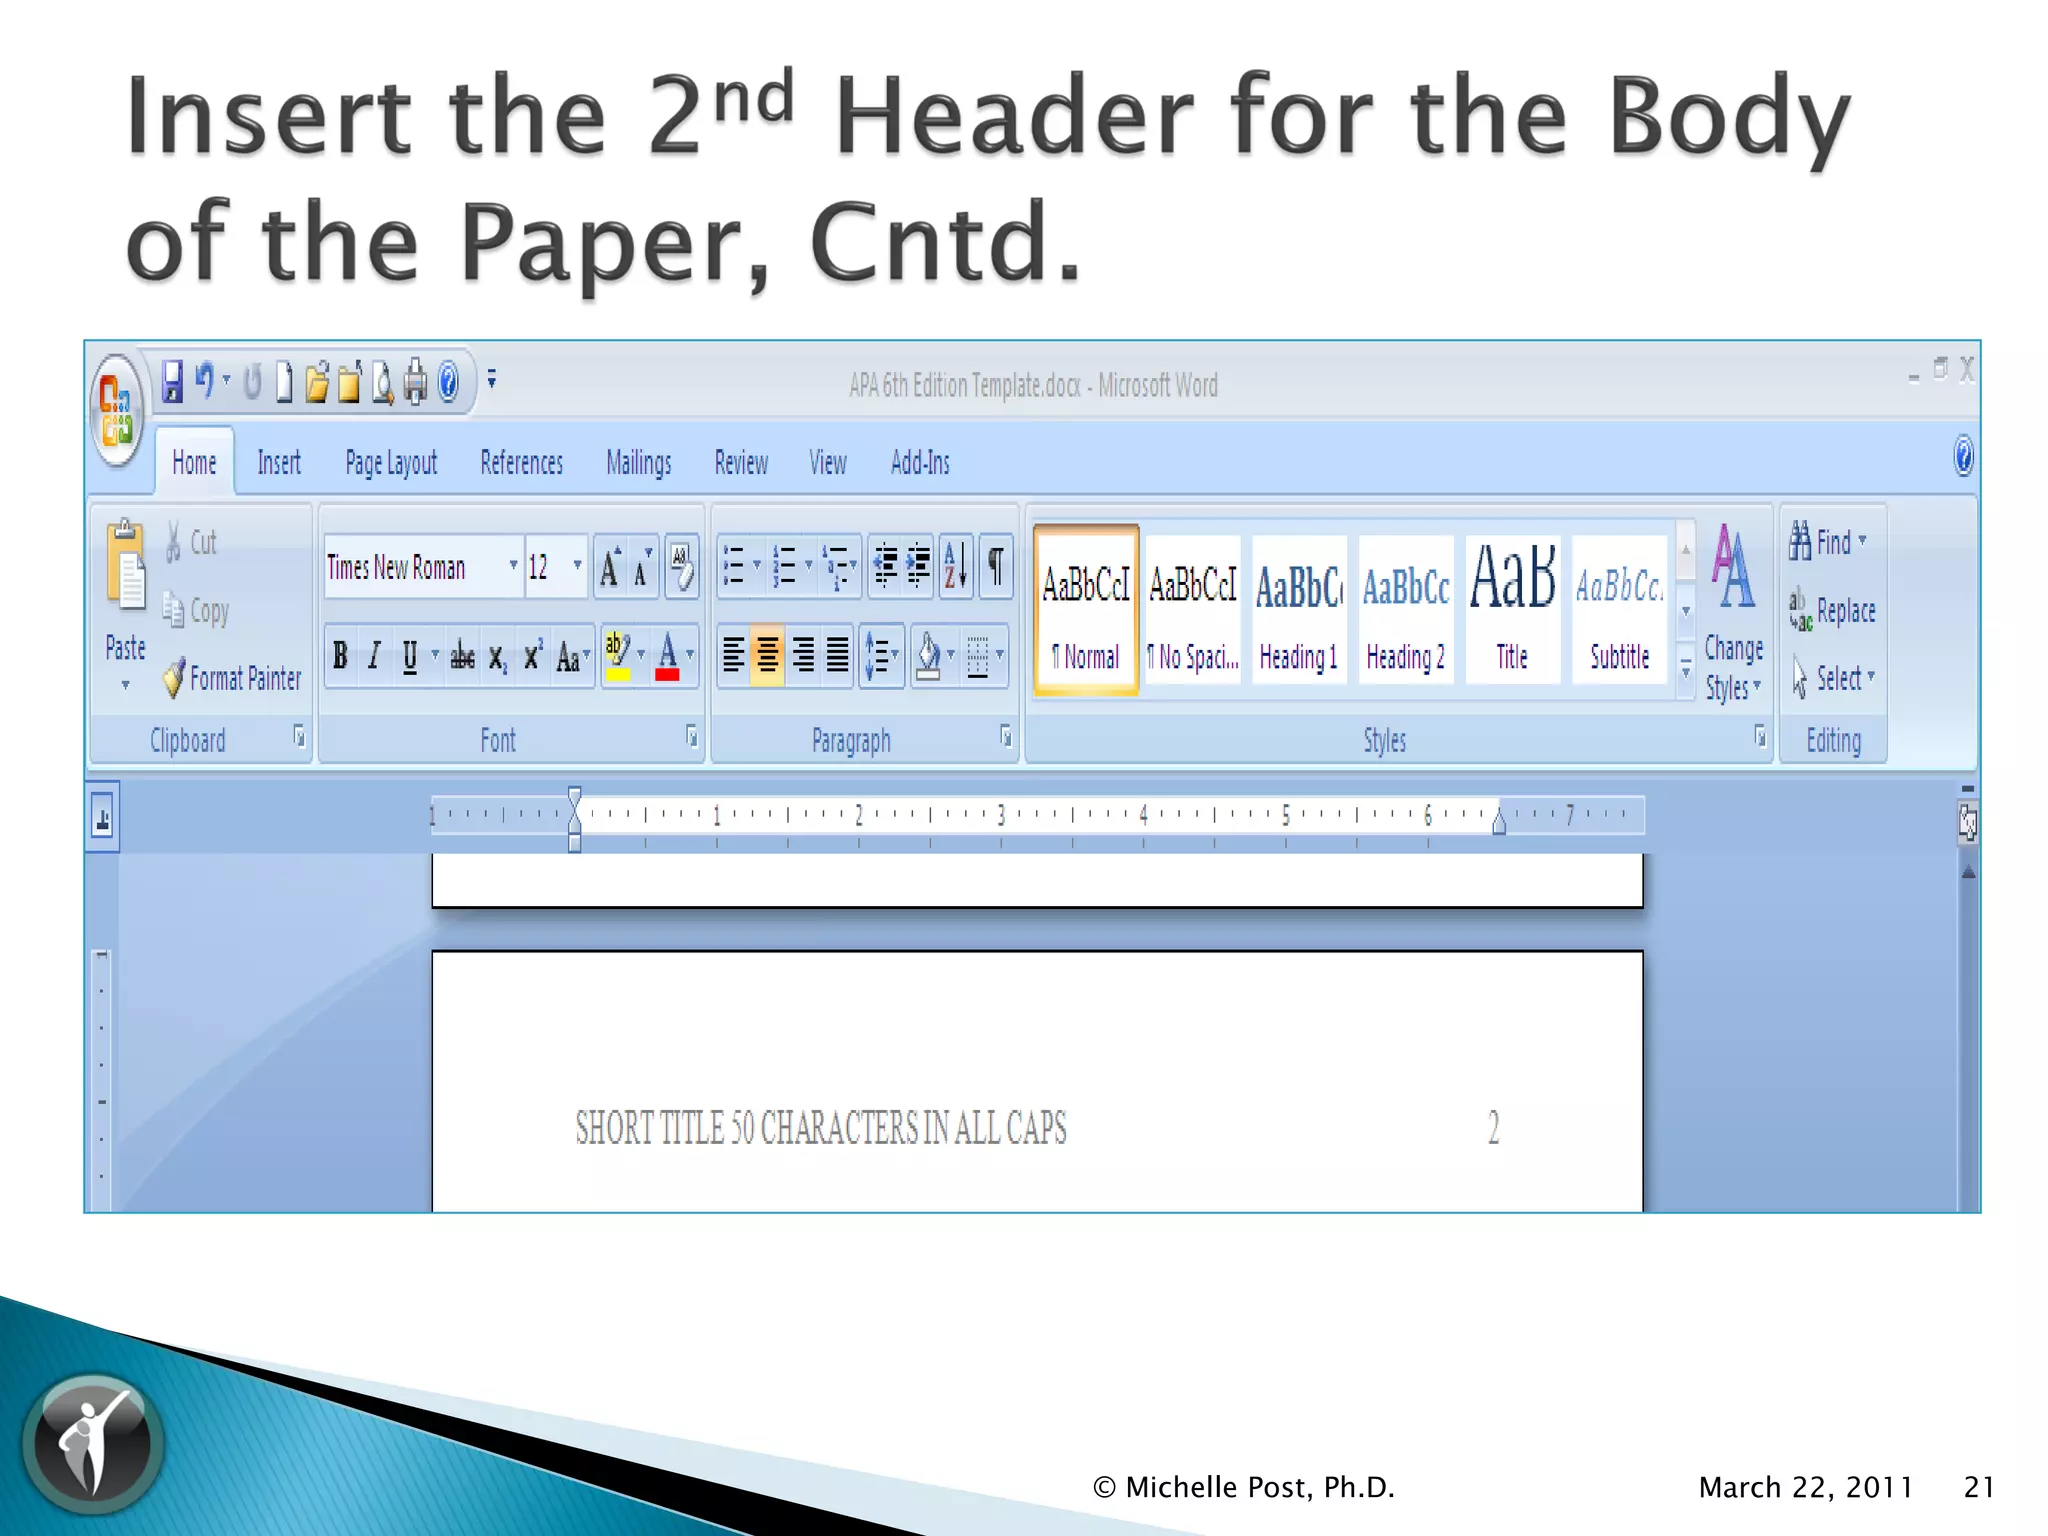
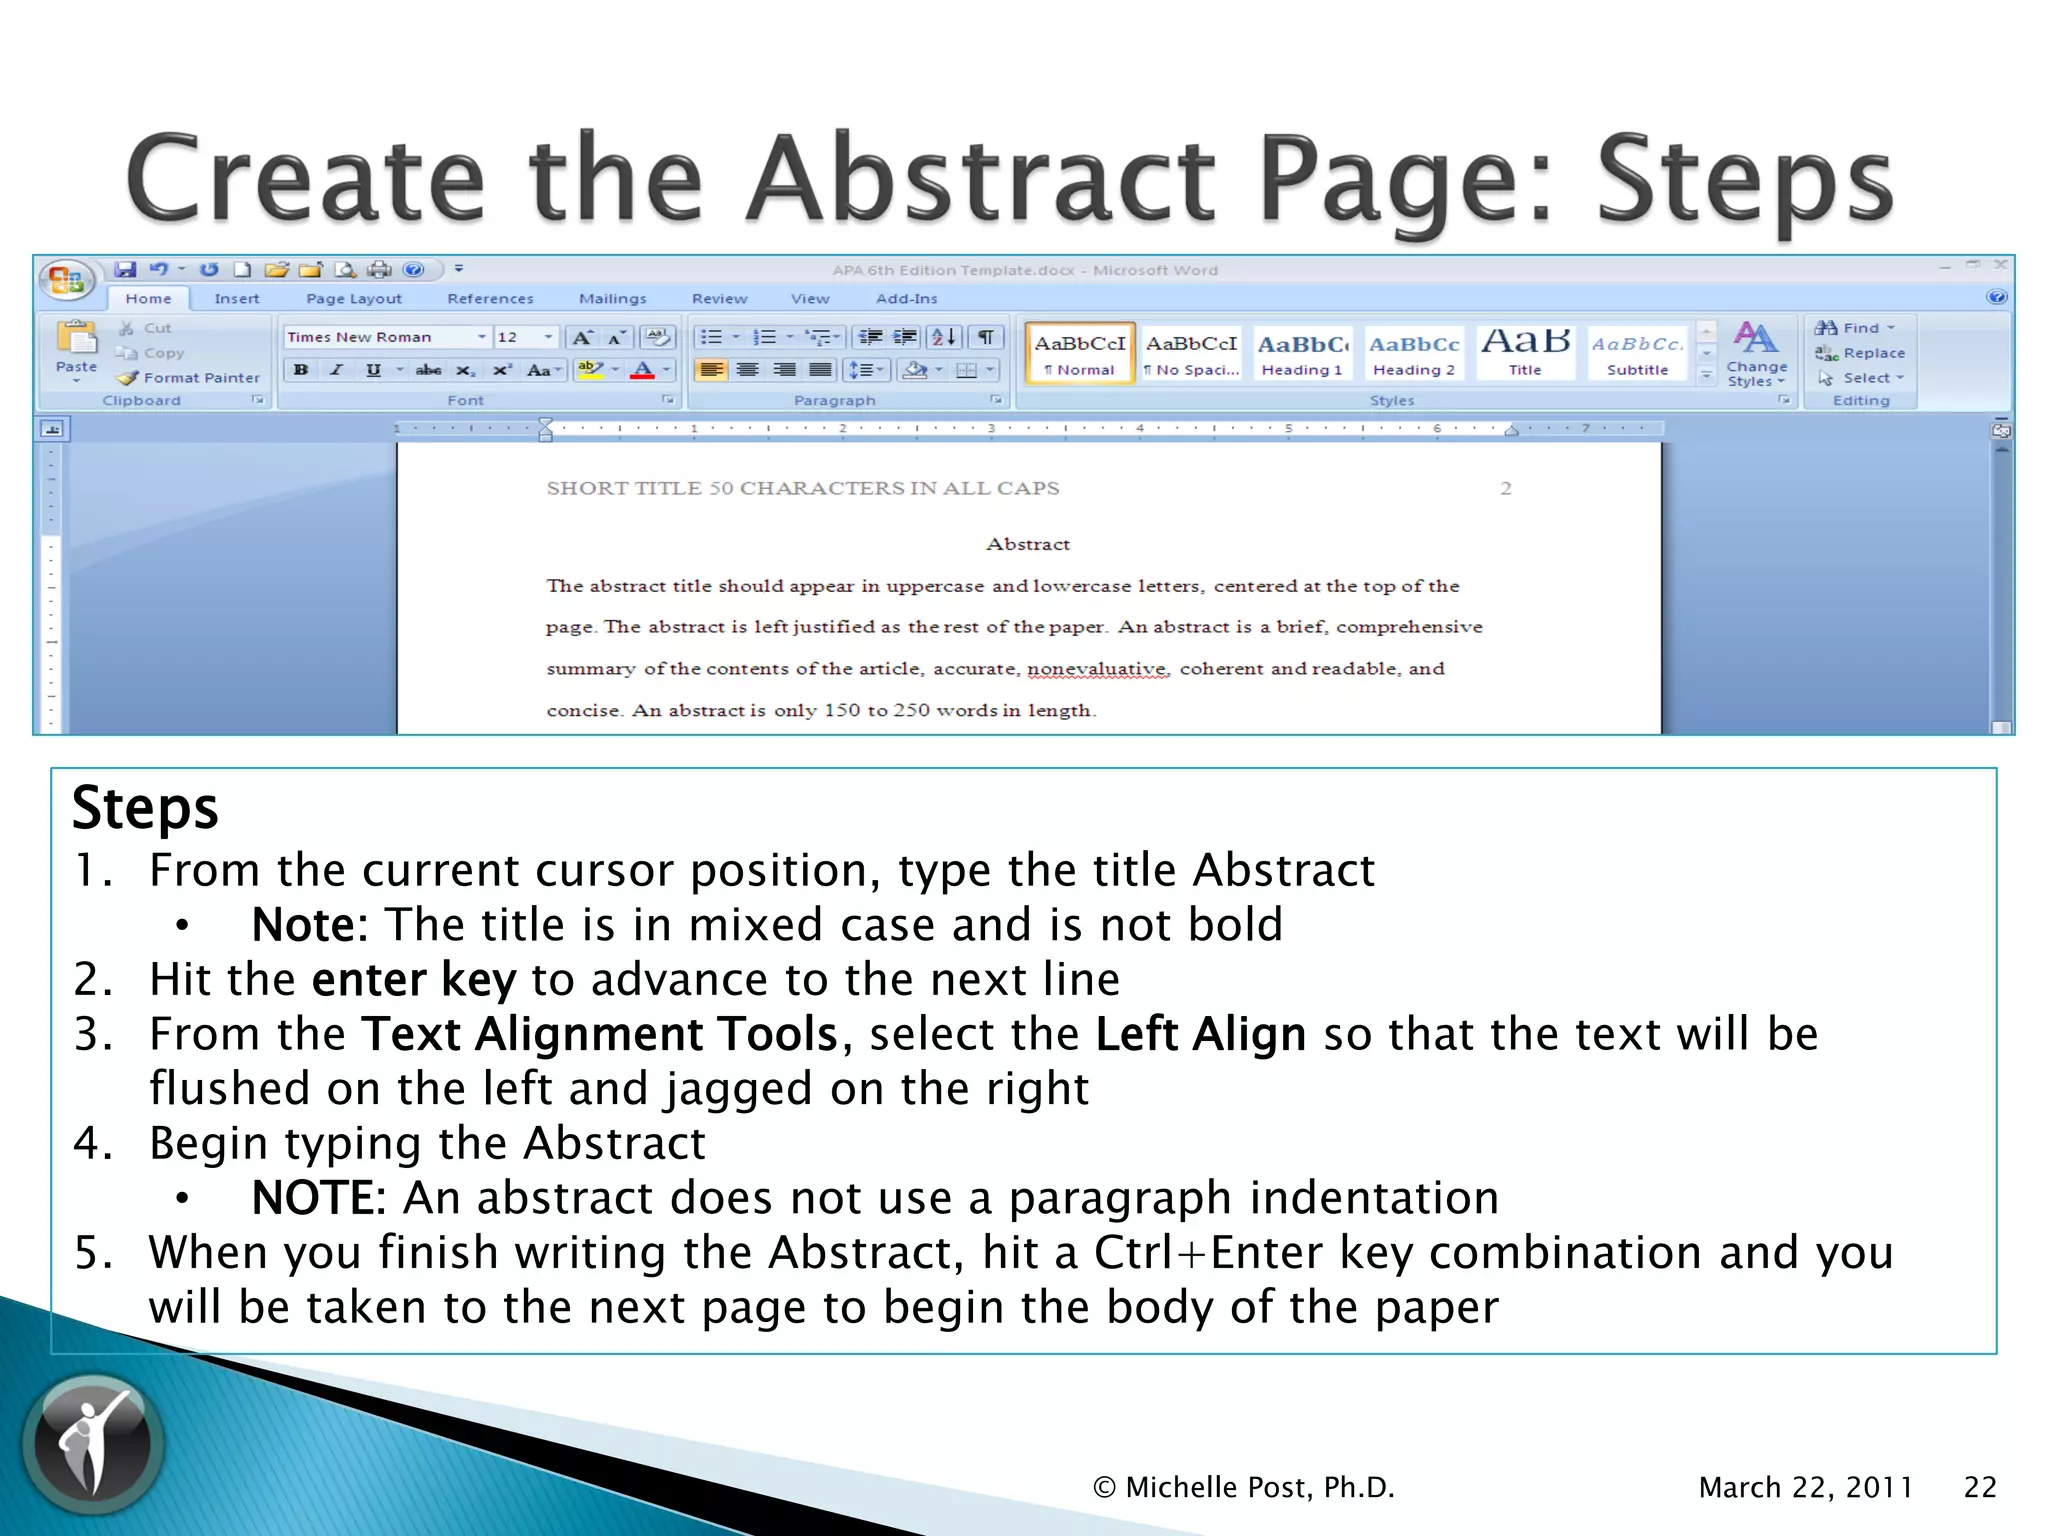
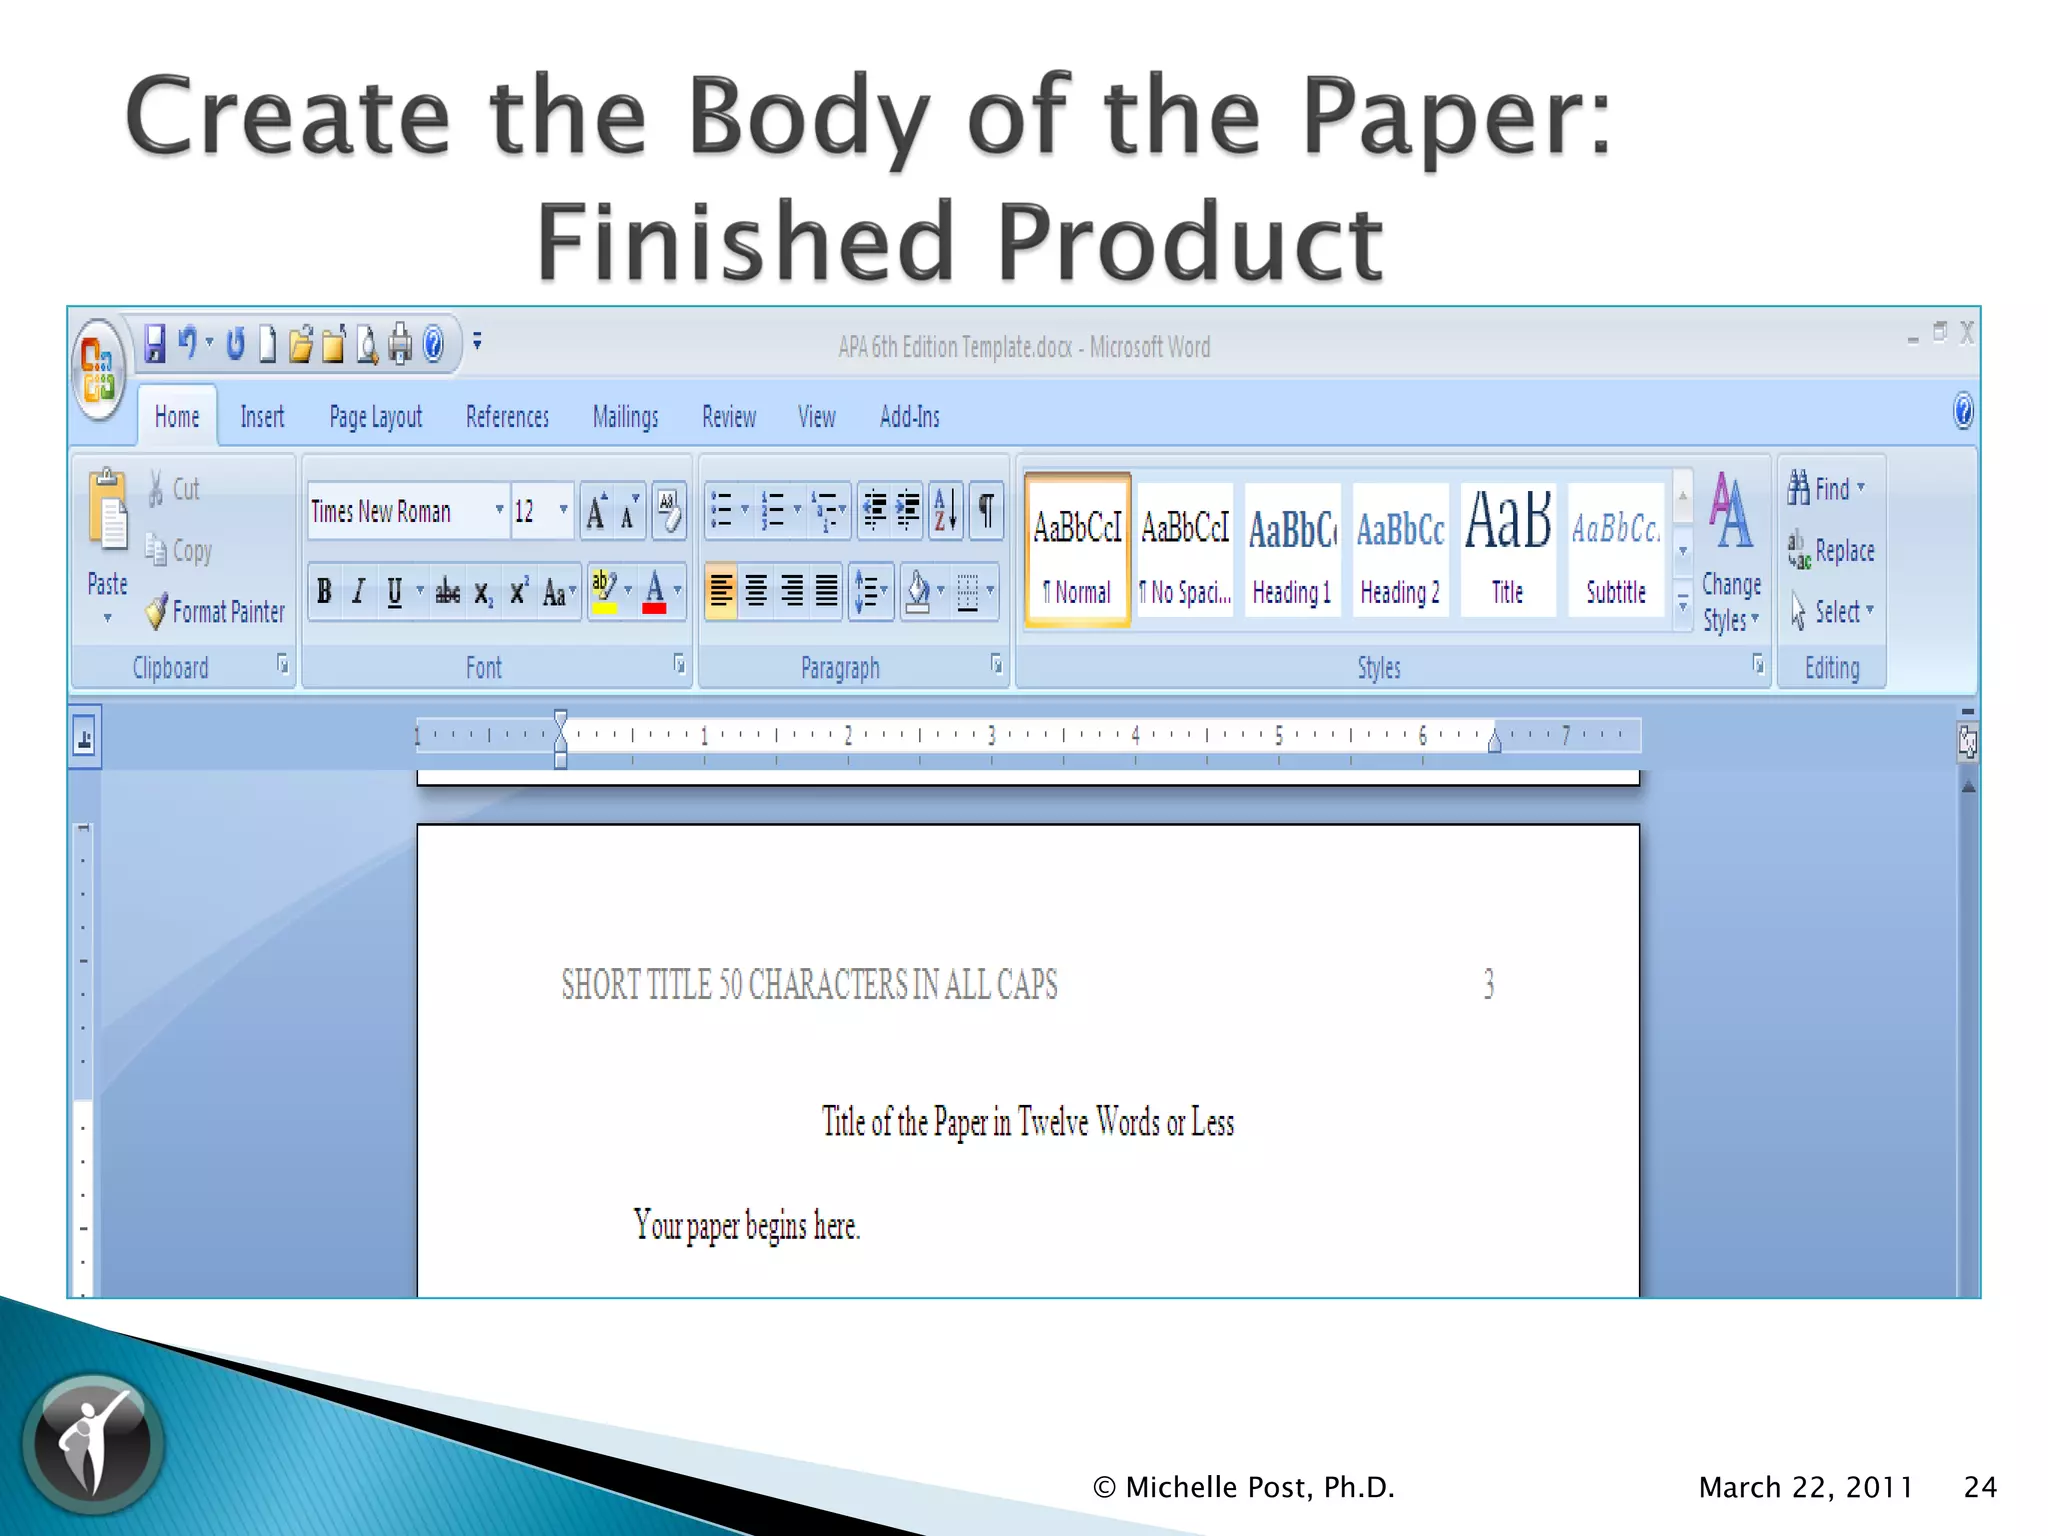
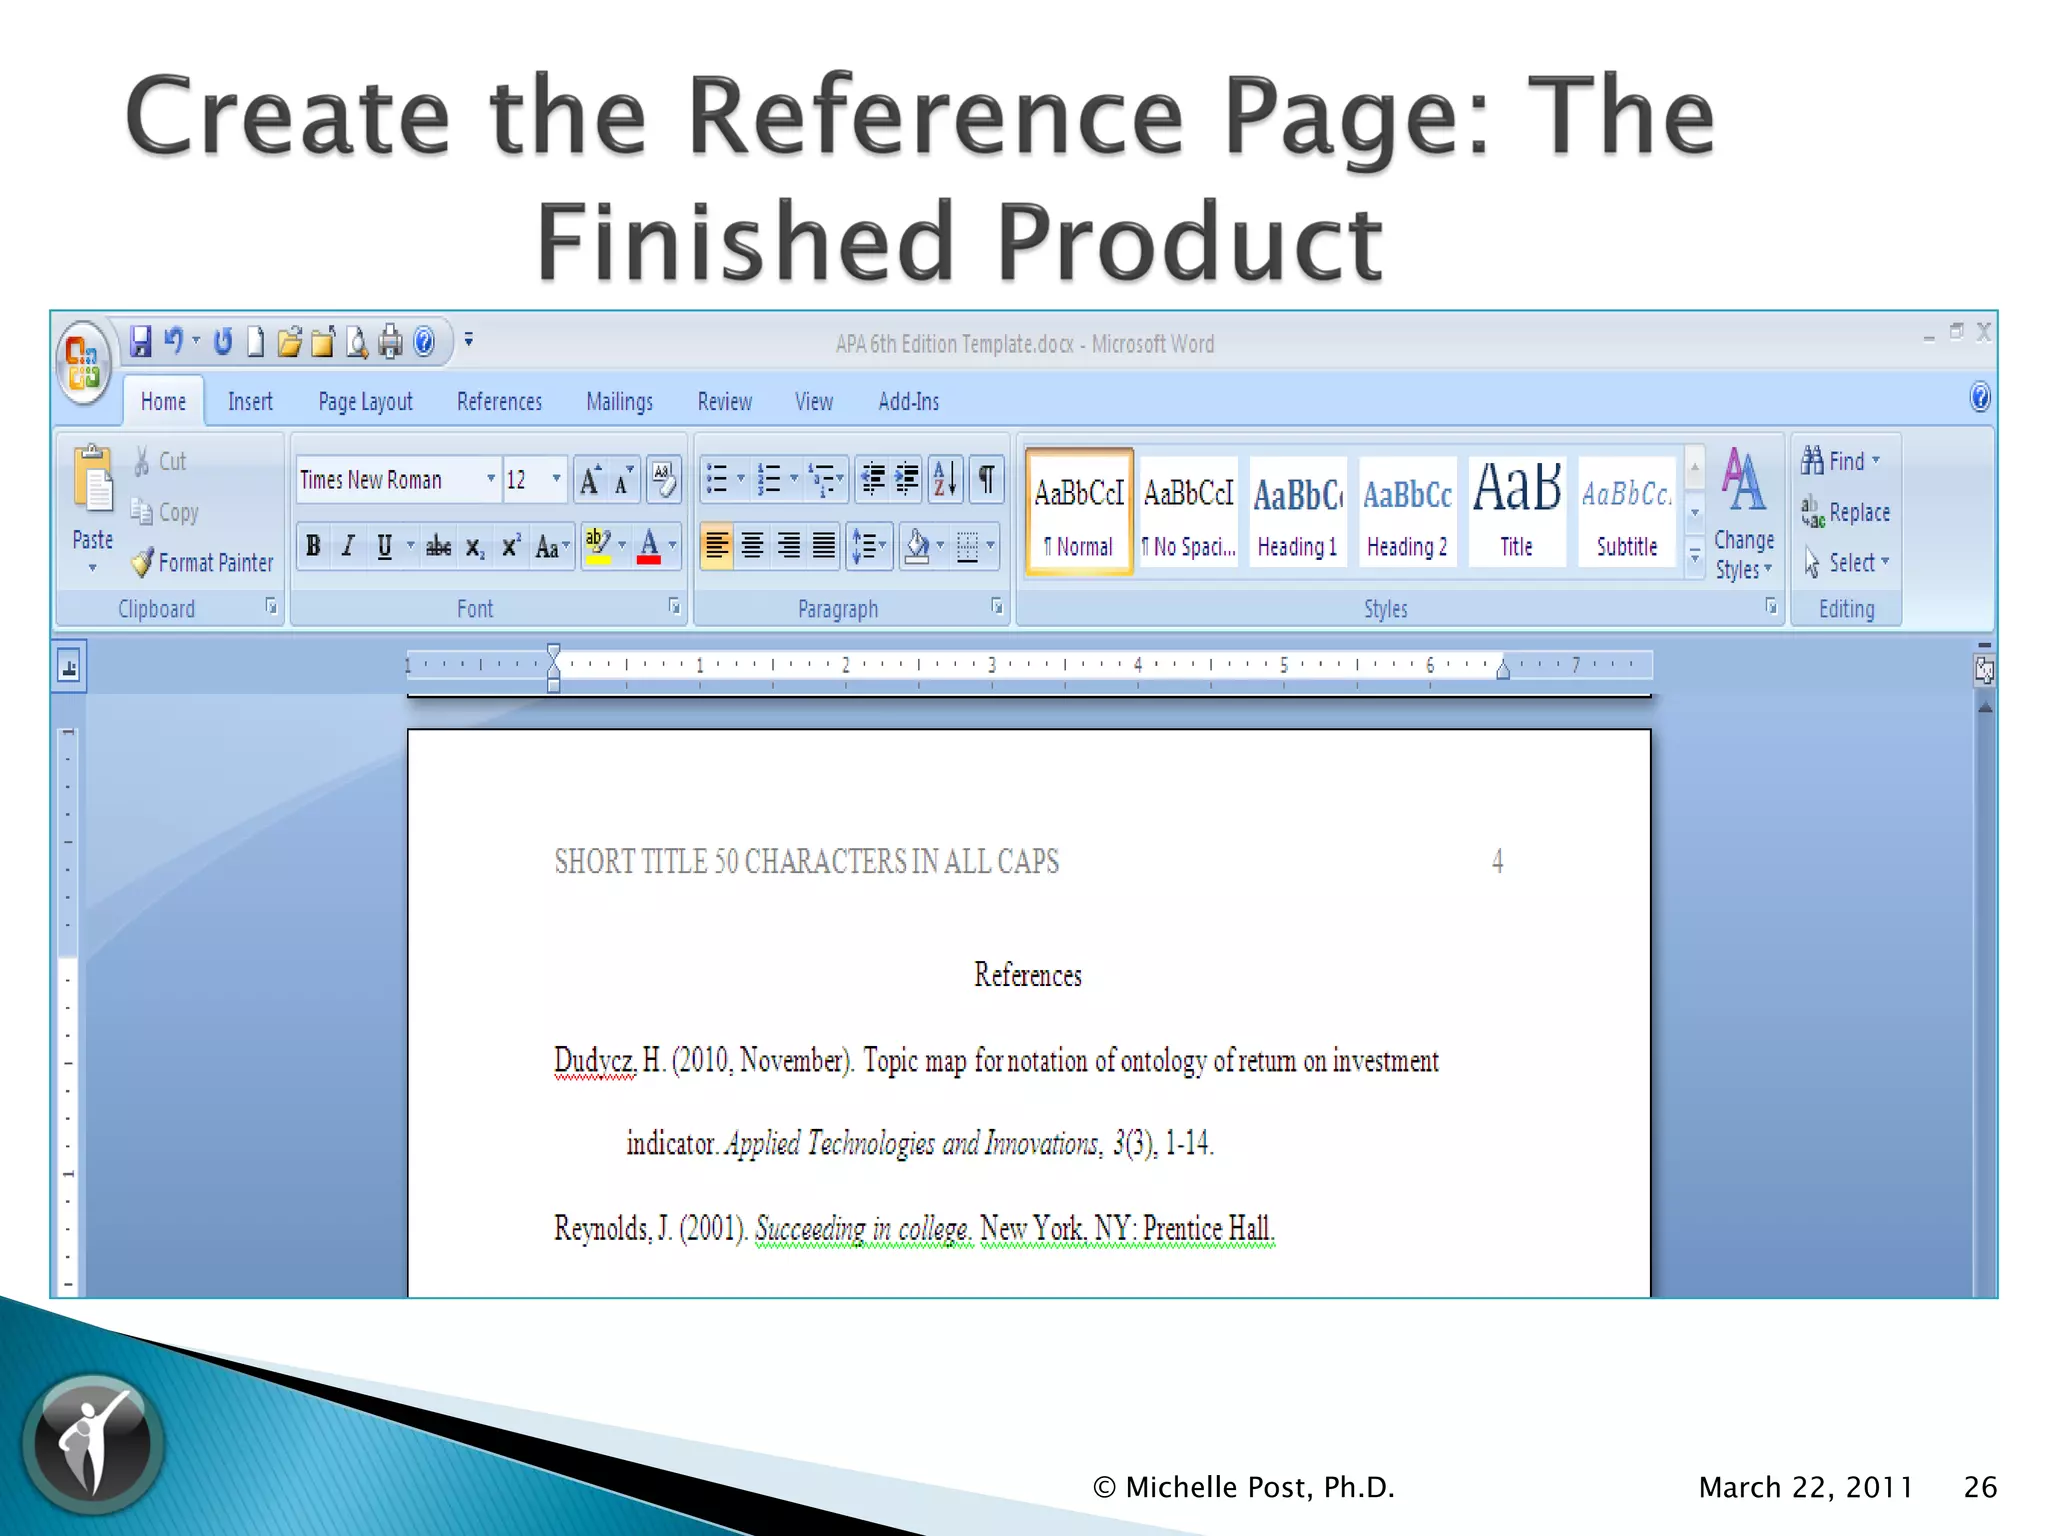
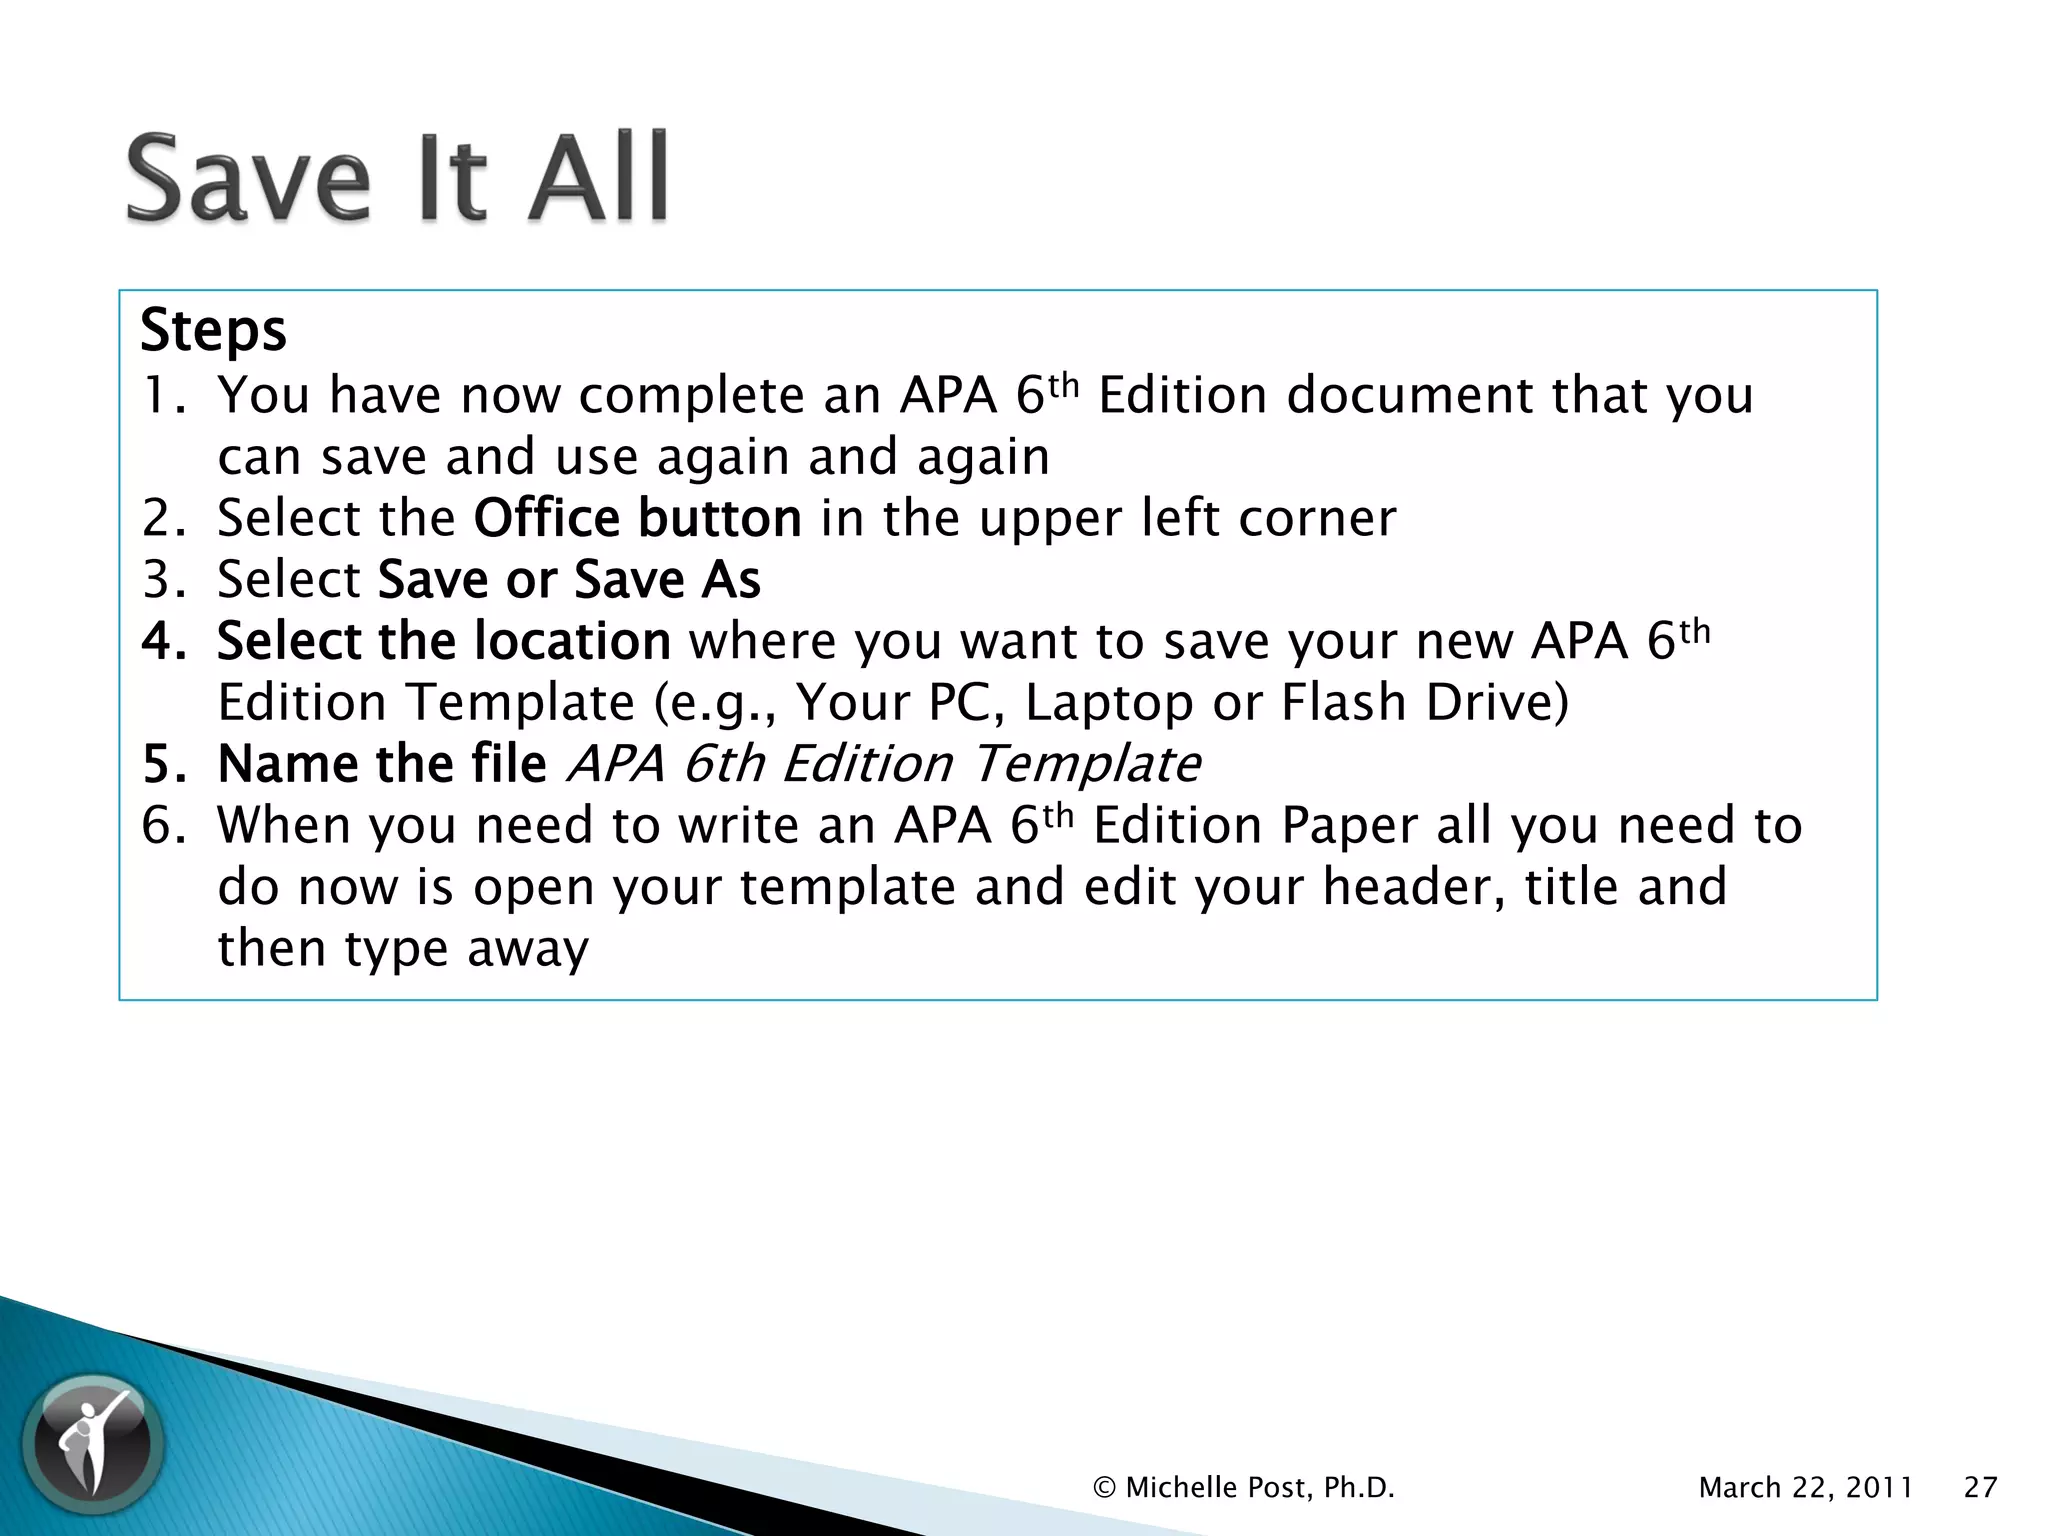
SlideShare a Scribd company logo
Michelle Post, Ph.D. (mpost.phd@gmail.com)
   APA 6th Edition Basic Formatting
   Preparing for Two Headers
   Set the Margins
   Set the Font
   Set the Line Spacing
   Insert Title Page Header (Step 1 - 5)
   Type the Title Page: Steps
   Insert the 2nd Header for the Body of the
    Paper


                            © Michelle Post, Ph.D.   March 22, 2011   2
   Create the Abstract Page
   Create the Body of the Paper
   Create the Reference Page
   Save it All
   YouTube Video Training


                           © Michelle Post, Ph.D.   March 22, 2011   3
Basic Formatting – The Paper                                            APA 6th Edition Location
Page Size: 8.5” x 11”
Margins: 1” on all sides                                                Chapter 8: Section 8.03 – Margins (p. 229)
Line Spacing: Double spaced for whole document                          Chapter 8: Section 8.03 – Line spacing (p.
                                                                        229)
Font Type: Times New Roman (serif typeface)                             Chapter 8: Section 8.03 – Typeface (p. 228)

Font Size: 12 pt                                                        Chapter 8: Section 8.03 – Typeface (p. 228)


Alignment: Flush-left style (right margin is uneven)                    Chapter 8: Section 8.03 – Line length and
                                                                        alignment (p. 229)
Paragraph and indentation: Indent the first line of every paragraph     Chapter 8: Section 8.03 – Paragraph and
and footnote. Use the tab key, which should be set at five to seven     indentation (p. 229)
spaces or a ½”
Length: The optimal length to effectively communicate the primary       Chapter 3: Section 3.01 – Length (p. 61)
ideas.
       RULE: “less is more”
Writing Style: Clear communication that uses continuity in              Chapter 3: Sections 3.05 – 3.10 (pp. 65 – 70)
presentation of ideas, smoothness of expression, tone, economy of
expression, precision and clarity, and linguistic devices.

Voice: Third person point of view and active voice                      Chapter 3: Section 3.09 – Precision and
                                                                        Clarity: Attribution (pp. 69 -70)

                                                                        Chapter 3: Section 3.18 – Verbs (p. 77)


                                                           © Michelle Post, Ph.D.                   March 22, 2011      4
Steps
1. Select from the menu bar
   Page Layout
2. Select Page Setup
3. Select the Layout tab
4. Check Different first page


                                © Michelle Post, Ph.D.   March 22, 2011   5
Steps
1. Select Page Layout
   tab
2. Select Margins
3. Select 1” on all sides


                            © Michelle Post, Ph.D.   March 22, 2011   6
Steps
1. From the menu bar select Home
2. From the Font type drop down
   select Times New Roman
3. From the Font size drop down,
   select 12 pt.


 © Michelle Post, Ph.D.   March 22, 2011   7
Steps
1. From the Home tab
2. Select the Line Spacing
   short cut tool
3. From the Line Spacing
   drop down menu select
   2.0
4. NOTE: Make sure there
   are no spaces before or
   after a paragraph

                             © Michelle Post, Ph.D.   March 22, 2011   8
Steps
1. Select the Insert tab
2. Select Header button
3. Select Blank header


                           © Michelle Post, Ph.D.   March 22, 2011   9
Steps
1. Remove the tab marker from the Right margin
2. To do this, select the tab with your right mouse
   button and drag off the page


                                   © Michelle Post, Ph.D.   March 22, 2011   10
Steps
1. Select the decimal tab from the left tab selection
   box
2. Insert the decimal tab near the 1”right margin (you
   cannot place it directly on it)
3. Slide the decimal tab onto the 1” right margin


                             © Michelle Post, Ph.D.   March 22, 2011   11
Steps
1. Type the words Running head: in mixed case
2. Type a short title of your paper in ALL CAPS one
   space after the colon
3. NOTE: The title cannot exceed 50 characters


                   © Michelle Post, Ph.D.   March 22, 2011   12
Steps
1. After you finish typing your title hit your tab key until you are at
   the right margin
2. Select Insert from the menu bar
3. Select Page Number from the button menu
4. Select Current Position from the drop down menu
5. Select Plain Number from the second drop down menu
6. NOTE: Do NOT manually enter a number on the right margin. If
   you do, each page will have the same page number
7. Close the Header box


                                        © Michelle Post, Ph.D.    March 22, 2011   13
© Michelle Post, Ph.D.   March 22, 2011   14
© Michelle Post, Ph.D.   March 22, 2011   15
© Michelle Post, Ph.D.   March 22, 2011   16
Steps
1. From the short cut menus select the Center Text Alignment (this
   will center your cursor so that you can type your title page
   information)
2. Hit the Enter Key three times to move the cursor to the right
   place to start your title page information
3. Type the title of your paper in twelve words or less (Words that
   are 4 characters or more are capitalized)
4. Hit the enter key to move to the next line, type Your Name
5. Hit the enter key to move to the next line, type the University
   Name
6. After typing the University Name, hit the key combination Control
   (Ctrl) plus Enter (This key combination will take you to the
   beginning of the next page)
7. See the next slide for the finished product


                                     © Michelle Post, Ph.D.   March 22, 2011   17
© Michelle Post, Ph.D.   March 22, 2011   18
Steps
1. You will create the 2nd header the same way you did the first, the only
   difference is you do not use the words “Running head” in the 2nd header
2. Select the Insert tab
3. Select Header button
4. Select Blank header
5. Remove the tab marker from the Right margin
    1. To do this, select the tab with your right mouse button and drag off
        the page
6. Select the decimal tab from the left tab selection box
7. Insert the decimal tab near the 1”right margin (you cannot place it
   directly on it)
8. Slide the decimal tab onto the 1” right margin
9. Type the same short title from Header 1


                                             Michelle Post, Ph.D.             19
Steps, Cntd.
1. After you finish typing your title hit your tab key until you are at the
   right margin
2. Select Insert from the menu bar
3. Select Page Number from the button menu
4. Select Current Position from the drop down menu
5. Select Plain Number from the second drop down menu
    • NOTE: Do NOT manually enter a number on the right margin. If you
       do, each page will have the same page number
6. Close the Header box
7. See the next slide for the finished product


                                             Michelle Post, Ph.D.             20
© Michelle Post, Ph.D.   March 22, 2011   21
Steps
1. From the current cursor position, type the title Abstract
     • Note: The title is in mixed case and is not bold
2. Hit the enter key to advance to the next line
3. From the Text Alignment Tools, select the Left Align so that the text will be
   flushed on the left and jagged on the right
4. Begin typing the Abstract
     • NOTE: An abstract does not use a paragraph indentation
5. When you finish writing the Abstract, hit a Ctrl+Enter key combination and you
   will be taken to the next page to begin the body of the paper


                                             © Michelle Post, Ph.D.     March 22, 2011   22
Steps
1. Select from the Text Alignment Tools, the Center Alignment Tool to
   center your cursor on the page
2. Go to the Title Page and copy the Title of the Paper from that page by
   highlighting the text and selecting the copy button from the button
   menu or using the Ctrl+C key combination for Control Copy
3. Return to the Body of the Paper and with your cursor placed in the
   center of the page select the Paste Button from the menu bar or using
   the Ctrl+V key combination for Control Paste
4. Hit the Enter key to advance one line
5. Select from the Text Alignment Tools, the Left Alignment Tool to
   place your cursor on the left-side of the page
6. Hit the Tab Key to indent the paragraph by 1/2” or you can use your
   space key to space in 5-7 spaces
7. Begin typing your paper
8. See the next slide for the finished product


                                      © Michelle Post, Ph.D.   March 22, 2011   23
© Michelle Post, Ph.D.   March 22, 2011   24
Steps
1. After you finish writing your paper, use the Ctrl+Enter key
   combination to advance to the next page
2. Select from the Text Alignment Tools, the Center Alignment Tool to
   center your cursor on the page
3. Type the title References if you have more than one reference, if you
   only have one reference than the title is not plural.
    • The title is not in bold and is in mixed case
4. After typing the title, hit the enter key to advance to the next line
5. Select from the Text Alignment Tools, the Left Alignment Tool to
   place your cursor on the left-side of the page
6. Begin entering your references
    • Arrange the entries of the reference list by alphabetical order by
       last name, followed by initials.
    • If the author has two or more listings, list by publication date
       from earliest to latest.
7. See the next slide for the finished product


                                       © Michelle Post, Ph.D.   March 22, 2011   25
© Michelle Post, Ph.D.   March 22, 2011   26
Steps
1. You have now complete an APA 6th Edition document that you
   can save and use again and again
2. Select the Office button in the upper left corner
3. Select Save or Save As
4. Select the location where you want to save your new APA 6th
   Edition Template (e.g., Your PC, Laptop or Flash Drive)
5. Name the file APA 6th Edition Template
6. When you need to write an APA 6th Edition Paper all you need to
   do now is open your template and edit your header, title and
   then type away


                                     © Michelle Post, Ph.D.   March 22, 2011   27
   Setting up Word 2007 for APA -
    http://www.youtube.com/watch?v=zwte1ntB
    2gA
   Setting up Word 2010 for APA -
    http://www.youtube.com/watch?v=KUjhwGm
    hDrI
   APA Format Citations-Sixth (6th) Edition -
    http://www.youtube.com/watch?v=9pbUoNa
    5tyY


                             Michelle Post, Ph.D.   28

More Related Content

What's hot

Word Chapter 2 - Formatting Characters and Paragraphs
Word Chapter 2 - Formatting Characters and ParagraphsWord Chapter 2 - Formatting Characters and Paragraphs
Word Chapter 2 - Formatting Characters and Paragraphsdpd
 
Lesson4 Formatting Text
Lesson4 Formatting TextLesson4 Formatting Text
Lesson4 Formatting Textguevarra_2000
 
Micro soft word,excel notes
Micro soft word,excel notesMicro soft word,excel notes
Micro soft word,excel notesImran Waris
 
Word excel
Word excelWord excel
Word exceljjsn04
 
Excel 2007 shortcut and function keys
Excel 2007 shortcut and function keysExcel 2007 shortcut and function keys
Excel 2007 shortcut and function keysGopal Padamati
 
Excel for beginners class 1
Excel for beginners class 1Excel for beginners class 1
Excel for beginners class 1
Carlstadt Public Library
 
Welcome to word template
Welcome to word templateWelcome to word template
Welcome to word template
InRai1
 
Understanding microsoft excel
Understanding microsoft excelUnderstanding microsoft excel
Understanding microsoft excelLovely Ann Azanza
 
Emmylet computer training hand book
Emmylet computer training hand bookEmmylet computer training hand book
Emmylet computer training hand bookOfun Emma
 
Accessibility worksheet
Accessibility worksheetAccessibility worksheet
Accessibility worksheet
John Allan
 
Text formatting in ms word ppt
Text formatting in ms word pptText formatting in ms word ppt
Text formatting in ms word ppt
Josephclarin15
 
Pc Fundamentalspart 2 Word
Pc Fundamentalspart 2 WordPc Fundamentalspart 2 Word
Pc Fundamentalspart 2 Word
LUZ PINGOL
 

What's hot (17)

05 formatting paragraphs
05   formatting paragraphs05   formatting paragraphs
05 formatting paragraphs
 
Word Chapter 2 - Formatting Characters and Paragraphs
Word Chapter 2 - Formatting Characters and ParagraphsWord Chapter 2 - Formatting Characters and Paragraphs
Word Chapter 2 - Formatting Characters and Paragraphs
 
Lesson4 Formatting Text
Lesson4 Formatting TextLesson4 Formatting Text
Lesson4 Formatting Text
 
Micro soft word,excel notes
Micro soft word,excel notesMicro soft word,excel notes
Micro soft word,excel notes
 
Word excel
Word excelWord excel
Word excel
 
Beginner word class_4
Beginner word class_4Beginner word class_4
Beginner word class_4
 
Ms word
Ms wordMs word
Ms word
 
Excel 2007 shortcut and function keys
Excel 2007 shortcut and function keysExcel 2007 shortcut and function keys
Excel 2007 shortcut and function keys
 
Excel for beginners class 1
Excel for beginners class 1Excel for beginners class 1
Excel for beginners class 1
 
Welcome to word template
Welcome to word templateWelcome to word template
Welcome to word template
 
Beginner word class_5
Beginner word class_5Beginner word class_5
Beginner word class_5
 
Understanding microsoft excel
Understanding microsoft excelUnderstanding microsoft excel
Understanding microsoft excel
 
Formatting Paragraphs
Formatting ParagraphsFormatting Paragraphs
Formatting Paragraphs
 
Emmylet computer training hand book
Emmylet computer training hand bookEmmylet computer training hand book
Emmylet computer training hand book
 
Accessibility worksheet
Accessibility worksheetAccessibility worksheet
Accessibility worksheet
 
Text formatting in ms word ppt
Text formatting in ms word pptText formatting in ms word ppt
Text formatting in ms word ppt
 
Pc Fundamentalspart 2 Word
Pc Fundamentalspart 2 WordPc Fundamentalspart 2 Word
Pc Fundamentalspart 2 Word
 

Viewers also liked

Excel --practicas-----tic
Excel --practicas-----ticExcel --practicas-----tic
Excel --practicas-----ticMayra Fortaneli
 
Agricultura
AgriculturaAgricultura
Agricultura
Alexandre Sampaio
 
Blogging blueprint ss
Blogging blueprint ssBlogging blueprint ss
Blogging blueprint ss
RestyledLife
 
Excel --practicas-----tic
Excel --practicas-----ticExcel --practicas-----tic
Excel --practicas-----ticMayra Fortaneli
 
Bukaera
BukaeraBukaera
Bukaera
Belén Flores
 
Makalah psikologi emosi klp 9 "EMOSI DAN PSIKOPATOLOGI"
Makalah psikologi emosi klp 9 "EMOSI DAN PSIKOPATOLOGI"Makalah psikologi emosi klp 9 "EMOSI DAN PSIKOPATOLOGI"
Makalah psikologi emosi klp 9 "EMOSI DAN PSIKOPATOLOGI"Yelfy Yazid
 
Estrutura geológica do brasil
Estrutura geológica do brasilEstrutura geológica do brasil
Estrutura geológica do brasil
Alexandre Sampaio
 
Urbanização
UrbanizaçãoUrbanização
Urbanização
Alexandre Sampaio
 
Divisao regional brasil
Divisao regional brasilDivisao regional brasil
Divisao regional brasil
Alexandre Sampaio
 
Estrutura geológica do brasil
Estrutura geológica do brasilEstrutura geológica do brasil
Estrutura geológica do brasil
Alexandre Sampaio
 
Estrutura geológica
Estrutura geológicaEstrutura geológica
Estrutura geológica
Alexandre Sampaio
 
Apa 6th edition publication manual
Apa 6th edition publication manualApa 6th edition publication manual
Apa 6th edition publication manualIris Fiallos-Finstad
 
1 gaia 3 dbh apunteak
1 gaia 3 dbh apunteak1 gaia 3 dbh apunteak
1 gaia 3 dbh apunteak
Belén Flores
 
Ppt 2007 tutorial complete
Ppt 2007 tutorial completePpt 2007 tutorial complete
Ppt 2007 tutorial complete
Master Jhay
 
PowerPoint Tutorial
PowerPoint TutorialPowerPoint Tutorial
PowerPoint Tutorial
Ashford University
 

Viewers also liked (18)

Indie bookcatalog 2015
Indie bookcatalog 2015Indie bookcatalog 2015
Indie bookcatalog 2015
 
Ui você inventa
Ui você inventaUi você inventa
Ui você inventa
 
Excel --practicas-----tic
Excel --practicas-----ticExcel --practicas-----tic
Excel --practicas-----tic
 
Agricultura
AgriculturaAgricultura
Agricultura
 
Blogging blueprint ss
Blogging blueprint ssBlogging blueprint ss
Blogging blueprint ss
 
Excel --practicas-----tic
Excel --practicas-----ticExcel --practicas-----tic
Excel --practicas-----tic
 
Indie bookcatalog 2015
Indie bookcatalog 2015Indie bookcatalog 2015
Indie bookcatalog 2015
 
Bukaera
BukaeraBukaera
Bukaera
 
Makalah psikologi emosi klp 9 "EMOSI DAN PSIKOPATOLOGI"
Makalah psikologi emosi klp 9 "EMOSI DAN PSIKOPATOLOGI"Makalah psikologi emosi klp 9 "EMOSI DAN PSIKOPATOLOGI"
Makalah psikologi emosi klp 9 "EMOSI DAN PSIKOPATOLOGI"
 
Estrutura geológica do brasil
Estrutura geológica do brasilEstrutura geológica do brasil
Estrutura geológica do brasil
 
Urbanização
UrbanizaçãoUrbanização
Urbanização
 
Divisao regional brasil
Divisao regional brasilDivisao regional brasil
Divisao regional brasil
 
Estrutura geológica do brasil
Estrutura geológica do brasilEstrutura geológica do brasil
Estrutura geológica do brasil
 
Estrutura geológica
Estrutura geológicaEstrutura geológica
Estrutura geológica
 
Apa 6th edition publication manual
Apa 6th edition publication manualApa 6th edition publication manual
Apa 6th edition publication manual
 
1 gaia 3 dbh apunteak
1 gaia 3 dbh apunteak1 gaia 3 dbh apunteak
1 gaia 3 dbh apunteak
 
Ppt 2007 tutorial complete
Ppt 2007 tutorial completePpt 2007 tutorial complete
Ppt 2007 tutorial complete
 
PowerPoint Tutorial
PowerPoint TutorialPowerPoint Tutorial
PowerPoint Tutorial
 

Similar to APA-formatting with MSword2007

Ms word2013 complete
Ms word2013  completeMs word2013  complete
Ms word2013 complete
SOMITTUBE
 
Apa paper setup
Apa paper setupApa paper setup
Apa paper setup
yosra Yassora
 
Microsoftwordexcelpptnotes 130107205245-phpapp02
Microsoftwordexcelpptnotes 130107205245-phpapp02Microsoftwordexcelpptnotes 130107205245-phpapp02
Microsoftwordexcelpptnotes 130107205245-phpapp02
mohan kumar
 
Microsoft Word Basics - part 1
Microsoft Word Basics - part 1Microsoft Word Basics - part 1
Microsoft Word Basics - part 1
Hoboken Public Library
 
Open Office Writer : Lesson 03
Open Office Writer : Lesson 03Open Office Writer : Lesson 03
Open Office Writer : Lesson 03thinkict
 
Ms word
Ms wordMs word
Ms word
Omar Jacalne
 
Ms word
Ms wordMs word
Ms word
Omar Jacalne
 
Introduction to InDesign
Introduction to InDesignIntroduction to InDesign
Introduction to InDesign
DUSPviz
 
Ms word 2013 Training
Ms word 2013 TrainingMs word 2013 Training
Ms word 2013 Training
Jahnavee Parmar
 
Ms office 2013
Ms office 2013Ms office 2013
Ms office 2013
Dr. Sunil Kumar
 
Text formatting in ms w ord
Text formatting in ms w ordText formatting in ms w ord
Text formatting in ms w ord
joy grace bagui
 
Office productivity tools (part i) (3.13 mb)
Office productivity tools (part i) (3.13 mb)Office productivity tools (part i) (3.13 mb)
Office productivity tools (part i) (3.13 mb)IMRAN KHAN
 
"Bba (III year)osmania university it project report"
"Bba (III year)osmania university it project report""Bba (III year)osmania university it project report"
"Bba (III year)osmania university it project report"
isagargandhi
 
-Working with Text in Corel Draw
-Working with Text in Corel Draw-Working with Text in Corel Draw
-Working with Text in Corel Draw
SanthiNivas
 
MS Word 2007
MS Word 2007MS Word 2007
MS Word 2007
Mirea Mizushima
 
ASSIGNMENT ENG Lit Modern British LiteratureFirst, part of two p.docx
ASSIGNMENT ENG Lit Modern British LiteratureFirst, part of two p.docxASSIGNMENT ENG Lit Modern British LiteratureFirst, part of two p.docx
ASSIGNMENT ENG Lit Modern British LiteratureFirst, part of two p.docx
rock73
 
Introduction to word processing
Introduction to word processingIntroduction to word processing
Introduction to word processing
Iddrisu Issah
 
Lecture4 1
Lecture4 1Lecture4 1
Lecture4 1
sajib333
 

Similar to APA-formatting with MSword2007 (20)

Ms word2013 complete
Ms word2013  completeMs word2013  complete
Ms word2013 complete
 
Apa paper setup
Apa paper setupApa paper setup
Apa paper setup
 
Microsoftwordexcelpptnotes 130107205245-phpapp02
Microsoftwordexcelpptnotes 130107205245-phpapp02Microsoftwordexcelpptnotes 130107205245-phpapp02
Microsoftwordexcelpptnotes 130107205245-phpapp02
 
Microsoft Word Basics - part 1
Microsoft Word Basics - part 1Microsoft Word Basics - part 1
Microsoft Word Basics - part 1
 
Open Office Writer : Lesson 03
Open Office Writer : Lesson 03Open Office Writer : Lesson 03
Open Office Writer : Lesson 03
 
Ms word
Ms wordMs word
Ms word
 
Ms word
Ms wordMs word
Ms word
 
Word Lecture 1
Word Lecture 1Word Lecture 1
Word Lecture 1
 
Powerpoint class 1
Powerpoint class 1Powerpoint class 1
Powerpoint class 1
 
Introduction to InDesign
Introduction to InDesignIntroduction to InDesign
Introduction to InDesign
 
Ms word 2013 Training
Ms word 2013 TrainingMs word 2013 Training
Ms word 2013 Training
 
Ms office 2013
Ms office 2013Ms office 2013
Ms office 2013
 
Text formatting in ms w ord
Text formatting in ms w ordText formatting in ms w ord
Text formatting in ms w ord
 
Office productivity tools (part i) (3.13 mb)
Office productivity tools (part i) (3.13 mb)Office productivity tools (part i) (3.13 mb)
Office productivity tools (part i) (3.13 mb)
 
"Bba (III year)osmania university it project report"
"Bba (III year)osmania university it project report""Bba (III year)osmania university it project report"
"Bba (III year)osmania university it project report"
 
-Working with Text in Corel Draw
-Working with Text in Corel Draw-Working with Text in Corel Draw
-Working with Text in Corel Draw
 
MS Word 2007
MS Word 2007MS Word 2007
MS Word 2007
 
ASSIGNMENT ENG Lit Modern British LiteratureFirst, part of two p.docx
ASSIGNMENT ENG Lit Modern British LiteratureFirst, part of two p.docxASSIGNMENT ENG Lit Modern British LiteratureFirst, part of two p.docx
ASSIGNMENT ENG Lit Modern British LiteratureFirst, part of two p.docx
 
Introduction to word processing
Introduction to word processingIntroduction to word processing
Introduction to word processing
 
Lecture4 1
Lecture4 1Lecture4 1
Lecture4 1
 

APA-formatting with MSword2007

  • 1. Michelle Post, Ph.D. (mpost.phd@gmail.com)
  • 2. APA 6th Edition Basic Formatting  Preparing for Two Headers  Set the Margins  Set the Font  Set the Line Spacing  Insert Title Page Header (Step 1 - 5)  Type the Title Page: Steps  Insert the 2nd Header for the Body of the Paper © Michelle Post, Ph.D. March 22, 2011 2
  • 3. Create the Abstract Page  Create the Body of the Paper  Create the Reference Page  Save it All  YouTube Video Training © Michelle Post, Ph.D. March 22, 2011 3
  • 4. Basic Formatting – The Paper APA 6th Edition Location Page Size: 8.5” x 11” Margins: 1” on all sides Chapter 8: Section 8.03 – Margins (p. 229) Line Spacing: Double spaced for whole document Chapter 8: Section 8.03 – Line spacing (p. 229) Font Type: Times New Roman (serif typeface) Chapter 8: Section 8.03 – Typeface (p. 228) Font Size: 12 pt Chapter 8: Section 8.03 – Typeface (p. 228) Alignment: Flush-left style (right margin is uneven) Chapter 8: Section 8.03 – Line length and alignment (p. 229) Paragraph and indentation: Indent the first line of every paragraph Chapter 8: Section 8.03 – Paragraph and and footnote. Use the tab key, which should be set at five to seven indentation (p. 229) spaces or a ½” Length: The optimal length to effectively communicate the primary Chapter 3: Section 3.01 – Length (p. 61) ideas. RULE: “less is more” Writing Style: Clear communication that uses continuity in Chapter 3: Sections 3.05 – 3.10 (pp. 65 – 70) presentation of ideas, smoothness of expression, tone, economy of expression, precision and clarity, and linguistic devices. Voice: Third person point of view and active voice Chapter 3: Section 3.09 – Precision and Clarity: Attribution (pp. 69 -70) Chapter 3: Section 3.18 – Verbs (p. 77) © Michelle Post, Ph.D. March 22, 2011 4
  • 5. Steps 1. Select from the menu bar Page Layout 2. Select Page Setup 3. Select the Layout tab 4. Check Different first page © Michelle Post, Ph.D. March 22, 2011 5
  • 6. Steps 1. Select Page Layout tab 2. Select Margins 3. Select 1” on all sides © Michelle Post, Ph.D. March 22, 2011 6
  • 7. Steps 1. From the menu bar select Home 2. From the Font type drop down select Times New Roman 3. From the Font size drop down, select 12 pt. © Michelle Post, Ph.D. March 22, 2011 7
  • 8. Steps 1. From the Home tab 2. Select the Line Spacing short cut tool 3. From the Line Spacing drop down menu select 2.0 4. NOTE: Make sure there are no spaces before or after a paragraph © Michelle Post, Ph.D. March 22, 2011 8
  • 9. Steps 1. Select the Insert tab 2. Select Header button 3. Select Blank header © Michelle Post, Ph.D. March 22, 2011 9
  • 10. Steps 1. Remove the tab marker from the Right margin 2. To do this, select the tab with your right mouse button and drag off the page © Michelle Post, Ph.D. March 22, 2011 10
  • 11. Steps 1. Select the decimal tab from the left tab selection box 2. Insert the decimal tab near the 1”right margin (you cannot place it directly on it) 3. Slide the decimal tab onto the 1” right margin © Michelle Post, Ph.D. March 22, 2011 11
  • 12. Steps 1. Type the words Running head: in mixed case 2. Type a short title of your paper in ALL CAPS one space after the colon 3. NOTE: The title cannot exceed 50 characters © Michelle Post, Ph.D. March 22, 2011 12
  • 13. Steps 1. After you finish typing your title hit your tab key until you are at the right margin 2. Select Insert from the menu bar 3. Select Page Number from the button menu 4. Select Current Position from the drop down menu 5. Select Plain Number from the second drop down menu 6. NOTE: Do NOT manually enter a number on the right margin. If you do, each page will have the same page number 7. Close the Header box © Michelle Post, Ph.D. March 22, 2011 13
  • 14. © Michelle Post, Ph.D. March 22, 2011 14
  • 15. © Michelle Post, Ph.D. March 22, 2011 15
  • 16. © Michelle Post, Ph.D. March 22, 2011 16
  • 17. Steps 1. From the short cut menus select the Center Text Alignment (this will center your cursor so that you can type your title page information) 2. Hit the Enter Key three times to move the cursor to the right place to start your title page information 3. Type the title of your paper in twelve words or less (Words that are 4 characters or more are capitalized) 4. Hit the enter key to move to the next line, type Your Name 5. Hit the enter key to move to the next line, type the University Name 6. After typing the University Name, hit the key combination Control (Ctrl) plus Enter (This key combination will take you to the beginning of the next page) 7. See the next slide for the finished product © Michelle Post, Ph.D. March 22, 2011 17
  • 18. © Michelle Post, Ph.D. March 22, 2011 18
  • 19. Steps 1. You will create the 2nd header the same way you did the first, the only difference is you do not use the words “Running head” in the 2nd header 2. Select the Insert tab 3. Select Header button 4. Select Blank header 5. Remove the tab marker from the Right margin 1. To do this, select the tab with your right mouse button and drag off the page 6. Select the decimal tab from the left tab selection box 7. Insert the decimal tab near the 1”right margin (you cannot place it directly on it) 8. Slide the decimal tab onto the 1” right margin 9. Type the same short title from Header 1 Michelle Post, Ph.D. 19
  • 20. Steps, Cntd. 1. After you finish typing your title hit your tab key until you are at the right margin 2. Select Insert from the menu bar 3. Select Page Number from the button menu 4. Select Current Position from the drop down menu 5. Select Plain Number from the second drop down menu • NOTE: Do NOT manually enter a number on the right margin. If you do, each page will have the same page number 6. Close the Header box 7. See the next slide for the finished product Michelle Post, Ph.D. 20
  • 21. © Michelle Post, Ph.D. March 22, 2011 21
  • 22. Steps 1. From the current cursor position, type the title Abstract • Note: The title is in mixed case and is not bold 2. Hit the enter key to advance to the next line 3. From the Text Alignment Tools, select the Left Align so that the text will be flushed on the left and jagged on the right 4. Begin typing the Abstract • NOTE: An abstract does not use a paragraph indentation 5. When you finish writing the Abstract, hit a Ctrl+Enter key combination and you will be taken to the next page to begin the body of the paper © Michelle Post, Ph.D. March 22, 2011 22
  • 23. Steps 1. Select from the Text Alignment Tools, the Center Alignment Tool to center your cursor on the page 2. Go to the Title Page and copy the Title of the Paper from that page by highlighting the text and selecting the copy button from the button menu or using the Ctrl+C key combination for Control Copy 3. Return to the Body of the Paper and with your cursor placed in the center of the page select the Paste Button from the menu bar or using the Ctrl+V key combination for Control Paste 4. Hit the Enter key to advance one line 5. Select from the Text Alignment Tools, the Left Alignment Tool to place your cursor on the left-side of the page 6. Hit the Tab Key to indent the paragraph by 1/2” or you can use your space key to space in 5-7 spaces 7. Begin typing your paper 8. See the next slide for the finished product © Michelle Post, Ph.D. March 22, 2011 23
  • 24. © Michelle Post, Ph.D. March 22, 2011 24
  • 25. Steps 1. After you finish writing your paper, use the Ctrl+Enter key combination to advance to the next page 2. Select from the Text Alignment Tools, the Center Alignment Tool to center your cursor on the page 3. Type the title References if you have more than one reference, if you only have one reference than the title is not plural. • The title is not in bold and is in mixed case 4. After typing the title, hit the enter key to advance to the next line 5. Select from the Text Alignment Tools, the Left Alignment Tool to place your cursor on the left-side of the page 6. Begin entering your references • Arrange the entries of the reference list by alphabetical order by last name, followed by initials. • If the author has two or more listings, list by publication date from earliest to latest. 7. See the next slide for the finished product © Michelle Post, Ph.D. March 22, 2011 25
  • 26. © Michelle Post, Ph.D. March 22, 2011 26
  • 27. Steps 1. You have now complete an APA 6th Edition document that you can save and use again and again 2. Select the Office button in the upper left corner 3. Select Save or Save As 4. Select the location where you want to save your new APA 6th Edition Template (e.g., Your PC, Laptop or Flash Drive) 5. Name the file APA 6th Edition Template 6. When you need to write an APA 6th Edition Paper all you need to do now is open your template and edit your header, title and then type away © Michelle Post, Ph.D. March 22, 2011 27
  • 28. Setting up Word 2007 for APA - http://www.youtube.com/watch?v=zwte1ntB 2gA  Setting up Word 2010 for APA - http://www.youtube.com/watch?v=KUjhwGm hDrI  APA Format Citations-Sixth (6th) Edition - http://www.youtube.com/watch?v=9pbUoNa 5tyY Michelle Post, Ph.D. 28