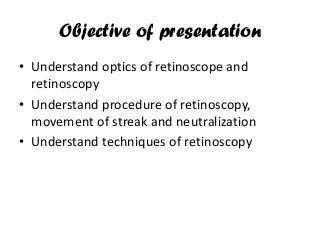
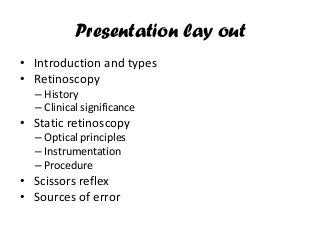
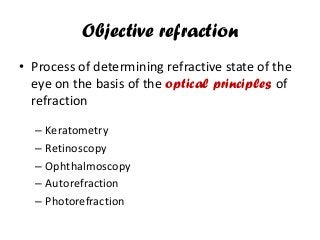
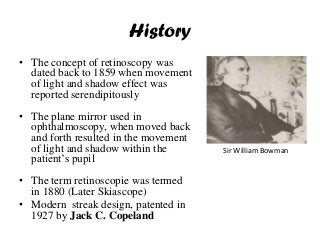
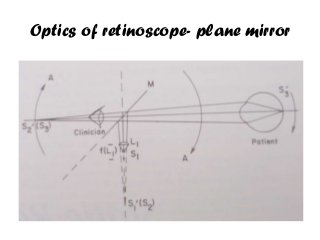
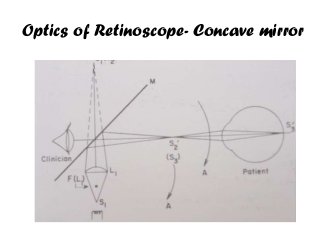
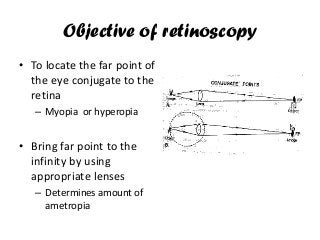
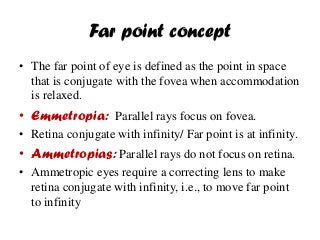
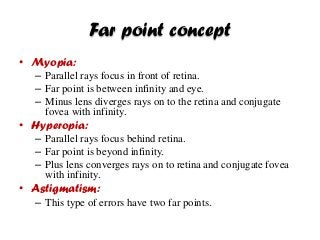
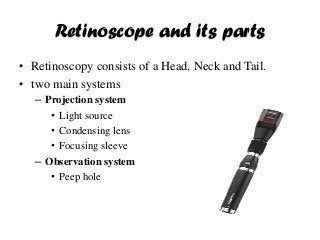
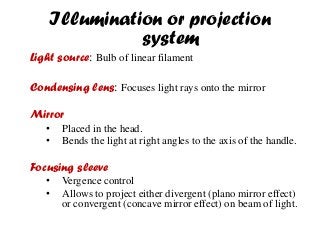
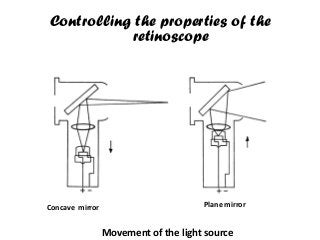
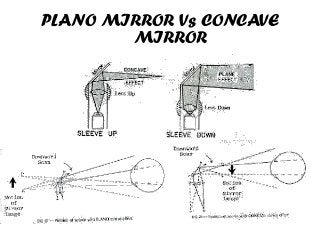
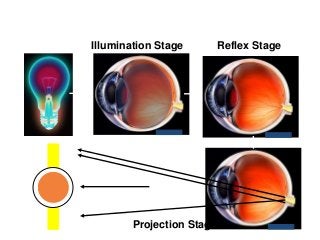
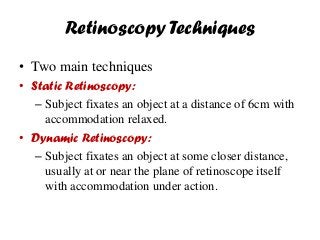
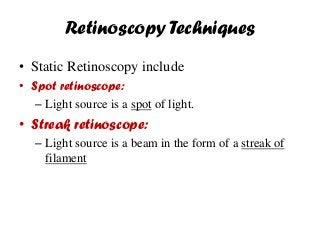
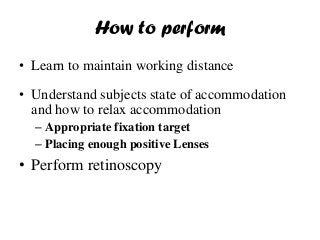
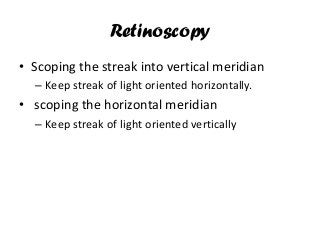
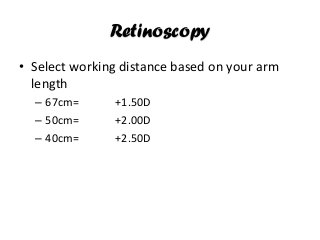
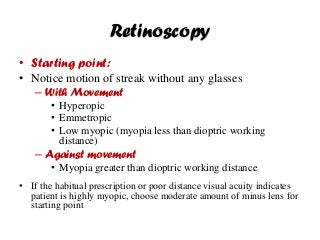
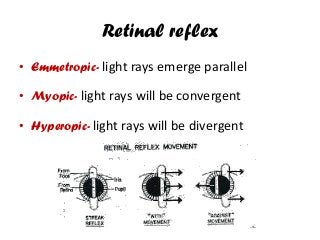
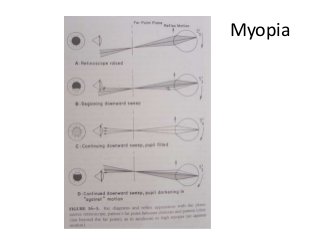
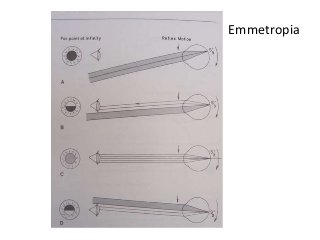
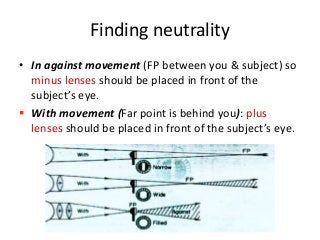
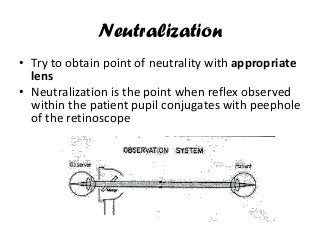
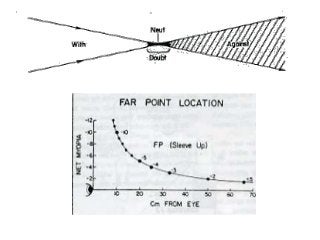
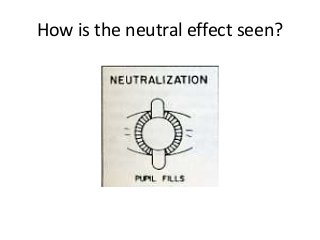
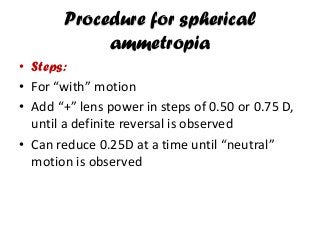
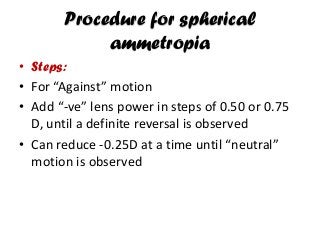
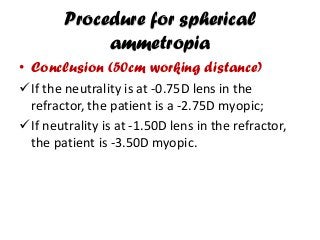
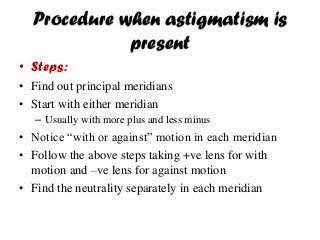
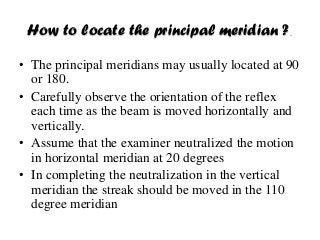
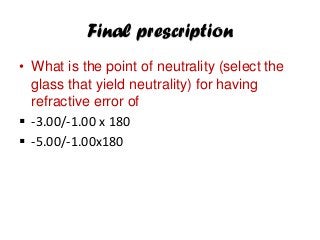
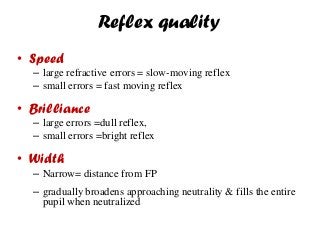
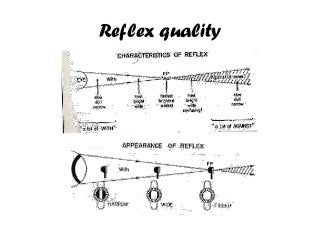
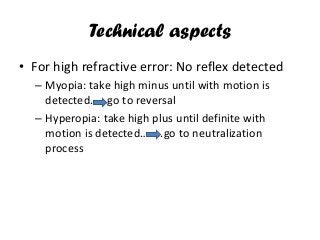
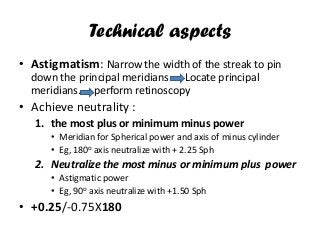
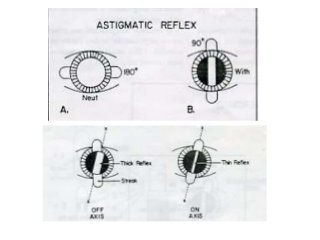
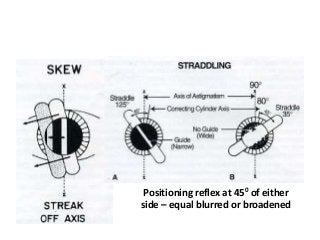
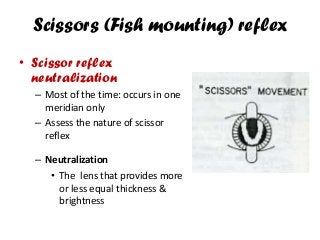
Objective of presentation
• Understand optics of retinoscope and
retinoscopy
• Understand procedure of retinoscopy,
movement of streak and neutralization
• Understand techniques of retinoscopy
Presentation lay out
• Introduction and types
• Retinoscopy
– History
– Clinical significance
• Static retinoscopy
– Optical principles
– Instrumentation
– Procedure
• Scissors reflex
• Sources of error
Objective refraction
• Process of determining refractive state of the
eye on the basis of the optical principles of
refraction
– Keratometry
– Retinoscopy
– Ophthalmoscopy
– Autorefraction
– Photorefraction
History
• The concept of retinoscopy was
dated back to 1859 when movement
of light and shadow effect was
reported serendipitously
• The plane mirror used in
ophthalmoscopy, when moved back
and forth resulted in the movement
of light and shadow within the
patient’s pupil
• The term retinoscopie was termed
in 1880 (Later Skiascope)
• Modern streak design, patented in
1927 by Jack C. Copeland
Sir William Bowman
Clinical uses
• Estimate refractive error objectively
• Detect Regular and irregular astigmatism
• Detect opacities within the media
• Only way to assess refraction status in infants,
toddles, uncooperative people, non-
communicative and non-verbal patients
Optics of retinoscope- plane mirror
Optics of Retinoscope- Concave mirror
Objective of retinoscopy
• To locate the far point of
the eye conjugate to the
retina
– Myopia or hyperopia
• Bring far point to the
infinity by using
appropriate lenses
– Determines amount of
ametropia
Far point concept
• The far point of eye is defined as the point in space
that is conjugate with the fovea when accommodation
is relaxed.
• Emmetropia: Parallel rays focus on fovea.
• Retina conjugate with infinity/ Far point is at infinity.
• Ammetropias: Parallel rays do not focus on retina.
• Ammetropic eyes require a correcting lens to make
retina conjugate with infinity, i.e., to move far point
to infinity
Far point concept
• Myopia:
– Parallel rays focus in front of retina.
– Far point is between infinity and eye.
– Minus lens diverges rays on to the retina and conjugate
fovea with infinity.
• Hyperopia:
– Parallel rays focus behind retina.
– Far point is beyond infinity.
– Plus lens converges rays on to retina and conjugate fovea
with infinity.
• Astigmatism:
– This type of errors have two far points.
Retinoscope and its parts
• Retinoscopy consists of a Head, Neck and Tail.
• two main systems
– Projection system
• Light source
• Condensing lens
• Focusing sleeve
– Observation system
• Peep hole
Illumination or projection
system
Light source: Bulb of linear filament
Condensing lens: Focuses light rays onto the mirror
Mirror
• Placed in the head.
• Bends the light at right angles to the axis of the handle.
Focusing sleeve
• Vergence control
• Allows to project either divergent (plano mirror effect)
or convergent (concave mirror effect) on beam of light.
Controlling the properties of the
retinoscope
Plane mirrorConcave mirror
Movement of the light source
PLANO MIRROR Vs CONCAVE
MIRROR
Illumination Stage Reflex Stage
Projection Stage
Retinoscopy Techniques
• Two main techniques
• Static Retinoscopy:
– Subject fixates an object at a distance of 6cm with
accommodation relaxed.
• Dynamic Retinoscopy:
– Subject fixates an object at some closer distance,
usually at or near the plane of retinoscope itself
with accommodation under action.
Retinoscopy Techniques
• Static Retinoscopy include
• Spot retinoscope:
– Light source is a spot of light.
• Streak retinoscope:
– Light source is a beam in the form of a streak of
filament
How to perform
• Learn to maintain working distance
• Understand subjects state of accommodation
and how to relax accommodation
– Appropriate fixation target
– Placing enough positive Lenses
• Perform retinoscopy
Retinoscopy
• Scoping the streak into vertical meridian
– Keep streak of light oriented horizontally.
• scoping the horizontal meridian
– Keep streak of light oriented vertically
Retinoscopy
• Select working distance based on your arm
length
– 67cm= +1.50D
– 50cm= +2.00D
– 40cm= +2.50D
Retinoscopy
• Starting point:
• Notice motion of streak without any glasses
– With Movement
• Hyperopic
• Emmetropic
• Low myopic (myopia less than dioptric working
distance)
– Against movement
• Myopia greater than dioptric working distance
• If the habitual prescription or poor distance visual acuity indicates
patient is highly myopic, choose moderate amount of minus lens for
starting point
Retinal reflex
• Emmetropic- light rays emerge parallel
• Myopic- light rays will be convergent
• Hyperopic- light rays will be divergent
Myopia
Hyperopia
Emmetropia
Finding neutrality
• In against movement (FP between you & subject) so
minus lenses should be placed in front of the
subject’s eye.
 With movement (Far point is behind you): plus
lenses should be placed in front of the subject’s eye.
Neutralization
• Try to obtain point of neutrality with appropriate
lens
• Neutralization is the point when reflex observed
within the patient pupil conjugates with peephole
of the retinoscope
How is the neutral effect seen?
Procedure for spherical
ammetropia
• Steps:
• For “with” motion
• Add “+” lens power in steps of 0.50 or 0.75 D,
until a definite reversal is observed
• Can reduce 0.25D at a time until “neutral”
motion is observed
Procedure for spherical
ammetropia
• Conclusion (50cm working distance)
If neutrality is at +2.00D lens in the refractor,
patient is emmetropic
If the neutrality is at +2.75D lens in the
refractor, the patient is a +0.75D hyperope;
If neutrality is at +1.00D lens in the refractor,
the patient is -1.00D myopic.
Procedure for spherical
ammetropia
• Steps:
• For “Against” motion
• Add “-ve” lens power in steps of 0.50 or 0.75
D, until a definite reversal is observed
• Can reduce -0.25D at a time until “neutral”
motion is observed
Procedure for spherical
ammetropia
• Conclusion (50cm working distance)
If the neutrality is at -0.75D lens in the
refractor, the patient is a -2.75D myopic;
If neutrality is at -1.50D lens in the refractor,
the patient is -3.50D myopic.
Procedure when astigmatism is
present
• Steps:
• Find out principal meridians
• Start with either meridian
– Usually with more plus and less minus
• Notice “with or against” motion in each meridian
• Follow the above steps taking +ve lens for with
motion and –ve lens for against motion
• Find the neutrality separately in each meridian
How to locate the principal meridian ?.
• The principal meridians may usually located at 90
or 180.
• Carefully observe the orientation of the reflex
each time as the beam is moved horizontally and
vertically.
• Assume that the examiner neutralized the motion
in horizontal meridian at 20 degrees
• In completing the neutralization in the vertical
meridian the streak should be moved in the 110
degree meridian
Final prescription
• What is the point of neutrality (select the
glass that yield neutrality) for having
refractive error of
 -3.00/-1.00 x 180
 -5.00/-1.00x180
Reflex quality
• Speed
– large refractive errors = slow-moving reflex
– small errors = fast moving reflex
• Brilliance
– large errors =dull reflex,
– small errors =bright reflex
• Width
– Narrow= distance from FP
– gradually broadens approaching neutrality & fills the entire
pupil when neutralized
Reflex quality
Technical aspects
• For high refractive error: No reflex detected
– Myopia: take high minus until with motion is
detected……go to reversal
– Hyperopia: take high plus until definite with
motion is detected……..go to neutralization
process
Technical aspects
• Astigmatism: Narrow the width of the streak to pin
down the principal meridians….. Locate principal
meridians……perform retinoscopy
• Achieve neutrality :
1. the most plus or minimum minus power
• Meridian for Spherical power and axis of minus cylinder
• Eg, 180o axis neutralize with + 2.25 Sph
2. Neutralize the most minus or minimum plus power
• Astigmatic power
• Eg, 90o axis neutralize with +1.50 Sph
• +0.25/-0.75X180
Positioning reflex at 450 of either
side – equal blurred or broadened
Scissors (Fish mounting) reflex
• Scissor reflex
neutralization
– Most of the time: occurs in one
meridian only
– Assess the nature of scissor
reflex
– Neutralization
• The lens that provides more
or less equal thickness &
brightness
Control of patients accommodation
• Remind the subject to watch fixation target
• Make sure you donot obscure subject’s
fixation target
• You can add +ve lens before fixating eye to
relax subject’s accommodation
• Avoid viewing from one sitting only to perform
patient’s both eyes retinoscopy
Sources of error
• Location of retinal reflex :
– 0.2 mm anterior to the plane of photoreceptor
– 0.50 Ds difference from subjective refraction.
• Accommodation control
• Unstandardized working distance
• Criteria for neutrality
• Scoping off the patient’s visual axis
• Failure to locate the principle meridians
• Failure to recognize scissors motion
Summary
• Question???
Refraction simplified

Refraction simplified

  • 2.
    Objective of presentation •Understand optics of retinoscope and retinoscopy • Understand procedure of retinoscopy, movement of streak and neutralization • Understand techniques of retinoscopy
  • 3.
    Presentation lay out •Introduction and types • Retinoscopy – History – Clinical significance • Static retinoscopy – Optical principles – Instrumentation – Procedure • Scissors reflex • Sources of error
  • 4.
    Objective refraction • Processof determining refractive state of the eye on the basis of the optical principles of refraction – Keratometry – Retinoscopy – Ophthalmoscopy – Autorefraction – Photorefraction
  • 5.
    History • The conceptof retinoscopy was dated back to 1859 when movement of light and shadow effect was reported serendipitously • The plane mirror used in ophthalmoscopy, when moved back and forth resulted in the movement of light and shadow within the patient’s pupil • The term retinoscopie was termed in 1880 (Later Skiascope) • Modern streak design, patented in 1927 by Jack C. Copeland Sir William Bowman
  • 6.
    Clinical uses • Estimaterefractive error objectively • Detect Regular and irregular astigmatism • Detect opacities within the media • Only way to assess refraction status in infants, toddles, uncooperative people, non- communicative and non-verbal patients
  • 7.
  • 8.
    Optics of Retinoscope-Concave mirror
  • 10.
    Objective of retinoscopy •To locate the far point of the eye conjugate to the retina – Myopia or hyperopia • Bring far point to the infinity by using appropriate lenses – Determines amount of ametropia
  • 11.
    Far point concept •The far point of eye is defined as the point in space that is conjugate with the fovea when accommodation is relaxed. • Emmetropia: Parallel rays focus on fovea. • Retina conjugate with infinity/ Far point is at infinity. • Ammetropias: Parallel rays do not focus on retina. • Ammetropic eyes require a correcting lens to make retina conjugate with infinity, i.e., to move far point to infinity
  • 12.
    Far point concept •Myopia: – Parallel rays focus in front of retina. – Far point is between infinity and eye. – Minus lens diverges rays on to the retina and conjugate fovea with infinity. • Hyperopia: – Parallel rays focus behind retina. – Far point is beyond infinity. – Plus lens converges rays on to retina and conjugate fovea with infinity. • Astigmatism: – This type of errors have two far points.
  • 13.
    Retinoscope and itsparts • Retinoscopy consists of a Head, Neck and Tail. • two main systems – Projection system • Light source • Condensing lens • Focusing sleeve – Observation system • Peep hole
  • 14.
    Illumination or projection system Lightsource: Bulb of linear filament Condensing lens: Focuses light rays onto the mirror Mirror • Placed in the head. • Bends the light at right angles to the axis of the handle. Focusing sleeve • Vergence control • Allows to project either divergent (plano mirror effect) or convergent (concave mirror effect) on beam of light.
  • 15.
    Controlling the propertiesof the retinoscope Plane mirrorConcave mirror Movement of the light source
  • 16.
    PLANO MIRROR VsCONCAVE MIRROR
  • 17.
    Illumination Stage ReflexStage Projection Stage
  • 18.
    Retinoscopy Techniques • Twomain techniques • Static Retinoscopy: – Subject fixates an object at a distance of 6cm with accommodation relaxed. • Dynamic Retinoscopy: – Subject fixates an object at some closer distance, usually at or near the plane of retinoscope itself with accommodation under action.
  • 19.
    Retinoscopy Techniques • StaticRetinoscopy include • Spot retinoscope: – Light source is a spot of light. • Streak retinoscope: – Light source is a beam in the form of a streak of filament
  • 20.
    How to perform •Learn to maintain working distance • Understand subjects state of accommodation and how to relax accommodation – Appropriate fixation target – Placing enough positive Lenses • Perform retinoscopy
  • 21.
    Retinoscopy • Scoping thestreak into vertical meridian – Keep streak of light oriented horizontally. • scoping the horizontal meridian – Keep streak of light oriented vertically
  • 22.
    Retinoscopy • Select workingdistance based on your arm length – 67cm= +1.50D – 50cm= +2.00D – 40cm= +2.50D
  • 23.
    Retinoscopy • Starting point: •Notice motion of streak without any glasses – With Movement • Hyperopic • Emmetropic • Low myopic (myopia less than dioptric working distance) – Against movement • Myopia greater than dioptric working distance • If the habitual prescription or poor distance visual acuity indicates patient is highly myopic, choose moderate amount of minus lens for starting point
  • 24.
    Retinal reflex • Emmetropic-light rays emerge parallel • Myopic- light rays will be convergent • Hyperopic- light rays will be divergent
  • 25.
  • 26.
  • 27.
  • 28.
    Finding neutrality • Inagainst movement (FP between you & subject) so minus lenses should be placed in front of the subject’s eye.  With movement (Far point is behind you): plus lenses should be placed in front of the subject’s eye.
  • 29.
    Neutralization • Try toobtain point of neutrality with appropriate lens • Neutralization is the point when reflex observed within the patient pupil conjugates with peephole of the retinoscope
  • 31.
    How is theneutral effect seen?
  • 32.
    Procedure for spherical ammetropia •Steps: • For “with” motion • Add “+” lens power in steps of 0.50 or 0.75 D, until a definite reversal is observed • Can reduce 0.25D at a time until “neutral” motion is observed
  • 33.
    Procedure for spherical ammetropia •Conclusion (50cm working distance) If neutrality is at +2.00D lens in the refractor, patient is emmetropic If the neutrality is at +2.75D lens in the refractor, the patient is a +0.75D hyperope; If neutrality is at +1.00D lens in the refractor, the patient is -1.00D myopic.
  • 34.
    Procedure for spherical ammetropia •Steps: • For “Against” motion • Add “-ve” lens power in steps of 0.50 or 0.75 D, until a definite reversal is observed • Can reduce -0.25D at a time until “neutral” motion is observed
  • 35.
    Procedure for spherical ammetropia •Conclusion (50cm working distance) If the neutrality is at -0.75D lens in the refractor, the patient is a -2.75D myopic; If neutrality is at -1.50D lens in the refractor, the patient is -3.50D myopic.
  • 36.
    Procedure when astigmatismis present • Steps: • Find out principal meridians • Start with either meridian – Usually with more plus and less minus • Notice “with or against” motion in each meridian • Follow the above steps taking +ve lens for with motion and –ve lens for against motion • Find the neutrality separately in each meridian
  • 37.
    How to locatethe principal meridian ?. • The principal meridians may usually located at 90 or 180. • Carefully observe the orientation of the reflex each time as the beam is moved horizontally and vertically. • Assume that the examiner neutralized the motion in horizontal meridian at 20 degrees • In completing the neutralization in the vertical meridian the streak should be moved in the 110 degree meridian
  • 38.
    Final prescription • Whatis the point of neutrality (select the glass that yield neutrality) for having refractive error of  -3.00/-1.00 x 180  -5.00/-1.00x180
  • 39.
    Reflex quality • Speed –large refractive errors = slow-moving reflex – small errors = fast moving reflex • Brilliance – large errors =dull reflex, – small errors =bright reflex • Width – Narrow= distance from FP – gradually broadens approaching neutrality & fills the entire pupil when neutralized
  • 40.
  • 41.
    Technical aspects • Forhigh refractive error: No reflex detected – Myopia: take high minus until with motion is detected……go to reversal – Hyperopia: take high plus until definite with motion is detected……..go to neutralization process
  • 42.
    Technical aspects • Astigmatism:Narrow the width of the streak to pin down the principal meridians….. Locate principal meridians……perform retinoscopy • Achieve neutrality : 1. the most plus or minimum minus power • Meridian for Spherical power and axis of minus cylinder • Eg, 180o axis neutralize with + 2.25 Sph 2. Neutralize the most minus or minimum plus power • Astigmatic power • Eg, 90o axis neutralize with +1.50 Sph • +0.25/-0.75X180
  • 44.
    Positioning reflex at450 of either side – equal blurred or broadened
  • 45.
    Scissors (Fish mounting)reflex • Scissor reflex neutralization – Most of the time: occurs in one meridian only – Assess the nature of scissor reflex – Neutralization • The lens that provides more or less equal thickness & brightness
  • 46.
    Control of patientsaccommodation • Remind the subject to watch fixation target • Make sure you donot obscure subject’s fixation target • You can add +ve lens before fixating eye to relax subject’s accommodation • Avoid viewing from one sitting only to perform patient’s both eyes retinoscopy
  • 47.
    Sources of error •Location of retinal reflex : – 0.2 mm anterior to the plane of photoreceptor – 0.50 Ds difference from subjective refraction. • Accommodation control • Unstandardized working distance • Criteria for neutrality • Scoping off the patient’s visual axis • Failure to locate the principle meridians • Failure to recognize scissors motion
  • 48.