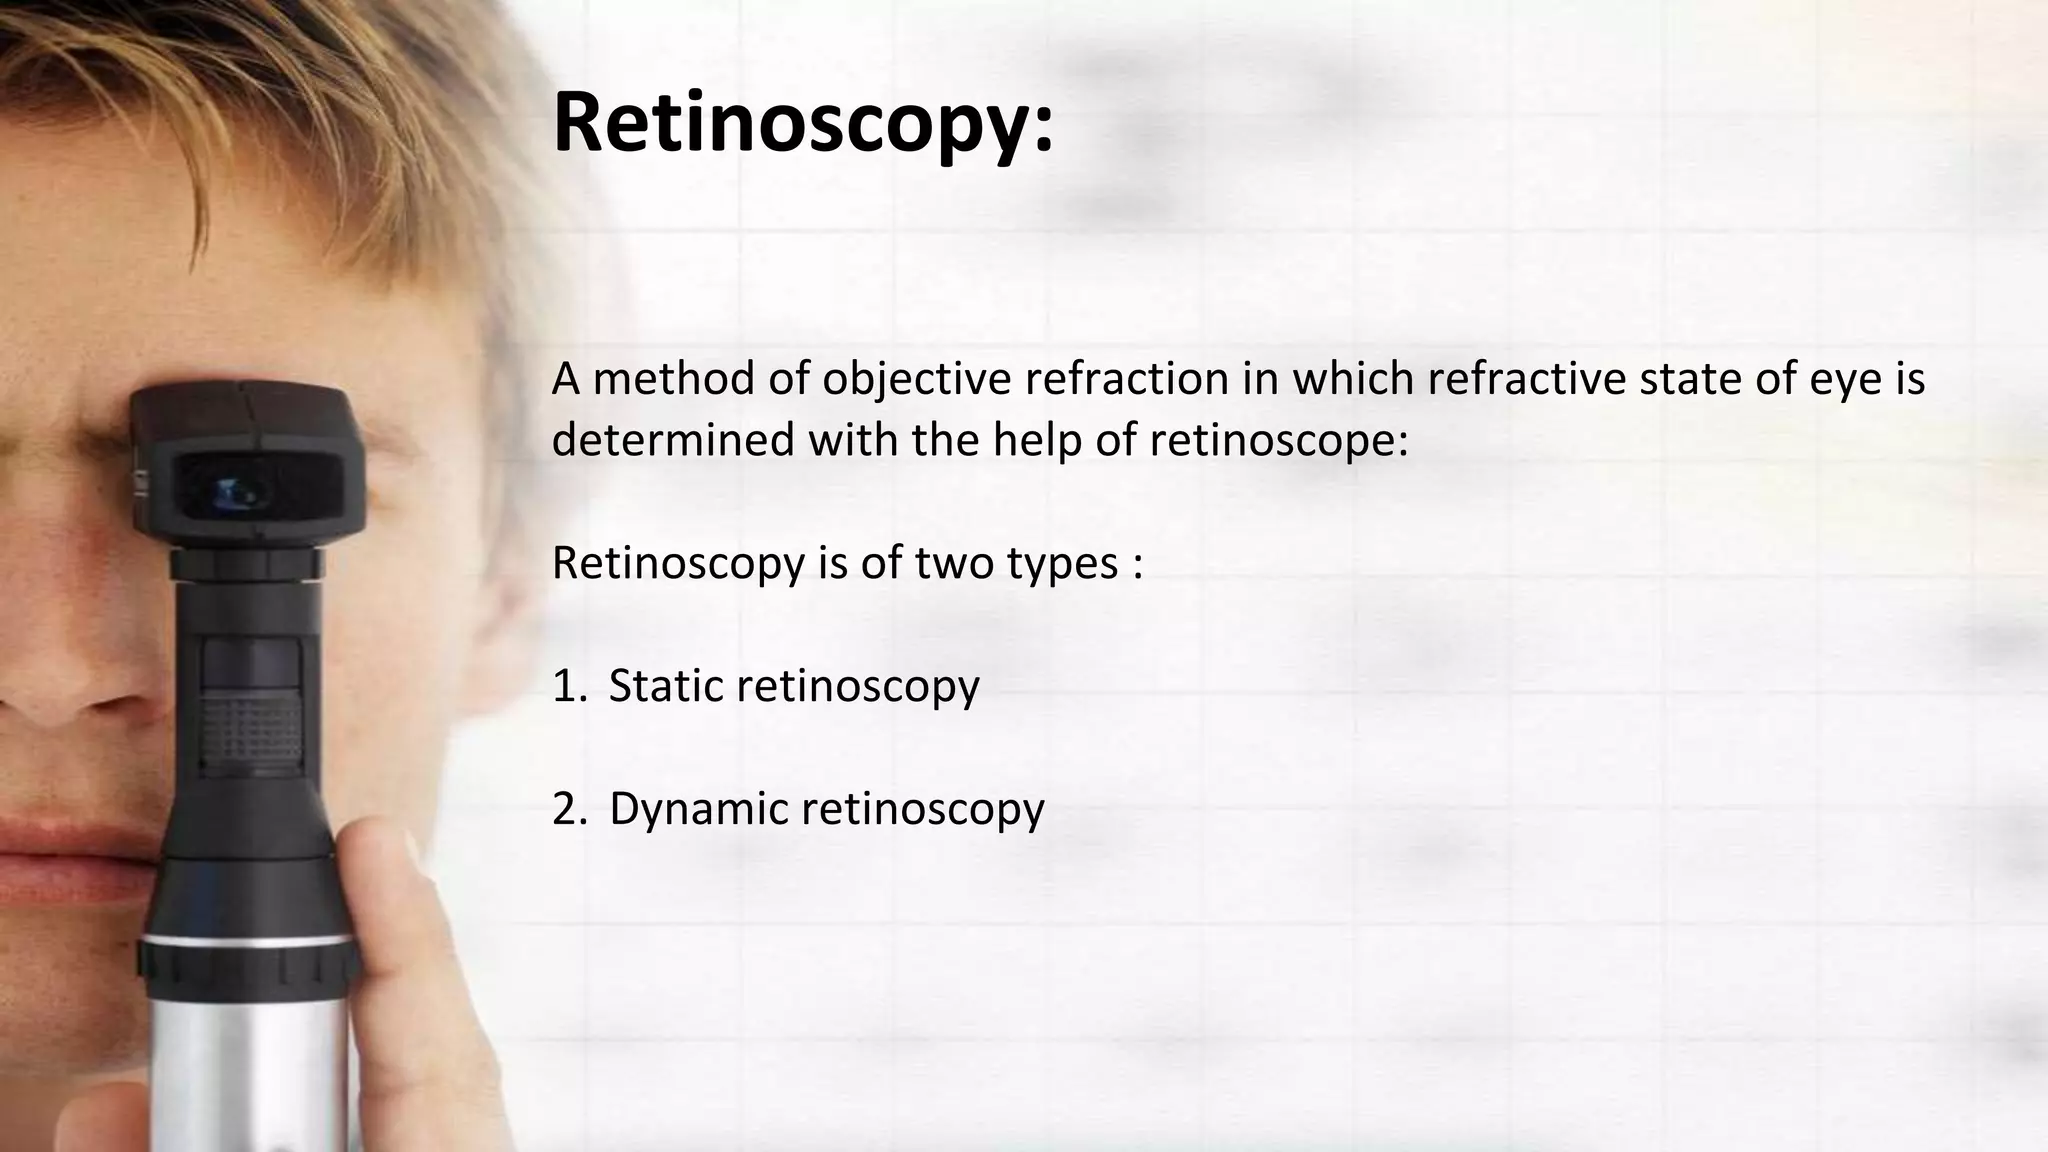
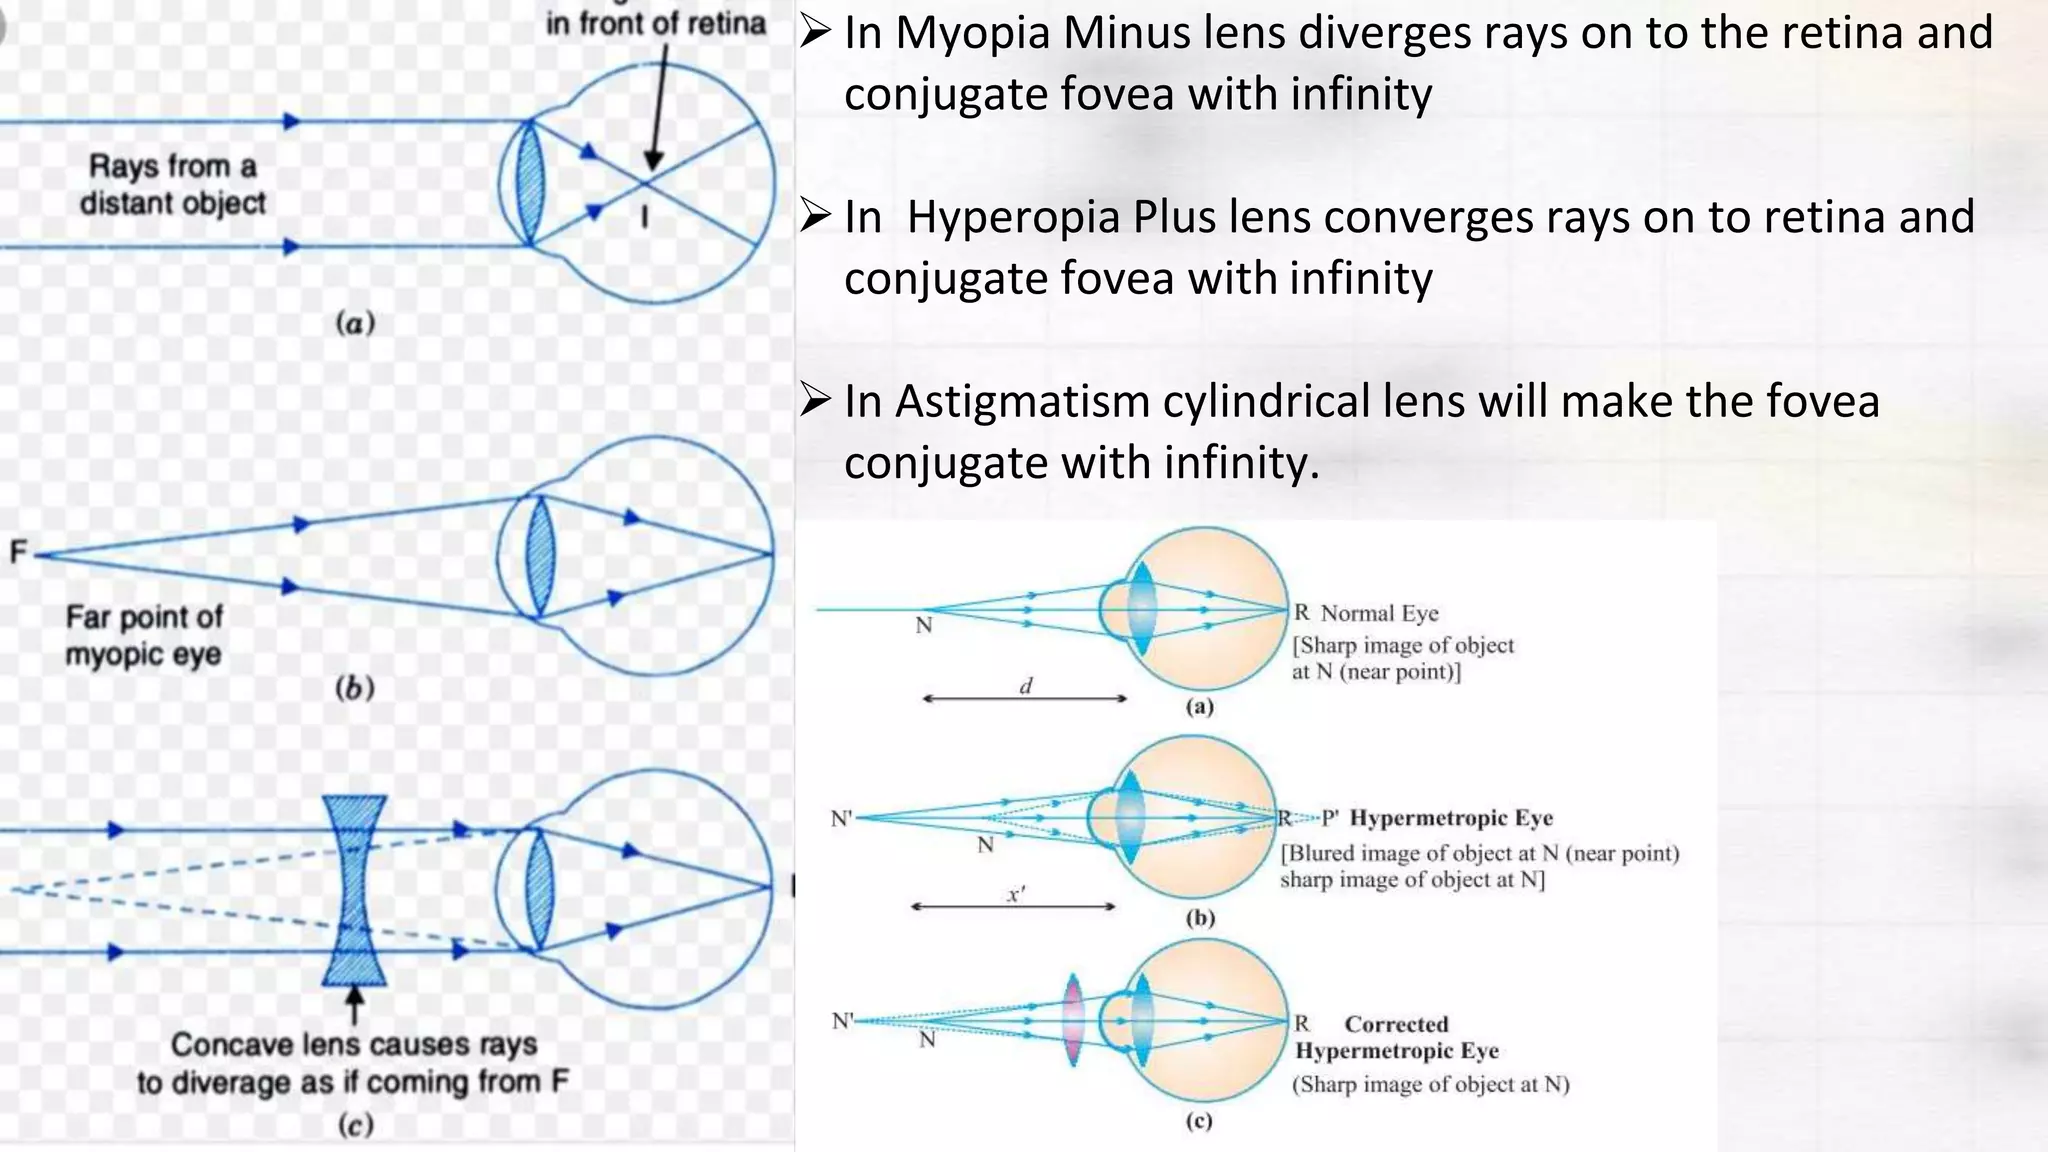
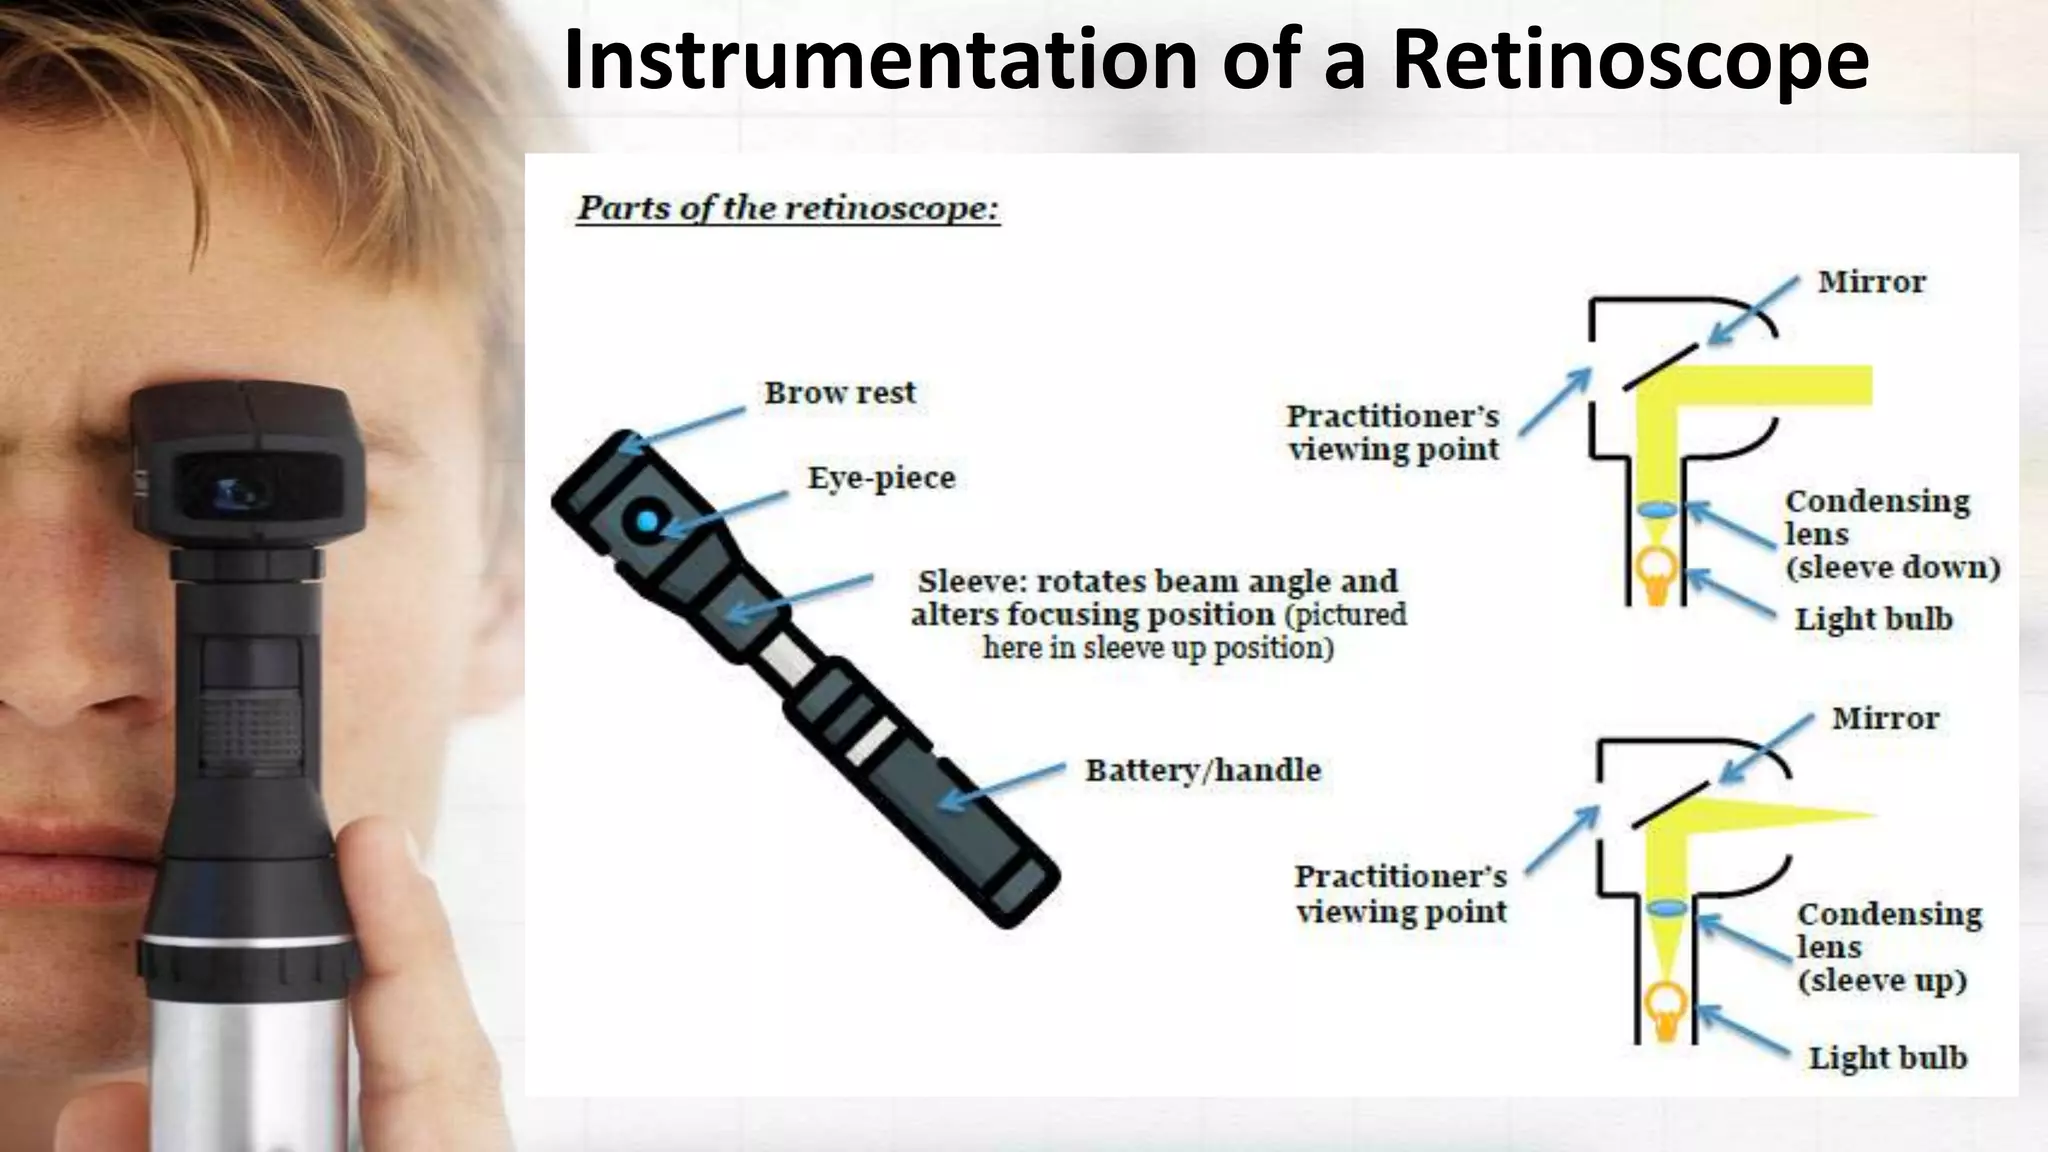
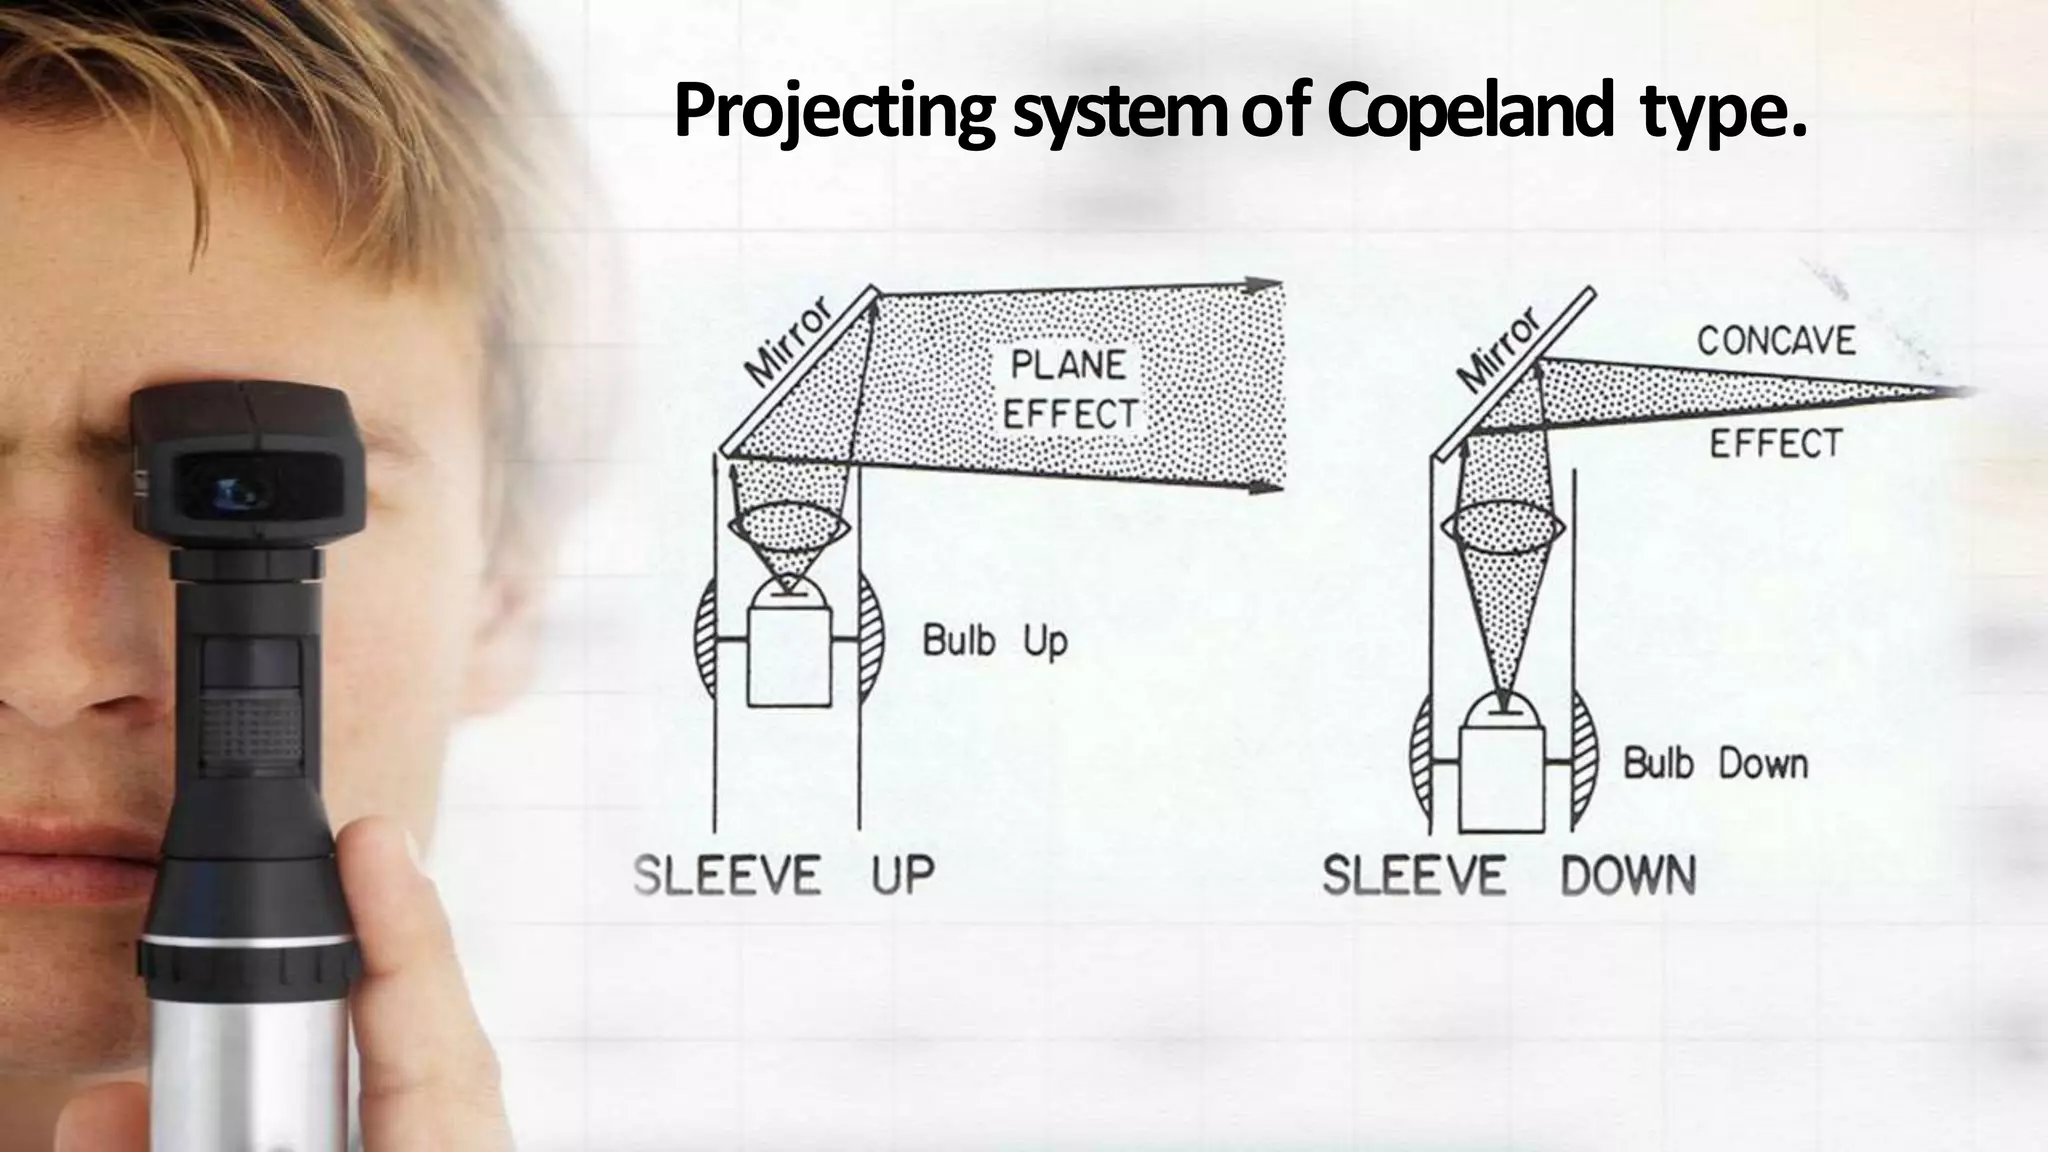
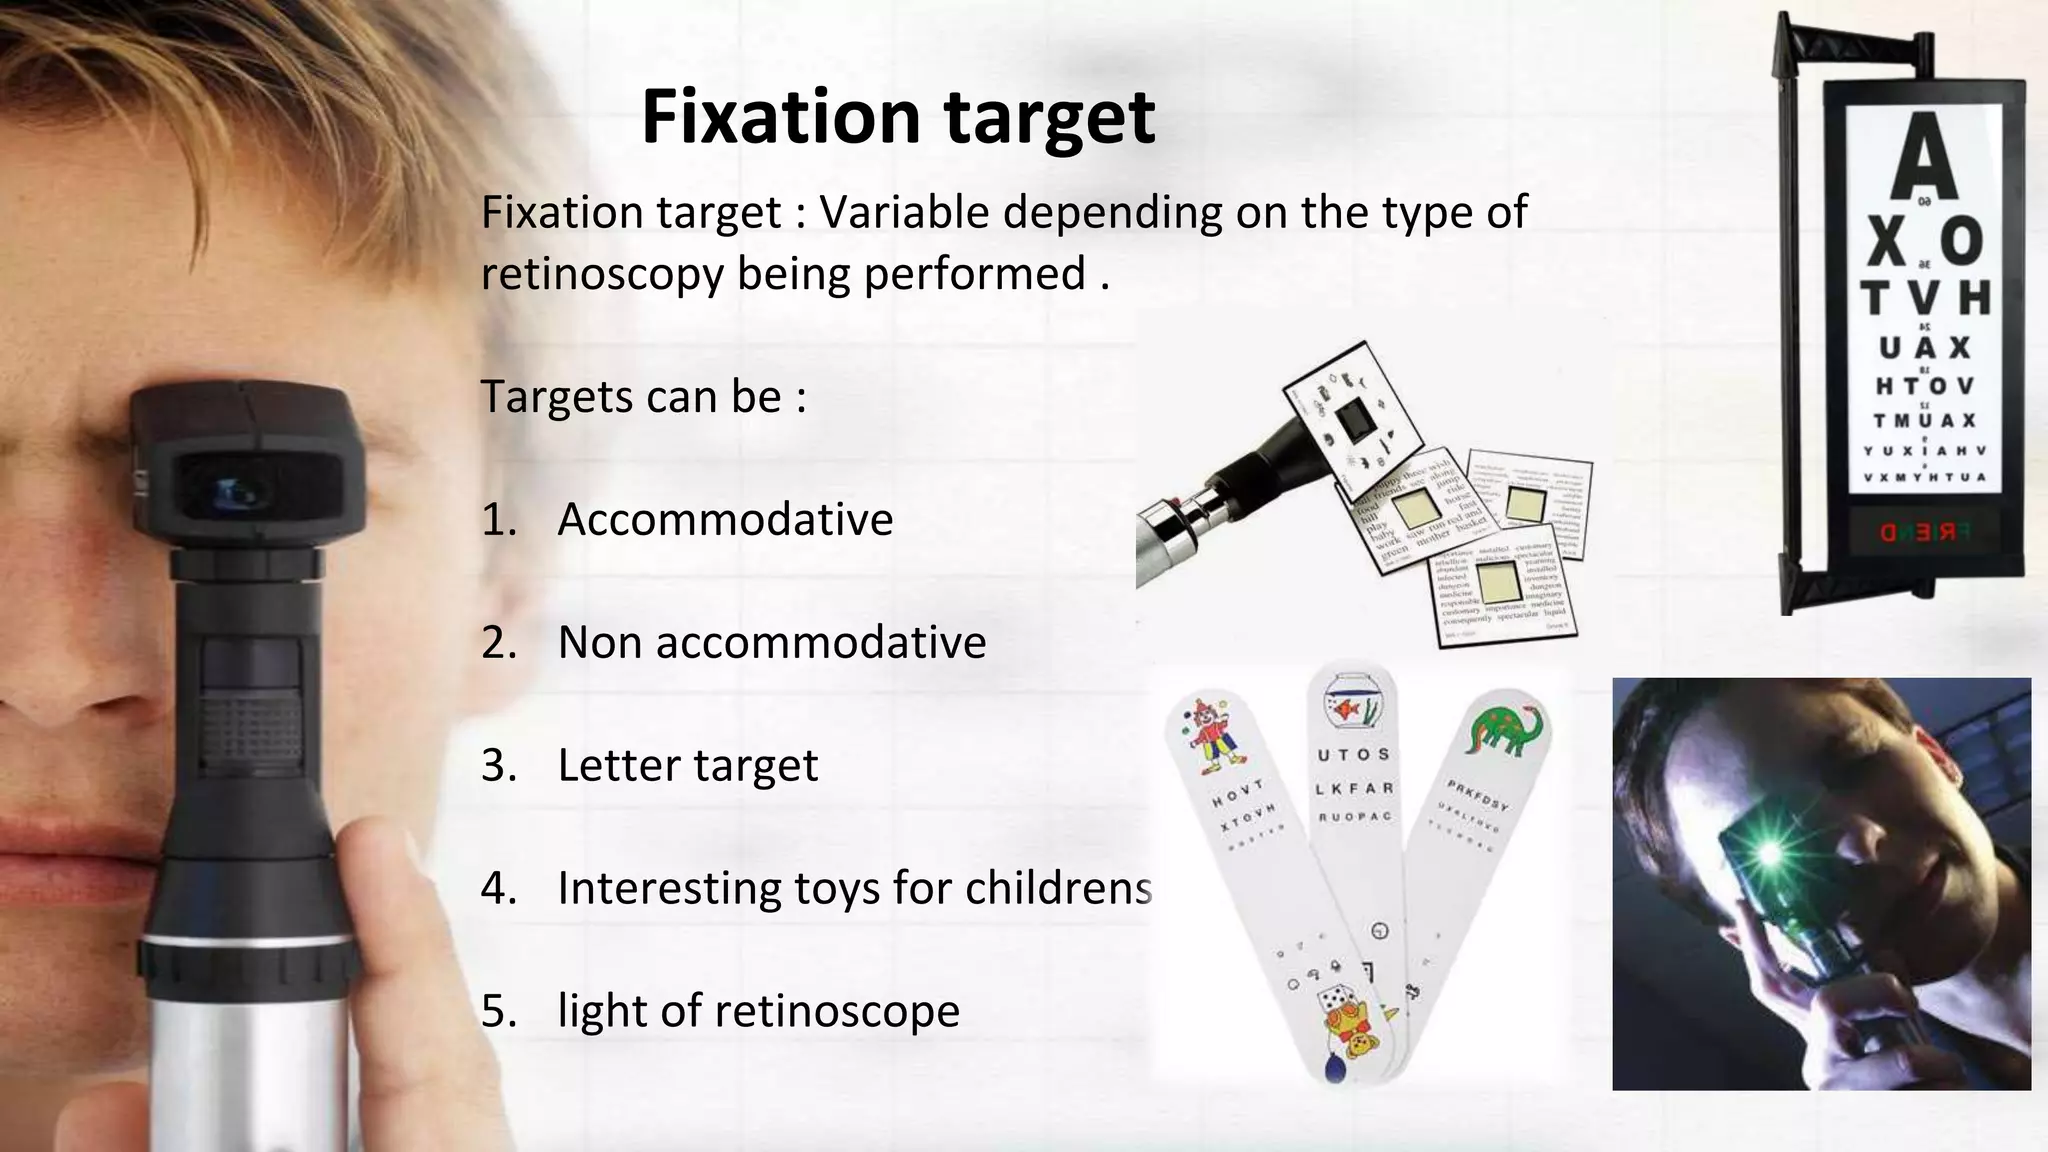
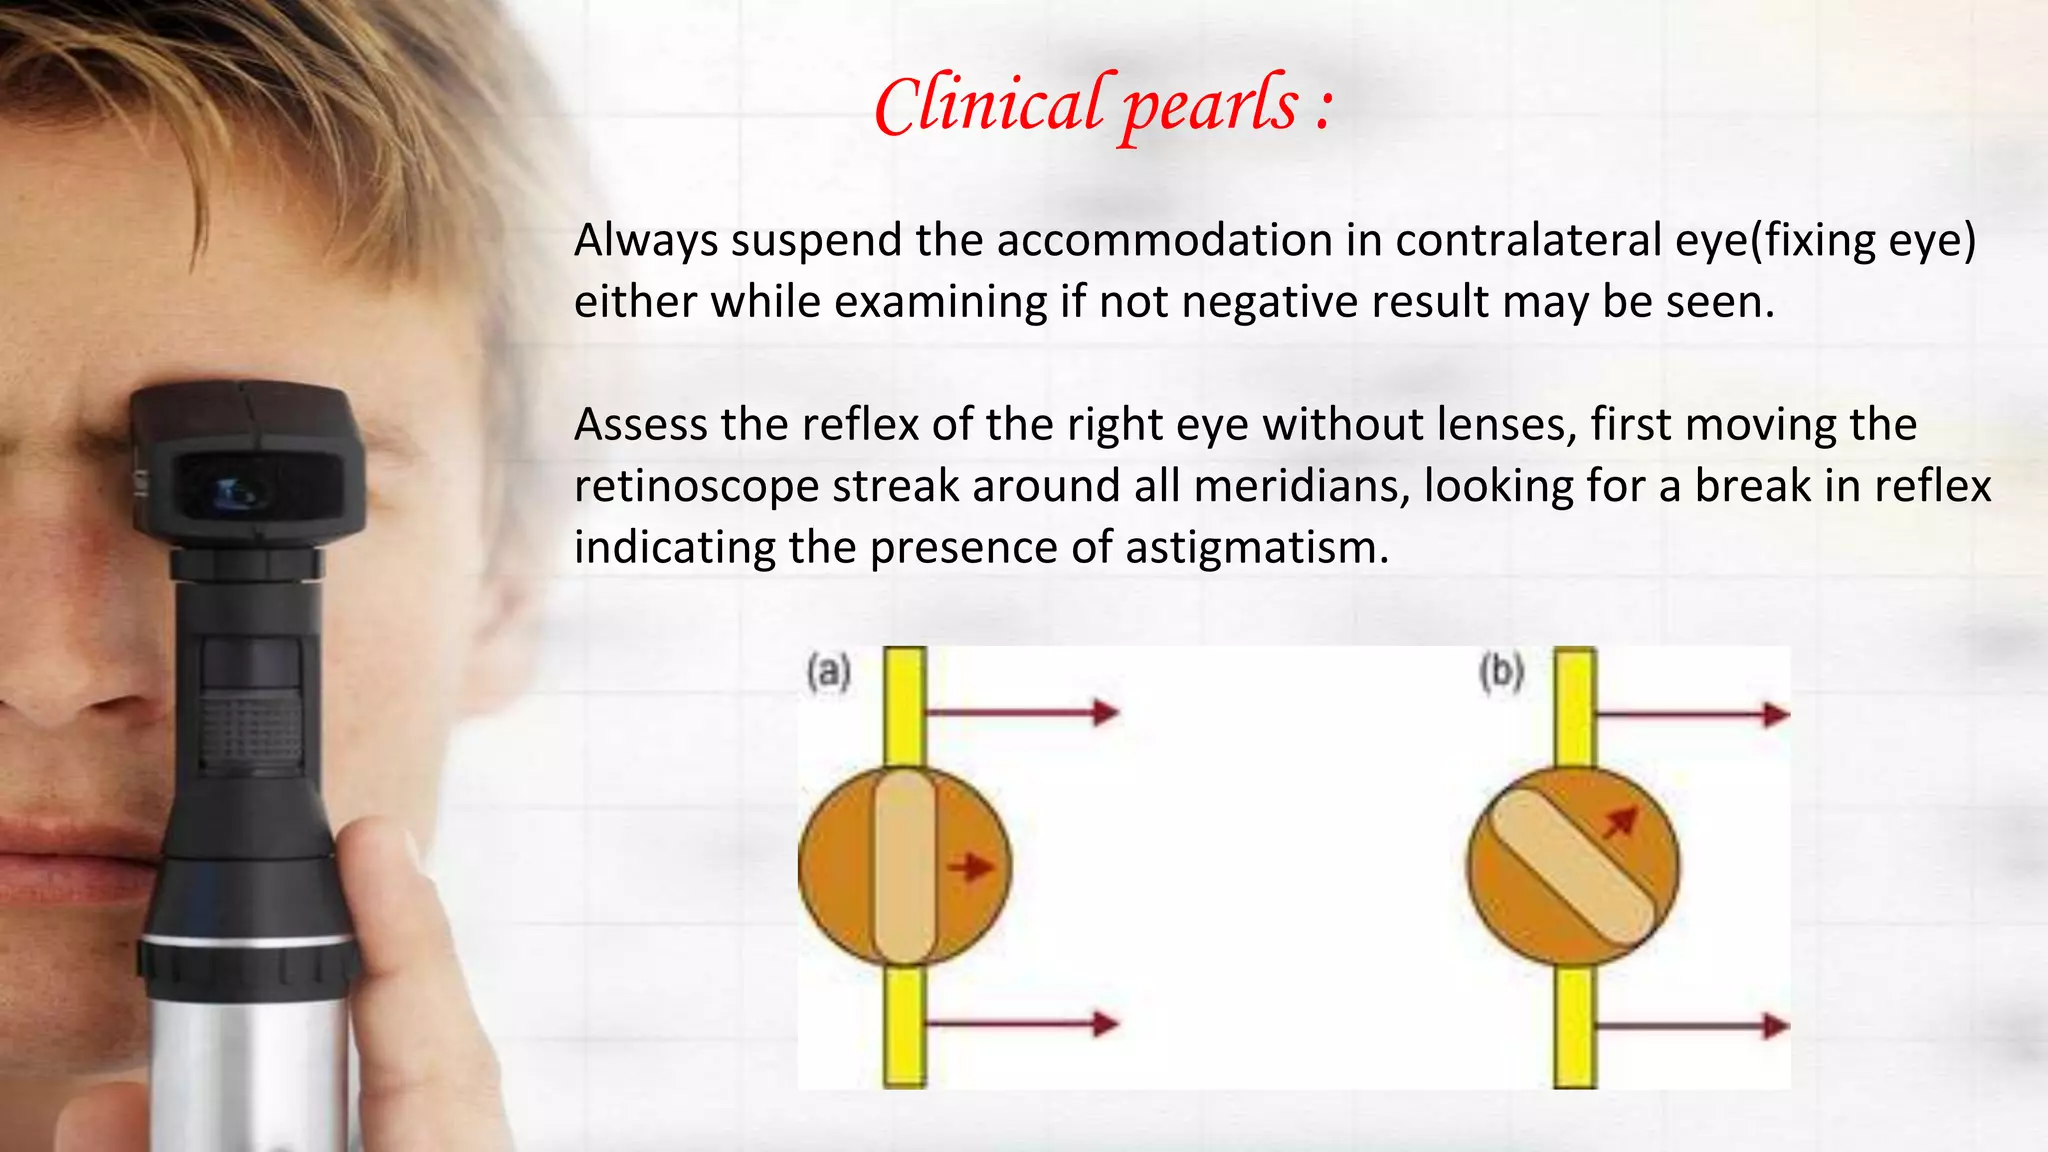
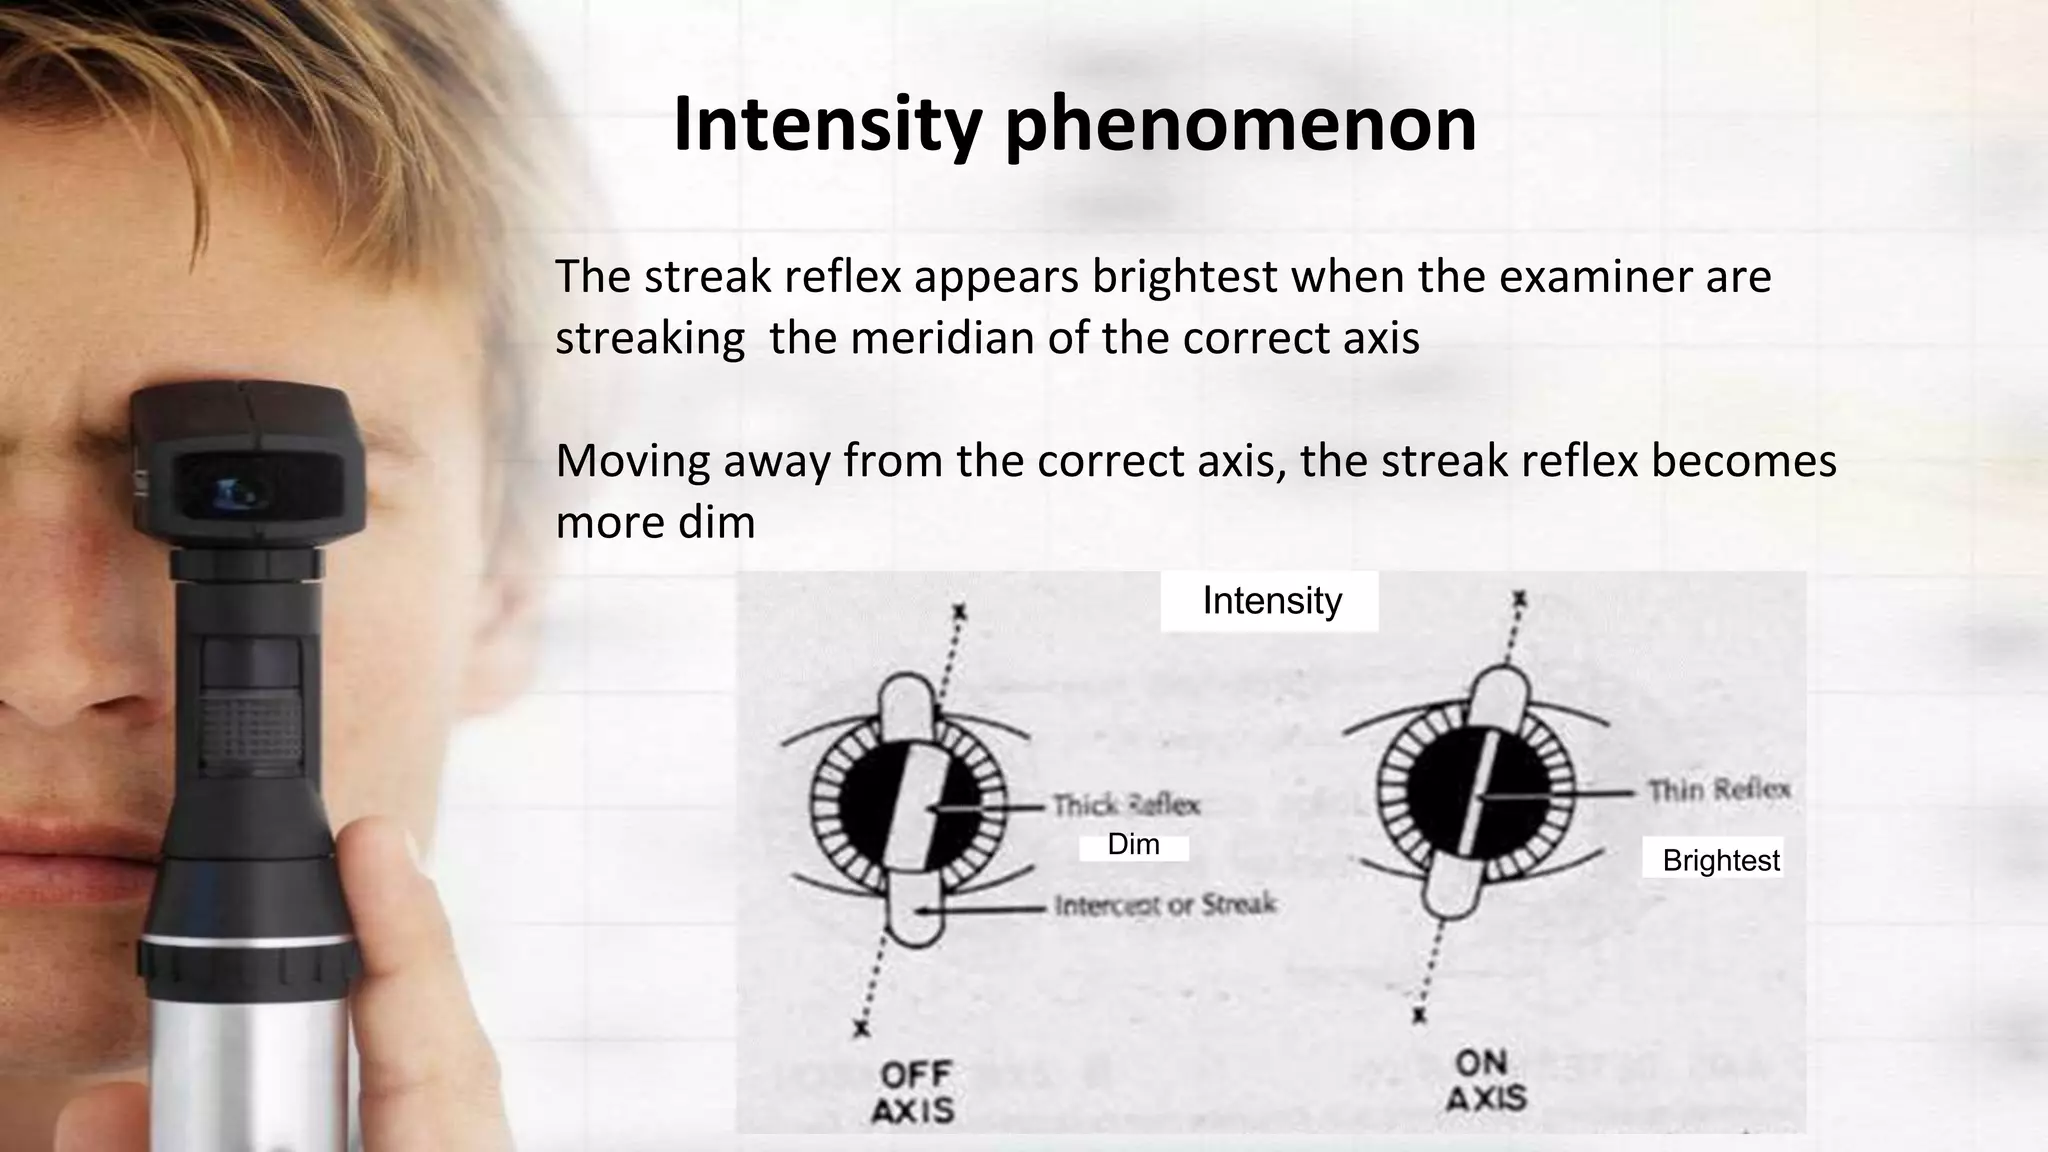
1. Retinoscopy is an objective refraction technique used to determine a patient's refractive error without their subjective response. It involves examining the movement of the patient's retinal reflex seen through a retinoscope.
2. Several factors must be considered to perform an accurate retinoscopy, including working distance, lighting conditions, the fixation target, and patient and examiner positioning. The characteristics of the retinal reflex, including direction of movement, speed, width and brightness provide clues about the refractive error.
3. Spherical refractive errors are neutralized by increasing or decreasing lens power until reversal of movement is seen. For astigmatism, each principal meridian must be neutralized separately using the same technique. Estim
To know Humphrey visual field analyser
To know about various types of perimetry
To identify field defect
To recognize that field defect is due to glaucoma or neurological lesion
To know that field defect is progressive or not
Interpretation of HVFA
To know Humphrey visual field analyser
To know about various types of perimetry
To identify field defect
To recognize that field defect is due to glaucoma or neurological lesion
To know that field defect is progressive or not
Interpretation of HVFA
Detailed instumentaion and use of manual Lensometer and just a outline of automated lensometer.
I have used the picture of manual lensometer with out the parts describtion because i have explained orally by showing the picture..
Hope u all like it and may help you in learning better. :)
Accommodation/ Accommodation of Eye, Measurement of Accommodation of Eye (hea...Bikash Sapkota
CLICK HERE TO DOWNLOAD FULL PPT ❤❤ https://healthkura.com/measurement-of-accommodation-of-eye/ ❤❤
Dear viewers Check Out my other piece of works at ❤❤❤ https://healthkura.com ❤❤❤
Measurement of Accommodation of eye:
Amplitude, Facility,
Relative Accommodation, Fatigue, Lag,
Dynamic Retinoscopy
Presentation Layout:
-Introduction to accommodation of eye
-Mechanism
-Components
-Measurement of accommodation of eye
- Amplitude
- Facility
- Relative accommodation
- Lag
-Dynamic Retinoscopy
Accommodation
-dioptric adjustment of the crystalline lens of the eye
- to obtain clear vision for a given target of regard
-process by which the refractive power of eye is altered
- to ensure a clear retinal image
For further reading
-Clinical Procedures in Optometry by J.D. Bartlett, J.B. Eskridge, J.F. Amos
-Primary Care Optometry by Theodere Grosvenor
-Borish’s Clinical Refraction by W.J. Benjamin
-Clinical Procedures for Ocular examination by Carlson et al
-American Academy of Ophthalmology
-Optometric Clinical Practice Guideline by American Optometric Association
-Internet
Follow me to get in touch with optometric and ophthalmic updates
It describes about the procedure of Hess charting. it serves as a great tool to understand the concepts involved. Suitable for optometry course. This is not a routine procedure but an important procedure which is used in diagnosis.
Retinoscope is an objective refraction instrument used to
determine the spherocylindrical refractive error, as well as
observe optical aberrations, irregularities, and opacities.
The technique is called Retinoscopy/Skiascopy/Shadow Test
Techniques of refraction is the process of calculation of glass power.drbrijeshbhu
Refractive errors are most common cause of ocular morbidity. It affects all age groups, and ethnic profiles. There is no g nder discrimination. Most common symptoms are blur vission along with pain in eye ,headache and tiredness. Refraction is process of determination of eye and currect it with power glass power or contact lens power. It can subjective or objective.
these slides explain the objective refraction in optometry , and describes its types and its measurement , and it gives you in details the types of Retinoscopy.
DIRECT DOWNLOAD LINK ❤❤https://healthkura.com/retinoscopy/❤❤
Dear viewers Check Out my other piece of works at ❤❤❤ https://healthkura.com ❤❤❤
Retinoscopy and Objective Refraction and Subjective Refraction in spherical ametropia and astigmatism
Retinoscopy (Principle & Techniques of Retinoscopy) and objective refraction, Subjective Refracition
Best presentation about retinoscopy and objective refraction techniques, and basis of subjective refraction. If you want to master the technique of retinoscopy, this presentation can be your guidance and partner in your journey to retinoscopy, objective refraction and subjective refraction.
Presentation Layout:
Retinoscope, types of retinoscope and uses of retinoscope
-Introduction to retinoscopy and objective refraction
-Retinoscopy
- In spherical ametropia
- In astigmatism
- Others: strabismus, amblyopia, pediatric pt.,
cycloplegic refraction
-Static and Dynamic Retinoscopy
-Problems seeing reflex during retinoscopy
-Errors in retinoscopy
Objective of retinoscopy and objective refraction
-To locate the far point of the eye conjugate to the retina
- Myopia or hyperopia
-Bring far point to the infinity by using appropriate lenses
- Determines amount of ametropia by retinoscopy and objective refraction
References:
-Clinical Procedures in Optometry by Eskridge, Amos and Bartlett ,
-Primary Care Optometry by Grosvenor T.,
-Borish’s Clinical Refraction by Benjamin W. J.,
-Theory And Practice Of Optics And Refraction by AK Khurana
-Retinoscopy-Student Manual by ICEE Refractive Error Training Package (2009)
-Clinical Optics and Refraction By Andrew Keirl, Caroline Christie
-Clinical Refraction Guide - A Kumar Bhootra
-Clinical Procedures in Primary Eye Care by David B. Elliott
-Internet
Follow me to get in touch with optometric and ophthalmic updates.
This include a brief explanation of the clinical refraction methods in the eye examination procedure. In order to get the full video download the ppt. it includes a lot of important things
Retinoscopy for undergraduates and post-graduates.
salient points covering examinations and PGMEE.
Detailed discussion of the technique of retinoscopy and its utility in deducing refractive errors.
Use of cycloplegic refraction and subjective refraction has been discussed.
Prix Galien International 2024 Forum ProgramLevi Shapiro
June 20, 2024, Prix Galien International and Jerusalem Ethics Forum in ROME. Detailed agenda including panels:
- ADVANCES IN CARDIOLOGY: A NEW PARADIGM IS COMING
- WOMEN’S HEALTH: FERTILITY PRESERVATION
- WHAT’S NEW IN THE TREATMENT OF INFECTIOUS,
ONCOLOGICAL AND INFLAMMATORY SKIN DISEASES?
- ARTIFICIAL INTELLIGENCE AND ETHICS
- GENE THERAPY
- BEYOND BORDERS: GLOBAL INITIATIVES FOR DEMOCRATIZING LIFE SCIENCE TECHNOLOGIES AND PROMOTING ACCESS TO HEALTHCARE
- ETHICAL CHALLENGES IN LIFE SCIENCES
- Prix Galien International Awards Ceremony
micro teaching on communication m.sc nursing.pdfAnurag Sharma
Microteaching is a unique model of practice teaching. It is a viable instrument for the. desired change in the teaching behavior or the behavior potential which, in specified types of real. classroom situations, tends to facilitate the achievement of specified types of objectives.
These lecture slides, by Dr Sidra Arshad, offer a quick overview of physiological basis of a normal electrocardiogram.
Learning objectives:
1. Define an electrocardiogram (ECG) and electrocardiography
2. Describe how dipoles generated by the heart produce the waveforms of the ECG
3. Describe the components of a normal electrocardiogram of a typical bipolar leads (limb II)
4. Differentiate between intervals and segments
5. Enlist some common indications for obtaining an ECG
Study Resources:
1. Chapter 11, Guyton and Hall Textbook of Medical Physiology, 14th edition
2. Chapter 9, Human Physiology - From Cells to Systems, Lauralee Sherwood, 9th edition
3. Chapter 29, Ganong’s Review of Medical Physiology, 26th edition
4. Electrocardiogram, StatPearls - https://www.ncbi.nlm.nih.gov/books/NBK549803/
5. ECG in Medical Practice by ABM Abdullah, 4th edition
6. ECG Basics, http://www.nataliescasebook.com/tag/e-c-g-basics
Tom Selleck Health: A Comprehensive Look at the Iconic Actor’s Wellness Journeygreendigital
Tom Selleck, an enduring figure in Hollywood. has captivated audiences for decades with his rugged charm, iconic moustache. and memorable roles in television and film. From his breakout role as Thomas Magnum in Magnum P.I. to his current portrayal of Frank Reagan in Blue Bloods. Selleck's career has spanned over 50 years. But beyond his professional achievements. fans have often been curious about Tom Selleck Health. especially as he has aged in the public eye.
Follow us on: Pinterest
Introduction
Many have been interested in Tom Selleck health. not only because of his enduring presence on screen but also because of the challenges. and lifestyle choices he has faced and made over the years. This article delves into the various aspects of Tom Selleck health. exploring his fitness regimen, diet, mental health. and the challenges he has encountered as he ages. We'll look at how he maintains his well-being. the health issues he has faced, and his approach to ageing .
Early Life and Career
Childhood and Athletic Beginnings
Tom Selleck was born on January 29, 1945, in Detroit, Michigan, and grew up in Sherman Oaks, California. From an early age, he was involved in sports, particularly basketball. which played a significant role in his physical development. His athletic pursuits continued into college. where he attended the University of Southern California (USC) on a basketball scholarship. This early involvement in sports laid a strong foundation for his physical health and disciplined lifestyle.
Transition to Acting
Selleck's transition from an athlete to an actor came with its physical demands. His first significant role in "Magnum P.I." required him to perform various stunts and maintain a fit appearance. This role, which he played from 1980 to 1988. necessitated a rigorous fitness routine to meet the show's demands. setting the stage for his long-term commitment to health and wellness.
Fitness Regimen
Workout Routine
Tom Selleck health and fitness regimen has evolved. adapting to his changing roles and age. During his "Magnum, P.I." days. Selleck's workouts were intense and focused on building and maintaining muscle mass. His routine included weightlifting, cardiovascular exercises. and specific training for the stunts he performed on the show.
Selleck adjusted his fitness routine as he aged to suit his body's needs. Today, his workouts focus on maintaining flexibility, strength, and cardiovascular health. He incorporates low-impact exercises such as swimming, walking, and light weightlifting. This balanced approach helps him stay fit without putting undue strain on his joints and muscles.
Importance of Flexibility and Mobility
In recent years, Selleck has emphasized the importance of flexibility and mobility in his fitness regimen. Understanding the natural decline in muscle mass and joint flexibility with age. he includes stretching and yoga in his routine. These practices help prevent injuries, improve posture, and maintain mobilit
Ethanol (CH3CH2OH), or beverage alcohol, is a two-carbon alcohol
that is rapidly distributed in the body and brain. Ethanol alters many
neurochemical systems and has rewarding and addictive properties. It
is the oldest recreational drug and likely contributes to more morbidity,
mortality, and public health costs than all illicit drugs combined. The
5th edition of the Diagnostic and Statistical Manual of Mental Disorders
(DSM-5) integrates alcohol abuse and alcohol dependence into a single
disorder called alcohol use disorder (AUD), with mild, moderate,
and severe subclassifications (American Psychiatric Association, 2013).
In the DSM-5, all types of substance abuse and dependence have been
combined into a single substance use disorder (SUD) on a continuum
from mild to severe. A diagnosis of AUD requires that at least two of
the 11 DSM-5 behaviors be present within a 12-month period (mild
AUD: 2–3 criteria; moderate AUD: 4–5 criteria; severe AUD: 6–11 criteria).
The four main behavioral effects of AUD are impaired control over
drinking, negative social consequences, risky use, and altered physiological
effects (tolerance, withdrawal). This chapter presents an overview
of the prevalence and harmful consequences of AUD in the U.S.,
the systemic nature of the disease, neurocircuitry and stages of AUD,
comorbidities, fetal alcohol spectrum disorders, genetic risk factors, and
pharmacotherapies for AUD.
MANAGEMENT OF ATRIOVENTRICULAR CONDUCTION BLOCK.pdfJim Jacob Roy
Cardiac conduction defects can occur due to various causes.
Atrioventricular conduction blocks ( AV blocks ) are classified into 3 types.
This document describes the acute management of AV block.
Anti ulcer drugs and their Advance pharmacology ||
Anti-ulcer drugs are medications used to prevent and treat ulcers in the stomach and upper part of the small intestine (duodenal ulcers). These ulcers are often caused by an imbalance between stomach acid and the mucosal lining, which protects the stomach lining.
||Scope: Overview of various classes of anti-ulcer drugs, their mechanisms of action, indications, side effects, and clinical considerations.
Title: Sense of Smell
Presenter: Dr. Faiza, Assistant Professor of Physiology
Qualifications:
MBBS (Best Graduate, AIMC Lahore)
FCPS Physiology
ICMT, CHPE, DHPE (STMU)
MPH (GC University, Faisalabad)
MBA (Virtual University of Pakistan)
Learning Objectives:
Describe the primary categories of smells and the concept of odor blindness.
Explain the structure and location of the olfactory membrane and mucosa, including the types and roles of cells involved in olfaction.
Describe the pathway and mechanisms of olfactory signal transmission from the olfactory receptors to the brain.
Illustrate the biochemical cascade triggered by odorant binding to olfactory receptors, including the role of G-proteins and second messengers in generating an action potential.
Identify different types of olfactory disorders such as anosmia, hyposmia, hyperosmia, and dysosmia, including their potential causes.
Key Topics:
Olfactory Genes:
3% of the human genome accounts for olfactory genes.
400 genes for odorant receptors.
Olfactory Membrane:
Located in the superior part of the nasal cavity.
Medially: Folds downward along the superior septum.
Laterally: Folds over the superior turbinate and upper surface of the middle turbinate.
Total surface area: 5-10 square centimeters.
Olfactory Mucosa:
Olfactory Cells: Bipolar nerve cells derived from the CNS (100 million), with 4-25 olfactory cilia per cell.
Sustentacular Cells: Produce mucus and maintain ionic and molecular environment.
Basal Cells: Replace worn-out olfactory cells with an average lifespan of 1-2 months.
Bowman’s Gland: Secretes mucus.
Stimulation of Olfactory Cells:
Odorant dissolves in mucus and attaches to receptors on olfactory cilia.
Involves a cascade effect through G-proteins and second messengers, leading to depolarization and action potential generation in the olfactory nerve.
Quality of a Good Odorant:
Small (3-20 Carbon atoms), volatile, water-soluble, and lipid-soluble.
Facilitated by odorant-binding proteins in mucus.
Membrane Potential and Action Potential:
Resting membrane potential: -55mV.
Action potential frequency in the olfactory nerve increases with odorant strength.
Adaptation Towards the Sense of Smell:
Rapid adaptation within the first second, with further slow adaptation.
Psychological adaptation greater than receptor adaptation, involving feedback inhibition from the central nervous system.
Primary Sensations of Smell:
Camphoraceous, Musky, Floral, Pepperminty, Ethereal, Pungent, Putrid.
Odor Detection Threshold:
Examples: Hydrogen sulfide (0.0005 ppm), Methyl-mercaptan (0.002 ppm).
Some toxic substances are odorless at lethal concentrations.
Characteristics of Smell:
Odor blindness for single substances due to lack of appropriate receptor protein.
Behavioral and emotional influences of smell.
Transmission of Olfactory Signals:
From olfactory cells to glomeruli in the olfactory bulb, involving lateral inhibition.
Primitive, less old, and new olfactory systems with different path
Ozempic: Preoperative Management of Patients on GLP-1 Receptor Agonists Saeid Safari
Preoperative Management of Patients on GLP-1 Receptor Agonists like Ozempic and Semiglutide
ASA GUIDELINE
NYSORA Guideline
2 Case Reports of Gastric Ultrasound
TEST BANK for Operations Management, 14th Edition by William J. Stevenson, Ve...kevinkariuki227
TEST BANK for Operations Management, 14th Edition by William J. Stevenson, Verified Chapters 1 - 19, Complete Newest Version.pdf
1. Clinical pearls while performing
Objective Refraction :
What we should not miss?
Moderator: Presenter:
Hira Nath Dahal Bipin Koirala
MMC , IOM
Final year
3. Presentation Layout:
Basic outline of Retinoscopy
Retinoscopy in different refractive errors
Special consideration for children's
Common errors in retinoscopy
4. Introduction:
Procedure in which examiner determines the refractive state of
eye on the basis of optical principles of the refraction without the
need of subjective response on the part of the patients :
Objective refraction
Common methods of objective refraction are:
Retinoscopy
Keratometry
Auto Refraction
5. Retinoscopy:
A method of objective refraction in which refractive state of eye is
determined with the help of retinoscope:
Retinoscopy is of two types :
1. Static retinoscopy
2. Dynamic retinoscopy
6. Materials and Tools needed during
Retinoscopy
1. Retinoscope ( Spot or Streak
retinoscope )
2. Distance vision chart
3. Near vision chart
4. Loose lens trial set / lens bar
5. Adequate Illumination ( Room
illumination & Vision chart
illumination)
7. Aim: Neutralize the movement observed on retinoscopy to achieve
reversal (no movement)
Occurs when the far point of the eye being examined coincides with
the nodal point of the practitioner’s eye.
8. A point in space conjugate with fovea when accommodation
is relaxed is called far point.
Location of Far points in different Refractive Errors
1. Myopia : Between examiner and patient
2. Hyperopia : Behind the eye
3. Astigmatism : Has two far points one for each meridians
4. Emmetropes : Has far point at infinity
Far point ????
9. In Myopia Minus lens diverges rays on to the retina and
conjugate fovea with infinity
In Hyperopia Plus lens converges rays on to retina and
conjugate fovea with infinity
In Astigmatism cylindrical lens will make the fovea
conjugate with infinity.
14. Clinical pearls
Concave Mirror vs Plano Mirror Effect
Concave mirror effect Plano mirror effect
Less commonly used technique Commonly used technique
Effective source of light is placed in
front of mirror
Effective source of light is placed behind
the reflecting mirror
Convergent light beam is emitted Parallel or diverging rays are emitted
With motion : myopia With motion : hyperopia
Against motion: hyperopia Against motion: myopia
Used to conform neutrality Generally Plano mirror effect is used
Used in media opacity as it increases
light intensity
17. Luminous Retina
We will illuminate the fundus with the retinoscope and observe rays
coming from the retina
When the light rays leaves the retina, the optical system of the eye will
also applies vergence to the rays.
If we illuminate the retina with parallel rays (plane mirror), the
reflected rays leave the eye according to the refractive error.
Emmetropia, rays leave parallel.
Hyperopia, rays leave diverging.
Myopia, rays leave converging.
18. Looking through the peephole in your retinoscope, you will see the
emerging rays as a red reflex in the patient’s pupil.
If you sweep the streak across the eye, the reflex you see will also
move.
If the emerging rays have not converged to a point (the FP), the retinal
reflex will move in the same direction as you move the streak; this is
called the with motion reflex (WITH).
If the rays have come to the FP and diverged, the reflex will move
opposite to your movements; this is the against motion reflex
(AGAINST)
19.
20. Before commencing retinoscopy a variety of factors need to be
considered to ensure the results obtained are accurate and reliable.
These includes:
1. Working distance,
2. Lighting conditions,
3. Fixation target
4. Patient and Examiner positioning
21. Working distance
The distance from the retinoscope to the patient’s eye is known as the
working distance
Performing retinoscopy at an infinite distance from the patient ie
greater than 6m away, means no allowance needs to be taken for
working distance.
However, it is not practical to do this; the reflex will be dim, difficult to
observe, and it will be impractical to change the correcting lenses.
22. As a result, practitioners perform retinoscopy at a distance less than
infinity, but modify their final retinoscopy result to take account of their
‘working distance’.
23. Most practitioners use a working distance of 50cm , which requires
adding a working distance lens of -2.00Dsph to the final result.
Alternatively, a working distance allowance lens of +2.00 Dsph can
be placed in the trial fame prior to commencing retinoscopy.
Clinical pearls
How to calculate working distance allowance lens ?
P= (1/D) diopter
P= working lens power
D= working distance in cm
EXAMPLE for 50cm working distance ide +2.00D
24. Whyworking lens to compensatefor the
workingdistance?
Advantages-
Instant identification of myope orhyperope.
Working lens might help relaxaccommodation.
No need for mental arithmetic to allow for working
distance
Disadvantages-
Too much blur does not necessarily relax
accommodation.
Working lens adds extra reflections to the view.
25. Lighting condition
It is ideal to perform retinoscopy in a darkened room.
This will cause the pupil to dilate, making the reflex more visible also to
reduce distractions and provide contrast for the reflex.
However, as a result of dilation aberrations and accommodation may be
increased.
The retinoscope light levels should be kept on medium.
If too bright, the pupil may constrict, so inhibiting visibility.
26. Fixation target
Fixation target : Variable depending on the type of
retinoscopy being performed .
Targets can be :
1. Accommodative
2. Non accommodative
3. Letter target
4. Interesting toys for childrens
5. light of retinoscope
27. In static retinoscopy : Patient fixates on a distance target.
Target should ensure that patient’s accommodation is relaxed,
otherwise the final prescription will be incorrect.
With the advent of computerized test charts, practitioners have a
plethora of targets to choose
Clinical pearl:
But the green section of the duochrome is considered to be a good
fixation target as it induces the least amount of accommodation.
28. Examiner positioning and instructions.
Patient must sitting comfortably, not standing as standing patients will
slightly alter the practitioner’s working distance.
Present a large and non-accommodative target at the furthest point in
the room.
Adjust the trial frame or Phoropter in front of the patient prior to
beginning.
Practitioner’s chair must also be adjusted in front of the patient to
ensure they are at eye level with the patient.
Use your right eye to examine right eye of patient and vice versa
29. “Keep looking at the distant target”
“Please tell me if my head gets in the way
and you cannot see the target anymore”
“The target might be blurry- don’t worry
about that, but just relax and keep
looking in that direction”
“Please keep both of your eyes open”
Patient instructions:
30. Starting point
While scoping eye with retinoscope you can see the fundal reflex in
the pupil
Light reflected from the fundus has two components:
1. A diffuse component, which is also called backscatter
2. Adirected component
And the nature of reflex motion will give you idea about
starting point
Also previous prescription can be used as an reference for
starting retinoscopy.
32. Clinical pearls :
Always suspend the accommodation in contralateral eye(fixing eye)
either while examining if not negative result may be seen.
Assess the reflex of the right eye without lenses, first moving the
retinoscope streak around all meridians, looking for a break in reflex
indicating the presence of astigmatism.
33. 1. If Astigmatism is present, line the streak up where the reflex is in line
with the streak angle.
a. Individual meridian must be neutralized separately
b. Once the first meridian is neutral, move the streak 90 degrees around
from the first meridian’s angle to neutralize the second meridian.
2. If the reflex appears to line up in all directions with equal width,
movement and speed, the refraction is Spherical.
34. Characteristics of a Retinoscopic Reflex
Reflex
Direction
Speed
Width
Brightness
37. Brightness
An experienced optometrist can use brightness as an important cue in
process of neutralizing the light reflex.
Brightness of reflex is related with the sharpness of focus of light into
the retina and the area of retina observed as filling the pupil of the eye.
Why reflex is dull in high errors?
When the patients retina is not conjugate with the peephole of the
retinoscope, the illuminated area of patients retina is usually greater
than observed area so reflex is largely out of focus spreads in the area
greater than the area of patients pupil and hence appears dull.
38. Clinical pearls
Large errors have dull reflex,
Small errors have a bright reflex
Dimmer reflex
1. Smaller pupil (Hyperopic and elderly)
2. Darkly pigmented RPE
3. Media opacities
39. Width
Width is related with the distance between far point and the
examiner eye
When the distance between patient and far point increases the
reflex width will gradually narrowed
And when the distance between them reduces the reflex will
gradually broaden and ultimately fill up the pupil when far point
and eye get conjugated.
40. Speed
Speed always depends on amount of residual Ametropia during
retinoscopy
On approaching neutrality speed will increase.
Speed less than half – Ametropia more than 3.00DS from neutrality
Speed 3 times – 0.50DS from neutrality
Speed 6 times – 0.25DS from neutrality
Speed infinity at neutrality, so pupil seems covered with reflex
41.
42. Clinical pearls
For with movements always go on increasing plus power greater than
working lens .
For against movement go on reducing plus ( adding minus over working
lens )
For fast movements change small power steps
For slow motion change greater steps
If reflex is dim , slow and difficult to interpret add high plus / minus
alternately to note improvement of visibility of reflex
Also we can switch concave effect to raise the brightness and speed of
reflex for better judgement.
43. Reflex Observation Meaning
Brightness Dim Far from Rx
Bright Close to Rx
Streak size Narrow Far from Rx
Wide Close to Rx
Movement direction With Need more plus
Against Need more minus
Movement speed Slow Far from Rx
Fast Close to Rx
Summary Table
44. Procedure for Spherical Errors
Spherical
Error
With
AgainstWith
Against
No lens
+2 Dsph
Increase plus in
0.25 steps till
reversal
Reduce plus in
0.25 steps till
reversal
Increase minus
in 0.25 steps till
reversal
45. Procedure for Astigmatic Error:
In astigmatic error two principle meridian have different far point so
they must be neutralized separately.
All the procedure of changing lens is same as spherical error (mentioned
in previous slide)but each meridian must be considered separately.
Astigmatic error can be assumed by following 3 methods:
1. With two spherical lenses and optical cross
2. With one spherical and one cylindrical lens
3. With two cylinders
46. Clinical pearls for Astigmatism
To identify and confirm the axis as well as to locate exact principle
meridians in an astigmatic patients there are following 4 special
methods.
Intensity phenomenon
Thickness phenomenon
The Break & Skew phenomenon
Straddling the axis
47. Intensity phenomenon
The streak reflex appears brightest when the examiner are
streaking the meridian of the correct axis
Moving away from the correct axis, the streak reflex becomes
more dim
Intensity
Dim
Brightest
48. Thickness phenomenon
The streak reflex appears to be narrowest when we are streaking the
meridian of the correct axis
As we move away from the correct axis the streak reflex becomes wider
49. Break and skew phenomenon
Break in the alignment between the reflex in the pupil and the band
outside (intercept) it is observed when the streak is not parallel to
one of the principle meridian
If the streak is not aligned with the true axis oblique motion of
streak reflex will be observed on movement of the steak.
50. In higher amounts of astigmatism, the streak reflex will tend to stay
on-axis even if the streak is rotated off-axis
So break and skew phenomenon helps to locate correct principle
meridian
52. Clinical pearls
High power estimation :
High error often simulate following two conditions:
1. Hazy media
This appears as either no reflex, or a very dull one. Placing
weak plus and minus lenses without a change in the reflex seems
to confirm your suspicion of opaque media
2. Neutrality (This appears as a full, motionless reflex (pseudo
neutrality), suggesting that you are near the endpoint.
Simply lean in 10 to 15 cm (4 to 6 inches). If the reflex does not
change, you cannot be near NEUT so try the strong lens check just
described.
53. Estimation methods are very useful because
1. Easily conform the refractive error
2. No need of extensive trial set and lens.
3. Quickly perform the retinoscopy in uncooperative child.
Myopic estimation:
1. Against motion is seen(examiner is sitting beyond far point)
2. Examiner will gradually approach the patient from his working
distance till with reflex is noted
3. And the distance between the patient and point at which reversal
obtained is noted.
54. Example :
At WD: 50cm so (+2 Diopter)
If neutrality or reversal is noted at 25cm from patient then net
error will be -4 Diopter
Hence same neutrality will be obtained if -2.00 Diopter lens is
placed in front of patient eye
55. Hyperopic estimation:
We can estimate the amount of gross hyperopia (up to about 5 D)
by a technique called Enhancement.
On changing from plane to concave effect the narrowest retinal
reflex is called as Enhanced band.
By comparing width of enhanced band with intercept estimation is
made.
At 1 D WITH, lowering the sleeve will not enhance the retinal band
In higher amounts of WITH, you can enhance the retinal reflex.
As you slide the sleeve down a little more, the enhanced retinal
band of 2 D WITH appears well before the intercept is enhanced.
56. In +3 D, the reflex appears enhanced at a still lower sleeve height, nearer
the intercept.
The band of +4 D enhances just before the intercept.
At 5 D WITH, the retinal reflex and intercept are enhanced with the
sleeve at the same height.
57. Estimating the cylinder : Enhancement
technique
Once the spherical meridian is neutralized, the width of the astigmatic
reflex indicates the power of the cylinder.
As a rule, the thinner the reflex in the cylindrical meridian, the greater
the astigmatism.
If the streak is wide, you are nearer about neutralization, so of course
there is less astigmatism.
58. In low astigmatism, which you cannot enhance, the width of the pupil
reflex gives the best estimate of cylinder power.
In higher astigmatism, in which the intercept and reflex narrow
increasingly as you enhance larger cylinders, the intercept gives us the
most accurate indication of power.
59. Clinical pearl
How to conform neutrality?
At neutral point
1. Reducing plus lens power 0.25D (increasing minus by
0.25D) should result in the observation of “with”
motion
2. Increasing plus lens power to 0.25D (decreasing minus
by 0.25D) should result in the observation of “against”
motion
60. Clinical pearl
Always it is not possible to obtain end point as neutral point with pupil
fill with light glow so in many cases there is two possibilities .
• Neutralization of red reflex in all
meridian and no motion is appreciated
Neutral
• Real end point of retinoscopy
• Overcorrection by 0.25D should cause reversal of
the movement
• Slight forward movement should cause with
movement & by slight backward movement
against movement
Reversal
61. Due to small pupils/cataract/other media opacities: faint
retinoscopic reflex
The practitioner finds easy as moving closer to the patient
Involves a WD as close as 20 cm/or even 10cm
Eg: if possible at 20 cm WD then +5.00D is subtracted
from lens power
Clinical pearl
Radical Retinoscopy
62. Direct Retinoscopy???
1. In this technique, you hold the retinoscope close to the patient’s
eye (as with an ophthalmoscope) i.e 5cm
2. while looking for the image of the bulb filament focused on the
retina (retinoscopic focus)
3. In direct retinoscopy, we seek the sharpest, brightest image of the
filament focused on the retina
4. As in direct ophthalmoscopy, the image we see is affected by our
own refractive error and accommodation
5. The technique is especially helpful when the reflex is aberrated or
dull and in aphakia and other high ametropias.
63. Mohindra Retinoscopy
Also known as near monocular retinoscopy
Estimate the refractive status of the eye in childrens
The stimulus or fixation is the dimmed light source of
the retinoscope in a darkened room
The retinoscope is held at a distance of 50cm with
hand-held trial lenses
Accommodation remains stable during this technique
64. What actually happens ??
Most patients exhibits anomalous myopia during retinoscopy
This excessive refractive power reflects a shift of accommodation
towards the patients intermediate resting focus under reduced
stimulation
To compensate for this effect, a tonus factor is applied to the
gross refraction obtained with near retinoscopy
Tonus factor is +0.75D
65. In addition , taking the WD in consideration ( if 50 cm)
i.e. -2.00 D
The total adjustment factor will be :
Working distance + tonus factor = ( -2.00 D + 0.75 D)
= - 1.25 D
66. Procedures
1. The room light is dimmed
2. The child is encouraged to fixate the retinoscope light
3. Babies will instinctively fixate the light
4. Retinoscope is performed monocularly (Fellow eye closed)
Example :
At WD =50 cm
Gross refraction = 4.00 D – 1.00 D × 180
Add adjustment factor = -1.25
Final net refraction = +2.75 – 1.00 × 180
67. Clinical points not to be missed in Mohindra
retinoscopy:
1. Always darken the room as darkening the room light will aid
patient fixation and concentration.
2. Dim the retinoscope light as dim light doesn’t stimulate
accommodation but bright light will act as good source of
accommodation.
3. Ensure that retinoscope light is kept on the pupil only for short
period of time so as to avoid stimulating accommodation
4. Adjustment factor -1.25 D for school age -1.00D for preschool and
-0.75 D for infants
68. Clinical pearls while performing
retinoscopy in children's :
If you are unable to get a full prescription on a young child, prioritize the mos
important refractive information:
1. Check if there is astigmatism greater than 1.00D by scanning the meridians
without lenses, looking for significant changes to reflex width, speed and
brightness.
2. Check refractions are equal between the eyes (in all corresponding
meridians if you’ve identified significant astigmatism) without lenses.
3. With loose lenses or a retinoscopy rack, check if the sphere power is
between +2.00D and Plano.
69. 4. Then, if you can, narrow down to get the exact prescription.
Consider what target you are using in the distance i.e. use something
engaging that makes noise and/or displays lights.
If children are not under cycloplegic , pay attention to the pupil size.
A small pupil size is often indicative of over accommodation and you
should suspect moderate hyperopia.
Have the child sit on their care-giver’s lap.
Retinoscopy lens racks can be very helpful tools for community screenings,
examination under anesthesia, and children/adults unable to wear the trial
lens frame or sit behind a Phoropter.
70. If, during retinoscopy,
the fixating eye is the
amblyopic eye, it may
not see the fixation
target (if best corrected
VA <6/60)
The examiner may have
to move further to the
temporal side of the
tested eye
So that it can see the
fixation target although
this increases the angle
of obliquity)
Retinoscopy in Amblyopia
71. Retinoscopy in Strabismus and
Eccentric fixation:
1. Retinoscopy is ideally performed along the patient's visual axis.
2. In a patient with strabismus, this can be difficult
3. Retinoscopy on the ‘good’ eye must be performed slightly off-axis
4. For the strabismic eye, it can be easier to change the fixation point
for the ‘good’ eye, so that retinoscopy along the visual axis of the
strabismic eye is easier.
5. Alternatively, occlude the ‘good’ eye and perform retinoscopy
slightly off-axis
72. Where eccentric fixation is present with strabismus, the
examiner must decide whether to refract the fovea or the
eccentric fixating point on the fundus
74. Dry vs Wet
Retinoscopy
There are certain cases in which
wet retinoscopy is better as
compared to that of dry
retinoscopy.
So we should not miss such
cases in clinical practice.
Accommodative esotropia
All children younger than 3 years
Suspected latent hyperopia
Suspected pseudomyopia
Uncooperative/ non communicative patients
Variable and inconsistent end point of refraction
Visual acuity not corrected to a predicted level
Strabismic children
Amblyopic children
Suspected malingering
75. Atropine cycloplegic refraction is advised in the children
younger than 2 years
Atropine cycloplegic refraction is advised in esotropic children
(accommodative type) up to 4 years
After 4 years, cyclopentolate cycloplegic refraction is advised
up to 25- 30 years
Clinical pearls for using appropriate drugs:
76. Dynamic Retinoscopy
Dynamic retinoscopy: Patient is looking at a near object, with
accommodation active
Types of dynamic retinoscopy:
1. MEM retinoscopy
2. Nott’s retinoscopy
3. Bell retinoscopy
77. Clinical pearls not to be missed during
Dynamic Retinoscopy
Always done binocularly fixing an accommodative target separately
for individual eye.
Done to find accommodative response of a patient
Done over patients habitual distance correction
Always make correct note of working distance and placement
distance of accommodative target while reflex neutralizes
Response must be noted with in a fraction of time i.e quickly
3D target are considered best for dynamic retinoscopy.
As during viewing near target eye converges there might be off axis
retinoscopy.
78. When to do Dynamic Retinoscopy??
Accommodative anomalies
Headache and stress during near work
Pseudo myopia suspect
Patient with Esophoria/Esotropia
Patient with high hyperopia
Way to find out minus overcorrection in patients
79. Additional clinical pearls :
1. If the patient has a large pupil, watch the center of the reflex. In dilated
or larger pupil peripheral conflicting shadows will affect the judgement
of reflex
2. Go slower when close to neutralization to identify if the reflex as the
retinoscope beam begins to enter the pupil is entering from the same or
opposite side. If neutral, the pupil will immediately fill with light as the
retinoscope beam crosses the pupil.
80. 4. Hold the retinoscopy rack or loose lens very close to the
patient’s face so not to change the effective power of the lens
Especially important in high refractive errors
5. Careful not to block the eye that is focusing in the distance
with either your head, hand or retinoscopy rack.
81. 6. Scan all meridians before adding any lenses looking for differences in
beam width, speed and brightness – this will help identify astigmatism
before neutralizing the reflexes.
7. Try adding a working distance lens (67cm = +1.50D, 50cm = +2.00D)
into both the right and left lens wells at the back of the trial frame. When
you do this, there is no need to calculate the net result, just remove the
working distance lenses when finished.
82. 8. You must remain on the patient’s visual axis, so ensure you are at
the same height of the patient and using your right eye to assess
the patient’s right prescription and your left eye to assess the
patient’s left prescription.
9. When recording your prescription in negative cylinder, the sphere
is the most plus meridian and the cylinder is the most least plus
meridian.
83. 10. The longer you take to perform retinoscopy the more likely you
are to over minus the patient as you begin to accommodate.
11. Maintain your working distance throughout the entire
procedure and know your working distance
12. When in doubt stay a little with motion.
84. Accuracy of retinoscopy depends
on following clinical considerations.
Working distance
Always maintain constant distance .using closer distance than
assumed will cause more plus error of less minus error and going
farther will cause opposite effect.
Example:
If a examiner thinks that he is at 50 cm and does retinoscopy from
40cm then retinoscopic error will be + 0.50D more
85. Scoping off the patients visual axis
Scoping off axis by 2-3 degree will not cause significant effect in cyl
power and axis also in the spherical power.
But off axis retinoscopy of angle greater than 5 degree will causes
significant effect on sph and cylindrical power but less effect in
cylindrical axis
Amount of errors for oblique viewing
0.12 DC for 5 degree
0.37DC for 10 degree
0.75DC for 15 degree
1.37DC for 20 degree
86. Failure to fixate at distance
Children's may fixate at near and accommodate
Over minus may be seen
This can be avoided by reminding child to look at distance
constantly
Failure to locate principle meridian
87. Scissors (fish mouth) reflex
Due to
• large pupil diameter (aberrations)
• Irregular astigmatism
• Irregular retina
• Tilted lens
• Corneal scar
Neutralized by lens that provides more or less equal
thickness and brightness to the opposing reflex
Problems with Retinoscopy
88. High refractive error
Large pupils (or dilated pupils)
Observation
1. “With” movement in the central part of the ret. reflex
2. “Against” movement in the peripheral part of the ret. Reflex
Retinoscopy Technique
1. Central part of the ret. reflex is considered ignoring the outer par
of the ret. reflex
2. Central part of the reflex must be neutralized
89. Small pupils
1. The room lights are made dim and wait for the
pupils to be dilated
2. Reminding the pt. not to look at retinoscope light
3. Mydriatics can be tried
4. Radical retinoscopy is useful
90. Corneal scars and opacities/Cataracts /Vitreous opacities
1. Stop the retinoscope light from entering or exiting the eye
2. Scatter light and distort the ret. reflex (make it irregular)
Retinoscopy Technique
The neutral point is estimated by choosing the brightest ret. Reflex
Trying to find a “window” through the opacities so that the ret.
reflex can be seen (but be careful not to move too far off axis)
91. Mydriatics can be tried
Radical retinoscopy is useful
Retinoscopy is done by decreasing the width of beam and
increasing the brightness of the reflex (concave mirror effect)
If the opacity is too dense
- It may not be possible to do retinoscopy
Difference between plane mirror effect or concave mirror effects
Performing retinoscopy at an infinite distance from the patient ie greater than 6m away, means no allowance needs to be taken for working distance
; in other words, the results achieved represent the patient’s refractive status.
It is done to reduce bother some reflection in lens while performing refraction with refractor .
by moving the retinoscopy
streak across the left pupil and observing the movement to decide if the reflex is with, against
or neutral. Quickly add lenses in front of the left eye so the reflex motion is close neutral (if
using a 67cm working distance) or slightly against (if using a 50cm working distance). This will
over plus the left eye by approximately +1.50D, relaxing accommodation.
.* When you suspect this situation, aphakic
throw up strong lenses of plus or minus
5.0 or 10.0 D, to see if there is any change in
the reflex. A definite, recognizable reflex will
appear if it is a case of high error.
Whn not dark the retinoscope becomes and effective accommodation target and the accommodation will become active