Inkscape Beginner Tutorial: How to Make a Yoga Class Flyer
•
1 like•2,473 views

Learn how to use the Free Open Source Program - Inkscape, to make a Yoga Class Flyer from beginning to end. With this Inkscape Tutorial you will learn how to do Document Setup, Create Rectangle, Set Object Size, Edit Fill and Stroke Color, Convert to Curves, Add Nodes, Adjust Line Segment, Curve Line Segment, Create Duplicates, Arrange Order, Insert Circles, Find Royalty Free Clipart, Import Image, Ungroup Images, Flip Images Horizontally, Find Free Fonts, Insert and Format Text, Add Drop Shadow, and Save your File.

Recommended
More Related Content
What's hot
What's hot (20)
Viewers also liked
Viewers also liked (8)
Similar to Inkscape Beginner Tutorial: How to Make a Yoga Class Flyer
Similar to Inkscape Beginner Tutorial: How to Make a Yoga Class Flyer (20)
More from Flyer Tutor
More from Flyer Tutor (12)
Recently uploaded
Recently uploaded (20)
Inkscape Beginner Tutorial: How to Make a Yoga Class Flyer
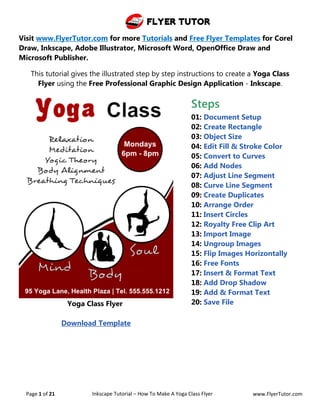
- 1. Flyer Tutor Page 1 of 21 Inkscape Tutorial – How To Make A Yoga Class Flyer www.FlyerTutor.com Visit www.FlyerTutor.com for more Tutorials and Free Flyer Templates for Corel Draw, Inkscape, Adobe Illustrator, Microsoft Word, OpenOffice Draw and Microsoft Publisher. This tutorial gives the illustrated step by step instructions to create a Yoga Class Flyer using the Free Professional Graphic Design Application - Inkscape. Yoga Class Flyer Download Template Steps 01: Document Setup 02: Create Rectangle 03: Object Size 04: Edit Fill & Stroke Color 05: Convert to Curves 06: Add Nodes 07: Adjust Line Segment 08: Curve Line Segment 09: Create Duplicates 10: Arrange Order 11: Insert Circles 12: Royalty Free Clip Art 13: Import Image 14: Ungroup Images 15: Flip Images Horizontally 16: Free Fonts 17: Insert & Format Text 18: Add Drop Shadow 19: Add & Format Text 20: Save File
- 2. Flyer Tutor Page 2 of 21 Inkscape Tutorial – How To Make A Yoga Class Flyer www.FlyerTutor.com Step 01: Document Setup After opening the Inkscape program, go up to the Menu Bar and select File > Document Properties. This will open up the Document Properties Window. On the Page Tab where the Default Units is set to px, select the Down Arrow and choose in for Inches from the drop down window. (I prefer to work with Inches, however you can leave the px for Pixels if that is your preference). In the Page Size section choose US Letter which gives the dimensions 8.5" x 11". Inkscape File Menu > Document Properties Inkscape Document Properties Window
- 3. Flyer Tutor Page 3 of 21 Inkscape Tutorial – How To Make A Yoga Class Flyer www.FlyerTutor.com Orientation will be set to Portrait by Default. The change will be immediately made to the document. To close the window, simply click on the x in the upper right hand corner. Now you can move on to creating your document. Step 02: Create Rectangle The first thing that you will add to this Flyer will be a Rectangle. Go to the Toolbox on the left and select the Rectangle Tool. Notice that this will change the Rectangle Tool Controls Bar, which is located above the Flyer/Canvas. You'll see that the Width and Height boxes are grayed out. Draw a Rectangle anywhere on the canvas. The Rectangle will have 3 Handles (2 squares, 1 circle) on 3of its corners. The Circular Handle allows you to adjust the Roundness of the Rectangle Corners. The Square Handles allow you to adjust the Rectangle's Width and Height. However, instead of adjusting the Dimensions by sight, we will use a more precise method. Inkscape Toolbox Inkscape Rectangle Tool Controls Bar
- 4. Flyer Tutor Page 4 of 21 Inkscape Tutorial – How To Make A Yoga Class Flyer www.FlyerTutor.com Step 03: Object Size Notice that the Width and Height boxes of the Rectangle Tool Controls Bar have changed to allow you to edit the Rectangle's Dimensions directly. Go up to the Width Box and enter 8.5 Inches and set Height to 4.5 Inches. Next click on the Select Tool from the Toolbox. Select the Rectangle and drag it to the bottom of the Flyer. The Selected Rectangle will have 8 Black Arrows around it. These are also used for Scaling and Skewing the Shape. Inkscape Object Size Width & Height Inkscape Selected Rectangle Step 04: Edit Fill & Stroke Color Let's now edit the Fill & Stroke Color of this Rectangle. With the Rectangle selected, move your cursor over the Maroon Color on the Color Palette below and click to set the Rectangle Fill. Then right click over the same Color to reveal a menu. Select Set Stroke. Inkscape Color Palette
- 5. Flyer Tutor Page 5 of 21 Inkscape Tutorial – How To Make A Yoga Class Flyer www.FlyerTutor.com So the Rectangle will now be a Solid Maroon Color. Step 05: Convert to Curves With the Rectangle selected, go to the Toolbox and select the Edit Paths by Nodes Tool. INKSCAPE PATHS TOOL CONTROLS BAR Notice the Paths Tool Controls Bar becomes visible. Click on the Convert Selected Object to Path Icon. Four very tiny Grey Nodes become visible around the Rectangle. Step 06: Add Nodes While pressing your left mouse button down, drag your cursor over both Nodes on the Top Left & Right side of the Rectangle. The selected Nodes change from Grey Squares to Blue Green. Inkscape Paths Tool Controls Bar Inkscape Rectangle with Nodes
- 6. Flyer Tutor Page 6 of 21 Inkscape Tutorial – How To Make A Yoga Class Flyer www.FlyerTutor.com On the Controls Bar select the Insert New Nodes Into Selected Segments Icon or as I like to say Add Nodes Icon. Clicking this Icon once will add a Node to the middle of this Line Segment. Click a second time to add 2 more Nodes. Click on any white area to deselect these Nodes. Step 07: Adjust Line Segment Select the Right Node. On the Controls Bar set the Y Coordinate to 6.2 Inches. The Node will be moved higher than the other Nodes on this Line Segment. Inkscape Line Segment Adjusted Y Coordinate
- 7. Flyer Tutor Page 7 of 21 Inkscape Tutorial – How To Make A Yoga Class Flyer www.FlyerTutor.com Select the Left Node. Set its Y Coordinate to 3.2 Inches. This Node will be moved lower than the other Nodes on this Line Segment. Step 08: Curve Line Segment Select the 3 Middle Nodes. On the Tools Control Bar select the Make Selected Nodes Smooth Icon.
- 8. Flyer Tutor Page 8 of 21 Inkscape Tutorial – How To Make A Yoga Class Flyer www.FlyerTutor.com The Line Segment Curves. Set the Y Coordinate of the 2nd Node of this Line Segment to 4.7 Inches and make its X Coordinate 2.6 Inches. Drop the Y Coordinate of the 3rd Node on this Line Segment to 4.3 Inches. Select the 3 Middle Nodes again and click the Make Selected Nodes Auto Smooth Icon. Now we have a new Custom Shape.
- 9. Flyer Tutor Page 9 of 21 Inkscape Tutorial – How To Make A Yoga Class Flyer www.FlyerTutor.com Step 09: Create Duplicates Let's create 2 Duplicates of this shape. Select the Maroon Shape and hold down your Ctrl and D Keys together to create 1 Duplicate, then repeat. Another way to create a Duplicate would be to go to the Menu Bar and select Edit > Duplicate. A third way would be to select the Duplicate Selected Objects Icon from the Commands Bar. Even though it’s not easy to see, know that your Duplicates have been created. They have been placed behind the Original Shape. Move 2 of the shapes away from each other. Change the Fill and Stroke Color of the First Duplicate to White. Set the Second to Black. Use the Color Palette at the bottom.
- 10. Flyer Tutor Page 10 of 21 Inkscape Tutorial – How To Make A Yoga Class Flyer www.FlyerTutor.com Step 10: Arrange Order Select the White Shape. Go up to the Select Tool Controls Bar. Select the Lower Selection One Step Icon. This places the White Shape below the other 2 Shapes. Next select the Black Shape. Click the Lower Selection to Bottom Icon. The Black Shape becomes the Bottom Layer.
- 11. Flyer Tutor Page 11 of 21 Inkscape Tutorial – How To Make A Yoga Class Flyer www.FlyerTutor.com Step 11: Insert Circles Select the Circle Tool from the Toolbox. Draw a Circle on the page. The Circle has 3 Nodes (2 Squares Nodes for adjusting Height and Width and a Circle Node to create the End Points for an Arc or Segment). Click the Select Tool, and set the Circle's Width to 2.96 Inches. The Circle will have the Last Colors used for Fill and Stroke. So in this case, that Color will be Black. Change the Fill to White. Select the Fill and Stroke Icon from the Command Bar. This opens the Fill and Stroke Docker. You will see Tabs for Fill, Stroke Paint and Stroke Style. Select the Stroke Style Tab. Set the Width to 0.06 Inches and hit your Enter Key to see the change.
- 12. Flyer Tutor Page 12 of 21 Inkscape Tutorial – How To Make A Yoga Class Flyer www.FlyerTutor.com Create 3 Duplicates of this Circle. Change the size of one of the Duplicates to 2.02 Inches. Set its Stroke to 0.05 Inches. Place this Circle in between the larger two. Set the Last Duplicate's Size to 2.3 Inches, with a Maroon Fill. Place it in the desired location on the Flyer. Next we can add Images to the Flyer.
- 13. Flyer Tutor Page 13 of 21 Inkscape Tutorial – How To Make A Yoga Class Flyer www.FlyerTutor.com Step 12: Royalty Free Clipart The Royalty Free Clip Art in the Yoga Class Flyer was downloaded from Clker. The Clip Art is called Lots of Yoga Poses. When you go to the Clker website to download this Image, click on the SVG Link below the Image so that you can save the SVG Format of the file. Once the Image has been downloaded, you will need to place it into the Yoga Flyer. Step 13: Import Image To Import the Image go to the Menu Bar and select File > Import.
- 14. Flyer Tutor Page 14 of 21 Inkscape Tutorial – How To Make A Yoga Class Flyer www.FlyerTutor.com This will open the Select File to Import Window. Locate the File that you wish to insert in the document, select it and click Open. This file will be large and will completely cover the Yoga Flyer. Go to the bottom right corner of the window and click the Down Arrow on the Zoom Box until you can see the Arrows that surround the Image. Move your cursor over one of the Corner Arrows, hold your Left Mouse button and your Ctrl Key and drag inward until the Image is more manageable.
- 15. Flyer Tutor Page 15 of 21 Inkscape Tutorial – How To Make A Yoga Class Flyer www.FlyerTutor.com Step 14: Ungroup Images On the Commands Bar click on the Ungroup Selected Groups Icon 2 times. Click in any White Area to deselect the Images. Select and move the Images needed for this Flyer closer together. You can Delete the remaining Images. Select all 3 Images and give them a Black Fill instead of Blue. Place each Image in a Circle.
- 16. Flyer Tutor Page 16 of 21 Inkscape Tutorial – How To Make A Yoga Class Flyer www.FlyerTutor.com Step 15: Flip Images Horizontally Select the Left Image and click the Flip Selected Objects Horizontally Icon from the Tool Controls Bar. Repeat for the Image on the Right. Use the Scaling Arrows and your Ctrl Key to Resize the Images proportionally. Now you can start adding Text to the Flyer. Step 16: Free Fonts Three Fonts are used on this Flyer. The Advert Font was downloaded from Font Freak and created by Richard William Mueller.
- 17. Flyer Tutor Page 17 of 21 Inkscape Tutorial – How To Make A Yoga Class Flyer www.FlyerTutor.com The Desyrel Font was downloaded from Font Squirrel and created by Apostrophic Labs. The Last Font is a System Font called Arial. For a newly downloaded Font to be usable on your machine, you must first install it. Any Font installed while Inkscape is open, will not be visible in the Font List. To correct this, you must first restart the Inkscape Program after Font(s) Installation. For more information on Fonts and how to properly install them, visit the FlyerTutor Blog. Step 17: Insert & Format Text Let's start with the Title Text. Select the Text Tool from the Toolbox. Click anywhere on the page and type "Yoga Class". Double click over the word "Yoga" to select it. Go up to the Text Tool Control Bar.
- 18. Flyer Tutor Page 18 of 21 Inkscape Tutorial – How To Make A Yoga Class Flyer www.FlyerTutor.com Click the Down Arrow on the Font Family List and scroll up to find the Advert Font and select it. Right next to the Font Family Box is the Font Size Box. Type in 125 and hit your Enter Key. Next highlight the word "Class", set its Font to Arial and Size to 110. Then make it Bold by selecting the Bold Icon next to the Font Size Box. Give the "Yoga" Text a Maroon Fill. Then select both words and give them a White Stroke.
- 19. Flyer Tutor Page 19 of 21 Inkscape Tutorial – How To Make A Yoga Class Flyer www.FlyerTutor.com Step 18: Add Drop Shadow Use the Select Tool and click the Text. On the Menu Bar select Filters > Shadows and Glows > Drop Shadow. This opens a Drop Shadow Window with settings for Blur, Opacity and Offset. You can check the Live Preview Box to see a Preview of the Drop Shadow. Set Blur to 2.0 Opacity to 80%, Horizontal Offset to 8 and Vertical Offset to 8. Click the Apply Button. You don't only see the Drop Shadow, but also the White Stroke is now visible.
- 20. Flyer Tutor Page 20 of 21 Inkscape Tutorial – How To Make A Yoga Class Flyer www.FlyerTutor.com Step 19: Add & Format Text The Font used for the Bottom of the Flyer and the Red Circle is Arial, Size 32, Fill Color White, Bold. Center the Text in the Red Circle by clicking the Center Icon. "Relaxation" Text is set to Font Desyrel, Size 40, and Centered. The words, "Mind, Body, Soul” are Font Desyrel, Size 64, Fill White, Stroke Black. There you have created an eye- catching Yoga Flyer with Inkscape. You see what this does for the Flyer.
- 21. Flyer Tutor Page 21 of 21 Inkscape Tutorial – How To Make A Yoga Class Flyer www.FlyerTutor.com All that's left to do is Save. Step 20: Save File On the Menu Bar, select File > Save. This opens the Select File to Save To Window. Here you'll give your file a Name and click the Save Button. If you like this Tutorial and think that it may be of some use to someone else, Please Share! Thank You! Visit www.FlyerTutor.com for more Tutorials and Free Flyer Templates for Corel Draw, Inkscape, Adobe Illustrator, Microsoft Word, OpenOffice Draw and Microsoft Publisher.