Inkscape Fall Fest Flyer Tutorial
•
1 like•1,160 views

Learn how to create a Fall Fest Flyer from beginning to end using the Professional Graphic Design Application - Inkscape (a Vector Graphics Editor).

Recommended
Recommended
More Related Content
What's hot
What's hot (20)
Viewers also liked
Similar to Inkscape Fall Fest Flyer Tutorial
Similar to Inkscape Fall Fest Flyer Tutorial (20)
More from Flyer Tutor
More from Flyer Tutor (9)
Inkscape Fall Fest Flyer Tutorial
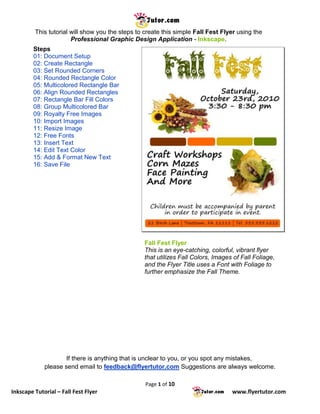
- 1. This tutorial will show you the steps to create this simple Fall Fest Flyer using the Professional Graphic Design Application - Inkscape. Steps 01: Document Setup 02: Create Rectangle 03: Set Rounded Corners 04: Rounded Rectangle Color 05: Multicolored Rectangle Bar 06: Align Rounded Rectangles 07: Rectangle Bar Fill Colors 08: Group Multicolored Bar 09: Royalty Free Images 10: Import Images 11: Resize Image 12: Free Fonts 13: Insert Text 14: Edit Text Color 15: Add & Format New Text 16: Save File Fall Fest Flyer This is an eye-catching, colorful, vibrant flyer that utilizes Fall Colors, Images of Fall Foliage, and the Flyer Title uses a Font with Foliage to further emphasize the Fall Theme. If there is anything that is unclear to you, or you spot any mistakes, please send email to feedback@flyertutor.com Suggestions are always welcome. Page 1 of 10 Inkscape Tutorial – Fall Fest Flyer www.flyertutor.com
- 2. Step 01: Document Setup Upon opening Inkscape, locate the Menu Bar. Select File > New > Letter. This will determine the Page Size. Letter is 8.5 by 11 inches. Step 02: Create Rectangle The first thing that you will add to this Flyer will be a Rectangle. Go to the Tool Bar and select the Rectangle Tool. Notice that this will change the Tool Properties Bar, which is located above the Flyer/Canvas. You'll see that the Width and Height boxes are grayed out. Draw a Rectangle at the bottom of the page. Once this is done, the Width and Height boxes will change to allow you to edit the Rectangle Dimensions. Page 2 of 10 Inkscape Tutorial – Fall Fest Flyer www.flyertutor.com
- 3. On the Tool Properties Bar, the last box allows you to change the measurement type. Here it is set to px for Pixels. When you select the down arrow a drop down menu will appear that has different measurement types to choose from. pt for Points px for Pixels mm for Millimeters cm for Centimeters m for Meters in for Inches Choose in for Inches. Then go over to the Width Box and enter “8.05” in, and set the Height Box to “0.46” in. Note that this gives you a Rectangle without rounded corners. Step 03: Set Rounded Corners To Round the corners of the Rectangle go back to the Tool Properties Box and set Ry (which is the Vertical Radius of Rounded Corners) to 0.09 in. Click on any white area outside of the Flyer to deselect the Rectangle. It should look like this: Step 04: Rounded Rectangle Color Now we need to change the Rounded Rectangle's Color. To do this, first go to the Toolbar and pick the Select Tool. Using this tool, click on the Rounded Rectangle. Proceed to the Tool Bar and select the Fill and Stroke Icon. This opens the Fill and Stroke Window. The Fill Tab will be active. Select the Flat Color Icon (the second icon in the Fill Tab). Page 3 of 10 Inkscape Tutorial – Fall Fest Flyer www.flyertutor.com
- 4. This will show the Flat Color Options with Tabs for RGB, HSL, CMYK & Wheel. Under RGB, set R to 255, G to 102, and B to 0 by entering the desired number or using the up and down arrows to change the visible figures. This changes the Rounded Rectangle's Fill from the previous color to our desired orange color. So that your flyer should look like this: Step 05: Multicolored Rounded Rectangle Bar Ok, now using what we've just learned we will now create a Multicolored Rounded Rectangle Bar. Draw 4 Rectangles and place them side by side. We will use the following dimensions for each Rectangle: First Rectangle's Dimensions: W 2.16, H 0.48, Ry 0.11 Second Rectangle's Dimensions: W 1.65, H 0.48, Ry 0.11 Third Rectangle's Dimensions: W 2.16, H 0.48, Ry 0.11 Fourth Rectangle's Dimensions: W 1.35, H 0.48, Ry 0.11 With the Rectangle Tool still selected, click on the First Rectangle. Set the Dimensions (remember to use the Tool Property Bar). Repeat steps for the other Rectangles. They will all have the last Fill Color applied which was our Custom Orange. Before applying the new Colors to the Rectangles, let us align and adjust them. Page 4 of 10 Inkscape Tutorial – Fall Fest Flyer www.flyertutor.com
- 5. Step 06: Align Rounded Rectangles Look at the Ruler on the left side of the screen. Pick a number with which to line up your 4 Rectangles, let's say a random number 6. Using the Select Tool, click on the first Rectangle and drag it over to this number 6 on the ruler. Then select the Zoom Tool from the Tool Bar, and click to zoom in as far as you would like to go. Reselect the Rectangle and move it so that it lines up with this 6. Then do this for every other Rounded Rectangle. Once you have lined up all 4 Rectangles, go up to the Menu Bar and select the Zoom to Fit Page in Window Icon. Using the Select Tool, move the Rectangles to the right of each other so that there is a tiny space between each Rectangle. So that the flyer should look like this: Step 07: Multicolored Rectangle Bar Fill Repeating the steps to set Fill Color, set the following: Rectangle 1 - R 128, G 51, B 0 Rectangle 2 - R 255, G 102, B 0 Rectangle 3 - R 212, G 170, B 0 Rectangle 4 - R 102, G 128, B 0 So that your Flyer will now look like this: Page 5 of 10 Inkscape Tutorial – Fall Fest Flyer www.flyertutor.com
- 6. Step 08: Group Multicolored Bar Before moving on, we will group the Multicolored Bar so that none of the Rectangles accidentally get moved out of line with the others. To do this, click on the Select Tool from the Tool Bar, and while holding down the left mouse button drag the cursor over the 4 Rectangles. Click on the Group Selected Objects Icon on the Menu Bar. Movement of the entire Multicolored Bar will now be much easier. If for some reason you need to make a change to one or more of your Rounded Rectangles, simply select the bar, right click the mouse, and select Ungroup from the popup menu. To make this step even simpler, select the Ungroup Selected Objects Icon located on the Menu Bar. Step 09: Royalty Free Images With this done, we can now focus on adding Images to the Flyer. The Royalty Free Images for this Fall Fest Flyer were downloaded from PublicDomainPictures The Top Image is called Autumn Still Life. The Bottom Image is called Sweet Conker. Both images were taken by Petr Kratochvil. Once your images have been downloaded, you will need to place them into the Flyer. Page 6 of 10 Inkscape Tutorial – Fall Fest Flyer www.flyertutor.com
- 7. Step 10: Import Images To place the new images, go to File > Import which will open the Select File to Import Window. After you've located the file, click the Open button at the bottom right of the window. Your image will appear with 8 arrows around it. Step 11: Resize Image To resize the image, move your mouse over one of the corner arrows and while holding down the Ctrl key ( to keep proportional image ) drag the mouse to decrease the size of the image, then move into place on the Flyer. Click in any white area on the canvas to deselect the image. Repeat these steps to place the second image, so that both images on the Flyer should look like this: Page 7 of 10 Inkscape Tutorial – Fall Fest Flyer www.flyertutor.com
- 8. Step 12: Free Fonts Next we can start adding text to the Flyer. For the Fall Fest Title, the Font used is Kingthings Annex by Kevin King, which was downloaded from FontFreak.com. I picked this Font especially because of all the foliage that comes with it, going well with the theme of the Flyer - Fall. If you want to view more of Kevin King's Free Fonts check out his website at www.KingthingsFonts.co.uk. (Note for a newly downloaded Font to be usable on your machine, you must first install it. Any Font installed while Inkscape is open, will not be visible in the Font List. To correct this, you must first restart the Inkscape program after the Font(s) installation.) Step 13: Insert Text To insert the text, go to the Tool Box and select the Text Tool. Click anywhere on the page and type "Fall Fest". Go to the Tool Properties Bar, click the First Down Arrow and select KingThings Annex from the Font List, then set the Font Size to "144" by clicking on the Next Down Arrow to the right and selecting "144" or you can just click in the box and type in that number, whichever is faster for you. The Font should look like this: Step 14: Edit Text Color To change the color of the text, hold down the Left mouse button, drag the mouse to select only the word "Fall". Once selected, go up to the Menu Bar and click on the Fill and Stroke Icon. In the Fill Tab, set R to 68, G to 85, and B to 0. Repeat this step for "Fest" and set R to 212, G to170, and B to 0. Use the Select Tool to move your Text to the Top Center of the Flyer. The Colored Title will look like this: And when added to the Flyer, it should look like this: Page 8 of 10 Inkscape Tutorial – Fall Fest Flyer www.flyertutor.com
- 9. Step 15: Add & Format New Text Now to add the remaining text. Originally, when I first did this Fall Fest Flyer (years ago), I downloaded a Font called Segoe Print from FontFreak.com and it was Freeware at the time. Now it no longer is available there, seems you have to purchase it for both personal and commercial purposes. Unless you have Windows Vista or Windows 7 running on your machine or you use Microsoft Office 2007or Microsoft Office 2010. Seems these fonts are now bundled with these programs. So for those of you without any of these, you'll have to find a free Font that goes well with this Flyer. Again, check out FontFreak.com and verify that you can use a Font by checking its License. Ok, back to the Font. Set the "Saturday" text to "Segoe Print", Size 40, Centered and Bold. To Center, with text selected, click on the Center Icon which can be found on the right side of the Font Size Box. Set Text to Bold by clicking on the Bold Icon. Move your text into place using the Select Tool. The "Craft" text is "Segoe Print", Size 48, Aligned Left and Bold. Again move the text into the proper position on the Flyer. The "Children" text is "Segoe Print", Size 32 and Centered. The "Address" text is "Segoe Print", Size 23 and Aligned Left. Move into position on the Orange Colored Bar making the Bar appear to be the background for the Text. Page 9 of 10 Inkscape Tutorial – Fall Fest Flyer www.flyertutor.com
- 10. Step 16: Save File To save your file, go to File > Save. It will be saved as a Scalable Vector Graphic (svg) file by default. There you have it, we have created an eye-catching, vibrant, colorful Fall Fest Flyer by implementing a very simple step by step process. Your completed Fall Fest Flyer using the OpenSource Professional Graphic Design Application - Inkscape should look like this: Page 10 of 10 Inkscape Tutorial – Fall Fest Flyer www.flyertutor.com