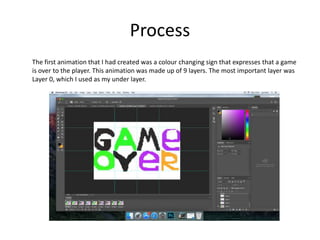
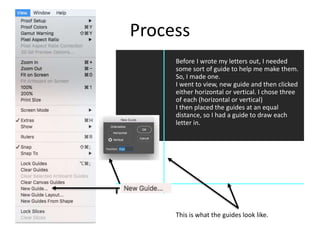
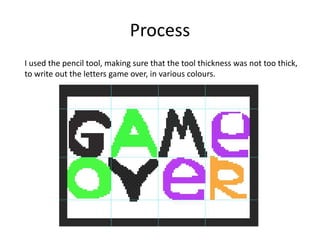
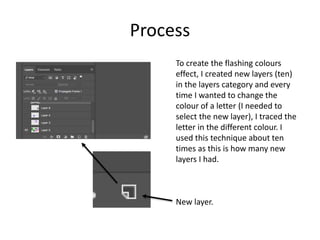
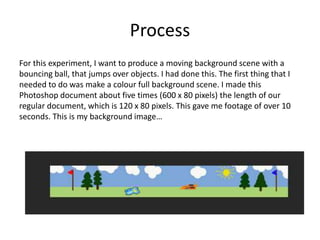
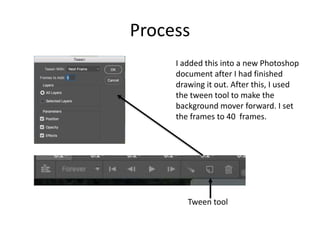
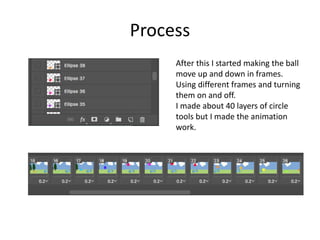
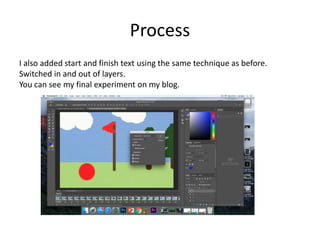
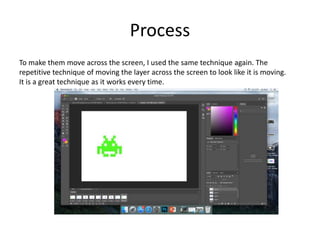
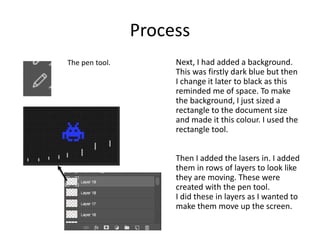
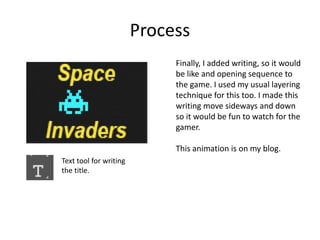
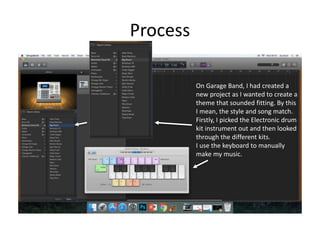
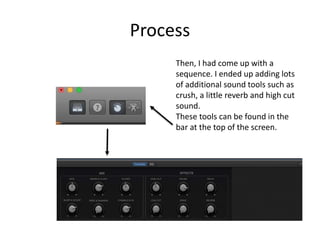
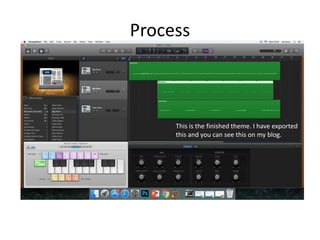
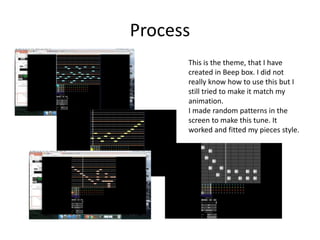
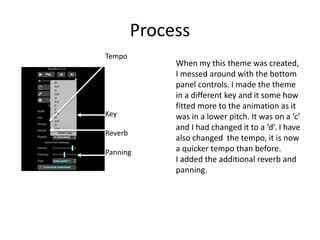
2. To startā¦
Just to point out! Before I started this project, I did not know how to do
anything to do with animation. This is all new to me.
I have learned the basics because of having to complete experiments, such as
this. This meaning how to use layers in Adobe Photoshop to change the
colours of text and shapes. I have also learned how to put backgrounds into
the file to create the illusion of a character or object moving.
Here are some processes and reflectionsā¦
4. Process
The first animation that I had created was a colour changing sign that expresses that a game
is over to the player. This animation was made up of 9 layers. The most important layer was
Layer 0, which I used as my under layer.
5. Process
Before I wrote my letters out, I needed
some sort of guide to help me make them.
So, I made one.
I went to view, new guide and then clicked
either horizontal or vertical. I chose three
of each (horizontal or vertical)
I then placed the guides at an equal
distance, so I had a guide to draw each
letter in.
This is what the guides look like.
6. Process
I used the pencil tool, making sure that the tool thickness was not too thick,
to write out the letters game over, in various colours.
7. Process
To create the flashing colours
effect, I created new layers (ten)
in the layers category and every
time I wanted to change the
colour of a letter (I needed to
select the new layer), I traced the
letter in the different colour. I
used this technique about ten
times as this is how many new
layers I had.
New layer.
8. Process
Finally, I used the timeline to put it all together.
I placed 9 duplications of Layer 0. I used the see tool
to control which layer you could and could not see.
After I thought it was done I pressed play. Controlling
how many minutes it was playing over for. I also
selected the forever button so it would replay.
See tool off
See tool on
9. Reflection
In my final product, I will include this experiment (Not the same one!). I will
use the same technique to indicate to the player that the game is over, or that
the game is starting. I could also use this same technique but with typed out
text, I just thought drawing it out would look more homemade and it does
look that way. I was being creative.
I donāt only have to use this colour changing technique with letters or text, I
could use this with shapes or objects in my game. I think I might also do this
in my final product. I just need to sort out the layer so they look appropriate.
11. Process
For this experiment, I want to produce a moving background scene with a
bouncing ball, that jumps over objects. I had done this. The first thing that I
needed to do was make a colour full background scene. I made this
Photoshop document about five times (600 x 80 pixels) the length of our
regular document, which is 120 x 80 pixels. This gave me footage of over 10
seconds. This is my background imageā¦
12. Process
I added this into a new Photoshop
document after I had finished
drawing it out. After this, I used
the tween tool to make the
background mover forward. I set
the frames to 40 frames.
Tween tool
13. Process
After this I started making the ball
move up and down in frames.
Using different frames and turning
them on and off.
I made about 40 layers of circle
tools but I made the animation
work.
14. Process
I also added start and finish text using the same technique as before.
Switched in and out of layers.
You can see my final experiment on my blog.
15. Reflection
In my opinion, this turned out great. I really liked this technique. Even though,
it is tie consuming, I think that this is worth the wait. I will be defiantly using
the moving background in m final product. I could turn this into al sorts of
things. I need to use my creative mind.
17. Process
The first thing that I needed to do was draw these creatures out. I made this
up as I went along and added an new layer every time I started to draw a new
creature.
New layers.
18. Process
To make them move across the screen, I used the same technique again. The
repetitive technique of moving the layer across the screen to look like it is moving.
It is a great technique as it works every time.
19. Process
Next, I had added a background.
This was firstly dark blue but then
I change it later to black as this
reminded me of space. To make
the background, I just sized a
rectangle to the document size
and made it this colour. I used the
rectangle tool.
Then I added the lasers in. I added
them in rows of layers to look like
they are moving. These were
created with the pen tool.
I did these in layers as I wanted to
make them move up the screen.
The pen tool.
20. Process
Finally, I added writing, so it would
be like and opening sequence to
the game. I used my usual layering
technique for this too. I made this
writing move sideways and down
so it would be fun to watch for the
gamer.
This animation is on my blog.
Text tool for writing
the title.
21. Reflection
I am, overall, very happy with this animation. I am going to make a title
opening sequence in my final product that is like this. My favourite thing
about this was drawing the little space invaders, and the colours of them
stand out to me as well. The only thing I am not happy with is the length of it.
I would have to make it longer if I was going to use a similar piece to this in
my final product.
23. To startā¦
For this series of experiments I will be using two programs. Garage Band and
Beep Box. These two programs will help me to practice making music for my
actual product.
I have had plenty of experience with Garage Band so should be able to figure
out a tune for my favorite animation experiment that I have created. I have an
idea for what instrument I want to use. I want to use the electronic drum kits
to start to make a theme tune. I think that this will sound very fitting.
However, in this project, it is my first time using Beep Box so it will be hard for
me to adjust to it. I know that this program is good for making these types of
tunes so I donāt think this will be too hard.
25. Process
To start, I wanted to create a theme tune for my favourite experiment,
Space Invaders. I think this was a good challenge to set myself.
Firstly, I am going to be using Garage Band, to create a theme tune and then
I will try and complete one on Beep Box. I will compare and see which
sounds better.
26. Process
On Garage Band, I had created a
new project as I wanted to create a
theme that sounded fitting. By this
I mean, the style and song match.
Firstly, I picked the Electronic drum
kit instrument out and then looked
through the different kits.
I use the keyboard to manually
make my music.
27. Process
Then, I had come up with a
sequence. I ended up adding lots
of additional sound tools such as
crush, a little reverb and high cut
sound.
These tools can be found in the
bar at the top of the screen.
28. Process
This is the finished theme. I have exported
this and you can see this on my blog.
29. Reflection
I am pleased with how this theme turned out. I think It might need a little
more improvement with timing and when parts of the theme come in. Overall
I am leaning towards using Garage Band in my final product.
30. Process
This is the theme, that I have
created in Beep box. I did not
really know how to use this but I
still tried to make it match my
animation.
I made random patterns in the
screen to make this tune. It
worked and fitted my pieces style.
31. Process
When my this theme was created,
I messed around with the bottom
panel controls. I made the theme
in a different key and it some how
fitted more to the animation as it
was in a lower pitch. It was on a ācā
and I had changed it to a ādā. I have
also changed the tempo, it is now
a quicker tempo than before.
I added the additional reverb and
panning.
Tempo
Key
Reverb
Panning
32. Reflection
I like this program with a little bit more practice, I could use this program in
my final product. I liked changing the different panels such as reverb and
tempo. I didn't like the fact that you couldnāt pick the instrument that you
could play.
Editor's Notes
Discuss the tools and processes used in your experiments
What elements of your experiments will you include in your final product?
Discuss the tools and processes used in your experiments
What elements of your experiments will you include in your final product?
Discuss the tools and processes used in your experiments
What elements of your experiments will you include in your final product?
Discuss the tools and processes used in your experiments
What elements of your experiments will you include in your final product?
Discuss the tools and processes used in your experiments
What elements of your experiments will you include in your final product?