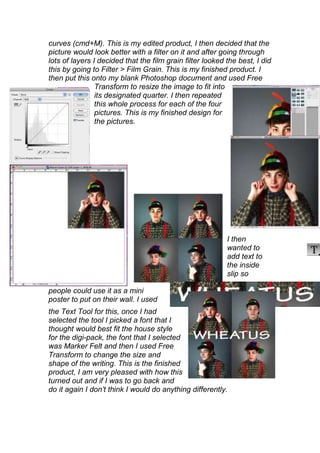
Digi-Pack
Development Diary

I started the construction of my physical CD by opening an existing
template, to do this I went to File > Open, once my selections
opened I selected the correct template. Once I had the correct
template I then opened the pictures that I would use for the CD, I
used the same process that I followed to open the CD template.
These are the pictures I chose. I wanted the model to be walking
around the CD, jumping over the amps. Once I had opened the
pictures I then edited them to make them brighter and more
visually appealing to do this I used the Level and Curves tool. The
shortcut for the Levels tool is ‘CMD > L’ and the shortcut for
Curves is ‘CMD > M’.
Once I had finished editing the pictures I then had to select them to
drag them onto the CD Template, to do this I used the magic wand
tool, once I had it selected I traced around the model’s body and it
selected the model and separated it from
the background. I then selected the move
            tool and dragged the
            model onto the CD
            Template. I then had to resize
            the model as they did not fit
            properly onto the CD, to do
            this I used Free Transform, to
            do this I went to Edit > Free
            Transform; then making sure I
            held down the shift button, to
           make sure the picture stayed
           in proportion, I dragged the
           corners in to make the model
           the correct size. When I had finished this I put the amp
           in, I followed the same process that I did for the model,
           the only different that I did this time was rotate it, to do
           this I went to Edit > Transform > Rotate I then rotated
           the amp until it was at the correct angle, I then used the
           eraser tool rub out the bottom of the amp so it fitted
against the inner circle of the CD. I then repeated this process with
            the next model and continued until I had covered the
            whole CD. After I had finished this I felt that the CD
            just looked too plain so I decided that I would link in the
            chequered pattern from the front cover in with the CD.
            To do this I first hid the layers with the model and amps
            on them so I had a clear background, I then started off
            with the lines that I would need to draw, I used the Line
            Tool to execute this, I set the thickness to 0.2cm so the
            line wasn’t too big but still able to be seen. Once I had
            completed this I merged the layers and then filled in
every other space with a different colour using the Fill Tool. I then
added a Inner Shadow by double clicking on
the layer and selecting Inner Shadow with the
opacity at 100 and changed the Distance, Size and
Choke until I had the desired effect. This is the finished product.
I then moved on to the inside cover, to
                  do this I first created a new square
                  Photoshop document, I did this by
                  opening Photoshop and going to File >
                  New, I then went onto custom and
                  changes the centimetres to 22cm by 22cm as this
would give me the same width as a A4 page. Once I had this page
set up I opened the first picture that I would be using as one of my
                                four, to do this I went to File > Open.
                                Once I had the picture open I then had
                                to edit this picture, to do this I first
                                wanted to fix the models skin to
                                make it look smoother, I did this by
                                using a technique called soft focus;
                                this includes selecting the
                                lasso tool and tracing
                                around the models eyes and
                                mouth, making sure I was on
the duplicated layer. I then inversed the selection and
       went to Filter > Gaussian
       Blur, I then changed the
       opacity of the layer to
       make the blur look subtle

            but effective, once I
            had the desired look I
            flattened the image, I
            did this by going to Layer >
            Flatten Image. Once I had
            finished with this process I then
            went onto changing the colour
            and tone of the picture, I did this
            by using levels (cmd+L) and
curves (cmd+M). This is my edited product, I then decided that the
picture would look better with a filter on it and after going through
lots of layers I decided that the film grain filter looked the best, I did
this by going to Filter > Film Grain. This is my finished product. I
then put this onto my blank Photoshop document and used Free
                Transform to resize the image to fit into
                its designated quarter. I then repeated
                this whole process for each of the four
                pictures. This is my finished design for
                the pictures.


                                                           I then
                                                           wanted to
                                                           add text to
                                                           the inside
                                                           slip so

people could use it as a mini
poster to put on their wall. I used
the Text Tool for this, once I had
selected the tool I picked a font that I
thought would best fit the house style
for the digi-pack, the font that I selected
was Marker Felt and then I used Free
Transform to change the size and
shape of the writing. This is the finished
product, I am very pleased with how this
turned out and if I was to go back and
do it again I don’t think I would do anything differently.
I then moved onto the Front Cover, this was a
Mash-up idea. To do this I first freehand drew a
design on a square piece of paper. Once I had
finished the design I then scanned it onto my
computer system using a scanner, this is what the
picture looked like once I had scanned it onto my
system. I then opened this picture in Photoshop
and duplicated the layer, to do this I had to go to
Layer > Duplicate Layer. Once I had the layer
duplicated I then selected the line tool and began drawing all of the
straight lines, once I had finished the straight lines I started with
the curved lines, to do this I first used the straight line from one
                   point to the other, using the warp tool change the
                   line so it fit against the drawing, I did this by
                   going to Edit > Transform > Warp. After I had
                   finished with the outline I stared to add colour, to
 do this I used the Fill Tool. I also wanted to add a realistic aspect
 to the front cover so I decided to replace the cartoon iPod with an
            actual iPod, to do this I took a picture of my iPod and
            then traced around the iPod using the Magic Wand
            Tool and then inversed the selection
            using Select > Inverse and then pressed
            the backspace button to get rid of the
            background. I then used the Magic Wand
            Tool again to select the screen, I then
            opened a picture of the Wheatus album
            cover and dragged it onto the iPod into
            the selection using the Move Tool, and
            resized it using Free Transform. This is
                                the finished iPod.
                                This is the finished
                                product, I am very
                                pleased with how
                                this product has
                                turned out as I feel it
                                achieved the
                                cartoon style I was
                                going for.
I then created the template for the Digi-pack,
to do this I opened a new Photoshop
document, I did this the same way I did the
previous square document by going to File >
New. I then dragged the Front Cover onto
the document using the Move Tool and
resizing it using Free Transform. Once I had
this in place I added a spine to separate the Front
and Back Cover, to do this I used the rectangle
                             tool. Once I had
                             finished with the I
                             began the Back Cover,
                             to do this I used the
                             Rectangle Shape Tool
                             to then fill in the left-
                             hand corner of the
                             document, I then
                             double clicked on the
                             shape layer to bring up I
                             would be able to edit the
                             colour and style of the
                          box. I added an Inner
                          Shadow to the box, I set the
                          opacity to 100% and then
                          adjusted the Distance, Choke
                          and Size until I had my
                          desired effect. This is when I
                                  added the text using the Text Tool.
                                  For the header I chose the font
                                  Marker Felt because I thought it
                          would be
                          better to keep
                          the same
house style throughout. And then for the list of tracks I decided to
                       use the font Bangla
                       because I thought it
looked better and fit into the style of my
Digi-pack. I then added a barcode to the
back cover, I did this by placing the
image onto the image and then resizing it
using Free Transform This is the finished
design for the back cover.
Once I had finished this I started to assemble my Digi-pack,
because I already had the Front cover and back cover on the
Photoshop document I only needed to drag the Inside Cover and
CD onto the document using the Move Tool. This is the finished
Digi-pack, I am very pleased with how this turned out, as there is a
certain style throughout which I feel reflects the band well and the
tone of the album.

Digi-Pack Development Diary

  • 1.
    Digi-Pack Development Diary I startedthe construction of my physical CD by opening an existing template, to do this I went to File > Open, once my selections opened I selected the correct template. Once I had the correct template I then opened the pictures that I would use for the CD, I used the same process that I followed to open the CD template. These are the pictures I chose. I wanted the model to be walking around the CD, jumping over the amps. Once I had opened the pictures I then edited them to make them brighter and more visually appealing to do this I used the Level and Curves tool. The shortcut for the Levels tool is ‘CMD > L’ and the shortcut for Curves is ‘CMD > M’.
  • 2.
    Once I hadfinished editing the pictures I then had to select them to drag them onto the CD Template, to do this I used the magic wand tool, once I had it selected I traced around the model’s body and it selected the model and separated it from the background. I then selected the move tool and dragged the model onto the CD Template. I then had to resize the model as they did not fit properly onto the CD, to do this I used Free Transform, to do this I went to Edit > Free Transform; then making sure I held down the shift button, to make sure the picture stayed in proportion, I dragged the corners in to make the model the correct size. When I had finished this I put the amp in, I followed the same process that I did for the model, the only different that I did this time was rotate it, to do this I went to Edit > Transform > Rotate I then rotated the amp until it was at the correct angle, I then used the eraser tool rub out the bottom of the amp so it fitted against the inner circle of the CD. I then repeated this process with the next model and continued until I had covered the whole CD. After I had finished this I felt that the CD just looked too plain so I decided that I would link in the chequered pattern from the front cover in with the CD. To do this I first hid the layers with the model and amps on them so I had a clear background, I then started off with the lines that I would need to draw, I used the Line Tool to execute this, I set the thickness to 0.2cm so the line wasn’t too big but still able to be seen. Once I had completed this I merged the layers and then filled in every other space with a different colour using the Fill Tool. I then added a Inner Shadow by double clicking on the layer and selecting Inner Shadow with the opacity at 100 and changed the Distance, Size and
  • 3.
    Choke until Ihad the desired effect. This is the finished product.
  • 4.
    I then movedon to the inside cover, to do this I first created a new square Photoshop document, I did this by opening Photoshop and going to File > New, I then went onto custom and changes the centimetres to 22cm by 22cm as this would give me the same width as a A4 page. Once I had this page set up I opened the first picture that I would be using as one of my four, to do this I went to File > Open. Once I had the picture open I then had to edit this picture, to do this I first wanted to fix the models skin to make it look smoother, I did this by using a technique called soft focus; this includes selecting the lasso tool and tracing around the models eyes and mouth, making sure I was on the duplicated layer. I then inversed the selection and went to Filter > Gaussian Blur, I then changed the opacity of the layer to make the blur look subtle but effective, once I had the desired look I flattened the image, I did this by going to Layer > Flatten Image. Once I had finished with this process I then went onto changing the colour and tone of the picture, I did this by using levels (cmd+L) and
  • 5.
    curves (cmd+M). Thisis my edited product, I then decided that the picture would look better with a filter on it and after going through lots of layers I decided that the film grain filter looked the best, I did this by going to Filter > Film Grain. This is my finished product. I then put this onto my blank Photoshop document and used Free Transform to resize the image to fit into its designated quarter. I then repeated this whole process for each of the four pictures. This is my finished design for the pictures. I then wanted to add text to the inside slip so people could use it as a mini poster to put on their wall. I used the Text Tool for this, once I had selected the tool I picked a font that I thought would best fit the house style for the digi-pack, the font that I selected was Marker Felt and then I used Free Transform to change the size and shape of the writing. This is the finished product, I am very pleased with how this turned out and if I was to go back and do it again I don’t think I would do anything differently.
  • 6.
    I then movedonto the Front Cover, this was a Mash-up idea. To do this I first freehand drew a design on a square piece of paper. Once I had finished the design I then scanned it onto my computer system using a scanner, this is what the picture looked like once I had scanned it onto my system. I then opened this picture in Photoshop and duplicated the layer, to do this I had to go to Layer > Duplicate Layer. Once I had the layer duplicated I then selected the line tool and began drawing all of the straight lines, once I had finished the straight lines I started with the curved lines, to do this I first used the straight line from one point to the other, using the warp tool change the line so it fit against the drawing, I did this by going to Edit > Transform > Warp. After I had finished with the outline I stared to add colour, to do this I used the Fill Tool. I also wanted to add a realistic aspect to the front cover so I decided to replace the cartoon iPod with an actual iPod, to do this I took a picture of my iPod and then traced around the iPod using the Magic Wand Tool and then inversed the selection using Select > Inverse and then pressed the backspace button to get rid of the background. I then used the Magic Wand Tool again to select the screen, I then opened a picture of the Wheatus album cover and dragged it onto the iPod into the selection using the Move Tool, and resized it using Free Transform. This is the finished iPod. This is the finished product, I am very pleased with how this product has turned out as I feel it achieved the cartoon style I was going for.
  • 7.
    I then createdthe template for the Digi-pack, to do this I opened a new Photoshop document, I did this the same way I did the previous square document by going to File > New. I then dragged the Front Cover onto the document using the Move Tool and resizing it using Free Transform. Once I had this in place I added a spine to separate the Front and Back Cover, to do this I used the rectangle tool. Once I had finished with the I began the Back Cover, to do this I used the Rectangle Shape Tool to then fill in the left- hand corner of the document, I then double clicked on the shape layer to bring up I would be able to edit the colour and style of the box. I added an Inner Shadow to the box, I set the opacity to 100% and then adjusted the Distance, Choke and Size until I had my desired effect. This is when I added the text using the Text Tool. For the header I chose the font Marker Felt because I thought it would be better to keep the same house style throughout. And then for the list of tracks I decided to use the font Bangla because I thought it looked better and fit into the style of my Digi-pack. I then added a barcode to the back cover, I did this by placing the image onto the image and then resizing it using Free Transform This is the finished design for the back cover.
  • 8.
    Once I hadfinished this I started to assemble my Digi-pack, because I already had the Front cover and back cover on the Photoshop document I only needed to drag the Inside Cover and CD onto the document using the Move Tool. This is the finished Digi-pack, I am very pleased with how this turned out, as there is a certain style throughout which I feel reflects the band well and the tone of the album.