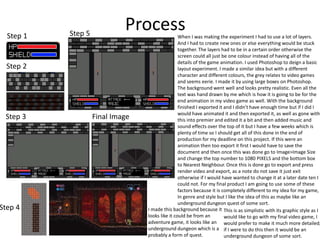
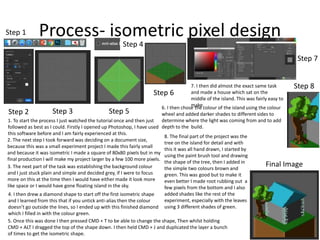
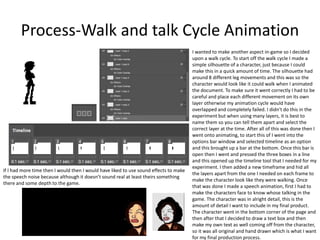
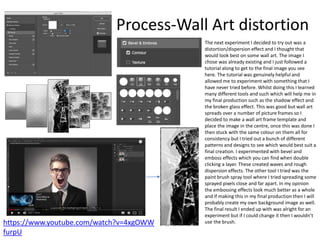
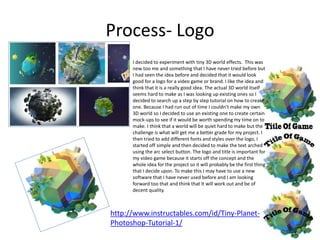
Experiments
Jay Birkin
Process
https://www.youtube.com/watch?v=DvBhY6aJ7N8
https://www.youtube.com/watch?v=M0SF-nxVskE
Music is going to be an important part of my project and I will need to
make my own sound track with my own original sounds, to do this I
only know a few music apps/websites that can help me, the two which I
will most likely be using are garageband and beebpox. Garageband is a
line of digital audio workstations for MacOS and IOS that allows users to
create music or podcasts. Its music and podcast creation system
enables users to create multiple tracks in the system with pre-
made instruments of different kinds, pre-made loops and allows various
instrumental effects, and voice recordings and this is helpful towards
different artists and anybody that wants to make their own music or
soundtrack. I decided to watch a tutorial on how to use GarageBand
because it has been a while before I have used this. I am not that good
at music so I will definitely probably have to follow some guidelines that
will help me out a little. This tutorial was very helpful towards me and
taught me the basics and tools of how this works. I learned so many
things from this but I may still have to get help from somebody else
who can do music better than me and collaborate with them.
An easier music maker which I could use is beepbox, I have used this
before and know the way this works, it only creates 8-bit sound tracks
though which doesn't go with my game but it will be my back up plan
for the project in case anything else goes wrong. This tutorial taught me
everything about this website, except I knew most of it already. I shall
be using one of these in my final production for the project and think
that it should go well and work. The difference between these is garage
band has many more instruments and can vary massive where as
beepbox is much more simplistic and doesn't change much. The
tools/options that are provided in beepbox I did not use because I just
don’t think they are necessary and that I could make a good song
without them.
Process
https://www.youtube.com/watch?v=0E
DnAdJZNXA
https://www.youtube.com/watch?v=zcD5AljC8x4
The next tutorial I looked up was one on isometric in Photoshop
and I did this because it was something different and never tried
by me personally before.
I have even learned 3 new tools and methods on Photoshop
which I never knew previously from this tutorial:
• If you press CMD + J it then it copy and duplicates a layer
• If you untick the Anti-Alias option bar then It only fills in the
inside of a shape.
• When holding the ALT key changing the shape of an object it
makes it symmetrical.
These can all be of use to me for my final production of the
project but also as well future projects.
I already know most of the ins and outs of Photoshop but I decided to
look up a tutorial on pixel art and the best way to go about it because I
wanted to see the most efficient way to do my project as well as too
see if I could learn something new. Photoshop is at times simplistic but
it does have some complex tools as well. This tutorial helped me
understand that the best way to go about my project would to be too
draw my images first and then scan them in on the computer so I could
go over them with certain tools to get the best outcome. I like
Photoshop and think that it is a helpful program that I will be making
my final product in.
ProcessStep 1
Step 2
Step 3
Step 4
Step 5
Final Image
This is as simplistic with its graphic style as I
would like to go with my final video game, I
would prefer to make it much more detailed,
if I were to do this then it would be an
underground dungeon of some sort.
I made this background because it
looks like it could be from an
adventure game, it looks like an
underground dungeon which is a
probably a form of quest.
When I was making the experiment I had to use a lot of layers.
And I had to create new ones or else everything would be stuck
together. The layers had to be in a certain order otherwise the
screen could all just be one colour instead of having all of the
details of the game animation. I used Photoshop to deign a basic
layout experiment. I made a similar idea but with a different
character and different colours, the grey relates to video games
and seems eerie. I made it by using large boxes on Photoshop.
The background went well and looks pretty realistic. Even all the
text was hand drawn by me which is how it is going to be for the
end animation in my video game as well. With the background
finished I exported it and I didn’t have enough time but if I did I
would have animated it and then exported it, as well as gone with
this into premier and edited it a bit and then added music and
sound effects over the top of it but I have a few weeks which is
plenty of time so I should get all of this done in the end of
production for my deadline on this project. If this were an
animation then too export it first I would have to save the
document and then once this was done go to Image>Image Size
and change the top number to 1080 PIXELS and the bottom box
to Nearest Neighbour. Once this is done go to export and press
render video and export, as a note do not save it just exit
otherwise if I would have wanted to change it at a later date ten I
could not. For my final product I am going to use some of these
factors because it is completely different to my idea for my game,
In genre and style but I like the idea of this as maybe like an
underground dungeon quest of some sort.
Process- isometric pixel designStep 1
Step 2 Step 3
Step 4
Step 5
Step 6
Step 7
Step 8
Final Image
1. To start the process I just watched the tutorial once and then just
followed as best as I could. Firstly I opened up Photoshop, I have used
this software before and I am fairly experienced at this.
2. The next step I took forward was deciding on a document size,
because this was a small experiment project I made this fairly small
and because it was isometric I made a square of 80x80 pixels but in my
final production I will make my project larger by a few 100 more pixels.
3. The next part of the task was establishing the background colour
and I just stuck plain and simple and decided grey, if I were to focus
more on this at the time then I would have either made it look more
like space or I would have gone floating island in the sky.
4. I then drew a diamond shape to start off the first isometric shape
and I learned from this that if you untick anti-alias then the colour
doesn’t go outside the lines, so I ended up with this finished diamond
which I filled in with the colour green.
5. Once this was done I then pressed CMD + T to be able to change the shape, Then whilst holding
CMD + ALT I dragged the top of the shape down. I then held CMD + J and duplicated the layer a bunch
of times to get the isometric shape.
6. I then chose the colour of the island using the colour
wheel and added darker shades to different sides to
determine where the light was coming from and to add
depth to the build.
7. I then did almost the exact same task
and made a house which sat on the
middle of the island. This was fairly easy to
make.
8. The final part of the project was the
tree on the island for detail and with
this it was all hand drawn, I started by
using the paint brush tool and drawing
the shape of the tree, then I added in
the simple two colours brown and
green. This was good but to make it
even better I made root rubbing out a
few pixels from the bottom and I also
added shades like the rest of the
experiment, especially with the leaves
using 3 different shades of green.
Process-Walk and talk Cycle Animation
I wanted to make another aspect in-game so I decided
upon a walk cycle. To start off the walk cycle I made a
simple silhouette of a character, just because I could
make this in a quick amount of time. The silhouette had
around 8 different leg movements and this was so the
character would look like it could walk when I animated
the document. To make sure it went correctly I had to be
careful and place each different movement on its own
layer otherwise my animation cycle would have
overlapped and completely failed. I didn't do this in the
experiment but when using many layers, it is best to
name them so you can tell them apart and select the
correct layer at the time. After all of this was done then I
went onto animating, to start this of I went into the
options bar window and selected timeline as an option
and this brought up a bar at the bottom. Once this bar is
open then I went and pressed the three boxes in a line
and this opened up the timeline tool that I needed for my
experiment. I then added a new timeframe and hid all
the layers apart from the one I needed on each frame to
make the character look like they were walking. Once
that was done I made a speech animation, first I had to
make the characters face to know whose talking in the
game. The character was in alright detail, this is the
amount of detail I want to include in my final product.
The character went in the bottom corner of the page and
then after that I decided to draw a text box and then
make my own text as well coming off from the character,
so it was all original and hand drawn which is what I want
for my final production process.
If I had more time then I would then I would have liked to use sound effects to make
the speech noise because although it doesn’t sound real at least theirs something
there and some depth to the game.
Process-Wall Art distortion
https://www.youtube.com/watch?v=4xgOWW
furpU
The next experiment I decided to try out was a
distortion/dispersion effect and I thought that
would look best on some wall art. The image I
chose was already existing and I just followed a
tutorial along to get to the final image you see
here. The tutorial was genuinely helpful and
allowed me to experiment with something that I
have never tried before. Whilst doing this I learned
many different tools and such which will help me in
my final production such as the shadow effect and
the broken glass effect. This was good but wall art
spreads over a number of picture frames so I
decided to make a wall art frame template and
place the image in the centre, once this was done I
then stuck with the same colour on them all for
consistency but I tried out a bunch of different
patterns and designs to see which would best suit a
final creation. I experimented with bevel and
emboss effects which you can find when double
clicking a layer. These created waves and rough
dispersion effects. The other tool I tried was the
paint brush spray tool where I tried spreading some
sprayed pixels close and far apart. In my opinion
the embossing effects look much better as a whole
and if making this in my final production then I will
probably create my own background image as well.
The final result I ended up with was alright for an
experiment but if I could change it then I wouldn’t
use the brush.
Process-Simple Poster
Step 1 Step 2
Step 3
Because I am making a video game and I want to home a
little bit of my skills elsewhere, on this experiment I
decided to create a poster. I once again used Photoshop
for this experiment and didn’t try other software which
was a much better idea and part of the task as well. I am
basing my poster off others poster I found in my
research. The poster size I chose was A4 portrait. The
first step was too get the images for this I got a logo and
character from an already existing game for my game I
am going to create my own, I then put them central in
the page and enlarged them this made it fill in more
space and is an alright design. I then used colour overlay
on both of these by double clicking on the layer and
adjusting the opacity of the colour overlay to make it
fully one colour. After that I placed a border on the
background layer to do this I selected the stroke option
and tick the box for inside then I just made it as big as I
wanted, I made it quiet thick to make it look that little
better. After all that I tried some different fonts for a title
and this is the best one that I came up with that matched
the game. I used the character tool which allowed me to
spread out letters and text size In any direction. This was
all very useful and these tools I will definitely use for
posters but I don’t think that this was a good looking
complete poster, so if I were to make one in my final
production I will definitely change my approach towards
making this.
Process- Video Game sound effects
https://www.leshylabs.com/apps/sfMaker/
Another experiment which I tried was working with
sound effects. These were from a website called
leshylabs which I found after searching up for video
game sound effect creator on Google. It was a fairly
easy website to use, all I had too do was adjust the
bars and tick certain boxes and then it would create
different sounds. Their were a lot of bars and this
made it so their was so many more different options
of sounds I could achieve. All of the sounds that were
created were useful because some of them were
good and helpful and sounded like they would be
good for a video game but then some of them that
were made were just random unrelated sounds that
wouldn't fit with a video game and what I was looking
for. Many of the different options that I could play
around with were a lot of things to do with frequency
and noise because these made the noises sound the
best. Even if you cant get a sound to how you want it
I could just press random and that randomly
generates a sound, sometimes this can be really good
and exactly what I was looking for or if it isn't it just
requires a little bit of tweaking. When making my
final game in production I will definitely be using this
because I think this experiment went well. The only
pre-set I tried was NOISE and I didn’t like it but I
never tried the others and should before making the
final product.
Process- GarageBand Soundtrack
As the whole experiments were coming along, my garage band music that I made was alright even though I didn't think that it was going to go
well. I started this experiment by looking up a tutorial on YouTube of the program and this helped me understand it because I hadn't used it in a
long time. I chose all the major instruments that are required in music such as piano, drums, guitar, bass and as an extra I decided to place some
techno keyboard sounds. I started by playing the piano, this could be done either way such as the computer keyboard or you can plug a keyboard
in. I chose to use the mouse and keyboard instead of a plug in and this turned out great but I think I should have given the other option a shot
and in my final production I may even use it because it is simpler. I liked the first keyboard part and thought that it even sounded like it should be
from a game, this is my favorite part of the soundtrack and depending on adventure soundtracks I will make it similar to this. The drums that I
selected where pre-set and it already had them in the program as a backing for soundtracks. The rest of the song was rather simple, I just played
single notes and try to make as decent a tune as possible which is very hard but I think that I pulled it off. To make the clips shorter I just had to
drag them inwards from the end and this cut it too the size I wanted. In the end I selected the loop tool and dragged it across and over my piece
so it was all selected and played again and again. I then didn't know how to export my music so I had to search it up and got the information
from a website. This was helpful and I learned for other future projects Including my final production process.
Step 1 Step 2
Step 3 Step 4
Step5
Final
Experiment
Process- 8 bit simple music
I used the music website beep box to make my music, this website I have used before but it was simple to understand since the music
always runs on a loop, you can make your own sets. The requirements I set for myself for the music were made as well, I made it 8 bit
music and it was simple and repetitive. This was not the only song I planned on making for the project I was going to make some others
later on for different parts of the game. I liked the song considering music is not really my talent I think it turned out fairly okay and it
works with the game idea in my head as of so far. BeepBox is an easy website to use, I made a really simple 8-bit track which repeats
itself in a loop, I feel like this was a little too simple though and I could have gone into better detail with it and made a full song out of it
but I am saving that for the final production. The best way to go about the soundtrack is to change your notes from high to low or vice
versa and I think this is really fantastic way to improve any song and make it have a steady flow and beat. To fill the track up more I also
played two different tracks on top of one another and this just made my music sound even better than it should. I didn’t use any of the
other option bars on the website to improve my song to change it for better or worse but I don’t think that it needs them being a part
of it. There was nothing else to mention about for this experiment except for the length which I would have worked on but I wanted to
spend my time elsewhere.
Process- Logo
I decided to experiment with tiny 3D world effects. This was
new too me and something that I have never tried before but
I had seen the idea before and decided that it would look
good for a logo for a video game or brand. I like the idea and
think that it is a really good idea. The actual 3D world itself
seems hard to make as I was looking up existing ones so I
decided to search up a step by step tutorial on how to create
one. Because I had run out of time I couldn’t make my own
3D world so I decided to use an existing one to create certain
mock-ups to see if it would be worth spending my time on to
make. I think that a world will be quiet hard to make but the
challenge is what will get me a better grade for my project. I
then tried to add different fonts and styles over the logo, I
started off simple and then decided to make the text arched
using the arc select button. The logo and title is important for
my video game because it starts off the concept and the
whole idea for the project so it will probably be the first thing
that I decide upon. To make this I may have to use a new
software that I have never used before and I am looking
forward too that and think that It will work out and be of
decent quality.
http://www.instructables.com/id/Tiny-Planet-
Photoshop-Tutorial-1/
Reflection
• What elements of your experiments will you include in your final product?
• From the experiments I shall take most of the aspects from nearly all of the experiments, mainly because they were all
useful to me and will use them in my project. The parts that I would like to take in to my final production are the aspects of
the video game such as the walk and talk cycle animation mainly because these will always be included in a video game and
they are very important to me to get as best a grade as possible. I am also going to use the same sound effects website in
my production because it was easy to understand and helpful. Every new thing that I have learned I am going to be taking
with me in to production because I believe that some of these will come in handy such as some of the tools on Photoshop. I
didn't make a game case in my experiment but I would like to in my final project and it will probably be the size of already
gaming cases which I will have to research their size, the rest should be simple from their. The wall art was a good idea but I
think that I am not going to be doing this but I shall do a poster and place it alongside with the game case but I will have to
focus on it and completely change it because I didn't like it in the experiment.
Bibliography
Page 2:TheGaragebandGuide. (2015). Garageband Tutorial For Beginners - Set Up Your Project. Available:
https://www.youtube.com/watch?v=DvBhY6aJ7N8. Last accessed 18th April 2018.
Page 2:CassandSaraMusic. (2016). Beepbox & OnlineSequencer Video Tutorial. Available:
https://www.youtube.com/watch?v=M0SF-nxVskE. Last accessed 18th April 2018.
Page 3:Flow Graphics. (2017). Isometric Pixel Art Tutorial | Photoshop CC. Available:
https://www.youtube.com/watch?v=zcD5AljC8x4. Last accessed 18th April 2018.
Page 3:Jaysen Batchelor. (2017). Pixel Game Art Design in Photoshop: Character animation & background
tutorial. Available: https://www.youtube.com/watch?v=0EDnAdJZNXA. Last accessed 18th April 2018.
Page 9:Anon. (.). Leshy SFDesigner. Available: https://www.leshylabs.com/apps/sfMaker/. Last accessed
24th April 2018.
Page 7:Photoshop Tutorials. (2016). Dispersion Effect: Photoshop Tutorial. Available:
https://www.youtube.com/watch?v=4xgOWWfurpU. Last accessed 24th April 2018.
Page 10:Anon. (.). Exporting a Podcast as an MP3 in GarageBand. Available:
https://mediacommons.psu.edu/2017/03/30/exporting-a-podcast-as-an-mp3-in-garageband/. Last
accessed 24th April 2018.
Page 12:CJR2000. (2015). TINY PLANET PHOTOSHOP TUTORIAL. Available:
http://www.instructables.com/id/Tiny-Planet-Photoshop-Tutorial-1/. Last accessed 26th April.
Page 11:Anon. (.). BeepBox. Available:
https://www.beepbox.co/#6n31s0kbl00e03t7m0a7g0fj7i0r1o3210T0w1f1d1c0h0v0T0w1f1d1c0h0v0T0w1f1d
1c0h0v0T2w1d1v0b4h4h4h4h4h4h4h4h4h4h4h4h4h4h4h4h4h4h4h4h4h4p16000000. Last accessed 27th
April 2018.

4. production experiments(1)

  • 1.
  • 2.
    Process https://www.youtube.com/watch?v=DvBhY6aJ7N8 https://www.youtube.com/watch?v=M0SF-nxVskE Music is goingto be an important part of my project and I will need to make my own sound track with my own original sounds, to do this I only know a few music apps/websites that can help me, the two which I will most likely be using are garageband and beebpox. Garageband is a line of digital audio workstations for MacOS and IOS that allows users to create music or podcasts. Its music and podcast creation system enables users to create multiple tracks in the system with pre- made instruments of different kinds, pre-made loops and allows various instrumental effects, and voice recordings and this is helpful towards different artists and anybody that wants to make their own music or soundtrack. I decided to watch a tutorial on how to use GarageBand because it has been a while before I have used this. I am not that good at music so I will definitely probably have to follow some guidelines that will help me out a little. This tutorial was very helpful towards me and taught me the basics and tools of how this works. I learned so many things from this but I may still have to get help from somebody else who can do music better than me and collaborate with them. An easier music maker which I could use is beepbox, I have used this before and know the way this works, it only creates 8-bit sound tracks though which doesn't go with my game but it will be my back up plan for the project in case anything else goes wrong. This tutorial taught me everything about this website, except I knew most of it already. I shall be using one of these in my final production for the project and think that it should go well and work. The difference between these is garage band has many more instruments and can vary massive where as beepbox is much more simplistic and doesn't change much. The tools/options that are provided in beepbox I did not use because I just don’t think they are necessary and that I could make a good song without them.
  • 3.
    Process https://www.youtube.com/watch?v=0E DnAdJZNXA https://www.youtube.com/watch?v=zcD5AljC8x4 The next tutorialI looked up was one on isometric in Photoshop and I did this because it was something different and never tried by me personally before. I have even learned 3 new tools and methods on Photoshop which I never knew previously from this tutorial: • If you press CMD + J it then it copy and duplicates a layer • If you untick the Anti-Alias option bar then It only fills in the inside of a shape. • When holding the ALT key changing the shape of an object it makes it symmetrical. These can all be of use to me for my final production of the project but also as well future projects. I already know most of the ins and outs of Photoshop but I decided to look up a tutorial on pixel art and the best way to go about it because I wanted to see the most efficient way to do my project as well as too see if I could learn something new. Photoshop is at times simplistic but it does have some complex tools as well. This tutorial helped me understand that the best way to go about my project would to be too draw my images first and then scan them in on the computer so I could go over them with certain tools to get the best outcome. I like Photoshop and think that it is a helpful program that I will be making my final product in.
  • 4.
    ProcessStep 1 Step 2 Step3 Step 4 Step 5 Final Image This is as simplistic with its graphic style as I would like to go with my final video game, I would prefer to make it much more detailed, if I were to do this then it would be an underground dungeon of some sort. I made this background because it looks like it could be from an adventure game, it looks like an underground dungeon which is a probably a form of quest. When I was making the experiment I had to use a lot of layers. And I had to create new ones or else everything would be stuck together. The layers had to be in a certain order otherwise the screen could all just be one colour instead of having all of the details of the game animation. I used Photoshop to deign a basic layout experiment. I made a similar idea but with a different character and different colours, the grey relates to video games and seems eerie. I made it by using large boxes on Photoshop. The background went well and looks pretty realistic. Even all the text was hand drawn by me which is how it is going to be for the end animation in my video game as well. With the background finished I exported it and I didn’t have enough time but if I did I would have animated it and then exported it, as well as gone with this into premier and edited it a bit and then added music and sound effects over the top of it but I have a few weeks which is plenty of time so I should get all of this done in the end of production for my deadline on this project. If this were an animation then too export it first I would have to save the document and then once this was done go to Image>Image Size and change the top number to 1080 PIXELS and the bottom box to Nearest Neighbour. Once this is done go to export and press render video and export, as a note do not save it just exit otherwise if I would have wanted to change it at a later date ten I could not. For my final product I am going to use some of these factors because it is completely different to my idea for my game, In genre and style but I like the idea of this as maybe like an underground dungeon quest of some sort.
  • 5.
    Process- isometric pixeldesignStep 1 Step 2 Step 3 Step 4 Step 5 Step 6 Step 7 Step 8 Final Image 1. To start the process I just watched the tutorial once and then just followed as best as I could. Firstly I opened up Photoshop, I have used this software before and I am fairly experienced at this. 2. The next step I took forward was deciding on a document size, because this was a small experiment project I made this fairly small and because it was isometric I made a square of 80x80 pixels but in my final production I will make my project larger by a few 100 more pixels. 3. The next part of the task was establishing the background colour and I just stuck plain and simple and decided grey, if I were to focus more on this at the time then I would have either made it look more like space or I would have gone floating island in the sky. 4. I then drew a diamond shape to start off the first isometric shape and I learned from this that if you untick anti-alias then the colour doesn’t go outside the lines, so I ended up with this finished diamond which I filled in with the colour green. 5. Once this was done I then pressed CMD + T to be able to change the shape, Then whilst holding CMD + ALT I dragged the top of the shape down. I then held CMD + J and duplicated the layer a bunch of times to get the isometric shape. 6. I then chose the colour of the island using the colour wheel and added darker shades to different sides to determine where the light was coming from and to add depth to the build. 7. I then did almost the exact same task and made a house which sat on the middle of the island. This was fairly easy to make. 8. The final part of the project was the tree on the island for detail and with this it was all hand drawn, I started by using the paint brush tool and drawing the shape of the tree, then I added in the simple two colours brown and green. This was good but to make it even better I made root rubbing out a few pixels from the bottom and I also added shades like the rest of the experiment, especially with the leaves using 3 different shades of green.
  • 6.
    Process-Walk and talkCycle Animation I wanted to make another aspect in-game so I decided upon a walk cycle. To start off the walk cycle I made a simple silhouette of a character, just because I could make this in a quick amount of time. The silhouette had around 8 different leg movements and this was so the character would look like it could walk when I animated the document. To make sure it went correctly I had to be careful and place each different movement on its own layer otherwise my animation cycle would have overlapped and completely failed. I didn't do this in the experiment but when using many layers, it is best to name them so you can tell them apart and select the correct layer at the time. After all of this was done then I went onto animating, to start this of I went into the options bar window and selected timeline as an option and this brought up a bar at the bottom. Once this bar is open then I went and pressed the three boxes in a line and this opened up the timeline tool that I needed for my experiment. I then added a new timeframe and hid all the layers apart from the one I needed on each frame to make the character look like they were walking. Once that was done I made a speech animation, first I had to make the characters face to know whose talking in the game. The character was in alright detail, this is the amount of detail I want to include in my final product. The character went in the bottom corner of the page and then after that I decided to draw a text box and then make my own text as well coming off from the character, so it was all original and hand drawn which is what I want for my final production process. If I had more time then I would then I would have liked to use sound effects to make the speech noise because although it doesn’t sound real at least theirs something there and some depth to the game.
  • 7.
    Process-Wall Art distortion https://www.youtube.com/watch?v=4xgOWW furpU Thenext experiment I decided to try out was a distortion/dispersion effect and I thought that would look best on some wall art. The image I chose was already existing and I just followed a tutorial along to get to the final image you see here. The tutorial was genuinely helpful and allowed me to experiment with something that I have never tried before. Whilst doing this I learned many different tools and such which will help me in my final production such as the shadow effect and the broken glass effect. This was good but wall art spreads over a number of picture frames so I decided to make a wall art frame template and place the image in the centre, once this was done I then stuck with the same colour on them all for consistency but I tried out a bunch of different patterns and designs to see which would best suit a final creation. I experimented with bevel and emboss effects which you can find when double clicking a layer. These created waves and rough dispersion effects. The other tool I tried was the paint brush spray tool where I tried spreading some sprayed pixels close and far apart. In my opinion the embossing effects look much better as a whole and if making this in my final production then I will probably create my own background image as well. The final result I ended up with was alright for an experiment but if I could change it then I wouldn’t use the brush.
  • 8.
    Process-Simple Poster Step 1Step 2 Step 3 Because I am making a video game and I want to home a little bit of my skills elsewhere, on this experiment I decided to create a poster. I once again used Photoshop for this experiment and didn’t try other software which was a much better idea and part of the task as well. I am basing my poster off others poster I found in my research. The poster size I chose was A4 portrait. The first step was too get the images for this I got a logo and character from an already existing game for my game I am going to create my own, I then put them central in the page and enlarged them this made it fill in more space and is an alright design. I then used colour overlay on both of these by double clicking on the layer and adjusting the opacity of the colour overlay to make it fully one colour. After that I placed a border on the background layer to do this I selected the stroke option and tick the box for inside then I just made it as big as I wanted, I made it quiet thick to make it look that little better. After all that I tried some different fonts for a title and this is the best one that I came up with that matched the game. I used the character tool which allowed me to spread out letters and text size In any direction. This was all very useful and these tools I will definitely use for posters but I don’t think that this was a good looking complete poster, so if I were to make one in my final production I will definitely change my approach towards making this.
  • 9.
    Process- Video Gamesound effects https://www.leshylabs.com/apps/sfMaker/ Another experiment which I tried was working with sound effects. These were from a website called leshylabs which I found after searching up for video game sound effect creator on Google. It was a fairly easy website to use, all I had too do was adjust the bars and tick certain boxes and then it would create different sounds. Their were a lot of bars and this made it so their was so many more different options of sounds I could achieve. All of the sounds that were created were useful because some of them were good and helpful and sounded like they would be good for a video game but then some of them that were made were just random unrelated sounds that wouldn't fit with a video game and what I was looking for. Many of the different options that I could play around with were a lot of things to do with frequency and noise because these made the noises sound the best. Even if you cant get a sound to how you want it I could just press random and that randomly generates a sound, sometimes this can be really good and exactly what I was looking for or if it isn't it just requires a little bit of tweaking. When making my final game in production I will definitely be using this because I think this experiment went well. The only pre-set I tried was NOISE and I didn’t like it but I never tried the others and should before making the final product.
  • 10.
    Process- GarageBand Soundtrack Asthe whole experiments were coming along, my garage band music that I made was alright even though I didn't think that it was going to go well. I started this experiment by looking up a tutorial on YouTube of the program and this helped me understand it because I hadn't used it in a long time. I chose all the major instruments that are required in music such as piano, drums, guitar, bass and as an extra I decided to place some techno keyboard sounds. I started by playing the piano, this could be done either way such as the computer keyboard or you can plug a keyboard in. I chose to use the mouse and keyboard instead of a plug in and this turned out great but I think I should have given the other option a shot and in my final production I may even use it because it is simpler. I liked the first keyboard part and thought that it even sounded like it should be from a game, this is my favorite part of the soundtrack and depending on adventure soundtracks I will make it similar to this. The drums that I selected where pre-set and it already had them in the program as a backing for soundtracks. The rest of the song was rather simple, I just played single notes and try to make as decent a tune as possible which is very hard but I think that I pulled it off. To make the clips shorter I just had to drag them inwards from the end and this cut it too the size I wanted. In the end I selected the loop tool and dragged it across and over my piece so it was all selected and played again and again. I then didn't know how to export my music so I had to search it up and got the information from a website. This was helpful and I learned for other future projects Including my final production process. Step 1 Step 2 Step 3 Step 4 Step5 Final Experiment
  • 11.
    Process- 8 bitsimple music I used the music website beep box to make my music, this website I have used before but it was simple to understand since the music always runs on a loop, you can make your own sets. The requirements I set for myself for the music were made as well, I made it 8 bit music and it was simple and repetitive. This was not the only song I planned on making for the project I was going to make some others later on for different parts of the game. I liked the song considering music is not really my talent I think it turned out fairly okay and it works with the game idea in my head as of so far. BeepBox is an easy website to use, I made a really simple 8-bit track which repeats itself in a loop, I feel like this was a little too simple though and I could have gone into better detail with it and made a full song out of it but I am saving that for the final production. The best way to go about the soundtrack is to change your notes from high to low or vice versa and I think this is really fantastic way to improve any song and make it have a steady flow and beat. To fill the track up more I also played two different tracks on top of one another and this just made my music sound even better than it should. I didn’t use any of the other option bars on the website to improve my song to change it for better or worse but I don’t think that it needs them being a part of it. There was nothing else to mention about for this experiment except for the length which I would have worked on but I wanted to spend my time elsewhere.
  • 12.
    Process- Logo I decidedto experiment with tiny 3D world effects. This was new too me and something that I have never tried before but I had seen the idea before and decided that it would look good for a logo for a video game or brand. I like the idea and think that it is a really good idea. The actual 3D world itself seems hard to make as I was looking up existing ones so I decided to search up a step by step tutorial on how to create one. Because I had run out of time I couldn’t make my own 3D world so I decided to use an existing one to create certain mock-ups to see if it would be worth spending my time on to make. I think that a world will be quiet hard to make but the challenge is what will get me a better grade for my project. I then tried to add different fonts and styles over the logo, I started off simple and then decided to make the text arched using the arc select button. The logo and title is important for my video game because it starts off the concept and the whole idea for the project so it will probably be the first thing that I decide upon. To make this I may have to use a new software that I have never used before and I am looking forward too that and think that It will work out and be of decent quality. http://www.instructables.com/id/Tiny-Planet- Photoshop-Tutorial-1/
  • 13.
    Reflection • What elementsof your experiments will you include in your final product? • From the experiments I shall take most of the aspects from nearly all of the experiments, mainly because they were all useful to me and will use them in my project. The parts that I would like to take in to my final production are the aspects of the video game such as the walk and talk cycle animation mainly because these will always be included in a video game and they are very important to me to get as best a grade as possible. I am also going to use the same sound effects website in my production because it was easy to understand and helpful. Every new thing that I have learned I am going to be taking with me in to production because I believe that some of these will come in handy such as some of the tools on Photoshop. I didn't make a game case in my experiment but I would like to in my final project and it will probably be the size of already gaming cases which I will have to research their size, the rest should be simple from their. The wall art was a good idea but I think that I am not going to be doing this but I shall do a poster and place it alongside with the game case but I will have to focus on it and completely change it because I didn't like it in the experiment.
  • 14.
    Bibliography Page 2:TheGaragebandGuide. (2015).Garageband Tutorial For Beginners - Set Up Your Project. Available: https://www.youtube.com/watch?v=DvBhY6aJ7N8. Last accessed 18th April 2018. Page 2:CassandSaraMusic. (2016). Beepbox & OnlineSequencer Video Tutorial. Available: https://www.youtube.com/watch?v=M0SF-nxVskE. Last accessed 18th April 2018. Page 3:Flow Graphics. (2017). Isometric Pixel Art Tutorial | Photoshop CC. Available: https://www.youtube.com/watch?v=zcD5AljC8x4. Last accessed 18th April 2018. Page 3:Jaysen Batchelor. (2017). Pixel Game Art Design in Photoshop: Character animation & background tutorial. Available: https://www.youtube.com/watch?v=0EDnAdJZNXA. Last accessed 18th April 2018. Page 9:Anon. (.). Leshy SFDesigner. Available: https://www.leshylabs.com/apps/sfMaker/. Last accessed 24th April 2018. Page 7:Photoshop Tutorials. (2016). Dispersion Effect: Photoshop Tutorial. Available: https://www.youtube.com/watch?v=4xgOWWfurpU. Last accessed 24th April 2018. Page 10:Anon. (.). Exporting a Podcast as an MP3 in GarageBand. Available: https://mediacommons.psu.edu/2017/03/30/exporting-a-podcast-as-an-mp3-in-garageband/. Last accessed 24th April 2018. Page 12:CJR2000. (2015). TINY PLANET PHOTOSHOP TUTORIAL. Available: http://www.instructables.com/id/Tiny-Planet-Photoshop-Tutorial-1/. Last accessed 26th April. Page 11:Anon. (.). BeepBox. Available: https://www.beepbox.co/#6n31s0kbl00e03t7m0a7g0fj7i0r1o3210T0w1f1d1c0h0v0T0w1f1d1c0h0v0T0w1f1d 1c0h0v0T2w1d1v0b4h4h4h4h4h4h4h4h4h4h4h4h4h4h4h4h4h4h4h4h4h4p16000000. Last accessed 27th April 2018.

Editor's Notes

  • #3 Discuss the tools and processes used in your experiments