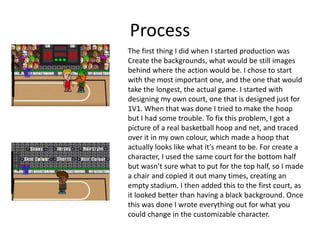
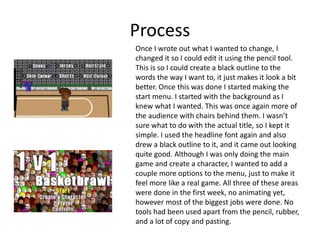
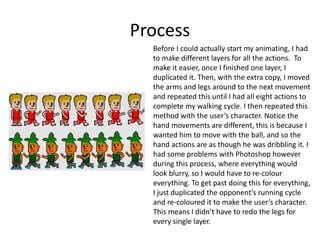
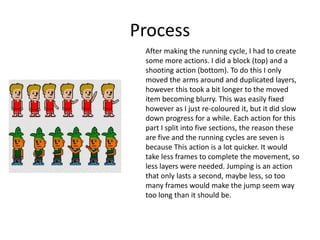
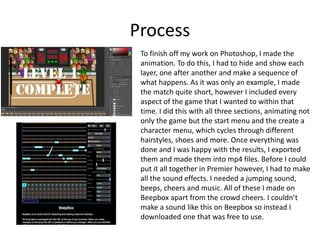
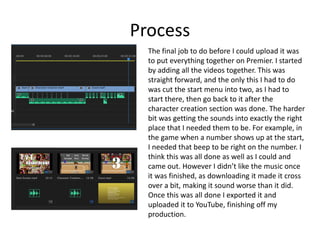
Production Reflection
Ewan Wild
Process
The first thing I did when I started production was
Create the backgrounds, what would be still images
behind where the action would be. I chose to start
with the most important one, and the one that would
take the longest, the actual game. I started with
designing my own court, one that is designed just for
1V1. When that was done I tried to make the hoop
but I had some trouble. To fix this problem, I got a
picture of a real basketball hoop and net, and traced
over it in my own colour, which made a hoop that
actually looks like what it’s meant to be. For create a
character, I used the same court for the bottom half
but wasn’t sure what to put for the top half, so I made
a chair and copied it out many times, creating an
empty stadium. I then added this to the first court, as
it looked better than having a black background. Once
this was done I wrote everything out for what you
could change in the customizable character.
Process
Once I wrote out what I wanted to change, I
changed it so I could edit it using the pencil tool.
This is so I could create a black outline to the
words the way I want to, it just makes it look a bit
better. Once this was done I started making the
start menu. I started with the background as I
knew what I wanted. This was once again more of
the audience with chairs behind them. I wasn’t
sure what to do with the actual title, so I kept it
simple. I used the headline font again and also
drew a black outline to it, and it came out looking
quite good. Although I was only doing the main
game and create a character, I wanted to add a
couple more options to the menu, just to make it
feel more like a real game. All three of these areas
were done in the first week, no animating yet,
however most of the biggest jobs were done. No
tools had been used apart from the pencil, rubber,
and a lot of copy and pasting.
Process
Before I could actually start my animating, I had
to make different layers for all the actions. To
make it easier, once I finished one layer, I
duplicated it. Then, with the extra copy, I moved
the arms and legs around to the next movement
and repeated this until I had all eight actions to
complete my walking cycle. I then repeated this
method with the user’s character. Notice the
hand movements are different, this is because I
wanted him to move with the ball, and so the
hand actions are as though he was dribbling it. I
had some problems with Photoshop however
during this process, where everything would
look blurry, so I would have to re-colour
everything. To get past doing this for everything,
I just duplicated the opponent’s running cycle
and re-coloured it to make the user’s character.
This means I didn’t have to redo the legs for
every single layer.
Process
After making the running cycle, I had to create
some more actions. I did a block (top) and a
shooting action (bottom). To do this I only
moved the arms around and duplicated layers,
however this took a bit longer to the moved
item becoming blurry. This was easily fixed
however as I just re-coloured it, but it did slow
down progress for a while. Each action for this
part I split into five sections, the reason these
are five and the running cycles are seven is
because This action is a lot quicker. It would
take less frames to complete the movement, so
less layers were needed. Jumping is an action
that only lasts a second, maybe less, so too
many frames would make the jump seem way
too long than it should be.
Process
To finish off my work on Photoshop, I made the
animation. To do this, I had to hide and show each
layer, one after another and make a sequence of
what happens. As it was only an example, I made
the match quite short, however I included every
aspect of the game that I wanted to within that
time. I did this with all three sections, animating not
only the game but the start menu and the create a
character menu, which cycles through different
hairstyles, shoes and more. Once everything was
done and I was happy with the results, I exported
them and made them into mp4 files. Before I could
put it all together in Premier however, I had to make
all the sound effects. I needed a jumping sound,
beeps, cheers and music. All of these I made on
Beepbox apart from the crowd cheers. I couldn’t
make a sound like this on Beepbox so instead I
downloaded one that was free to use.
Process
The final job to do before I could upload it was
to put everything together on Premier. I started
by adding all the videos together. This was
straight forward, and the only this I had to do
was cut the start menu into two, as I had to
start there, then go back to it after the
character creation section was done. The harder
bit was getting the sounds into exactly the right
place that I needed them to be. For example, in
the game when a number shows up at the start,
I needed that beep to be right on the number. I
think this was all done as well as I could and
came out. However I didn’t like the music once
it was finished, as downloading it made it cross
over a bit, making it sound worse than it did.
Once this was all done I exported it and
uploaded it to YouTube, finishing off my
production.

Games: Production Reflection

  • 1.
  • 2.
    Process The first thingI did when I started production was Create the backgrounds, what would be still images behind where the action would be. I chose to start with the most important one, and the one that would take the longest, the actual game. I started with designing my own court, one that is designed just for 1V1. When that was done I tried to make the hoop but I had some trouble. To fix this problem, I got a picture of a real basketball hoop and net, and traced over it in my own colour, which made a hoop that actually looks like what it’s meant to be. For create a character, I used the same court for the bottom half but wasn’t sure what to put for the top half, so I made a chair and copied it out many times, creating an empty stadium. I then added this to the first court, as it looked better than having a black background. Once this was done I wrote everything out for what you could change in the customizable character.
  • 3.
    Process Once I wroteout what I wanted to change, I changed it so I could edit it using the pencil tool. This is so I could create a black outline to the words the way I want to, it just makes it look a bit better. Once this was done I started making the start menu. I started with the background as I knew what I wanted. This was once again more of the audience with chairs behind them. I wasn’t sure what to do with the actual title, so I kept it simple. I used the headline font again and also drew a black outline to it, and it came out looking quite good. Although I was only doing the main game and create a character, I wanted to add a couple more options to the menu, just to make it feel more like a real game. All three of these areas were done in the first week, no animating yet, however most of the biggest jobs were done. No tools had been used apart from the pencil, rubber, and a lot of copy and pasting.
  • 4.
    Process Before I couldactually start my animating, I had to make different layers for all the actions. To make it easier, once I finished one layer, I duplicated it. Then, with the extra copy, I moved the arms and legs around to the next movement and repeated this until I had all eight actions to complete my walking cycle. I then repeated this method with the user’s character. Notice the hand movements are different, this is because I wanted him to move with the ball, and so the hand actions are as though he was dribbling it. I had some problems with Photoshop however during this process, where everything would look blurry, so I would have to re-colour everything. To get past doing this for everything, I just duplicated the opponent’s running cycle and re-coloured it to make the user’s character. This means I didn’t have to redo the legs for every single layer.
  • 5.
    Process After making therunning cycle, I had to create some more actions. I did a block (top) and a shooting action (bottom). To do this I only moved the arms around and duplicated layers, however this took a bit longer to the moved item becoming blurry. This was easily fixed however as I just re-coloured it, but it did slow down progress for a while. Each action for this part I split into five sections, the reason these are five and the running cycles are seven is because This action is a lot quicker. It would take less frames to complete the movement, so less layers were needed. Jumping is an action that only lasts a second, maybe less, so too many frames would make the jump seem way too long than it should be.
  • 6.
    Process To finish offmy work on Photoshop, I made the animation. To do this, I had to hide and show each layer, one after another and make a sequence of what happens. As it was only an example, I made the match quite short, however I included every aspect of the game that I wanted to within that time. I did this with all three sections, animating not only the game but the start menu and the create a character menu, which cycles through different hairstyles, shoes and more. Once everything was done and I was happy with the results, I exported them and made them into mp4 files. Before I could put it all together in Premier however, I had to make all the sound effects. I needed a jumping sound, beeps, cheers and music. All of these I made on Beepbox apart from the crowd cheers. I couldn’t make a sound like this on Beepbox so instead I downloaded one that was free to use.
  • 7.
    Process The final jobto do before I could upload it was to put everything together on Premier. I started by adding all the videos together. This was straight forward, and the only this I had to do was cut the start menu into two, as I had to start there, then go back to it after the character creation section was done. The harder bit was getting the sounds into exactly the right place that I needed them to be. For example, in the game when a number shows up at the start, I needed that beep to be right on the number. I think this was all done as well as I could and came out. However I didn’t like the music once it was finished, as downloading it made it cross over a bit, making it sound worse than it did. Once this was all done I exported it and uploaded it to YouTube, finishing off my production.

Editor's Notes

  • #3 Discuss the tools and processes used in your production. Log your thoughts and feelings about your work.
  • #4 Discuss the tools and processes used in your production. Log your thoughts and feelings about your work.
  • #5 Discuss the tools and processes used in your production. Log your thoughts and feelings about your work.
  • #6 Discuss the tools and processes used in your production. Log your thoughts and feelings about your work.
  • #7 Discuss the tools and processes used in your production. Log your thoughts and feelings about your work.