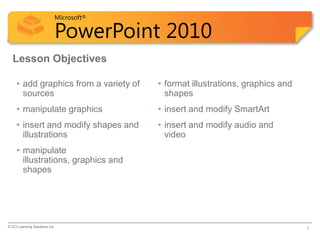
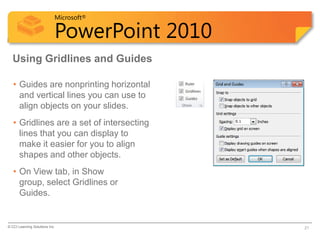
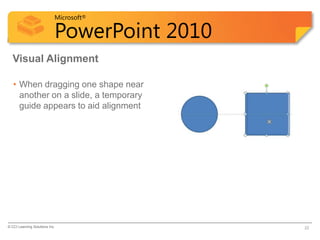
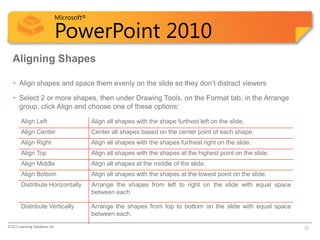
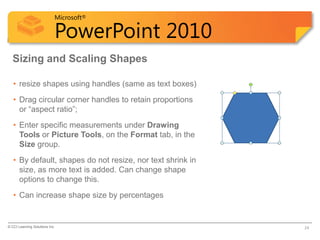
SlideShare a Scribd company logo
1 of 45
Microsoft®

        PowerPoint 2010

Microsoft Office
PowerPoint 2010
Lesson 3: Working with Illustrations
and other Media
Courseware #: 3246
Microsoft®

                            PowerPoint 2010
  Lesson Objectives

     • add graphics from a variety of    • format illustrations, graphics and
       sources                             shapes
     • manipulate graphics               • insert and modify SmartArt
     • insert and modify shapes and      • insert and modify audio and
       illustrations                       video
     • manipulate
       illustrations, graphics and
       shapes


© CCI Learning Solutions Inc.                                                   2
Microsoft®

                            PowerPoint 2010
  Using Pictures

   • an external graphical object that you add to a slide to illustrate a point.
   • an easy way to liven up a slide and add visual appeal
   • can enhance points presented in text form, making them easier to
     understand and making slides more attractive.


© CCI Learning Solutions Inc.                                                      3
Microsoft®

                            PowerPoint 2010
  Inserting Pictures from Files

   • Some slide layouts provide a placeholder for a picture
     (e.g. Title and Content, Two
     Content, Comparison, Content with Caption, and Picture
     with Caption)
   • To add a picture to a slide with a picture placeholder, click
     Insert Picture from File in the placeholder.
   • To add a picture to a slide with no picture placeholder, on
     the Insert tab, in the Images group, click Picture.


© CCI Learning Solutions Inc.                                        4
Microsoft®

                            PowerPoint 2010
  Inserting Pictures from Files

   • 3 insertion options:

       Insert                        Picture is embedded in presentation and
                                     can only be changed by removing and
                                     re-inserting.
       Link to File                  Picture is stored outside presentation and
                                     will be updated in presentation if picture
                                     changes.
       Insert and Link               Picture is embedded in presentation and
                                     linked to external file for updating.


© CCI Learning Solutions Inc.                                                     5
Microsoft®

                            PowerPoint 2010
  Modifying Pictures

   • Many options on Picture Tools ribbon, including:
          – Brightness and Contrast
          – Sharpen and Soften
          – Color Saturation and Tone
          – Artistic Effects
          – Picture Styles, Borders, and Effect


© CCI Learning Solutions Inc.                           6
Microsoft®

                            PowerPoint 2010
  Picture Corrections

   • Use when picture is not quite
     perfect
   • Sharpen blurry pictures or soften
     for a more subdued effect
   • Adjust brightness and contrast
     for pictures that are too dark or
     light


© CCI Learning Solutions Inc.                 7
Microsoft®

                            PowerPoint 2010
  Picture Color

   • Make picture warmer or cooler
   • apply a color effect


© CCI Learning Solutions Inc.                 8
Microsoft®

                            PowerPoint 2010
  Artistic Effects

   • Add visual interest with an
     artistic effect


© CCI Learning Solutions Inc.                 9
Microsoft®

                            PowerPoint 2010
  Picture Styles and Borders

   • Frames, borders and effects
     enhance less interesting pictures


© CCI Learning Solutions Inc.                 10
Microsoft®

                            PowerPoint 2010
  Crop a Picture

   • Remove unneeded content from
     a picture to focus viewer on most
     significant areas


© CCI Learning Solutions Inc.                 11
Microsoft®

                            PowerPoint 2010
  Reset or Change Picture

   • Remove all formatting with Reset
     Picture
   • Keep formatting but change picture with
     Change Picture


© CCI Learning Solutions Inc.                  12
Microsoft®

                            PowerPoint 2010
  Compressing Pictures

   • Presentation can become a large file
     with many images
   • Harder to email and copy
   • Can compress images and remove
     cropped portions to reduce file size
   • Optimize images for print, screen or
     email
   • To compress pictures:
          – click File, click Save As, and click
            Tools. Click Compress Pictures; or
          – select a picture, then under
            Drawing Tools, on the Format
            tab, in the Adjust group, click
            Compress Pictures.
© CCI Learning Solutions Inc.                      13
Microsoft®

                            PowerPoint 2010
  Inserting Clip Art
   • Clip Organizer contains
          – drawings,
          – photographs,
          – sounds,
          – videos; and
          – other media files.

   • insert into a presentation to add impact and
     illustrate specific concepts.

   • To insert Clip Art, on the Insert tab, in the
     Illustrations group, click Clip Art.

   • Enter search criteria and click Go

   • Limit results to specific types of clip art (e.g.
     just photographs)

   • Click result to insert
© CCI Learning Solutions Inc.                            14
Microsoft®

                            PowerPoint 2010
  Inserting Shapes

   • Use shapes to create a diagram or illustration that
     visually displays data, key points or graphically
     illustrates complicated ideas.
   • To insert shapes, use one of the following
     methods:
          – On the Home tab, in the Drawing group, click a
            shape and drag the mouse cursor on the slide to form
            the shape, or
          – on the Insert tab, in the Illustrations group, click
            Shapes, click a shape and drag the mouse cursor on
            the slide to form the shape, or
                                                                   New
          – under Drawing Tools, on the Format tab, in the
            Insert Shapes group, click a shape and drag the
            mouse cursor on the slide to form the shape.
   • Hold Shift or Ctrl to draw straight lines or
     symmetric shapes
   • Add text to a shape by typing right after creating
     shape

© CCI Learning Solutions Inc.                                            15
Microsoft®

                            PowerPoint 2010
  Selecting and Moving Shapes

   • Click on shape to select, or use
     Selection Pane
   • Click and drag shape to reposition
     on slide, or use arrow keys


© CCI Learning Solutions Inc.                 16
Microsoft®

                            PowerPoint 2010
  Formatting Illustrations and Shapes

   • Apply a Quick Style; or
   • add outline, fill or effect.
   • Format text within shape
     separately


© CCI Learning Solutions Inc.                 17
Microsoft®

                            PowerPoint 2010
  Inserting Hyperlinks

   • Text or an object that you can click when viewing a slide to:
          – move to another slide,

          – open another presentation,

          – open some other type of document, such as a Word document or an Excel worksheet,
            or

          – open a web site.

   • To insert a hyperlink, select text or object, then:
          – On the Insert tab, in the Links group, click Hyperlink, or

          – press Ctrl+K , or

          – right-click and click Hyperlink.

© CCI Learning Solutions Inc.                                                                  18
Microsoft®

                            PowerPoint 2010
  Arranging Illustrations and Shapes

   • if illustrations and shapes are not aligned, it can be very
     distracting to the audience and look unprofessional.
   • Can use ruler, gridlines, and guides to help arrange shapes


© CCI Learning Solutions Inc.                                      19
Microsoft®

                            PowerPoint 2010
  Using the Ruler

   • on the View tab, in the Show/Hide group, click Ruler
   • units of measurement are determined by the regional settings in
     Windows


© CCI Learning Solutions Inc.                                          20
Microsoft®

                            PowerPoint 2010
  Using Gridlines and Guides

   • Guides are nonprinting horizontal
     and vertical lines you can use to
     align objects on your slides.
   • Gridlines are a set of intersecting
     lines that you can display to
     make it easier for you to align
     shapes and other objects.
   • On View tab, in Show
     group, select Gridlines or
     Guides.


© CCI Learning Solutions Inc.                 21
Microsoft®

                            PowerPoint 2010
  Visual Alignment

   • When dragging one shape near
     another on a slide, a temporary
     guide appears to aid alignment


© CCI Learning Solutions Inc.                 22
Microsoft®

                            PowerPoint 2010
  Aligning Shapes

   • Align shapes and space them evenly on the slide so they don’t distract viewers

   • Select 2 or more shapes, then under Drawing Tools, on the Format tab, in the Arrange
     group, click Align and choose one of these options:

        Align Left                       Align all shapes with the shape furthest left on the slide.
        Align Center                     Center all shapes based on the center point of each shape.
        Align Right                      Align all shapes with the shapes furthest right on the slide.
        Align Top                        Align all shapes with the shapes at the highest point on the slide.
        Align Middle                     Align all shapes at the middle of the slide.
        Align Bottom                     Align all shapes with the shapes at the lowest point on the slide.
        Distribute Horizontally          Arrange the shapes from left to right on the slide with equal space
                                         between each.

        Distribute Vertically            Arrange the shapes from top to bottom on the slide with equal space
                                         between each.
© CCI Learning Solutions Inc.                                                                                  23
Microsoft®

                            PowerPoint 2010
  Sizing and Scaling Shapes

   • resize shapes using handles (same as text boxes)
   • Drag circular corner handles to retain proportions
     or “aspect ratio”;
   • Enter specific measurements under Drawing
     Tools or Picture Tools, on the Format tab, in the
     Size group.
   • By default, shapes do not resize, nor text shrink in
     size, as more text is added. Can change shape
     options to change this.
   • Can increase shape size by percentages


© CCI Learning Solutions Inc.                               24
Microsoft®

                            PowerPoint 2010
  Rotating Shapes

   • Rotate or flip shapes vertically or
     horizontally:
          – On the Home tab, in the Drawing
            group, click Arrange, and click
            Rotate, or

          – under Drawing Tools or Picture
            Tools, on the Format tab, in the
            Arrange group, click Rotate, or

          – drag the Rotation handle (green
            circular handle) in a circular
            movement.


© CCI Learning Solutions Inc.                  25
Microsoft®

                            PowerPoint 2010
  Changing the Order of Content

   • Shapes may overlap, but not in the right order
   • Can change how shapes overlap, by moving them in this way:

        Bring to the
                                  Bring the shape to the front of all shapes.
        Front
        Bring Forward             Bring the shape from behind the shape directly in front of it.
        Send to the
                                  Send the shape to the back of all shapes.
        Back
        Send
                                  Send the shape to behind the shape directly behind it.
        Backward


© CCI Learning Solutions Inc.                                                                      26
Microsoft®

                            PowerPoint 2010
  Grouping and Ungrouping Content

   • Group shapes in a completed diagram to
          – Prevent accidental moving of individual shapes

          – More easily cut, copy, paste or move entire diagram within presentation

   • Can temporarily ungroup to edit a shape, then regroup
   • To group shapes, use one of the following methods:
          – On the Home tab, in the Drawing group, click Arrange and click Group, or

          – under Drawing Tools or Picture Tools, on the Format tab, in the Arrange group, click
            Group, or

          – right-click the shape and click Group.


© CCI Learning Solutions Inc.                                                                      27
Microsoft®

                            PowerPoint 2010
  Inserting a Photo Album

   • A photo album is a presentation for showing
     photographs
   • Can add captions, adjust order and layout, and add
     frames.
   • Can also add effects, such as
     transitions, backgrounds and themes.
   • To create a photo album, on the Insert tab, in the
     Illustrations group, click Photo Album.


© CCI Learning Solutions Inc.                             28
Microsoft®

                            PowerPoint 2010
  Inserting a Photo Album
  Insert picture from               Use File/Disk to navigate to where the picture files are located.
  Insert text                       Create a new text box to enter text or information about this picture.
  Pictures in album                 Lists the files included in the photo album. Use the Up or Down buttons
                                    below this list to rearrange the order of the file list, or use Remove to delete
                                    a file from the list.
  Preview                           Displays a preview of each file selected in the Pictures in album list. Use the
                                    buttons across the bottom of the preview box to adjust the rotation, contrast
                                    or brightness of the picture.
  Picture Options                   Choose whether to have caption boxes below the pictures, such as names
                                    of people or product identifiers, or to show the pictures in black and white
                                    for a different effect.
  Picture layout                    Choose how you want the pictures laid out in the photo album.
  Frame shape                       Choose the shape for the frame around each picture. This field is available
                                    when you choose any option other than Fit to slide.
  Theme                             Add a theme for the photo album.
© CCI Learning Solutions Inc.                                                                                      29
Microsoft®

                            PowerPoint 2010
  Working with SmartArt

   • Challenging to create
     professional or artistic
     illustrations from individual       Shapes       Pictures
     shapes
   • Use SmartArt: pre-built
     illustration templates              ClipArt    Illustrations
   • Easy to add text and style

                                               SmartArt


© CCI Learning Solutions Inc.                                       30
Microsoft®

                            PowerPoint 2010
  Inserting SmartArt

   • To add a SmartArt graphic to a
     slide with a SmartArt graphic
     placeholder, click Insert
     SmartArt Graphic; or
   • to add a SmartArt graphic to a
     slide without a SmartArt graphic
     placeholder, on the Insert tab, in
     the Illustrations group, click
     SmartArt.
   • Select type of SmartArt shape
     closest to content (can easily
     change after entering text)
© CCI Learning Solutions Inc.                 31
Microsoft®

                            PowerPoint 2010
  Diagram Types

    List                          Show non-sequential information.

    Process                       Show steps in a process or timeline.

    Cycle                         Show a continual process.

    Hierarchy                     Create an organization chart.

    Hierarchy                     Show a decision tree.

    Relationship                  Illustrate connections.

    Matrix                        Show how parts relate to a whole.

    Pyramid                       Show proportional relationships with the largest component
                                  on the top or bottom.


© CCI Learning Solutions Inc.                                                                  32
Microsoft®

                            PowerPoint 2010
  Using the Text Pane

   • Text pane is like a bulleted list:
     associates text with a SmartArt
     shape.
   • Use  and  to move through
     entries in pane
   • Use Tab and Shift+Tab to
     demote and promote entries
   • Use Enter for more entries


© CCI Learning Solutions Inc.                 33
Microsoft®

                            PowerPoint 2010
  Using SmartArt Styles

   • Under SmartArt Tools, on the Design Tab, you can:
          – Change Colors

          – Select a SmartArt Style, including 3D effects

          – Change the diagram type

          – Reset the SmartArt graphic back to the original design


© CCI Learning Solutions Inc.                                        34
Microsoft®

                            PowerPoint 2010
  Adding or Removing Shapes

   • Can add or remove text in Text pane;
     or

   • Under SmartArt Tools, on the Design
     tab, in the Create Graphic group, click
          – Add Shape

          – Add Shape After

          – Add Shape Before

          – Add Shape Above

          – Add Shape Below

   • Click shape and press Delete to
     remove
© CCI Learning Solutions Inc.                  35
Microsoft®

                            PowerPoint 2010
  Converting Text to SmartArt

   • Can easily select text already in
     a placeholder or text box and
     convert to a SmartArt graphic
   • Click the text placeholder, and
     then on the Home tab, in the
     Paragraph group, click Convert
     to SmartArt Graphic, then
     select a layout


© CCI Learning Solutions Inc.                 36
Microsoft®

                            PowerPoint 2010
  Converting SmartArt to Text or Shapes

   • Converting SmartArt to shapes or text allows you to create a custom
     design not available as a SmartArt, or simply remove the SmartArt
   • Under SmartArt Tools, on the Design tab, click Convert, then Convert to
     Text or Convert to Shapes.
   • Can no longer be edited as SmartArt


© CCI Learning Solutions Inc.                                                  37
Microsoft®

                            PowerPoint 2010
  Using Sounds

   • Begin or end presentation with
     music
   • Use sound effects with animation
   • Play sounds directly related to
     presentation content
   • To insert a sound from a file, on
     the Insert tab, in the Media
     group, click Audio.


© CCI Learning Solutions Inc.                 38
Microsoft®

                            PowerPoint 2010
  Using Sounds

   • Under Audio Tools, on Playback tab, adjust sound options:
          – Trim start and end of sound

          – Fade sound in or out

          – Raise or lower volume

          – Loop until stopped


© CCI Learning Solutions Inc.                                    39
Microsoft®

                            PowerPoint 2010
  Using Movies

   • Could use movies to:
          – Play a speaker not in attendance

          – Demonstrate products or deliver training

   • Movies are desktop video files with formats
     such as AVI or MPEG and file extensions
     such as .avi, .mov, .mpg, and .mpeg
   • To insert a movie from a file, on the Insert tab,
     in the Media Clips group, click Video.


© CCI Learning Solutions Inc.                            40
Microsoft®

                            PowerPoint 2010
  Using Movies

   • Under Video Tools, on Playback tab, adjust movie options:
          – Trim start and end of movie
          – Fade movie in or out
          – Raise or lower volume
          – Adjust start to play automatically
          – Play full screen
          – Loop until stopped


© CCI Learning Solutions Inc.                                    41
Microsoft®

                            PowerPoint 2010
  Using Movies

   • Under Video Tools, on Format tab, adjust movie border style or frame or
     other visual effects (similar to effects on pictures and clip art)


© CCI Learning Solutions Inc.                                                  42
Microsoft®

                            PowerPoint 2010
  Lesson Summary

     • add graphics from a variety of    • format illustrations, graphics and
       sources                             shapes
     • manipulate graphics               • insert and modify SmartArt
     • insert and modify shapes and      • insert and modify audio and
       illustrations                       video
     • manipulate illustrations,
       graphics and shapes


© CCI Learning Solutions Inc.                                                   43
Microsoft®

                            PowerPoint 2010
  Review Questions

   1.         What is a benefit of linking to a picture rather than inserting a picture on a slide?

   2.         How do you change a shape from an oval to a rectangle without removing the oval and
              inserting a rectangle?

   3.         How do you quickly remove all illustration effects from a picture?

   4.         How do you remove parts of a picture?

   5.         How do you hide or show the guides?

   6.         How do you insert clip art?

   7.         What is the difference between Bring to the Front and Bring Forward?

   8.         What is a benefit of grouping shapes?

   9.         Why are SmartArt graphics used in presentations?

© CCI Learning Solutions Inc.                                                                         44
Microsoft®

                            PowerPoint 2010
  Review Questions

   10.        How do you demote bulleted text in the Text pane when creating a SmartArt graphic?

   11.        How do you convert text to a SmartArt graphic?

   12.        How do you quickly remove SmartArt graphic formatting?

   13.        How do you change the layout of SmartArt graphics?

   14.        How do you add a shape before another shape in a SmartArt graphic?

   15.        How do you delete a shape in a SmartArt graphic?

   16.        How do you quickly change the colors of a SmartArt graphic?

   17.        How do you insert a sound from the clip organizer?

   18.        How do you modify a sound to play across all slides?


© CCI Learning Solutions Inc.                                                                      45

More Related Content

What's hot

Advanced Presentation Skills - Empowerment Technologies
Advanced Presentation Skills - Empowerment TechnologiesAdvanced Presentation Skills - Empowerment Technologies
Advanced Presentation Skills - Empowerment TechnologiesMark Jhon Oxillo
 
Web Page Creation
Web Page CreationWeb Page Creation
Web Page CreationRastaman05
 
[EMPOWERMENT TECHNOLOGIES]-ADVANCED PRESENTATION SKILLS
[EMPOWERMENT TECHNOLOGIES]-ADVANCED PRESENTATION SKILLS[EMPOWERMENT TECHNOLOGIES]-ADVANCED PRESENTATION SKILLS
[EMPOWERMENT TECHNOLOGIES]-ADVANCED PRESENTATION SKILLSJazzyNF
 
Learning Photoshop CS6 with 100 practical exercises
Learning Photoshop CS6 with 100 practical exercisesLearning Photoshop CS6 with 100 practical exercises
Learning Photoshop CS6 with 100 practical exercisesMCB Press
 
Introduction to PowerPoint 2007
Introduction to PowerPoint 2007Introduction to PowerPoint 2007
Introduction to PowerPoint 2007misscrawleymfl
 
what is Microsoft Powerpoint
what is Microsoft Powerpointwhat is Microsoft Powerpoint
what is Microsoft Powerpointajeet kumar
 
Powerpoint 2013 tutorial
Powerpoint 2013 tutorial Powerpoint 2013 tutorial
Powerpoint 2013 tutorial 18goodm
 
Ms Word 2010 Training In Ambala ! Batra Computer Centre
Ms Word 2010 Training In Ambala ! Batra Computer CentreMs Word 2010 Training In Ambala ! Batra Computer Centre
Ms Word 2010 Training In Ambala ! Batra Computer Centrejatin batra
 
PowerPoint on Powerpoint
PowerPoint on PowerpointPowerPoint on Powerpoint
PowerPoint on PowerpointKBLibrary
 
LESSON 5 ADVANCE PRESENTATION SKILLS
LESSON 5 ADVANCE PRESENTATION SKILLSLESSON 5 ADVANCE PRESENTATION SKILLS
LESSON 5 ADVANCE PRESENTATION SKILLSbonzy_30
 

What's hot (20)

Advanced Presentation Skills - Empowerment Technologies
Advanced Presentation Skills - Empowerment TechnologiesAdvanced Presentation Skills - Empowerment Technologies
Advanced Presentation Skills - Empowerment Technologies
 
PowerPoint Lesson 1: PowerPoint Basics
PowerPoint Lesson 1: PowerPoint BasicsPowerPoint Lesson 1: PowerPoint Basics
PowerPoint Lesson 1: PowerPoint Basics
 
What is Powerpoint
What is PowerpointWhat is Powerpoint
What is Powerpoint
 
MS PowerPoint Essential Training- Module 1
MS PowerPoint Essential Training- Module 1MS PowerPoint Essential Training- Module 1
MS PowerPoint Essential Training- Module 1
 
Web Page Creation
Web Page CreationWeb Page Creation
Web Page Creation
 
[EMPOWERMENT TECHNOLOGIES]-ADVANCED PRESENTATION SKILLS
[EMPOWERMENT TECHNOLOGIES]-ADVANCED PRESENTATION SKILLS[EMPOWERMENT TECHNOLOGIES]-ADVANCED PRESENTATION SKILLS
[EMPOWERMENT TECHNOLOGIES]-ADVANCED PRESENTATION SKILLS
 
Ms powerpoint 2013
Ms powerpoint 2013Ms powerpoint 2013
Ms powerpoint 2013
 
Learning Photoshop CS6 with 100 practical exercises
Learning Photoshop CS6 with 100 practical exercisesLearning Photoshop CS6 with 100 practical exercises
Learning Photoshop CS6 with 100 practical exercises
 
PPT Lesson 4
PPT Lesson 4PPT Lesson 4
PPT Lesson 4
 
Introduction to PowerPoint 2007
Introduction to PowerPoint 2007Introduction to PowerPoint 2007
Introduction to PowerPoint 2007
 
what is Microsoft Powerpoint
what is Microsoft Powerpointwhat is Microsoft Powerpoint
what is Microsoft Powerpoint
 
Microsoft power point 2007
Microsoft power point 2007Microsoft power point 2007
Microsoft power point 2007
 
Powerpoint 2013 tutorial
Powerpoint 2013 tutorial Powerpoint 2013 tutorial
Powerpoint 2013 tutorial
 
Ms Word 2010 Training In Ambala ! Batra Computer Centre
Ms Word 2010 Training In Ambala ! Batra Computer CentreMs Word 2010 Training In Ambala ! Batra Computer Centre
Ms Word 2010 Training In Ambala ! Batra Computer Centre
 
Wix tutorial
Wix tutorialWix tutorial
Wix tutorial
 
PowerPoint on Powerpoint
PowerPoint on PowerpointPowerPoint on Powerpoint
PowerPoint on Powerpoint
 
Intro. to PowerPoint
Intro. to PowerPointIntro. to PowerPoint
Intro. to PowerPoint
 
LESSON 5 ADVANCE PRESENTATION SKILLS
LESSON 5 ADVANCE PRESENTATION SKILLSLESSON 5 ADVANCE PRESENTATION SKILLS
LESSON 5 ADVANCE PRESENTATION SKILLS
 
PowerPoint Tutorial
PowerPoint TutorialPowerPoint Tutorial
PowerPoint Tutorial
 
PPT Lesson 5
PPT Lesson 5PPT Lesson 5
PPT Lesson 5
 

Viewers also liked

Beginners' Guide to Powerpoint
Beginners' Guide to PowerpointBeginners' Guide to Powerpoint
Beginners' Guide to PowerpointLaura Hampton
 
How to create a basic power point presentation
How to create a basic power point presentationHow to create a basic power point presentation
How to create a basic power point presentationjoluisae
 
Summary powerpoint lesson 3 CLIL
Summary powerpoint lesson 3 CLILSummary powerpoint lesson 3 CLIL
Summary powerpoint lesson 3 CLILjanorom
 
10 Powerful Body Language Tips for your next Presentation
10 Powerful Body Language Tips for your next Presentation10 Powerful Body Language Tips for your next Presentation
10 Powerful Body Language Tips for your next PresentationSOAP Presentations
 
PowerPoint Tutorial Presentation - Tips & Tricks
PowerPoint Tutorial Presentation - Tips & TricksPowerPoint Tutorial Presentation - Tips & Tricks
PowerPoint Tutorial Presentation - Tips & TricksNiezette -
 
The Search for Meaning in B2B Marketing
The Search for Meaning in B2B MarketingThe Search for Meaning in B2B Marketing
The Search for Meaning in B2B MarketingVelocity Partners
 
SMOKE - The Convenient Truth [1st place Worlds Best Presentation Contest] by ...
SMOKE - The Convenient Truth [1st place Worlds Best Presentation Contest] by ...SMOKE - The Convenient Truth [1st place Worlds Best Presentation Contest] by ...
SMOKE - The Convenient Truth [1st place Worlds Best Presentation Contest] by ...Empowered Presentations
 
Steps to Make a PPT
Steps to Make a PPTSteps to Make a PPT
Steps to Make a PPTdonnar7
 
Microsoft Power Point
Microsoft Power PointMicrosoft Power Point
Microsoft Power PointOwly Eyes
 
Computer Basics 101 Slide Show Presentation
Computer Basics 101 Slide Show PresentationComputer Basics 101 Slide Show Presentation
Computer Basics 101 Slide Show Presentationsluget
 
Tweet Tweet Tweet Twitter
Tweet Tweet Tweet TwitterTweet Tweet Tweet Twitter
Tweet Tweet Tweet TwitterJimmy Jay
 
16 things that Panhandlers can teach us about Content Marketing
16 things that Panhandlers can teach us about Content Marketing16 things that Panhandlers can teach us about Content Marketing
16 things that Panhandlers can teach us about Content MarketingBrad Farris
 
Cubicle Ninjas' Code of Honor
Cubicle Ninjas' Code of HonorCubicle Ninjas' Code of Honor
Cubicle Ninjas' Code of HonorCubicle Ninjas
 
Hashtag 101 - All You Need to Know About Hashtags
Hashtag 101 - All You Need to Know About HashtagsHashtag 101 - All You Need to Know About Hashtags
Hashtag 101 - All You Need to Know About HashtagsModicum
 
The Do's and Don'ts of Presentations
The Do's and Don'ts of Presentations The Do's and Don'ts of Presentations
The Do's and Don'ts of Presentations Cubicle Ninjas
 
Using Color to Convey Data in Charts
Using Color to Convey Data in ChartsUsing Color to Convey Data in Charts
Using Color to Convey Data in ChartsZingChart
 

Viewers also liked (20)

Beginners' Guide to Powerpoint
Beginners' Guide to PowerpointBeginners' Guide to Powerpoint
Beginners' Guide to Powerpoint
 
How to create a basic power point presentation
How to create a basic power point presentationHow to create a basic power point presentation
How to create a basic power point presentation
 
Summary powerpoint lesson 3 CLIL
Summary powerpoint lesson 3 CLILSummary powerpoint lesson 3 CLIL
Summary powerpoint lesson 3 CLIL
 
10 Powerful Body Language Tips for your next Presentation
10 Powerful Body Language Tips for your next Presentation10 Powerful Body Language Tips for your next Presentation
10 Powerful Body Language Tips for your next Presentation
 
How Google Works
How Google WorksHow Google Works
How Google Works
 
PowerPoint Tutorial Presentation - Tips & Tricks
PowerPoint Tutorial Presentation - Tips & TricksPowerPoint Tutorial Presentation - Tips & Tricks
PowerPoint Tutorial Presentation - Tips & Tricks
 
The Search for Meaning in B2B Marketing
The Search for Meaning in B2B MarketingThe Search for Meaning in B2B Marketing
The Search for Meaning in B2B Marketing
 
SMOKE - The Convenient Truth [1st place Worlds Best Presentation Contest] by ...
SMOKE - The Convenient Truth [1st place Worlds Best Presentation Contest] by ...SMOKE - The Convenient Truth [1st place Worlds Best Presentation Contest] by ...
SMOKE - The Convenient Truth [1st place Worlds Best Presentation Contest] by ...
 
PowerPoint 2010
PowerPoint 2010PowerPoint 2010
PowerPoint 2010
 
Steps to Make a PPT
Steps to Make a PPTSteps to Make a PPT
Steps to Make a PPT
 
Microsoft Power Point
Microsoft Power PointMicrosoft Power Point
Microsoft Power Point
 
Ms powerpoint
Ms powerpointMs powerpoint
Ms powerpoint
 
Computer Basics 101 Slide Show Presentation
Computer Basics 101 Slide Show PresentationComputer Basics 101 Slide Show Presentation
Computer Basics 101 Slide Show Presentation
 
Tweet Tweet Tweet Twitter
Tweet Tweet Tweet TwitterTweet Tweet Tweet Twitter
Tweet Tweet Tweet Twitter
 
16 things that Panhandlers can teach us about Content Marketing
16 things that Panhandlers can teach us about Content Marketing16 things that Panhandlers can teach us about Content Marketing
16 things that Panhandlers can teach us about Content Marketing
 
Cubicle Ninjas' Code of Honor
Cubicle Ninjas' Code of HonorCubicle Ninjas' Code of Honor
Cubicle Ninjas' Code of Honor
 
Email and tomorrow
Email and tomorrowEmail and tomorrow
Email and tomorrow
 
Hashtag 101 - All You Need to Know About Hashtags
Hashtag 101 - All You Need to Know About HashtagsHashtag 101 - All You Need to Know About Hashtags
Hashtag 101 - All You Need to Know About Hashtags
 
The Do's and Don'ts of Presentations
The Do's and Don'ts of Presentations The Do's and Don'ts of Presentations
The Do's and Don'ts of Presentations
 
Using Color to Convey Data in Charts
Using Color to Convey Data in ChartsUsing Color to Convey Data in Charts
Using Color to Convey Data in Charts
 

Similar to Microsoft PowerPoint 2010 Lesson 3 Working with Illustrations

Word Lesson 8A Pictures
Word Lesson 8A PicturesWord Lesson 8A Pictures
Word Lesson 8A Picturesdeborahburns
 
Word lesson 8 power point
Word lesson 8 power pointWord lesson 8 power point
Word lesson 8 power pointfgc013
 
Word Lesson 8B Shapes
Word Lesson 8B ShapesWord Lesson 8B Shapes
Word Lesson 8B Shapesdeborahburns
 
Word Lesson 8C Smartart & Screenshots
Word Lesson 8C Smartart & ScreenshotsWord Lesson 8C Smartart & Screenshots
Word Lesson 8C Smartart & Screenshotsdeborahburns
 
Word Lesson 5D Backgrounds
Word Lesson 5D BackgroundsWord Lesson 5D Backgrounds
Word Lesson 5D Backgroundsdeborahburns
 
The effective use of power point
The effective use of power pointThe effective use of power point
The effective use of power pointabie01523
 
2579 microsoft powerpoint2010_rtm_wsg_external
2579 microsoft powerpoint2010_rtm_wsg_external2579 microsoft powerpoint2010_rtm_wsg_external
2579 microsoft powerpoint2010_rtm_wsg_externalLily2479
 
2579 microsoft powerpoint2010_rtm_wsg_external (1)
2579 microsoft powerpoint2010_rtm_wsg_external (1)2579 microsoft powerpoint2010_rtm_wsg_external (1)
2579 microsoft powerpoint2010_rtm_wsg_external (1)Germaine Indangan
 
Powerpoint 2010 Unit D PPT
Powerpoint 2010 Unit D PPTPowerpoint 2010 Unit D PPT
Powerpoint 2010 Unit D PPTokmomwalking
 
Triad 2010 power_point_chapter_1
Triad 2010 power_point_chapter_1Triad 2010 power_point_chapter_1
Triad 2010 power_point_chapter_1Dalia Saeed
 
Ppt new features.
Ppt new features.Ppt new features.
Ppt new features.sportsknc2
 
Powerpoint 2010 Unit A PPT
Powerpoint 2010 Unit A PPTPowerpoint 2010 Unit A PPT
Powerpoint 2010 Unit A PPTokmomwalking
 
Job Interview PPT Template and Google Slides Themes
Job Interview PPT Template and Google Slides ThemesJob Interview PPT Template and Google Slides Themes
Job Interview PPT Template and Google Slides ThemesSlideEgg
 
LAC POWERPOINT.pptx
LAC POWERPOINT.pptxLAC POWERPOINT.pptx
LAC POWERPOINT.pptxCharryAsher1
 
2579 microsoft powerpoint2010_rtm_wsg_external
2579 microsoft powerpoint2010_rtm_wsg_external2579 microsoft powerpoint2010_rtm_wsg_external
2579 microsoft powerpoint2010_rtm_wsg_externalcasamira
 
2579 microsoft powerpoint2010_rtm_wsg_external
2579 microsoft powerpoint2010_rtm_wsg_external2579 microsoft powerpoint2010_rtm_wsg_external
2579 microsoft powerpoint2010_rtm_wsg_externalanahiii12
 

Similar to Microsoft PowerPoint 2010 Lesson 3 Working with Illustrations (20)

Word Lesson 8A Pictures
Word Lesson 8A PicturesWord Lesson 8A Pictures
Word Lesson 8A Pictures
 
Word lesson 8 power point
Word lesson 8 power pointWord lesson 8 power point
Word lesson 8 power point
 
Objects and effects
Objects and effectsObjects and effects
Objects and effects
 
Word Lesson 8B Shapes
Word Lesson 8B ShapesWord Lesson 8B Shapes
Word Lesson 8B Shapes
 
Word Lesson 8C Smartart & Screenshots
Word Lesson 8C Smartart & ScreenshotsWord Lesson 8C Smartart & Screenshots
Word Lesson 8C Smartart & Screenshots
 
PPT Lesson 7
PPT Lesson 7 PPT Lesson 7
PPT Lesson 7
 
Word Lesson 5D Backgrounds
Word Lesson 5D BackgroundsWord Lesson 5D Backgrounds
Word Lesson 5D Backgrounds
 
Exploring Visio
Exploring VisioExploring Visio
Exploring Visio
 
The effective use of power point
The effective use of power pointThe effective use of power point
The effective use of power point
 
2579 microsoft powerpoint2010_rtm_wsg_external
2579 microsoft powerpoint2010_rtm_wsg_external2579 microsoft powerpoint2010_rtm_wsg_external
2579 microsoft powerpoint2010_rtm_wsg_external
 
2579 microsoft powerpoint2010_rtm_wsg_external (1)
2579 microsoft powerpoint2010_rtm_wsg_external (1)2579 microsoft powerpoint2010_rtm_wsg_external (1)
2579 microsoft powerpoint2010_rtm_wsg_external (1)
 
Powerpoint 2010 Unit D PPT
Powerpoint 2010 Unit D PPTPowerpoint 2010 Unit D PPT
Powerpoint 2010 Unit D PPT
 
Triad 2010 power_point_chapter_1
Triad 2010 power_point_chapter_1Triad 2010 power_point_chapter_1
Triad 2010 power_point_chapter_1
 
Ppt new features.
Ppt new features.Ppt new features.
Ppt new features.
 
Power Point presentation workshop, 2018
Power Point presentation workshop, 2018Power Point presentation workshop, 2018
Power Point presentation workshop, 2018
 
Powerpoint 2010 Unit A PPT
Powerpoint 2010 Unit A PPTPowerpoint 2010 Unit A PPT
Powerpoint 2010 Unit A PPT
 
Job Interview PPT Template and Google Slides Themes
Job Interview PPT Template and Google Slides ThemesJob Interview PPT Template and Google Slides Themes
Job Interview PPT Template and Google Slides Themes
 
LAC POWERPOINT.pptx
LAC POWERPOINT.pptxLAC POWERPOINT.pptx
LAC POWERPOINT.pptx
 
2579 microsoft powerpoint2010_rtm_wsg_external
2579 microsoft powerpoint2010_rtm_wsg_external2579 microsoft powerpoint2010_rtm_wsg_external
2579 microsoft powerpoint2010_rtm_wsg_external
 
2579 microsoft powerpoint2010_rtm_wsg_external
2579 microsoft powerpoint2010_rtm_wsg_external2579 microsoft powerpoint2010_rtm_wsg_external
2579 microsoft powerpoint2010_rtm_wsg_external
 

More from deborahburns

1.02 setting financial goals power point burns
1.02 setting financial goals power point   burns1.02 setting financial goals power point   burns
1.02 setting financial goals power point burnsdeborahburns
 
1.02 factors affecting financial decisions burns
1.02 factors affecting financial decisions   burns1.02 factors affecting financial decisions   burns
1.02 factors affecting financial decisions burnsdeborahburns
 
PF 1.01 intro power point
PF 1.01 intro power pointPF 1.01 intro power point
PF 1.01 intro power pointdeborahburns
 
PF 1.01 investment in yourself_1.1.9.g1
PF 1.01 investment in yourself_1.1.9.g1PF 1.01 investment in yourself_1.1.9.g1
PF 1.01 investment in yourself_1.1.9.g1deborahburns
 
Personal Finance 1.01 PPT
Personal Finance 1.01 PPTPersonal Finance 1.01 PPT
Personal Finance 1.01 PPTdeborahburns
 
Word Lesson 10 PPT
Word Lesson 10 PPTWord Lesson 10 PPT
Word Lesson 10 PPTdeborahburns
 
Word Lesson 9 Creating Mass Mailing Documents
Word Lesson 9 Creating Mass Mailing DocumentsWord Lesson 9 Creating Mass Mailing Documents
Word Lesson 9 Creating Mass Mailing Documentsdeborahburns
 
Word Lesson 7C PPT
Word Lesson 7C PPTWord Lesson 7C PPT
Word Lesson 7C PPTdeborahburns
 
Word Lesson 7B PPT
Word Lesson 7B PPTWord Lesson 7B PPT
Word Lesson 7B PPTdeborahburns
 
Word Lesson 7A PPT
Word Lesson 7A PPTWord Lesson 7A PPT
Word Lesson 7A PPTdeborahburns
 
Word Lesson 6B Comments & Printing
Word Lesson 6B Comments & PrintingWord Lesson 6B Comments & Printing
Word Lesson 6B Comments & Printingdeborahburns
 
Word Lesson 6A Proofing
Word Lesson 6A ProofingWord Lesson 6A Proofing
Word Lesson 6A Proofingdeborahburns
 
Word Lesson 5C Columns, Header, Footers, Page No.
Word Lesson 5C Columns, Header, Footers, Page No.Word Lesson 5C Columns, Header, Footers, Page No.
Word Lesson 5C Columns, Header, Footers, Page No.deborahburns
 
Word Lesson 5B Page & Section Breaks
Word Lesson 5B Page & Section BreaksWord Lesson 5B Page & Section Breaks
Word Lesson 5B Page & Section Breaksdeborahburns
 
Word Lesson 5A Orientation & Margins
Word Lesson 5A Orientation & MarginsWord Lesson 5A Orientation & Margins
Word Lesson 5A Orientation & Marginsdeborahburns
 
Word Lesson 4B PPT
Word Lesson 4B PPTWord Lesson 4B PPT
Word Lesson 4B PPTdeborahburns
 
Word Lesson 4A PowerPoint
Word Lesson 4A PowerPointWord Lesson 4A PowerPoint
Word Lesson 4A PowerPointdeborahburns
 

More from deborahburns (20)

8.02B PF
8.02B PF8.02B PF
8.02B PF
 
8.02A PF
8.02A PF8.02A PF
8.02A PF
 
1.02 setting financial goals power point burns
1.02 setting financial goals power point   burns1.02 setting financial goals power point   burns
1.02 setting financial goals power point burns
 
1.02 factors affecting financial decisions burns
1.02 factors affecting financial decisions   burns1.02 factors affecting financial decisions   burns
1.02 factors affecting financial decisions burns
 
PF 1.01 intro power point
PF 1.01 intro power pointPF 1.01 intro power point
PF 1.01 intro power point
 
PF 1.01 investment in yourself_1.1.9.g1
PF 1.01 investment in yourself_1.1.9.g1PF 1.01 investment in yourself_1.1.9.g1
PF 1.01 investment in yourself_1.1.9.g1
 
Personal Finance 1.01 PPT
Personal Finance 1.01 PPTPersonal Finance 1.01 PPT
Personal Finance 1.01 PPT
 
PPT Lesson 6
PPT Lesson 6PPT Lesson 6
PPT Lesson 6
 
Word Lesson 10 PPT
Word Lesson 10 PPTWord Lesson 10 PPT
Word Lesson 10 PPT
 
Word Lesson 9 Creating Mass Mailing Documents
Word Lesson 9 Creating Mass Mailing DocumentsWord Lesson 9 Creating Mass Mailing Documents
Word Lesson 9 Creating Mass Mailing Documents
 
Word Lesson 7C PPT
Word Lesson 7C PPTWord Lesson 7C PPT
Word Lesson 7C PPT
 
Word Lesson 7B PPT
Word Lesson 7B PPTWord Lesson 7B PPT
Word Lesson 7B PPT
 
Word Lesson 7A PPT
Word Lesson 7A PPTWord Lesson 7A PPT
Word Lesson 7A PPT
 
Word Lesson 6B Comments & Printing
Word Lesson 6B Comments & PrintingWord Lesson 6B Comments & Printing
Word Lesson 6B Comments & Printing
 
Word Lesson 6A Proofing
Word Lesson 6A ProofingWord Lesson 6A Proofing
Word Lesson 6A Proofing
 
Word Lesson 5C Columns, Header, Footers, Page No.
Word Lesson 5C Columns, Header, Footers, Page No.Word Lesson 5C Columns, Header, Footers, Page No.
Word Lesson 5C Columns, Header, Footers, Page No.
 
Word Lesson 5B Page & Section Breaks
Word Lesson 5B Page & Section BreaksWord Lesson 5B Page & Section Breaks
Word Lesson 5B Page & Section Breaks
 
Word Lesson 5A Orientation & Margins
Word Lesson 5A Orientation & MarginsWord Lesson 5A Orientation & Margins
Word Lesson 5A Orientation & Margins
 
Word Lesson 4B PPT
Word Lesson 4B PPTWord Lesson 4B PPT
Word Lesson 4B PPT
 
Word Lesson 4A PowerPoint
Word Lesson 4A PowerPointWord Lesson 4A PowerPoint
Word Lesson 4A PowerPoint
 

Recently uploaded

Alper Gobel In Media Res Media Component
Alper Gobel In Media Res Media ComponentAlper Gobel In Media Res Media Component
Alper Gobel In Media Res Media ComponentInMediaRes1
 
Presentation by Andreas Schleicher Tackling the School Absenteeism Crisis 30 ...
Presentation by Andreas Schleicher Tackling the School Absenteeism Crisis 30 ...Presentation by Andreas Schleicher Tackling the School Absenteeism Crisis 30 ...
Presentation by Andreas Schleicher Tackling the School Absenteeism Crisis 30 ...EduSkills OECD
 
Organic Name Reactions for the students and aspirants of Chemistry12th.pptx
Organic Name Reactions  for the students and aspirants of Chemistry12th.pptxOrganic Name Reactions  for the students and aspirants of Chemistry12th.pptx
Organic Name Reactions for the students and aspirants of Chemistry12th.pptxVS Mahajan Coaching Centre
 
MENTAL STATUS EXAMINATION format.docx
MENTAL     STATUS EXAMINATION format.docxMENTAL     STATUS EXAMINATION format.docx
MENTAL STATUS EXAMINATION format.docxPoojaSen20
 
Crayon Activity Handout For the Crayon A
Crayon Activity Handout For the Crayon ACrayon Activity Handout For the Crayon A
Crayon Activity Handout For the Crayon AUnboundStockton
 
Kisan Call Centre - To harness potential of ICT in Agriculture by answer farm...
Kisan Call Centre - To harness potential of ICT in Agriculture by answer farm...Kisan Call Centre - To harness potential of ICT in Agriculture by answer farm...
Kisan Call Centre - To harness potential of ICT in Agriculture by answer farm...Krashi Coaching
 
ECONOMIC CONTEXT - LONG FORM TV DRAMA - PPT
ECONOMIC CONTEXT - LONG FORM TV DRAMA - PPTECONOMIC CONTEXT - LONG FORM TV DRAMA - PPT
ECONOMIC CONTEXT - LONG FORM TV DRAMA - PPTiammrhaywood
 
The basics of sentences session 2pptx copy.pptx
The basics of sentences session 2pptx copy.pptxThe basics of sentences session 2pptx copy.pptx
The basics of sentences session 2pptx copy.pptxheathfieldcps1
 
How to Configure Email Server in Odoo 17
How to Configure Email Server in Odoo 17How to Configure Email Server in Odoo 17
How to Configure Email Server in Odoo 17Celine George
 
mini mental status format.docx
mini    mental       status     format.docxmini    mental       status     format.docx
mini mental status format.docxPoojaSen20
 
18-04-UA_REPORT_MEDIALITERAСY_INDEX-DM_23-1-final-eng.pdf
18-04-UA_REPORT_MEDIALITERAСY_INDEX-DM_23-1-final-eng.pdf18-04-UA_REPORT_MEDIALITERAСY_INDEX-DM_23-1-final-eng.pdf
18-04-UA_REPORT_MEDIALITERAСY_INDEX-DM_23-1-final-eng.pdfssuser54595a
 
Solving Puzzles Benefits Everyone (English).pptx
Solving Puzzles Benefits Everyone (English).pptxSolving Puzzles Benefits Everyone (English).pptx
Solving Puzzles Benefits Everyone (English).pptxOH TEIK BIN
 
POINT- BIOCHEMISTRY SEM 2 ENZYMES UNIT 5.pptx
POINT- BIOCHEMISTRY SEM 2 ENZYMES UNIT 5.pptxPOINT- BIOCHEMISTRY SEM 2 ENZYMES UNIT 5.pptx
POINT- BIOCHEMISTRY SEM 2 ENZYMES UNIT 5.pptxSayali Powar
 
Mastering the Unannounced Regulatory Inspection
Mastering the Unannounced Regulatory InspectionMastering the Unannounced Regulatory Inspection
Mastering the Unannounced Regulatory InspectionSafetyChain Software
 
A Critique of the Proposed National Education Policy Reform
A Critique of the Proposed National Education Policy ReformA Critique of the Proposed National Education Policy Reform
A Critique of the Proposed National Education Policy ReformChameera Dedduwage
 
The Most Excellent Way | 1 Corinthians 13
The Most Excellent Way | 1 Corinthians 13The Most Excellent Way | 1 Corinthians 13
The Most Excellent Way | 1 Corinthians 13Steve Thomason
 
_Math 4-Q4 Week 5.pptx Steps in Collecting Data
_Math 4-Q4 Week 5.pptx Steps in Collecting Data_Math 4-Q4 Week 5.pptx Steps in Collecting Data
_Math 4-Q4 Week 5.pptx Steps in Collecting DataJhengPantaleon
 
Separation of Lanthanides/ Lanthanides and Actinides
Separation of Lanthanides/ Lanthanides and ActinidesSeparation of Lanthanides/ Lanthanides and Actinides
Separation of Lanthanides/ Lanthanides and ActinidesFatimaKhan178732
 
“Oh GOSH! Reflecting on Hackteria's Collaborative Practices in a Global Do-It...
“Oh GOSH! Reflecting on Hackteria's Collaborative Practices in a Global Do-It...“Oh GOSH! Reflecting on Hackteria's Collaborative Practices in a Global Do-It...
“Oh GOSH! Reflecting on Hackteria's Collaborative Practices in a Global Do-It...Marc Dusseiller Dusjagr
 

Recently uploaded (20)

Alper Gobel In Media Res Media Component
Alper Gobel In Media Res Media ComponentAlper Gobel In Media Res Media Component
Alper Gobel In Media Res Media Component
 
Presentation by Andreas Schleicher Tackling the School Absenteeism Crisis 30 ...
Presentation by Andreas Schleicher Tackling the School Absenteeism Crisis 30 ...Presentation by Andreas Schleicher Tackling the School Absenteeism Crisis 30 ...
Presentation by Andreas Schleicher Tackling the School Absenteeism Crisis 30 ...
 
Organic Name Reactions for the students and aspirants of Chemistry12th.pptx
Organic Name Reactions  for the students and aspirants of Chemistry12th.pptxOrganic Name Reactions  for the students and aspirants of Chemistry12th.pptx
Organic Name Reactions for the students and aspirants of Chemistry12th.pptx
 
MENTAL STATUS EXAMINATION format.docx
MENTAL     STATUS EXAMINATION format.docxMENTAL     STATUS EXAMINATION format.docx
MENTAL STATUS EXAMINATION format.docx
 
Crayon Activity Handout For the Crayon A
Crayon Activity Handout For the Crayon ACrayon Activity Handout For the Crayon A
Crayon Activity Handout For the Crayon A
 
Kisan Call Centre - To harness potential of ICT in Agriculture by answer farm...
Kisan Call Centre - To harness potential of ICT in Agriculture by answer farm...Kisan Call Centre - To harness potential of ICT in Agriculture by answer farm...
Kisan Call Centre - To harness potential of ICT in Agriculture by answer farm...
 
ECONOMIC CONTEXT - LONG FORM TV DRAMA - PPT
ECONOMIC CONTEXT - LONG FORM TV DRAMA - PPTECONOMIC CONTEXT - LONG FORM TV DRAMA - PPT
ECONOMIC CONTEXT - LONG FORM TV DRAMA - PPT
 
The basics of sentences session 2pptx copy.pptx
The basics of sentences session 2pptx copy.pptxThe basics of sentences session 2pptx copy.pptx
The basics of sentences session 2pptx copy.pptx
 
TataKelola dan KamSiber Kecerdasan Buatan v022.pdf
TataKelola dan KamSiber Kecerdasan Buatan v022.pdfTataKelola dan KamSiber Kecerdasan Buatan v022.pdf
TataKelola dan KamSiber Kecerdasan Buatan v022.pdf
 
How to Configure Email Server in Odoo 17
How to Configure Email Server in Odoo 17How to Configure Email Server in Odoo 17
How to Configure Email Server in Odoo 17
 
mini mental status format.docx
mini    mental       status     format.docxmini    mental       status     format.docx
mini mental status format.docx
 
18-04-UA_REPORT_MEDIALITERAСY_INDEX-DM_23-1-final-eng.pdf
18-04-UA_REPORT_MEDIALITERAСY_INDEX-DM_23-1-final-eng.pdf18-04-UA_REPORT_MEDIALITERAСY_INDEX-DM_23-1-final-eng.pdf
18-04-UA_REPORT_MEDIALITERAСY_INDEX-DM_23-1-final-eng.pdf
 
Solving Puzzles Benefits Everyone (English).pptx
Solving Puzzles Benefits Everyone (English).pptxSolving Puzzles Benefits Everyone (English).pptx
Solving Puzzles Benefits Everyone (English).pptx
 
POINT- BIOCHEMISTRY SEM 2 ENZYMES UNIT 5.pptx
POINT- BIOCHEMISTRY SEM 2 ENZYMES UNIT 5.pptxPOINT- BIOCHEMISTRY SEM 2 ENZYMES UNIT 5.pptx
POINT- BIOCHEMISTRY SEM 2 ENZYMES UNIT 5.pptx
 
Mastering the Unannounced Regulatory Inspection
Mastering the Unannounced Regulatory InspectionMastering the Unannounced Regulatory Inspection
Mastering the Unannounced Regulatory Inspection
 
A Critique of the Proposed National Education Policy Reform
A Critique of the Proposed National Education Policy ReformA Critique of the Proposed National Education Policy Reform
A Critique of the Proposed National Education Policy Reform
 
The Most Excellent Way | 1 Corinthians 13
The Most Excellent Way | 1 Corinthians 13The Most Excellent Way | 1 Corinthians 13
The Most Excellent Way | 1 Corinthians 13
 
_Math 4-Q4 Week 5.pptx Steps in Collecting Data
_Math 4-Q4 Week 5.pptx Steps in Collecting Data_Math 4-Q4 Week 5.pptx Steps in Collecting Data
_Math 4-Q4 Week 5.pptx Steps in Collecting Data
 
Separation of Lanthanides/ Lanthanides and Actinides
Separation of Lanthanides/ Lanthanides and ActinidesSeparation of Lanthanides/ Lanthanides and Actinides
Separation of Lanthanides/ Lanthanides and Actinides
 
“Oh GOSH! Reflecting on Hackteria's Collaborative Practices in a Global Do-It...
“Oh GOSH! Reflecting on Hackteria's Collaborative Practices in a Global Do-It...“Oh GOSH! Reflecting on Hackteria's Collaborative Practices in a Global Do-It...
“Oh GOSH! Reflecting on Hackteria's Collaborative Practices in a Global Do-It...
 

Microsoft PowerPoint 2010 Lesson 3 Working with Illustrations

  • 1. Microsoft® PowerPoint 2010 Microsoft Office PowerPoint 2010 Lesson 3: Working with Illustrations and other Media Courseware #: 3246
  • 2. Microsoft® PowerPoint 2010 Lesson Objectives • add graphics from a variety of • format illustrations, graphics and sources shapes • manipulate graphics • insert and modify SmartArt • insert and modify shapes and • insert and modify audio and illustrations video • manipulate illustrations, graphics and shapes © CCI Learning Solutions Inc. 2
  • 3. Microsoft® PowerPoint 2010 Using Pictures • an external graphical object that you add to a slide to illustrate a point. • an easy way to liven up a slide and add visual appeal • can enhance points presented in text form, making them easier to understand and making slides more attractive. © CCI Learning Solutions Inc. 3
  • 4. Microsoft® PowerPoint 2010 Inserting Pictures from Files • Some slide layouts provide a placeholder for a picture (e.g. Title and Content, Two Content, Comparison, Content with Caption, and Picture with Caption) • To add a picture to a slide with a picture placeholder, click Insert Picture from File in the placeholder. • To add a picture to a slide with no picture placeholder, on the Insert tab, in the Images group, click Picture. © CCI Learning Solutions Inc. 4
  • 5. Microsoft® PowerPoint 2010 Inserting Pictures from Files • 3 insertion options: Insert Picture is embedded in presentation and can only be changed by removing and re-inserting. Link to File Picture is stored outside presentation and will be updated in presentation if picture changes. Insert and Link Picture is embedded in presentation and linked to external file for updating. © CCI Learning Solutions Inc. 5
  • 6. Microsoft® PowerPoint 2010 Modifying Pictures • Many options on Picture Tools ribbon, including: – Brightness and Contrast – Sharpen and Soften – Color Saturation and Tone – Artistic Effects – Picture Styles, Borders, and Effect © CCI Learning Solutions Inc. 6
  • 7. Microsoft® PowerPoint 2010 Picture Corrections • Use when picture is not quite perfect • Sharpen blurry pictures or soften for a more subdued effect • Adjust brightness and contrast for pictures that are too dark or light © CCI Learning Solutions Inc. 7
  • 8. Microsoft® PowerPoint 2010 Picture Color • Make picture warmer or cooler • apply a color effect © CCI Learning Solutions Inc. 8
  • 9. Microsoft® PowerPoint 2010 Artistic Effects • Add visual interest with an artistic effect © CCI Learning Solutions Inc. 9
  • 10. Microsoft® PowerPoint 2010 Picture Styles and Borders • Frames, borders and effects enhance less interesting pictures © CCI Learning Solutions Inc. 10
  • 11. Microsoft® PowerPoint 2010 Crop a Picture • Remove unneeded content from a picture to focus viewer on most significant areas © CCI Learning Solutions Inc. 11
  • 12. Microsoft® PowerPoint 2010 Reset or Change Picture • Remove all formatting with Reset Picture • Keep formatting but change picture with Change Picture © CCI Learning Solutions Inc. 12
  • 13. Microsoft® PowerPoint 2010 Compressing Pictures • Presentation can become a large file with many images • Harder to email and copy • Can compress images and remove cropped portions to reduce file size • Optimize images for print, screen or email • To compress pictures: – click File, click Save As, and click Tools. Click Compress Pictures; or – select a picture, then under Drawing Tools, on the Format tab, in the Adjust group, click Compress Pictures. © CCI Learning Solutions Inc. 13
  • 14. Microsoft® PowerPoint 2010 Inserting Clip Art • Clip Organizer contains – drawings, – photographs, – sounds, – videos; and – other media files. • insert into a presentation to add impact and illustrate specific concepts. • To insert Clip Art, on the Insert tab, in the Illustrations group, click Clip Art. • Enter search criteria and click Go • Limit results to specific types of clip art (e.g. just photographs) • Click result to insert © CCI Learning Solutions Inc. 14
  • 15. Microsoft® PowerPoint 2010 Inserting Shapes • Use shapes to create a diagram or illustration that visually displays data, key points or graphically illustrates complicated ideas. • To insert shapes, use one of the following methods: – On the Home tab, in the Drawing group, click a shape and drag the mouse cursor on the slide to form the shape, or – on the Insert tab, in the Illustrations group, click Shapes, click a shape and drag the mouse cursor on the slide to form the shape, or New – under Drawing Tools, on the Format tab, in the Insert Shapes group, click a shape and drag the mouse cursor on the slide to form the shape. • Hold Shift or Ctrl to draw straight lines or symmetric shapes • Add text to a shape by typing right after creating shape © CCI Learning Solutions Inc. 15
  • 16. Microsoft® PowerPoint 2010 Selecting and Moving Shapes • Click on shape to select, or use Selection Pane • Click and drag shape to reposition on slide, or use arrow keys © CCI Learning Solutions Inc. 16
  • 17. Microsoft® PowerPoint 2010 Formatting Illustrations and Shapes • Apply a Quick Style; or • add outline, fill or effect. • Format text within shape separately © CCI Learning Solutions Inc. 17
  • 18. Microsoft® PowerPoint 2010 Inserting Hyperlinks • Text or an object that you can click when viewing a slide to: – move to another slide, – open another presentation, – open some other type of document, such as a Word document or an Excel worksheet, or – open a web site. • To insert a hyperlink, select text or object, then: – On the Insert tab, in the Links group, click Hyperlink, or – press Ctrl+K , or – right-click and click Hyperlink. © CCI Learning Solutions Inc. 18
  • 19. Microsoft® PowerPoint 2010 Arranging Illustrations and Shapes • if illustrations and shapes are not aligned, it can be very distracting to the audience and look unprofessional. • Can use ruler, gridlines, and guides to help arrange shapes © CCI Learning Solutions Inc. 19
  • 20. Microsoft® PowerPoint 2010 Using the Ruler • on the View tab, in the Show/Hide group, click Ruler • units of measurement are determined by the regional settings in Windows © CCI Learning Solutions Inc. 20
  • 21. Microsoft® PowerPoint 2010 Using Gridlines and Guides • Guides are nonprinting horizontal and vertical lines you can use to align objects on your slides. • Gridlines are a set of intersecting lines that you can display to make it easier for you to align shapes and other objects. • On View tab, in Show group, select Gridlines or Guides. © CCI Learning Solutions Inc. 21
  • 22. Microsoft® PowerPoint 2010 Visual Alignment • When dragging one shape near another on a slide, a temporary guide appears to aid alignment © CCI Learning Solutions Inc. 22
  • 23. Microsoft® PowerPoint 2010 Aligning Shapes • Align shapes and space them evenly on the slide so they don’t distract viewers • Select 2 or more shapes, then under Drawing Tools, on the Format tab, in the Arrange group, click Align and choose one of these options: Align Left Align all shapes with the shape furthest left on the slide. Align Center Center all shapes based on the center point of each shape. Align Right Align all shapes with the shapes furthest right on the slide. Align Top Align all shapes with the shapes at the highest point on the slide. Align Middle Align all shapes at the middle of the slide. Align Bottom Align all shapes with the shapes at the lowest point on the slide. Distribute Horizontally Arrange the shapes from left to right on the slide with equal space between each. Distribute Vertically Arrange the shapes from top to bottom on the slide with equal space between each. © CCI Learning Solutions Inc. 23
  • 24. Microsoft® PowerPoint 2010 Sizing and Scaling Shapes • resize shapes using handles (same as text boxes) • Drag circular corner handles to retain proportions or “aspect ratio”; • Enter specific measurements under Drawing Tools or Picture Tools, on the Format tab, in the Size group. • By default, shapes do not resize, nor text shrink in size, as more text is added. Can change shape options to change this. • Can increase shape size by percentages © CCI Learning Solutions Inc. 24
  • 25. Microsoft® PowerPoint 2010 Rotating Shapes • Rotate or flip shapes vertically or horizontally: – On the Home tab, in the Drawing group, click Arrange, and click Rotate, or – under Drawing Tools or Picture Tools, on the Format tab, in the Arrange group, click Rotate, or – drag the Rotation handle (green circular handle) in a circular movement. © CCI Learning Solutions Inc. 25
  • 26. Microsoft® PowerPoint 2010 Changing the Order of Content • Shapes may overlap, but not in the right order • Can change how shapes overlap, by moving them in this way: Bring to the Bring the shape to the front of all shapes. Front Bring Forward Bring the shape from behind the shape directly in front of it. Send to the Send the shape to the back of all shapes. Back Send Send the shape to behind the shape directly behind it. Backward © CCI Learning Solutions Inc. 26
  • 27. Microsoft® PowerPoint 2010 Grouping and Ungrouping Content • Group shapes in a completed diagram to – Prevent accidental moving of individual shapes – More easily cut, copy, paste or move entire diagram within presentation • Can temporarily ungroup to edit a shape, then regroup • To group shapes, use one of the following methods: – On the Home tab, in the Drawing group, click Arrange and click Group, or – under Drawing Tools or Picture Tools, on the Format tab, in the Arrange group, click Group, or – right-click the shape and click Group. © CCI Learning Solutions Inc. 27
  • 28. Microsoft® PowerPoint 2010 Inserting a Photo Album • A photo album is a presentation for showing photographs • Can add captions, adjust order and layout, and add frames. • Can also add effects, such as transitions, backgrounds and themes. • To create a photo album, on the Insert tab, in the Illustrations group, click Photo Album. © CCI Learning Solutions Inc. 28
  • 29. Microsoft® PowerPoint 2010 Inserting a Photo Album Insert picture from Use File/Disk to navigate to where the picture files are located. Insert text Create a new text box to enter text or information about this picture. Pictures in album Lists the files included in the photo album. Use the Up or Down buttons below this list to rearrange the order of the file list, or use Remove to delete a file from the list. Preview Displays a preview of each file selected in the Pictures in album list. Use the buttons across the bottom of the preview box to adjust the rotation, contrast or brightness of the picture. Picture Options Choose whether to have caption boxes below the pictures, such as names of people or product identifiers, or to show the pictures in black and white for a different effect. Picture layout Choose how you want the pictures laid out in the photo album. Frame shape Choose the shape for the frame around each picture. This field is available when you choose any option other than Fit to slide. Theme Add a theme for the photo album. © CCI Learning Solutions Inc. 29
  • 30. Microsoft® PowerPoint 2010 Working with SmartArt • Challenging to create professional or artistic illustrations from individual Shapes Pictures shapes • Use SmartArt: pre-built illustration templates ClipArt Illustrations • Easy to add text and style SmartArt © CCI Learning Solutions Inc. 30
  • 31. Microsoft® PowerPoint 2010 Inserting SmartArt • To add a SmartArt graphic to a slide with a SmartArt graphic placeholder, click Insert SmartArt Graphic; or • to add a SmartArt graphic to a slide without a SmartArt graphic placeholder, on the Insert tab, in the Illustrations group, click SmartArt. • Select type of SmartArt shape closest to content (can easily change after entering text) © CCI Learning Solutions Inc. 31
  • 32. Microsoft® PowerPoint 2010 Diagram Types List Show non-sequential information. Process Show steps in a process or timeline. Cycle Show a continual process. Hierarchy Create an organization chart. Hierarchy Show a decision tree. Relationship Illustrate connections. Matrix Show how parts relate to a whole. Pyramid Show proportional relationships with the largest component on the top or bottom. © CCI Learning Solutions Inc. 32
  • 33. Microsoft® PowerPoint 2010 Using the Text Pane • Text pane is like a bulleted list: associates text with a SmartArt shape. • Use  and  to move through entries in pane • Use Tab and Shift+Tab to demote and promote entries • Use Enter for more entries © CCI Learning Solutions Inc. 33
  • 34. Microsoft® PowerPoint 2010 Using SmartArt Styles • Under SmartArt Tools, on the Design Tab, you can: – Change Colors – Select a SmartArt Style, including 3D effects – Change the diagram type – Reset the SmartArt graphic back to the original design © CCI Learning Solutions Inc. 34
  • 35. Microsoft® PowerPoint 2010 Adding or Removing Shapes • Can add or remove text in Text pane; or • Under SmartArt Tools, on the Design tab, in the Create Graphic group, click – Add Shape – Add Shape After – Add Shape Before – Add Shape Above – Add Shape Below • Click shape and press Delete to remove © CCI Learning Solutions Inc. 35
  • 36. Microsoft® PowerPoint 2010 Converting Text to SmartArt • Can easily select text already in a placeholder or text box and convert to a SmartArt graphic • Click the text placeholder, and then on the Home tab, in the Paragraph group, click Convert to SmartArt Graphic, then select a layout © CCI Learning Solutions Inc. 36
  • 37. Microsoft® PowerPoint 2010 Converting SmartArt to Text or Shapes • Converting SmartArt to shapes or text allows you to create a custom design not available as a SmartArt, or simply remove the SmartArt • Under SmartArt Tools, on the Design tab, click Convert, then Convert to Text or Convert to Shapes. • Can no longer be edited as SmartArt © CCI Learning Solutions Inc. 37
  • 38. Microsoft® PowerPoint 2010 Using Sounds • Begin or end presentation with music • Use sound effects with animation • Play sounds directly related to presentation content • To insert a sound from a file, on the Insert tab, in the Media group, click Audio. © CCI Learning Solutions Inc. 38
  • 39. Microsoft® PowerPoint 2010 Using Sounds • Under Audio Tools, on Playback tab, adjust sound options: – Trim start and end of sound – Fade sound in or out – Raise or lower volume – Loop until stopped © CCI Learning Solutions Inc. 39
  • 40. Microsoft® PowerPoint 2010 Using Movies • Could use movies to: – Play a speaker not in attendance – Demonstrate products or deliver training • Movies are desktop video files with formats such as AVI or MPEG and file extensions such as .avi, .mov, .mpg, and .mpeg • To insert a movie from a file, on the Insert tab, in the Media Clips group, click Video. © CCI Learning Solutions Inc. 40
  • 41. Microsoft® PowerPoint 2010 Using Movies • Under Video Tools, on Playback tab, adjust movie options: – Trim start and end of movie – Fade movie in or out – Raise or lower volume – Adjust start to play automatically – Play full screen – Loop until stopped © CCI Learning Solutions Inc. 41
  • 42. Microsoft® PowerPoint 2010 Using Movies • Under Video Tools, on Format tab, adjust movie border style or frame or other visual effects (similar to effects on pictures and clip art) © CCI Learning Solutions Inc. 42
  • 43. Microsoft® PowerPoint 2010 Lesson Summary • add graphics from a variety of • format illustrations, graphics and sources shapes • manipulate graphics • insert and modify SmartArt • insert and modify shapes and • insert and modify audio and illustrations video • manipulate illustrations, graphics and shapes © CCI Learning Solutions Inc. 43
  • 44. Microsoft® PowerPoint 2010 Review Questions 1. What is a benefit of linking to a picture rather than inserting a picture on a slide? 2. How do you change a shape from an oval to a rectangle without removing the oval and inserting a rectangle? 3. How do you quickly remove all illustration effects from a picture? 4. How do you remove parts of a picture? 5. How do you hide or show the guides? 6. How do you insert clip art? 7. What is the difference between Bring to the Front and Bring Forward? 8. What is a benefit of grouping shapes? 9. Why are SmartArt graphics used in presentations? © CCI Learning Solutions Inc. 44
  • 45. Microsoft® PowerPoint 2010 Review Questions 10. How do you demote bulleted text in the Text pane when creating a SmartArt graphic? 11. How do you convert text to a SmartArt graphic? 12. How do you quickly remove SmartArt graphic formatting? 13. How do you change the layout of SmartArt graphics? 14. How do you add a shape before another shape in a SmartArt graphic? 15. How do you delete a shape in a SmartArt graphic? 16. How do you quickly change the colors of a SmartArt graphic? 17. How do you insert a sound from the clip organizer? 18. How do you modify a sound to play across all slides? © CCI Learning Solutions Inc. 45

Editor's Notes

  1. Briefly introduce the topics that will be covered in this lesson so students are aware of the new skills they will learn. Remind students that all the information is available in the book as a reference so they don’t need to commit anything to memory or take notes.
  2. Review with students how they can use pictures in a presentation to illustrate ideas and add visual interest.
  3. Demonstrate how students can click either the picture icon inside a content placeholder, or use the button on the Insert tab, to add a picture. Explain that the same Windows file browse dialog is used as when opening presentations, but that the File Type is set to look only for pictures, so even though students may be looking in the same folder as they have for other files, only picture files are listed. As well, Windows may try to look for pictures in the My Pictures folder, so students may need to navigate to the folder containing the student data files.
  4. Explain the benefits of each method of inserting a picture. In most cases, Insert will be fine (especially if pictures are later compressed to reduce the presentationfile size). It’s probably not necessary to demonstrate Link to File, changing the file, and watching it update in the presentation, but you certainly could if time permits.
  5. This slide lists the picture modification options that are covered in detail on the following slides.
  6. The visual previews of the different picture correction effects will quickly give students an understanding of the effect of this feature on their picture. Have students try different options to see their effect.
  7. As with the features on the previous slide, the visual previews of the different picture color effects will quickly give students an understanding of the effect of this feature on their picture. This feature can be used both to “correct” a photo—bringing the colors into a more natural balance—as well introduce artistic effects.
  8. This feature speaks for itself – it can add visual appeal to a photo or presentation.
  9. In a presentation without a theme, or with a plain one or white backgrounds, a border around a photo can really give it focus and anchor it on the slide. It can improve an otherwise dull picture. Conversely, on an already busy slide, the frame may be too much.
  10. Cropping pictures is a great way of conveying a more meaningful message. In the example on the slide, the crop focuses the viewer on the couple on bicycles, making it clear this slide is about them, not about the Golden Gate Bridge in the background. Cropping a photo allows us to enlarge it on the slide as well, since space isn’t taken up by unneeded portions, and that can enhance details and make the photo easier to see. Until it’s removed using the Compress Pictures feature, the cropped portion of the photo remains available and can be restored using the Crop tool again, so students shouldn’t fear trying different crops.
  11. After experimenting with all the picture correction and effect options, students will either have a masterpiece or a mess! The Reset Picture option will help return the picture to its original state. Note the 2 options available and that the second, Reset Picture & Size, removes crops as well as restores the picture to its original size.If students like the formatting they have applied, but have decided a different picture might be more appropriate, Change Picture allows them to replace the picture with a new one, but retain the formatting (unlike deleting a picture and adding a new one, where all formatting is lost and must be reapplied).
  12. Students may not know that when they crop or resize an image within PowerPoint, the full-sized original remains available. If the image was a large file, this can unnecessarily increase the size of the PowerPoint file, making it harder to email (takes longer or may be blocked altogether) and making the presentation run more slowly. As well, the original image may contain information not intended for viewing, but it remains available. Compressing images (and deleting cropped areas of pictures at the same time) deals with this situation, optimizing a presentation for emailing or sharing in other ways.You could show students the size of a PowerPoint file (one that contains many large images) in Windows Explorer before and after compressing the images, to show the effect.This topic is covered again in Lesson 7.
  13. The clip art pane built-in to PowerPoint (and other Office applications) is an easy way to find and clip art and other illustrations and add them to a slide.Review the choices available in the media file types drop-down. If their search returns many results, students may wish to limit the media types to just photographs, for example (as well as add more keywords to their search to narrow the results).Most students will click an illustration that appears from a search, and see it immediately inserted into a presentation. Review also that they can click the arrow next to an illustration and choose Copy, to assemble several illustrations in the clipboard for insertion where needed later.Explain that PowerPoint is installed with a very limited amount of clip art illustrations and that the “Include Office.com” content allows students to access a much greater resource of clip-art, with an internet connection.
  14. Spend some time reviewing the different shapes and demonstrating how to draw them. Be sure to demonstrate how to use Shift, Ctrl, or Ctrl+Shift to draw a straight line and a round circle, for example. Demonstrate adding text to a shape.Discuss ways in which shapes can be used – e.g. to create a diagram, to draw attention to areas of a picture, to use as a text box.
  15. Students should be pretty comfortable by now in moving objects around on the screen, so this demonstration should be quick and simple.
  16. Students have seen these quick styles applied to text boxes and content placeholders, so applying them to shapes should be familiar. Demonstrate how to apply a quick style, how to separately apply shape fill, outline and effect, and how to combine a quick style with changes to the shape fill, outline or effect for a custom design. Demonstrate formatting the text within a shape, using the text formatting features in the Font group on the Home tab, as well as WordArt features.
  17. Most students will likely be familiar with hyperlinks as a way of navigating web sites. They may not know that in PowerPoint a hyperlink can connect to a website, as well as open other documents on the computer, or simply navigate within the presentation. A common example is to connect to a web site related to the slide. Embedding links in a presentation allows the presenter to click to view the site, then return to the presentation and continue on, fairly seamlessly.Hyperlinks and action buttons are similar. While action buttons are covered in Lesson 5, you can mention them here if you wish.
  18. It’s useful to have the ruler visible on the screen much of the time – it gives a more real-world scale to objects on a slide
  19. Students may find gridlines useful, particularly with snap to grid enabled. Be sure to open the Grids and Guides dialog to show how they can adjust the spacing of the gridlines and enable the snap to grid and other objects options.
  20. Dragging shapes on a slide is a quick and easy way to align them. The new temporary visual alignment guide line that appears when you drag one shape near another is very helpful for aligning them. The temporary line is dashed and appears in the middle, top, bottom, left or right of the two shapes, depending on how one is moved in relation to the other. This method works well for quickly and accurately aligning one object to another, but not for aligning multiple objects at once.
  21. These alignment methods should be familiar from the lesson on text boxes, and work well for aligning more than two objects at once.Note that with the selected objects option selected (default for multiple selections), the objects are aligned relative to each other (i.e., align bottom will align objects to the lowest point of all selected objects). If Align to Slide is selected, then all objects are aligned to the slide. If only one object is selected, Align to Slide is the default selection, and objects will align accordingly.
  22. Having worked with text boxes, students should be familiar with the methods for resizing shapes. However, a review here is still a good idea. Demonstrate how using corner handles retains proportions, but side handles does not, as well as the numeric size measurements in the Size group on the Format tab, and in the Shape dialog. You might also work with a shape with text, which is essentially a text box, and review the Autofit text options in the Shape dialog.
  23. Again, students should be familiar with this feature from working with text boxes, but a review is a good idea.
  24. As with text boxes, shapes can be ordered one over top of the other. The order may need to be changed to make shapes visible or complete an illustration. Review the different options for moving shapes towards and away from the viewer. You may want to introduce the term "layers". This is a common term used in other programs, and can be applied here.
  25. This topic was not covered with text boxes, although they too can be grouped. Demonstrate how to group multiple shapes together when an illustration is complete, as a means of preventing accidental changes to the illustration, and as a way of more easily moving the complete illustration on the slide, or cutting and pasting it with the clipboard. Using the Selection Pane to select shapes to group may be easier than clicking on them individually on the slide, depending on the complexity of the illustration. Be sure to demonstrate how to temporarily Ungroup objects, make a change, then regroup them (without having to re-select each shape individually).
  26. PowerPoint has a feature specially designed for creating presentations of photos. It’s somewhat like a wizard that walks a student through selecting and inserting images (which they could of course do by hand as well, one picture at a time). Be sure to review all the options in the Photo Album dialog, listed on the next slide. Spend time creating a Photo Album, then editing it to select different options. Students will likely need to practice this on their own to master it.
  27. Now that they have some experience creating shapes and text boxes, students may find that it’s difficult, or at least time consuming, to create complex illustrations, and will appreciate that SmartArt can help them to quickly create professional looking diagrams and illustrations.
  28. The best way to become familiar with SmartArt is to try creating one. A simple list is often a good starting point. Once students have mastered the process for creating a SmartArt graphic and adding text, they can explore some of the other shapes and layouts.
  29. You can briefly review the different types of diagrams available, then return to this list later to explore them in more detail.
  30. The arrows to make the text pane visible, on the left of the SmartArt graphic, are unfortunately quite small, easily missed, and hard to click. However, students can right-click on a SmartArt graphic and choose Show Text Pane, or click the Text Pane button on the Design tab.Once visible, the text pane is quite simple to use and will be familiar from working with bulleted lists (and from Outline view in Word, for those students who have used it). Point out that some graphics have a limited number of shapes available, so students may not be able to continue adding text and have additional shapes appear. As well, not all shapes supported text at multiple levels, so demoting text may not produce the desired results.
  31. Like all quick styles in PowerPoint, SmartArt styles can quickly add more visual interest to a SmartArt graphic. The main difference with SmartArt styles and others is that changing the colors is a separate feature from the outline and effects. Students should try different sets of colors and different styles to see their effect. Some may add just the right amount of enhancement, and others may be too “busy”.
  32. Adding shapes to a SmartArt graphic can be done either using the text pane, or using the buttons in the Create Graphic group on the Design tab, whichever the student is more comfortable with. Be sure to demonstrate both methods.
  33. Students may find it easier to type text into a content placeholder, then convert it to SmartArt later, or may simply decide that text on a particular slide could be made more interesting if done as a SmartArt graphic. PowerPoint provides an easy method to convert selected text to SmartArt. Of course, a SmartArt layout appropriate to the text must be selected, and the text may need to be edited to fit within the shapes.
  34. Similarly to the previous slide, students may wish to remove a SmartArt graphic and use a bulleted list instead, such as when there’s too much text to comfortably fit in the SmartArt shapes.
  35. Sounds can be added to animations (covered in Lesson 5) or directly to a slide, and set to play manually or automatically. Sounds may be inserted because they are important content (e.g. a speech, pronunciation of a name or word, etc.), to attract the audience’s attention at a particular moment in the presentation, or as background sounds or music, such as at the start or end of a slide show.
  36. Spend time reviewing the sound editing features built in to PowerPoint—they work well for adjusting sound clips. The trim tool is much like the crop tool for pictures, useful for shortening a long sound clip to fit a slide, or focussing on the important part of a clip. The fade in effect is especially useful with a loud clip, which may startle the audience if it plays abruptly.
  37. Unlike sounds, movies are not usually used as a background! They’re best inserted when they contain content relevant to the presentation.
  38. The features for adjusting movie playback are very similar to those for sounds.
  39. This feature is more like photos than sounds, in that you can modify the visual appearance of a movie as it plays.
  40. Review the topics covered in this lesson to remind students of what they have learned and accomplished, and to invite questions on any topics not entirely clear.