This document provides guidance on using Microsoft Publisher to create pamphlets and posters. It discusses templates, formatting text and images, inserting shapes, and tips for successful pamphlet design. Key recommendations include using a maximum of two fonts and two to three colors, leaving white space, and avoiding all-capital headings. Permission is required to use logos from trusts or organizations. The document includes step-by-step instructions for tasks in Publisher.
Simon Whiffin
Created November2008
Updated October 2013 Page 2
Contents
Introduction ............................................................................................................................................. 3
Getting started......................................................................................................................................... 3
Poster Presentation Template ............................................................................................................. 4
The Publisher Screen Layout.................................................................................................................... 7
Lining everything up................................................................................................................................. 9
Formatting the text................................................................................................................................ 10
Changing the font type ...................................................................................................................... 10
Changing the font colour ................................................................................................................... 10
Inserting Shapes..................................................................................................................................... 12
Inserting text inside the shape........................................................................................................... 12
Formatting the shape......................................................................................................................... 12
Inserting Images..................................................................................................................................... 14
Inserting an image in the foreground................................................................................................ 14
Clip art................................................................................................................................................ 15
Setting an image as the background.................................................................................................. 16
Submitting your work ............................................................................................................................ 19
What makes a successful pamphlet?..................................................................................................... 20
White Space ....................................................................................................................................... 20
Avoid headings set all in capital letters ............................................................................................. 20
Two font maximum............................................................................................................................ 20
Two to Three Colours maximum........................................................................................................ 20
Important........................................................................................................................................... 20
3.
Simon Whiffin
Created November2008
Updated October 2013 Page 3
Introduction
Publisher is Microsoft’s version of a desktop publishing application that allows you to create documents
that require complex formatting such as flyers, brochures, newsletters and handouts.
Getting started
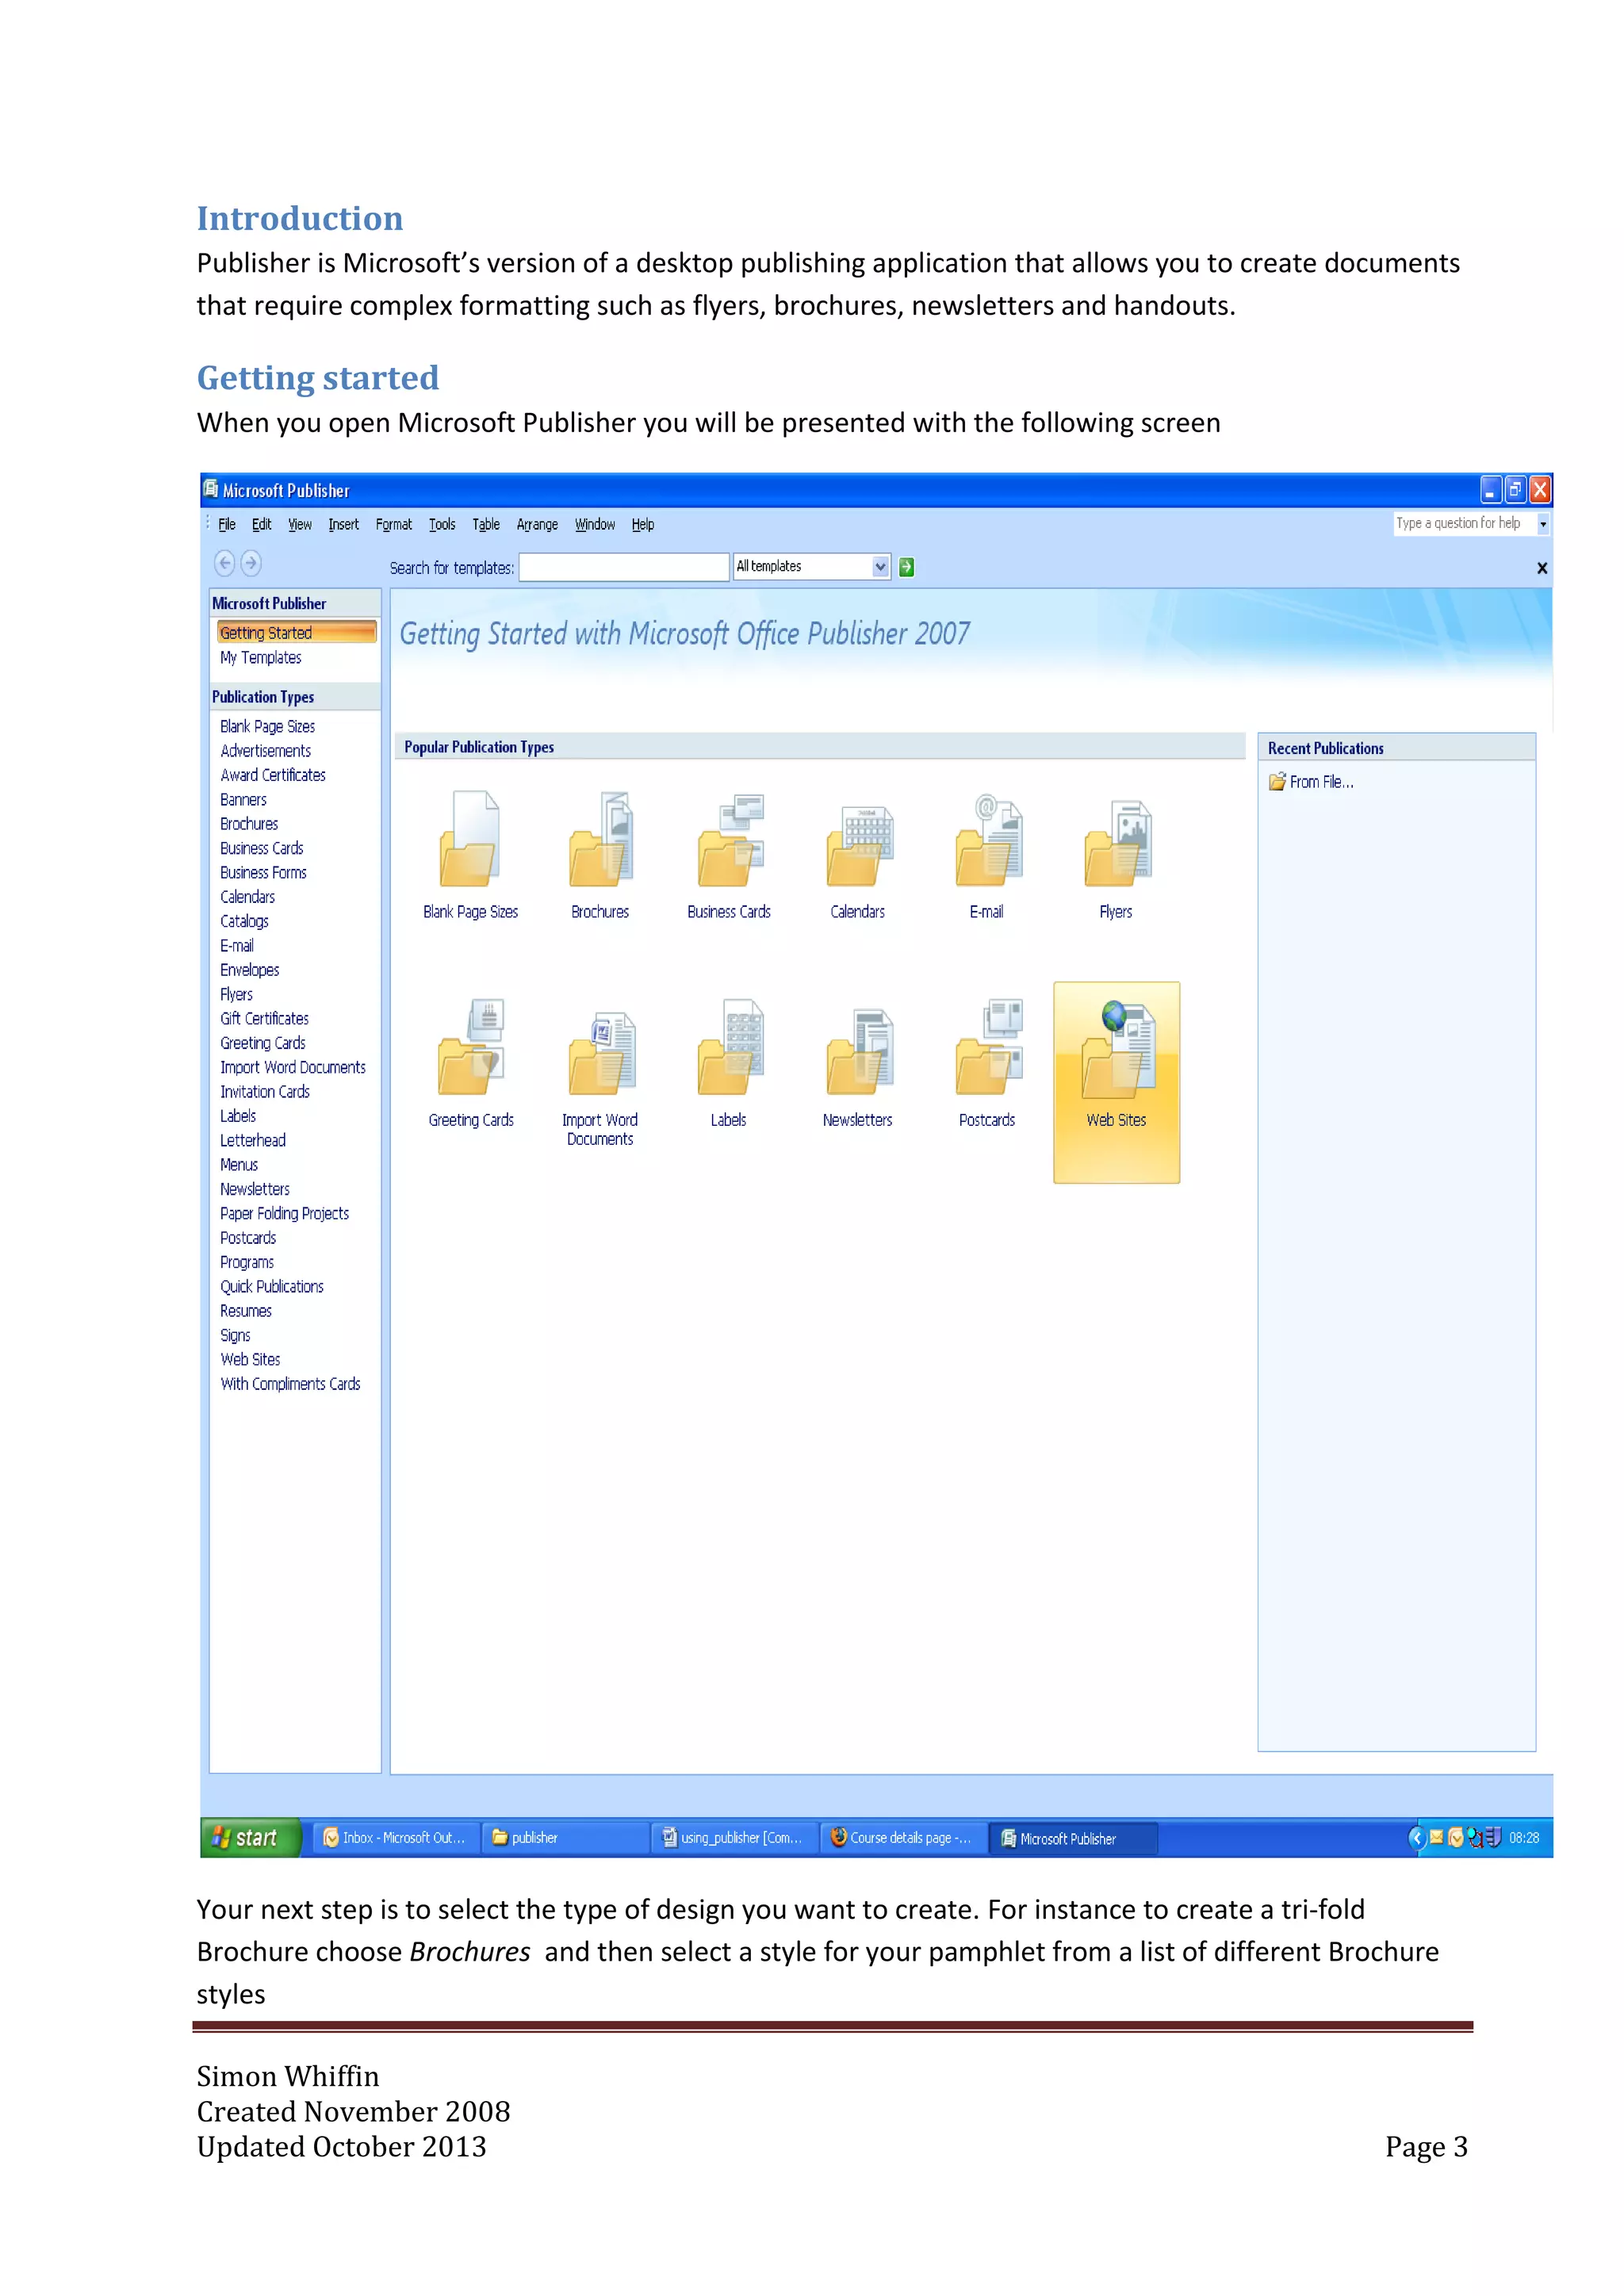
When you open Microsoft Publisher you will be presented with the following screen
Your next step is to select the type of design you want to create. For instance to create a tri-fold
Brochure choose Brochures and then select a style for your pamphlet from a list of different Brochure
styles
4.
Simon Whiffin
Created November2008
Updated October 2013 Page 4
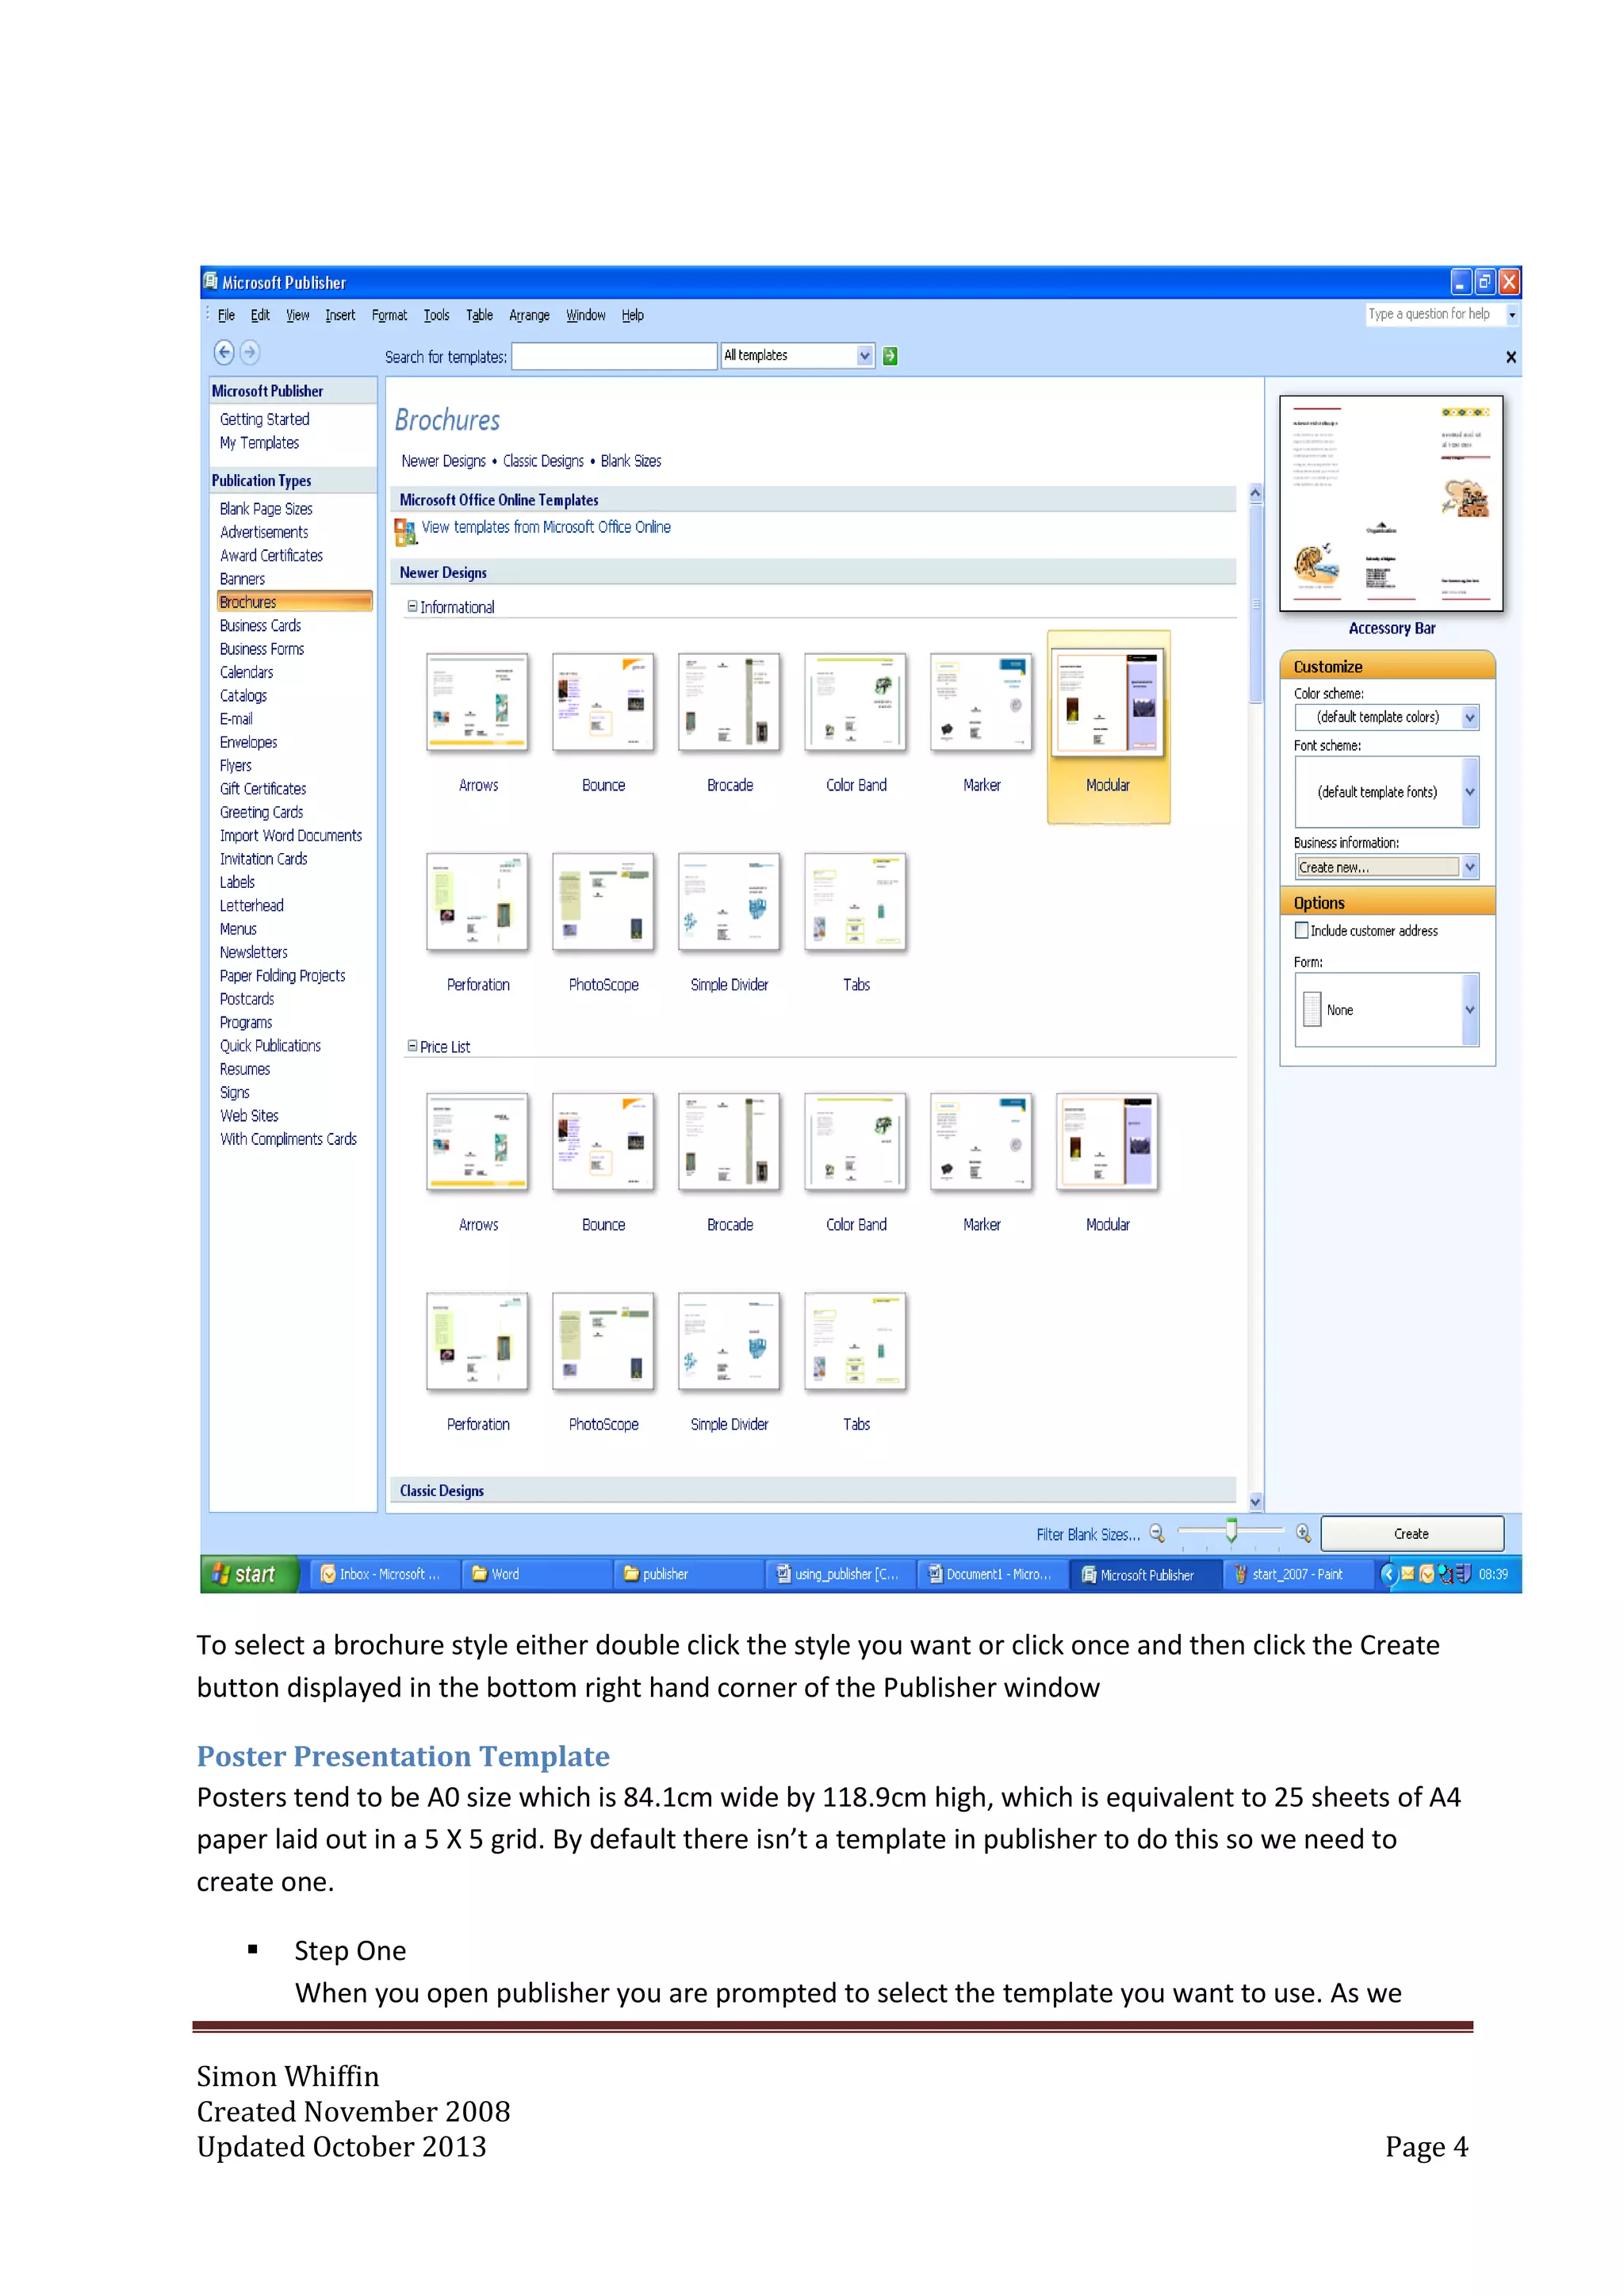
To select a brochure style either double click the style you want or click once and then click the Create
button displayed in the bottom right hand corner of the Publisher window
Poster Presentation Template
Posters tend to be A0 size which is 84.1cm wide by 118.9cm high, which is equivalent to 25 sheets of A4
paper laid out in a 5 X 5 grid. By default there isn’t a template in publisher to do this so we need to
create one.
Step One
When you open publisher you are prompted to select the template you want to use. As we
5.
Simon Whiffin
Created November2008
Updated October 2013 Page 5
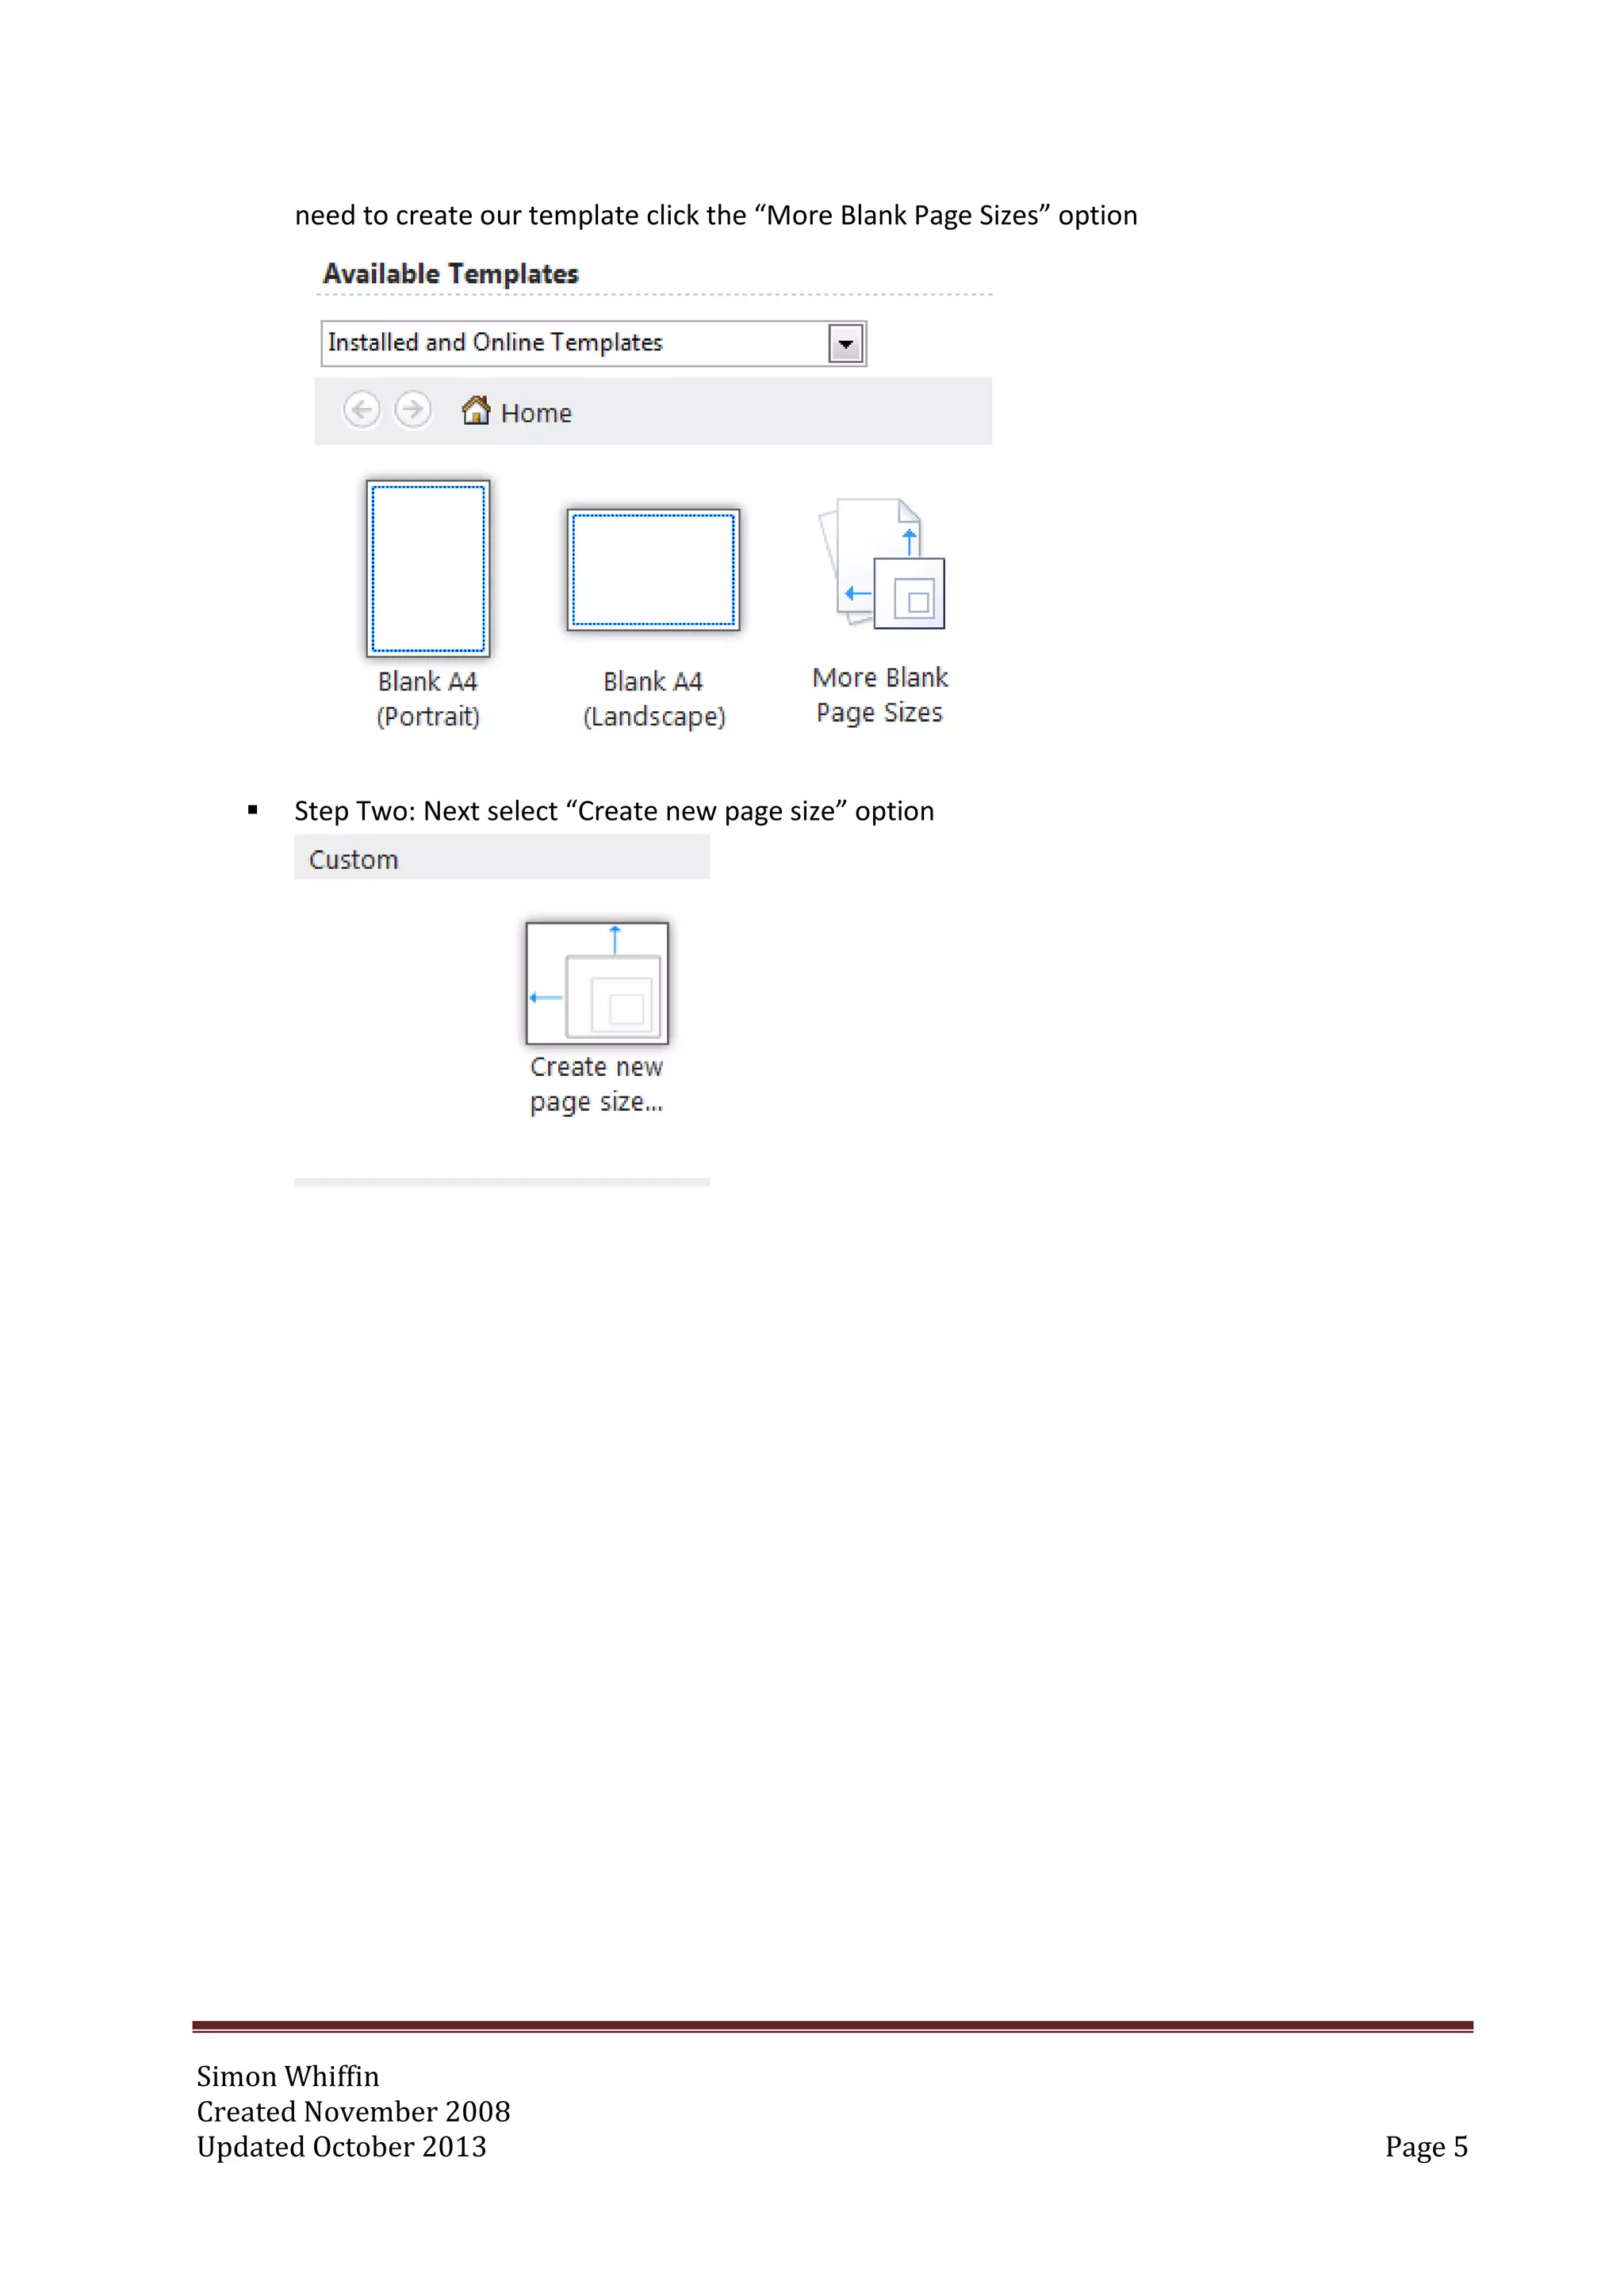
need to create our template click the “More Blank Page Sizes” option
Step Two: Next select “Create new page size” option
6.
Simon Whiffin
Created November2008
Updated October 2013 Page 6
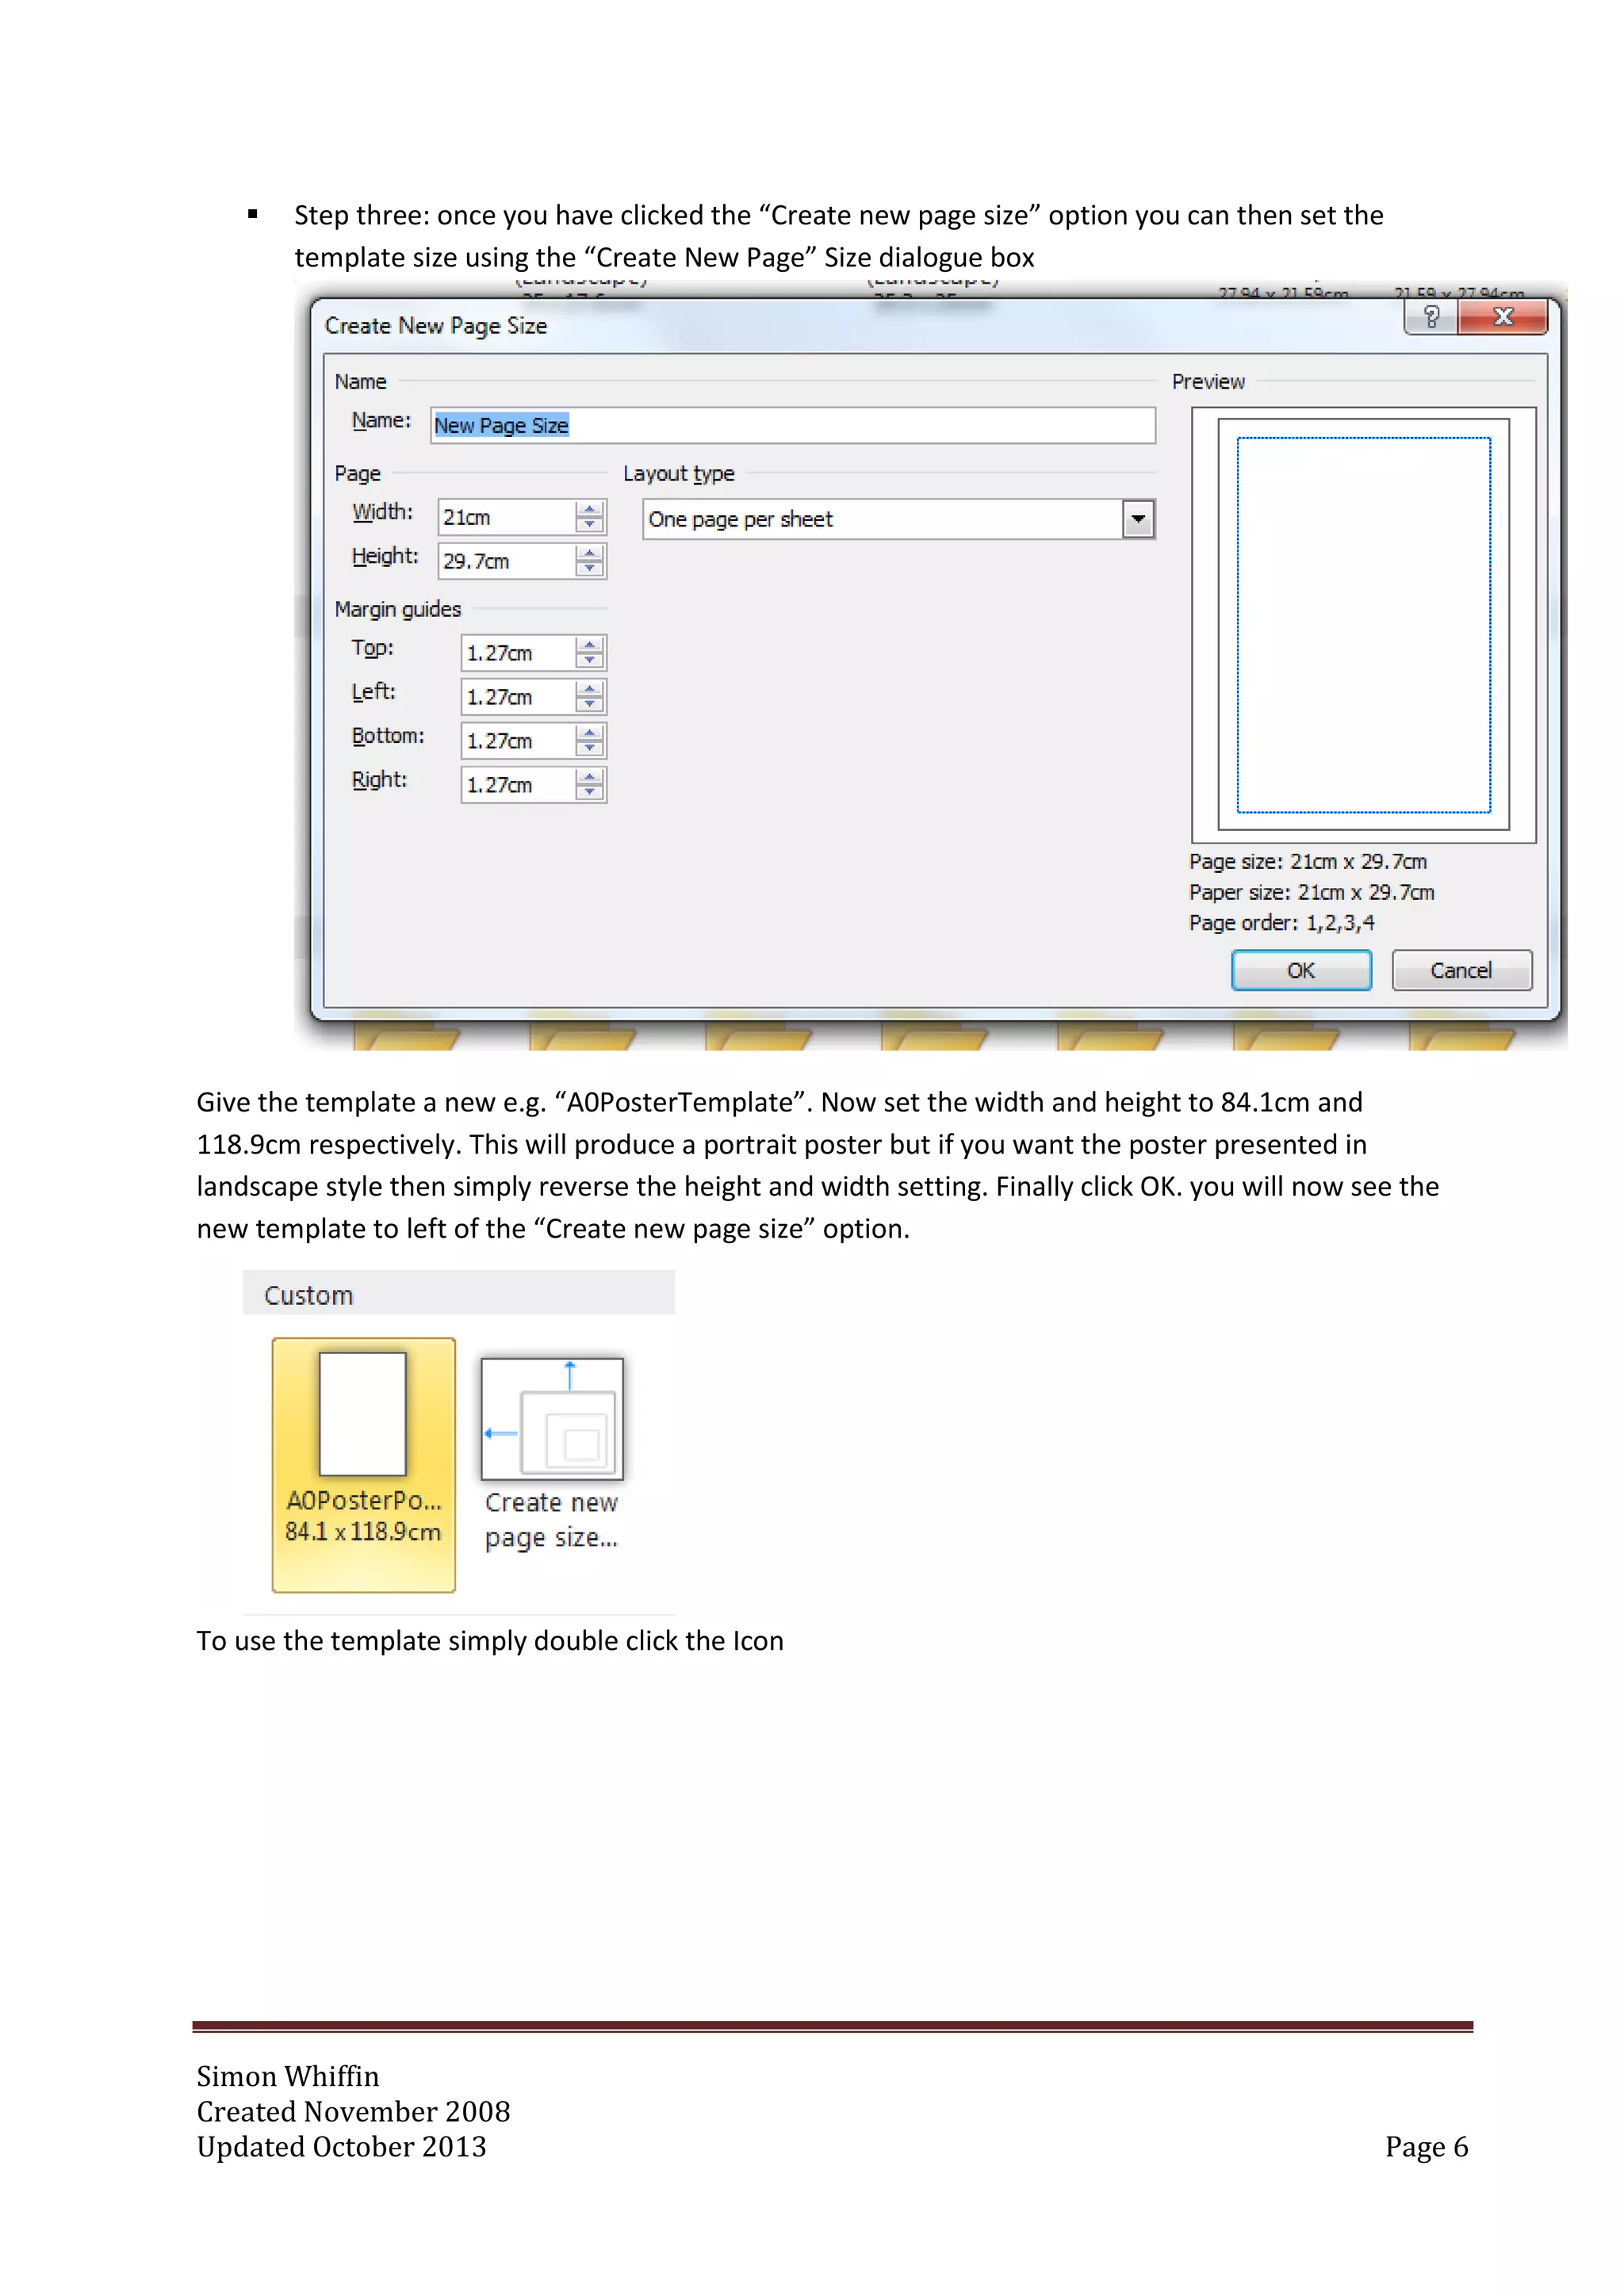
Step three: once you have clicked the “Create new page size” option you can then set the
template size using the “Create New Page” Size dialogue box
Give the template a new e.g. “A0PosterTemplate”. Now set the width and height to 84.1cm and
118.9cm respectively. This will produce a portrait poster but if you want the poster presented in
landscape style then simply reverse the height and width setting. Finally click OK. you will now see the
new template to left of the “Create new page size” option.
To use the template simply double click the Icon
7.
Simon Whiffin
Created November2008
Updated October 2013 Page 7
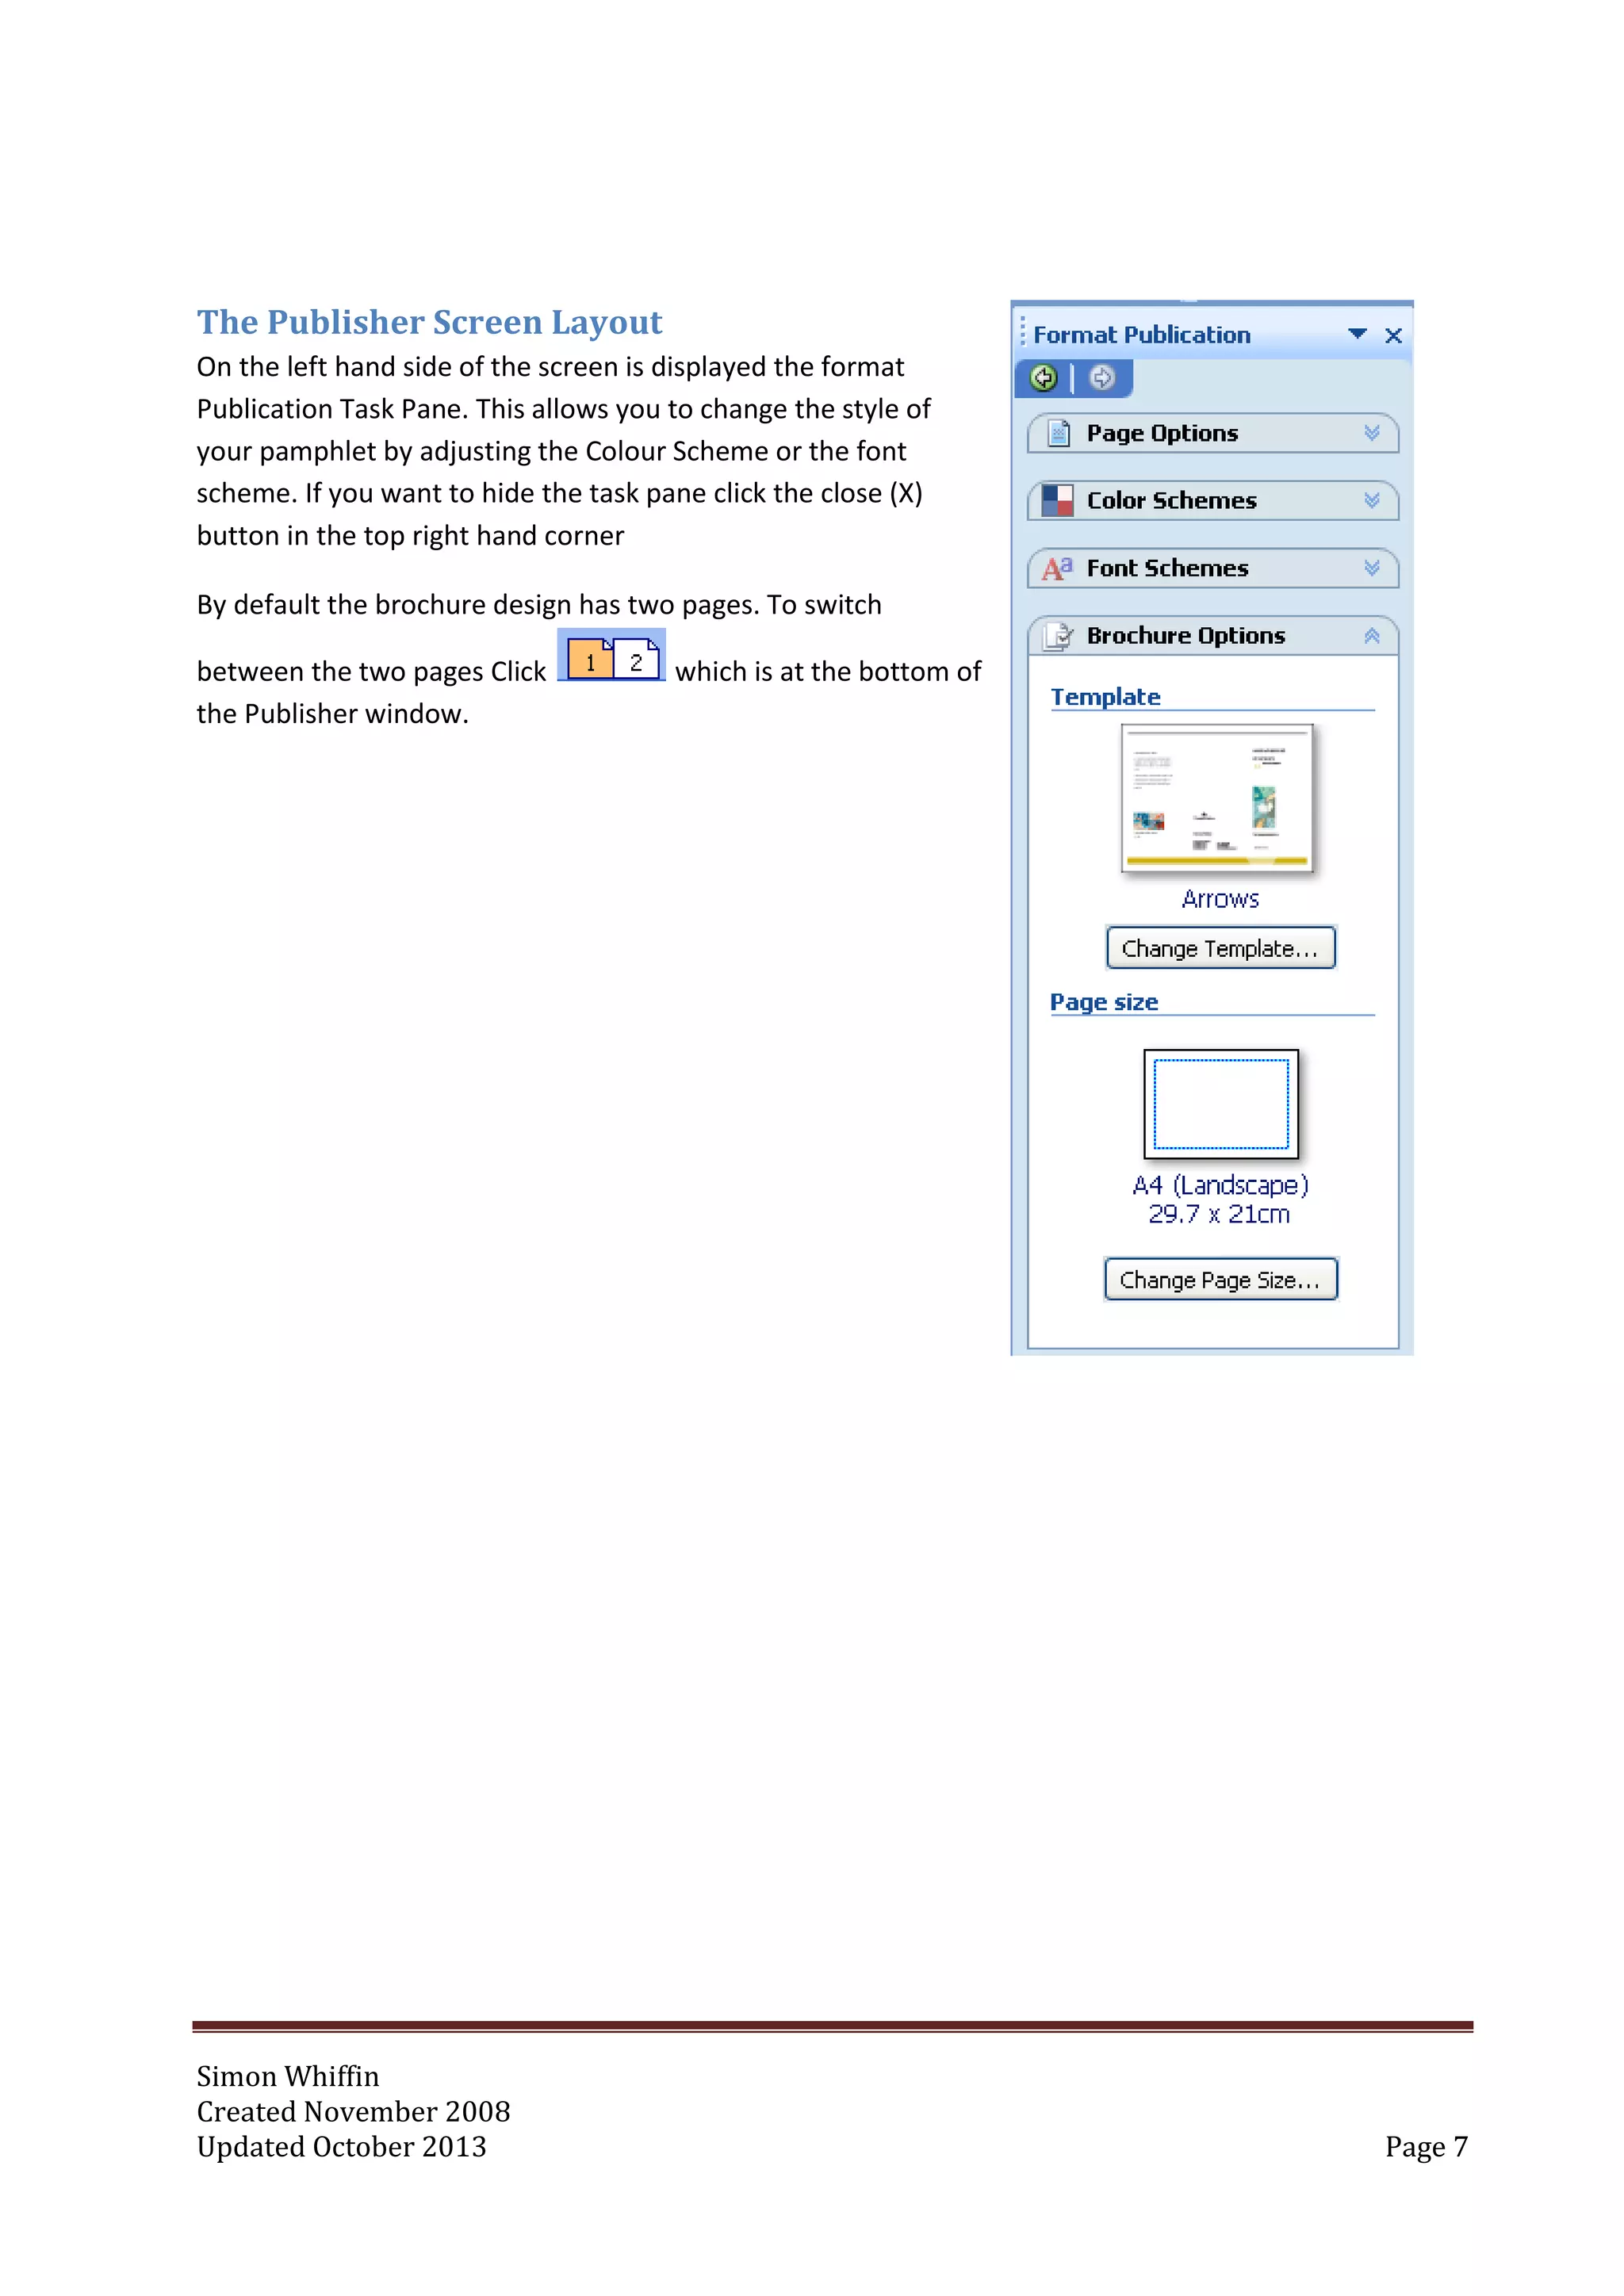
The Publisher Screen Layout
On the left hand side of the screen is displayed the format
Publication Task Pane. This allows you to change the style of
your pamphlet by adjusting the Colour Scheme or the font
scheme. If you want to hide the task pane click the close (X)
button in the top right hand corner
By default the brochure design has two pages. To switch
between the two pages Click which is at the bottom of
the Publisher window.
8.
Simon Whiffin
Created November2008
Updated October 2013 Page 8
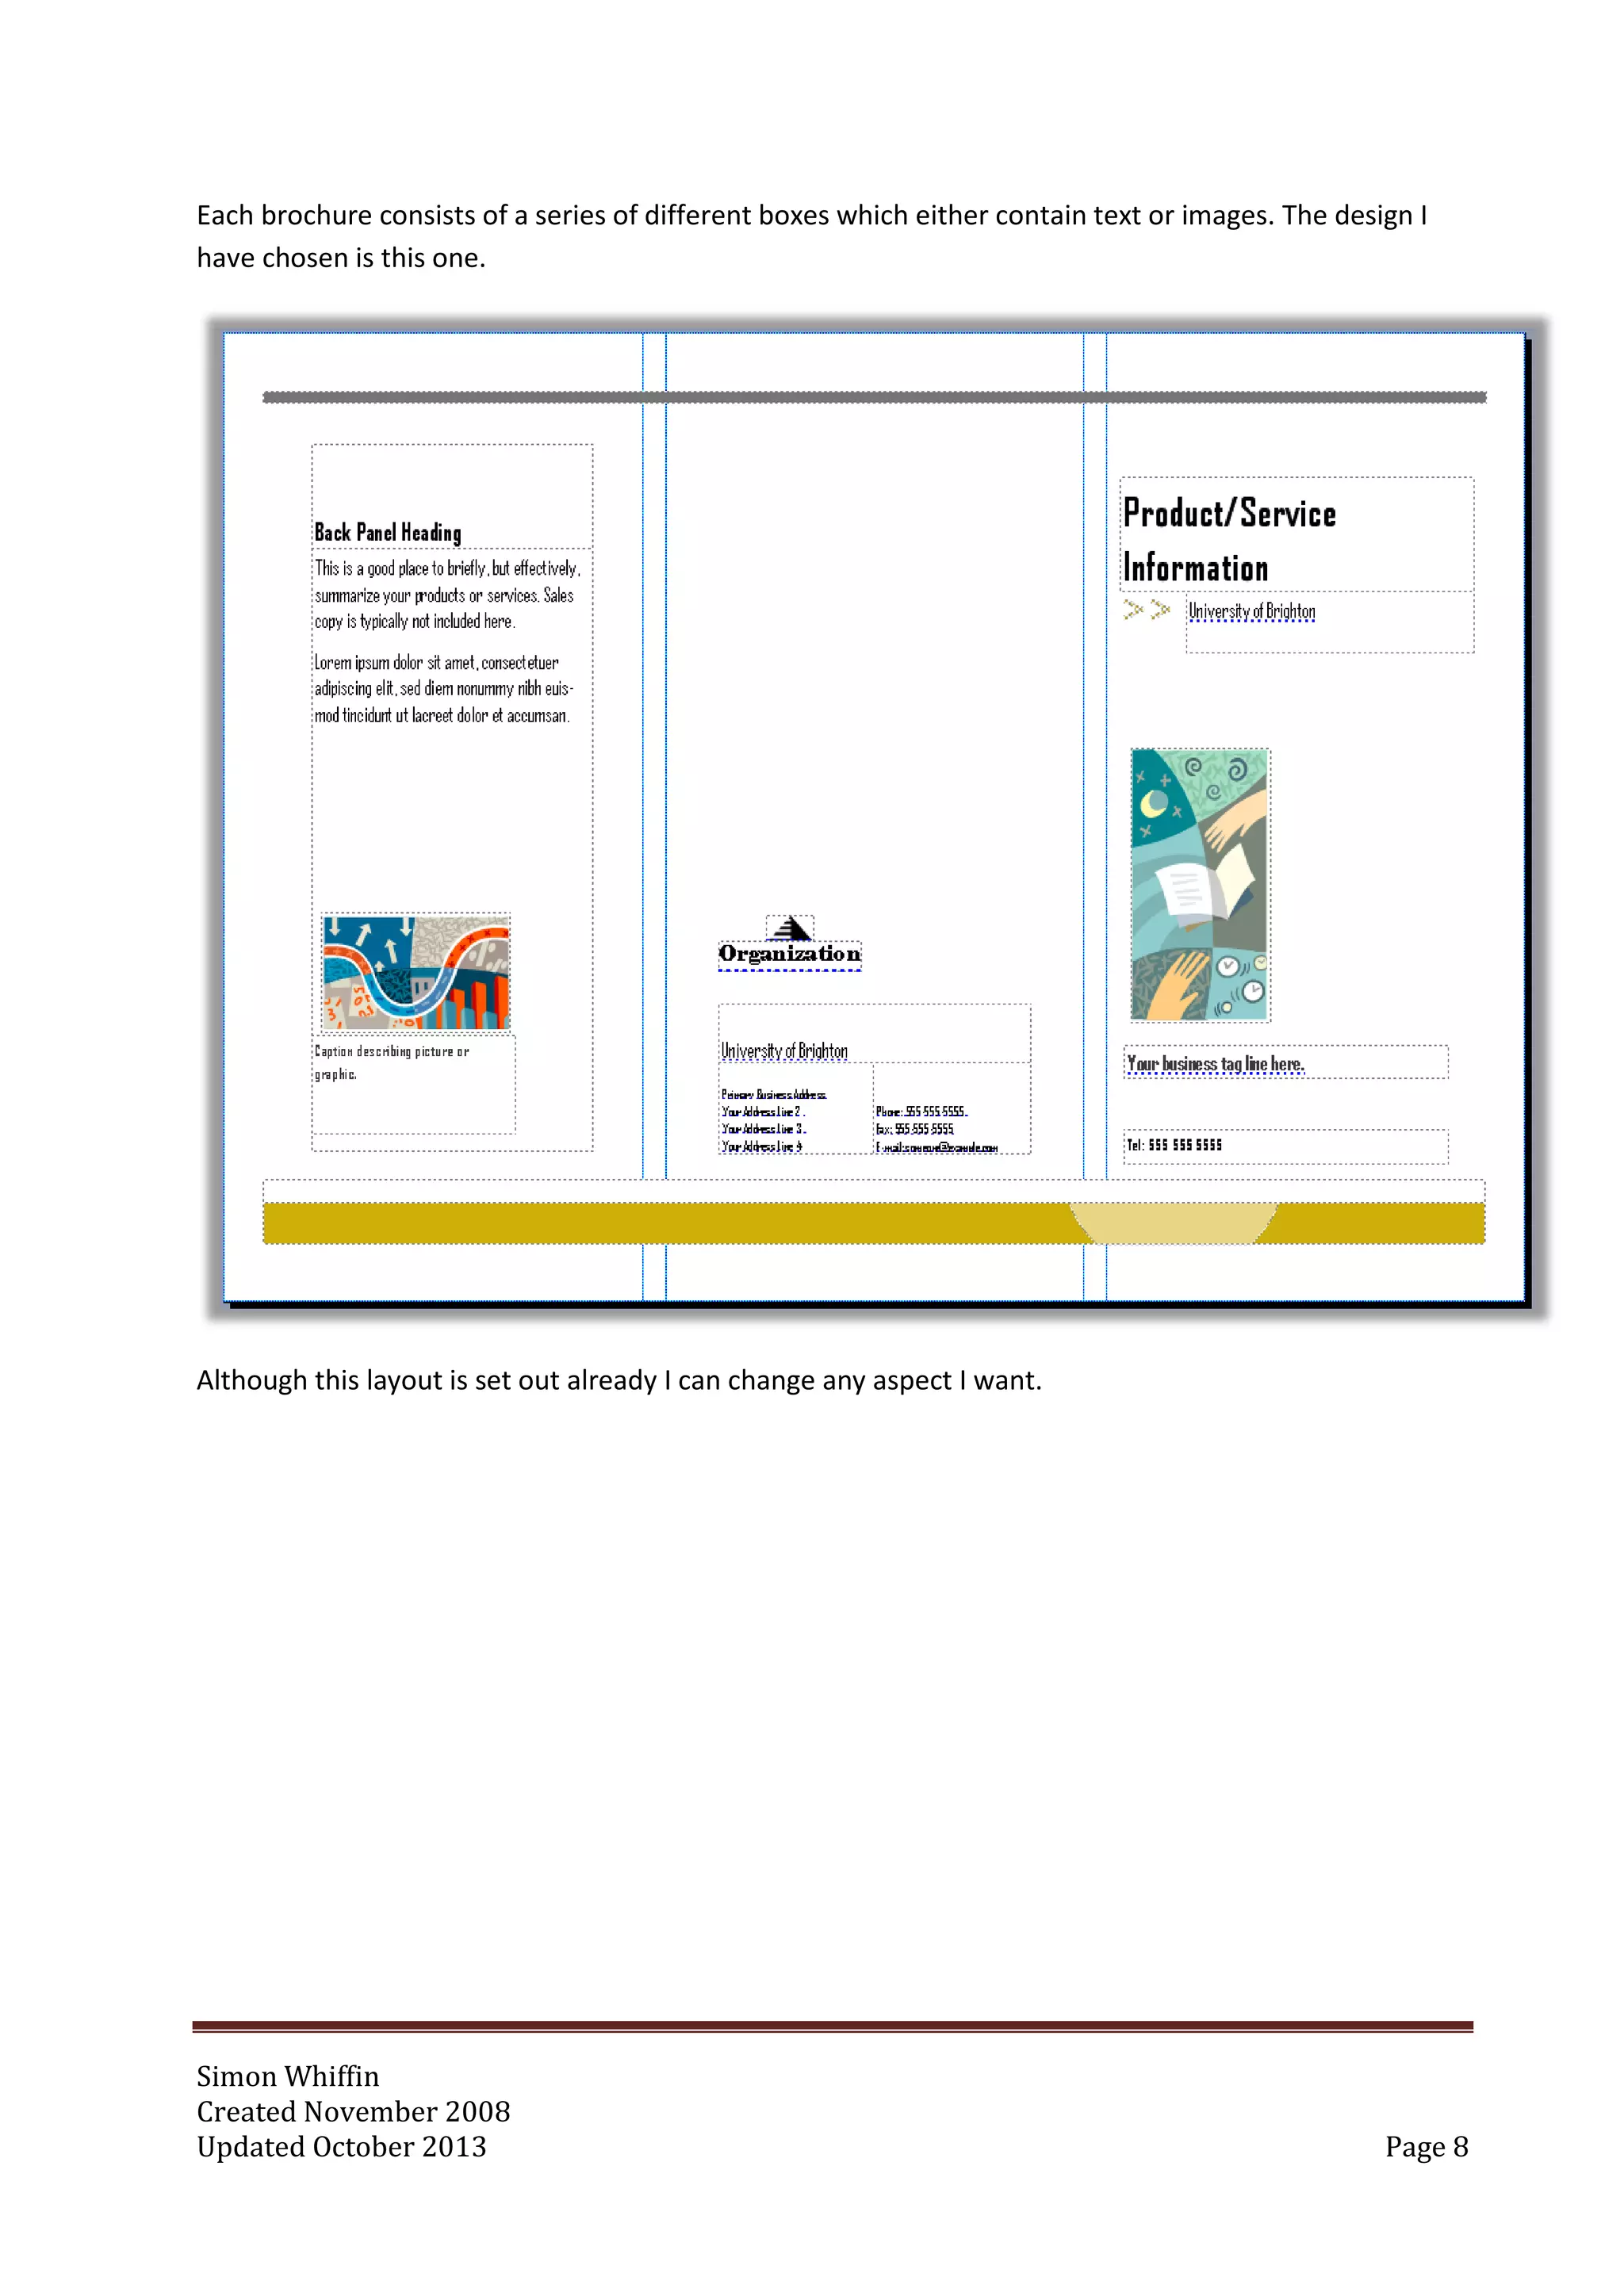
Each brochure consists of a series of different boxes which either contain text or images. The design I
have chosen is this one.
Although this layout is set out already I can change any aspect I want.
9.
Simon Whiffin
Created November2008
Updated October 2013 Page 9
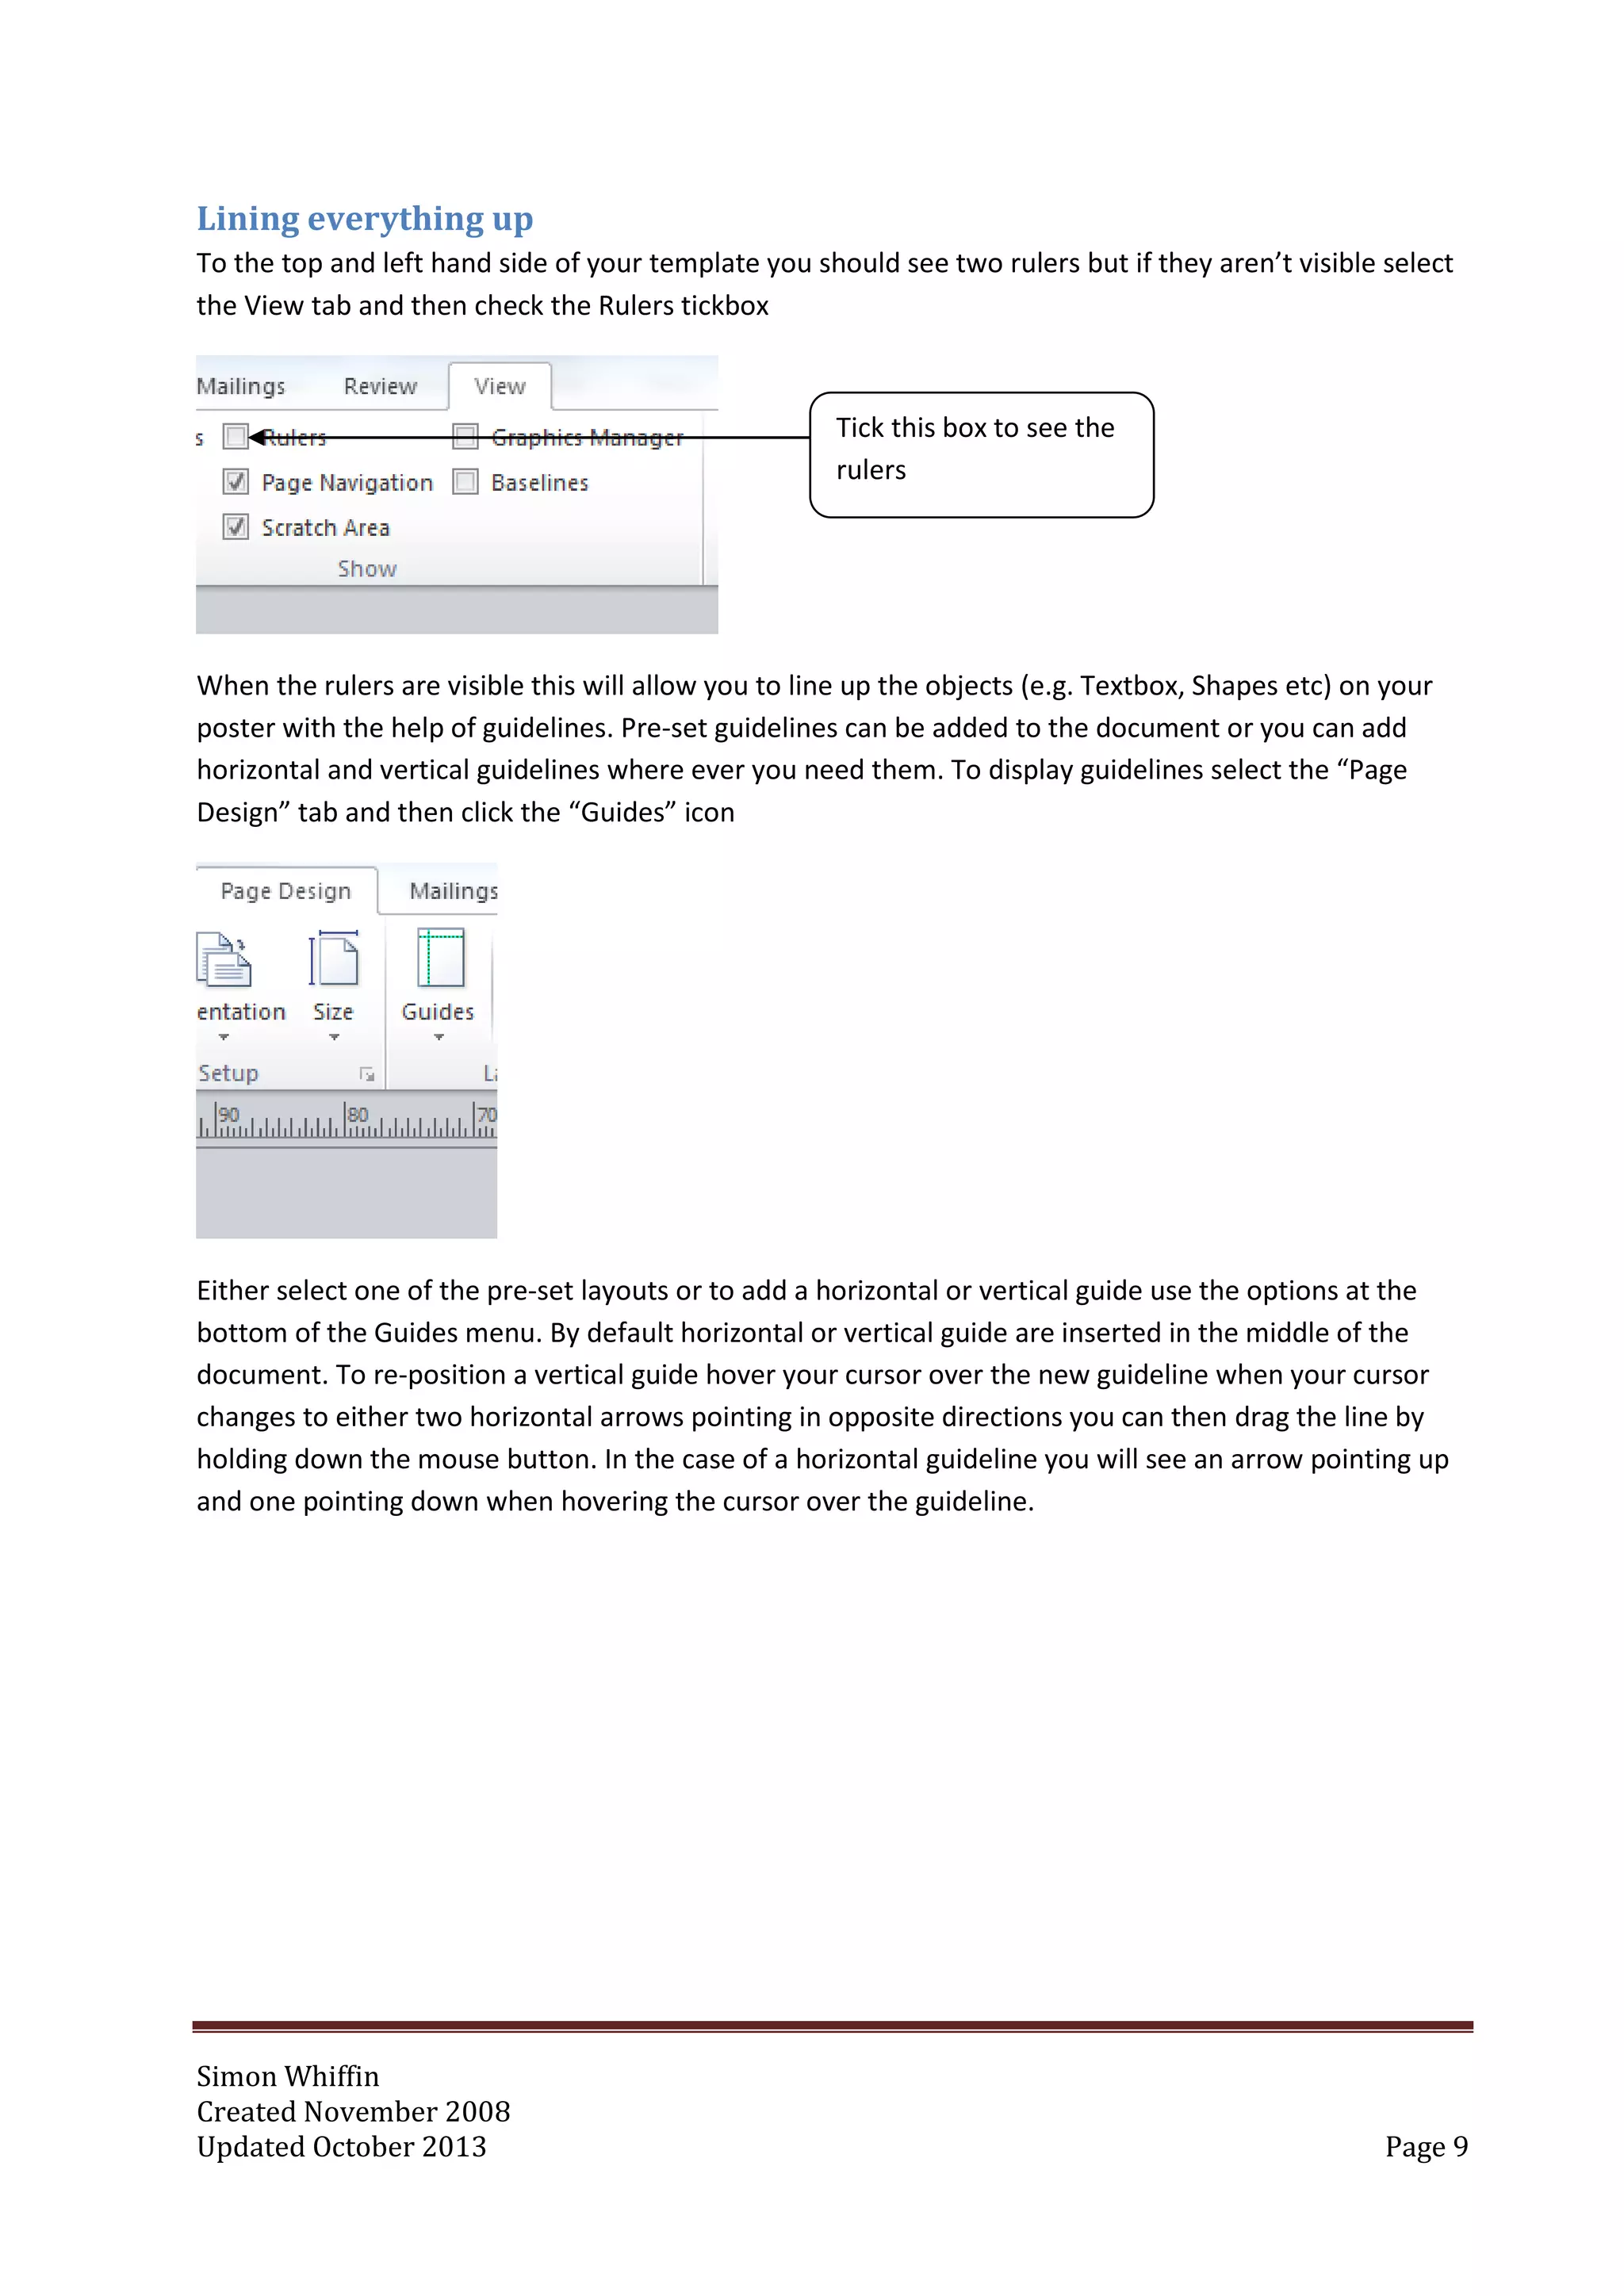
Lining everything up
To the top and left hand side of your template you should see two rulers but if they aren’t visible select
the View tab and then check the Rulers tickbox
When the rulers are visible this will allow you to line up the objects (e.g. Textbox, Shapes etc) on your
poster with the help of guidelines. Pre-set guidelines can be added to the document or you can add
horizontal and vertical guidelines where ever you need them. To display guidelines select the “Page
Design” tab and then click the “Guides” icon
Either select one of the pre-set layouts or to add a horizontal or vertical guide use the options at the
bottom of the Guides menu. By default horizontal or vertical guide are inserted in the middle of the
document. To re-position a vertical guide hover your cursor over the new guideline when your cursor
changes to either two horizontal arrows pointing in opposite directions you can then drag the line by
holding down the mouse button. In the case of a horizontal guideline you will see an arrow pointing up
and one pointing down when hovering the cursor over the guideline.
Tick this box to see the
rulers
10.
Simon Whiffin
Created November2008
Updated October 2013 Page 10
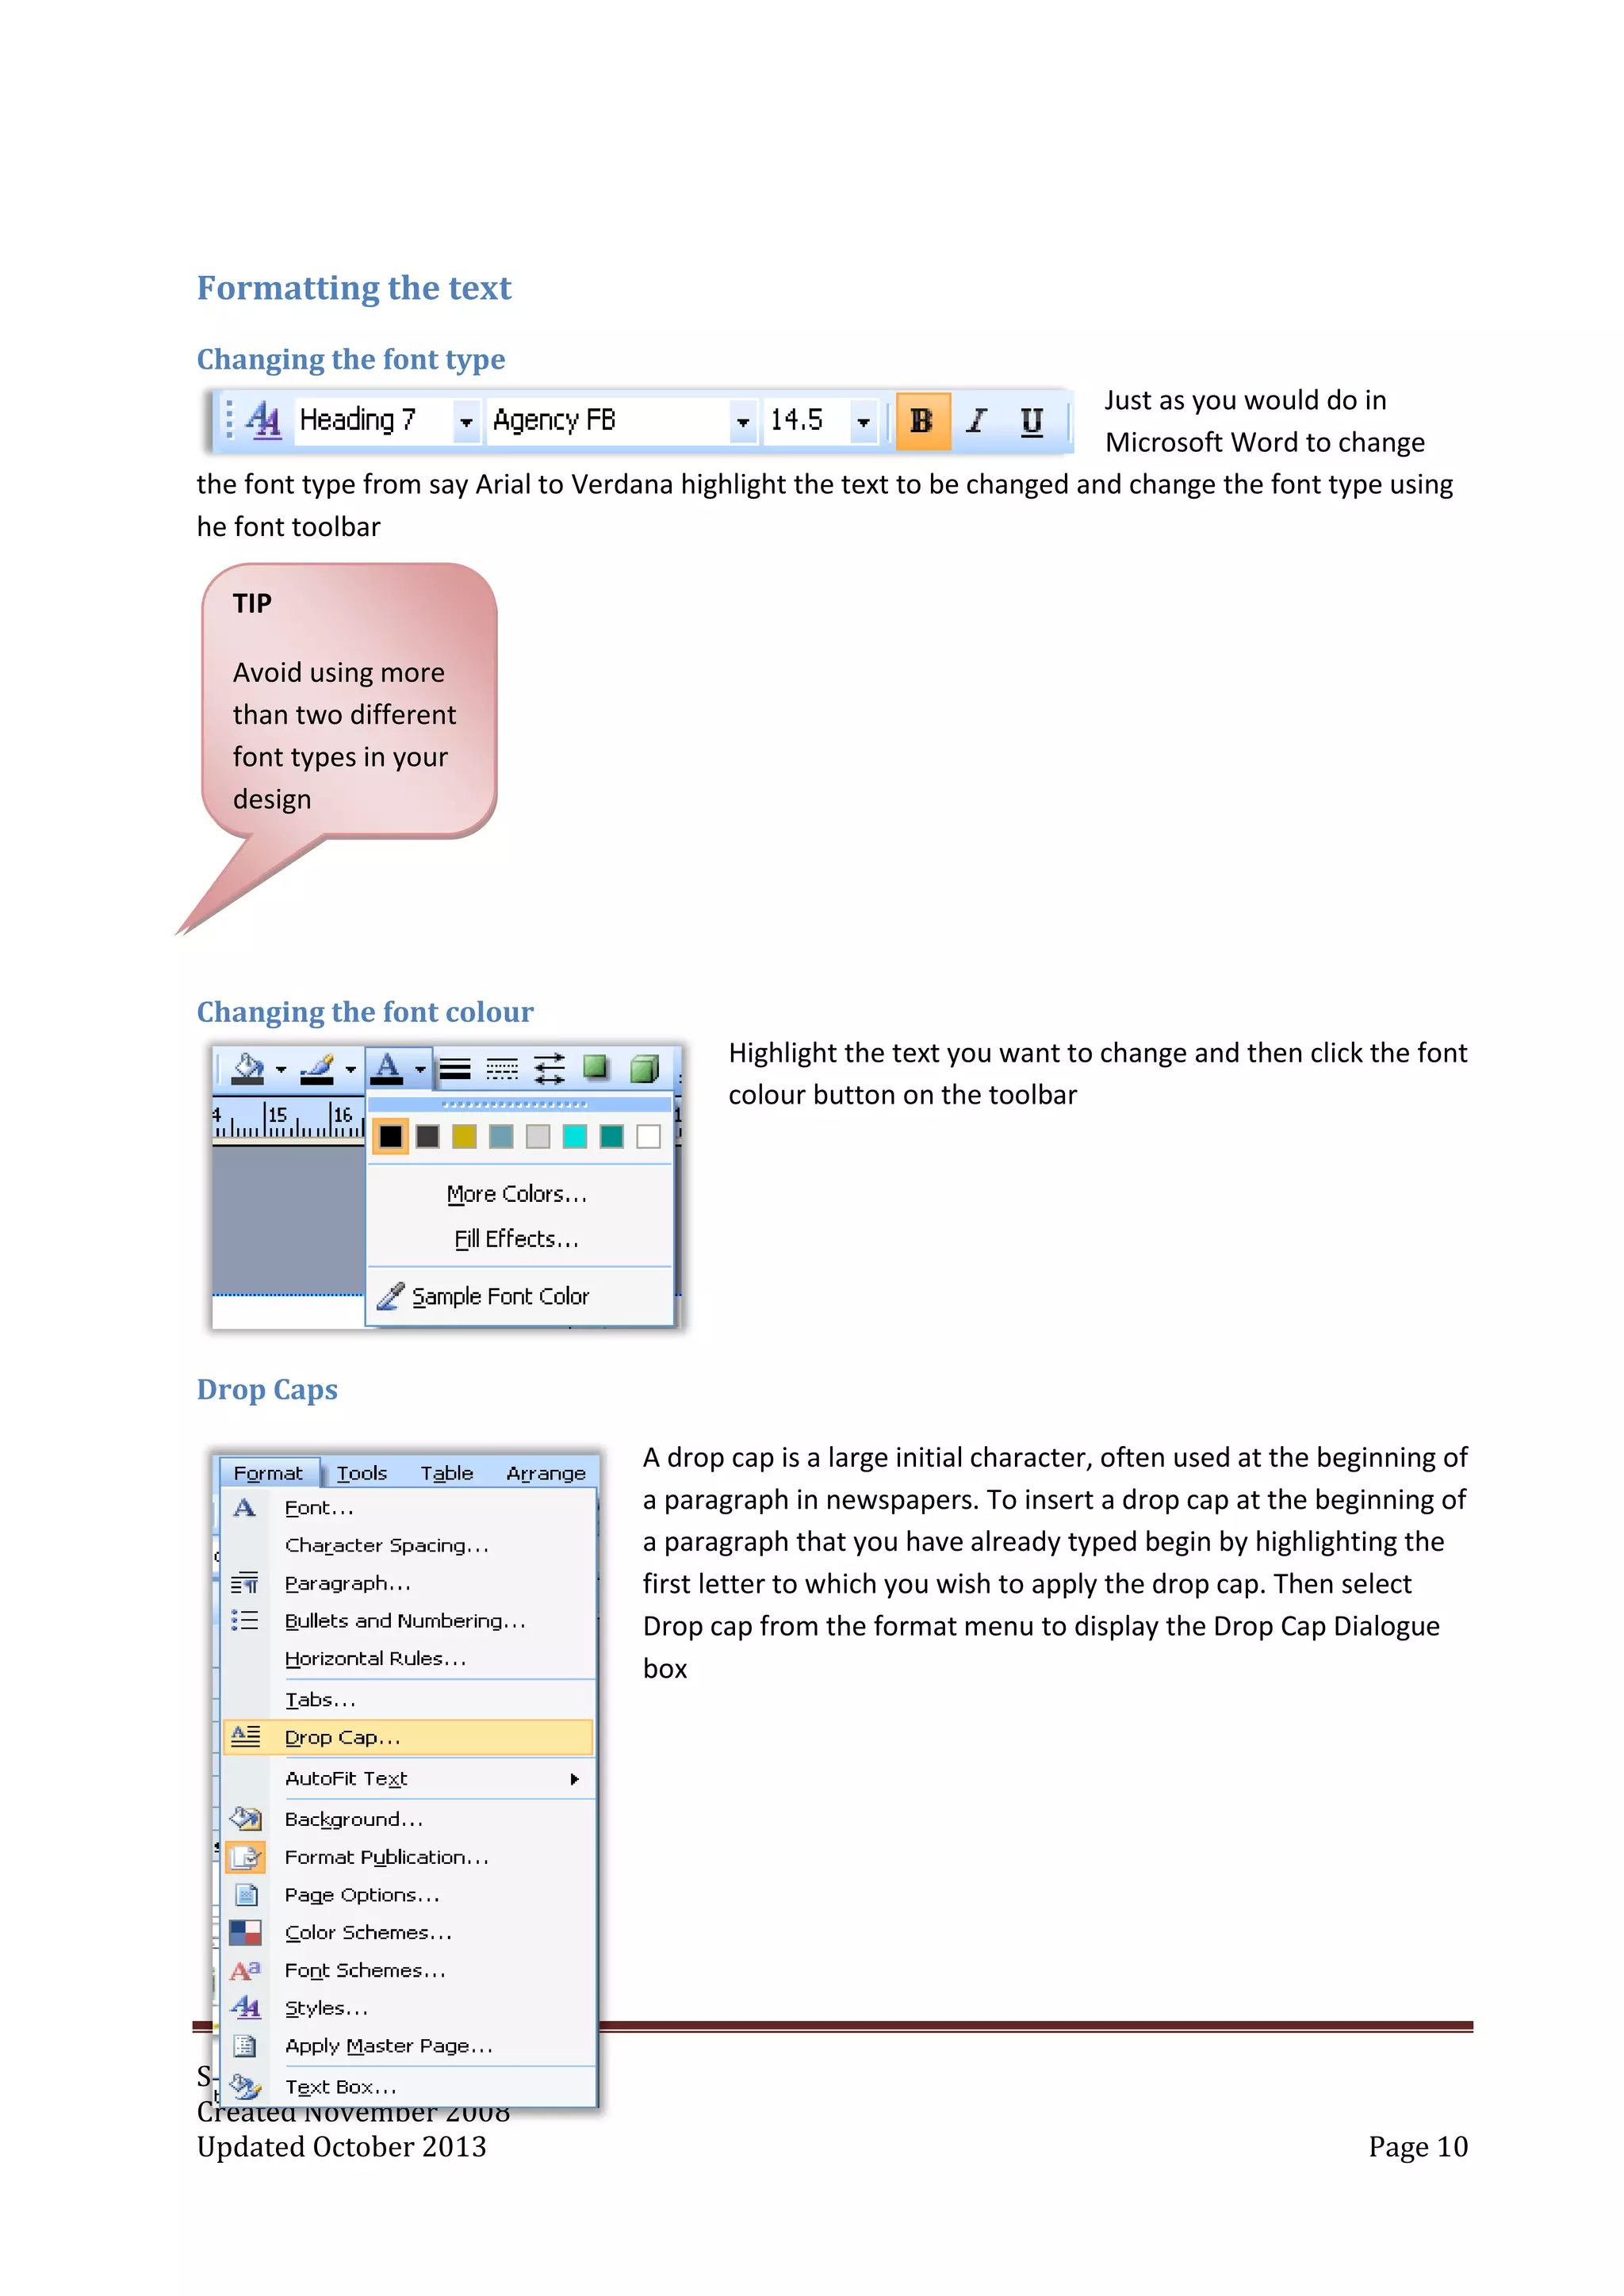
Formatting the text
Changing the font type
Just as you would do in
Microsoft Word to change
the font type from say Arial to Verdana highlight the text to be changed and change the font type using
he font toolbar
Changing the font colour
Highlight the text you want to change and then click the font
colour button on the toolbar
Drop Caps
A drop cap is a large initial character, often used at the beginning of
a paragraph in newspapers. To insert a drop cap at the beginning of
a paragraph that you have already typed begin by highlighting the
first letter to which you wish to apply the drop cap. Then select
Drop cap from the format menu to display the Drop Cap Dialogue
box
TIP
Avoid using more
than two different
font types in your
design
11.
Simon Whiffin
Created November2008
Updated October 2013 Page 11
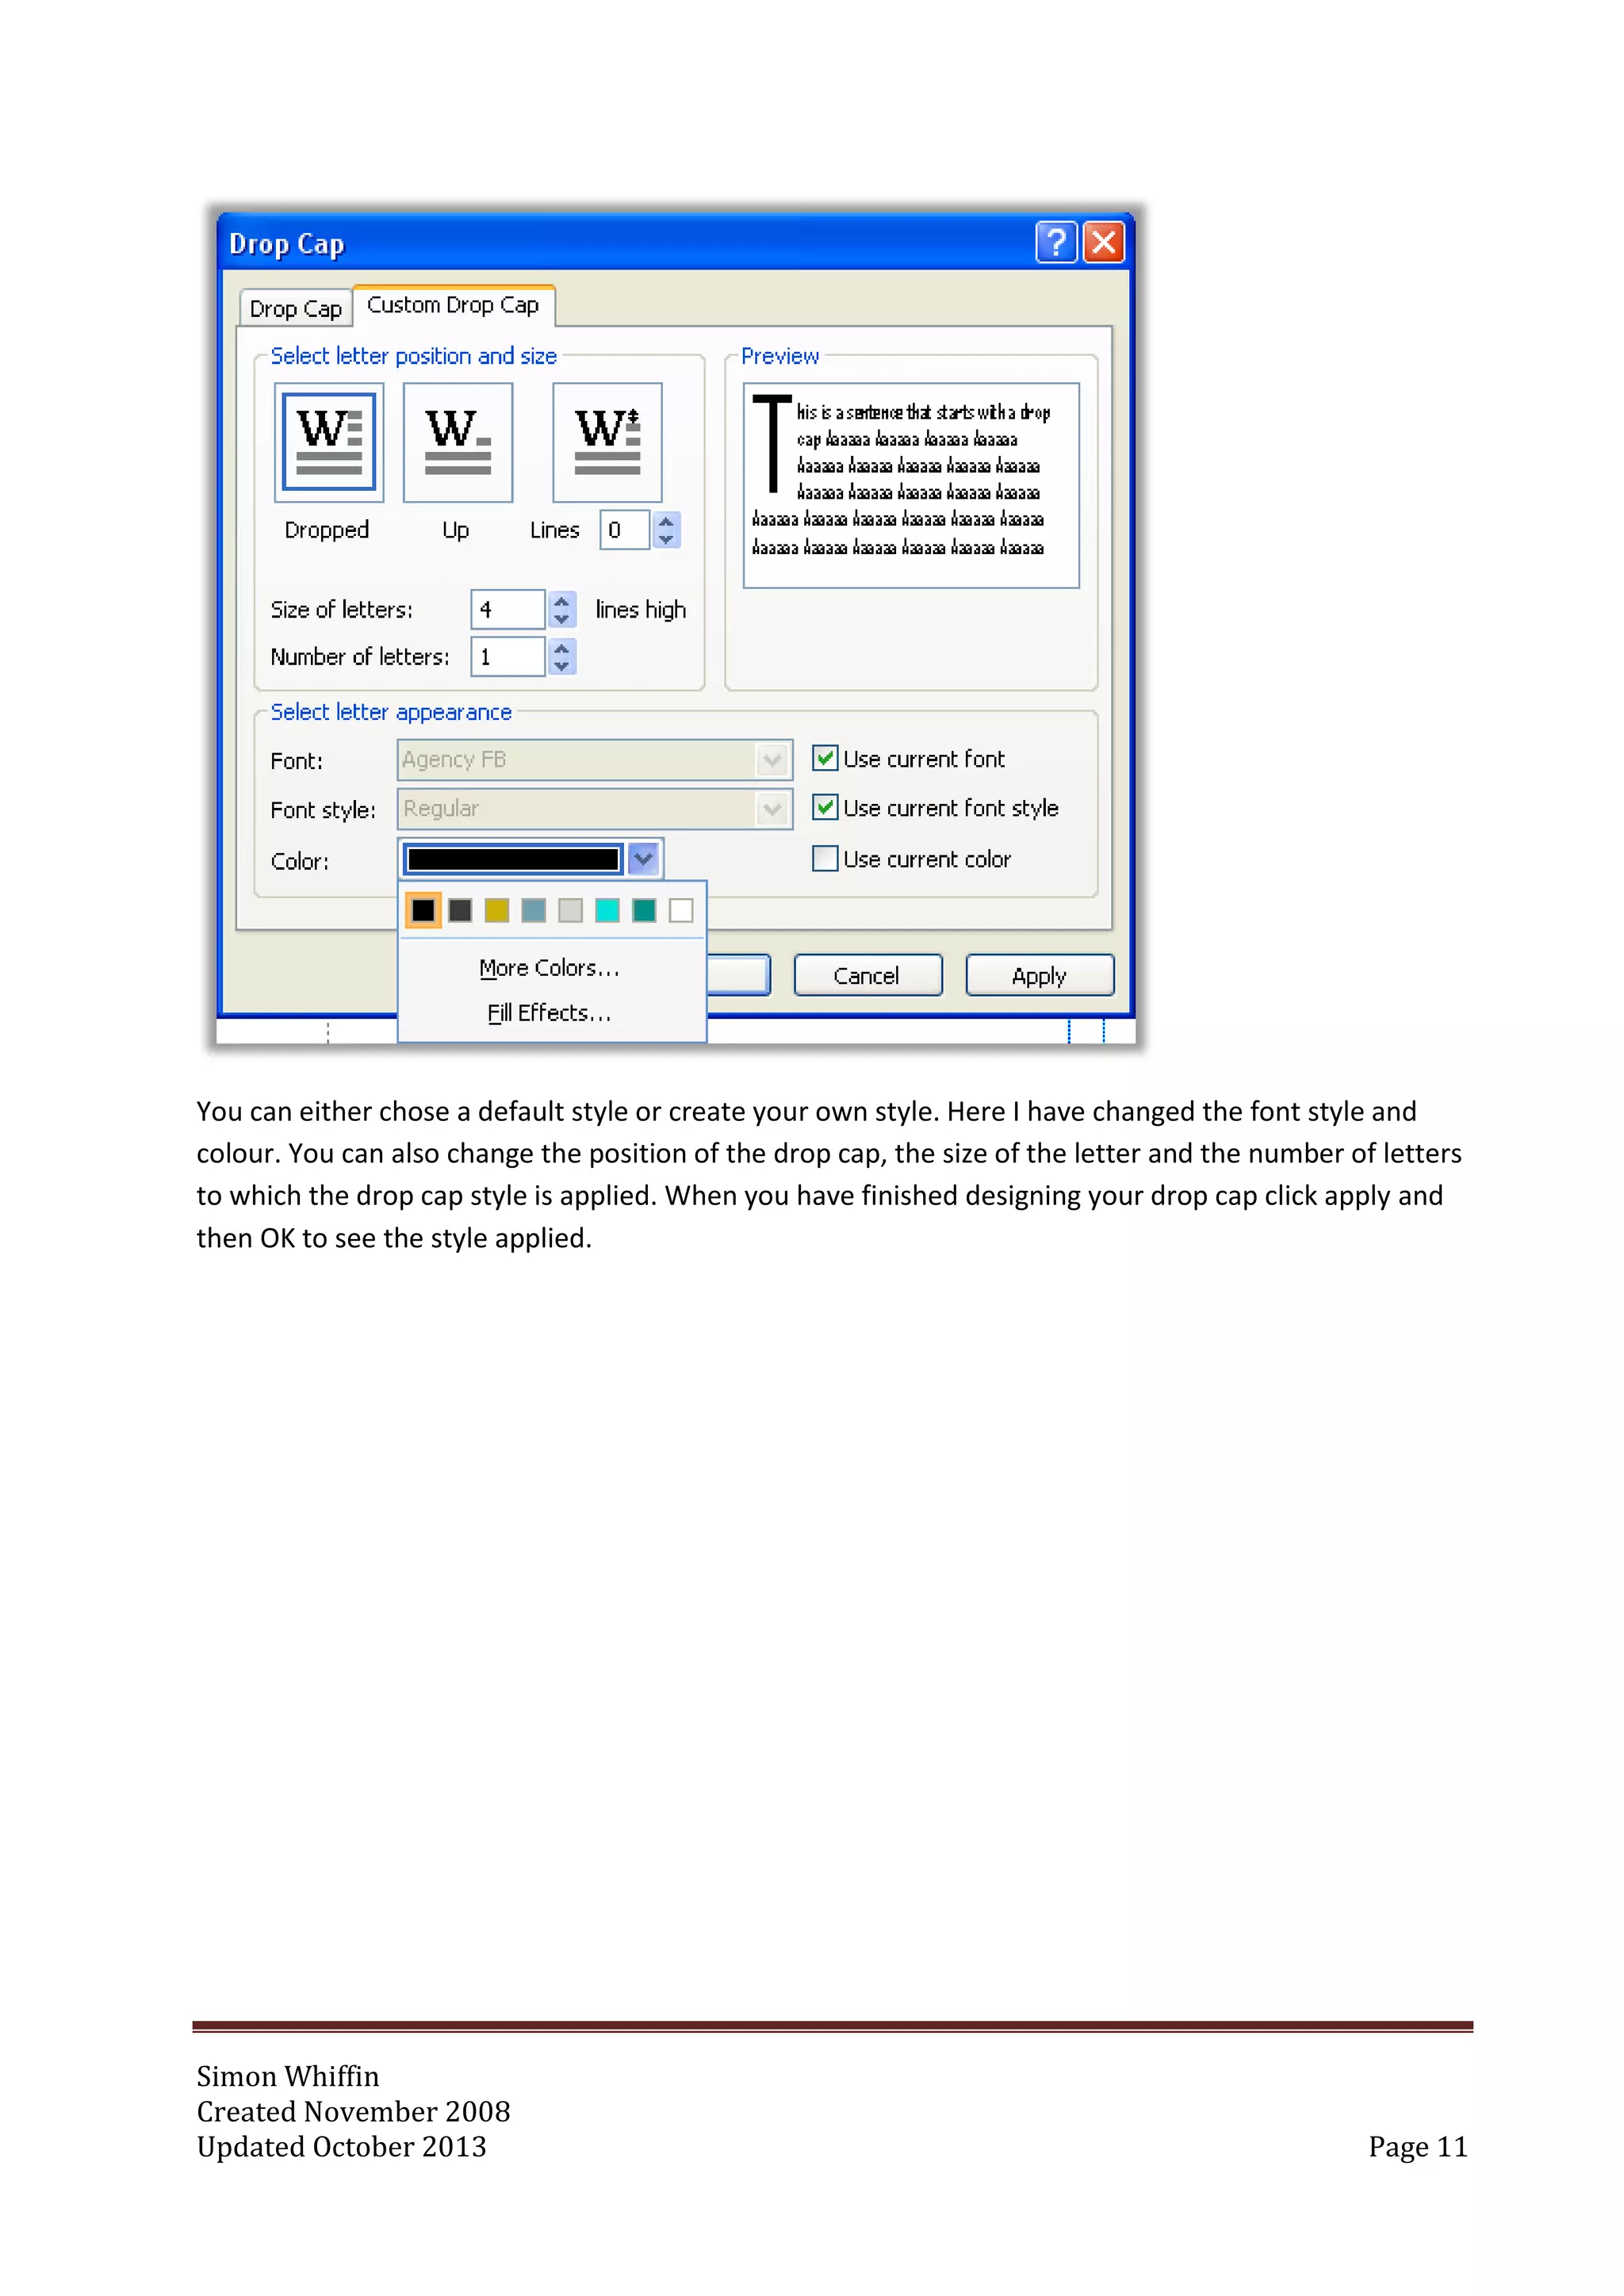
You can either chose a default style or create your own style. Here I have changed the font style and
colour. You can also change the position of the drop cap, the size of the letter and the number of letters
to which the drop cap style is applied. When you have finished designing your drop cap click apply and
then OK to see the style applied.
12.
Simon Whiffin
Created November2008
Updated October 2013 Page 12
Inserting Shapes
Inserting text inside the shape
Right mouse click inside the Shape and select Add Text from the pop up menu.
Formatting the shape
Setting border width: select the Drawing Tools tab and then click shape outline.
To change the size of the border choose “Weight” from the Shape Outline menu.
Changing border colour: this can be done from the Shape outline menu. To change the colour
select the colour you want from the colour pallet displayed on the Shape Outline menu.
Alternatively you can set the colour to match another colour you have already used say from a
picture. Here’s a link to a short clip showing how to do this (no commentary though) Sampling
Colour.
This is an example of a rounded textbox. To
add a shape like this select the Insert tab,
click Shapes button and select the shape you
want.
Simon Whiffin
Created November2008
Updated October 2013 Page 14
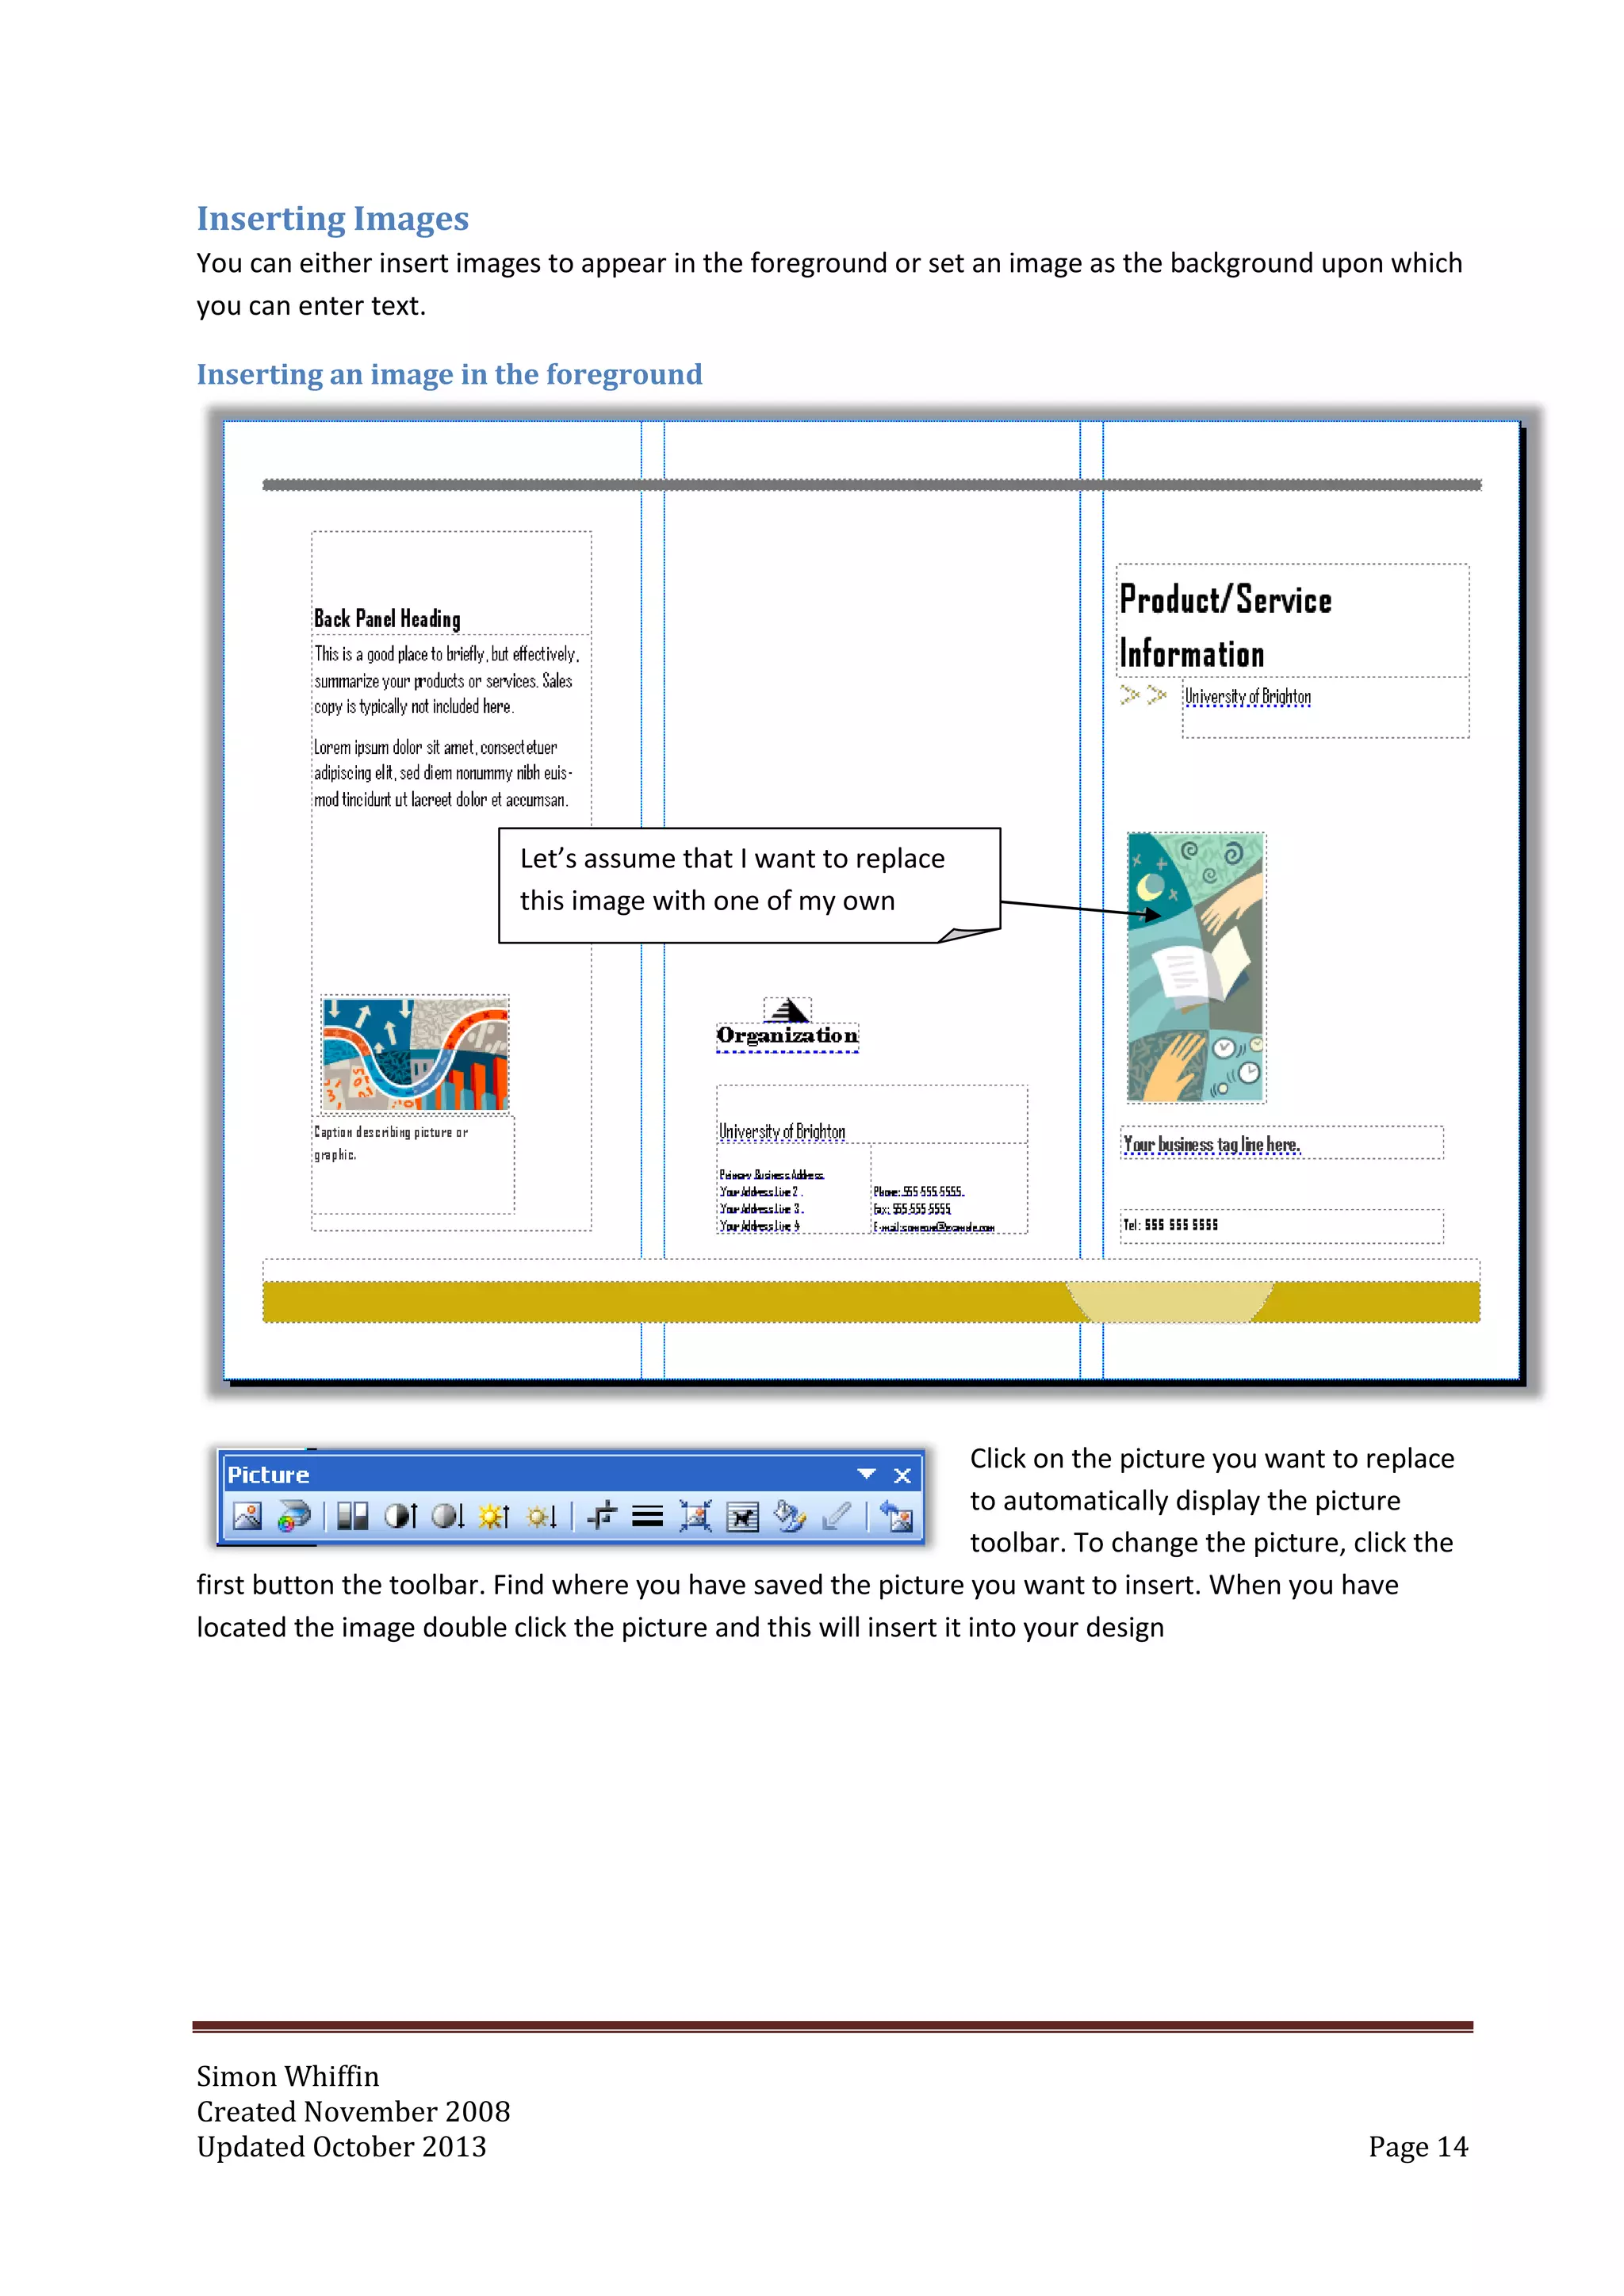
Inserting Images
You can either insert images to appear in the foreground or set an image as the background upon which
you can enter text.
Inserting an image in the foreground
Click on the picture you want to replace
to automatically display the picture
toolbar. To change the picture, click the
first button the toolbar. Find where you have saved the picture you want to insert. When you have
located the image double click the picture and this will insert it into your design
Let’s assume that I want to replace
this image with one of my own
15.
Simon Whiffin
Created November2008
Updated October 2013 Page 15
Clip art
If you don’t have any images or are concerned about using images sourced from google then try using
Clip art, which is Microsoft’s database of open source (i.e. copyright free) images. The Clip art icon is
located on the Insert menu bar. Trying searching on subjects like Medicine, Nursing to view images
tagged with those descriptions.
16.
Simon Whiffin
Created November2008
Updated October 2013 Page 16
Setting an image as the background
First insert the image you want as the background into your design as described above.
This is the image I want to set as
the background
17.
Simon Whiffin
Created November2008
Updated October 2013 Page 17
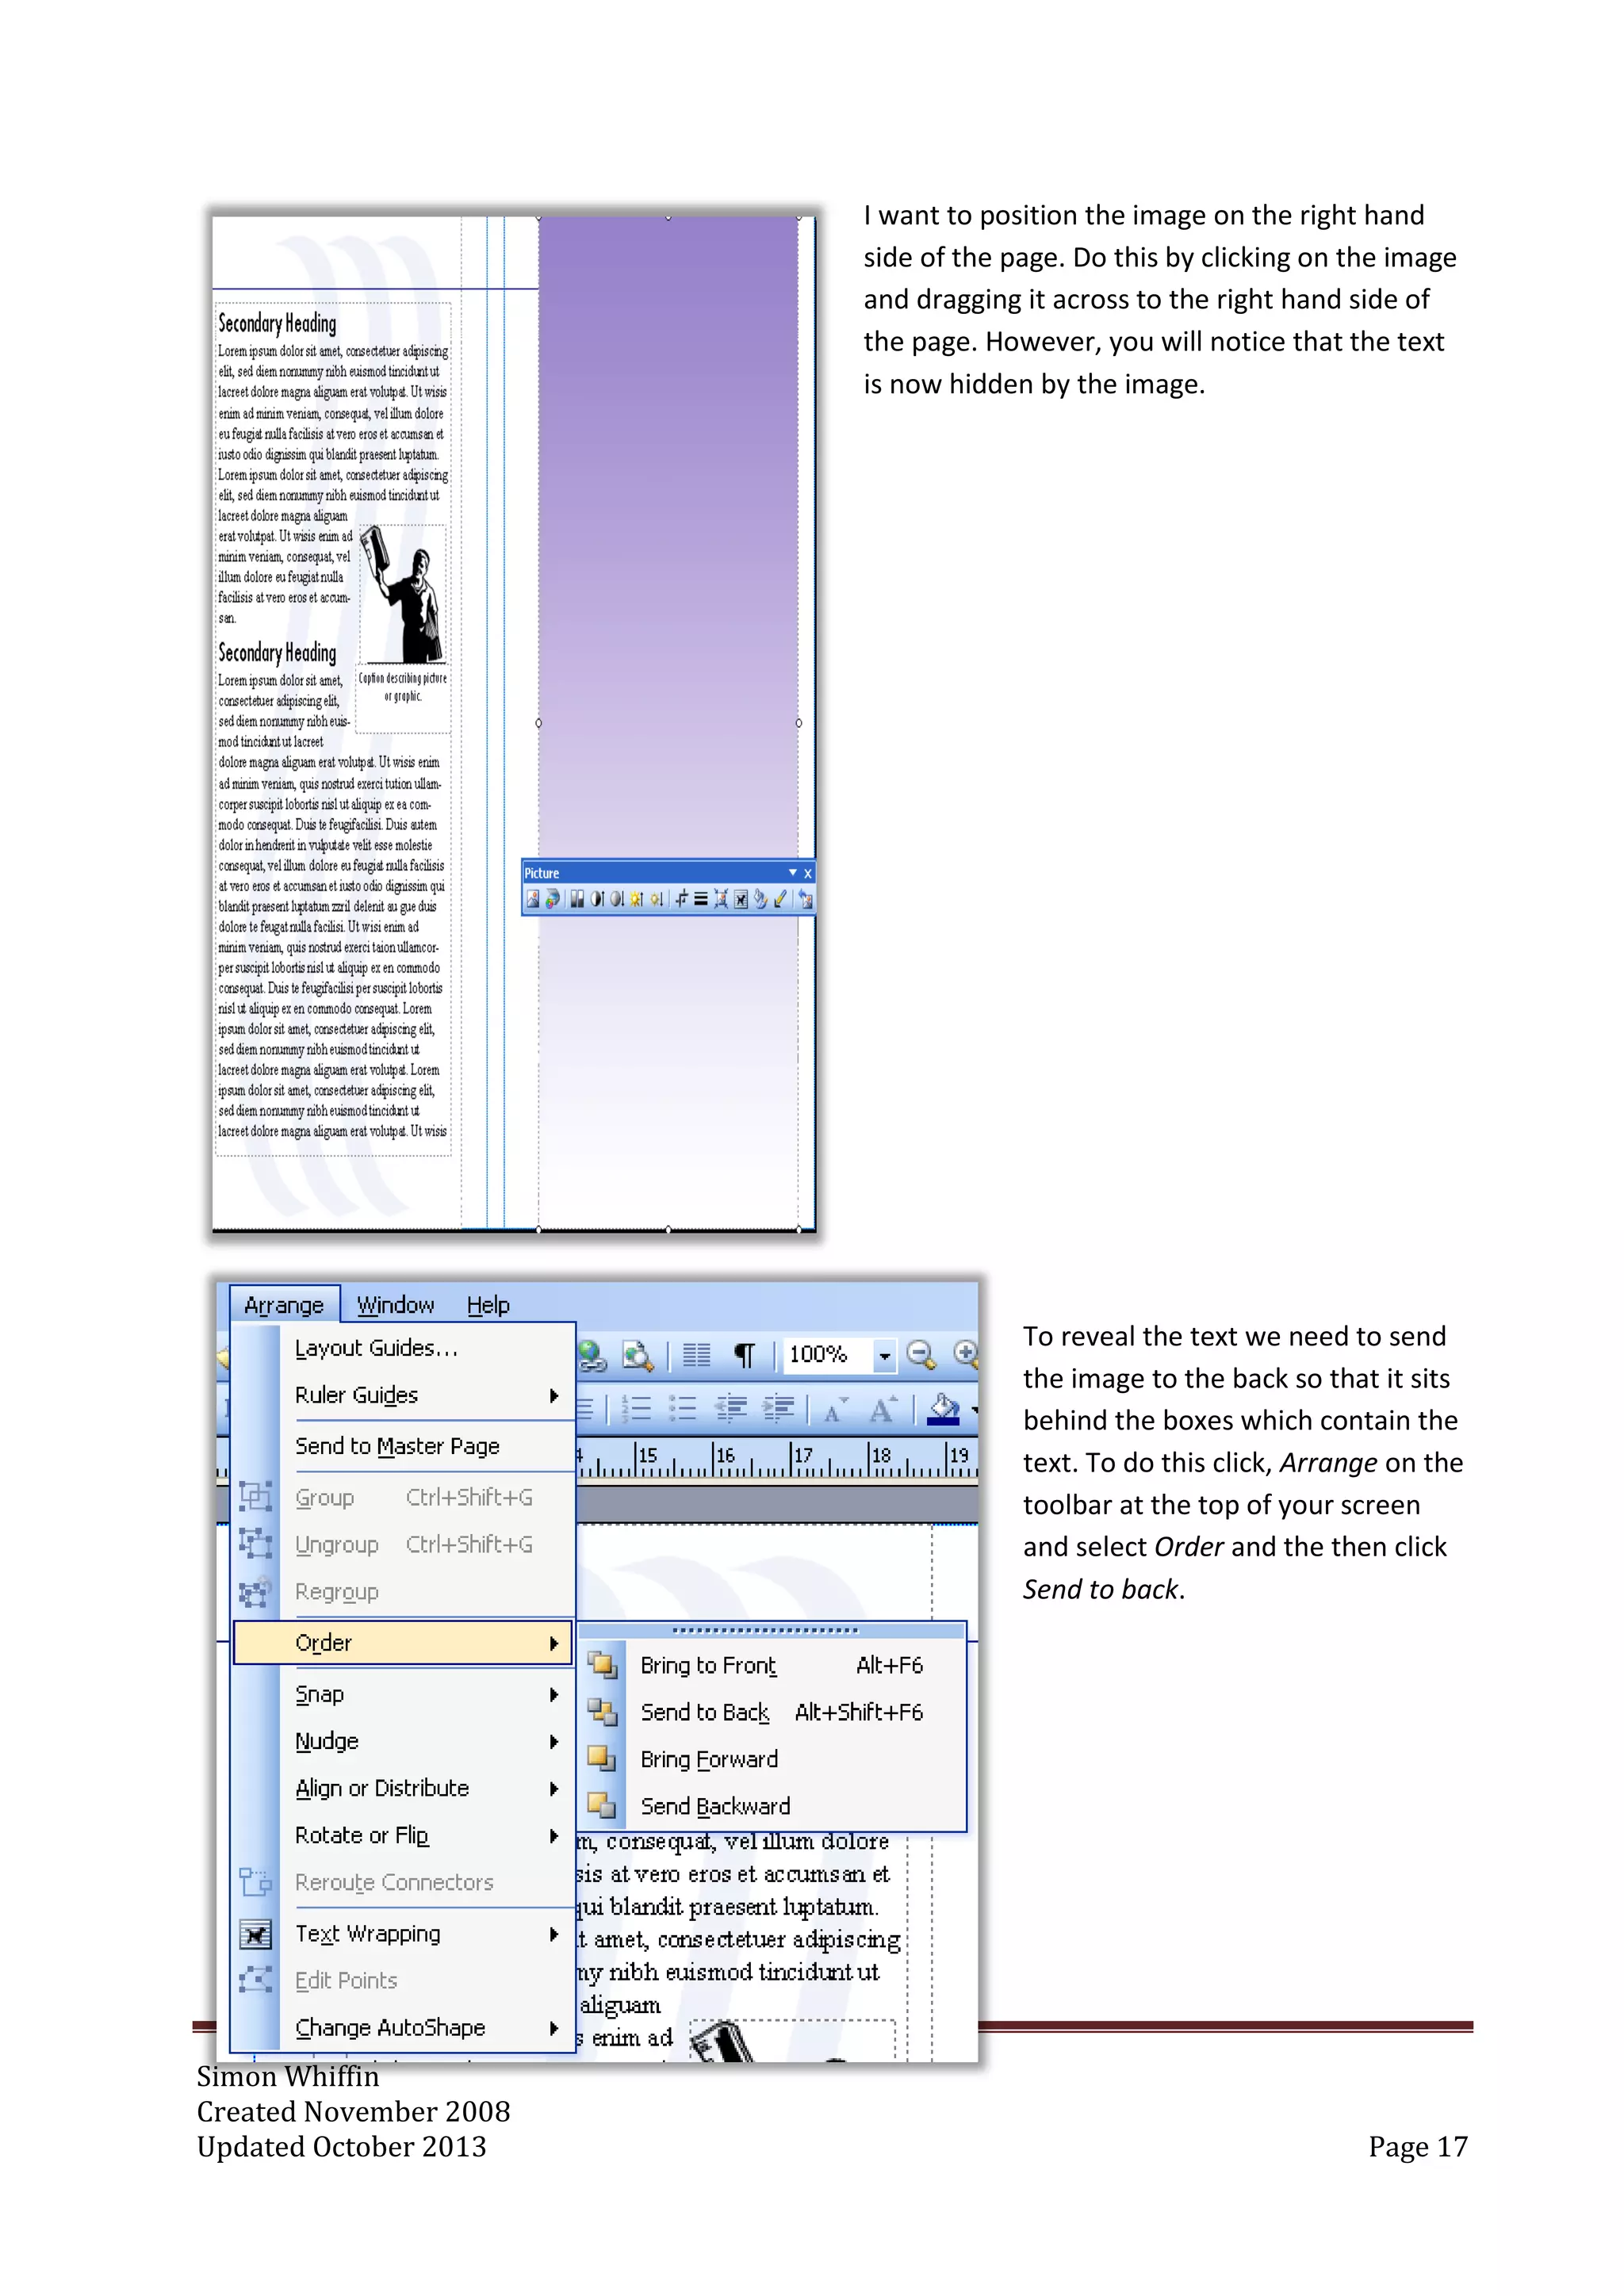
I want to position the image on the right hand
side of the page. Do this by clicking on the image
and dragging it across to the right hand side of
the page. However, you will notice that the text
is now hidden by the image.
To reveal the text we need to send
the image to the back so that it sits
behind the boxes which contain the
text. To do this click, Arrange on the
toolbar at the top of your screen
and select Order and the then click
Send to back.
18.
Simon Whiffin
Created November2008
Updated October 2013 Page 18
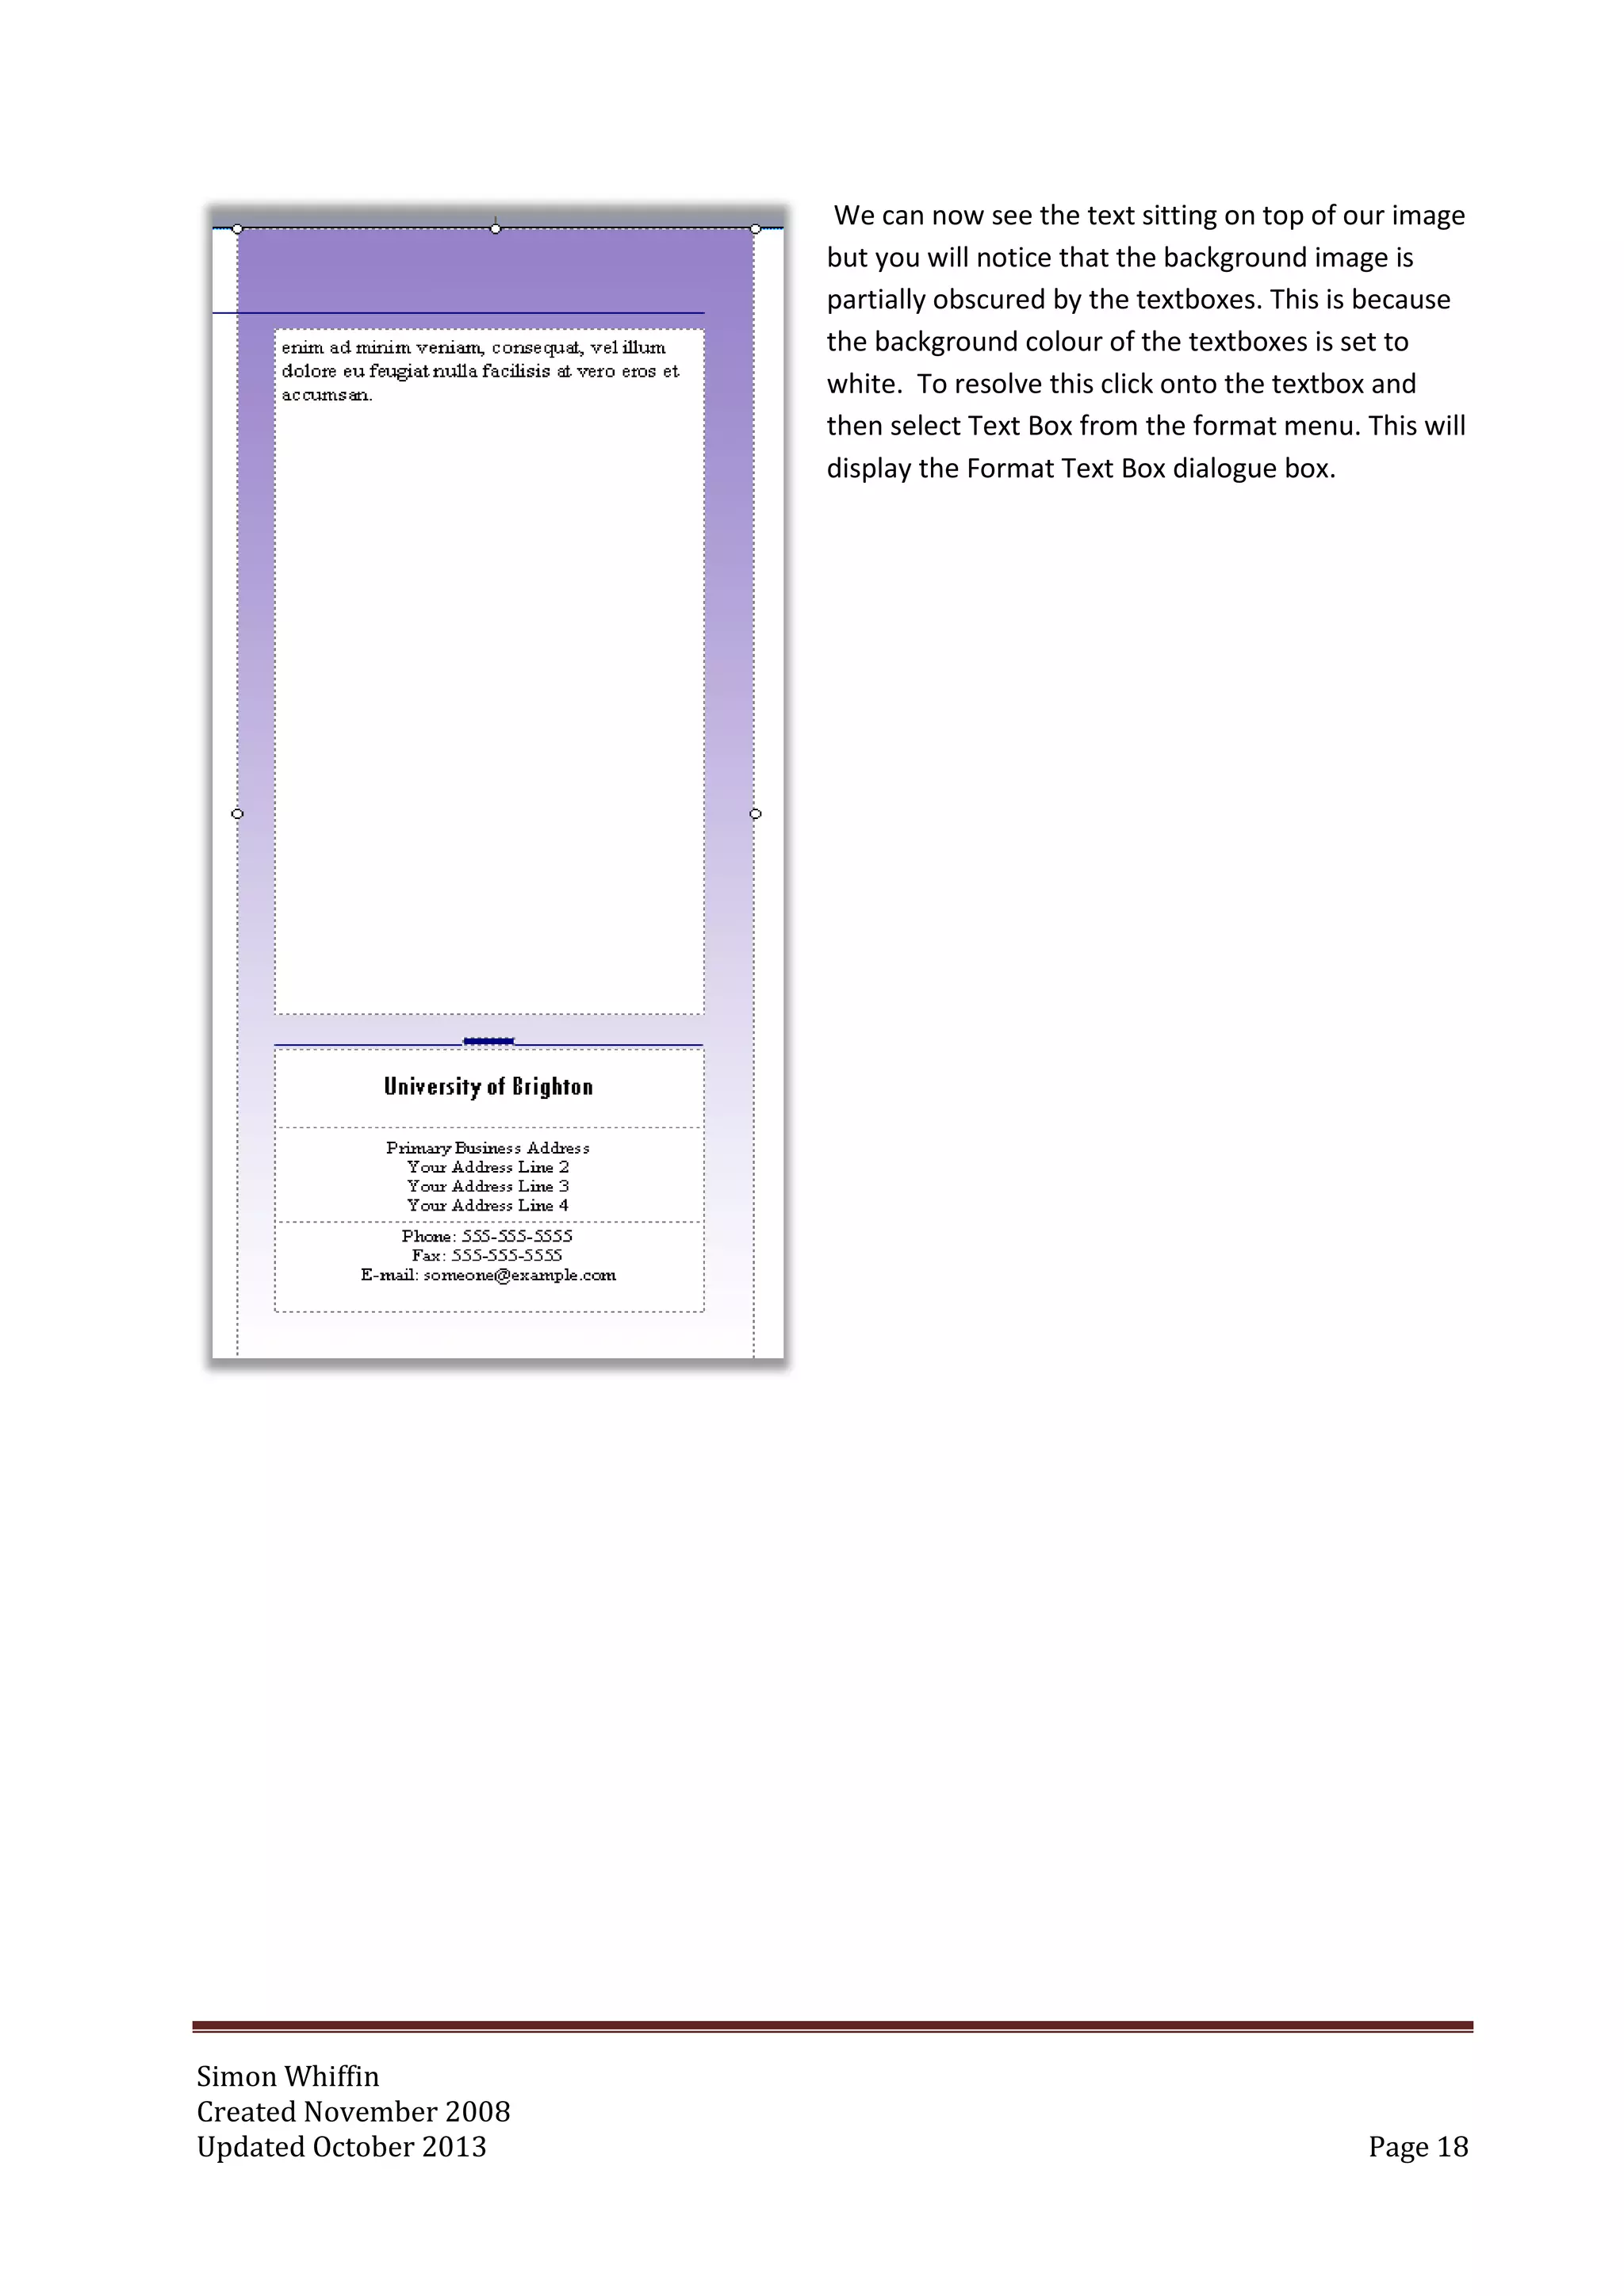
We can now see the text sitting on top of our image
but you will notice that the background image is
partially obscured by the textboxes. This is because
the background colour of the textboxes is set to
white. To resolve this click onto the textbox and
then select Text Box from the format menu. This will
display the Format Text Box dialogue box.
19.
Simon Whiffin
Created November2008
Updated October 2013 Page 19
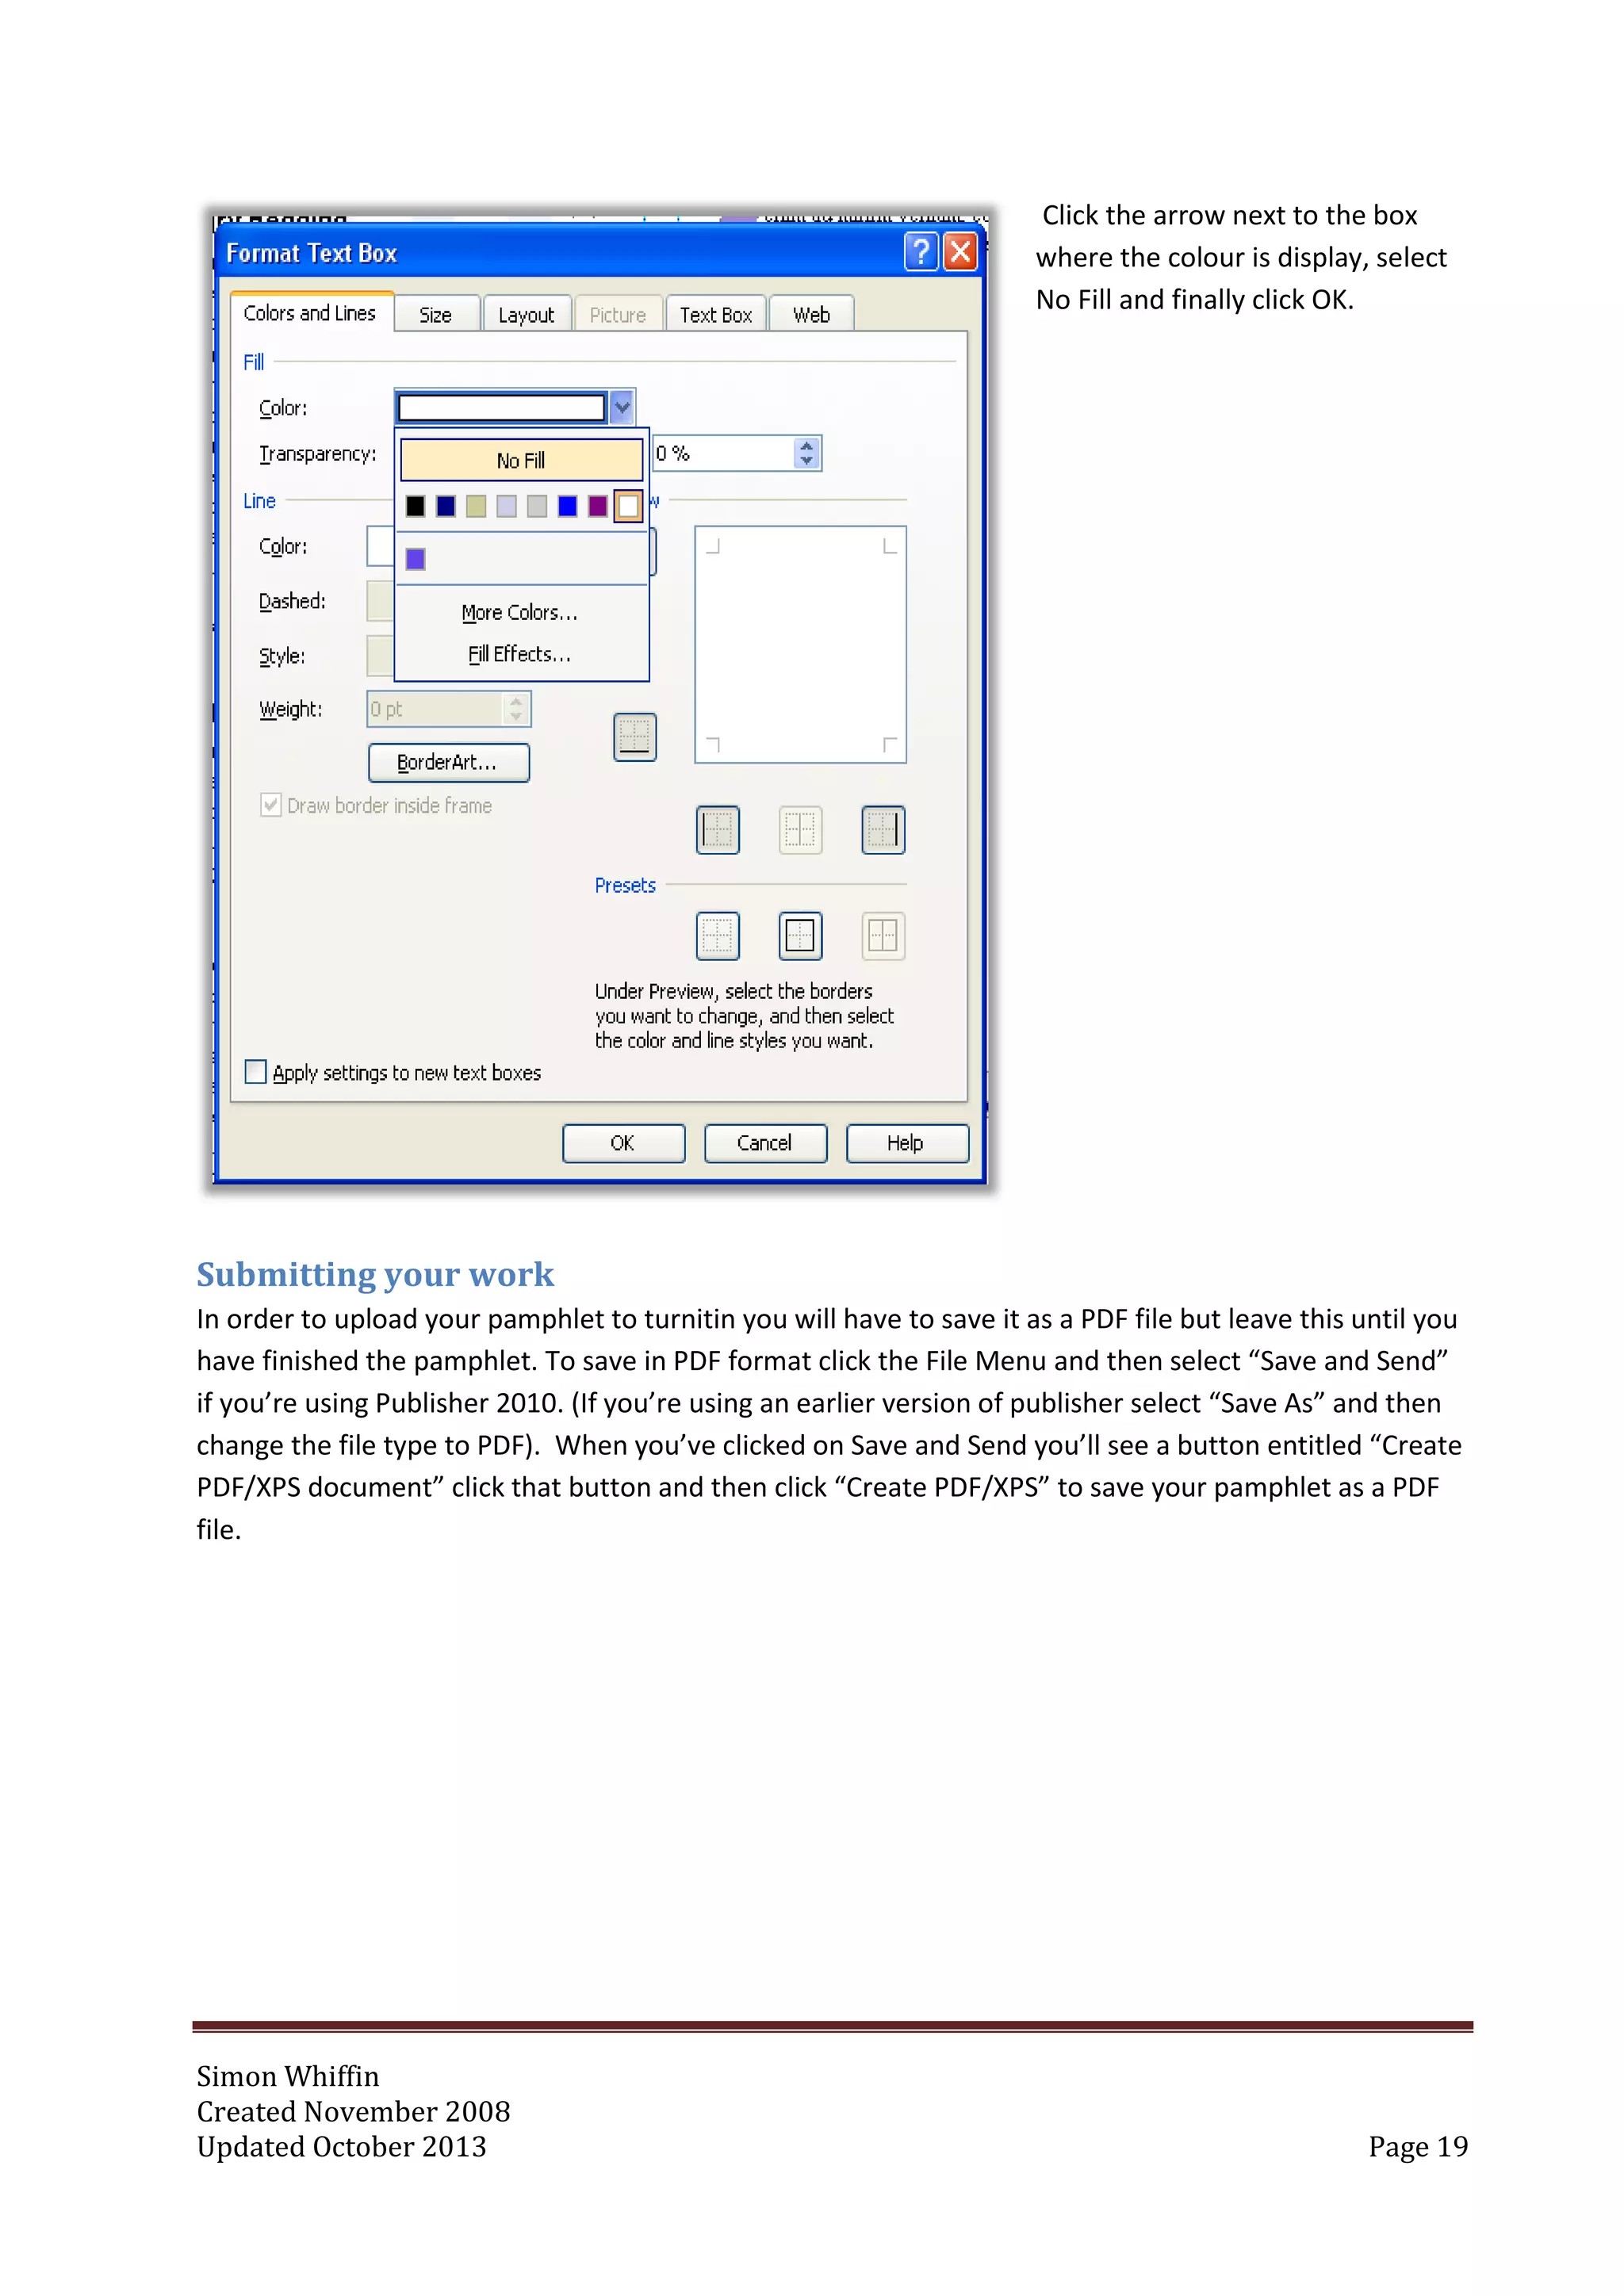
Click the arrow next to the box
where the colour is display, select
No Fill and finally click OK.
Submitting your work
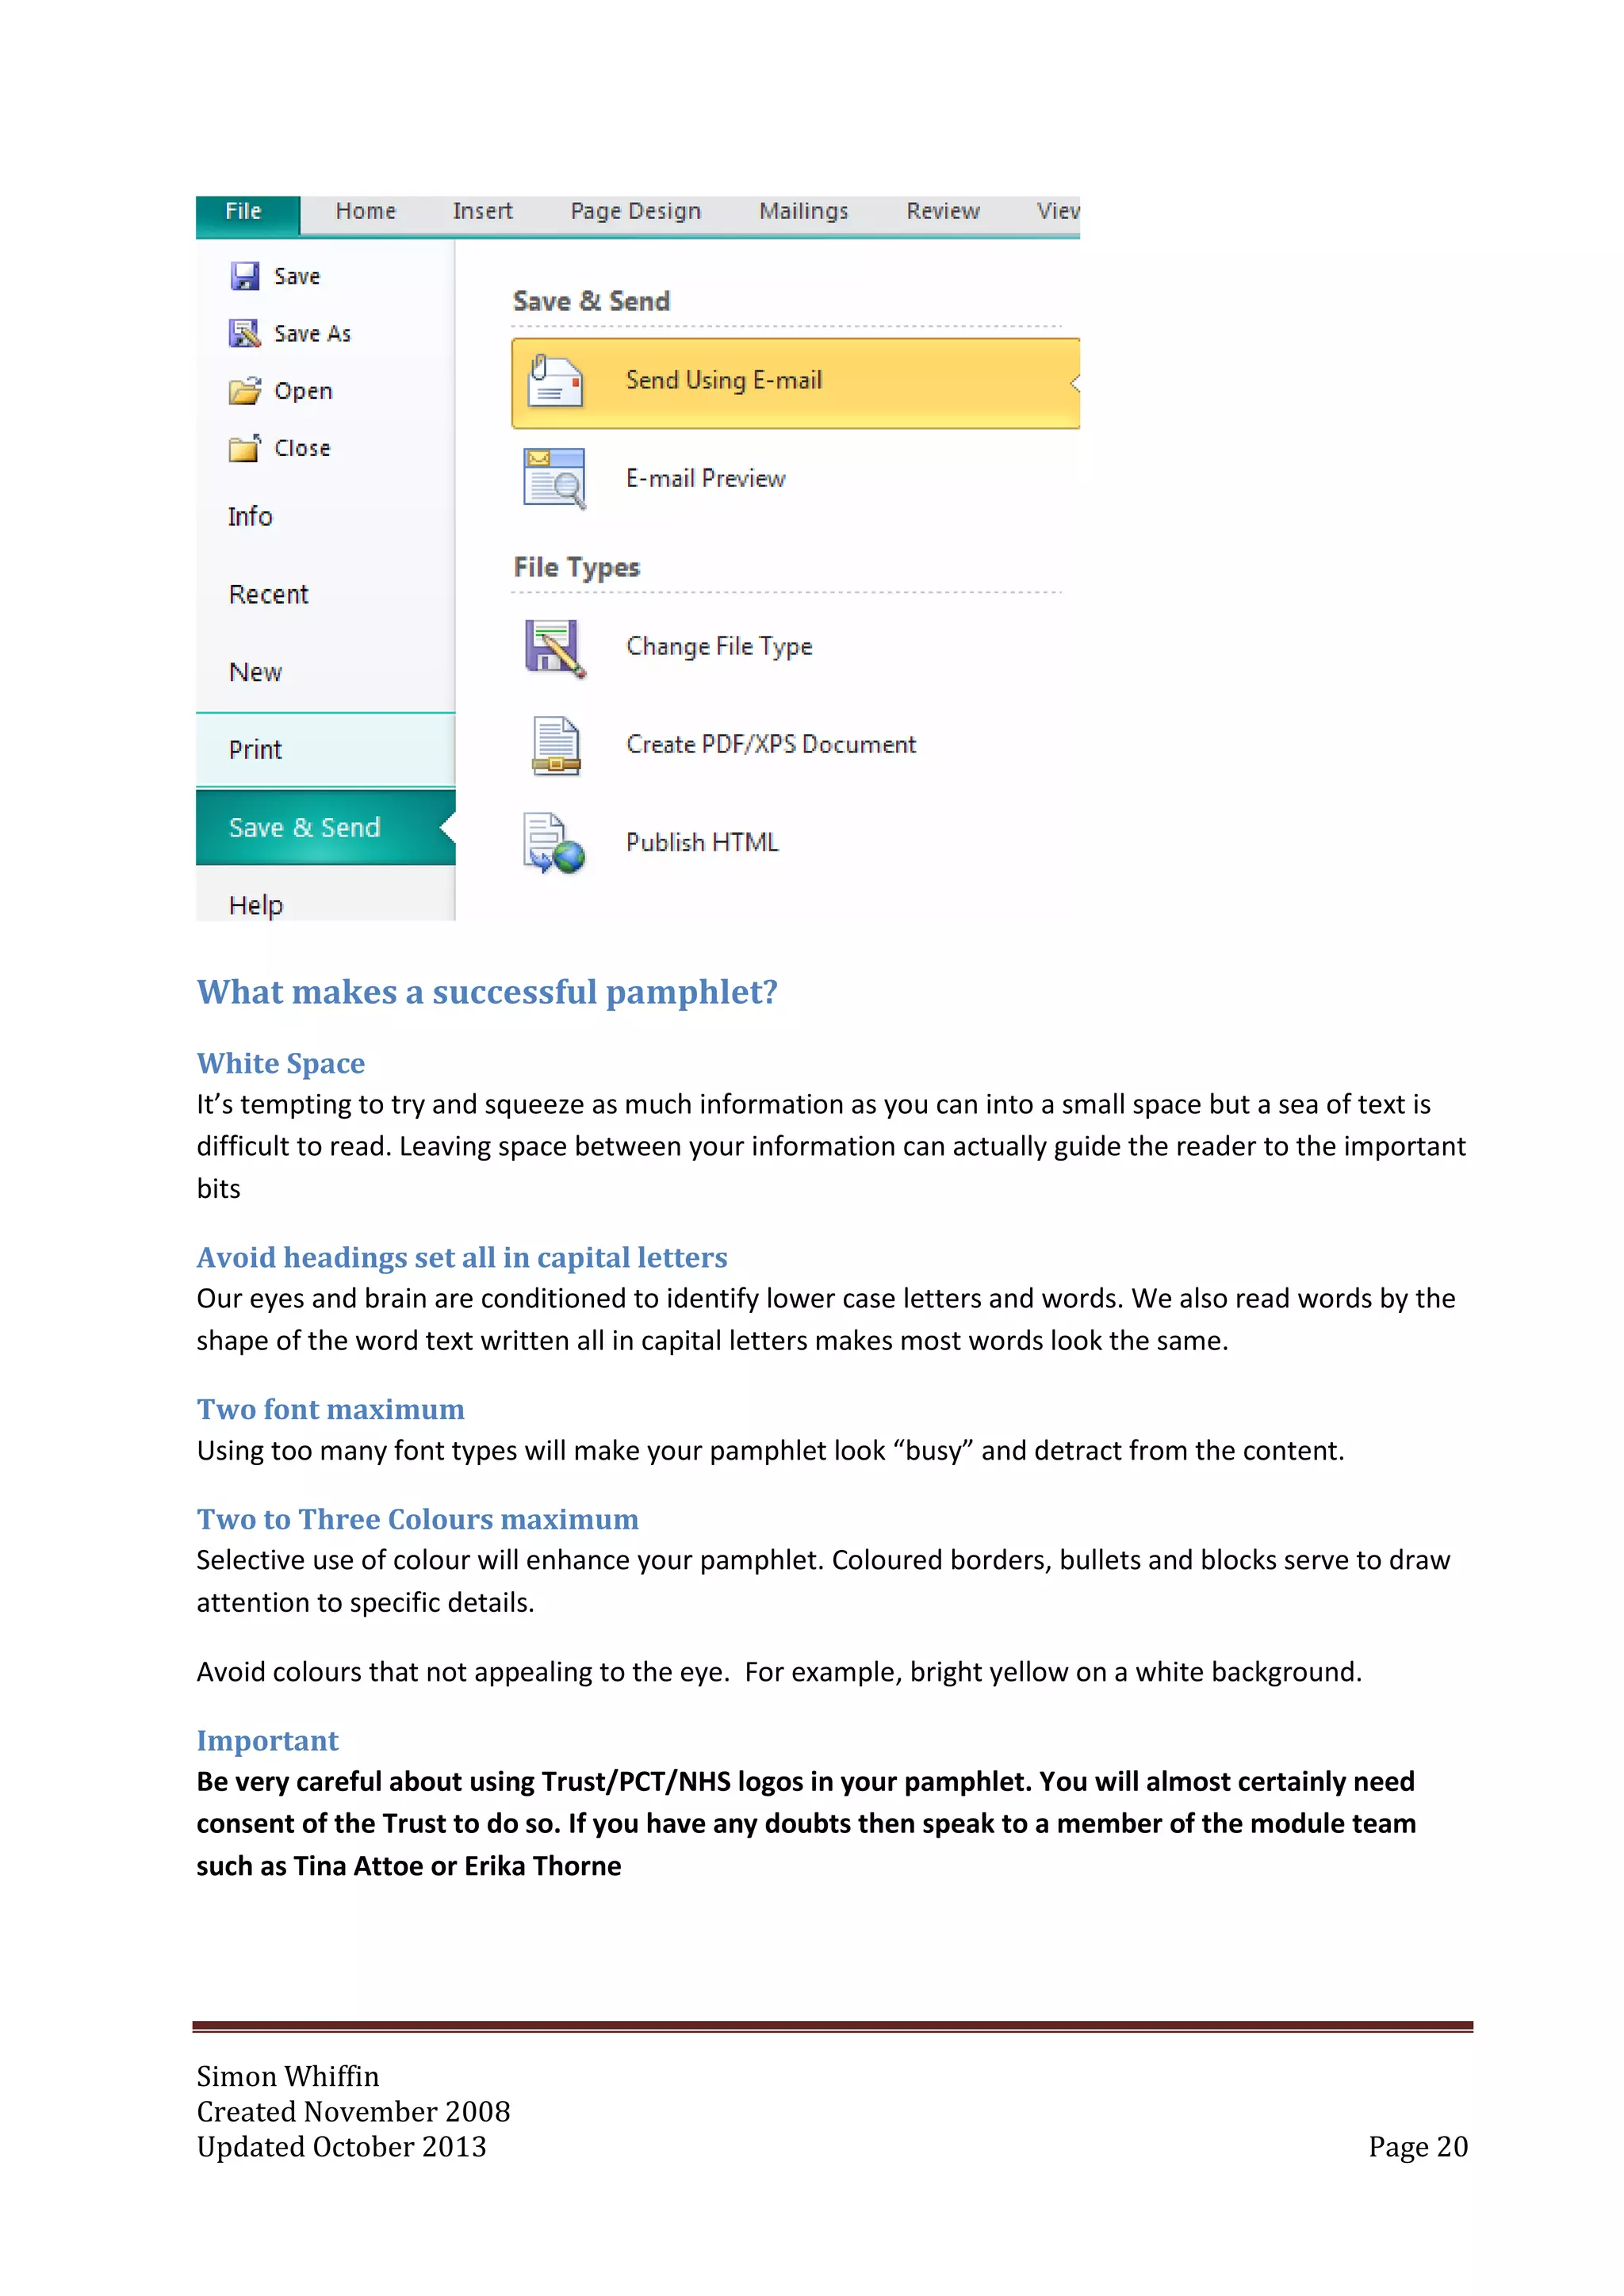
In order to upload your pamphlet to turnitin you will have to save it as a PDF file but leave this until you
have finished the pamphlet. To save in PDF format click the File Menu and then select “Save and Send”
if you’re using Publisher 2010. (If you’re using an earlier version of publisher select “Save As” and then
change the file type to PDF). When you’ve clicked on Save and Send you’ll see a button entitled “Create
PDF/XPS document” click that button and then click “Create PDF/XPS” to save your pamphlet as a PDF
file.
20.
Simon Whiffin
Created November2008
Updated October 2013 Page 20
What makes a successful pamphlet?
White Space
It’s tempting to try and squeeze as much information as you can into a small space but a sea of text is
difficult to read. Leaving space between your information can actually guide the reader to the important
bits
Avoid headings set all in capital letters
Our eyes and brain are conditioned to identify lower case letters and words. We also read words by the
shape of the word text written all in capital letters makes most words look the same.
Two font maximum
Using too many font types will make your pamphlet look “busy” and detract from the content.
Two to Three Colours maximum
Selective use of colour will enhance your pamphlet. Coloured borders, bullets and blocks serve to draw
attention to specific details.
Avoid colours that not appealing to the eye. For example, bright yellow on a white background.
Important
Be very careful about using Trust/PCT/NHS logos in your pamphlet. You will almost certainly need
consent of the Trust to do so. If you have any doubts then speak to a member of the module team
such as Tina Attoe or Erika Thorne


![[EMPOWERMENT TECHNOLOGIES]-ADVANCED PRESENTATION SKILLS](https://cdn.slidesharecdn.com/ss_thumbnails/et-advancedpresentationskills-211128024220-thumbnail.jpg?width=640&height=640&fit=bounds)


